1
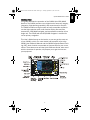
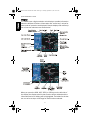
CNX80 Pilot Guide 560-0984-00C Draft1.book Page 1 Tuesday, September 2, 2003 10:36 AM
CNX80 Pilot Guide 560-0984-00C Draft1.book Page 2 Tuesday, September 2, 2003 10:36 AM
Airworthiness certification support for non-TSO functions is available from AT
upon request (see the installation manual for details).
This document and the information disclosed herein are proprietary information of Garmin AT. Neither this document nor the information contained
herein shall be transmitted, reproduced, copied, or disclosed in any form or
by any means without the written authorization of Garmin AT.
The information disclosed herein includes trade secrets and confidential
business and/or financial information and falls within exemption (b) (4) of 5
USC 552 (FOIA) and the prohibitions of 18 USC 1905.
Garmin AT™ is a trademark of Garmin International, Inc.
© 2003 by Garmin AT, Inc. All rights reserved.
Garmin AT, Inc.
PO Box 13549
Salem, OR 97309
2345 Turner Rd., SE
Salem, OR 97302
USA
Phone (503) 581-8101
1-800-525-6726
In Canada 1-800-654-3415
FAX (503) 364-2138
www.garminat.com
Cage Code: 0XCJ6
History of Revisions
April 2003
April 2003
May 2003
August 2003
SW Ver. 1.0
SW Ver. 1.0
SW Ver. 1.0
SW Ver 1.0
560-0984-00 Rev -560-0984-00 Rev A
560-0984-00 Rev B
560-0984-00 Rev C
CNX80 Pilot Guide 560-0984-00C Draft1.book Page 1 Tuesday, September 2, 2003 10:36 AM
Table of Contents
Introduction . . . . . . . . . . . . . . . . . . . . . . . . . . . . . . . . . . . . . . . . . . . . . . . . . . . . .1
Controls . . . . . . . . . . . . . . . . . . . . . . . . . . . . . . . . . . . . . . . . . . . . . . . . . . . . . . . .2
Power/Volume . . . . . . . . . . . . . . . . . . . . . . . . . . . . . . . . . . . . . . . . . . . . . . . 2
Datacard . . . . . . . . . . . . . . . . . . . . . . . . . . . . . . . . . . . . . . . . . . . . . . . . . . . 3
Display . . . . . . . . . . . . . . . . . . . . . . . . . . . . . . . . . . . . . . . . . . . . . . . . . . . . . . . . .4
Annunciations . . . . . . . . . . . . . . . . . . . . . . . . . . . . . . . . . . . . . . . . . . . . . . . 5
Starting Up . . . . . . . . . . . . . . . . . . . . . . . . . . . . . . . . . . . . . . . . . . . . . . . . . . . . .6
Power Up . . . . . . . . . . . . . . . . . . . . . . . . . . . . . . . . . . . . . . . . . . . . . . . . . . . 6
Database Check . . . . . . . . . . . . . . . . . . . . . . . . . . . . . . . . . . . . . . . . . . . . . 6
Map Mode (MAP) . . . . . . . . . . . . . . . . . . . . . . . . . . . . . . . . . . . . . . . . . . . . . . . .7
Panning (PAN) . . . . . . . . . . . . . . . . . . . . . . . . . . . . . . . . . . . . . . . . . . . . . . . . . . .9
Range . . . . . . . . . . . . . . . . . . . . . . . . . . . . . . . . . . . . . . . . . . . . . . . . . . . . . . 9
Create a New User waypoint . . . . . . . . . . . . . . . . . . . . . . . . . . . . . . . . . . . . 9
Direct-To . . . . . . . . . . . . . . . . . . . . . . . . . . . . . . . . . . . . . . . . . . . . . . . . . . . . . 10
WPTS . . . . . . . . . . . . . . . . . . . . . . . . . . . . . . . . . . . . . . . . . . . . . . . . . . . . .10
DB . . . . . . . . . . . . . . . . . . . . . . . . . . . . . . . . . . . . . . . . . . . . . . . . . . . . . . . .10
Direct . . . . . . . . . . . . . . . . . . . . . . . . . . . . . . . . . . . . . . . . . . . . . . . . . . . . .10
Inserting a Hold . . . . . . . . . . . . . . . . . . . . . . . . . . . . . . . . . . . . . . . . . . . . .10
Destination (Dest) . . . . . . . . . . . . . . . . . . . . . . . . . . . . . . . . . . . . . . . . . . .11
Course To (CrsTo) . . . . . . . . . . . . . . . . . . . . . . . . . . . . . . . . . . . . . . . . . . .12
Course From (CrsFr) . . . . . . . . . . . . . . . . . . . . . . . . . . . . . . . . . . . . . . . . .12
OBS . . . . . . . . . . . . . . . . . . . . . . . . . . . . . . . . . . . . . . . . . . . . . . . . . . . . . . .13
FlyLeg . . . . . . . . . . . . . . . . . . . . . . . . . . . . . . . . . . . . . . . . . . . . . . . . . . . . .14
Nearest Waypoints (NRST) . . . . . . . . . . . . . . . . . . . . . . . . . . . . . . . . . . . . . . . 15
Nearest Frequency . . . . . . . . . . . . . . . . . . . . . . . . . . . . . . . . . . . . . . . . . .15
Info on Nearest Waypoint . . . . . . . . . . . . . . . . . . . . . . . . . . . . . . . . . . . . .16
Fly Direct-To a Nearest Waypoint . . . . . . . . . . . . . . . . . . . . . . . . . . . . . . .16
Change Your Approach to a Nearest Waypoint . . . . . . . . . . . . . . . . . . . .16
Information on Waypoints (INFO) . . . . . . . . . . . . . . . . . . . . . . . . . . . . . . . . . . 17
Com Radio (COM) . . . . . . . . . . . . . . . . . . . . . . . . . . . . . . . . . . . . . . . . . . . . . . 18
Nav Radio (VOR) . . . . . . . . . . . . . . . . . . . . . . . . . . . . . . . . . . . . . . . . . . . . . . . 21
Transponder Control (XPDR) . . . . . . . . . . . . . . . . . . . . . . . . . . . . . . . . . . . . . 24
Ident . . . . . . . . . . . . . . . . . . . . . . . . . . . . . . . . . . . . . . . . . . . . . . . . . . . . . .24
Standby . . . . . . . . . . . . . . . . . . . . . . . . . . . . . . . . . . . . . . . . . . . . . . . . . . .24
ON . . . . . . . . . . . . . . . . . . . . . . . . . . . . . . . . . . . . . . . . . . . . . . . . . . . . . . . .24
Alt . . . . . . . . . . . . . . . . . . . . . . . . . . . . . . . . . . . . . . . . . . . . . . . . . . . . . . . .24
Transponder Line Selection Keys . . . . . . . . . . . . . . . . . . . . . . . . . . . . . . .24
Manually Select a Squawk Code . . . . . . . . . . . . . . . . . . . . . . . . . . . . . . .25
Flight Planning (FPL) . . . . . . . . . . . . . . . . . . . . . . . . . . . . . . . . . . . . . . . . . . . . 26
View . . . . . . . . . . . . . . . . . . . . . . . . . . . . . . . . . . . . . . . . . . . . . . . . . . . . . .26
Reverse (Rvrse) . . . . . . . . . . . . . . . . . . . . . . . . . . . . . . . . . . . . . . . . . . . . .26
Save . . . . . . . . . . . . . . . . . . . . . . . . . . . . . . . . . . . . . . . . . . . . . . . . . . . . . .27
Edit . . . . . . . . . . . . . . . . . . . . . . . . . . . . . . . . . . . . . . . . . . . . . . . . . . . . . . .27
CNX80 Pilot Guide 560-0984-00C Draft1.book Page 2 Tuesday, September 2, 2003 10:36 AM
Execute (Exec) . . . . . . . . . . . . . . . . . . . . . . . . . . . . . . . . . . . . . . . . . . . . . .27
Comment (Cmnt) . . . . . . . . . . . . . . . . . . . . . . . . . . . . . . . . . . . . . . . . . . . .27
Copy . . . . . . . . . . . . . . . . . . . . . . . . . . . . . . . . . . . . . . . . . . . . . . . . . . . . . .27
Discontinuity . . . . . . . . . . . . . . . . . . . . . . . . . . . . . . . . . . . . . . . . . . . . . . .27
Pilot Nav Legs . . . . . . . . . . . . . . . . . . . . . . . . . . . . . . . . . . . . . . . . . . . . . .28
Searching for Waypoints to Insert into a Flight Plan . . . . . . . . . . . . . . . .28
Steps for Setting Up a Simple Flight Plan . . . . . . . . . . . . . . . . . . . . . . . .29
Steps for Setting Up an IFR Flight Plan . . . . . . . . . . . . . . . . . . . . . . . . . .30
Vector To Final . . . . . . . . . . . . . . . . . . . . . . . . . . . . . . . . . . . . . . . . . . . . . .33
Missed Approach . . . . . . . . . . . . . . . . . . . . . . . . . . . . . . . . . . . . . . . . . . . .33
Timer (TMR) . . . . . . . . . . . . . . . . . . . . . . . . . . . . . . . . . . . . . . . . . . . . . . . . . . . 34
Timer 1 and Timer 2 . . . . . . . . . . . . . . . . . . . . . . . . . . . . . . . . . . . . . . . . .34
Trip Time and Distance . . . . . . . . . . . . . . . . . . . . . . . . . . . . . . . . . . . . . . .34
Flight Time and Distance . . . . . . . . . . . . . . . . . . . . . . . . . . . . . . . . . . . . .34
Trigger Speed . . . . . . . . . . . . . . . . . . . . . . . . . . . . . . . . . . . . . . . . . . . . . . .35
Checklist (CHK) . . . . . . . . . . . . . . . . . . . . . . . . . . . . . . . . . . . . . . . . . . . . . . . . 35
Creating a New or Editing an Existing Checklist . . . . . . . . . . . . . . . . . . .35
Using Your Checklist . . . . . . . . . . . . . . . . . . . . . . . . . . . . . . . . . . . . . . . . .36
Move a Checklist . . . . . . . . . . . . . . . . . . . . . . . . . . . . . . . . . . . . . . . . . . . .36
User Waypoints (USER) . . . . . . . . . . . . . . . . . . . . . . . . . . . . . . . . . . . . . . . . . 37
Creating or Editing a User Waypoint . . . . . . . . . . . . . . . . . . . . . . . . . . . .37
Searching for a User Waypoint . . . . . . . . . . . . . . . . . . . . . . . . . . . . . . . . .37
System Mode (SYS) . . . . . . . . . . . . . . . . . . . . . . . . . . . . . . . . . . . . . . . . . . . . 38
GPS Status . . . . . . . . . . . . . . . . . . . . . . . . . . . . . . . . . . . . . . . . . . . . . . . . .38
Software Versions . . . . . . . . . . . . . . . . . . . . . . . . . . . . . . . . . . . . . . . . . . .38
Configuration . . . . . . . . . . . . . . . . . . . . . . . . . . . . . . . . . . . . . . . . . . . . . . .39
Parallel Track (PTK) . . . . . . . . . . . . . . . . . . . . . . . . . . . . . . . . . . . . . . . . . . . . 40
Activating Parallel Track . . . . . . . . . . . . . . . . . . . . . . . . . . . . . . . . . . . . . .40
Simulator Mode . . . . . . . . . . . . . . . . . . . . . . . . . . . . . . . . . . . . . . . . . . . . . . . 41
Automatic Track (ATK) . . . . . . . . . . . . . . . . . . . . . . . . . . . . . . . . . . . . . . . .41
Present Position (PPOS) . . . . . . . . . . . . . . . . . . . . . . . . . . . . . . . . . . . . . .42
Airspeed . . . . . . . . . . . . . . . . . . . . . . . . . . . . . . . . . . . . . . . . . . . . . . . . . . .42
Messages (MSG) . . . . . . . . . . . . . . . . . . . . . . . . . . . . . . . . . . . . . . . . . . . . . . . 42
CNX80 Pilot Guide 560-0984-00C Draft1.book Page 1 Tuesday, September 2, 2003 10:36 AM
Introduction
This guide describes the operation of the CNX80 Color GPS/WAAS
NavCom. The CNX80 provides a new, higher level of accuracy. integrity,
integration, flight planning capability, and convenience for the pilot.
The CNX80 combines a large number of easily accessible controls to
use the high-resolution color multi-function display, Nav and Com
transceivers, GPS/WAAS navigator, and transponder controller all in a
single unit. The CNX80 with the GPS/WAAS navigator is certified for
use as primary navigation.
This User’s Guide focuses on the basics, so you can get the most out
of your CNX80, quickly. For more details and examples, refer to the
CNX80 User Reference Manual and the CNX80 Computer-Based Training (CBT), both of which are provided on Compact Disc for your convenience. These documents and the Quick Reference Guide, when used
with the simulator for practice, will prepare you to get the most out
your equipment.
1
Intro
Apollo CNX80 Pilot’s Guide
Controls
CNX80 Pilot Guide 560-0984-00C Draft1.book Page 2 Tuesday, September 2, 2003 10:36 AM
Apollo CNX80 Pilot’s Guide
Controls
Power/Volume
The knob at the top left corner of the CNX80 controls power on/off
and the radio volume. Push the PWR/VOL knob in to turn power on.
Pull the knob out to turn power off. When the power knob is pulled out,
a time-out message and counter will appear for five seconds. Turning
the knob will control the volume of the COM radio, unless the NAV
radio is active then the NAV volume is controlled.
COM
Select Com radio mode. Press COM.
VOR
Select Nav radio mode. Press VOR.
XPDR
Select the Transponder mode, if installed. Press XPDR.
CDI
Toggles the CDI indication between GPS and internal VOR/LOC radio
sources.
SUSP
Suspends or resumes flight plan waypoint sequencing. When waypoint
sequencing is suspended, the SUSP annunciator will be displayed in
the bottom left corner of the display.
MAP
Selects Map mode. Press MAP twice to view Map page 1.
Direct-To
Selects the Direct-To menu. Menu options allow setting up Direct-To
(D->), setting a customized holding pattern around a waypoint (Hold),
Course To (CrsTo) a waypoint, Course From (CrsFr) a waypoint, OBS
mode, and jumping to a given leg of your active flight plan (FlyLeg).
Bearings can be TO or FROM. Radials are only FROM.
NRST
Activates Nearest Waypoint Search. You can search through the closest 20 of airports, NDBs, VORs, intersections, airspaces, user-created
waypoints, FSS, and ARTCC.
INFO
Activates Info mode for the highlighted waypoint or the TO waypoint.
CLR
Clears text when editing or deletes selected items depending on the mode.
2
CNX80 Pilot Guide 560-0984-00C Draft1.book Page 3 Tuesday, September 2, 2003 10:36 AM
MENU/ENTER and Line Selection Keys
When editing information, or a response is required, pressing this key
accepts the value. In other cases, pressing this key will bring up a
series of menu items on the right side of the display. The menu items
are then selected by pressing the key to the right of it. Pressing the
Menu/Enter key while the menu items are shown will make them disappear.
Large/Small Knobs
You can move the cursor or highlight information by turning the Large
knob. Turn the Small knob to change information.
CRSR
Press the Small knob in to activate the cursor. The area on the display
that you can now edit will be highlighted. Now you can change information with the Small knob and move the cursor to the next area to edit
with the Large knob. If you are in Map mode, pressing the CRSR activates PAN mode. In Transponder mode, it allows editing codes.
FN
Press the FN key to page through the available gro of Functions that
appear at the bottom display. The “smart” keys located below each
label will activate that function.
Datacard
The Map database and other information is stored on a data card. The
use of a data card allows you to easily update information.
Note
Only change the data card when the power is turned
off or you may damage your unit.
Handle your data card carefully. Do not touch the connector edge of
the data card. To eject the card, press the data card ejector. Gently pull
the card straight out of the slot. Insert a data card by pushing the card
straight into the slot. When fully inserted, the data card and eject button will be flush and slightly recessed into the bezel.
When contacting your dealer or the Garmin AT technical services staff,
eject the data card and write down the information shown on the label.
Note
Never insert or eject the data card with the power on.
3
Controls
Apollo CNX80 Pilot’s Guide
CNX80 Pilot Guide 560-0984-00C Draft1.book Page 4 Tuesday, September 2, 2003 10:36 AM
Apollo CNX80 Pilot’s Guide
Display
Display
The CNX80 uses a high-resolution color display to provide information
about the different functions. Information and “smart keys” unique for
each mode of operation are displayed. Sample displays with a description of common elements are shown below.
When you press the COM, VOR, XPDR, or CDI keys on the left side of
the display, the display area for that function will be outlined and the
information active for editing will be highlighted. The labels for the bottom row of smart keys will change for each function selected.
4
CNX80 Pilot Guide 560-0984-00C Draft1.book Page 5 Tuesday, September 2, 2003 10:36 AM
Apollo CNX80 Pilot’s Guide
Annunciation
Description
GPS
Indicates when GPS is being used as the source.
Appears in lower left corner of the display.
VOR/ILS/LOC
Indicates when VOR/ILS/LOC is being used as the
source. Appears in lower left corner of the display.
ENR
Appears to the right of the “GPS” annunciator when in
En Route mode.
TER
Appears to the right of the “GPS” annunciator when
performing approach navigation within 30 nm of
departure or arrival airport.
APPR
Appears to the right of the “GPS” annunciator when
GPS approach is active.
LOI
“LOI” (Loss of Integrity) appears on the left side of the
map display when WAAS/GPS detects a position error
or is unable to calculate the integrity of the position.
BC
The Back Course annunciation appears to the right of
“LOC” when the Back Course Localizer mode is enabled.
DR
The Dead Reckoning annunciator appears on the left
side of the map display when GPS position is lost and
the CNX80 is in Dead Reckoning mode. Dead Reckoning mode will continue until GPS position is restored
or the first Pilot Nav leg is reached.
PTK
The Parallel Track annunciator appears in the lower
left corner of the display when parallel track is active.
SUSP
Suspend annunciation appears in the lower left corner of the display when automatic sequencing of waypoints in the active flight plan is suspended.
M
Message annunciation appears in the lower left corner of the display when a message is available for
viewing. A blinking “M” indicates a new message.
VTF
Vector To Final annunciation appears in the lower left
corner of the display when “Vector To Final” is active.
5
Display
Annunciations
The following annunciations appear on the display to provide status or
information. All annunciations are available on the display. Annunciations may be output to external annunciators, but are not required.
CNX80 Pilot Guide 560-0984-00C Draft1.book Page 6 Tuesday, September 2, 2003 10:36 AM
Apollo CNX80 Pilot’s Guide
Start Up
Starting Up
The CNX80 performs internal checks and shows the status of the tests
during start up. The startup screen, owner name (if entered), testing,
position, and database information shows on the screen for several
seconds and then shows the first Map page. It is not generally necessary to enter a GPS seed position.
Power Up
1. Push the PWR/VOL knob in to turn on power.
2. When the position display appears, you can press CHG to manually
enter your present position or just wait a few seconds for the
CNX80 to establish your position.
3. The CNX80 performs a number of tests at startup to ensure proper
operation. You may press SKIP to bypass the startup tests, however,
completing these tests is required for IFR flight. Any failures will be
noted by a message.
Database Check
The CNX80 verifies the integrity and expiration date of the database.
Up to two database cycles are supported. The CNX80 will load the
appropriate current database cycle and also let you know if a database is not current (dates invalid).
6
CNX80 Pilot Guide 560-0984-00C Draft1.book Page 7 Tuesday, September 2, 2003 10:36 AM
Apollo CNX80 Pilot’s Guide
Map Mode (MAP)
1. Press MAP to reach Map mode. Radio, Nav, Transponder, CDI,
Annunciator, or pilot-customized information is shown on the left
side of the display and the map display is shown on the right side.
2. There are four Map pages that you select by turning the Large knob.
3. Turn the Small knob to change the Map scale. Map pages 2-4 allow
you to customize the Nav display items on the left side of the display and map display detail.
4. Press Menu/Enter to view the Menu items for the choices to customize your display.
5. Press the key next to the Menu item to change the values.
6. Press the More key to go to the next page of Menu items.
Menu Item
Description
Airports, VORs,
NDBs, Intersections, User Waypoints, Lo and Hi
Airways
Solid reversed label means identifier and location
symbol are displayed. A bold outline means only the
location symbol will be displayed. A thin outline
means this item will not be displayed on the map.
Airspace
Solid reversed means the airspace outline and sector lines are displayed. A bold outline means that
only the outline of airspace is displayed. A thin outline means that airspaces will not be displayed on
the map.
Flight Plan
Map pages 2-4. Toggles display of route line on/off.
Declutter
Auto-Declutter - Toggles display of labels and icons
on/off at the higher zoom levels.
Nav Data/Sel
Data
Customize the Nav information on map pages 2-4.
Press the Nav Data key and then the Sel Data key.
Then turn the Large knob to move the cursor to the
different fields in the Nav information part of the
Map display. Turn the Small knob to view the available choices of information. Press Menu/Enter to
confirm and save your choices.
7
Map
The Map mode provides a moving map for a graphic display of your
flight including the surrounding area as well as navigation information.
Maps are generally drawn with Ground Track True North at the top of
the display (Up). True North is at the top of the display for the minimaps for inserting holds, procedures, and intercepts.
CNX80 Pilot Guide 560-0984-00C Draft1.book Page 8 Tuesday, September 2, 2003 10:36 AM
Apollo CNX80 Pilot’s Guide
Map Symbols
Symbol Type
Symbol Graphic
Map
Airport
VOR
VORTAC
VOR-DME
NDB
User Waypoint
Flight Plan Waypoint
Intersection
Ownship - Single
Ownship - Twin
Ownship - Jet
Ownship - Helicopter
8
CNX80 Pilot Guide 560-0984-00C Draft1.book Page 9 Tuesday, September 2, 2003 10:36 AM
Apollo CNX80 Pilot’s Guide
Panning (PAN)
The Panning feature of the Map mode allows you to check out the area
near your present position. You can activate the Panning feature by
pressing the PAN key or by pressing the CRSR button on the Small
knob when in Map mode.
Panning
The cursor starts at your present position when you start the Pan function. The crosshair cursor remains in the center of the map display.
Move the map around the crosshair by turning the Large (N/S) and
Small (E/W) knobs. A green line will be drawn between your present
position and the crosshair position. The range and bearing to the
crosshair from your present position and the Lat/Lon of the crosshair
position is shown at the bottom of the map display.
Range
Press the Range key to highlight the Range menu item. When Range is
selected, turning the Small knob will change the map range instead of
moving the crosshair.
MRK
Create a User Waypoint at the cursor position.
Create a New User waypoint
User waypoints allow you to create unique waypoints not already
present in the database or to instantly mark your present position for
future reference.
1. While in the Pan function, press MRK.
2. Press Menu/Enter to save the displayed user name.
or
3. Create a name of your choice and add other information as desired
using the Small knob to change characters and the Large knob to
move the cursor. Press CLR to delete a highlighted character. Then,
press Menu/Enter to save the information.
9
CNX80 Pilot Guide 560-0984-00C Draft1.book Page 10 Tuesday, September 2, 2003 10:36 AM
Apollo CNX80 Pilot’s Guide
Direct-To
Direct-To
Press the Direct-To key to get to the Direct-To function which allows you
to quickly set up a flight from your present position directly to a
selected waypoint. You can also use this function to make changes to
a flight plan, set up a user-defined holding pattern, sequence directly
to a selected leg in your flight plan, and fly a Course To or Course From
a selected waypoint.
WPTS
Press the WPTS key to select a given leg from the active flight plan.
Turn the Large knob to highlight waypoints in your flight plan.
DB
Press the DB key to select any waypoint from the database. Use the
the Large and Small knobs to select the waypoint.
Direct
The Direct Menu selection key activates the direct course to the displayed waypoint.
1. When you press Direct-To, the default waypoint shown will be the
highlighted waypoint in your flight plan (unless another waypoint is
highlighted in another operation, then that waypoint would be
used). You can turn the Large knob to select a different waypoint in
your flight plan.
2. You may select a waypoint that is not in your flight plan by pressing
the DB key and then use the Large and Small knobs.
3. Press the Direct key to navigate directly to the selected waypoint.
Inserting a Hold
The Hold function of the Direct-To mode prepares you for entering a
holding pattern at a waypoint either in your flight plan or from the database.
10
CNX80 Pilot Guide 560-0984-00C Draft1.book Page 11 Tuesday, September 2, 2003 10:36 AM
Apollo CNX80 Pilot’s Guide
Destination (Dest)
The Dest Menu selection key replaces the active flight plan with a
direct course to the displayed waypoint. You can choose a waypoint
from your flight plan (WPTS) or another waypoint from the database
(DB).
1. When you press Direct-To, the default waypoint shown will be the
highlighted waypoint in your flight plan when the WPTS smart key is
highlighted. You can turn the Large knob to select a different a different waypoint in your flight plan.
2. You may select a waypoint that is not in your flight plan by pressing
the DB smart key and then use the Large and Small knobs to select
the new waypoint.
3. Press the Dest key to navigate directly to the selected waypoint.
4. Press Menu/Enter to accept the new destination waypoint. Press
Menu/Enter again to activate it.
11
Direct-To
1. Press Direct-To.
2. Select a waypoint for the holding pattern.
a. Press WPTS (default) to select a waypoint along your flight plan
by turning the Large knob to highlight the waypoint. Press Hold.
or
b. Press DB to select a waypoint from the database with the Large
and Small knobs. Press Hold.
3. Use the Large and Small knobs to select Right or Left turns, hold
course, and hold length (nm or km) or hold time (minutes).
4. Press Menu/Enter. The Hold pattern will be drawn on the display
and the CNX80 will provide guidance for the holding pattern. when
you near the holding pattern flight plan sequencing is suspended.
Press SUSP (SUSP annunciator will turn off) to exit the holding pattern and return to the flight plan.
CNX80 Pilot Guide 560-0984-00C Draft1.book Page 12 Tuesday, September 2, 2003 10:36 AM
Apollo CNX80 Pilot’s Guide
Direct-To
Course To (CrsTo)
Course To operation allows you to select an inbound to the intercept
course for the selected waypoint. The default course for the operation
is the course from the present position to the selected waypoint. The
length of the magenta course to line will be the distance from the
present position to the selected waypoint or 20 NM; whichever is
larger to a maximum of 300 NM. Upon reaching the selected waypoint,
if the waypoint is in the active flight plan, the flightplan will sequence
to the next waypoint in the flightplan normally. Maps are always drawn
with True North at the top of the display (Up).
1. Press Direct-To. Select a new waypoint, if desired, with the Large
and Small knobs.
2. Press CrsTo. A map is displayed showing the selected course.
3. Change the course bearing, if desired. Turn the Large knob to
change the 10’s value. Turn the Small knob to change the 1’s value.
4. Press Menu/Enter.
Course From (CrsFr)
The Course From operation allows you to navigate from a waypoint on
a pre-defined course. The default course for the Course From operation will depend on whether the ownship symbol is heading toward the
selected waypoint or away from it. If the ownship symbol is heading
toward the selected waypoint, the default course will be the bearing
from the present position to the selected waypoint. If the ownship symbol is heading away from the waypoint, the default course will be the
bearing from your present position to the selected waypoint plus
180°. The length of the magenta course line will always be 100 NM.
12
CNX80 Pilot Guide 560-0984-00C Draft1.book Page 13 Tuesday, September 2, 2003 10:36 AM
Apollo CNX80 Pilot’s Guide
When the Course From operation is executed, the CDI will indicate
FROM and the flightplan will go into suspend mode (SUSP); it will not
automatically sequence the flightplan waypoints.
1. Press Direct-To. Select a new waypoint, if desired, with the Large
and Small knobs.
2. Press CrsFr. A map is displayed showing the selected course.
3. Change the course bearing, if desired. Turn the Large knob to
change the 10’s value. Turn the Small knob to change the 1’s value.
4. Press Menu/Enter.
Direct-To
OBS
This function activates the OBS mode where the CDI/HSI resolver controls the selected course to a selected waypoint when an external
resolver is installed. This allows you to treat any waypoint as though it
were a VOR station. Automatic flight plan sequencing will be suspended initially.
Note
When using OBS mode for a VOR, station declination
provided by the database is used. This corresponds to
the magnetic variation actually used by the VOR rather
than the value calculated from your present position.
OBS to a Waypoint in Your Flight Plan
If the OBS waypoint is on the map display, a magenta line will be
drawn for the Course-To. After you intercept that line, the CNX80
will track the course inbound to the selected OBS fix. The white
line on the Map is the Course-From the OBS fix. Once the aircraft
intercepts the OBS course, the CNX80 will fly the course inbound
and then continue outbound until you terminate the OBS mode.
However, if you unsuspend, the CNX80 will terminate OBS mode
and continue to sequence en route on the flight plan. You will also
13
CNX80 Pilot Guide 560-0984-00C Draft1.book Page 14 Tuesday, September 2, 2003 10:36 AM
Direct-To
Apollo CNX80 Pilot’s Guide
terminate OBS mode by making another flight leg active or going
Direct-To another waypoint.
1. Press Direct-To. With the WPTS smart key highlighted, select a
waypoint in the flight plan with the Large knob or with the DB
smart key highlighted, select a new waypoint outside of your
flight plan with the Large and Small knobs.
2. Press OBS. Now use the external CDI/HSI resolver to control the
selected course. The CNX80 will read the OBS information and
will change the course displayed on the Map displays.
3. After the course is selected, press SUSP to sequence normally
on your flight plan.
OBS to a Waypoint Not in Your Flight Plan
1. Press Direct-To. Press the DB smart key.
2. Select a new waypoint outside of your flight plan with the Large
and Small knobs.
3. Press OBS. Now use the external CDI/HSI resolver to control the
selected course. The CNX80 will read the OBS information and
will change the course displayed on the Map displays.
4. After reaching the waypoint, you will need to select a new destination.
FlyLeg
With the FlyLeg Menu selection you can activate a particular leg of
your flight plan. This feature allows you to bypass a leg in your flight
plan. If you have picked a leg that cannot be activated for navigation, a
message will appear to warn you. Press CLR to exit.
1. Press Direct-To.
2. Select the desired leg of your flight plan with the Large knob (WPTS
smart key is highlighted).
3. Press the FlyLeg key to activate the selected leg.
14
CNX80 Pilot Guide 560-0984-00C Draft1.book Page 15 Tuesday, September 2, 2003 10:36 AM
Apollo CNX80 Pilot’s Guide
Nearest Waypoints (NRST)
The Nearest Waypoint Search function allows you to search for the 20
waypoints nearest to your present position in each waypoint type.
There are eight waypoints types: Airport, VOR, NDB, INT, User, FSS
(Flight Service Station), and Air Route Traffic Contol Center (ARTCC).
The last Menu selection lets you set Limits to select a range of airport
types to show up for the Nearest Airport type. You can then look up
information about that waypoint by pressing INFO or fly direct to it by
pressing the Direct-To key. See “Information on Waypoints (INFO)” on
page 17 for more information on waypoint types.
SRCH
Search near a selected waypoint.
Nearest Frequency
While viewing the Nearest waypoints that have frequency information,
you can transfer the displayed frequency to the Active or Standby frequency. The CNX80 automatically knows if it is a Com or a VOR frequency.
1. Press NRST.
2. Press the Line Selection key for the waypoint type you want to
search.
3. Turn the Large knob to scroll thru the list of nearest waypoints, such
as Airport, VOR, User if a frequency is present, FSS, or ARTCC. Highlight the desired waypoint.
15
Nearest
1. Press NRST to display the Nearest waypoints.
2. The Nearest waypoint type labels are shown on the right side of the
display. Press the Line Selection key next to the waypoint type label
that you want.
3. Turn the Large knob to highlight (green) the waypoint you want to
select.
CNX80 Pilot Guide 560-0984-00C Draft1.book Page 16 Tuesday, September 2, 2003 10:36 AM
Apollo CNX80 Pilot’s Guide
4. Press <-SBY to insert the highlighted frequency into the Standby
position or <-A-> to insert the frequency into the Active position.
Nearest
Info on Nearest Waypoint
1. Press NRST.
2. Press the key for the waypoint type you want to search.
3. Turn the Large knob to select the nearest waypoint.
4. Press the INFO button.
Fly Direct-To a Nearest Waypoint
1. Press NRST.
2. Press the key for the waypoint type you want to search.
3. Turn the Large knob to scroll thru the list of nearest waypoints. Highlight the desired waypoint.
4. Press the Direct-To button.
5. Press the Direct key.
Change Your Approach to a Nearest Waypoint
1. Press NRST.
2. Turn the Large knob to select the desired nearest waypoint.
3. Press the INFO button. Note, if “IFR” is listed with the identifier,
instrument approaches are available. Press INFO again to toggle
back to the Nearest Waypoint list.
4. With the desired airport selected, press the D-> key.
5. Press the Dest key. Press Menu/Enter to accept the change to your
flight plan. Press Menu/Enter to activate the new flight plan direct
to the selected waypoint.
6. Press FN and then PROC.
7. Press Appch for the destination waypoint. Select the approach with
the Large and Small knobs. You can also select the type of
approach with the selection keys on the right side of the display.
Press Menu/Enter.
7. Press EXEC. The CNX80 will ask if you want to replace the Active
flight plan with the Modified flight plan. Press Menu/Enter.
16
CNX80 Pilot Guide 560-0984-00C Draft1.book Page 17 Tuesday, September 2, 2003 10:36 AM
Apollo CNX80 Pilot’s Guide
Information on Waypoints (INFO)
Info mode allows you to view information about the selected waypoint.
Examples of selecting a waypoint can be: active Wpt in flight plan, item
selected from Nearest Waypoint list, item selected in Pan mode, etc.
VOR Information
• Identifier, city, state, country, bearing and distance from present
position, frequency, lat/lon coordinates, and magnetic variation.
• Map of area
NDB Information
• Identifier, city, state, country, bearing and distance from present
position, frequency, lat/lon coordinates, and magnetic variation.
• Map of area
Airway Intersection Information
• Identifier, country, bearing and distance from present position, lat/
lon coordinates, and magnetic variation.
• Map of area
17
Info
Airport Information
• Identifier, city/facility name, state, country, elevation, type, and fuel
• Position: bearing and distance from present position, sunrise/sunset, lat/lon coordinates, and magnetic variation.
• Frequencies
• Map of area and runway
• Runway information: length, lighting, surface type, category type
and frequency
CNX80 Pilot Guide 560-0984-00C Draft1.book Page 18 Tuesday, September 2, 2003 10:36 AM
Apollo CNX80 Pilot’s Guide
Com Radio (COM)
Press COM to activate control of the internal Com Radio. All other functions will continue to function normally, such as active flight plans.
Turn the PWR/VOL knob to control the Com volume.
Squelch (SQ)
Press the SQ key to toggle the Com receiver squelch function. When
squelch is active, the Squelch (SQ) annunciator will appear on the left
side of the active frequency display and the SQ function label will be
highlighted.
Com Radio
Monitor (MON)
Press the MON key to toggle the Standby channel monitoring function.
When Monitor mode is active, the MON annunciator will appear on the
left side of the standby frequency and the MON function label will be
highlighted.
Frequency monitoring allows you to listen to the Standby frequency
while the CNX80 monitors the Active frequency for activity. When
Active frequency receives a signal, you will hear the Active frequency
until its activity stops. The frequency monitoring function is inhibited
while you are transmitting.
Recall (RCL)
1. Press the RCL key to display the menu of Recent, User, or Emergency frequencies.
2. Press the <SBY key to insert the selected frequency as the Standby
frequency.
3. Press the <A> key to insert the selected frequency as the Active frequency and set the previous Active frequency as Standby frequency.
Recent
1. Press the Recent key to bring up a list of the last eight frequencies used as the Active frequency.
2. Turn the Large knob to highlight a frequency.
3. Press the <SBY or <A> keys to insert the frequency.
4. Press the Menu/Enter key if no choice is desired.
User
1. Press the User key to bring up a list of the 100 User created frequencies.
2. Turn the Large knob to highlight a frequency.
3. Press the <SBY or <A> keys to insert the frequency.
18
CNX80 Pilot Guide 560-0984-00C Draft1.book Page 19 Tuesday, September 2, 2003 10:36 AM
Apollo CNX80 Pilot’s Guide
4. Press the Menu/Enter key if no choice is desired.
Emergency
Press the Emrgncy key to insert the Emergency frequency
(121.500) as the Standby frequency.
Flip/Flop
Press the <-> (flip/flop) key to swap the Active and Standby frequencies.
Signal
1. Press Menu/Enter and then the Signal key to bring up the RF Level
and Noise Level values. The Signal menu label will be highlighted.
These values are useful for troubleshooting installations as a measure of signal quality. You won’t normally need to use these values.
2. Press the Signal key again to turn the value display off.
Weather
1. Press Menu/Enter and then the Weather key to bring up the list of
Weather frequencies (where available). The Weather menu label
will be highlighted.
Com Radio
2. Turn the Large knob to highlight a frequency.
3. Press <SBY to insert the highlighted frequency as the Standby frequency or <A> to insert it as the Active frequency.
4. Press the Weather key again to turn the value display off.
Audio
1. Press Menu/Enter and then the Audio key to bring up the Audio
Level values. The Audio menu label will be highlighted.
2. Press the Audio key again to turn the value display off.
3. Turn the Large knob to highlight the Audio Message Annunciator
(AMA) volume, Com radio volume, Sidetone level, and Nav radio volume.
4. Use the Small knob to adjust the values.
19
CNX80 Pilot Guide 560-0984-00C Draft1.book Page 20 Tuesday, September 2, 2003 10:36 AM
Apollo CNX80 Pilot’s Guide
Com Radio
Save Channel
This function allows you to save and name the current Active frequency in the User frequency list.
1, Press Menu/Enter and then the Save Chnl key to bring up the Save
Channel box. The Save Chnl menu label will be highlighted.
2. Press the Save Chnl key again to turn the value display off.
3. Turn the Small knob to change the value.
4. Turn the Large knob to move the cursor to another character.
5. Press the Menu/Enter key to save the name and frequency.
20
CNX80 Pilot Guide 560-0984-00C Draft1.book Page 21 Tuesday, September 2, 2003 10:36 AM
Apollo CNX80 Pilot’s Guide
Nav Radio (VOR)
Press VOR to activate control of the internal Nav Radio. All other functions will continue to function normally, such as active flight plans.
Note that distances, such as to a Localizer, are based on calculated
distances from GPS information.
ID
Press the ID key to toggle the Nav audio between Off, On and Voice
only. The On selection is indicated by ID replacing the ACT annunciator
to the left of the Active frequency and pressing the ID key so ID is highlighted. The Voice selection is indicated by VOX replacing the ACT
annunciator to the left of the Active frequency. The ID function label
will be partially highlighted when Voice is selected and fully highlighted
when On is selected. The Monitor function is turned off when any ID
mode is active.
Monitor (MON)
Press the MON key to toggle the Nav channel monitoring function.
When monitor mode is active, a MON annunciator will appear on the
left side of the standby frequency, the standby radial replaces the
active identifier, and the MON function label will be highlighted.
Recall (RCL)
1. Press the RCL key to bring up a list of the last eight VOR/ILS frequencies used as the Active frequency.
2. Turn the Large knob to highlight a frequency.
3. Press the <SBY or <A> keys to insert the frequency.
4. Press the VOR key again if no choice is desired.
Flip/Flop
Press the <-> (flip/flop) key to swap the Active and Standby frequencies.
21
Nav Radio
Frequency monitoring allows you to listen to the Standby VOR frequency while the CNX80 monitors the Active frequency for activity.
When Active frequency receives a signal, you will hear the Active frequency until its activity stops. Pressing MON will be ignored for ILS frequencies. If Voice or ID functions are active, the Nav radio will
temporarily turn off the ID function until the Monitor function is turned
off.
CNX80 Pilot Guide 560-0984-00C Draft1.book Page 22 Tuesday, September 2, 2003 10:36 AM
Apollo CNX80 Pilot’s Guide
ID/To/Fr
When the Active frequency is a VOR, you can view the current course
To/Fr the VOR as well as the Identifier and distance. This value
appears between the Active and Standby VOR frequencies and to the
right. Press Menu/Enter and then each press of the ID/To/Fr key will
toggle between the display of the ID (Identifier), To bearing, or From
bearing values.
Back Course
When the Active frequency is an ILS, the Back Course mode will be
available for ILS frequencies. Press Menu/Enter and then the Back
CRS key to turn Back Course mode on. Back Course mode reverses
needle sensing. When on, the Back CRS menu label will be highlighted.
Audio
This function operates the same as in Com mode.
Nav Radio
Save Channel
This function operates the same as in Com mode.
Test Log
The Test Log function allows you to store information about the last
time you tested your Nav receiver. The information you can enter
includes: Date (month, day, year), Type of test (Differential, Ground,
Air), Location (text), Bearing Error (-5 to +5), and name of person logging the test information (text).
1. In the Nav function, Press Menu/Enter and then the Test Log key.
2. Press the EDIT key. The month of the Date will be highlighted.
3. Turn the Small knob the change the month of the date. Turn the
Large knob to move to Day of the Date.
4. Turn the Small knob to change the day. Turn the Large knob to move
to the year. Turn the Small knob to change the year.
22
CNX80 Pilot Guide 560-0984-00C Draft1.book Page 23 Tuesday, September 2, 2003 10:36 AM
Apollo CNX80 Pilot’s Guide
5. Turn the Large knob to move to the Type selection. Turn the Small
knob to choose between Differential, Ground, or Air. Differential
means the value was referenced to another calibrated source or
unit. Ground means the unit was calibrated while on the ground. Air
means the unit was calibrated while in the air.
6. Turn the Large knob to move to the Location selection. Press the
Cursor knob in to start editing. Turn the Small knob to change the
character. Turn the Large knob to the next character and turn the
Small knob to change the character. When editing is complete,
press the Cursor knob again to exit editing the Location.
7. Turn the Large knob to move to the Brg Error selection. Turn the
Small knob the change the value required to center the needle. Left
for “-” and right for “+” corrections.
8. Turn the Large knob to move to the Name selection. This value if for
recording the name of the person entering the values in the Test
Log. Press the Cursor knob in to start editing. Turn the Small knob
to change the character. Turn the Large knob to the next character
and turn the Small knob to change the character. When editing is
complete, press the Cursor knob again to exit editing the Name.
Nav Radio
23
CNX80 Pilot Guide 560-0984-00C Draft1.book Page 24 Tuesday, September 2, 2003 10:36 AM
Apollo CNX80 Pilot’s Guide
Transponder Control (XPDR)
If a remote Apollo SL70 transponder is connected and setup to operate with the CNX80, the Transponder Control Mode will allow you to
control your transponder from the CNX80 front panel. Press XPDR to
activate Transponder mode.
Ident
Press the IDNT key once to activate the Ident mode. The key label will
be highlighted and an IDNT annunciator will appear by the squawk
code for 20 seconds.
XPDR
Standby
Press the STBY key to place the transponder in Standby mode. No
information will be transmitted while in Standby mode. A SBY annunciator will appear to the left of the squawk code.
ON
Press the ON key to enable Mode A operation, which shows the fourdigit squawk code. An ON annunciator will appear to the left of the
squawk code.
Alt
Press the Alt key to enable Mode C operation, which also sends altitude data along with your squawk code. An ALT annunciator will
appear to the left of the squawk code.
Transponder Line Selection Keys
Press the Menu/Enter key to display the keys on the right side of the
screen.
Emergency
Press the Emrgncy key to select the emergency 7700 squawk
code.
24
CNX80 Pilot Guide 560-0984-00C Draft1.book Page 25 Tuesday, September 2, 2003 10:36 AM
Apollo CNX80 Pilot’s Guide
VFR
Press the VFR key to select the VOR 1200 squawk code.
TrgrSpd
The TrgrSpd key allows you to edit the aircraft speed that will
switch the transponder automatically between active and standby.
See the Auto mode description below.
Auto
When Auto mode is selected, the transponder will automatically
become active after the aircraft reaches the Trigger speed. While
the aircraft is below the Trigger speed, your transponder will not
send any information.
1. In Transponder mode, press Menu/Enter.
2. If necessary, edit the Trigger Speed. Press TrgrSpd. Select the
desired Trigger Speed with the Large and Small knobs. Press
Menu/Enter.
3. Press Menu/Enter. Press the Auto key. Auto mode is active when
it is highlighted. Press Auto again when you want to deactivate
the Auto mode.
OR
1. Change the number value with the Small knob and move to the next
number with the Large knob.
2. After selecting the fourth number, turning the Large knob or pressing Menu/Enter key will end editing.
3. You can press the CRSR knob while editing to cancel any changes.
25
XPDR
Manually Select a Squawk Code
1. Press the CRSR in or turn the Large knob to activate squawk code
editing. Numbers 0 - 7 will be displayed adjacent to the Smart and
Line Selection keys.
2. Press the key for the desired number. After pressing a numbered
key, the next number to the right will be active for editing.
CNX80 Pilot Guide 560-0984-00C Draft1.book Page 26 Tuesday, September 2, 2003 10:36 AM
Apollo CNX80 Pilot’s Guide
Flight Planning (FPL)
The Flight Planning function lets you set up and store flight plans
where you can name the flight plan, insert a series of waypoints, and
then add comments.
Flightplan
View
Display the active flight plan.
Back
Press the BACK smart key to return to the previous display.
Edit
Use this feature to edit an existing flight plan. Editing a displayed
flight plan will not change the active flight plan.
Expand (XPND)
Pressing the XPND key toggles between a simple view of the waypoints in the flight plan and one that shows the details of the procedures and airways.
Reverse (Rvrse)
Pressing the Rvrse key will create a copy of the active flight plan and
reverse the waypoints. Any procedures or approaches will be removed
from the copied flight plan.
26
CNX80 Pilot Guide 560-0984-00C Draft1.book Page 27 Tuesday, September 2, 2003 10:36 AM
Apollo CNX80 Pilot’s Guide
Save
Press the Save key to save the active flight plan to memory. If a flight
plan exists with the same name, the CNX80 will add a suffix (such as a
“2”) to the flight plan to show the difference. Press Menu/Enter for Yes
or CLR for No.
Edit
Pressing the Edit key creates a copy of the active flight plan. Making a
copy protects you from accidently changing your active flight plan. You
can now edit the “Modified” flight plan. If you are already viewing a
“Modified” flight plan, you will be prompted to replace the current
modified flight plan (Menu/Enter) or keep the current one (CLR).
1. Turn the Large knob to move to the waypoint to modify (highlighted
in green).
2. Press Modify to change the selected waypoint. Use the Large and
Small knobs to select a new waypoint and press Menu/Enter.
2. Press the Wpt key to insert another Waypoint or press the Arwy key
to insert an Airway.
3. After modifying the flight plan, the smart keys give you the choice of
Back, Executing, or Expanding and viewing details in the new Flight
Plan
Execute (Exec)
Use the Execute command to make the modified flight plan the Active
flight plan. A flight plan that is being modified will not be used until you
press Exec and confirm the activation.
Copy
The Copy function creates a duplicate of the selected flight plan. You
can use the Copy function as a timesaving method to create a new
flight plan when you will reuse many of the same waypoints and procedures.
Discontinuity
A Discontinuity is a message placed in the affected position in a flight
plan indicating the pilot needs to fill in more detail about the flight
plan. The CNX80 either needs to know how you want to go from waypoint A to B or an inserted procedure doesn’t match the end of the en
route structure. You may delete the Discontinuity message after
27
Flightplan
Comment (Cmnt)
This function allows you to place a comment, of up to one line of text,
for the flight plan. The comment will be placed just below the flight
plan name.
CNX80 Pilot Guide 560-0984-00C Draft1.book Page 28 Tuesday, September 2, 2003 10:36 AM
Apollo CNX80 Pilot’s Guide
resolving any conflicts by turning the Large knob to highlight it and
then pressing the CLR key. Deleting a discontinuity results in a fix-to-fix
direct nav path between those waypoints.
Pilot Nav Legs
When the “Pilot Nav” message appears on a leg in your flight plan it
means the CNX80 will not provide guidance on that leg. You will have
to use other flight instruments or autopilot modes to fly the given procedure leg until intercepting the course to the next waypoint. Once
the intercept is complete the flight plan will sequence and begin providing guidance to the waypoint.
Flightplan
The CNX80 will go into Suspend mode when the current leg is a Pilot
Nav leg. Pressing SUSP again sequences you to the next leg in the procedure. As you arrive at the course the course deviation indicator will
begin to center and once again you may engage the appropriate NAV
mode on your autopilot or flight director.
Searching for Waypoints to Insert into a Flight Plan
The following steps describe in general how you can select a waypoint
for one of the points in a flight plan.
1. Press the FN key (if necessary) and then the FPL key.
2. Press the NEW key. The waypoint database will be displayed. You
can choose to search for a waypoint by the Identifier, Facility Name,
Location, or Waypoint Type.
3. Select by Identifier
a. With the first character of the Identifier highlighted, turn the
Small knob to select the desired character.
b. Turn the Large knob CW to the next character and select the
character by turning the Small knob.
4. Select by Waypoint Type
a. With the first character of the Identifier highlighted, press the
CRSR knob in. The whole Identifier field will be highlighted. Now
turn the Large knob CCW one turn to highlight the waypoint type
field.
b. Turn the Small knob to display the different waypoint types.
5. Select by Facility Name
a. With the first character of the Identifier highlighted, press the
CRSR knob in. The whole Identifier field will be highlighted. Now
turn the Large knob CCW one turn to highlight the Facility Name
field.
b. Turn the Small knob to display the facilities in alphabetic
sequence.
28
CNX80 Pilot Guide 560-0984-00C Draft1.book Page 29 Tuesday, September 2, 2003 10:36 AM
Apollo CNX80 Pilot’s Guide
6. Select by Location
a. With the first character of the Identifier highlighted, press the
CRSR knob in. The whole Identifier field will be highlighted. Now
turn the Large knob CCW one turn to highlight the Location field.
b. Turn the Small knob to display the facilities in alphabetic
sequence.
Steps for Setting Up a Simple Flight Plan
1. Press the FN key (if necessary) and then the FPL key.
2. Press the NEW key. The waypoint database will be displayed. You
can choose to search for a waypoint by the identifier, facility name,
city, or waypoint type.
3. Select the Origin waypoint as described in Building a New Flight
Plan above. Press Menu/Enter.
4. Select the Destination waypoint. Press Menu/Enter.
Flightplan
5. Turn the Large knob to highlight the “Discontinuity.” Press CLR to
remove the Discontinuity. This creates a direct path between waypoints.
6. Select the final operation for creating this flight plan: Save or Execute. Press SAVE to store the flight plan in the Library for future use
or press EXEC to both save the Library plan and make the plan the
Active flight plan.
29
CNX80 Pilot Guide 560-0984-00C Draft1.book Page 30 Tuesday, September 2, 2003 10:36 AM
Apollo CNX80 Pilot’s Guide
Steps for Setting Up an IFR Flight Plan
Procedures can be inserted at the time you are creating the flight plan
(as described here) or later with the Procedure (PROC) function.
Note
If datum for an airport is unknown, no terminal or instrument
procedures will be displayed. The Jeppesen database can
only show one procedure type per runway (i.e. ILS, GPS,
VOR). The procedures are present, but must be selected
from multiple transitions. Note that the name may not match
the paper approach. Verify the sequence of waypoints to
ensure you have selected the desired procedure.
Flightplan
A. Set Origin, Destination, and Alternate Waypoints.
B. Add Departure Procedure (DP).
C. Insert en route flight plan of Airways and/or Waypoints.
D. Modifying a Flight Plan While in Flight
E. Add Arrival Procedures (STARS).
F. Add Approach Procedures when you receive clearance.
A. Set Origin, Destination, and Alternate Waypoints
1. In Flightplan mode, press the NEW key.
2. Use the Large and Small knobs to select the Origin waypoint. Press
Menu/Enter.
3. The Destination waypoint selection page will now be displayed.
Select the Destination waypoint and press Menu/Enter.
4. Set an Alternate airport, if desired. Turn the Large knob CCW to
highlight the flight plan name. Press the Altrnt key and select an
alternate airport/waypoint along the flight plan with the Large and
Small knobs. The alternate airport will be added in parentheses to
the flight plan name.
5. Press SAVE.
30
CNX80 Pilot Guide 560-0984-00C Draft1.book Page 31 Tuesday, September 2, 2003 10:36 AM
Apollo CNX80 Pilot’s Guide
B. Add Departure Procedure (DP)
Departure procedures may be modified in either the Flight Plan (FPL)
or Procedure (PROC) modes. The Procedure mode method is shown.
1. In Flight Plan mode, highlight the flight plan name and press EXEC.
2. Press FN and then PROC.
3. In the Origin section press the Depart key.
Note
Guidance is not provided for Pilot Nav legs or Vectored DPs.
4. The runway is highlighted. Use the Small knob or Line Selection keys
on the right side of the display to select a runway.
5. Turn the Large knob to select the departure procedure and transition.
6. Verify your flight plan and resolve any discontinuities. Press Menu/
Enter.
31
Flightplan
C. Insert En Route Flight Plan Airways and/or Waypoints
1. Turn the Large knob CW to highlight the waypoint where you want to
insert a waypoint or Airway in your flight plan after it. Press →Wpt
or →Arwy. In this example, Airway is selected.
2. Turn the Small knob to select the desired point to enter the airway.
You may also press one of the Line Selection keys that display the
available airways.
3. Turn the Large knob CW one position to highlight the Intersection
choices. Turn the Small knob to choose the desired point to exit the
Airway. Press Menu/Enter.
D. Modifying a Flight Plan While In Flight
Flight plans may be modified in either the Flight Plan (FPL) or Procedure (PROC) modes. In Flight Plan mode you can modify the entire
flight plan. In Procedure mode you can modify procedures for the Origin, Destination, or Alternate airports. Both methods are shown below.
Flight Plan Mode
1. Press the FN key and then the FPL key.
2. Highlight the Active flight plan and press the EDIT key.
3. If you want to change the Origin, Destination, or Alternate waypoints, press the appropriate selection key on the left side of the
display when the flight plan name is highlighted. If you want to
insert a waypoint or airway, go to step 5.
4. Turn the Large knob to highlight the leg where you want to make
the change.
CNX80 Pilot Guide 560-0984-00C Draft1.book Page 32 Tuesday, September 2, 2003 10:36 AM
Flightplan
Apollo CNX80 Pilot’s Guide
5. Press ->Wpt to insert a waypoint or ->Arwy to insert an airway following the highlighted leg. If the airway choice is not available
there are no airways available for that waypoint. Delete a waypoint or airway by pressing the CLR key.
6. Press XPND to display all of the parts of the flight plan.
7. Review your flight plan to clear up any discontinuities as desired
and then press the EXEC key to execute.
Procedure Mode
Selecting an Arrival or Approach
1. Press FN and then PROC to go to the Procedure Mode.
2. Press the Arrival or Appch key in the Destination section.
3. Use the Large and Small knobs to select the desired selections.
4. Press Menu/Enter.
5. Resolve any discontinuities and then press EXEC.
Selecting an Alternate Airport
1. Press FN and then PROC to go to the Procedure Mode.
2. Press the Select key next to the Alternate airport.
3. Next, press the Load key to load the selected airport into your
flight plan. If you want to choose a different Alternate airport,
press Modify, choose another airport with the Large and Small
knobs and press Menu/Enter, and then press the Load key. If you
do not have an Alternate airport, select one by pressing Modify
and select one with the Large and Small knobs followed by pressing Menu/Enter and then pressing the Load key.
4. Insert any waypoints, or airways, for the diversion and then press EXEC.
Note
Note that when you execute the changed plan, you will
not have an active leg until you activate a new flight plan
leg with either the FlyLeg, Direct-To, or CrsTo functions.
Flying Direct to a Waypoint in a Flight Plan
1. Press Direct-To. The flight plan waypoint list will be displayed.
2. Turn the Large knob to highlight the desired waypoint.
3. Press the Direct key on the right side of the display.
Making a Flight Plan Leg Active
With the FlyLeg Menu selection you can activate a particular leg of
your flight plan. This feature allows you to bypass a waypoint in
your flight plan.
1. Press Direct-To.
32
CNX80 Pilot Guide 560-0984-00C Draft1.book Page 33 Tuesday, September 2, 2003 10:36 AM
Apollo CNX80 Pilot’s Guide
2. Select the desired leg of your flight plan with the Large knob
(WPTS smart key is highlighted).
3. Press the FlyLeg key to activate the selected leg.
E. Add Arrival Procedures (STARS)
1. Press the Arrival key in the Destination section.
2. Use the Large and Small knobs to select the runway, arrival, and
transition.
3. Press Menu/Enter.
F. Add Approach Procedures
1. Press the Appr key. Select the approach with the Large and Small
knobs, or the keys on the right side of the display. Press Menu/Enter.
2. Press the XPND (Expand) key to view all waypoints and legs in the
flight plan. Every waypoint, airway, procedure, and intersection is
shown with the bearing and distance of each leg. Verify the waypoints in your flight plan and resolve any discontinuities.
3. Press EXEC.
Vector To Final
When you are in the Terminal area, you may be directed to fly a vector
to final approach.
Missed Approach
1. Press SUSP to deselect the suspend state (while the Missed
Approach point is the TO waypoint) and allow flight plan sequencing
after the FAF.
2. Follow the guidance of the CNX80 to the Missed Approach Hold Point.
3. If missed approach clearance differs from the published information, use Direct-To and manual hold as required.
33
Flightplan
1. Press FN and then PROC.
2. Press VTF.
3. Follow the guidance from the CNX80 as the inbound course to the
Final Approach Fix (FAF) is now active.
CNX80 Pilot Guide 560-0984-00C Draft1.book Page 34 Tuesday, September 2, 2003 10:36 AM
Apollo CNX80 Pilot’s Guide
Timer (TMR)
The Timer Mode allows you to set or view several timing functions. You
can set one or two timers as count up or count down timers. You can
view the Trip Time, Trip Distance, Flight Time, and Flight Distance. The
Trip Time and Trip Distance show the time and distance traveled since
being reset. The Flight Time and Flight Distance show the time and distance traveled since the Trigger Speed was reached. Enter the Trigger
Speed to set the threshold where the Flight timers start after the aircraft reaches the selected speed. Use the Large knob to highlight the
selection to change.
Timers
Timer 1 and Timer 2
Edit the Timer values by pressing in the CRSR knob, move the cursor
with the Large knob, change the value with the Small knob, and then
press the Enter key. Press the 1 Min or 2 Min keys to instantly insert 1 or
two minutes as the time. Press the Disp key to display the Timer value
on the Map pages. The Disp key will be highlighted and an asterisk will
appear next to the value that will be displayed on the Map pages. Press
the CLR key to reset the values to 0.
Trip Time and Distance
The Trip Time and Distance counters display the time and distance
traveled since the last time they were reset.
1. Turn the Large knob to highlight Trip Time.
2. Press the Disp key to display the Trip Timer value on the Map pages.
3. To clear the Trip Time and Trip Distance values, press the CLR key.
Flight Time and Distance
The Flight Time and Distance counters start and stop according to two rules:
1) The counters reset and start once the aircraft goes above the Trigger Speed for ten seconds.
2) The counters stop after the aircraft has been below the Trigger
Speed for 30 seconds or more.
34
CNX80 Pilot Guide 560-0984-00C Draft1.book Page 35 Tuesday, September 2, 2003 10:36 AM
Apollo CNX80 Pilot’s Guide
Trigger Speed
Set the Trigger Speed for the speed where you want the Flight Time
and Distance counters to start and stop.
1. Turn the Large knob to highlight Trigger Speed.
2. Press the CRSR knob in. The Trigger Speed will now be highlighted.
3. Turn the Small knob to the desired speed and then press the CRSR
knob again or press the Menu/Enter key.
Checklist (CHK)
The Checklist function allows you to create up to eight checklists with
up to 100 lines of text in each. You can use this feature as a method to
create customized checklists for in-cockpit review.
35
Checklist
Creating a New or Editing an Existing Checklist
1. Press FN and then the CHK key to start the Checklist function.
2. Press the NEW or EDIT key. Press the CRSR knob in and use the
Small and Large knobs to name the new list. Press Menu/Enter
when finished.
3. With the name of your new list highlighted, press the EDIT key.
4. Turn the Small knob to choose the desired checklist item. See the
following table for available checklist items. If you want to make
your own item, press the CRSR knob in and use the Small and Large
knobs to name the new item. Press Menu/Enter when finished.
5. Then, turn the Large knob to the checklist result for that item. Turn
the Small knob to choose the desired checklist result. See the following table for available checklist results. If you want to make your
own result, press the CRSR knob in and use the Small and Large
knobs to name the new result. Press Menu/Enter when finished.
6. Turn the Large knob to the next checklist item. Continue with the
process in the previous steps until finished with your list. Press the
LIST key or other key to leave the Checklist function.
CNX80 Pilot Guide 560-0984-00C Draft1.book Page 36 Tuesday, September 2, 2003 10:36 AM
Apollo CNX80 Pilot’s Guide
Using Your Checklist
1. Press FN and then the CHK key to start the Checklist function.
2. Turn the Large knob to highlight the desired list and then press
Enter/Menu. The selected list will be displayed with the first line
highlighted.
3. Press the CHK key, or the Menu/Enter key, as you check each item
in the list. After pressing the CHK key, the next item in the list will be
highlighted.
4. After the last item is checked, the >CHECKLIST COMPLETE< line will
be highlighted. Press CHK to check this item and return to the main
Checklist page.
Checkllist
Move a Checklist
1. Press FN and then the CHK key to start the Checklist function.
2. Press the MOV key.
3. Turn the Large knob to the position in the order of lists where you
want to put the highlighted list and press the Menu/Enter key.
36
CNX80 Pilot Guide 560-0984-00C Draft1.book Page 37 Tuesday, September 2, 2003 10:36 AM
Apollo CNX80 Pilot’s Guide
User Waypoints (USER)
The CNX80 can hold up to 500 user-defined waypoints. These waypoints can be based on either lat/lon position or range and bearing
from a reference point. In the User Waypoint function, you can create
new waypoint, edit existing ones, or search for a User waypoint.
Creating or Editing a User Waypoint
1. Press FN and then the USER key to start the User Waypoint function. You can also create User waypoint by using the PAN function.
2. Press the NEW or EDIT key.
3. Use the Small and Large knobs to name or edit the waypoint name.
4. Turn the Large knob to go to each field on the page and edit the values.
5. Press Menu/Enter when finished.
Searching for a User Waypoint
1. Press FN and then the USER key to start the User Waypoint function.
2. Press the SEARCH key.
3. Use the Small and Large knobs to select the waypoint name. You
can also search through a given field by pressing the CRSR knob,
moving to a field with the Large knob, and then searching within a
field by turning the Small knob.
4. Press Menu/Enter when finished.
User Wpt
37
CNX80 Pilot Guide 560-0984-00C Draft1.book Page 38 Tuesday, September 2, 2003 10:36 AM
Apollo CNX80 Pilot’s Guide
System Mode (SYS)
The System mode provides information about GPS status (GPS), System Software Versions (VERS), and allows for configuring the system
for individual installations (CNFG).
GPS Status
1. Press FN and then the SYS key to reach the System functions.
2. The GPS function shows a map of the satellite locations with ID and
other system information. On the right side of the display, a bar
graph is shown for each satellite ID.
WAAS:
In use indicates WAAS corrections are being used. Standby
is shown if WAAS corrections are not being used.
Time:
Current UTC time computed from the GPS constellation.
EPU:
Estimated Position uncertainty in meters. Dashes are
shown if the value is not valid.
HPL:
Horizontal Protection Level in meters. Dashes are shown if
the value is not valid.
VPL:
Vertical Protection Level in meters. Dashes are shown if
the value is not valid.
Lat/Lon: Current position in degrees, minutes, and hundredths of
minutes.
System
Software Versions
The Software Version page shows you the serial number for the CNX80
and the versions of the software in your unit. This information is useful
should you need to talk with Technical Support at Garmin AT. Please
copy the values for the information on this display before calling
Garmin AT Technical Support (1-800-525-6726).
38
CNX80 Pilot Guide 560-0984-00C Draft1.book Page 39 Tuesday, September 2, 2003 10:36 AM
Apollo CNX80 Pilot’s Guide
Configuration
The Configuration page lets you customize many of the settings and
unit measurements for your installation or local needs.
1. Press FN and then the CNFG key to reach the Configuration functions.
2. Turn the Large knob to highlight the value you want to change. The
green arrow on the right side of the display indicates the direction to
turn the Large knob to view more choices.
3. Press the CRSR knob in to start editing.
4. Turn the Small knob to change the value.
5. Press the CRSR knob in again or press the Menu/Enter key to save
the value.
System
39
CNX80 Pilot Guide 560-0984-00C Draft1.book Page 40 Tuesday, September 2, 2003 10:36 AM
Apollo CNX80 Pilot’s Guide
Parallel Track (PTK)
The Parallel Track function allows you to create a parallel course offset
of 1 to 99 nm to the left or right of your current flight plan. You must
have FROM and TO waypoints defined. Parallel Track cannot be activated if you set a course using Direct-To. Choose Left or Right of the
current course, and the offset distance. When Parallel Track is activated, the course line drawn on the Map pages will show the parallel
course, a PTK annunciation will be shown in the lower left corner of
the display, and waypoint names will have a lower case “p” preceding
their identifier. Using Direct-To, loading an approach, holding pattern,
or editing and executing your flight plan will automatically cancel Parallel Track. Parallel track is cancelled if a course change occurs greater
than 120° or the parallel tracks overlap as a result of the course
change.
Activating Parallel Track
1. Press FN and then the PTK key to reach the Parallel Track function.
2. Press the CRSR knob.
Parallel
Track
3. Turn the Small knob to change the value for the Distance parallel
from the flight track. With the Distance field showing, selections or
1 nm, 2 nm, 3 nm, 5 nm, or 10 nm can be selected by pressing the
appropriate Menu Selection key.
4. Turn the Large knob to move between the Distance and the Direction from Track. With the Direction selection highlighted, turn the
Small knob to select between Right or Left of Track. When the
Direction field is shown, selections of Right and Left can be
selected by pressing the appropriate Menu Selection key.
40
CNX80 Pilot Guide 560-0984-00C Draft1.book Page 41 Tuesday, September 2, 2003 10:36 AM
Apollo CNX80 Pilot’s Guide
4. Press the Menu/Enter key or the CRSR knob when you are finished
making selections.
5. Press the Activate or Standby key to activate or deactivate the Parallel Track values selected.
Simulator Mode
The CNX80 has a built-in simulator so you can practice with your unit
without being in flight. You can set your present position, ground
speed, and track. The track can also be set to Auto to simulate use
with an autopilot. The Com and Nav radios, and transponder will
appear to operate normally, but will not send any signals.
1. After the CNX80 start-up screen (clouds and title) ends and the left
side of the display information just appears, press SUSP three
times.
2. Press Menu/Enter to continue in Simulator mode or press CLR to
continue with normal operation.
3. Turn the Small knob, if desired, to change the Local Altimeter Setting. Press Menu/Enter to continue to the start-up test phase. Press
SKIP to bypass the start-up tests.
4. Select Automatic Track mode, present position, and airspeed as
described below.
Automatic Track (ATK)
Press the ATK key to enable/disable the Automatic Track mode. When
enabled, the simulator ownship will follow the tracking of the flight
plan. Press CLR to exit and enable Automatic Track. Press ATK and
CLR again to disable Automatic Track.
Simulator
41
CNX80 Pilot Guide 560-0984-00C Draft1.book Page 42 Tuesday, September 2, 2003 10:36 AM
Apollo CNX80 Pilot’s Guide
Present Position (PPOS)
Press the PPOS key to bring up a display for selecting a Lat/Lon position for your ownship starting point.
1. Turn the Large knob to select the item to change.
2. Turn the Small knob to change the values.
3. Press Menu/Enter to accept the displayed values or press CLR to
cancel the selection and return to the previous display.
Airspeed
The Airspeed (SPD) key brings up a display where you can select the
Track, Speed, and Altitude.
1. Turn the Large knob to select the item to change.
2. Turn the Small knob to change the values.
3. Press Menu/Enter to accept the displayed values or press CLR to
cancel the selection and return to the previous display.
Messages (MSG)
Messages
Message mode lets the pilot know about conditions that require immediate attention. Depending on the level of importance, a message box
may appear on the display over the active mode. A flashing annunciator “M” will appear at the bottom of the display when a message is
available for viewing. The CNX80 provides both visual text and audio
messages. Audio messages do not require pilot input and can be
turned on or off in the System mode.
1. Press the FN key until the MSG key label is available.
2. Press the MSG key.
3. Turn the Large knob, or press the New or Old keys, to switch
between the Old and New Messages.
4. Turn the Small knob to list the available New or Old messages.
42
CNX80 Pilot Guide 560-0984-00C Draft1.book Page 43 Tuesday, September 2, 2003 10:36 AM
Apollo CNX80 Pilot’s Guide
Text Messages
Message
Description
Inside of x, Within x nm of x, Within x min of Special Use Area alert. Pilot awareness of upcomx
ing pilot action required.
For Loaded Approach Do NOT use GPS For
Primary Navigation Guidance
Selected approach does not meet requirements
for primary guidance by GPS.
PTK end in x sec
Parallel track course ending.
GPS Fault Code: xxxx
GPS error report. Note fault code to notify Customer Service.
WARNING Low Battery Voltage: Unit Needs
Service
Low internal battery voltage is detected. This battery backs up memory for user entered information, such as user waypoints and stored flight
plans. Battery requires replacement.
Parallel Track Ending within x minutes/x
seconds
Pilot awareness of upcoming pilot action required.
WARNING Communications lost with external CNX
Communications have failed between the reporting and an external CNX.
WARNING Communications lost with Com
Radio
Communications have failed between the CNX
and its Com radio
WARNING Stuck Microphone
Mic key has been pressed for a continuous period
and should be checked.
WARNING Communications lost with Nav
Radio
CNX80 has not received any valid messages for 2
second. Active/standby frequency digits changed
to yellow. No Nav radio changes are allowed.
Altitude Out of Range, Check Altitude
Encoder
Pilot awareness. Check unit prior to next flight.
WARNING Altitude Encoder Communications Failure
Altitude information is not being received by the
CNX.
WARNING Fuel/Air Data Communications
Failure
Fuel/Air Data information is not being received by
the CNX.
Library Flight Plan Memory Loss x Library
Plans Deleted
A checksum error has occurred and x number of
plans have been deleted.
WARNING Low Fuel Less Than x Min Check
Tanks
Fuel air data computer reports remaining fuel is
below the user-selected value.
Countdown Timer 1 Expired
User selected timer value has expired.
Countdown Timer 2 Expired
User selected timer value has expired.
Database Invalid: Integrity check failed
Check to see if card is seated properly. Replace
datacard if necessary.
Using Manual Mag Var: <deg>°<E or W>
User may have set Mag Var to manual. If received
with Database Invalid message, see above.
NAV Radio Memory Error Unit Requires Ser- Nav radio still usable, but automatic features are
vice
not available. Contact factory service.
NAV Radio Resolver Error Recalibration Nec- Do not use CDI for instrument approach or navigaessary
tion in IMC.
WARNING Transponder Failure
Pilot awareness.
WARNING Unable to Command Transponder Pilot awareness.
Reload flight plan and activate as required.
Initiating Auto Track Mode Following Flight
Plan
Simulator mode only.
43
Messages
Active Flight Plan Memory Loss
CNX80 Pilot Guide 560-0984-00C Draft1.book Page 44 Tuesday, September 2, 2003 10:36 AM
Apollo CNX80 Pilot’s Guide
Message
Description
Initiating Manual Track Using Manual Track, Simulator mode only.
Speed, and Altitude
Steep Turn Ahead (or others)
Pilot awareness.
Arrival (or) Arrival in x sec
Pilot awareness.
Pilot Nav (or) Pilot Nav in x sec
Pilot awareness.
DISCONTINUITY Ahead
Modify flight plan or perform Direct-To function.
DISCONTINUITY
Modify flight plan or perform Direct-To function to
reestablish navigation.
Hold (Parallel, Teardrop, or Direct)
Pilot awareness.
Excessive Heat, Possible loss of cooling
CNX may fail or behave erratically.
WARNING Loss of Integrity Cross-Check NAV GPS position integrity lost. Verify by cross-checking with VHF Nav.
Integrity Restored Normal Ops
Pilot awareness.
WARNING Loss of Navigation (Insufficient
Sats, Position Error, Loss of GPS Com)
GPS position lost. Use other Nav equipment.
Configuration Failure: Unit needs servicing
Do not use for IFR ops or primary navigation. Contact dealer or Customer Service.
Configuration Corrupt: Use Ground Maint
Mode to correct
Checked on power-up. System configuration
invalid. See dealer or call Customer Service.
Configuration Error: Verify User Settings
Go to System Configuration page and check user
settings.
CDI Selection Should be set To (Localizer,
ILS, or VOR)
Pilot awareness.
VOR Receiver Should Be Tuned To xxx.xx For Pilot awareness.
(name of approach)
Database Invalid: Database needs updating Database unavailable until updated.
Database Invalid: Software needs updating Database unavailable until unit software is
updated.
Database Expired on (date)
Database should be updated.
Altimeter correction failed switching to alter- Altimeter corrections failed. Unit will prompt for
nate correction mode
other inputs.
Flight Plan Mismatch with Database Invalid Flight plan waypoints are no longer in the Nav
Waypoints Found
database.
Input correct baro setting.
Warning Loss of Navigation LOI On
Approach
Execute missed approach using other nav equipment.
Messages
Baro Correction xx.yy CRSR to Change,
ENTER to Accept
44
CNX80 Pilot Guide 560-0984-00C Draft1.book Page 1 Tuesday, September 2, 2003 10:36 AM
CNX80 Pilot Guide 560-0984-00C Draft1.book Page 2 Tuesday, September 2, 2003 10:36 AM
© 2003 by Garmin AT, Inc.
2345 Turner Rd., S.E.
Salem, OR 97302 U.S.A.
Phone 503.581.8101
800.525.6726
In Canada 800.654.3415
FAX 503.364.2138
http://www.garminat.com
Part #560-0984-00 Rev C
August 2003