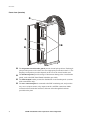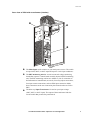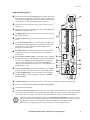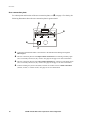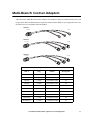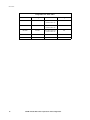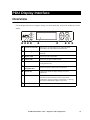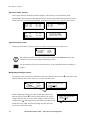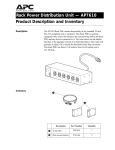
1
60kW InfraStruXure PDU PD60F6FK1 PD60G6FK1 PD60L6FK1 PDRPPNX10 Operation and Configuration 208/400/600V Input About This Manual Audience This manual is intended for end-users of a 60kW InfraStruXure PDU. It covers the operation and basic network configuration of the PDU, and includes basic InfraStruXure system operation. For additional information about the InfraStruXure system, see the InfraStruXure 60kW Installation and Start-Up Manual (990-1638B) which covers the installation and start-up of UPS power distribution to the rack and power distribution within the rack. Companion manuals For information about specific components in your InfraStruXure system, see the documentation included with each component. Before installing or operating any component, refer to the safety instructions in the component’s manual. The illustrations of products in this manual may vary slightly from the products in your InfraStruXure system. How to find updates to this manual You can check for updates to this manual by clicking on the User Manuals link on the Support page of the APC Web site (www.apc.com). In the list of InfraStruXure Manuals, look for the latest letter revision (A, B, etc.) of the part number on the back cover of this manual. 60 kW InfraStruXure PDU—Operation and Configuration i Contents Safety ......................................................................1 Overview . . . . . . . . . . . . . . . . . . . . . . . . . . . . . . . . . . . . . . . . . 1 Save these instructions . . . . . . . . . . . . . . . . . . . . . . . . . . . . 1 Safety symbols used in this manual . . . . . . . . . . . . . . . . . . . 1 Cross-reference symbols used in this manual . . . . . . . . . . . . . 1 Warnings . . . . . . . . . . . . . . . . . . . . . . . . . . . . . . . . . . . . . . . . . 2 Receiving/moving . . . . . . . . . . . . . . . . . . . . . . . . . . . . . . . 2 Installation/Maintenance . . . . . . . . . . . . . . . . . . . . . . . . . . 2 Maintenance performed while the PDU is receiving input power . . . . . . . . . . . . . . . . . . . . . . . 2 Total power off procedure . . . . . . . . . . . . . . . . . . . . . . . . . 3 Emergency Power Off (EPO) . . . . . . . . . . . . . . . . . . . . . . . . 3 EMI . . . . . . . . . . . . . . . . . . . . . . . . . . . . . . . . . . . . . . . . . 4 Overview .................................................................5 InfraStruXure PDU . . . . . . . . . . . . . . . . . . . . . . . . . . . . . . . . . . . 5 Front view . . . . . . . . . . . . . . . . . . . . . . . . . . . . . . . . . . . . 5 Front view (interior) . . . . . . . . . . . . . . . . . . . . . . . . . . . . . . 6 Rear view of PDU with transformer (interior) . . . . . . . . . . . . . 7 Rear view of PDU without transformer (interior) . . . . . . . . . . . 8 PDU monitoring unit . . . . . . . . . . . . . . . . . . . . . . . . . . . . . 9 User connection plate . . . . . . . . . . . . . . . . . . . . . . . . . . . 10 Multi-Branch Cordset Adapters . . . . . . . . . . . . . . . . . . . . . . . . 11 PDU Display Interface.............................................13 Overview . . . . . . . . . . . . . . . . . . . . . . . . . . . . . . . . . . . . . . . . 13 Top-level status screens . . . . . . . . . . . . . . . . . . . . . . . . . . 14 Top-level menu screen . . . . . . . . . . . . . . . . . . . . . . . . . . . 14 Navigating through screens . . . . . . . . . . . . . . . . . . . . . . . 14 Password-protected screens . . . . . . . . . . . . . . . . . . . . . . . 15 Load-Meter Screen. . . . . . . . . . . . . . . . . . . . . . . . . . . . . . . . . . 16 60 kW InfraStruXure PDU — Operation and Configuration iii Volt-Meter Screen . . . . . . . . . . . . . . . . . . . . . . . . . . . . . . . . . . 17 Contacts Screen . . . . . . . . . . . . . . . . . . . . . . . . . . . . . . . . . . . . 18 Breakers Screen . . . . . . . . . . . . . . . . . . . . . . . . . . . . . . . . . . . . 21 Alarms Screen . . . . . . . . . . . . . . . . . . . . . . . . . . . . . . . . . . . . . 22 View Active Alarms . . . . . . . . . . . . . . . . . . . . . . . . . . . . . 22 Alarm/Event Log . . . . . . . . . . . . . . . . . . . . . . . . . . . . . . . 22 Alarm Setup . . . . . . . . . . . . . . . . . . . . . . . . . . . . . . . . . . 23 Alarm Beeper . . . . . . . . . . . . . . . . . . . . . . . . . . . . . . . . . 23 PDU Alarms . . . . . . . . . . . . . . . . . . . . . . . . . . . . . . . . . . 24 Panel Screen . . . . . . . . . . . . . . . . . . . . . . . . . . . . . . . . . . . . . . 25 Branch Ckt Loading . . . . . . . . . . . . . . . . . . . . . . . . . . . . . 25 Branch Ckt Limits . . . . . . . . . . . . . . . . . . . . . . . . . . . . . . 25 Panel Configuration . . . . . . . . . . . . . . . . . . . . . . . . . . . . 26 Global Panel Config . . . . . . . . . . . . . . . . . . . . . . . . . . . . . 27 Config Screen . . . . . . . . . . . . . . . . . . . . . . . . . . . . . . . . . . . . . 28 System/Network . . . . . . . . . . . . . . . . . . . . . . . . . . . . . . . 28 Electrical Config . . . . . . . . . . . . . . . . . . . . . . . . . . . . . . . 29 Manufacturer Data . . . . . . . . . . . . . . . . . . . . . . . . . . . . . 29 System ID . . . . . . . . . . . . . . . . . . . . . . . . . . . . . . . . . . . 29 Factory Defaults . . . . . . . . . . . . . . . . . . . . . . . . . . . . . . . 30 Firmware Updates . . . . . . . . . . . . . . . . . . . . . . . . . . . . . . 30 Operation ............................................................. 31 How to Apply Power to the System . . . . . . . . . . . . . . . . . . . . . 31 How to Ensure Total Power Off . . . . . . . . . . . . . . . . . . . . . . . 33 Communication Configuration ............................... 35 InfraStruXure PDU Management Options . . . . . . . . . . . . . . . . . 35 Overview . . . . . . . . . . . . . . . . . . . . . . . . . . . . . . . . . . . . 35 InfraStruXure Manager . . . . . . . . . . . . . . . . . . . . . . . . . . . 35 Network management interfaces . . . . . . . . . . . . . . . . . . . . 35 Configuring the InfraStruXure Manager . . . . . . . . . . . . . . . . . . 36 iv 60 kW InfraStruXure PDU — Operation and Configuration Configuring the Network Management Interface . . . . . . . . . . . 37 Connect the InfraStruXure PDU to your network . . . . . . . . . 37 Configuration Overview . . . . . . . . . . . . . . . . . . . . . . . . . . 37 TCP/IP configuration methods . . . . . . . . . . . . . . . . . . . . . . 38 Device IP Configuration Wizard . . . . . . . . . . . . . . . . . . . . . 38 BOOTP & DHCP configuration . . . . . . . . . . . . . . . . . . . . . . 39 Local access to the control console . . . . . . . . . . . . . . . . . . . 41 Remote access to the control console . . . . . . . . . . . . . . . . . 41 Control console . . . . . . . . . . . . . . . . . . . . . . . . . . . . . . . . 42 How to Access a Network Management Interface on a Configured InfraStruXure PDU . . . . . . . . . . . . . . 43 Web interface . . . . . . . . . . . . . . . . . . . . . . . . . . . . . . . . . 43 Telnet and SSH . . . . . . . . . . . . . . . . . . . . . . . . . . . . . . . . 43 SNMP . . . . . . . . . . . . . . . . . . . . . . . . . . . . . . . . . . . . . . 44 FTP and SCP . . . . . . . . . . . . . . . . . . . . . . . . . . . . . . . . . . 45 How to Recover From a Lost Network Management Interface Password. . . . . . . . . . . . . . . . 46 Customizing and Updating the PDU .......................47 Important Safety Instructions. . . . . . . . . . . . . . . . . . . . . . . . . . 47 PDU Orderable Part List. . . . . . . . . . . . . . . . . . . . . . . . . . . . . . 48 How to Add Circuit Breakers and Power Cables . . . . . . . . . . . . 50 How to Connect User Input Contacts and Relay Outputs to the User Connection Plate . . . . . . . . . . . . . . 52 How to Test the EPO Switch . . . . . . . . . . . . . . . . . . . . . . . . . . 54 How to Download Firmware Up grades . . . . . . . . . . . . . . . . . . .57 Specifications .........................................................59 60kW InfraStruXure PDU. . . . . . . . . . . . . . . . . . . . . . . . . . . . . 59 60 kW InfraStruXure PDU — Operation and Configuration v Product Information .............................................. 61 InfraStruXure Standard Warranty . . . . . . . . . . . . . . . . . . . . . . . 61 Life-Support Policy . . . . . . . . . . . . . . . . . . . . . . . . . . . . . . . . . . 63 How to Obtain Service. . . . . . . . . . . . . . . . . . . . . . . . . . . . . . . 64 Appendix: Changes in This Manual ........................ 65 vi 60 kW InfraStruXure PDU — Operation and Configuration Safety Overview Save these instructions This manual contains important instructions that must be followed during installation, operation, and maintenance of the InfraStruXure PDU. Safety symbols used in this manual Electrical Hazard Indicates an electrical hazard, which, if not avoided, could result in injury or death. Indicates a hazard, which, if not avoided, could result in personal injury or damage to product or other property. Warning Indicates a potential hazard which could result in damage to product or other property. Caution Indicates important information. Note Indicates a heavy load that should not be lifted without assistance. Heavy Indicates a standby state. When in standby, the unit is not operating, but it may still contain hazardous voltage. It is not safe to service until the equipment is disconnected from all sources of electrical power. Cross-reference symbols used in this manual Indicates that more information is available on the same subject in a different section of this manual. Indicates that more information is available on the same subject in a different manual. See also 60 kW InfraStruXure PDU — Operation and Configuration 1 Warnings Receiving/moving Do not tilt the PDU greater than 45° from its vertical axis. Never lay the PDU on its side. Installation/Maintenance Only a certified electrician can: • Connect the PDU to its power source • Connect a switch to the EPO interface on the PDU • Install a customer-specified, hard-wired power cable Only a certified electrician or an APC Field Service Engineer can perform maintenance of the PDU. When connecting the PDU to utility, a circuit breaker must be installed to protect the PDU against over-current. Determine the type of circuit breaker that you need to install: Input Voltage Circuit Breaker Sizing 208V 225A 480V 90A 600V 75A Maintenance performed while the PDU is receiving input power APC does not recommend that you perform maintenance of the PDU while it is receiving input power. However, due to the critical nature of data center loads, this may occur. If you must perform maintenance while the PDU is receiving input power, observe the following precautions to reduce the risk of electric shock: 1. Never work alone. 2. Perform the maintenance only if you are a certified electrician who is trained in the hazards of live electrical installation. 3. Know the procedure for disconnecting electricity to the PDU and the data center in case of an emergency. 4. Wear appropriate personal protective equipment. 5. Use double-insulated tools. 6. Always follow local and site regulations when working on the PDU. 2 60 kW InfraStruXure PDU — Operation and Configuration Safety Total power off procedure 1. Open (turn OFF) the main circuit breaker of the power source feeding the PDU. 2. Open (turn OFF) the Main Input on the InfraStruXure PDU. 3. If applicable, open (turn OFF) the Main Output circuit breakers on the front of the PDU. For more information, see “How to Ensure Total Power Off” on page 33. Emergency Power Off (EPO) Hazardous voltage from the branch circuit must be isolated from the 24VAC, 24VDC, and contact closure. 24VAC and 24VDC are considered Class 2 circuits as defined in Article 725 of the National Electrical Code (NFPA 70) and Section 16 of the Canadian Electrical Code (C22.1). A Class 2 circuit is a source having limited voltage and energy capacity as follows: a. If an Inherently Limited Power Source, voltage and energy are limited to less than 30VAC, less than 30VDC, and 8A. b. If not an Inherently Limited Power Source, voltage and energy are limited to less than 30VAC, less than 60VDC, 250VA, and the current is limited to 1000/Vmax. The fuse is limited to 5A if less than 20VAC or 20VDC, or 100/Vmaximum if less than 30VAC or 60VDC. If you choose to use a 24VAC, 24VDC, or contact closure connection to the EPO, use one of the following UL-listed wire types: • CL2 Class 2 cable for general purpose use • CL2P Plenum cable for use in ducts, plenums, and other space used for environmental air • CL2R Riser cable for use in a vertical run shaft from floor to floor • CL2X Limited Use cable for use in dwellings and for use in a raceway • For installation in Canada, the cable should be CSA Certified, type ELC (extra-low-voltage control cable). If you do not use a CL2 cable, route the EPO wiring in conduit that does not contain any branch circuit wiring. 60 kW InfraStruXure PDU — Operation and Configuration 3 Safety EMI This equipment has been tested and found to comply with the limits for a Class A digital device, pursuant to Part 15 of the FCC Rules. These limits are designed to provide reasonable protection against harmful interference when the equipment is operated in a commercial environment. This equipment generates, uses, and can radiate radio frequency energy and, if not installed and used in accordance with this user manual, may cause harmful interference to radio communications. Operation of this equipment in a residential area is likely to cause harmful interference. The user will bear sole responsibility for correcting such interference. This Class A digital apparatus complies with Canadian ICES-003. Cet appareil numérique de la classe A est conforme à la norme NMB-003 du Canada. 4 60 kW InfraStruXure PDU — Operation and Configuration Overview InfraStruXure PDU Front view The PDU Shielding Trough accommodates the power cables exiting the roof of the PDU, and separates power cables from data cables. The PDU power cables supply power to equipment racks; they are fed through knockouts on the top of the PDU. There are the following two options for PDU power cables: • Multi-circuit power cables that terminate with an L21-20 outlet (shown). • Single-circuit power cables that terminate with an L6-30 outlet. The number of power cables installed in the PDU depends on your system configuration. Each power cable accepts a variety of APC InfraStruXure rackmount power distribution accessories. Leveling feet adjust to level the enclosure. All enclosures must be level before installation of the system begins. The display interface provides a local interface for viewing status data. It has an LCD, fivebutton interface, basic status lights, and a beeper. 60 kW InfraStruXure PDU—Operation and Configuration 5 Overview Front view (interior) ! ! ! The 42-position circuit breaker panels provide 84 total pole positions. Each single pole provides power at 120 volts L-N or two single poles provide 208 volts L-L. The amperage each position provides depends on the size of the circuit breaker used. The document pocket provides storage of documents relating to the circuit breaker panels, such as the PDU Panel Board Schedules (provided). The Main Output breaker protects the distribution circuit breaker panels (versions with a transformer only). The user connection plate is connected to the PDU monitoring unit, and provides easy access to input contact, relay output, network, and EPO connections. Make connections from inside the enclosure, and route wires through the knockout provided on the plate. 6 60 kW InfraStruXure PDU—Operation and Configuration Overview Rear view of PDU with transformer (interior) The Main Input switch connects to your main power source. The switch accepts 208V, 480V, or 600V input and requires 3-wire input conductors. The PDU monitoring unit has several current and voltage monitoring boards that report to a central board assembly located in PDU monitoring unit. The PDU monitoring unit has one 10Base-T (Cat-5) connection to the Information Controller hub (or switch), four relay output connections, four input contact connections, and one EPO input connection. Make these connections at the user connection plate located on the roof of the PDU. The delta-wye Input Transformer is based on your input voltage (208V, 480V, or 600V input). The output of the transformer feeds the circuit breaker that protects the panel boards. 60 kW InfraStruXure PDU—Operation and Configuration 7 Overview Rear view of PDU without transformer (interior) ! 8 The Main Input circuit breaker connects to the main power source (UPS or utility). The breaker accepts 208V input and requires 4-wire input conductors. Note: This circuit breaker also serves as the Main Output (disconnect) circuit breaker. The PDU monitoring unit has several current and voltage monitoring boards that report to a central board assembly located in the PDU monitoring unit. The PDU monitoring unit has one 10Base-T (Cat-5) connection to the Information Controller hub (or switch), four relay output connections, four input contact connections, and one EPO input connection. Make these connections at the user connection plate located on the roof of the PDU. 60 kW InfraStruXure PDU—Operation and Configuration Overview PDU monitoring unit This connection provides the input power for the PDU monitoring unit. The power is supplied by the monitoring unit circuit breaker on the front of the PDU. If the panel is on, and the monitoring unit circuit breaker is closed, the monitoring unit is powered. Connects to sensors monitoring values such as, voltage, current, and power. Digital input sensing for monitoring such as, circuit breaker status, transformer temperature, fans, etc. 1 14 2 15 3 17 6 18 5 Use the Console port (DB-9) to connect a laptop computer to the monitoring unit using an appropriate communication cable (APC part number 940-0103). This port is used to configure items relating to servicing the PDU. 16 U S ER / E PO C O N TA C TS The Power LED indicates wether the monitoring unit is receiving power. 4 TO U P S The Display port (RJ-45) connects the PDU monitoring unit to the PDU display interface. 8 8 5- 22 8 8 The EPO Tripped LED is red when the EPO switch is engaged (the EPO button is pressed), regardless of the state of the EPO Arm/Test rocker. 7 20 8 21 9 22 10 23 11 24 12 25 TR IPP ED 13 10 = G R N 1 00 = O R N N ET W O R K STATU S D ISP L AY TE ST R S-2 3 2 C O N S O LE PO R T A R M ED EPO PO W ER 9 6 00 -8 -N -1 R E SE T NC The EPO Armed LED is green when the rocker is in the Armed position. The LED is dark when the rocker is in the Test position. LIN K R X /TX NO When the EPO Arm/Test rocker is in the Test position, engaging the EPO switch will not cause the load to be powered off. When the rocker is in the Armed position, engaging the EPO switch will cause the PDU’s Main Input switch to be switched OFF. See “How to Test the EPO Switch” on page 54 for more information on testing the EPO switch. 19 EPO DIP switches configure the EPO input for the type of EPO switch that is connected—Normally Open (NO) or Normally Closed (NC). The Reset button resets the network processor; it does not reset the PDU or the PDU monitoring unit. Connect to the InfraStruXure Manager through the network port. Not used on this model PDU. The optional User/EPO Contacts port is connected to wire harnesses that connect to the User Connection Plate in the roof (or floor) of the PDU. The port allows for relay outputs (4), input contacts (4), and an EPO input (1). See “Contacts Screen” on page 18 and “How to Test the EPO Switch” on page 54 for more information. Note The branch current monitoring boards connect to the Branch Current Monitor ports (RJ-11). These ports are on the top side of the PDU monitoring unit, and are labeled on the face of the unit. Each port corresponds to a section of circuit breakers on the PDU distribution circuit breaker panel: upper left=[01..41]; upper right=[02..42]; lower left=[43..83]; lower right=[44..84]. 60 kW InfraStruXure PDU—Operation and Configuration 9 Overview User connection plate For a description and location of the user connection plate, see () on page 6. For clarity, the following illustration shows the user connection plate in greater detail. ! USER INTERFACE © 2001 APC MADE IN USA ATS 1 Contact Outputs ATS 2 4 ATS EN 2 3 Contact Inputs ATS 0 1 – + EPO 24V EPO AC/DC Contact ! Connect the InfraStruXure PDU to the network or the InfraStruXure Manager through the ethernet port. The user connection plate has four input contact connections for monitoring Normally Open (NO) or Normally Closed (NC) dry contacts. See page 20 and page 53 for more information. The user connection plate has four relay output connections for connection of Normally Open (NO) or Normally Closed (NC) dry contacts. See page 20 and page 53 for more information. Connect an Emergency Power Off (EPO) switch at one of three choices of EPO connections (24VDC, 24VAC, or contact closure). See page 54 for more information. 10 60 kW InfraStruXure PDU—Operation and Configuration Multi-Branch Cordset Adapters APC offers three Multi-Branch Cordset Adapters. The adapters connect to a multi-branch power cord (whip) on the PDU and distribute three separate branches to Rack PDUs in your equipment racks. See the table below for compatible APC Rack PDUs. AP9882 L21-20P 5-20R AP9883 L21-20P L5-20R AP9884 L21-20P L6-20R 0 Compatible APC 120V PDUs SKU # Plug Outlets Manageable AP7530 L5-20P (24) NEMA 5-20R No AP9551 L5-20P (14) NEMA 5-15R No AP9563 L5-20P (10) NEMA 5-20R No AP9564 L5-20P (10) NEMA 5-20R No AP7830 L5-20P (24) NEMA 5-20R Yes AP7901 L5-20P (24) NEMA 5-20R Yes AP7930 L5-20P (24) NEMA 5-15R Yes AP7930J L5-20P (24) NEMA 5-15R Yes AP9510520 L5-20P (2) NEMA L5-20R No SU042X163 L5-20P (1) NEMA L5-20R No 60 kW InfraStruXure PDU—Operation and Configuration 11 Overview Compatible APC 208V PDUs 12 SKU # Plug Outlets Manageable AP7540 L6-20P (20) IEC 320 C13 (4) IEC 320 C19 No AP7840 L6-20P (20) IEC 320 C13 (4) IEC 320 C19 Yes AP7940 L6-20P (21) IEC 320 C13 (3) IEC 320 C19 Yes AP9510L620 L6-20P (1) NEMA L6-20R Yes SU045X163 L6-20P (1) NEMA L6-30R No 60 kW InfraStruXure PDU—Operation and Configuration PDU Display Interface Overview Use the display interface to configure settings, set alarm thresholds, and provide audible and visual alarms. Load Powered ESC Check Log ? Bypass Alarm Load Powered LED When green, all output phases are within the limits specified by the output alarm limit thresholds. Check Log LED When yellow, at least one new alarm condition has been detected. Bypass LED Not used on this model PDU. Alarm LED When red, an alarm condition exists. LCD View alarms, status data, instructional help, and configuration items. Up and Down navigation keys Selects menu items and accesses information. ENTER key Opens menu items and inputs changes to system parameters. HELP key Launches context-sensitive help. Press the HELP key for information about each item on the screen and for instructions on how to perform certain tasks (i.e. placing the UPS into Maintenance Bypass operation). ESC key Returns to previous screen displayed. 60 kW InfraStruXure PDU — Operation and Configuration 13 PDU Display Interface Top-level status screens After system start-up, the display interface displays a brief start-up screen and then scrolls automatically and continuously through four screens of basic status information. Press the Up and Down arrow keys to interrupt the automatic scrolling if you wish to view a specific status screen. Volts In L1-2: 000 L2-3: 000 L3-1: 000 Volts Out L1: 000 L2: 000 L3: 000 Load L1: L2: L3: Total Output Loading kW: 000 PF: 000 kVA: 000 %LD: 000 Freq: 00.0 Current 000 000 000 Neut:000 No Active Alarms System Date/Time: Jun-24 2003 07:58 Top-level menu screen On any top-level status screen, press the ENTER key to open the top-level menu screen. Load-Meter Volt-Meter Contacts Breakers Alarms Panel Config Help If the display interface is inactive for the time specified as the Time-out setting, the interface reverts to the initial basic monitoring screens. Note For descriptions of the top-level menu choices, see the individual sections starting on page 16. Navigating through screens To open any screen, press the Up and Down arrow keys until the selector arrow ( rests next to your desired selection. Press the ENTER key to view the selected screen. Load-Meter Volt-Meter Contacts Breakers Alarms Panel Config Help Contacts In: 02of04 Name: User Switch #2 Normal: Open Status: Open When configuring settings, press the Up and Down arrow keys until the selector arrow ( rests next to the setting you want to change, and press the ENTER key. If the setting is a list of choices, an input arrow ( will appear next to the setting. Press the Up and Down arrow keys until your desired change is listed. Press the ENTER key to select the setting. 14 Contacts In: 02of04 Name: User Switch #2 Normal: Open Status: Open 60 kW InfraStruXure PDU — Operation and Configuration PDU Display Interface On some screens, continue arrows ( indicate that there are additional screens to view in the category. Press the Up or Down arrow key to view the additional screens. System/Network Electrical Configuration Panel Configuration Manufacturer Data Product Data Factory Defaults Firmware Updates Password-protected screens When configuring or changing settings, you will be prompted for your password. To enter your password: 1. Press the Up or Down arrow key until the correct letter is displayed, and then press the ENTER key. Note Enter Password: ******* After you press the ENTER key, the character you entered is displayed as an asterisk and the input arrow moves to the next space for you to select the next password character. 2. Press the ENTER key twice after you enter your password. See “System Password” on page 28 to change your password. 60 kW InfraStruXure PDU — Operation and Configuration 15 Load-Meter Screen From the Load-Meter screen, you can select the following items: Total Load by Phase The load supported by each phase in kVA, in RMS current (Irms), and as a percentage of the maximum allowable load (%LD). Total Load Summary For the total load supported: • kW: The power provided, in kilowatts. • kVA: The actual power drawn by the load, in kilovolt-amperes. • Freq: Frequency. • PF: The power factor, which affects the power available to the load. • %LD: The load as a percentage of the maximum allowable load. Power Factor For each phase: • kVA: The actual power drawn by the load, in kilovolt-amperes. • kW: The power, in kilowatts, provided by the phase. • PF: The power factor (kW/kVA) that affects the power available to the load. 16 60 kW InfraStruXure PDU — Operation and Configuration Volt-Meter Screen From the Volt-Meter screen, you can select the following items: Output Voltage Displays each phase-to-phase output voltage (e.g., L1-2 for phase L1 to phase L2) and each phase-to-neutral output voltage (e.g., L1 for phase L1 to neutral). Input Voltage Displays each phase-to-phase input voltage (e.g., L1-2 for phase L1 to L2), or, if your service transformer is a wye transformer, each phase-to-neutral input voltage (e.g., L1 for phase L1 to neutral). 60 kW InfraStruXure PDU — Operation and Configuration 17 Contacts Screen Overview The PDU can monitor external contact closure events. Possible applications include the following: • Magnetic contact switches • Window foil • Tamper switches • Heat detectors • Water sensors • Pressure sensors • Building smoke and fire detection systems You can set input contacts to cause alarm conditions based on their current state and a user-defined normal state. Relay outputs can map internal alarms and events to outside devices. Use the Contacts screen to display and configure information about input contacts and relay outputs. Input Contacts Scroll through the list to display information about each of the installed input contacts. For example, 02of04 displays information about the second of four installed input contacts. • Name—The name of this contact input (Maximum: 14 alphanumeric characters). • Normal—The normal position of this input contact, either Open or Closed. • Status—The position of this input contact. If the position is not the normal position, an alarm condition occurs. Relay Outputs Scroll through the list to display information about each of the installed relay outputs. For example, 04of04 displays information about the fourth of the four available relay outputs. • Name—The name of the relay output (Maximum: 14 alphanumeric characters). • Normal—The normal position of this relay output, either Open or Closed. • Status—The position of this relay output. See “Relay Outputs” on page 59 for relay output specifications. 18 60 kW InfraStruXure PDU — Operation and Configuration PDU Display Interface Alarm Relay Map Configure the relay outputs, using Alarm Map: 01 of 04 the Alarm Relay Map. Each [Vo, By, C4] Map: Input Voltage Alarm Map corresponds to an Apply Now relay output. For example, Alarm Map 01of04 corresponds to the first of four relay outputs. The second line, in brackets [ ], lists the items that you have selected to map to the selected relay. The third line allows you to select the alarms to which you want to map the relay: • Any Load (L)—Maps to over- or under-current alarms for circuit breaker panels and branch circuits. • Overload (O)—Maps to over-current alarms for circuit breaker panels, branch circuits, and SYSGND • Input Voltage (Vi)—Maps to any input voltage alarm. • Output Voltage (Vo)—Maps to any output voltage alarm. • PDU in Bypass (By)—Not used on this model PDU. • Any Breaker (Br)—Not used on this PDU. • Contacts 1–4 (C1,C2,C3,C4)—Maps to the input contact alarms. Before exiting the screen, to save your changes, select the Apply Now option on the bottom line of the screen. 60 kW InfraStruXure PDU — Operation and Configuration 19 PDU Display Interface How to connect contacts to the PDU monitoring unit 1. Choose one or more contact number on the User/EPO contacts port on the user connection plate to which you will connect the contacts. The user connection plate connects to the PDU monitoring unit. 2. From the PDU display interface: a. Press the ESC or ENTER key to go to the top-level menu screen. b. Select Contacts on the top-level menu screen, and press the ENTER key. Load-Meter Volt-Meter Contacts Breakers Alarms Panel Config Help c. Select Contact Inputs (or Relay Outputs) and press ENTER to display the contact inputs (or relay outputs) screen. >Contact Inputs >Relay Outputs >Alarm Relay Map d. Select Contact In and press the ENTER key to select the number of the contact you are connecting. The continue arrow will appear next to the contact number. Contact In: 01of04 Name: UserContact1 Normal: Open Status:Closed e. Press the Up or Down arrow key to select the appropriate contact number, and press the ENTER key. f. Press the Down arrow key to enter a unique Name for the contact and to configure the Normal state of the contact (Open or Closed). The default Normal state is Open. Press the ENTER key to select the item to configure. You will be prompted for your password to configure these items. Note 3. Connect contact wires (300V-rated cabling required) to the User Contacts terminal block on the user connection plate. You will need a 2.5-mm standard screwdriver. 4. Run the wires from the terminal block out the roof or under the floor of the PDU to your contact’s location. Ensure that wires are properly retained and away from high voltage lines and breakers. Warning 20 60 kW InfraStruXure PDU — Operation and Configuration Breakers Screen Use the Breakers screen to view the status of the system and PDU circuit breakers. Main Input Reports status of PDU Main Input Switch (Open or Closed). Under normal operation, this switch is Closed. 60 kW InfraStruXure PDU — Operation and Configuration 21 Alarms Screen View Active Alarms Use this option of the Alarms screen to display active alarms (alarms that have not been resolved). Scroll through the list to view each active alarm. Alarm/Event Log Use this selection of the Alarms screen to access the following options: New Logged Items Display a description and the date and time of each alarm that occurred since the last time this option was used. The date/time format is mm/dd/yyyy hh:mm:ss. • The most recent alarm is displayed initially. • If the log contains no alarms, the screen displays Alarm Log Empty. Entire Log Display a description and the date and time of each alarm in the alarm log. The date/time format is mm/dd/ yyyy hh:mm:ss. • The most recent alarm is displayed initially. To move to the previous alarm, press the Down arrow key. To move to the next more recent alarm, press the Up arrow key. • If the log contains no alarms, the screen displays Alarm Log Empty. Clear Log 22 Delete the contents of the alarm log. You will be asked to confirm this deletion. 60 kW InfraStruXure PDU — Operation and Configuration PDU Display Interface Alarm Setup Use this option of the Alarms screen to access the following options: Loading Limits Configure the following in amps and as a percentage of full load: • Out High: The upper limit for output current. • Out Low: The lower limit for output current. • Out Neut: The upper limit for current on the neutral wire for the output phases. Voltage Limits Configure the following as a percentage under or over the rated voltage: • Input: The allowed range for input voltage. • Output: The allowed range for output voltage. Other Limits Configure these limits: Frequency: The frequency variation, in hertz, that is acceptable for the output current. Global Alarm Config Set all the loading limits or all the voltage limits simultaneously as a percentage of full load: • Load Limits: Set the same percentage for the upper limit for output current, the lower limit for output current, and the upper limit for current on the neutral wire for the output phases. (Use the Loading Limits option to set these thresholds individually). • Volt Limits: Set the same percentage for the high and low thresholds for input and output voltage. (Use the Voltage Limits option to set these thresholds individually.) Select Apply Now and then YES to implement your changes. Alarm Beeper Use this option of the Alarms screen to turn the alarm beeper ON or OFF. 60 kW InfraStruXure PDU — Operation and Configuration 23 PDU Display Interface PDU Alarms This table lists all alarms that can be generated by the PDU, as displayed by the All Possible Alarms option, with numeric variables between the < > characters. Logged alarms will display specific numbers instead. 24 Alarm Condition Explanation Input V <Ln-N> =<Value> Voltage Under Limit Input voltage of the phase indicated has dropped below the configured lower limit. Input V <Ln-N> =<Value> Voltage Over Limit Input voltage of the phase indicated exceeded the configured upper limit. Output V <Ln-N> =<Value> Voltage Under Limit Phase-to-neutral output voltage for phase <L-N> dropped below the configured limit. Output V <Ln-N>=<Value> Voltage Over Limit Phase-to-neutral output voltage for phase <L-N> exceeded the configured limit. Output I L<n>=<Value> Current Over Limit Current of output phase <N> exceeded the configured limit. Output I L<n>=<Value> Current Under Limit Current of output phase <N> dropped below the configured limit. Output Neut=<Value> Current Over Limit Current on the neutral wire for the output phases exceeded the configured limit. Output FDev=<Value> Freq Out of Range Frequency of the output current is above or below the range that is configured as acceptable. Input Transformer Temperature Too High The temperature of the PDU transformer exceeded the normal limit, if applicable. Main Breaker Open Alarm Active The Main Input Switch is Off. <User Contact Name> Alarm Active A user-configured contact connected to the PDU monitoring unit is reporting an alarm condition. No UPS Input Breaker Q1 Open The Q1 circuit breaker is open, and the PDU is not receiving power from the UPS. Branch Ckt Pos: <nn> Current Over Limit Current on one of the poles of branch circuit breaker nn exceeded the configured limit. Branch Ckt Pos: <nn> Current Under Limit Current on one of the poles of branch circuit breaker nn dropped below the configured limit. Fan Rotation Failure Alarm Active There is a failure in one of the fans. The fan needs to be replaced, if applicable. 60 kW InfraStruXure PDU — Operation and Configuration Panel Screen Branch Ckt Loading You can display Branch Ckt Loading (Branch Circuit Loading) status if the option to measure current at the distribution circuit breakers is installed. You can view data for each individual panel position on the distribution panel. To view status of a panel position, select the range that includes the position: Branch Ckt Loading Select Range: [01..41] [02..42] [43..83] [44..84] The top line of selections on the screen applies to the top distribution circuit breaker panel on the PDU. The bottom line of selections applies to the bottom distribution circuit breaker panel on the PDU. The panel position numbers on the screen correspond to the numbers on the distribution panel. (Odd numbers are on the left; even numbers are on the right.) Once you have selected the correct range, press the Up and Down arrow keys to scroll through the list of circuit breakers in the selected range. Poles that are tied together will be shown on the same screen. Ckt: 03of21 Irms %LD 05: 20A 11.3 56.5 In the example above, the screen shows the third circuit breaker of 21 circuit breakers in the selected range. This is a single-pole circuit breaker, occupying panel position 05. The circuit breaker is rated at 20 amps. The following data are displayed for each pole: • Irms: Measured root mean square (RMS) current of the pole position. • %LD: Present load as a percentage of rated load of the panel position. Branch Ckt Limits Available only if the option to measure individual currents is installed, Branch Ckt Limits (Branch Circuit Limits) accesses a scrollable list of the circuit breakers in the panel. For each circuit breaker, the screen displays, in the Loading column, the current on each panel position. This number is shown as a percentage of the rated current. In the Load Alarm column, you can configure the high and low thresholds for the circuit breaker as a percentage of its rated current. For example, if you set 80% as the high threshold for a single-pole 20-amp circuit breaker, an alarm condition occurs if the current reaches 16 amps. 60 kW InfraStruXure PDU — Operation and Configuration 25 PDU Display Interface Panel Configuration Configure the branch metering settings for each circuit breaker on Panel Configuration the distribution panel, or configure both panels simultaneously. Select Range: [01..41] [02..42] To configure a circuit breaker, select the range that includes the circuit breaker. The top line of selections on the screen apply to the top distribution circuit breaker panel on the PDU. The bottom line of selections apply to the bottom distribution circuit breaker panel on the PDU. The panel position numbers on the screen correspond to the numbers on the distribution panel. (Odd numbers are on the left; even numbers are on the right.) Once you have selected the correct range, configure the settings for each circuit breaker in the range: Pos: The panel positions in the selected range. Breaker: Two configurable items: • The circuit breaker rating, in amps. • The circuit breaker tie indicator: Define the number of panel positions tied (i.e., associated). You can associate positions with circuit breakers, which enables you to view status about each circuit breaker and receive alarm notification when any of a circuit breaker’s poles are above or below the configured branch circuit limit. You can also tie together panel positions that are logically associated. For example, you can tie together panel positions for three separate circuit breakers that are connected to the same PDU power cable and that feed power to the same equipment enclosure. To configure the values on this screen: 1. From the first column, use the arrow keys to scroll up or down to the pole position you want to configure. 2. Press the ENTER key to move to the item you want to configure in the third column (the circuit breaker rating or the circuit breaker tie indicator). 3. Scroll again to select the value you want for the circuit breaker rating or the circuit breaker tie indicator. To associate one panel position with the next position in the list, choose the + character as the tie indicator immediately following the circuit breaker rating. To indicate that the position is not tied to (associated with) the next panel position in the list, choose the ] character as the tie indicator immediately following the circuit breaker rating. When you change the + or ] character that follows the circuit breaker rating in one row, the + or [ character before the circuit breaker rating in the next row also changes to indicate the changed association between the panel positions. For example, this screen shows three, single-pole, 20A, tied circuit breakers occupying positions 08, 10, and 12 on the top right distribution panel. 26 Pos 08 10 12 60 kW InfraStruXure PDU — Operation and Configuration Breaker [ 20A + + 20A + + 20A ] PDU Display Interface Global Panel Config Configures the same number of poles or circuit breaker ratings for all circuit breakers in both distribution panels simultaneously. For example, if your system uses only 3-pole, 20-amp circuit breakers, choose this option, scroll to the value 3 for Poles and 020 for Amp Rating, and then select Apply Now and YES to implement your changes. 60 kW InfraStruXure PDU — Operation and Configuration 27 Config Screen System/Network Use this option of the Config screen to access these options: System Password • Password: Change the system password required to access protected screens and fields in the display interface. Enter a string of up to eight alphanumeric characters, followed by the underline character ( _ ) to indicate the end of the string. The default password is APC. • Time-out: Set the time that the display interface waits for user input before it reverts to the initial scrolling of status screens. Select 1, 2, 5, 10 (the default), or 30 minutes; or 1, 2, or 4 hours, or Forever. • Invalidate NOW: Re-enter the system password for viewing password-protected screens. Date/Time • Date: Set in the following format: dd-mmm yyyy. • Time: Set in the following format: hh:mm:ss. Local Interface • Contrast: Set the screen contrast for the LCD. Select from 1 (high contrast) to 8 (low contrast). • Key Click: Choose On for an audible click whenever you press a navigation key. Choose Off to disable the key click. • Beeper: Select High, Medium, Low, or Off to adjust the loudness of the audible beeper and the key click. Network Address The following values are set by the Information Controller during initial configuration: • IP: The System IP address, which the domain name server translates into a domain name. • Mask: The subnet mask, which identifies the subnetwork on which the PDU operates. • GW: The Gateway address. This is the physical address of the PDU, expressed as a 48-bit hexadecimal number. 28 60 kW InfraStruXure PDU — Operation and Configuration PDU Display Interface Electrical Config This option of the Config screen displays information about the electrical service that provides input to the PDU. All of the values displayed on this screen are set at the factory. Use this information when viewing and setting alarms. Input Config Configure the following items: • Main Input: The voltage from the power source coming into the PDU main input switch. • 3W: 3-phase Delta, measured line-to-line • 4W: 3-phase wye, measured line-to-neutral • Transformer: Indicates whether the PDU has a transformer. Output Config Configure the following items: • Panel Voltage: The nominal voltage of the distribution panels supplying power to the load equipment. (This is measured line-to-neutral.) • Panel Breaker: The rating, in amps, of the circuit breaker feeding the distribution panels. Manufacturer Data Use this option of the Config screen to display a scrollable list containing information about the PDU. This information is useful when requesting service or product updates. The following information is displayed: • Manufacturer Name • Date of Manufacture • Date of Calibration • Hardware Revision • Firmware Revision (for PDU monitoring and metering) • Serial Number • Model Number System ID Use this option of the Config screen to identify your PDU. The following fields can be configured: Device Name Set a unique name for your PDU. Product Location Name the physical location of the product in your data center. Product Contact Identify the person to notify concerning questions or problems with regard to the product. 60 kW InfraStruXure PDU — Operation and Configuration 29 PDU Display Interface Factory Defaults Use this option of the Config screen to reset all PDU settings to their factory default values. Firmware Updates Use this option of the Config screen to download updated firmware to the PDU. 30 60 kW InfraStruXure PDU — Operation and Configuration Operation How to Apply Power to the System 1. Close (turn ON) the main circuit breaker of the power source supplying power to the PDU. 2. Close (turn ON) the Main Input on the InfraStruXure PDU. 3. Power the PDU distribution circuit breakers: a. For PDU with transformer: Close (turn ON) the Main Output circuit breaker on the PDU. After the Main Output circuit breaker has been closed (turned ON), both PDU distribution panels will be energized. Note 60 kW InfraStruXure PDU—Operation and Configuration 31 Operation b. For PDUs with and without a transformer: Close (turn ON) the PDU distribution panel circuit breakers. When the distribution panel circuit breakers are closed, the PDU power cables and connected equipment are energized. Note 32 60 kW InfraStruXure PDU—Operation and Configuration How to Ensure Total Power Off 1. Open (turn OFF) the main circuit breaker on the power source feeding the PDU. 2. Open (turn OFF) the Main Input on the InfraStruXure PDU. 3. For PDU with transformer: Open (turn OFF) the Main Output circuit breakers on the front of the InfraStruXure PDU. 60 kW InfraStruXure PDU—Operation and Configuration 33 Communication Configuration InfraStruXure PDU Management Options Overview You have two management options for the InfraStruXure PDU. You can manage the InfraStruXure PDU along with the rest of your InfraStruXure equipment through the InfraStruXure Manager (APC LAN), or you can manage your InfraStruXure PDU through APC’s network management interfaces (User LAN). InfraStruXure Manager The InfraStruXure Manager is a rack-mount management device that coordinates the management functions of APC InfraStruXure-Certified devices installed in your data center. It provides one single interface to view and configure all APC InfraStruXure-Certified devices. See “Configuring the InfraStruXure Manager” on page 36 for configuration instructions. For more information about the InfraStruXure Manager, see the Installation and Configuration manual included with the InfraStruXure Manager. See also Network management interfaces The control console and Web interfaces provide menus with options that allow you to manage the InfraStruXure PDU. See “Configuring the Network Management Interface” on page 37 for configuration instructions. For more information about the internal user interfaces, see the InfraStruXure PDU online Network Management User’s Guide. See also The SNMP interface allows you to use an SNMP browser with the PowerNet® Management Information Base (MIB) to manage the InfraStruXure PDU. See “Configuring the Network Management Interface” on page 37 for configuration instructions. See also To use the PowerNet MIB with an SNMP browser, see the PowerNet® SNMP Management Information Base (MIB) Reference Guide, which is provided on the InfraStruXure PDU Utility CD. 60 kW InfraStruXure PDU—Operation and Configuration 35 Configuring the InfraStruXure Manager Connect the InfraStruXure PDU to the InfraStruXure Manager 1. Connect a Cat-5 network cable to the surge-protected ethernet port on the PDU user connection plate. You can make connections from inside the enclosure, or you can remove the user connection plate and make your connections. Remove the plate using a Phillips or standard screwdriver to loosen the two captive screws. Use the knockout in the plate to route cables to and from the user connections on the plate. If you remove the plate, make sure that you do not disturb the existing connections. 2. Run the connected Cat-5 network cable through the knockout in the user connection plate to the Information Controller Hub. 3. Once all APC InfraStruXure-Certified equipment is installed, the network cables are connected to the Information Controller Hub, and start-up of the system is complete, configure the Information Controller. For detailed configuration instructions, see the Information Controller Installation and Quick-Start manual included with your Information Controller. See also 36 60 kW InfraStruXure PDU—Operation and Configuration Configuring the Network Management Interface Connect the InfraStruXure PDU to your network 1. Connect a Cat-5 network cable to the surge-protected ethernet port on the PDU user connection plate. You can make connections from inside the enclosure, or you can remove the user connection plate and make your connections. Remove the plate using a Phillips or standard screwdriver to loosen the two captive screws. Use the knockout in the plate to route cables to and from the user connections on the plate. If you remove the plate, make sure that you do not disturb the existing connections. 2. Run the connected Cat-5 network cable through the knockout in the user connection plate to your network connection. 3. Configure the TCP/IP settings of the InfraStruXure PDU. See “Configuration Overview” on this page for further instructions. Configuration Overview You must configure the following TCP/IP settings before the InfraStruXure PDU can operate on a network: • IP address of the InfraStruXure PDU • Subnet mask • Default gateway Note If a default gateway is unavailable, use the IP address of a computer that is located on the same subnet as the InfraStruXure PDU and that is usually running. The InfraStruXure PDU uses the default gateway to test the network when traffic is very light. See “Watchdog Features” in the “Introduction” of the InfraStruXure PDU’s online Network Management User’s Guide for more information about the watchdog role of the default gateway. 60 kW InfraStruXure PDU—Operation and Configuration 37 Communication Configuration TCP/IP configuration methods Use one of the following methods to define the TCP/IP settings needed by the InfraStruXure PDU: • Device IP Configuration Wizard (See “Device IP Configuration Wizard” on this page.) • BOOTP or DHCP server (See “BOOTP & DHCP configuration” on page 39.) • Local computer (See “Local access to the control console” on page 41.) • Networked computer (See “Remote access to the control console” on page 41.) Device IP Configuration Wizard You can use the Device IP Configuration Wizard on a Windows NT® 4.0, Windows 2000, or Windows XP computer to discover unconfigured InfraStruXure PDUs and configure their basic TCP/ IP settings. To configure one or more InfraStruXure PDUs by exporting configuration settings from a configured PDU, see “How to Export Configuration Settings” in the online Network See also Management User’s Guide on the Utility CD. 1. Insert the InfraStruXure PDU Utility CD into a computer on your network. 2. Launch the Wizard, when prompted, or, if prompted to restart the computer, access the Wizard from the Start menu after the computer has restarted. 3. Wait for the Wizard to discover the first unconfigured InfraStruXure PDU, then follow the onscreen instructions. Note 38 If you leave the Start a Web browser when finished option enabled, you can use apc for both the User Name and Password to access the InfraStruXure PDU through your browser. 60 kW InfraStruXure PDU—Operation and Configuration Communication Configuration BOOTP & DHCP configuration The Boot Mode Setting, a TCP/IP option in the InfraStruXure PDU’s Network menu, identifies how the TCP/IP settings will be defined. The possible settings are Manual, DHCP only, BOOTP only, and DHCP & BOOTP (the default setting). Note The DHCP & BOOTP setting assumes that a properly configured DHCP or BOOTP server is available to provide TCP/IP settings to InfraStruXure PDUs. If these servers are unavailable, see “Device IP Configuration Wizard” on page 38, “Local access to the control console” on page 41, or “Remote access to the control console” on page 41 to configure the needed TCP/IP settings. With Boot Mode set to DHCP & BOOTP, the InfraStruXure PDU attempts to discover a properly configured server. It first searches for a BOOTP server, then a DHCP server, and repeats this pattern until it discovers a BOOTP or DHCP server. For more information, see “BOOTP” on this page or “DHCP” on page 40. Note BOOTP. You can use an RFC951-compliant BOOTP server to configure the TCP/IP settings for the InfraStruXure PDU. Note The BOOTP setting assumes that a properly configured BOOTP server is available to provide TCP/IP settings to APC InfraStruXure PDUs. If a BOOTP server is unavailable, see “Device IP Configuration Wizard” on page 38, “Local access to the control console” on page 41, or “Remote access to the control console” on page 41 to configure the TCP/ IP settings. 1. Make sure that the BOOTP setting, a TCP/IP option in the InfraStruXure PDU’s Network menu, is enabled. 2. Enter the InfraStruXure PDU’s MAC and IP addresses, the subnet mask and default gateway settings, and an optional Bootup file name in the BOOTPTAB file of the BOOTP server. For the MAC address, look on the Quality Assurance slip included with the InfraStruXure PDU. See also 60 kW InfraStruXure PDU—Operation and Configuration 39 Communication Configuration 3. When the InfraStruXure PDU reboots, the BOOTP server provides it with the TCP/IP settings. – If you specified a bootup file name, the InfraStruXure PDU attempts to transfer that file from the BOOTP server using TFTP or FTP. The InfraStruXure PDU assumes all settings specified in the bootup file. – If you did not specify a bootup file name, the InfraStruXure PDU can be configured remotely by using Telnet or by using the Web interface. The User Name and Password are both apc, by default. To create the bootup file, see your BOOTP server documentation. See also DHCP. You can use a RFC2131/RFC2132-compliant DHCP server to configure the TCP/IP settings for the InfraStruXure PDU. See also This section briefly summarizes the InfraStruXure PDU communication with a DHCP server. For more detail about how a DHCP server is used to configure the network settings for a InfraStruXure PDU, see “DHCP Configuration” in the InfraStruXure PDU’s online Network Management User’s Guide. 1. A InfraStruXure PDU sends out a DHCP request that uses the following to identify itself: – A Vendor Class Identifier (APC by default) – A Client Identifier (by default, the InfraStruXure PDU’s MAC address value) – A User Class Identifier (by default, the identification of the InfraStruXure PDU’s application firmware) 2. A properly configured DHCP server responds with a DHCP offer that includes all of the settings that the InfraStruXure PDU needs for network communication. The DHCP offer also includes the Vendor Specific Information option (DHCP option 43). By default, the InfraStruXure PDU will ignore DHCP offers that do not encapsulate the APC cookie in the Vendor Specific Information option using the following hexidecimal format: Option 43 = 01 04 31 41 50 43 where – the first byte (01) is the code – the second byte (04) is the length – the remaining bytes (31 41 50 43) are the APC cookies See your DHCP server documentation to add code to the Vendor Specific Information option. To disable the APC cookie requirement, see “Local access to the control console” on page 41. To change the control console’s DHCP Cookie Is setting, use the Advanced option in the TCP/IP menu. See “Remote access to the control console” on page 41. 40 60 kW InfraStruXure PDU—Operation and Configuration Communication Configuration Local access to the control console You can use a local computer that connects to the InfraStruXure PDU through the console port on the InfraStruXure PDU monitoring unit to access the control console. 1. Select a serial port at the local computer, and disable any service that uses that port. 2. Use the configuration cable (APC part number 940-0103) to connect the selected port to the console port on the InfraStruXure PDU monitoring unit. 3. Run a terminal program (such as HyperTerminal®) on your computer and configure the selected port for 9600 bps, 8 data bits, no parity, 1 stop bit, and no flow control, and save the changes. 4. Press ENTER to display the User Name prompt. 5. Use apc for the User Name and Password. 6. See “Control console” on page 42 to finish the configuration. Remote access to the control console From any computer on the same subnet as the InfraStruXure PDU, you can use ARP and Ping to assign an IP address to an InfraStruXure PDU, and then use Telnet to access that InfraStruXure PDU’s control console and configure the needed TCP/IP settings. After an InfraStruXure PDU has its IP address configured, you can use Telnet, without first using ARP and Ping, to access that InfraStruXure PDU. Note 1. Use ARP to define an IP address for the InfraStruXure PDU, and use the InfraStruXure PDU’s MAC address in the ARP command. For example, to define an IP address of 156.205.14.141 for an InfraStruXure PDU that has a MAC address of 00 c0 b7 63 9f 67, use one of the following commands: – Windows command format: arp -s 156.205.14.141 00-c0-b7-63-9f-67 – LINUX command format: arp -s 156.205.14.141 00:c0:b7:63:9f:67 For the MAC address, look on the Quality Assurance slip included with the InfraStruXure PDU. See also 60 kW InfraStruXure PDU—Operation and Configuration 41 Communication Configuration 2. Use Ping with a size of 113 bytes to assign the IP address defined by the ARP command. For the IP address defined in step 1, use one of the following Ping commands: – Windows command format: ping 156.205.14.141 -l 113 – LINUX command format: ping 156.205.14.141 -s 113 3. Use Telnet to access the InfraStruXure PDU at its newly assigned IP address. For example: telnet 156.205.14.141 4. Use apc for both User Name and Password. 5. See “Control console” on this page to finish the configuration. Control console After you log on at the control console, as described in “Local access to the control console” on page 41 or “Remote access to the control console” on page 41: 1. Choose Network from the Control Console menu. 2. Choose TCP/IP from the Network menu. 3. If you are not using a BOOTP or DHCP server to configure the TCP/IP settings, select the Boot Mode menu. Select Manual boot mode, and then press ESC to return to the TCP/IP menu. (Changes will take effect when you log out.) 4. Set the System IP, Subnet Mask, and Default Gateway address values. 5. Press CTRL-C to exit to the Control Console menu. 6. Log out (option 4 in the Control Console menu). If you disconnected a cable during the procedure described in “Local access to the control console” on page 41, reconnect that cable and restart the associated service. Note 42 60 kW InfraStruXure PDU—Operation and Configuration How to Access a Network Management Interface on a Configured InfraStruXure PDU Note Disregard the procedures in this section if you have the APC InfraStruXure Manager as part of your system. See the InfraStruXure Manager’s Installation and Quick-Start manual for access information. Web interface As your browser, you can use Microsoft® Internet Explorer 5.0 (and higher) or Netscape® 4.0.8 (and higher, except Netscape 6.x) to access the InfraStruXure PDU through its Web interface. Other commonly available browsers also may work but have not been fully tested by APC. To use the Web browser to configure InfraStruXure PDU options or to view the event log, you can use either of the following: • The HTTP protocol (enabled by default), which provides authentication by user name and password but no encryption. • The more secure HTTPS protocol, which provides extra security through Secure Sockets Layer (SSL) and encrypts user names, passwords, and data being transmitted. It also provides authentication of Network Management Cards by means of digital certificates. To access the Web interface and configure the security of your device on the network: 1. Address the InfraStruXure PDU by its IP address or DNS name (if configured). 2. Enter the user name and password (by default, apc and apc for an Administrator, or device and apc for a Device Manager). 3. Select and configure the type of security you want. (This option is available only for Administrators.) See also See the chapter entitled “Security” in the InfraStruXure PDU’s online Network Management User’s Guide for information on choosing and setting up your network security. Use the Web/SSL option of the Network menu to enable or disable the HTTP or HTTPS protocols. Telnet and SSH You can access the control console through Telnet or Secure SHell (SSH), depending on which is enabled. (An Administrator can enable these access methods through the Telnet/SSH option of the Network menu.) By default, Telnet is enabled. Enabling SSH automatically disables Telnet. 60 kW InfraStruXure PDU—Operation and Configuration 43 Communication Configuration Telnet for basic access. Telnet provides the basic security of authentication by user name and password, but not the high-security benefits of encryption. To use Telnet to access an InfraStruXure PDU’s control console from any computer on the same subnet: 1. At a command prompt, use the following command line, and press ENTER: telnet address As address, use the InfraStruXure PDU’s IP address or DNS name (if configured). 2. Enter the user name and password (by default, apc and apc for an Administrator, or device and apc for a Device Manager). SSH for high-security access. If you use the high security of SSL for the Web interface, use Secure SHell (SSH) for access to the control console. SSH encrypts user names, passwords, and transmitted data. The interface, user accounts, and user access rights are the same whether you access the control console through SSH or Telnet, but to use SSH, you must first configure SSH and have an SSH client program installed on your computer. See the InfraStruXure PDU’s online Network Management User’s Guide for more information on configuring and using SSH. See also SNMP After you add the PowerNet MIB to a standard SNMP MIB browser, you can use that browser for SNMP access to the InfraStruXure PDU. The default read community name is public; the default read/write community name is private. Note 44 If you enable SSL and SSH for their high-security authentication and encryption, disable SNMP. Allowing SNMP access to the InfraStruXure PDU compromises the high security you implement by choosing SSL and SSH. To disable SNMP, you must be an Administrator; use the SNMP option of the Network menu. 60 kW InfraStruXure PDU—Operation and Configuration Communication Configuration FTP and SCP You can use FTP (enabled by default) or Secure CoPy (SCP) to transfer new firmware to the InfraStruXure PDU, or to access a copy of the InfraStruXure PDU’s event logs. SCP provides the higher security of encrypted data transmission and is enabled automatically when you enable SSH. Note If you enable SSL and SSH for their high-security authentication and encryption, disable FTP. Allowing file transfer to the InfraStruXure PDU through FTP compromises the high security you implement by choosing SSL and SSH. To disable FTP, use the FTP Server option of the Network menu (you must be an Administrator). To access the InfraStruXure PDU through FTP or SCP, the default user name and password are apc and apc for an Administrator, or device and apc for a Device Manager. In the command line, use the IP address of the unit. See also See the InfraStruXure PDU’s online Network Management User’s Guide to use FTP or SCP to retrieve log files from the InfraStruXure PDU or to transfer firmware files to the InfraStruXure PDU. 60 kW InfraStruXure PDU—Operation and Configuration 45 How to Recover From a Lost Network Management Interface Password Note Disregard the procedures in this section if you have the APC InfraStruXure Manager as part of your system. See the InfraStruXure Manager’s Installation and Quick-Start manual for information on recovering from a lost password. 1. Select a serial port at the local computer, and disable any service that uses that port. 2. Connect the serial cable (APC part number 940-0103) to the selected port on the computer and to the console port on the InfraStruXure PDU monitoring unit. 3. Run a terminal program (such as HyperTerminal®) on your computer and configure the selected port as follows: – 9600 bps – 8 data bits – no parity – 1 stop bit – no flow control 4. Press ENTER, repeatedly if necessary, to display the User Name prompt. If you are unable to display the User Name prompt, verify the following: – The serial port is not in use by another application. – The terminal settings are correct as specified in step 3. – The correct cable is being used as specified in step 2. 5. Press the Reset button on the InfraStruXure PDU monitoring unit. The Status LED will flash alternately orange and green. Press the Reset button on the InfraStruXure PDU monitoring unit a second time immediately while the LED is flashing to reset the user name and password to their defaults temporarily. 6. Press ENTER as many times as necessary to redisplay the User Name prompt, then use the default, apc, for the user name and password. (If you take longer than 30 seconds to log on after the User Name prompt is redisplayed, you must repeat step 5 and log on again.) 7. From the Control Console menu, select System, then User Manager. 8. Select Administrator, and change the User Name and Password settings, both of which are now defined as apc. 9. Press CTRL-C, log off, reconnect any serial cable you disconnected, and restart any service you disabled. 46 60 kW InfraStruXure PDU—Operation and Configuration Customizing and Updating the PDU Important Safety Instructions Electrical Hazard APC does not recommend that you perform maintenance of the PDU while it is receiving input power. However, due to the critical nature of data center loads, this may occur. If you must perform maintenance while the PDU is receiving input power, observe the following precautions to reduce the risk of electric shock: 1. Never work alone. 2. Perform the maintenance only if you are a certified electrician who is trained in the hazards of live electrical installation. 3. Know the procedure for disconnecting electricity to the PDU and the data center in case of an emergency. 4. Wear appropriate personal protective equipment. 5. Use double-insulated tools. 6. Always follow local and site regulations when working on the PDU. 60 kW InfraStruXure PDU — Operation and Configuration 47 PDU Orderable Part List Circuit Breakers PD1P20ABBSD single-pole, 20-amp breaker PD3P20ABBSD three-pole, 20-amp breaker PD1P50ABBSD single-pole, 50-amp breaker PD3P80ABBSD three-pole, 80-amp breaker PD2P20ABBSD two-pole, 20-amp breaker PD3P100ABBSD three-pole, 100-amp breaker PD2P30ABBSD two-pole, 30-amp breaker PD3P150ABBSD three-pole, 150-amp breaker Power Cables 20A, 3-wire power cables 48 30A, 3-wire power cables SKU Number Description SKU Number Description PDW5L21-20R 5-foot power cable PDW7L6-30C 7-foot power cable PDW7L21-20R 7-foot power cable PDW9L6-30C 9-foot power cable PDW9L21-20R 9-foot power cable PDW11L6-30C 11-foot power cable PDW11L21-20R 11-foot power cable PDW13L6-30C 13-foot power cable PDW13L21-20R 13-foot power cable PDW15L6-30C 15-foot power cable PDW15L21-20R 15-foot power cable PDW17L6-30C 17-foot power cable PDW17L21-20R 17-foot power cable PDW19L6-30C 19-foot power cable PDW19L21-20R 19-foot power cable PDW21L6-30C 21-foot power cable PDW21L21-20R 21-foot power cable PDW23L6-30C 23-foot power cable PDW23L21-20R 23-foot power cable PDW25L6-30C 25-foot power cable PDW25L21-20R 25-foot power cable PDW27L6-30C 27-foot power cable PDW27L21-20R 27-foot power cable PDW29L6-30C 29-foot power cable PDW29L21-20R 29-foot power cable PDW31L6-30C 31-foot power cable PDW31L21-20R 31-foot power cable PDW33L6-30C 33-foot power cable PDW33L21-20R 33-foot power cable PDW35L6-30C 35-foot power cable PDW35L21-20R 35-foot power cable PDW37L6-30C 37-foot power cable PDW37L21-20R 37-foot power cable PDW39L6-30C 39-foot power cable PDW39L21-20R 39-foot power cable PDW41L6-30C 41-foot power cable PDW41L21-20R 41-foot power cable PDW43L6-30C 43-foot power cable PDW43L21-20R 43-foot power cable PDW45L6-30C 45-foot power cable 60 kW InfraStruXure PDU — Operation and Configuration Customizing and Updating the PDU Power Cables 20A, 3-wire power cables 30A, 3-wire power cables SKU Number Description SKU Number Description PDW45L21-20R 45-foot power cable PDW47L6-30C 47-foot power cable PDW47L21-20R 47-foot power cable PDW49L6-30C 49-foot power cable PDW49L21-20R 49-foot power cable PDW51L6-30C 51-foot power cable PDW51L21-20R 51-foot power cable PDW53L6-30C 53-foot power cable PDW53L21-20R 53-foot power cable PDW55L6-30C 55-foot power cable PDW55L21-20R 55-foot power cable PDW57L6-30C 57-foot power cable PDW57L21-20R 57-foot power cable PDW59L6-30C 59-foot power cable PDW59L21-20R 59-foot power cable PDW61L6-30C 61-foot power cable PDW61L21-20R 61-foot power cable PDW63L6-30C 63-foot power cable PDW63L21-20R 63-foot power cable PDW65L6-30C 65-foot power cable PDW67L6-30C 67-foot power cable PDW69L6-30C 69-foot power cable PDW71L6-30C 71-foot power cable PDW73L6-30C 73-foot power cable PDW75L6-30C 75-foot power cable 60 kW InfraStruXure PDU — Operation and Configuration 49 How to Add Circuit Breakers and Power Cables Add a circuit breaker on the PDU 1. Snap and bolt the new circuit breaker into a position on the panel. 2. Remove the corresponding plastic blanking plate on the front panel of the PDU. Add a power cable to the PDU Before adding a power cable, add a circuit breaker. 1. Install a strain-relief connector in any available knockout on the roof of the PDU. 2. Slide enough of the power cable through the strain-relief connector to reach the new circuit breaker. 3. Tighten the strain-relief connector. If you must install at 20A or 30A power cable in a knockout designed for a 50A power cable, you must use reducing washers (included) to adjust the size of the hole. Note Note 50 If you are adding a power cable that will attach to a circuit breaker on the bottom circuit breaker panel, use a non-conductive fish tape to feed the power cable down the rectangular wireway (chute) in the center of the PDU. This will allow you to easily access the bottom circuit breaker panel. 60 kW InfraStruXure PDU — Operation and Configuration Customizing and Updating the PDU 4. At the front of the PDU, connect the power cord’s individual wires: a. If you have branch current monitoring installed, route the phase conductor through a current sensor. If it is a three-phase cable, route the L1, L2, and L3 wires through a current sensor. b. Connect the L1, L2, and L3 wires to the circuit breaker(s). The illustration below shows single pole breakers; however, you can also connect three-pole breakers. c. Connect the neutral wire to the closest open termination point on the Neutral Bar (N). d. Connect the ground wire to the closest open termination point on the Ground Bar (G). N G Caution You can configure your InfraStruXure system through the InfraStruXure Build-Out Tool to use 3, 20A, single-pole breakers to feed multi-circuit power cables supplying power to L-N loads. However, one 3-pole, 20A circuit breaker must be used with any power cable and Rack PDU that feeds L-L loads (NEC, NFPA 70). 60 kW InfraStruXure PDU — Operation and Configuration 51 How to Connect User Input Contacts and Relay Outputs to the User Connection Plate Overview 4 Contact Outputs ATS 1 2 3 Contact Inputs ATS 2 1 ATS 0 USER INTERFACE © 2001 APC MADE IN USA ATS EN Make contact closure connections (NO or NC) at the user connection plate to monitor dry contacts. You can make eight connections—four input contacts and four relay outputs. – + EPO 24V EPO AC/DC Contact The figure at the right shows the location of the user connection plate on the roof of the PDU enclosure. You can make connections from inside the enclosure, or you can remove the user connection plate and make your connections. Remove the plate using a Phillips or standard screwdriver to loosen the two captive screws. Use the knockout in the plate to route cables to and from the user connection on the plate. If you remove the plate, make sure that you do not disturb the existing connections. 52 60 kW InfraStruXure PDU — Operation and Configuration Customizing and Updating the PDU How to connect contacts to the PDU monitoring unit 1. Choose one or more contact number on the User/EPO contacts port on the user connection plate to which you will connect the contacts. The user connection plate connects to the PDU monitoring unit. 2. From the PDU display interface: a. Press the ESC or ENTER key to go to the top-level menu screen. b. Select Contacts on the top-level menu screen, and press the ENTER key. Load-Meter Volt-Meter Contacts Breakers Alarms Panel Config Help c. Select Contact Inputs (or Relay Outputs) and press ENTER to display the contact inputs (or relay outputs) screen. >Contact Inputs >Relay Outputs >Alarm Relay Map d. Select Contact In and press the ENTER key to select the number of the contact you are connecting. The continue arrow will appear next to the contact number. Contact In: 01of04 Name: UserContact1 Normal: Open Status:Closed e. Press the Up or Down arrow key to select the appropriate contact number, and press the ENTER key. f. Press the Down arrow key to enter a unique Name for the contact and to configure the Normal state of the contact (Open or Closed). The default Normal state is Open. Press the ENTER key to select the item to configure. You will be prompted for your password to configure these items. Note 3. Connect contact wires (300V-rated cabling required) to the User Contacts terminal block on the user connection plate. You will need a 2.5-mm standard screwdriver. 4. Run the wires from the terminal block out the roof or under the floor of the PDU to your contact’s location. Ensure that wires are properly retained and away from high voltage lines and breakers. Warning See “Relay Outputs” on page 59 for relay output specifications. 60 kW InfraStruXure PDU — Operation and Configuration 53 How to Test the EPO Switch APC offers an optional InfraStruXure EPO System (EPW9). Contact your APC sales representative, or visit the APC Web site (www.apc.com) for more information. Note EPO A RM E D T E ST NC EPO DIP switches configure the EPO input for the type of EPO switch that is connected—Normally Open (NO) or Normally Closed (NC). T RIPP E D NO After a certified electrician has connected an EPO switch to the PDU monitoring unit by way of the user connection plate, you can easily test the switch to make sure it is wired and working properly. The illustration to the right shows the EPO functions on the front panel of the PDU monitoring unit. When the EPO Arm/Test rocker is in the Test position, engaging the EPO switch will not cause the load to be powered off. When the rocker is in the Armed position, engaging the EPO switch will cause the PDU’s Main Input switch to be switched OFF. The EPO Armed LED is green when the rocker is in the Armed position. The LED is dark when the rocker is in the Test position. The EPO Tripped LED is red when the EPO switch is engaged (the EPO button is pressed), regardless of the state of the EPO Arm/Test rocker. To test your EPO wiring and switches: 1. Place the Arm/Test switch in the Test position. The Armed LED will be dark and the PDU display interface will show the following alarm (in addition to any other active alarms): Active Alarm xxofxx EPO Ready To Test 2. Engage the EPO switch. (If your switch is momentary, engage it with one person watching the EPO state LEDs, and another at the EPO switch.) 3. Observe the EPO LEDs. If the switch is wired and working properly, when the switch is engaged, the Tripped LED is red. 54 60 kW InfraStruXure PDU — Operation and Configuration Customizing and Updating the PDU 4. If the test was successful, place the Arm/Test switch back to the Arm position. The PDU display interface will clear the EPO test mode alarm. If the test was not successful, see the troubleshooting chart: Problem Action Neither state LED was red when EPO switch was engaged. • Check the wiring to your EPO switch. Only one of the state LEDs was red when the EPO switch was engaged. • Check to make sure the EPO DIP switch configuration is correct for your switch (NO or NC) and test again. • Check to make sure your EPO DIP switch configuration is correct for your switch (NO or NC). • If the switch is configured correctly and both LEDs are not red after testing again, contact customer support at a number on the back cover of this manual. 5. Repeat this test for each EPO switch installed. 6. Ensure that the Arm/Test rocker switch is in the Arm position on the monitoring unit. Safety warnings Hazardous voltage from the branch circuit must be isolated from the 24VAC, 24VDC, and contact closure. 24VAC and 24VDC are considered Class 2 circuits as defined in Article 725 of the National Electrical Code (NFPA 70) and Section 16 of the Canadian Electrical Code (C22.1). A Class 2 circuit is a source having limited voltage and energy capacity as follows: a. If an Inherently Limited Power Source, voltage and energy are limited to less than 30VAC, less than 30VDC, and 8A. b. If not an Inherently Limited Power Source, voltage and energy are limited to less than 30VAC, less than 60VDC, 250VA, and the current is limited to 1000/Vmax. The fuse is limited to 5A if less than 20VAC or 20VDC, or 100/Vmaximum if less than 30VAC or 60VDC. 60 kW InfraStruXure PDU — Operation and Configuration 55 Customizing and Updating the PDU If you choose to use a 24VAC, 24VDC, or contact closure connection to the EPO, use one of the following UL-listed wire types: • CL2 Class 2 cable for general purpose use • CL2P Plenum cable for use in ducts, plenums, and other space used for environmental air • CL2R Riser cable for use in a vertical run shaft from floor to floor • CL2X Limited Use cable for use in dwellings and for use in a raceway • For installation in Canada, the cable should be CSA Certified, type ELC (extra-low-voltage control cable). If you do not use a CL2 cable, route the EPO wiring in conduit that does not contain any branch circuit wiring. 56 60 kW InfraStruXure PDU — Operation and Configuration How to Download Firmware Upgrades Upgrading the PDU monitor processor You can download available PDU monitor processor upgrades through the PDU display interface. The most obvious indication that a firmware upgrade is necessary occurs when the Network Management Card and the monitor processor stop communicating. This lack of communication causes the PDU’s data to no longer be available through the display interface, and a SysData Mismatch alarm to occur. When this alarm occurs, perform the following steps to upgrade the PDU monitor processor firmware: 1. Upgrade the PDU Network Management Card. See also For instructions on how to upgrade the PDU’s Network Management Card, refer to the online Network Management User’s Guide on the Utility CD provided with your InfraStruXure PDU. 2. At the PDU display interface, select Config, and then Firmware Updates. You will receive the following screen: Press any key to download the upgrade. Note If you do not receive the SysData Mismatch alarm, but want to check for available upgrades, you can do so by performing step 2 in the procedure above. From a local computer To download a firmware upgrade and transfer it to your PDU, see “File Transfers” in the InfraStruXure PDU’s online Network Management User’s Guide on the Utility CD. See also 1. Select a serial port at the local computer, and disable any service that uses that port. 2. Use the configuration cable to connect the selected port to the console port on the PDU monitoring unit. 3. Run a terminal program (such as HyperTerminal®) and configure the port for 9600 bps, 8 data bits, no parity, 1 stop bit, and no flow control. Save the changes. 4. Press ENTER twice to display the User Name prompt. 5. Enter your User Name and Password (both apc, for administrators only) and press the ENTER key. 60 kW InfraStruXure PDU — Operation and Configuration 57 Customizing and Updating the PDU 6. From the Control Console menu, select System, then Tools, then File Transfer, then XMODEM. 7. The system will prompt you with Perform transfer with XMODEM -CRC? Type Yes and press ENTER. 8. The system will then prompt you to choose a transfer rate and to change your terminal settings to match the transfer rate. Press ENTER to set the PDU to accept the download. 9. In the terminal program, send the file using XMODEM protocol. Upon completion of the transfer, the console will prompt you to restore the baud rate to normal. Do not interrupt the download. Caution The PDU network management interface will reboot when the download is complete. 58 60 kW InfraStruXure PDU — Operation and Configuration Specifications 60kW InfraStruXure PDU Electrical 208V 480V 600V 208V (transformerless) Nominal Voltage 208/120V 480/277V 600/346V 208/120V Frequency 57–63Hz 57–63Hz 57–63Hz 57–63Hz Voltage AC 3-phase, 3-wire Nominal Current 167A Disconnect 225A molded case breaker Main Conductor Size #4/0AWG Input 72A #3/0AWG 3-phase, 4-wire plus ground 58A 180A 225A molded case breaker #4/0AWG #4/0AWG Output Voltage AC 3-phase 4-wire plus ground (208/120V) Full Load Rating 60kW 60kW 60kW 64.8kW Nominal Current 167A 167A 167A 180A Distribution Panels 2 × 225A, 42-position Distribution Breaker Size 150A (maximum size) 150A (maximum size) Main Breaker 175A MCCB, 100% rated No Main Breaker in transformerless PDU Relay Outputs Nominal Switching Capacity 1A at 30VDC Maximum Switching Power 30W Maximum Switching Voltage 60VDC Maximum Switching Current 2ADC Maximum Carrying Current 2ADC Surge Ratings 2kV per Bellcore TA-NWT-001089 1.5kV per FCC part 68 60 kW InfraStruXure PDU — Operation and Configuration 59 Specifications Physical 208V 480V 600V 208V (transformerless) Dimensions (H×W ×D) PDU 85 × 24 × 34 in (2159 × 610 × 864 mm) Weight PDU 1500lb (681.8kg) 1205lb (547.7kg) 765lb (347kg) 450lb (204kg) Shipping 1600lb (727.3kg) 1305lb (593.2) 865lb (393.2kg) 775lb (351kg) Type Isolation Step-down Step-down N/A Configuration Delta to WYE Transformer N/A Environmental Operating Environment Protected from water and conductive contaminates Humidity Operating 0–95%, non-condensing Storage 0–95%, non-condensing Temperature Class Class H (220°C) Storage Elevation 3,000ft (10 000 m) for aircraft transportation Heat Rejection at Full Load 6339BTU/hr. (1.9kW) for transformer models Compliance Approvals 60 UL 60950 60 kW InfraStruXure PDU — Operation and Configuration Product Information InfraStruXure Standard Warranty APC warrants that all components of the InfraStruXure system will be free from defect in material and workmanship for a period of two years from the date of start up when start up has been performed by APC authorized service personnel*. If assembly services are included in the original purchase and are also performed by APC authorized service personnel, APC offers an additional year of parts warranty and the first year of on site Next Business Day coverage at no additional charge. I the event that the system fails to meet the forgoing warranty, APC shall repair or replace, at its sole discretion, any such defective parts. Under this warranty, APC will ship all parts to your site at no cost to be available for you the next business day after APC is notified of this requirement. If you choose to upgrade the system to include an on site contract, APC offers modular service packages to match your needs. Each point product incorporated into the system has a separate factory warranty that is applied when sold as a standalone unit. When incorporated into an InfraStruXure solution, the unit will be covered by the InfraStruXure warranty. In cases where one warranty favors the customer over the other, the stronger of the two warranties will take precedence. The InfraStruXure factory warranty covers only those parts appearing on the bill of materials for that solution. Megawatt UPS systems are not covered under the InfraStruXure factory warranty. Battery functionality is typically impacted by age and environmental conditions, and therefore certain requirements must be met by the end-user. Failure to adhere to these requirements may put the battery warranty at risk. APC-supplied batteries must always be kept (whether stored or installed) in a climate-controlled environment, and should be re-charged at a minimum of every three (3) months. The battery environment must be free of excessive moisture, construction dirt, corrosive elements, or other contaminants. The temperature range must be maintained at 41 to 95° F (5 to 35° C). *All warranties are null and void unless startup is performed by authorized an APC Global Services service center. APC SHALL NOT BE LIABLE UNDER THIS WARRANTY IF ITS TESTING AND EXAMINATION DISCLOSE THAT THE ALLEGED DEFECT IN THE PRODUCT DOES NOT EXIST OR WAS CAUSED BY PURCHASER'S OR ANY THIRD PERSON'S MISUSE, NEGLIGENCE, IMPROPER INSTALLATION OR TESTING, UNAUTHORIZED ATTEMPTS TO REPAIR OR MODIFY, OR ANY OTHER CAUSE BEYOND THE RANGE OF THE INTENDED USE, OR BY ACCIDENT, FIRE, LIGHTNING OR OTHER HAZARD. 60 kW InfraStruXure PDU — Operation and Configuration 61 Product Information THERE ARE NO WARRANTIES, EXPRESS OR IMPLIED, BY OPERATION OF LAW OR OTHERWISE, OF PRODUCTS SOLD, SERVICED OR FURNISHED UNDER THIS AGREEMENT OR IN CONNECTION HEREWITH. APC DISCLAIMS ALL IMPLIED WARRANTIES OF MERCHANTABILITY, SATISFACTION AND FITNESS FOR A PARTICULAR PURPOSE. APC’S EXPRESS WARRANTIES WILL NOT BE ENLARGED, DIMINISHED, OR AFFECTED BY AND NO OBLIGATION OR LIABILITY WILL ARISE OUT OF, APC’S RENDERING OF TECHNICAL OR OTHER ADVICE OR SERVICE IN CONNECTION WITH THE PRODUCTS. THE FOREGOING WARRANTIES AND REMEDIES ARE EXCLUSIVE AND IN LIEU OF ALL OTHER WARRANTIES AND REMEDIES. THE WARRANTIES SET FORTH ABOVE. CONSTITUTE APC’S SOLE LIABILITY AND PURCHASER’ EXCLUSIVE REMEDY FOR ANY BREACH OF SUCH WARRANTIES. APC’S WARRANTIES RUN ONLY TO PURCHASER AND ARE NOT EXTENDED TO ANY THIRD PARTIES. IN NO EVENT SHALL APC, ITS OFFICERS, DIRECTORS, AFFILIATES OR EMPLOYEES BE LIABLE FOR ANY FORM OF INDIRECT, SPECIAL, CONSEQUENTIAL OR PUNITIVE DAMAGES, ARISING OUT OF THE USE, SERVICE OR INSTALLATION, OF THE PRODUCTS, WHETHER SUCH DAMAGES ARISE IN CONTRACT OR TORT, IRRESPECTIVE OF FAULT, NEGLIGENCE OR STRICT LIABILITY OR WHETHER APC HAS BEEN ADVISED IN ADVANCE OF THE POSSIBILITY OF SUCH DAMAGES. 62 60 kW InfraStruXure PDU — Operation and Configuration Life-Support Policy APC Three-Phase Systems As a general policy, American Power Conversion Corporation and its affiliates and subsidiaries worldwide (APC) do not recommend the use of any of its products in life support applications where failure or malfunction of the APC product can be reasonably expected to cause failure of the life support device or to significantly affect its safety or effectiveness. APC does not recommend the use of any of its products in direct patient care. APC will not knowingly sell its products for use in such applications. Examples of devices considered to be life support devices are neonatal oxygen analysers, nerve stimulators (whether used for anesthesia, pain relief, or other purposes), autotransfusion devices, blood pumps, defibrillators, arrhythmia detectors and alarms, pacemakers, hemodialysis systems, peritoneal dialysis systems, neonatal ventilator incubators, ventilators for both adults and infants, anesthesia ventilators, infusion pumps, and any other device designated as “critical” by the U.S.F.D.A. 60 kW InfraStruXure PDU — Operation and Configuration 63 How to Obtain Service Note If you ordered on-site service, see your entitlement certificate and terms and conditions of the service before following the procedure described below. An on-site service contract entitles you to an on-site visit by an APC technician to assess the issue, determine the problem, and replace parts, if needed. (Response time varies per contract.) How to contact APC Customer support for this or any other APC product is available at no charge in any of the following ways: • Visit the APC Web site to access documents in the APC Knowledge Base and to submit any customer support requests. – www.apc.com (Corporate Headquarters) Connect to localized APC Web sites for specific countries, each of which provides customer support information. – www.apc.com/support/ Global support searching APC Knowledge Base and using e-support. • Contact an APC Customer Support center by telephone or e-mail. – Regional centers: Direct InfraStruXure Customer Support Line (1) (877) 537-0607 (toll-free) APC Headquarters U.S., Canada (1) (800) 800-4272 (toll-free) Latin America (1) (401) 789-5735 (USA) Europe, Middle East, Africa (353) (91) 702000 (Ireland) Japan (0) 35434-2021 Australia, New Zealand, South Pacific area (61) (2) 9955 9366 (Australia) – Local, country-specific centers: got to www.apc.com/support/contact for contact information. Contact the APC representative or other distributor from whom you purchased your APC product for information on how to obtain local customer support. 64 60 kW InfraStruXure PDU — Operation and Configuration Appendix: Changes in This Manual Overview The following list references the specific changes that have been made to this manual since its last release (990-1600B). General changes Updated manual to reflect the InfraStruXure PDU’s network management capabilities. Changes by page number Page 10 Added section detailing the user connection plate. Page 20 Updated instructions for connecting contacts to the PDU monitoring unit. Pages 35–46 Added instructions for PDU communication configuration. Pages 48–49 Updated PDU orderable part list for power cables and circuit breakers. Pages 52–53 Added instructions for connect input contacts and relay outputs to the user connection plate. Pages 54–56 Updated instructions for testing the Emergency Power Off switch. Page 57 Added instructions for downloading firmware updates. Page 59 Added relay output specifications. Page 64 Updated instructions for obtaining service from APC. 60kW InfraStruXure PDU—Operation and Configuration 65 Index A Add a circuit breaker or power cable on the PDU, 50 Agency approvals, 60 Alarm beeper, 23 Alarm event log, 22 Alarm LED, 13 Alarm relay map, 19 Alarms screen, 22 – 24 Arm/test rocker switch, 9 B BOOTP & DHCP configuration, 39 Branch Ckt limits and loading, 25 Branch current monitor ports, 9 Breakers screen, 21 Breakers. See circuit breaker. Bypass LED, 13 C Check log LED, 13 Circuit breaker 42-position panels, 6 adding to the PDU, 50 determining size, 2 global panel configuration, 27 panel configuration, 26 Communication configuration, 35 Companion manuals, i Compliance, 60 Config screen, 28 – 30 Configuration BOOTP, 39 date/time, 28 device name, 29 DHCP, 39 – 40 electrical, 29 local interface, 28 network address, 28 of circuit breaker panel, 26 of communication devices, 35 – 46 of contact person, 29 overview, 37 password, 28 product location, 29 TCP/IP, 38 Configuring the InfraStruXure Manager, 36 Configuring the network management interface, 37 Connections InfraStruXure PDU to the InfraStruXure Manager, 36 InfraStruXure PDU to the network, 37 Console port, on monitoring unit, 9 Contact person, setting the, 29 Contacts screen, 18 – 20 Control console, 42 for PDU management, 35 local and remote access to, 41 – 42 Cordset adapters, types of, 11 Cross-reference symbols used in this manual, 1 Customizing the PDU, 47 – 57 D Date/time configuration, 28 Device IP configuration wizard, 38 Device name, setting the, 29 DHCP configuration, 39 – 40 Dimensions, 60 DIP switches, EPO, 9 Display interface, 13 – 30 location, 5 screens, 14 – 30 alarms screen, 22 – 24 breakers screen, 21 config screen, 28 – 30 contacts screen, 18 – 20 load-meter screen, 16 panel screen, 25 – 27 password-protected, 15 top-level status and menu, 14 volt-meter screen, 17 Display port, on monitoring unit, 9 Document pocket, 6 E Electrical Config, 29 Electrical configuration, 29 Electrical specifications, 59 Emergency Power Off connection point, 10 testing the switch, 54 – 55 warnings, 3 EMI warnings, 4 Environmental specifications, 60 EPO. See Emergency Power Off. Ethernet port, on user connection plate, 10 F Factory defaults, restoring the, 30 Firmware updates, 30, 57 From a local computer, 57 Front view exterior, 5 interior, 6 FTP and SCP access to the PDU, 45 G Global panel configuration, 27 Ground bar, location, 51 Ground wire, location, 51 I InfraStruXure Manager, 35 as a PDU management option, 35 configuration, 36 InfraStruXure standard warranty, 61 60kW InfraStruXure PDU—Operation and Configuration 67 Input contacts connection point, 10 information about, 18 Input transformer, 7 Installation warnings, 2 K Keys, for navigation, 13 Network management interface accessing on a configured PDU, 43 configuration, 37 – 46 recovering from a lost password, 46 Network management interfaces, 35 Neutral bar, location, 51 Neutral wire, location, 51 L LCD, 13 LEDs on display interface, 13 on monitoring unit, 9 Leveling feet, 5 Life-support policy, 63 Load powered LED, 13 Load-meter screen, 16 Local access to the control console, 41 Local interface configuration, 28 M Main input circuit breaker, 8 Main input switch, 7 Main output breaker, 6 Maintenance performed while the PDU is receiving input power, 2 Maintenance warnings, 2 Management options, 35 – 46 InfraStruXure Manager, 35 Network management interfaces, 35 Manufacturer data, 29 Monitoring unit connecting contacts to, 20 detailed description, 9 location, 8 Multi-branch cordset adapters, 11 N Naming the PDU, 29 Navigation keys, 13 through screens, 14 Network address configuration, 28 68 SCP access to the PDU, 45 Screens. See display interface or individual screen name. Service, obtaining, 64 Shielding troughs, 5 SNMP access to the PDU, 44 Specifications, 59 – 60 SSH for accessing a network management interface, 44 System ID, 29 System/Network, 28 O Operation, 31 – 35 applying power to the system, 31 total power off, 33 Orderable parts, 48 P Panel configuration, 26 Panel screen, 25 – 27 Password protected screens, 15 recovering from a lost, 46 setting and changing, 28 Physical specifications, 60 Power cables adding to the PDU, 50 – 51 location and type, 5 Product location, setting the, 29 T TCP/IP configuration methods, 38 Telnet for accessing a network management interface, 44 Time/date configuration, 28 Top-level status and menu screens, 14 Total power off procedure, 3, 33 U Updates in this manual, 65 to firmware, 30, 57 to this manual, i User connection plate detailed description, 10 location, 6 User/EPO contacts port, 9 R V Rear view with transformer, 7 without transformer, 8 Receiving/moving the PDU, 2 Relay outputs connection point, 10 information about, 18 specifications, 59 Remote access to the control console, 41 Viewing active alarms, 22 Voltage specifications, 59 Volt-meter screen, 17 S Safety, 1 – 4 symbols used in this manual, 1 warnings, 2 – 4 W Warnings, 2 – 4 Warranty, 61 – 62 Web interface, 43 accessing a Network management interface through, 43 for PDU management, 35 Weight specifications, 60 60kW InfraStruXure PDU—Operation and Configuration APC Worldwide Customer Support Customer support for this or any other APC product is available at no charge in any of the following ways: • Visit the APC Web site to access documents in the APC Knowledge Base and to submit customer support requests. – www.apc.com (Corporate Headquarters) Connect to localized APC Web sites for specific countries, each of which provides customer support information. – www.apc.com/support/ Global support searching APC Knowledge Base and using e-support. • Contact an APC Customer Support center by telephone or e-mail. – Regional centers: Direct InfraStruXure Customer Support Line (1)(877)537-0607 (toll free) APC headquarters U.S., Canada (1)(800)800-4272 (toll free) Latin America (1)(401)789-5735 (USA) Europe, Middle East, Africa (353)(91)702000 (Ireland) Japan (0) 35434-2021 Australia, New Zealand, South Pacific area (61) (2) 9955 9366 (Australia) – Local, country-specific centers: go to www.apc.com/support/contact for contact information. Contact the APC representative or other distributor from whom you purchased your APC product for information on how to obtain local customer support. Entire contents © 2005 American Power Conversion. All rights reserved. Reproduction in whole or in part without permission is prohibited. APC, the APC logo, NetShelter, InfraStruXure, and Symmetra are trademarks of American Power Conversion Corporation and may be registered in some jurisdictions. All other trademarks, product names, and corporate names are the property of their respective owners and are used for informational purposes only. 990-1600C *990-1600C* 04/2005