1
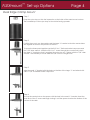
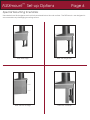
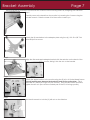
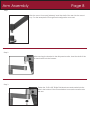
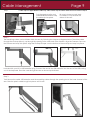
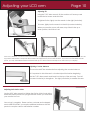
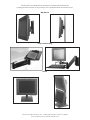
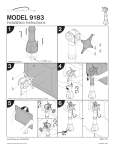
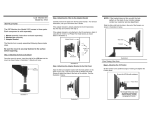
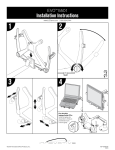
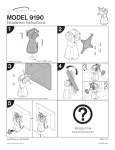
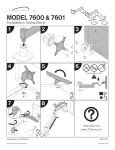
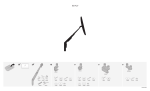
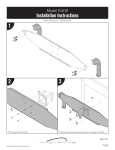
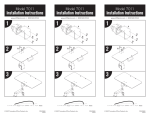
™
Lift
Cinema
for Apple Cinema Displays
™
StudioLift for Apple Cinema Displays
®
®
Installation Instructions
Ergonomic mounting solutions for monitors and keyboards
www.LCDarms.com
800.524.2744
Table of Contents:
TM
*These instructions are applicable for Models 3500, 3545, 7000, 7045 and 7506; all which include the FLEXmount
1.
Hardware Parts List
A. Arm .......................................................................................................................................... Page 2
B. FLEXmount™ ............................................................................................................................. Page 3
2.
FLEXmount™ Set-up Options
A. Desk Edge Clamp .................................................................................................................
B. Through Desk ..........................................................................................................................
C. Wall Mount/Reverse Wall Mount .........................................................................................
D. Special Mounting Scenarios ................................................................................................
Page
Page
Page
Page
4
5
5
6
3.
Bracket Assembly . ....................................................................................................................... Page 7
4.
Arm Assembly ............................................................................................................................... Page 8
5.
Cable Management ................................................................................................................... Page 9
6.
Adjusting your Monitor Arm ........................................................................................................ Page 10
How to place an order:
telephone
800.524.2744
email
[email protected]
fax
610.253.9521
Order online at:
www.LCDarms.com
Helpful handy information:
5 Product Number
5 Does your LCD meet the VESA standard? Not sure?
Check out www.LCDarms.com/adapter
5 Monitor Weight
5 Mount type if not included
© Innovative Office Products, Inc. 2008
The following patents apply: 6,409,134, 6,505,988, 6,726,167
Apple Cinema Display and Apple Studio Display are registered trademarks of Apple Computer, Inc.
P502373
Rev D
Hardware Parts List - Arm
Item
Page 2
Description & Part No.
Quantity
10-32 x 3/8" Phillips Flat Head Screw
705198
1
Dog Washer
105189
1
10-32 x 3/8” Phillips Flat Head Screw
702281
1 (4-pack)
M3-16 Socket Head Screw
702038
3
M3 Steel Nut
702161
3
M3 Wrench
DX2013
1
M2 Allen Wrench
702040
1
M2.5 Allen Wrench
702218
1
Cable Trough
702830
1
Forearm Cap
702825
1
Endcap Bumper
702829
1
Cable Clip
DX1835
1
Hardware Parts List - FLEXmount™
Page 3
*Depending on the mount style you select, you will not use all of the parts listed below.
Item
Description & Part No.
Quantity
Mount Column
702831
1
Base Plate
702826
1
Large “L” Bracket
702828
1
Small “L” Bracket
701116
1
3” x 3/4” x 1/4” Rectangular Spacer
701544
1
3/8-16 x 1 1/4” Flat Socket Cap Screw
701799
1
3/8-16 x 7/8” Button Socket Cap Screw
701122
1
3/8-16 Nylon Stop Nut
701418
1
3/8-16 x 7/8” Flat Socket Cap Screw
701124
1
3/8-16 x 2 1/2” Hex Head Bolt
700268
1
1/2-13 x 3” Socket Set Screw
701126
1
FLEXmount™ Set-up Options Page 4
Desk Edge Clamp Mount
Step 1
Drop the nylon stop nut into the impression on the inside of the metal mount column.
The rounded top of the nylon stop nut should be facing upwards.
Step 2
Position the mount cup, base plate and the large “L” bracket so that the center holes
are aligned as shown in the picture on the left.
To screw the three parts together use the 3/8-16 x 1” flat head socket cap screw and
the 7/32” allen wrench. Insert the 3/8-16 x 1” screw through the counter sunk hole in
the large “L” bracket so that it engages the nylon stop nut. Tighten with the 7/32” allen
wrench. The assembly is secure when the 3/8” screw no longer turns.
Step 3
Align the small “L” bracket with the holes on the side of the large “L” and attach with
3/8-16 x 7/8” Flat Head Socket Cap Screw.
Step 4
Line up the center hole on the spacer with the hole in the small “L” bracket; insert the
male end of the 3” screw and begin turning it until the spacer touches the bottom of the
surface of the desk.
FLEXmount™ Set-up Options Page 5
Through-Desk Mount
Wall mounting hardware
is not provided.
Wall/Reverse Wall Mount
Step 1
Drill a hole 3/8” into desk or mounting surface bout 1
1/2”-2” in from the edge of the surface edge.
Step 2
Step 1
Secure the large “L” bracket to a stud in the wall using wood
screws.
Reverse Wall Mount: Follow Step 1 above; be sure the short
side of the “L” bracket is on top.
Remove the backing on
the Neoprene foam pad
and affix to the bottom of
the mount cup. (ONLY if
you will not be using the
baseplate set-up in the
next step)
Mounting
Hardware
Mounting
Hardware
Reverse
Step 3
Line up the mount cup over the hole and drop the
2.5” threaded bolt into the mount cup, through the
optional base plate and through the desk.
Without
Baseplate
Step 2
Drop the nylon stop nut into the impression inside the mount cup.
The rounded top of the nylon stop nut
should be facing upward.
With
Baseplate
Step 3
Step 4
Under the desk, slide
the rectangular spacer
onto the 3/8-16 x 2 1/2”
Hex Head Bolt. Attach
the nut to the bolt and
tighten until the mount is
secured to the desk.
Align the mount cup over the short end of the large “L”
bracket so you can screw the two components together
using the 3/8-16 x 7/8” Button Head Socket Cap screw and
tighten using the 7/32” allen wrench. The mount is secure
when the 3/8” screw no longer turns.
If you are using the Reverse Mount configuration, the
3/8-16 x 1 1/4” Flat Socket Cap Screw should be used.
NOTE: The rounded part
of the nut should be facing
downward.
Reverse
FLEXmount™ Set-up Options Page 6
Special Mounting Scenarios
Some desks have thick edges as well as trim that extends below the work surface. The FLEXmount™ was designed to
accommodate any challenging mounting surface.
Thick desk edge
Desk with longer trim
Desk without an edge
Desk with a small lip
Bracket Assembly
Page 7
TM
Before beginning the assembly of your arm, be sure to select a secure mounting surface by configuring your FLEXmount
Step 1
Carefully remove the stand from the monitor by loosening the 3 screws using the
M2 allen wrench. Slide the stand off of the monitor toward you.
Loosen
3 Screws
Step 2
Attach the tilt mechanism to the adapter plate using four (4) #10-32 x 3/8” Flat
Head Philips Pan screws.
Step 3
Align the tilter and apple adapter bracket with the extrusion on the back of the
monitor; sliding it into the slot on the bracket.
Slot
Slot
Step 4
M3
Nuts
M3x16
Screws
Attach the Apple bracket to the monitor using the (3) M3 x 16 Socket Head Screws.
*You will need to press down on the bracket in order to line up the holes. (This is
intended as it assures a snug fit for your monitor). Using the M3 wrench provided,
tighten the M3 nuts. (Be sure the rounded part of the nut is facing upward).
Step 5
Use the M3 wrench to lock the (2) M3 nuts on the slide bar.
Arm Assembly
Page 8
Step 1
After the mount is securely fastened, insert the shaft of the arm into the mount
cup. For the example the Through-Desk configuration was used.
Step 2
After securing the bracket to the flat panel monitor, insert the shaft of the
tilt mechanism into the forearm.
Step 3
Fasten the 10-32 x 3/8" Philips Flat Head screw and washer into the
hole in the bottom of the tilt mechanism to secure the monitor onto
the arm.
Cable Management
Step 1
Page 9
* Cable clip is for Apple Monitor cable only. Other cables may be hidden within the arm as shown in Step 2.
Tuck the Apple monitor cord
underneath the forearm, snap
the cable clip into place.
Be sure to leave enough slack
for cables to loop around the
elbow of the arm.
Step 2
The remaining cables can be hidden within the arm by following the steps and diagrams below. Feed the cables
through the endcap (elbow), up through the opening in the other end of the forearm. Align the Forearm Cap over
the forearm and snap into place. Align the Endcap Bumper over the bottom of the endcap and snap into place.
Included with your kit is a USB extension plug. Connect the end of the USB extension into the end of the USB coming
out of the keyboard. Feed the cord through the arm as above step indicates.
Step 3
Tuck the monitor cable, USB extension and the remaining cables through the opening slot of the lower channel of the
arm. Slide the plastic cable trough into place until it locks.
Adjusting your LCD arm
Page 10
Adjusting Tilt
Using the 7/32” allen wrench, tilt the monitor so it faces up and
locate the set screw under the tilter.
To tighten friction, lightly turn the wrench to the right (clockwise).
To loosen, lightly turn the wrench to the left (counter-clockwise).
When your monitor moves with ease, stays tilted in the up or
down position, the friction is set.
*Due to the different curvature of the various monitor sizes, you may discover space between the back of your monitor and the
top pads of the bracket. This space will not affect the support that your monitor receives. If you feel uncomfortable with this
space, you may uninstall the bracket and bend the top two arms forward until they touch the back of your display.
Adjusting Counter-balance
*The monitor MUST be attached before adjusting the counter-balance.
*It is important to hold the arm in a horizontal position before beginning.
Use the 7/32” allen wrench and insert into the top of the end cap. Turn left
(counter-clockwise) to strengthen. Turn right (clockwise) to weaken the arm.
Adjusting Articulation Joints
Use the 3/32” allen wrench to tighten the friction joints found at the
three articulation points until you get the feel of how you would like
your monitor to move.
Your set-up is complete. Please call our customer service department at 800.524.2744 if you require additional assistance with this
product or require a return authorization number.
Other products available from Innovative include special stands for
holding double monitors or for pivoting LCD’s, keyboard arms and wall mounts.
Wall Mounts
Keyboard Mounting
Stands
Innovative Office Products, Inc. | 100 Kuebler Road | Easton, PA 18040
www.LCDarms.com | [email protected]