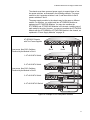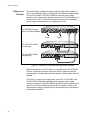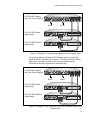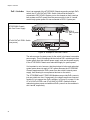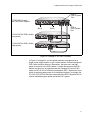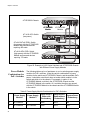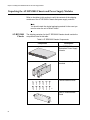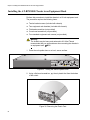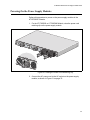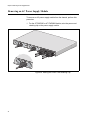
1
AT-RPS3000 Redundant Power Supply AT-RPS3000 AT-PWR250 AT-PWR800 AT-PWR1200 2179 Installation Guide 613-001498 Rev. B Copyright 2011 Allied Telesis, Inc. All rights reserved. No part of this publication may be reproduced without prior written permission from Allied Telesis, Inc. Allied Telesis and the Allied Telesis logo are trademarks of Allied Telesis, Incorporated. All other product names, company names, logos or other designations mentioned herein are trademarks or registered trademarks of their respective owners. Allied Telesis, Inc. reserves the right to make changes in specifications and other information contained in this document without prior written notice. The information provided herein is subject to change without notice. In no event shall Allied Telesis, Inc. be liable for any incidental, special, indirect, or consequential damages whatsoever, including but not limited to lost profits, arising out of or related to this manual or the information contained herein, even if Allied Telesis, Inc. has been advised of, known, or should have known, the possibility of such damages. Electrical Safety and Emissions Standards This product meets the following standards. U.S. Federal Communications Commission Radiated Energy Note: This equipment has been tested and found to comply with the limits for a Class A digital device pursuant to Part 15 of FCC Rules. These limits are designed to provide reasonable protection against harmful interference when the equipment is operated in a commercial environment. This equipment generates, uses, and can radiate radio frequency energy and, if not installed and used in accordance with this instruction manual, may cause harmful interference to radio communications. Operation of this equipment in a residential area is likely to cause harmful interference in which case the user will be required to correct the interference at his own expense. Note: Modifications or changes not expressly approved of by the manufacturer or the FCC, can void your right to operate this equipment. Industry Canada This Class A digital apparatus complies with Canadian ICES-003. Cet appareil numérique de la classe A est conforme à la norme NMB-003 du Canada. RFI Emissions FCC Class A, EN55022 Class A, EN61000-3-2, EN61000-3-3, VCCI Class A, C-TICK, CE Warning: In a domestic environment this product may cause radio interference in which case the user may be required to take adequate measures. EMC (Immunity) EN55024 Electrical Safety EN60950-1 (TUV), UL 60950-1 (CULUS) Laser Safety EN60825 3 Translated Safety Statements Important: The indicates that translations of the safety statement are available in the PDF document “Translated Safety Statements” posted on the Allied Telesis website at www.alliedtelesis.com. 4 Contents Preface ............................................................................................................................................................ 11 Document Conventions .................................................................................................................................... 12 Where to Find Web-based Guides ................................................................................................................... 13 Contacting Allied Telesis .................................................................................................................................. 14 Online Support ........................................................................................................................................... 14 Email and Telephone Support.................................................................................................................... 14 Warranty..................................................................................................................................................... 14 Returning Products .................................................................................................................................... 14 Sales or Corporate Information .................................................................................................................. 14 Management Software Updates................................................................................................................. 14 Chapter 1: Overview ...................................................................................................................................... 15 Features ........................................................................................................................................................... 16 LED Panel .................................................................................................................................................. 16 Power Supply Slots .................................................................................................................................... 17 RPS Connectors ........................................................................................................................................ 17 Power Supply Modules..................................................................................................................................... 19 System Power and Power for PoE+ ................................................................................................................. 21 System Power ............................................................................................................................................ 21 PoE+ Power ............................................................................................................................................... 22 Low-power and High-power Switches .............................................................................................................. 24 Configuration Examples ................................................................................................................................... 25 Low-power Switches .................................................................................................................................. 25 High-power Switches ................................................................................................................................. 28 PoE+ Switches........................................................................................................................................... 30 Invalid Configurations................................................................................................................................. 33 Choosing a Power Supply Module ................................................................................................................... 36 Non-PoE+ Switches ................................................................................................................................... 36 PoE+ Switches........................................................................................................................................... 37 Power Module Combinations for PoE+ Switches....................................................................................... 40 ................................................................................................................................................................... 41 LEDs................................................................................................................................................................. 42 Module A/B Ports LEDs ............................................................................................................................. 42 Power Module Status LEDs ....................................................................................................................... 44 Power Module LED .................................................................................................................................... 46 On/Off Power Switches .................................................................................................................................... 47 Guidelines......................................................................................................................................................... 48 Chapter 2: Installing the AT-RPS3000 Chassis and Power Supply Modules ........................................... 49 Reviewing Safety Precautions.......................................................................................................................... 50 Planning the Installation ................................................................................................................................... 52 Unpacking the AT-RPS3000 Chassis and Power Supply Modules.................................................................. 54 AT-RPS3000 Chassis ................................................................................................................................ 54 Power Supply Modules .............................................................................................................................. 55 Selecting a Location for the AT-RPS3000 Chassis in the Equipment Rack..................................................... 57 5 Contents Installing the AT-RPS3000 Chassis in an Equipment Rack.............................................................................. 58 Installing a Power Supply Module ..................................................................................................................... 61 Connecting the AT-RPS3000 Chassis to the x610 Series Switch ....................................................................65 Powering On the Power Supply Modules ......................................................................................................... 69 Chapter 3: Removing Power Supply Modules ............................................................................................. 75 Removing the AT-RPS-CBL1.0 Cable .............................................................................................................. 76 Removing an AC Power Supply Module ...........................................................................................................78 Chapter 4: Troubleshooting .......................................................................................................................... 83 Appendix A: Technical Specifications ......................................................................................................... 87 Physical Specifications ..................................................................................................................................... 87 Environmental Specifications ............................................................................................................................ 87 Power Specifications......................................................................................................................................... 88 Certifications ..................................................................................................................................................... 88 Port Pin-outs ..................................................................................................................................................... 89 6 Figures Figure 1: LED Panel .............................................................................................................................................................16 Figure 2: Slots A and B for the Power Supply Modules........................................................................................................17 Figure 3: Slot A and RPS 1 and 2 Ports ...............................................................................................................................17 Figure 4: Slot B and RPS 3 and 4 Ports ...............................................................................................................................18 Figure 5: RPS Ports..............................................................................................................................................................18 Figure 6: Removable and Non-removable Power Supply Modules in x610 Switches ..........................................................22 Figure 7: Example of a Single Low-power Switch Connected to an RPS System Port ........................................................25 Figure 8: Example of a Non-PoE+, Low-power Switch Connected to an RPS PoE+/System Port ......................................26 Figure 9: Example of Two Low-power Switches...................................................................................................................26 Figure 10: Example of Four Low-power Switches ................................................................................................................27 Figure 11: Example of Low-power and High-power Switches ..............................................................................................28 Figure 12: Example of Two High-power Switches on the System Ports...............................................................................29 Figure 13: Example of Two High-power, Non-PoE+ Switches on the PoE+/System Ports ..................................................29 Figure 14: Example of One PoE+ Switch .............................................................................................................................30 Figure 15: Example of Two PoE+ Switches .........................................................................................................................31 Figure 16: Example of Low-power PoE+ and Non-PoE+ Switches ......................................................................................32 Figure 17: Example of Low-power PoE+ and Non-PoE+ Switches ......................................................................................33 Figure 18: Example of an Invalid Configuration - A ..............................................................................................................34 Figure 19: Example of an Invalid Configuration - B ..............................................................................................................35 Figure 20: Example of Power Modules and Non-PoE+ Switches.........................................................................................36 Figure 21: Two AT-PWR800 Modules Providing Up to 480 Watts, with Full Redundancy...................................................37 Figure 22: Two AT-PWR800 Modules for 480 to 960 Watts, with Limited Redundancy ......................................................38 Figure 23: Two AT-PWR1200 Modules Providing Up to 780 Watts, with Full Redundancy.................................................38 Figure 24: Two AT-PWR1200 Modules for 780 to 1560 Watts, with Limited Redundancy ..................................................39 Figure 25: Example of x610 Series Switches and AT-RPS3000 Chassis with Different Power Supply Modules ................40 Figure 26: LED Panel ...........................................................................................................................................................42 Figure 27: Module A Ports LEDs ..........................................................................................................................................42 Figure 28: Module B Ports LEDs ..........................................................................................................................................43 Figure 29: Power Module Status LEDs.................................................................................................................................44 Figure 30: Power Module LED..............................................................................................................................................46 Figure 31: RPS Port On/Off Switches...................................................................................................................................47 Figure 32: 100 - 125 VAC 125 V NMA 5-20 Plug and Receptacle .......................................................................................52 Figure 33: Positioning the AT-RPS3000 Chassis in the Equipment Rack............................................................................57 Figure 34: Unauthorized AT-RPS3000 Chassis and x610 Series Switch Installations.........................................................57 Figure 35: Turning the Switch Upside Down ........................................................................................................................58 Figure 36: Removing the Plastic Feet...................................................................................................................................58 Figure 37: Attaching the Equipment Rack Brackets .............................................................................................................59 Figure 38: Mounting the AT-RPS3000 Redundant Power Supply in an Equipment Rack....................................................59 Figure 39: Removing the Blank Shipping Panel from the Back Panel..................................................................................61 Figure 40: Installing a Power Supply Module .......................................................................................................................62 Figure 41: Securing a Power Supply Module .......................................................................................................................63 Figure 42: Installing a Power Cord Retaining Clip ................................................................................................................63 Figure 43: Installing the Slot Cover.......................................................................................................................................64 Figure 44: Securing the Slot Cover.......................................................................................................................................64 Figure 45: Connecting the AT-RPS-CBL1.0 Cable to the x610 Series Switch .....................................................................65 Figure 46: Securing the AT-RPS-CBL1.0 Cable to the Switch .............................................................................................66 Figure 47: RPS Port On/Off Buttons and CABLE LEDs .......................................................................................................66 Figure 48: Connecting the AT-RPS-CBL1.0 Cable to the AT-RPS3000 Chassis.................................................................67 Figure 49: Securing the AT-RPS-CBL1.0 Cable to the AT-RPS3000 Chassis.....................................................................68 7 Figures Figure 50: Raising the Power Cord Retaining Clip ...............................................................................................................69 Figure 51: Connecting the AC Power Cord...........................................................................................................................70 Figure 52: Lowering the Power Cord Retaining Clip.............................................................................................................70 Figure 53: Lowering the Power Cord Retaining Clip.............................................................................................................71 Figure 54: Checking the FAN and DC OUT LEDs in the LED Panel ....................................................................................72 Figure 55: Checking the LOAD and CABLE LEDs in the LED Panel ...................................................................................73 Figure 56: Loosening the Thumbscrews that Secure the AT-RPS-CBL1.0 Cable to the AT-RPS3000 Chassis..................76 Figure 57: Removing the AT-RPS-CBL1.0 Cable from the AT-RPS3000 Chassis...............................................................77 Figure 58: Raising the Power Cord Retaining Clip ...............................................................................................................78 Figure 59: Removing the Power Cord...................................................................................................................................79 Figure 60: Loosening the Two Captive Screws ....................................................................................................................80 Figure 61: Removing the Power Supply from the Chassis ...................................................................................................80 Figure 62: Installing the Slot Cover.......................................................................................................................................81 Figure 63: Securing the Slot Cover.......................................................................................................................................81 Figure 64: Port Pin-outs for the RSP System and PoE+/System Ports ................................................................................89 8 Tables Table 1: Power Supply Modules ..........................................................................................................................................19 Table 2: Valid and Invalid Power Supply Combinations in the AT-RPS3000 Chassis ........................................................20 Table 3: Low-power and High-power Switches ..................................................................................................................24 Table 4: Valid and Invalid Configurations of Low- and High-power Switches for a Power Supply Module ........................24 Table 5: Power Supply Module Combinations for PoE+ Switches ......................................................................................40 Table 6: Module A and B Ports LEDs .................................................................................................................................43 Table 7: Power Module Status LEDs ..................................................................................................................................45 Table 8: Power Module LED ...............................................................................................................................................46 Table 9: AT-RPS3000 Chassis Components ......................................................................................................................54 Table 10: Power Supply Module Components ....................................................................................................................55 Table 11: RPS 1 and 3 System Ports ..................................................................................................................................89 Table 12: RPS 2 and 4 PoE+/System Ports ........................................................................................................................90 9 Tables 10 Preface This guide contains the installation instructions for the AT-RPS3000 Chassis. The chassis is a modular power supply system for the x610 Series of Layer 3 Gigabit Ethernet switches. This preface contains the following sections: “Document Conventions” on page 12 “Where to Find Web-based Guides” on page 13 “Contacting Allied Telesis” on page 14 11 Preface Document Conventions This document uses the following conventions: Note Notes provide additional information. Caution Cautions inform you that performing or omitting a specific action may result in equipment damage or loss of data. Warning Warnings inform you that performing or omitting a specific action may result in bodily injury. 12 AT-RPS3000 Redundant Power Supply Installation Guide Where to Find Web-based Guides The installation and user guides for all of the Allied Telesis products are available for viewing in portable document format (PDF) from our web site at www.alliedtelesis.com/support/documentation. 13 Preface Contacting Allied Telesis This section provides Allied Telesis contact information for technical support and for sales and corporate information. Online Support You may request technical support online by accessing the Allied Telesis Knowledge Base: www.alliedtelesis.com/support. You may use the Knowledge Base to submit questions to our technical support staff and review answers to previously asked questions. Email and Telephone Support For Technical Support via email or telephone, refer to the Support & Services section of the Allied Telesis web site: www.alliedtelesis.com/ support. Select your country from the list displayed on the website and then select the appropriate menu tab. Warranty For hardware warranty information, refer to the Allied Telesis web site at www.alliedtelesis.com/support. Returning Products Products for return or repair must first be assigned a return materials authorization (RMA) number. A product sent to Allied Telesis without an RMA number will be returned to the sender at the sender’s expense. To obtain an RMA number, contact the Allied Telesis Technical Support group at our web site: www.alliedtelesis.com/support. Select your country from the list displayed on the website. Then select the appropriate menu tab. Sales or Corporate Information You can contact Allied Telesis for sales or corporate information through our web site at www.alliedtelesis.com. To find the contact information for your country, select Contact Us. Management Software Updates New releases of management software for our managed products are available on our Allied Telesis web site at http://www.alliedtelesis.com/ support. 14 Chapter 1 Overview This chapter contains the following sections: “Features” on page 16 “Power Supply Modules” on page 19 “System Power and Power for PoE+” on page 21 “Low-power and High-power Switches” on page 24 “Configuration Examples” on page 25 “Choosing a Power Supply Module” on page 36 “LEDs” on page 42 “On/Off Power Switches” on page 47 “Guidelines” on page 48 15 Chapter 1: Overview Features The AT-RPS3000 Chassis is a modular power supply system for the x610 Series of Layer 3 Gigabit Ethernet switches. It protects the switches from power supply failures and provides additional PoE+ power. The chassis can support two or four x610 Series switches, depending on the switch model. It has two slots for power supply modules, an LED panel for viewing the status of the power modules, and four RPS connectors. As explained in this overview, the power supply modules in the chassis function in either a redundant or an active state, depending on the switch model. For non-PoE+ x610 Series switches, the chassis acts as the active power source for the switches, whose own internal, non-removable power supplies function as backup modules. For PoE+ switches, the chassis acts as a redundant power supply for system power and in a load-sharing mode for PoE+ power. Warning The AT-RPS3000 Chassis is designed specifically for the x610 Series of Layer 3 Gigabit Ethernet switches and should not be used with any other product. Note The AT-RPS3000 Chassis is not a battery backup unit. The power supply modules in the chassis have to be connected to active power sources to deliver power to the switches. LED Panel The front panel of the AT-RPS3000 Chassis has an LED panel that displays status information about the power supply modules and RPS ports. The LEDs are described in “LEDs” on page 42. 2148 LED Panel Figure 1. LED Panel 16 AT-RPS3000 Redundant Power Supply Installation Guide Power Supply Slots The slots on the back panel of the chassis are for two power supply modules. The slots are labeled A and B. A B 1 3 SYSTEM SYSTEM PoE+ / SYSTEM PoE+ / SYSTEM MODULE A MODULE B 2 A B 4 2166 Slot A Slot B Figure 2. Slots A and B for the Power Supply Modules Note The chassis is shipped from the factory with a blank panel over the power supply slots. RPS Connectors A The four RPS connectors, which connect the chassis to up to four x610 Series switches, are paired with the power supply slots. RPS 1 and 2 ports receive power from the power supply module in slot A. B 1 3 SYSTEM SYSTEM PoE+ / SYSTEM PoE+ / SYSTEM MODULE A MODULE B 2 A B 4 2166 Slot A RPS 1 and 2 ports Figure 3. Slot A and RPS 1 and 2 Ports 17 Chapter 1: Overview RPS 3 and 4 ports obtain power from the power supply module in slot B. A B 1 3 SYSTEM SYSTEM PoE+ / SYSTEM PoE+ / SYSTEM MODULE A MODULE B 2 A B 4 2166 Slot B RPS 3 and 4 ports Figure 4. Slot B and RPS 3 and 4 Ports The ports are labeled System and PoE+/System ports. The System ports provide system power to x610 Series switches, but not PoE+ power. You may use these ports to deliver system power to PoE+ and non-PoE+ switches. B 1 3 SYSTEM SYSTEM 2 B 4 PoE+ / SYSTEM PoE+ / SYSTEM MODULE A MODULE B 2206 Figure 5. RPS Ports The PoE+/System ports provide PoE+ power and system power, provided that the power modules and the switches support PoE+. For more information on the System and POE+/System ports, refer to “System Power and Power for PoE+” on page 21. 18 AT-RPS3000 Redundant Power Supply Installation Guide Power Supply Modules This table lists the power supply modules that are currently available for the AT-RPS3000 Chassis and PoE+ x610 Series switches. One module supplies only system power to the x610 Series switches and two modules provide system power and PoE+ power. Table 1. Power Supply Modules Power Source Power Supply Module AC System power only. AC System power plus 480W for PoE+. AC System power plus 780W for PoE+. DC OUT FAULT AT-PWR250 AT-PWR250 Description 100-240VAC~ 5A MAX 2185 DC OUT FAULT AT-PWR800 AT-PWR800 100-240VAC~ 12A MAX AT-PWR1200 AT-PWR1200 2186 DC OUT FAULT 100-240VAC~ 16A MAX 2187 Note There are AC and DC versions of the AT-PWR250 Module. The AC module is supported in the PoE+ x610 Switches and AT-RPS3000 Chassis. The DC module is only supported in the PoE+ x610 Switches. It is not supported in the AT-RPS3000 Chassis. 19 Chapter 1: Overview The power supply modules for the AT-RPS3000 Chassis and PoE+ x610 Series switches must be purchased separately. Non-PoE+ x610 Series switches come with non-removable power supply modules. Note The AT-PWR800 and AT-PWR1200 Modules are compatible with non-PoE+ x610 Series switches. They may be used in the AT-RPS3000 Chassis to provide active system power to non-PoE+ switches. The chassis has slots for two power supply modules. You may install one or two modules. The power supply modules may be the same model or different models. There are some combinations of power supply modules, however, that are not supported. Table 2 lists the valid and invalid combinations of modules for the chassis. Table 2. Valid and Invalid Power Supply Combinations in the AT-RPS3000 Chassis 20 Valid Combinations Invalid Combinations Two power supply modules of the same model (for instance, two AT-PWR800 Modules) One AT-PWR800 Module and one AT-PWR250 Module One AT-PWR800 Module and one AT-PWR1200 Module One AT-PWR1200 Module and one AT-PWR250 Module AT-RPS3000 Redundant Power Supply Installation Guide System Power and Power for PoE+ Although the product name contains the acronym “RPS,” which stands for “redundant power supply,” the AT-RPS3000 Chassis actually functions as the active, primary source of system power for some of the switches in the x610 Series. For others it functions both as a redundant source of system power and as an active source of additional PoE+ power. The easiest way to explain how and when the chassis supplies power to the x610 Series switch is to divide the discussion into the two types of power the switch may require: System Power “System Power,” next “PoE+ Power” on page 22 The switch uses system power to operate its switching, CPU, LEDs, fans, and management functions. The only function not supported by system power is PoE+. The switch may obtain its system power either from its own internal power supply module or from a module in the AT-RPS3000 Chassis. There is no load-sharing of system power. Consequently, one of the sources is going to be actively providing system power to the switch while the other source is held in a redundant state. The active source of system power is different for non-PoE+ and PoE+ x610 Series switches. Non-PoE+ switches use the power modules in the AT-RPS3000 Chassis as their primary, active power source for system power, and place their internal power modules in a redundant state. Thus, a non-PoE+ switch relies upon the AT-RPS3000 Chassis to provide all of its system power, and activates its internal power supply only if it stops receiving system power from the chassis. For PoE+ switches, the opposite is true. They use their internal power supply modules as the active source for system power, and the power module in the AT-RPS3000 Chassis as the redundant power source. Should there be a failure of the internal power supply in the switch or an interrupt in the AC power to it, the switch immediately begins to draw system power from the AT-RPS3000 Chassis to prevent any interruption to its network operations. The easiest way to determine whether the switch is a PoE+ or non-PoE+ x610 Series switch is to examine its model name on the front panel. PoE+ switches have “POE+” in their product names. Another way is to look at the back panel to see if the power supply is removable or non-removable. PoE+ switches have removable power modules while non-PoE+ switches have non-removable modules, as shown in Figure 6. 21 Chapter 1: Overview Removable Power Supply (PoE+ Switches) WARNING This unit m electric sho unit. 100-240 VAC~5A MAX WARNING This unit ma electric shoc unit. POWER SUPPLY POWER SUPPLY AT-PWR800 DC OUT FAULT 100-240 VAC~12A MAX 2158 Non-removable Power Supply (non-PoE+ Switches) Figure 6. Removable and Non-removable Power Supply Modules in x610 Switches To summarize, a non-PoE+ x610 Series switch uses the AT-RPS3000 Chassis as its active source of system power and its internal, nonremovable module as a redundant source. For a PoE+ x610 Series switch the reverse is true because its primary source of system power is its removable internal module and the redundant source is the power module in the AT-RPS3000 Chassis. System power for PoE+ and non-PoE+ x610 Series switches is provided by all four RPS ports on the AT-RPS3000 Chassis. RPS 1 and 3 System ports provide only system power, and RPS 2 and 4 PoE+/System ports provide PoE+ power in addition to system power. You may use any of the available power supply modules, listed in Table 1 on page 19, to provide system power to the x610 Series switches. In fact, the modules, when installed in the AT-RPS3000 Chassis, can provide system power to two low-power switches at the same time, as explained in “Low-power and High-power Switches” on page 24. The switch and chassis do not display the active or redundant status of a power supply module. You may use the LEDs and switch’s management software to determine whether a power module is operating correctly, but not whether it is the active or redundant system power for the switch. PoE+ Power The four x610 Series switches that support PoE+ on the twisted pair ports do not come with power supply modules. The modules have to be purchased separately. You may use any of the three modules in a PoE+ switch, although the AC AT-PWR250 Module does not provide PoE+ power, only system power. The AT-PWR800 and AT-PWR1200 Power Supply Modules provide 480 and 780 watts, respectively, of PoE+ power, in addition to system power. As explained earlier in this Overview, there is no load sharing of system power between the power supplies in the switch and AT-RPS3000 Chassis. Only one source is active while the other is held in a redundant state. 22 AT-RPS3000 Redundant Power Supply Installation Guide PoE+ power is different in that the power supplies in the switch and chassis do use load-sharing to provide power to the powered devices. This assumes, of course, that both supplies have PoE+ power. So, in essence, the AT-RPS3000 Chassis performs two roles for PoE+ switches. It acts as a redundant source of system power for the switches and, assuming the chassis has PoE+ power supplies, actively provides them with additional power for PoE+ so that they can support more powered devices. Of the three available power supply modules for the chassis, two modules provide PoE+ power along with system power to the PoE+ switches. They are the AT-PWR800 and AT-PWR1200 Modules. These modules can provide PoE+ power to just one switch at a time, meaning that each PoE+ switch has to have a separate power module in the AT-RPS3000 Chassis, that is, if you want the switches to receive additional PoE+ power from the chassis. All four RPS ports on the chassis may be used to provide system power to the switches. But only RPS 2 and 4 ports, labeled PoE+/System, may be used to supply PoE+ power. Thus, for a PoE+ switch to receive PoE+ power from a power supply in the chassis, it has to be connected to one of those ports. PoE+ switches that are connected to RPS 1 or 3 port will not receive extra PoE+ power, only redundant system power. 23 Chapter 1: Overview Low-power and High-power Switches The x610 Series switches are grouped into two categories of system power, which, as explained earlier, refers to the power required to run all switching and hardware functions, except for PoE+. The switch categories are low-power and high-power. The basic rule is that switches that have 24 ports are low-power devices while units that have 48 ports are highpower units. An exception is the 24-port AT-x610-24SPs/X Switch, which is a high-power device. The table shown here lists the two switch categories. Table 3. Low-power and High-power Switches Low-power Switches High-power Switches AT-x610-24Ts AT-x610-48Ts AT-x610-24Ts/X AT-x610-48Ts/X AT-x610-24Ts-POE+ AT-x610-48Ts-POE+ AT-x610-24Ts/X-POE+ AT-x610-48Ts/X-POE+ AT-x610-24SPs/X The two categories are important because the power supply modules can support two low-power switches or one high-power switch at the same time. This table lists the valid and invalid configurations of low- and highpower switches for the power modules. Table 4. Valid and Invalid Configurations of Low- and High-power Switches for a Power Supply Module Valid Configurations Invalid Configurations One low-power switch One low-power switch and one high-power switch Two low-power switches Two high power switches One high-power switch Caution A power supply module that is connected to an invalid configuration may overload and fail. The responsibility for adhering to the rule belongs to the installer because the AT-RPS3000 Chassis cannot determine the low- or high-power status of the switches connected to its ports. 24 AT-RPS3000 Redundant Power Supply Installation Guide Configuration Examples The following examples illustrate different configurations of the chassis, switches, and power supply modules. In the first example, the AT-RPS3000 Chassis, with one power supply module in slot A, is supporting a single low-power switch, connected to the RPS 1 System port. (The RPS 3 System and RPS 4 PoE+/System ports do not have power because slot B is empty.) The non-PoE+ AT-x610-24Ts Switch places its non-removable, internal power supply module in a redundant state, and receives all of its system power from the AT-RPS3000 Chassis and the power module in slot A. If there is an interruption of system power from the chassis, the switch automatically activates its internal power supply to maintain network operations. AT-RPS3000 Chassis with One Power Supply A AT-PNL800/1200 DC OUT AT-PWR800 Low-power Switches 1 3 SYSTEM SYSTEM PoE+ / SYSTEM PoE+ / SYSTEM MODULE A MODULE B 2 A B Slot B 100-240 VAC~12A MAX POWER SUPPLY Slot A AT-x610-24Ts Switch (Low-power) B FAULT 100-240 VAC~12A MAX 4 RPS 1 System Port WARNING This unit may have more than one power input. To reduce the risk of electric shock, disconnect both A/C and RPS inputs before servicing unit. RPS INPUT 12V/21A MAX RPS READY 2140 Figure 7. Example of a Single Low-power Switch Connected to an RPS System Port It should be noted that even though the switch in the example is a nonPoE+ model, the power supply module in slot A can be any of the three available power modules, including the AT-PWR800 and AT-PWR1200 Modules. The three modules may be used to provide system power to PoE+ and non-PoE+ switches. Non-PoE+ switches may be connected to either the RPS System or PoE+/ System port on the chassis. Non-PoE+ switches connected to an RPS PoE+/System port receive system power, but no power for PoE+, even if the power supply in the corresponding slot in the chassis contains a PoE+ module. This principal is illustrated in Figure 8 on page 26 where the single low-power, non-PoE+ switch from the previous example is now connected to the RPS 2 PoE+/System port, from which it receives just system power. 25 Chapter 1: Overview AT-RPS3000 Chassis with One Power Supply AT-PNL800/1200 DC OUT AT-PWR800 A B 3 SYSTEM SYSTEM PoE+ / SYSTEM PoE+ / SYSTEM MODULE A MODULE B 2 A B 4 RPS 2 PoE+/System Port Slot B POWER SUPPLY Slot A AT-x610-24Ts Switch (Low-power) 1 FAULT 100-240 VAC~12A MAX 100-240 VAC~12A MAX WARNING This unit may have more than one power input. To reduce the risk of electric shock, disconnect both A/C and RPS inputs before servicing unit. RPS INPUT RPS READY 12V/21A MAX 2141 Figure 8. Example of a Non-PoE+, Low-power Switch Connected to an RPS PoE+/System Port This example illustrates how a power supply module can provide system power to two low-power switches at the same time. The power supply module in slot A is actively supporting the low-power AT-x610-24Ts and AT-x610-24Ts/X Switches, which are connected to the RPS 1 System and RPS 2 PoE+/System ports, respectively. The power supply module in the chassis actively delivers system power to both switches, whose own nonremovable internal power supplies operate in redundant states. Again, as in the previous example, the power module in slot A can be any of the available models because they are all capable of supporting up to two lowpower switches. AT-PNL800/1200 DC OUT A AT-PWR800 AT-RPS3000 Chassis with One Power Supply B 3 SYSTEM SYSTEM PoE+ / SYSTEM PoE+ / SYSTEM MODULE A MODULE B RPS 1 System Port POWER SUPPLY 100-240 VAC~12A MAX POWER SUPPLY 100-240 VAC~12A MAX 4 RPS 2 PoE+/System Port Slot B WARNING This unit may have more than one power input. To reduce the risk of electric shock, disconnect both A/C and RPS inputs before servicing unit. RPS INPUT 12V/21A MAX AT-x610-24Ts/X Switch (Low-power) 1 2 A Slot A AT-x610-24Ts Switch (Low-power) B FAULT 100-240 VAC~12A MAX RPS READY WARNING This unit may have more than one power input. To reduce the risk of electric shock, disconnect both A/C and RPS inputs before servicing unit. RPS INPUT 12V/21A MAX RPS READY 2135 Figure 9. Example of Two Low-power Switches 26 AT-RPS3000 Redundant Power Supply Installation Guide The chassis must have a second power supply to support three or four low-power switches, as illustrated in the following example. The power module in slot A supports switches 1 and 2, and the module in slot B powers switches 3 and 4. The power supply modules in the chassis may be the same or different models. For instance, you might install two AT-PWR250 Modules or perhaps two AT-PWR1200 Modules. You may also combine the AT-PWR800 and AT-PWR1200 Modules in the chassis, installing one of each model in the slots. However, you may not combine the AT-PWR250 Module with the AT-PWR800 or AT-PWR1200 Module in the chassis, as explained in “Power Supply Modules” on page 19. DC POWER DC OUT A FAULT FAULT AT-PWR800 AT-PWR800 AT-RPS3000 Chassis with Two Power Supplies 100-240 VAC~12A MAX B 1. AT-x610-24Ts Switch 100-240 VAC~12A MAX 3 SYSTEM SYSTEM PoE+ / SYSTEM PoE+ / SYSTEM MODULE A MODULE B 4 Slot B POWER SUPPLY Slot A 1 2 A Low-power, Non-PoE+ Switches Powered by the Module in Slot A B 100-240 VAC~12A MAX WARNING This unit may have more than one power input. To reduce the risk of electric shock, disconnect both A/C and RPS inputs before servicing unit. RPS INPUT 12V/21A MAX RPS READY 100-240 VAC~12A MAX Low-power, Non-PoE+ Switches Powered by the Module in Slot B POWER SUPPLY 2. AT-x610-24Ts Switch WARNING This unit may have more than one power input. To reduce the risk of electric shock, disconnect both A/C and RPS inputs before servicing unit. RPS INPUT 3. AT-x610-24Ts Switch 100-240 VAC~12A MAX POWER SUPPLY 12V/21A MAX RPS READY WARNING This unit may have more than one power input. To reduce the risk of electric shock, disconnect both A/C and RPS inputs before servicing unit. RPS INPUT RPS READY 12V/21A MAX 100-240 VAC~12A MAX POWER SUPPLY 4. AT-x610-24Ts/X Switch WARNING This unit may have more than one power input. To reduce the risk of electric shock, disconnect both A/C and RPS inputs before servicing unit. RPS INPUT 12V/21A MAX RPS READY 2138 Figure 10. Example of Four Low-power Switches 27 Chapter 1: Overview The power supply modules can support just one high-power switch at a time. In the example in Figure 11 on page 28, the chassis is supporting the AT-x610-24Ts and AT-x610-48Ts Switches, with two power supply modules, one for each switch. Even though the AT-x610-24Ts Switch is a low-power unit, the AT-x610-48Ts Switch must have its own dedicated power supply module because it is a high-power device. DC OUT A DC POWER FAULT 100-240 VAC~12A MAX PoE+ / SYSTEM PoE+ / SYSTEM MODULE A MODULE B 4 POWER SUPPLY WARNING This unit may have more than one power input. To reduce the risk of electric shock, disconnect both A/C and RPS inputs before servicing unit. RPS INPUT 12V/21A MAX 100-240 VAC~12A MAX SYSTEM Slot B POWER SUPPLY AT-x610-48Ts Switch (High-power) 3 SYSTEM 2 B 100-240 VAC~12A MAX 1 100-240 VAC~12A MAX A Slot A AT-x610-24Ts Switch (Low-power) B FAULT AT-PWR800 AT-RPS3000 Chassis with Two Power Supplies AT-PWR800 High-power Switches RPS READY WARNING This unit may have more than one power input. To reduce the risk of electric shock, disconnect both A/C and RPS inputs before servicing unit. RPS INPUT 12V/21A MAX RPS READY 2136 Figure 11. Example of Low-power and High-power Switches When a high-power, non-PoE+ switch is connected to the AT-RPS3000 Chassis, it responds just like a low-power switch. It places its internal power supply in the redundant state and draws its system power from the chassis. In Figure 12 on page 29, the high-power, non-PoE+ AT-x610-48Ts and AT-x610-48Ts/X Switches are supported by separate power supply modules, with the AT-x610-48Ts Switch supported by the module in slot A and the AT-x610-48Ts/XSwitch powered by the module in slot B. If the chassis stops supplying system power to the switches, they activate their internal power supplies. 28 AT-RPS3000 Redundant Power Supply Installation Guide DC OUT A DC POWER FAULT 100-240 VAC~12A MAX B 1 100-240 VAC~12A MAX B 100-240 VAC~12A MAX MODULE B 4 RPS INPUT RPS READY WARNING This unit may have more than one power input. To reduce the risk of electric shock, disconnect both A/C and RPS inputs before servicing unit. POWER SUPPLY 100-240 VAC~12A MAX MODULE A WARNING This unit may have more than one power input. To reduce the risk of electric shock, disconnect both A/C and RPS inputs before servicing unit. 12V/21A MAX AT-x610-48Ts/X Switch (High-power) SYSTEM PoE+ / SYSTEM Slot B POWER SUPPLY AT-x610-48Ts Switch (High-power) SYSTEM PoE+ / SYSTEM 2 A Slot A 3 FAULT AT-PWR800 AT-PWR800 AT-RPS3000 Chassis with Two Power Supplies RPS INPUT RPS READY 12V/21A MAX 2136 Figure 12. Example of Two High-power Switches on the System Ports You may use either the System or PoE+/System port to connect highpower, non-PoE+ switches to the chassis. To illustrate this point, the two high-power, non-PoE+ switches in the previous example may be connected to the PoE+/System ports, as shown here. DC OUT A DC OUT FAULT 100-240 VAC~12A MAX POWER SUPPLY 100-240 VAC~12A MAX PoE+ / SYSTEM PoE+ / SYSTEM MODULE A MODULE B 4 WARNING This unit may have more than one power input. To reduce the risk of electric shock, disconnect both A/C and RPS inputs before servicing unit. RPS INPUT 12V/21A MAX AT-x610-48Ts/X Switch (High-power) SYSTEM Slot B POWER SUPPLY 100-240 VAC~12A MAX 3 SYSTEM 2 B Slot A 1 100-240 VAC~12A MAX A AT-x610-48Ts Switch (High-power) B FAULT AT-PWR800 AT-PWR800 AT-RPS3000 Chassis with Two Power Supplies RPS READY WARNING This unit may have more than one power input. To reduce the risk of electric shock, disconnect both A/C and RPS inputs before servicing unit. RPS INPUT 12V/21A MAX RPS READY 2139 Figure 13. Example of Two High-power, Non-PoE+ Switches on the PoE+/ System Ports 29 Chapter 1: Overview PoE+ Switches Here is an example of the AT-RPS3000 Chassis supporting a single PoE+ switch, the AT-x610-24Ts/X-POE+ Switch. Notice that the switch is connected to RPS 2 PoE+/System port on the chassis so that it receives both system and PoE+ power from the power module in slot A. It would receive only system power if it was connected to RPS 1 System port. AT-RPS3000 Chassis with One Power Supply AT-PNL800/1200 DC OUT AT-PWR800 A B 3 SYSTEM SYSTEM PoE+ / SYSTEM PoE+ / SYSTEM MODULE A MODULE B 2 A B Slot A 4 RPS 2 PoE+/System Port Slot B DC OUT FAULT 100-240 VAC~12A MAX POWER SUPPLY AT-PWR800 AT-x610-24Ts/X-POE+ Switch (Low-power) 1 FAULT 100-240 VAC~12A MAX WARNING This unit may have more than one power input. To reduce the risk of electric shock, disconnect both A/C and RPS inputs before servicing unit. RPS INPUT 12V/21A MAX RPS READY 2142 Figure 14. Example of One PoE+ Switch The active source of system power for the switch is its internal, removable power supply. This is in keeping with the rule that PoE+ switches gain their system power from their internal power supply, and use the power supply in the AT-RPS3000 Chassis as a redundant supply for system power. It is important to note, however, that the principal of active and redundant system power does not apply to PoE+ power because the AT-RPS3000 Chassis supplements the PoE+ power from the switch’s internal power supply, thus allowing for more powered devices on the switch. The AT-PWR800 and AT-PWR1200 Modules can provide PoE+ power to just one switch at a time. Consequently, the chassis must have a second module if it is to support two PoE+ switches. In Figure 15 on page 31, the AT-x610-24Ts/X-POE+ and AT-x610-48Ts/X-POE+ Switches receive redundant system power and additional PoE+ power from the modules in slot A and B, respectively. 30 AT-RPS3000 Redundant Power Supply Installation Guide RPS 2 PoE+/System Port A DC OUT DC POWER FAULT 100-240 VAC~12A MAX 3 SYSTEM SYSTEM PoE+ / SYSTEM PoE+ / SYSTEM MODULE A MODULE B 2 B 4 RPS 4 PoE+/System Port Slot B FAULT POWER SUPPLY AT-PWR800 DC OUT 100-240 VAC~12A MAX WARNING This unit may have more than one power input. To reduce the risk of electric shock, disconnect both A/C and RPS inputs before servicing unit. RPS INPUT 12V/21A MAX RPS READY DC OUT FAULT 100-240 VAC~12A MAX POWER SUPPLY AT-PWR800 AT-x610-48Ts/X-POE+ Switch (High-power) 1 100-240 VAC~12A MAX A Slot A AT-x610-24Ts/X-POE+ Switch (Low-power) B FAULT AT-PWR800 AT-PWR800 AT-RPS3000 Chassis with Two Power Supplies WARNING This unit may have more than one power input. To reduce the risk of electric shock, disconnect both A/C and RPS inputs before servicing unit. RPS INPUT 12V/21A MAX RPS READY 2143 Figure 15. Example of Two PoE+ Switches In Figure 16 on page 32, two low-power switches are supported by a single power supply module, in slot A of the chassis. One switch supports PoE+ while the other does not. (Remember, the terms low- and highpower do not refer to the PoE+ feature. A switch that supports the PoE+ feature may be a low- or high-power device.) Because it is a non-PoE+ switch, the AT-x610-24Ts Switch is connected to RPS 1 System port, from which it receives system power for its switching functions. In contrast, the AT-x610-24Ts/X-POE+ Switch is connected to the RPS 2 System/PoE+ to receive redundant system power and active PoE+ power. 31 Chapter 1: Overview AT-PNL800/1200 DC OUT A AT-PWR800 AT-RPS3000 Chassis with One Power Supply B B SYSTEM PoE+ / SYSTEM PoE+ / SYSTEM MODULE A MODULE B POWER SUPPLY 100-240 VAC~12A MAX 4 Slot B Slot A WARNING This unit may have more than one power input. To reduce the risk of electric shock, disconnect both A/C and RPS inputs before servicing unit. RPS INPUT 12V/21A MAX RPS READY DC OUT FAULT 100-240 VAC~12A MAX POWER SUPPLY AT-PWR800 AT-x610-24Ts/X-POE+ Switch (Low-power) 3 SYSTEM 2 A AT-x610-24Ts Switch (Low-power) 1 FAULT 100-240 VAC~12A MAX WARNING This unit may have more than one power input. To reduce the risk of electric shock, disconnect both A/C and RPS inputs before servicing unit. RPS INPUT 12V/21A MAX RPS READY 2144 Figure 16. Example of Low-power PoE+ and Non-PoE+ Switches The AT-PWR800 or AT-PWR1200 Module in slot A is performing three functions for the two switches. It is acting as the active source of system power for the AT-x610-24Ts Switch connected to RPS 1 System port, as a redundant source of system power for the AT-x610-24Ts-POE+ connected to the RPS 2 PoE+/System port, and as an active source of addition PoE+ power for the PoE+ switch. The example in Figure 17 on page 33 builds on the previous example, adding a power supply module to slot B and two more low power PoE+ and non-PoE+ switches. 32 AT-RPS3000 Redundant Power Supply Installation Guide DC OUT DC OUT A FAULT FAULT AT-PWR800 AT-PWR800 AT-RPS3000 Chassis with Two Power Supplies 100-240 VAC~12A MAX B Switches supported by the Power Module in Slot A. POWER SUPPLY AT-x610-24Ts Switch (Low-power) PoE+ / SYSTEM PoE+ / SYSTEM MODULE A MODULE B 4 RPS INPUT RPS READY FAULT POWER SUPPLY AT-PWR800 DC OUT 100-240 VAC~12A MAX WARNING This unit may have more than one power input. To reduce the risk of electric shock, disconnect both A/C and RPS inputs before servicing unit. RPS INPUT POWER SUPPLY 12V/21A MAX AT-x610-24Ts/X Switch (Low-power) 100-240 VAC~12A MAX RPS READY WARNING This unit may have more than one power input. To reduce the risk of electric shock, disconnect both A/C and RPS inputs before servicing unit. RPS INPUT RPS READY 12V/21A MAX DC OUT FAULT 100-240 VAC~12A MAX POWER SUPPLY AT-PWR800 AT-x610-24Ts/X-POE+ Switch (Low-power) SYSTEM WARNING This unit may have more than one power input. To reduce the risk of electric shock, disconnect both A/C and RPS inputs before servicing unit. 12V/21A MAX Switches supported by the Power Module in Slot B. 3 SYSTEM Slot B Slot A 100-240 VAC~12A MAX 1 2 A AT-x610-24Ts-POE+ Switch (Low-power) B 100-240 VAC~12A MAX WARNING This unit may have more than one power input. To reduce the risk of electric shock, disconnect both A/C and RPS inputs before servicing unit. RPS INPUT 12V/21A MAX RPS READY 2211 Figure 17. Example of Low-power PoE+ and Non-PoE+ Switches Invalid Configurations Here are examples of invalid configurations. In the first example in Figure 18 on page 34, two low-power, non-PoE+ switches are connected to RPS 1 and 3 System ports on a chassis that has one power module in slot A. While it is true that you may use one power supply module to supply system power to two low-power switches, you have to be sure to connect the switches to the correct ports. The power supply module in slot A delivers power to RPS 1 and 2 ports. RPS 3 and 4 ports are not receiving any power because slot B is empty. To correct the problem, you could connect the AT-x610-24Ts/X Switch to RPS 2 PoE+/System port on the chassis or install another power supply module. 33 Chapter 1: Overview DC OUT A AT-PWR800 AT-RPS3000 Chassis with One Power Supply B AT-PNL800/1200 FAULT B SYSTEM PoE+ / SYSTEM PoE+ / SYSTEM MODULE A MODULE B POWER SUPPLY 100-240 VAC~12A MAX WARNING This unit may have more than one power input. To reduce the risk of electric shock, disconnect both A/C and RPS inputs before servicing unit. RPS INPUT POWER SUPPLY 12V/21A MAX 100-240 VAC~12A MAX 4 Slot B Slot A AT-x610-24Ts/X Switch (Low-power) 3 SYSTEM 2 A AT-x610-24Ts Switch (Low-power) 1 100-240 VAC~12A MAX RPS READY WARNING This unit may have more than one power input. To reduce the risk of electric shock, disconnect both A/C and RPS inputs before servicing unit. RPS INPUT 12V/21A MAX RPS READY 2211 Figure 18. Example of an Invalid Configuration - A In the example in Figure 19 on page 35, the power supply in slot A is supporting a low-power switch and a high-power switch. This configuration is invalid because the power supply modules can support only one switch if it is a high-power switch. You could resolve the problem by installing a power supply module in slot B and connecting one of the switches to RPS port 3 or 4. The resolution is shown in Figure 11 on page 28. 34 AT-RPS3000 Redundant Power Supply Installation Guide AT-PNL800/1200 DC OUT A AT-PWR800 AT-RPS3000 Chassis with One Power Supply B B SYSTEM PoE+ / SYSTEM PoE+ / SYSTEM MODULE A MODULE B POWER SUPPLY 100-240 VAC~12A MAX WARNING This unit may have more than one power input. To reduce the risk of electric shock, disconnect both A/C and RPS inputs before servicing unit. RPS INPUT POWER SUPPLY 12V/21A MAX 100-240 VAC~12A MAX 4 Slot B Slot A AT-x610-48Ts Switch (High-power) 3 SYSTEM 2 A AT-x610-24Ts Switch (Low-power) 1 FAULT 100-240 VAC~12A MAX RPS READY WARNING This unit may have more than one power input. To reduce the risk of electric shock, disconnect both A/C and RPS inputs before servicing unit. RPS INPUT 12V/21A MAX RPS READY 2135 Figure 19. Example of an Invalid Configuration - B 35 Chapter 1: Overview Choosing a Power Supply Module Here are a few suggestions on how to choose the power supply modules for the x610 Series switches and AT-RPS3000 Chassis. Non-PoE+ Switches You may use any of the three available power supply modules listed in Table 1 on page 19, even the two PoE+ modules, in the AT-RPS3000 Chassis to provide active system power to non-PoE+ switches. The switches may be connected to any of the four RPS connectors on the chassis. A power module can support two low-power switches or one high-power switch. For more information, refer to “Low-power and High-power Switches” on page 24. Here is an example. If you have five low-power and two high-power nonPoE+ x610 Series switches, you would need five power modules, of any model, and three chassis. The five low-power switches would need three modules and the high-power switches two modules. The power modules can be the same model, such as all AT-PWR800 Modules, or different models. WARNING This unit may have more than one power input. To reduce the risk of electric shock, disconnect both A/C and RPS inputs before servicing unit. DC OUT A 4 DC OUT FAULT 100-240 VAC~12A MAX B SYSTEM SYSTEM PoE+ / SYSTEM PoE+ / SYSTEM MODULE A MODULE B 2 4 WARNING This unit may have more than one power input. To reduce the risk of electric shock, disconnect both A/C and RPS inputs before servicing unit. RPS INPUT 12V/21A MAX RPS READY 1 3 SYSTEM SYSTEM PoE+ / SYSTEM PoE+ / SYSTEM MODULE A MODULE B 2 B 100-240 VAC~12A MAX 4 WARNING This unit may have more than one power input. To reduce the risk of electric shock, disconnect both A/C and RPS inputs before servicing unit. RPS INPUT 12V/21A MAX 12V/21A MAX B FAULT 100-240 VAC~12A MAX A B 100-240 VAC~12A MAX 3 FAULT 100-240 VAC~12A MAX A RPS INPUT 1 AT-PWR800 MODULE B AT-PWR800 SYSTEM PoE+ / SYSTEM MODULE A POWER SUPPLY POWER SUPPLY 3 SYSTEM PoE+ / SYSTEM 2 B 100-240 VAC~12A MAX 1 100-240 VAC~12A MAX POWER SUPPLY B AT-PWR800 FAULT AT-PWR800 AT-PWR800 FAULT 100-240 VAC~12A MAX A AT-PNL800/1200 DC OUT A DC OUT DC OUT A RPS READY RPS READY WARNING This unit may have more than one power input. To reduce the risk of electric shock, disconnect both A/C and RPS inputs before servicing unit. POWER SUPPLY 100-240 VAC~12A MAX RPS READY POWER SUPPLY WARNING This unit may have more than one power input. To reduce the risk of electric shock, disconnect both A/C and RPS inputs before servicing unit. RPS INPUT 12V/21A MAX RPS READY WARNING This unit may have more than one power input. To reduce the risk of electric shock, disconnect both A/C and RPS inputs before servicing unit. RPS INPUT RPS READY 12V/21A MAX 100-240 VAC~12A MAX 100-240 VAC~12A MAX RPS INPUT 12V/21A MAX POWER SUPPLY 100-240 VAC~12A MAX POWER SUPPLY 2211 WARNING This unit may have more than one power input. To reduce the risk of electric shock, disconnect both A/C and RPS inputs before servicing unit. RPS INPUT 12V/21A MAX RPS READY Low-power, non-PoE+ switches powered by the module in slot B. High-power, non-PoE+ switch powered by the module in slot B. High-power, non-PoE+ switch powered by the module in slot A. Low-power, non-PoE+ switch powered by the module in slot A. Low-power, non-PoE+ switches powered by the module in slot A. Figure 20. Example of Power Modules and Non-PoE+ Switches 36 AT-RPS3000 Redundant Power Supply Installation Guide PoE+ Switches The PoE+ switches do not come with power supplies. You must purchase them separately and install them as part of the switch’s installation procedure. The only way to determine which power module is appropriate for a PoE+ switch is to determine the amount of power the powered devices connected to the switch will require. The powered requirements of the devices can be found in their documentation. If the power requirements of the power devices of the switch are below 480 watts, you may use the AT-PWR800 Module. If you want PoE+ redundancy, you would also install an AT-PWR800 Module in the AT-RPS3000 Chassis. AT-PNL800/1200 DC OUT A AT-PWR800 AT-RPS3000 Chassis B 1 3 FAULT 100-240 VAC~12A MAX SYSTEM SYSTEM PoE+ / SYSTEM PoE+ / SYSTEM MODULE A MODULE B 2 A B 4 AT-PWR800 Module DC OUT FAULT 100-240 VAC~12A MAX POWER SUPPLY AT-PWR800 AT-x610-24Ts/X-POE+ Switch with powered devices requiring up to 480 watts WARNING This unit may have more than one power input. To reduce the risk of electric shock, disconnect both A/C and RPS inputs before servicing unit. RPS INPUT 12V/21A MAX RPS READY 2142 AT-PWR800 Module Figure 21. Two AT-PWR800 Modules Providing Up to 480 Watts, with Full Redundancy If the total power requirements of the devices on a PoE+ switch are greater than 480 watts, you have two possible solutions to providing the necessary power. If the power requirement is between 480 and 960 watts, you could use the load-sharing property of two AT-PWR800 Modules to provide up to 960 watts, as shown in Figure 22 on page 38. The drawback to this approach is that PoE+ redundancy extends only to 480 watts, the power supplied by a single power module. If one of the power supplies were to stop functioning, the switch would have to deny power to some powered devices. For example, if the powered devices on the AT-x610-24Ts/X-POE+ Switch required 550 watts, the two AT-PWR800 Modules would each provide half, or 275 watts, of the power requirements of the devices. If power is lost on one of the power supplies, the remaining power module will supply up to 480 watts of power to the switch, which, being short 70 watts, will have to deny power to some of the devices. 37 Chapter 1: Overview AT-PNL800/1200 DC OUT A AT-PWR800 AT-RPS3000 Chassis B 1 3 FAULT 100-240 VAC~12A MAX SYSTEM SYSTEM PoE+ / SYSTEM PoE+ / SYSTEM MODULE A MODULE B 2 A B 4 AT-PWR800 Module AT-x610-24Ts/X-POE+ Switch with powered devices requiring 480 to 960 watts WARNING This unit may have more than one power input. To reduce the risk of electric shock, disconnect both A/C and RPS inputs before servicing unit. FAULT POWER SUPPLY AT-PWR800 DC OUT 100-240 VAC~12A MAX RPS INPUT 12V/21A MAX RPS READY 2142 AT-PWR800 Module Figure 22. Two AT-PWR800 Modules for 480 to 960 Watts, with Limited Redundancy Another approach to dealing with a PoE+ switch that needs more than 480 watts for its powered devices is with the AT-PWR1200 Module. This module can provide 780 watts. If you install this module in both the switch and chassis, the switch will have PoE+ power redundancy up to 780 watts. A AT-PNL800/1200 DC OUT AT-PWR1200 AT-RPS3000 Chassis B 1 3 FAULT 100-240 VAC~16A MAX SYSTEM SYSTEM PoE+ / SYSTEM PoE+ / SYSTEM MODULE A MODULE B 2 A B 4 DC OUT FAULT 100-240 VAC~16A MAX POWER SUPPLY AT-x610-24Ts/X-POE+ Switch with powered devices requiring up to 780 watts AT-PWR1200 AT-PWR1200 Module WARNING This unit may have more than one power input. To reduce the risk of electric shock, disconnect both A/C and RPS inputs before servicing unit. RPS INPUT 12V/21A MAX RPS READY 2165 AT-PWR1200 Module Figure 23. Two AT-PWR1200 Modules Providing Up to 780 Watts, with Full Redundancy For example, if the total power requirements of the devices connected to the switch is 720 watts, each AT-PWR1200 Module would be responsible for providing 360 watts. A failure of one power supplies will not affect the ability of the switch to support all of the powered devices, because the power capacity of the remaining AT-PWR1200 Module will be adequate to meet the needs of all the devices. 38 AT-RPS3000 Redundant Power Supply Installation Guide Two AT-PWR1200 Modules may be used for amounts above 780 watts, up to 1560 watts, but there is no redundancy for power requirements above 780 watts. A AT-PNL800/1200 DC OUT AT-PWR1200 AT-RPS3000 Chassis B 1 3 FAULT 100-240 VAC~16A MAX SYSTEM SYSTEM PoE+ / SYSTEM PoE+ / SYSTEM MODULE A MODULE B 2 A B 4 DC OUT FAULT 100-240 VAC~16A MAX POWER SUPPLY AT-x610-48Ts-POE+ Switch with powered devices consuming 780 to 1560 watts AT-PWR1200 AT-PWR1200 Module WARNING This unit may have more than one power input. To reduce the risk of electric shock, disconnect both A/C and RPS inputs before servicing unit. RPS INPUT 12V/21A MAX RPS READY 2165 AT-PWR1200 Module Figure 24. Two AT-PWR1200 Modules for 780 to 1560 Watts, with Limited Redundancy The power modules in the switches and chassis in the examples up to this point have been the same model. But as shown in Figure 25 on page 40, they can be different. The example shows a chassis that is supporting three switches, two of which are low-power and one is high-power. 39 Chapter 1: Overview A DC OUT AT-PWR1200 DC OUT FAULT AT-PWR800 AT-RPS3000 Chassis 100-240 VAC~12A MAX B AT-PWR800 Module 100-240 VAC~12A MAX SYSTEM PoE+ / SYSTEM PoE+ / SYSTEM MODULE A MODULE B 4 WARNING This unit may have more than one power input. To reduce the risk of electric shock, disconnect both A/C and RPS inputs before servicing unit. RPS INPUT RPS READY 12V/21A MAX FAULT POWER SUPPLY AT-PWR1200 DC OUT 100-240 VAC~16A MAX WARNING This unit may have more than one power input. To reduce the risk of electric shock, disconnect both A/C and RPS inputs before servicing unit. RPS INPUT RPS READY 12V/21A MAX DC OUT FAULT 100-240 VAC~5A MAX POWER SUPPLY AT-PWR250 AT-x610-48Ts-POE+ Switch (high-power) with the AT-PWR250 Module and powered devices requiring 710 watts. 3 SYSTEM AT-PWR1200 Module POWER SUPPLY AT-x610-24Ts Switch (low-power) 1 2 A AT-x610-24Ts/X-POE+ Switch (low-power) with the AT-PWR1200 Module and powered devices requiring 420 watts. B FAULT 100-240 VAC~12A MAX WARNING This unit may have more than one power input. To reduce the risk of electric shock, disconnect both A/C and RPS inputs before servicing unit. RPS INPUT 12V/21A MAX RPS READY 2154 Figure 25. Example of x610 Series Switches and AT-RPS3000 Chassis with Different Power Supply Modules Power Module Combinations for PoE+ Switches The following table may be of assistance to you in selecting power supply modules for PoE+ switches. It lists the various combinations of power modules for the switch and AT-RPS3000 Chassis, and the available PoE+ power. It should be noted that it does not matter which module is in the switch and which is in the chassis. For example, in option 4, the AT-PWR800 Module could be in the AT-RPS3000 Chassis and the AT-PWR250 Module in the switch. Or it could be the other way around, with the AT-PWR250 Module in the chassis and the AT-PWR800 Module in the switch. Table 5. Power Supply Module Combinations for PoE+ Switches Power Supply Module 1 Power Supply Module 2 Range of PoE+ Power with Redundancy Range of PoE+ Power without Redundancy System Power Redundancy 1 AT-PWR250 -- None None No 2 AT-PWR250 AT-PWR250 None None Yes 40 AT-RPS3000 Redundant Power Supply Installation Guide Table 5. Power Supply Module Combinations for PoE+ Switches Power Supply Module 1 Power Supply Module 2 Range of PoE+ Power with Redundancy Range of PoE+ Power without Redundancy System Power Redundancy 3 AT-PWR800 -- None 0 to 480 watts No 4 AT-PWR800 AT-PWR250 None 0 to 480 watts Yes 5 AT-PWR800 AT-PWR800 0 to 480 watts 481 to 960 watts Yes 6 AT-PWR1200 -- None 0 to 780 watts No 7 AT-PWR1200 AT-PWR250 None 0 to 780 watts Yes 8 AT-PWR1200 AT-PWR800 0 to 480 watts 481 to 1260 watts Yes 9 AT-PWR1200 AT-PWR1200 0 to 780 watts 781 to 1440 watts Yes 41 Chapter 1: Overview LEDs On the front panel of the AT-RPS3000 Chassis is an LED panel that displays status information about the power supply modules and RPS ports. 2148 LED Panel Figure 26. LED Panel Module A/B Ports LEDs A DC OUT FAULT 100-240 VAC~12A MAX AT-PWR800 DC OUT AT-PWR800 A The LEDs in the Module A Ports section of the LED panel provide information about the status of RPS ports 1 and 2, which receive their power from the power supply module in slot A. B 1 3 FAULT 100-240 VAC~12A MAX SYSTEM SYSTEM PoE+ / SYSTEM PoE+ / SYSTEM MODULE A MODULE B 2 B 4 2156 Figure 27. Module A Ports LEDs 42 AT-RPS3000 Redundant Power Supply Installation Guide The LEDs in the Module B Ports section provide information you may use to monitor RPS ports 3 and 4, whose power is provided by the power supply module in slot B. A DC OUT FAULT B 1 3 FAULT AT-PWR800 AT-PWR800 DC OUT 100-240 VAC~12A MAX 100-240 VAC~12A MAX SYSTEM SYSTEM PoE+ / SYSTEM PoE+ / SYSTEM MODULE A MODULE B 2 A B 4 2157 Figure 28. Module B Ports LEDs The LEDs are described in this table. Table 6. Module A and B Ports LEDs LED State Description LOAD Green The port is operating normally. Amber The port has encountered a problem. Off This LED state indicates one of the following: The port is disabled. There is no power supply in the power supply slot. The power supply is powered off. 43 Chapter 1: Overview Table 6. Module A and B Ports LEDs (Continued) Power Module Status LEDs A State Description CABLE Green The RPS port is enabled and connected to an x610 Series switch, and the power supply module is powered on. Amber The RPS port is not connected to an x610 Series switch. Off This LED state indicates one of the following: DC OUT AT-PWR800 FAULT 100-240 VAC~12A MAX The RPS port is disabled. The power supply slot is empty. The power supply module is not powered on. The power supply module has failed. For general status information about the power supply modules, refer to the FAN and DC OUT LEDs in the Power Module Status section of the LED panel. DC OUT AT-PWR800 A LED B 1 3 FAULT 100-240 VAC~12A MAX SYSTEM SYSTEM PoE+ / SYSTEM PoE+ / SYSTEM MODULE A MODULE B 2 B 4 Figure 29. Power Module Status LEDs 44 AT-RPS3000 Redundant Power Supply Installation Guide Table 7 describes the Power Module Status LEDs. Table 7. Power Module Status LEDs LED State Description FAN Green The power module’s fans are operating normally. Amber One or both fans in the module have stopped or are operating below their normal operating speed. Off No power supply module is installed in the module slot. Green The DC output from the power supply module to the RPS ports is within the normal operating range. Amber The DC output from the power supply module is below the normal operating range, either because the module is failing or the input voltage from the AC power source is below the normal operating range. Off The module is not receiving any AC power or the slot is empty. Green The temperatures inside the power supply modules are in the normal operating range. Amber One of the power supply modules is experiencing an increase in temperature that exceeds the normal operating range. The affected module is continuing to provide system power to its two RPS ports, but has stopped providing PoE+ power to the PoE+/System port. To determine which power supply in the chassis is overheating, use the SHOW SYSTEM ENVIRONMENT command in the management software on the x610 Series switch. DC OUT TEMP 45 Chapter 1: Overview Power Module LED The power modules have a DC OUT/FAULT LED, shown in Figure 30 on page 46, that displays the same information as the DC OUT LEDs on the front panel. DC OUT FAULT 100-240 VAC~12A MAX A DC OUT B 1 3 FAULT AT-PWR800 AT-PWR800 DC OUT FAULT 100-240 VAC~12A MAX 100-240 VAC~12A MAX SYSTEM SYSTEM PoE+ / SYSTEM PoE+ / SYSTEM MODULE A MODULE B 2 A B 4 2162 Figure 30. Power Module LED Table 8 describes the Power Module LED. Table 8. Power Module LED 46 LED State Description DC OUT/ FAULT Green The DC output from the power supply module is within the normal operating range. Amber The DC output from the power supply module is below the normal operating range, either because the module is failing or the input voltage from the AC power source is below the normal operating range. Off The module is not receiving any AC power. AT-RPS3000 Redundant Power Supply Installation Guide On/Off Power Switches The LED panel has On/Off switches that control the RPS ports. You may use the buttons to turn the ports on or off. When the chassis is operational, you should always turn off a port before connecting or disconnecting its RPS cable. 2207 RPS Port 1 Switch RPS Port 2 Switch RPS Port 3 Switch RPS Port 4 Switch Figure 31. RPS Port On/Off Switches Caution The electronic circuitry inside the chassis may be damaged if you do not turn off an RPS port before connecting or disconnecting the RPS cable. Review the following before turning off an RPS port on the chassis: Turning off an RPS port stops the transmission of system power. The switch that is connected to the RPS port will stop functioning if it is completely dependent on the AT-RPS3000 Chassis for its system power, either because its internal power supply has failed or been removed. Turning off an PoE+/System port also stops the transmission of PoE+ power. A PoE+ switch may support fewer powered devices or stop supporting all devices, depending on whether its internal power module supports PoE+. 47 Chapter 1: Overview Guidelines Here is a summary of the rules and guidelines discussed in this chapter: Caution The AT-RPS3000 Chassis is designed specifically for the x610 Series of Layer 3 Gigabit Ethernet switches. It should not be used with any other product. 48 You may install up to two power supply modules in the chassis. The power supply module in slot A (left-hand slot as you face the rear panel) provides power to the RPS 1 System and RPS 2 PoE+/System ports. The power supply module in slot B (right-hand slot) provides power to the RPS 3 System and RPS 4 PoE+/System ports. The AT-RPS3000 Chassis can support two power modules of the same type, such as two AT-PWR800 Modules, or one AT-PWR800 Module and one AT-PWR1200 Module. All other combinations are not allowed, as explained in “Power Supply Modules” on page 19. The AT-PWR250 Power Supply Module may be used to provide system power to two low-power switches or one high-power switch. The module does not provide PoE+ power, The AT-PWR800 and AT-PWR1200 Modules may be used to supply system power to two low-power switches or one high-power switch. They may also be used to provide 480W or 780W, respectively, of additional PoE+ power to one PoE+ switch. You may use the AT-PWR800 and AT-PWR1200 Modules in the AT-RPS3000 Chassis to provide redundant system power to nonPoE+ switches. The modules provide redundant system power but no power for PoE+ for non-PoE+ switches. You may connect a non-PoE+ switch to either an RPS System or RPS PoE+/System port on the chassis. The AT-PWR800 and AT-PWR1200 Modules can supply PoE+ power to just one switch at a time. A PoE+ switch has to be connected to the RPS 2 or 4 PoE+/System port to receive PoE+ power from the chassis. The power supply in the switch does not have to be the same type as the power supply in the AT-RPS3000 Chassis. For example, a switch that contains the AT-PWR250 Module may be connected to an AT-PWR1200 Module in the AT-RPS3000 Chassis. If the chassis is operational, you should always turn off an RPS port with the appropriate On/Off port switch, in the LED panel, before connecting or disconnecting an RPS cable. Chapter 2 Installing the AT-RPS3000 Chassis and Power Supply Modules Here are the installation procedures for the AT-RPS3000 Chassis: “Reviewing Safety Precautions” on page 50 “Planning the Installation” on page 52 “Unpacking the AT-RPS3000 Chassis and Power Supply Modules” on page 54 “Selecting a Location for the AT-RPS3000 Chassis in the Equipment Rack” on page 57 “Installing the AT-RPS3000 Chassis in an Equipment Rack” on page 58 “Installing a Power Supply Module” on page 61 “Connecting the AT-RPS3000 Chassis to the x610 Series Switch” on page 65 “Powering On the Power Supply Modules” on page 69 49 Chapter 2: Installing the AT-RPS3000 Chassis and Power Supply Modules Reviewing Safety Precautions Please review the following safety precautions before installing the unit. Note The indicates that a translation of the safety statement is available in a PDF document titled “Translated Safety Statements” (613000405) posted on the Allied Telesis website at www.alliedtelesis.com. Warning: To prevent electric shock, do not remove the cover. No user-serviceable parts inside. This unit contains hazardous voltages and should only be opened by a trained and qualified technician. To avoid the possibility of electric shock, disconnect electric power to the product before connecting or disconnecting the LAN cables. E1 Warning: Do not work on equipment or cables during periods of lightning activity. E2 Warning: Power cord is used as a disconnection device. To deenergize equipment, disconnect the power cord. E3 Warning: Class I Equipment. This equipment must be earthed. The power plug must be connected to a properly wired earth ground socket outlet. An improperly wired socket outlet could place hazardous voltages on accessible metal parts. E4 Pluggable Equipment. The socket outlet shall be installed near the equipment and shall be easily accessible. E5 Caution: Air vents must not be blocked and must have free access to the room ambient air for cooling. E6 Warning: Operating Temperature. This product is designed for a maximum ambient temperature of 40° degrees C. E7 All Countries: Install product in accordance with local and National Electrical Codes. E8 50 AT-RPS3000 Redundant Power Supply Installation Guide Circuit Overloading: Consideration should be given to the connection of the equipment to the supply circuit and the effect that overloading of circuits might have on overcurrent protection and supply wiring. Appropriate consideration of equipment nameplate ratings should be used when addressing this concern. E21 Warning: Mounting of the equipment in the rack should be such that a hazardous condition is not created due to uneven mechanical loading. E25 Warning: This unit might have more than one power cord. To reduce the risk of electric shock, disconnect all power cords before servicing the unit. E30 If installed in a closed or multi-unit rack assembly, the operating ambient temperature of the rack environment may be greater than the room ambient temperature. Therefore, consideration should be given to installing the equipment in an environment compatible with the manufacturer’s maximum rated ambient temperature (Tmra). E35 Caution: Installation of the equipment in a rack should be such that the amount of air flow required for safe operation of the equipment is not compromised. E36 Warning: Reliable earthing of rack-mounted equipment should be maintained. Particular attention should be given to supply connections other than direct connections to the branch circuits (e.g., use of power strips). E37 Caution: This unit does not contain serviceable components. Please return damaged units for servicing E42 Caution: An Energy Hazard exists inside this equipment. Do not insert hands or tools into open chassis slots or sockets. E44 Warning: This equipment shall be installed in a Restricted Access location. E45 51 Chapter 2: Installing the AT-RPS3000 Chassis and Power Supply Modules Planning the Installation Observe these requirements when planning the installation: Verify that the equipment rack containing the x610 Series switches has adequate space for the AT-RPS3000 Chassis. For further information, refer to “Selecting a Location for the AT-RPS3000 Chassis in the Equipment Rack” on page 57. Check that the rack is safely secured and will not tip over. Devices in a rack should be installed starting at the bottom, with the heavier devices near the bottom of the rack. Check that the power outlets are located near the chassis and are easily accessible. If you are installing the AT-PWR1200 Power Supply Module in North America, verify that the AC power source has an NEMA 5-20R receptacle. The power cord that comes with the AT-PWR1200 Power Supply Module for installations in North America has a 20 Amp, 125 V NEMA 5-20P plug that is only compatible with an NEMA 5-20R receptacle. G W 1965 Figure 32. 100 - 125 VAC 125 V NMA 5-20 Plug and Receptacle 52 Verify that the site provides easy access to the front and rear panels of the chassis. This will make it easy for you to install the power modules, view the LEDs, and connect and disconnect the power and RPS cables. Check that the site allows for adequate air flow around the units and through the cooling vents on the front and rear panels. (The ventilation flow is from front to back, with the fans on the power supply modules drawing air out of the unit.) Do not place objects on top of the chassis. AT-RPS3000 Redundant Power Supply Installation Guide Do not expose the chassis to moisture or water. Make sure the site is a dust-free environment. Use dedicated power circuits or power conditioners to supply reliable electrical power to the network devices. Do not install the device in a wiring or utility box. The device will overheat and fail from inadequate airflow. 53 Chapter 2: Installing the AT-RPS3000 Chassis and Power Supply Modules Unpacking the AT-RPS3000 Chassis and Power Supply Modules Refer to the tables in this section to verify the contents of the shipping containers of the AT-RPS3000 Chassis and power supply modules. Note You should retain the original packaging material in the event you need to return the unit to Allied Telesis. AT-RPS3000 Chassis The shipping container for the AT-RPS3000 Chassis should contain the components listed in this table. Table 9. AT-RPS3000 Chassis Components Component Description One AT-RPS3000 Redundant Power Supply Chassis 2131 Two rack mounting brackets 2181 Twelve bracket screws 2047 One AT-PNL250 Blank Panel AT-P NL2 50 2159 54 AT-RPS3000 Redundant Power Supply Installation Guide Table 9. AT-RPS3000 Chassis Components Component Description One AT-PNL800/1200 Blank Panel AT-P NL8 00/1 200 2160 Blank shipping panel (preinstalled on the power supply slots on the back panel) 2189 Note The AT-RPS3000 Chassis is connected to an x610 Series switch with the AT-RPS-CBL1.0 cable. The cable must be purchased separately. You will need one cable for each x610 Series switch. Power Supply Modules Refer to this table to verify the items in the shipping containers of the power supply modules. Table 10. Power Supply Module Components Power Supply Module Power Cord Retaining Clip Module Regional Power Cord AT-PWR250 AT-PWR250 DC OUT FAULT 2184 100-240VAC~ 5A MAX 157 2185 AT-PWR800 AT-PWR800 DC OUT FAULT 2184 100-240VAC~ 12A MAX 157 2186 55 Chapter 2: Installing the AT-RPS3000 Chassis and Power Supply Modules Table 10. Power Supply Module Components (Continued) Power Supply Module Power Cord Retaining Clip Module None. AT-PWR1200 AT-PWR1200 Regional Power Cord DC OUT FAULT 100-240VAC~ 16A MAX 157 2187 Note The power cord that comes with the AT-PWR1200 Power Supply Module for installations in North America has a 20 Amp, 125 V NEMA 5-20P plug that is only compatible with an NEMA 5-20R receptacle. Note There are AC and DC versions of the AT-PWR250 Module. The AC module is supported in the PoE+ x610 Switches and the AT-RPS3000 Chassis. The DC module is only supported in the PoE+ x610 Switches. It is not supported in the AT-RPS3000 Chassis. 56 AT-RPS3000 Redundant Power Supply Installation Guide Selecting a Location for the AT-RPS3000 Chassis in the Equipment Rack 7 9 11 13 15 17 19 21R 23R SFP 21 23 BUSY READY CLASS 1 LASER PRODUCT STACK STATUS MSTR L/A 1 L/A 2 PRES 4 x610-24Ts-POE+ 6 3 8 5 10 7 12 9 14 11 16 13 18 15 20 17 22R 19 23R SFP 23 1000 / 100 24 21 FAULT MASTER RPS PWR 24 1000 / 100 22 24R 21R BUSY STATUS FAULT MASTER RPS PWR 1 2 L/A 10 12 7 14 9 11 16 18 13 15 20 22R 17 19 22 24R 21R 23R SFP 21 19 21R 23R 21 SFP 23 18 20 22R 24R 22 1000 / 100 24 1 3 5 7 9 11 13 15 17 19 21R 23R 21 SFP 23 12 14 16 18 20 22R 24R 22 1000 / 100 24 READY BUSY 10 12 14 16 FDX 1 3 5 7 9 11 13 18 HDX 20 22R 22 24R STACK 6 3 8 5 10 7 9 11 13 15 17 19 21R 23R 21 SFP 23 19 21R 23R SFP 21 READY 2 FAULT MASTER RPS PWR 3 5 7 9 11 13 15 17 19 21R 23R 21 SFP 23 2 4 6 8 10 12 14 16 18 20 22R 24R 22 1000 / 100 24 1 3 5 7 9 11 13 15 17 19 21R 23R 21 SFP 23 22 1000 / 100 24 BUSY 1 L/A 2 BUSY 12 14 16 FDX 18 HDX 20 22R 22 24R BUSY FAULT MASTER RPS PWR FAULT SD STACK STATUS MSTR L/A 1 L/A 2 PRES STACK 1 L/A 2 L/A PRES 6 8 10 5 7 9 12 11 14 16 13 18 HDX 15 4 6 8 10 12 14 16 18 20 22R 24R FAULT MASTER RPS PWR 20 22R 24R 22 1000 / 100 24 10G STATUS FAULT MASTER RPS PWR 26 COL 17 19 21R 23R 21 SFP 23 READY BUSY 1 3 5 7 9 11 13 2 4 6 8 10 12 14 15 17 19 21R 23R 21 SFP 23 18 20 22R 24R 22 1000 / 100 24 FAULT STATUS FAULT MASTER RPS PWR SFP+ 25 READY STACK MSTR L/A 1 L/A 2 PRES 6 8 10 12 14 16 18 HDX 20 22R 24R 22 1000 / 100 BUSY FAULT SD CLASS 1 LASER PRODUCT 4 STATUS FAULT MASTER RPS PWR CLASS 1 LASER PRODUCT STACK MSTR 1 L/A 2 L/A PRES 24 16 FDX COL 1 L/A 1 L/A 2 STATUS FAULT MASTER RPS PWR 3 5 7 9 11 13 HDX 15 10G STATUS FAULT MASTER RPS PWR 26 COL 17 19 21R 23R 21 SFP 23 READY BUSY FAULT CLASS 1 LASER PRODUCT STACK MSTR L/A 1 L/A 2 PRES 2 24 1000 / 100 READY CLASS 1 LASER PRODUCT 2 x610-24Ts x610-24Ts STACK 10 2 L/A SD PRES 8 STATUS 1 L/A PRES FAULT MSTR 6 FAULT STACK MSTR FAULT CLASS 1 LASER PRODUCT 4 BUSY SD CLASS 1 LASER PRODUCT SD 2 READY SFP+ 25 MSTR 4 3 2 23 STATUS 1 1 CLASS 1 LASER PRODUCT 2 1 FDX 17 SD L/A COL 15 FAULT MASTER RPS PWR FAULT L/A 26 10G 24 1000 / 100 BUSY PRES 4 x610-24Ts x610-24Ts/X STACK L/A PRES 8 2 SD MSTR 6 1 L/A MSTR FAULT CLASS 1 LASER PRODUCT 4 STATUS L/A CLASS 1 LASER PRODUCT 2 SD 2 FAULT STACK FDX READY BUSY SD PRES SFP+ 25 23 READY SD STACK L/A 8 5 17 16 READY PRES 6 3 15 14 FAULT SD MSTR 4 1 13 12 1 READY CLASS 1 LASER PRODUCT 2 11 10 x610-24Ts/X 2 1 9 8 MSTR FAULT SD 7 6 x610-24Ts-POE+ 5 5 4 x610-24Ts/X 3 3 2 CLASS 1 LASER PRODUCT x610-24Ts-POE+ x610-24Ts-POE+ 1 1 x610-24Ts-POE+ x610-24Ts-POE+ The AT-RPS3000 Chassis has to be installed in the same equipment rack as the x610 Series switches. You may install it above, below, or between the switches. This may require relocating networking equipment to other equipment racks if there is currently no available space for the chassis in the rack. 4 6 8 10 12 14 16 18 FDX COL HDX 20 22R 24R 22 1000 / 100 STATUS FAULT MASTER RPS PWR 24 COL 2190 Figure 33. Positioning the AT-RPS3000 Chassis in the Equipment Rack This figure illustrates three arrangements that are not recommended for the chassis and switches. You should not install the devices in adjacent equipment racks or alongside each other on a tabletop because that would require twisting the AT-RPS-CBL1.0 Cables, which may damage them. In addition Allied Telesis does not recommend stacking the chassis and switches on a table because that could create an unsafe workplace. 5 7 9 11 13 15 17 19 21R 23R 21 SFP 23 4 6 8 10 12 14 16 18 20 22R 24R 22 1000 / 100 24 BUSY FAULT SD 7 9 21 SFP 2 4 6 8 10 12 14 16 18 20 22R 24R 22 1000 / 100 24 1 3 3 5 5 7 9 11 11 13 13 15 15 17 17 19 19 21R 21R 23R 23R 21 SFP 23 23 READY BUSY FAULT SD CLASS 1 LASER PRODUCT STACK STATUS MSTR 1 L/A 2 L/A PRES FAULT MASTER RPS PWR CLASS 1 LASER PRODUCT STACK STATUS MSTR L/A 1 L/A 2 PRES 1 3 5 7 9 11 13 15 17 19 21R 23R 21 SFP 23 22 1000 / 100 24 READY BUSY FAULT MASTER RPS PWR FAULT SD READY BUSY FAULT SD CLASS 1 LASER PRODUCT STACK STATUS MSTR L/A 1 L/A 2 PRES 2 4 6 8 10 12 14 16 18 20 22R 24R 22 1000 / 100 FAULT MASTER RPS PWR 24 CLASS 1 LASER PRODUCT STACK STATUS MSTR L/A L/A 1 2 PRES FAULT MASTER RPS PWR 1 2 4 6 8 10 12 14 16 18 20 22R 24R 7 9 2 4 6 8 10 1 3 3 5 5 7 9 11 13 15 17 19 21R 23R 21 SFP 22 1000 / 100 23 SFP+ 25 READY 1 3 5 7 9 11 13 2 4 6 8 10 12 14 15 17 19 21R 23R 21 SFP 23 18 20 22R 24R 22 1000 / 100 24 BUSY FAULT SD x610-24Ts/X x610-24Ts-POE+ READY x610-24Ts-POE+ 3 2 x610-24Ts-POE+ x610-24Ts-POE+ 1 1 CLASS 1 LASER PRODUCT STACK MSTR BUSY 2 L/A FAULT 12 14 SD x610-24Ts/X 1 L/A PRES SFP+ 25 READY 16 FDX 18 HDX 20 22R 24R 24 10G STATUS FAULT MASTER RPS PWR 26 COL CLASS 1 LASER PRODUCT STACK MSTR L/A 1 L/A 2 PRES 16 HDX 10G STATUS FAULT MASTER RPS PWR 11 13 15 17 19 21R 23R 26 21 SFP 23 1 3 5 7 9 11 13 2 4 6 8 10 12 14 15 17 19 21R 23R 21 SFP 23 18 20 22R 24R 22 1000 / 100 24 BUSY FAULT READY BUSY CLASS 1 LASER PRODUCT STACK MSTR L/A 1 L/A 2 PRES FAULT 2 SD x610-24Ts READY SD COL x610-24Ts FDX 4 6 8 10 12 14 16 FDX 18 HDX 20 22R 24R 22 1000 / 100 STATUS FAULT MASTER RPS PWR 24 COL CLASS 1 LASER PRODUCT STACK MSTR L/A 1 L/A 2 PRES STATUS FAULT MASTER RPS PWR COL 1 3 5 7 9 11 13 2 4 6 8 10 12 14 15 17 19 21R 23R 21 SFP 23 18 20 22R 24R 22 1000 / 100 24 SFP+ 25 READY BUSY 1 3 5 7 9 11 13 2 4 6 8 10 12 14 15 17 19 21R 23R 21 SFP 23 18 20 22R 24R 22 1000 / 100 24 FAULT STACK MSTR L/A 1 L/A 2 PRES HDX COL 10G 26 READY BUSY FAULT SD SD CLASS 1 LASER PRODUCT 16 FDX STATUS FAULT MASTER RPS PWR x610-24Ts HDX x610-24Ts/X 16 FDX CLASS 1 LASER PRODUCT STACK MSTR L/A 1 L/A 2 PRES 16 FDX HDX STATUS FAULT MASTER RPS PWR COL 2191 Figure 34. Unauthorized AT-RPS3000 Chassis and x610 Series Switch Installations Go to “Installing the AT-RPS3000 Chassis in an Equipment Rack” on page 58. 57 Chapter 2: Installing the AT-RPS3000 Chassis and Power Supply Modules Installing the AT-RPS3000 Chassis in an Equipment Rack Perform this procedure to install the chassis in a 19-inch equipment rack. The procedure requires the following items: Twelve bracket screws (included with chassis) Two equipment rack brackets (included with chassis) Flat-head screwdriver (not provided) Cross-head screwdriver (not provided) Four standard equipment rack screws (not provided) Warning The chassis may be heavy and awkward to lift. Allied Telesis recommends that you get assistance when mounting the chassis in an equipment rack. E28 1. Place the unit upside down on a level, secure surface. 2180 Figure 35. Turning the Switch Upside Down 2. Using a flat-head screwdriver, pry the six plastic feet from the bottom of the switch. 2168 Figure 36. Removing the Plastic Feet 58 AT-RPS3000 Redundant Power Supply Installation Guide 3. Turn the chassis over. 4. Using a cross-head screwdriver, secure the two rack mount brackets to the sides of the unit using the twelve bracket screws included with the unit. The illustration shows the only way in which the brackets may be positioned on the chassis. 2182 Figure 37. Attaching the Equipment Rack Brackets 5. Have another person hold the unit in the equipment rack while you secure it using standard screws (not provided). 2151 Figure 38. Mounting the AT-RPS3000 Redundant Power Supply in an Equipment Rack 59 Chapter 2: Installing the AT-RPS3000 Chassis and Power Supply Modules Note The chassis and x610 Series switches must be within one meter of each other in the equipment rack to accommodate the AT-RPS-CBL1.0 cables. 6. Go to “Installing a Power Supply Module” on page 61. 60 AT-RPS3000 Redundant Power Supply Installation Guide Installing a Power Supply Module To install a power supply unit module in the chassis, perform this procedure: 1. Using a cross-head screwdriver, remove the three screws that secure the blank shipping panel, from the back panel of the chassis. A A B 1 2 SYS TEM B PoE + / SYS TEM 3 SYS TEM MODU LE A PoE + / SYS TEM 4 MODU LE B 2167 Figure 39. Removing the Blank Shipping Panel from the Back Panel 2. Orient the new power supply module as shown in Figure 40 on page 62 and slide it into the slot until the tabs with the captive screws are flush with the back panel of the chassis. (If you are installing only one power supply module, you may install it in either slot.) Light pressure may be required to properly seat the module on the power connector inside the chassis. Caution Do not use excessive force when seating the module, because this may damage the system or the module. If the module resists seating, remove it from the system, realign it, and try again. E47 Note When installed, the AT-PWR1200 Module extends 5.6 cm (2.2 in.) from the back panel of the chassis. 61 100-2 40 VAC~ 5A MAX A A A A AT-PWR800 AT-PWR250 Chapter 2: Installing the AT-RPS3000 Chassis and Power Supply Modules DC OUT FAUL T 100-2 40 VAC~ 12A AT-PWR250 Module MAX DC OUT FAUL T AT-PWR800 Module A AT-PWR1200 A 100-2 40 VAC~ 16A MAX DC OUT FAUL T 2152 AT-PWR1200 Module Figure 40. Installing a Power Supply Module Caution Do not connect the power cord to the module until after you have installed the module in the chassis. The unit is not hot-swappable and may be damaged if it is installed while it is powered on. A AT-PWR800 A 100-240 VAC~12 A MAX DC OUT FAULT 2149 62 AT-RPS3000 Redundant Power Supply Installation Guide 3. Secure the module to the chassis by tightening the two captive screws. AT-PWR800 A 100-2 40 VAC~ 12A MAX DC OUT FAU LT A B 1 2 SYS TEM B PoE + / SYS 3 SYS TEM MODU TEM LE A PoE 4 + / SYS MODU TEM LE B 2176 Figure 41. Securing a Power Supply Module 4. For the AT-PWR250 or AT-PWR800 Module, install the power cord retaining clip on the AC power socket by pressing the sides of the clip inward and inserting the two ends into the holes on the power socket. (The AT-PWR1200 Module does not come with a power cord retaining clip.) AT-PWR800 A 100- 240 VAC ~12A MAX DC OUT FAU LT A B 1 2 SYSTE M B PoE + / SY STE M MODU LE A 3 SYSTE M PoE + / SY STE M MO 4 DULE B 2153 100-24 0 VA C~12A MAX DC OU T FAUL T Figure 42. Installing a Power Cord Retaining Clip 5. To install a second power supply module, repeat steps 2 through 4. 63 Chapter 2: Installing the AT-RPS3000 Chassis and Power Supply Modules 6. If the unit is to have only one power supply module, cover the empty slot with one of the slot covers, labelled AT-PNL250 and AT-PNL800/ 1200, provided with the unit, as shown in Figure 43 on page 64. The faceplates of the power supply modules and slot covers are keyed so that the slot cover has to correspond to the power supply module you installed in the unit. Use the AT-PNL250 Blank Panel if the chassis has either of the AT-PWR250 Power Supply Modules, or the AT-PNL800/1200 Blank Panel if the chassis contains the AT-PWR800 or AT-PWR1200 Power Supply Module. AT-PWR800 A 100-2 40 VAC~ 12A DC OUT FAU LT MAX A B 1 2 SYSTE M B AT-P NL8 00/1 200 PoE + / SY 3 SYSTE STE M M MODU LE A PoE + / SY 4 STE M MODU LE B 2150 Figure 43. Installing the Slot Cover 7. Secure the slot cover to the chassis by tightening the two captive screws. AT-PWR800 A 100-2 40 VAC~ 12A MAX DC OUT FAU LT A AT-P NL8 00/1 200 B 1 2 SYS TEM B PoE + / SYS MODU TEM LE A SYS TEM PoE + / SYS 3 4 MODU TEM LE B 2175 Figure 44. Securing the Slot Cover 64 AT-RPS3000 Redundant Power Supply Installation Guide Connecting the AT-RPS3000 Chassis to the x610 Series Switch Perform this procedure to connect the AT-RPS3000 Chassis to the x610 Series switch, with the AT-RPS-CBL1.0 cable: Note The AT-RPS-CBL1.0 cables must be purchased separately. 1. Connect one end of the RPS cable to the RPS Input connector on the back panel of the switch. Caution Be sure to connect the RPS cable squarely and evenly on the connector on the switch. Attaching the connector at an angle may cause an electrical short that might damage the device. AT-PWR800 A 100- 240 VAC ~12A MAX DC OUT FAUL T POWER SUPPLY A WAR NING This unit may elect have ric unit. shock, discomore than one nnec t both power A/C and input. RPS To reduc RPS input e INPU s befor the risk T e servi of cing 12V/2 1A MAX RPS READ Y STA CKING 12V/21A WAR NING This unit electric may have unit. shock, discmore than one onnect both power inpu A/C and t. RPS To reduce RPS inputs the INPU before risk of T servicin g 12V/21A MAX RPS REA DY POWER SUPPLY WAR NING This unit electric may have unit. shock, discmore than one onnect both power inpu A/C and t. RPS To reduce RPS inputs the INPU before risk of T servicin g POWER SUPPLY POWER SUPPLY 2132 WAR NING This unit electric may have unit. shock, discmore than one onnect both power inpu A/C and t. RPS To reduce RPS inputs the INPU before risk of T servicin g 12V/21A MAX RPS REA DY MAX RPS REA DY Figure 45. Connecting the AT-RPS-CBL1.0 Cable to the x610 Series Switch 65 Chapter 2: Installing the AT-RPS3000 Chassis and Power Supply Modules 100- 240 VAC ~12A MAX DC POW ER FAU LT POWER SUPPLY AT-PWR800 2. Secure the cable to the switch by tightening the two thumbscrews. WAR NING This unit may elect have ric unit. shock, discomore than one nnec t both power A/C and input. RPS To reduce RPS inputs the INPU before risk of T servicing RPS REA DY STA CKING 2133 Figure 46. Securing the AT-RPS-CBL1.0 Cable to the Switch If the AT-RPS3000 Chassis is already operational, perform step 3 to turn off the RPS port before connecting the RPS cable. Otherwise, go to step 4. Caution Never connect or disconnect an RPS cable from an RPS port on an operational AT-RPS3000 Chassis without first turning off the port. Failure to disable an RPS port may damage the redundant power supply system. 3. On the front panel of the AT-RPS3000 Chassis, examine the CABLE LED that corresponds to the port to which you will connect the cable. If the LED is off, go to the next step. If the LED is green, press the On/ Off button to turn off the port. The LED should turn off. For example, if you intend to connect the DC RPS cable to port 3 on the AT-RPS3000 Chassis, check the CABLE LED for port 3. If the LED is on, press the port’s On/Off button to disable the port. Port On/Off Button CABLE LED 2161 Figure 47. RPS Port On/Off Buttons and CABLE LEDs 66 AT-RPS3000 Redundant Power Supply Installation Guide 4. Connect the AT-RPS-CBL1.0 cable to the designated RPS port on the back panel of the AT-RPS3000 Chassis. Caution Be sure to connect the RPS cable squarely and evenly on the connector on the chassis. Attaching the connector at an angle may cause an electrical short that might damage the device. AT-PWR800 A 100- 240 VAC ~12A MAX DC OUT FAUL T AT-PWR800 A 100- 240 VAC ~12A MAX DC OUT FAUL T B 1 2 SYS TEM B PoE + / SYS SYS MODU TEM LE A 3 TEM PoE + / SYS 4 MODU TEM LE B 2145 B B 1 2 B 1 SYST 2 EM B 1 SYST 2 EM B PoE+ PoE+ / SY STEM MODU PoE+ / SY STEM MODU LE A SYST EM B / SY STEM MODU LE A LE A Po Po Po M M M Figure 48. Connecting the AT-RPS-CBL1.0 Cable to the AT-RPS3000 Chassis 67 Chapter 2: Installing the AT-RPS3000 Chassis and Power Supply Modules 5. Secure the cable to the port by tightening the two thumbscrews. AT-PWR800 A 100-2 40 VAC~ 12A MAX DC OUT FAU LT AT-PWR800 A 100-2 40 VAC~ 12A MAX DC OUT FAU LT B 1 2 SYSTE M B PoE + / SY STE M MODU LE A 3 SYSTE M PoE 4 + / SY STE M MODU LE B 2146 Figure 49. Securing the AT-RPS-CBL1.0 Cable to the AT-RPS3000 Chassis 6. Repeat this procedure to connect additional x610 Series switches to the AT-RPS3000 Chassis. 68 AT-RPS3000 Redundant Power Supply Installation Guide Powering On the Power Supply Modules Perform this procedure to power on the power supply modules in the AT-RPS3000 Chassis: 1. For the AT-PWR250 or AT-PWR800 Module, raise the power cord retaining clip on the power supply module. AT-PWR800 A 100-2 40 VAC~ 12A MAX DC OUT FAU LT AT-PWR800 A 100-2 40 VAC~ 12A MAX DC OUT FAU LT B 1 2 SYSTE M B PoE + / SY STE M MODU LE A 3 SYSTE M 4 PoE + / SY STE MODU LE M B 2164 100-2 40 VA C~12 A MAX DC OU T FAUL T Figure 50. Raising the Power Cord Retaining Clip 2. Connect the AC power cord to the AC socket on the power supply module, as shown in Figure 51 on page 70. 69 Chapter 2: Installing the AT-RPS3000 Chassis and Power Supply Modules AT-PWR800 A 100- 240 VAC ~12A MAX DC OUT FAU LT AT-PWR800 A 100- 240 VAC ~12A MAX DC OUT FAU LT B 1 2 SYSTE M B PoE + / SY 3 SYSTE STE MODU LE M M A PoE + / SY 4 STE M MODU LE B 2134 Figure 51. Connecting the AC Power Cord 3. For the AT-PWR250 or AT-PWR800 Module, lower the power cord retaining clip to secure the power cord to the unit. AT-PWR800 A 100-2 40 VAC~ 12A MAX DC OUT FAU LT AT-PWR800 A 100-2 40 VAC~ 12A MAX DC OUT FAU LT B 1 2 SYSTE M B PoE + / SY STE M MODU LE A 3 SYSTE M PoE 4 + / SY STE M MODU LE B 2155 AT-PWR800 A 100-240 VAC ~12A MAX DC OU T FAUL T A Figure 52. Lowering the Power Cord Retaining Clip 4. Connect the other end of the power cord to an appropriate power source. Refer to Appendix A, “Technical Specifications” on page 87 for the power specifications of the power supply modules. 70 AT-RPS3000 Redundant Power Supply Installation Guide 5. Examine the DC OUT/FAULT LED on the power supply module. The module is operating normally if the LED is green. If the LED is amber or off, refer to Chapter 4, “Troubleshooting” on page 83 for troubleshooting suggestions. 100-24 DC OU T FAUL T 0 VAC ~12A MAX AT-PWR800 A 100-2 40 VAC~ 12A MAX DC OUT FAU LT AT-PWR800 A 100-2 40 VAC~ 12A MAX DC OUT FAU LT B 1 2 SYST EM B PoE + / SY ST EM MODU LE A SYST EM PoE + / SY 3 4 ST EM MODU LE B 2147 Figure 53. Lowering the Power Cord Retaining Clip 6. In the POWER MODULE STATUS section of the LED panel shown in Figure 54 on page 72, examine the FAN and DC OUT LEDs of the power supply module you just powered on. Both LEDs should be green. If the LEDs are amber or off, refer to Chapter 4, “Troubleshooting” on page 83 for troubleshooting suggestions. 71 Chapter 2: Installing the AT-RPS3000 Chassis and Power Supply Modules A AT-PWR800 AT-PWR800 A DC OUT DC OUT FAULT 100-240 VAC~12A MAX B 1 3 FAULT 100-240 VAC~12A MAX SYSTEM SYSTEM PoE+ / SYSTEM PoE+ / SYSTEM MODULE A MODULE B 2 B 4 Figure 54. Checking the FAN and DC OUT LEDs in the LED Panel 7. In the MODULE A/B PORTS section of the LED panel shown in Figure 55 on page 73, examine the LOAD and CABLE LEDs of the two ports that receive power from the power supply module. The LOAD and CABLE LEDs of RPS ports that are connected to x610 Series switches should be green. If the LEDs are off, press the On/Off buttons to active the ports. 72 AT-RPS3000 Redundant Power Supply Installation Guide A DC OUT AT-PWR800 AT-PWR800 DC OUT FAULT 100-240 VAC~12A MAX B 1 3 FAULT 100-240 VAC~12A MAX SYSTEM SYSTEM PoE+ / SYSTEM PoE+ / SYSTEM MODULE A MODULE B 2 A B 4 2156 A A FAULT DC OUT AT-PWR800 AT-PWR800 DC OUT 100-240 VAC~12A MAX B 1 3 FAULT 100-240 VAC~12A MAX SYSTEM SYSTEM PoE+ / SYSTEM PoE+ / SYSTEM MODULE A MODULE B 2 B 4 2157 Figure 55. Checking the LOAD and CABLE LEDs in the LED Panel 73 Chapter 2: Installing the AT-RPS3000 Chassis and Power Supply Modules 8. If the chassis has two power supply modules, repeat this procedure to power on the second module. Warning This unit might have more than one power source. To reduce the risk of electric shock, disconnect all power cords before servicing the unit. E30 This completes the installation procedure for the AT-RPS3000 Redundant Power Supply. 74 Chapter 3 Removing Power Supply Modules Here are the procedures for removing power supply modules from the AT-RPS3000 Chassis: “Removing the AT-RPS-CBL1.0 Cable” on page 76 “Removing an AC Power Supply Module” on page 78 75 Chapter 3: Removing Power Supply Modules Removing the AT-RPS-CBL1.0 Cable Here are the steps to removing the AT-RPS-CBL1.0 cable from an RPS port on the AT-RPS3000 Chassis and switch: 1. On the front panel of the AT-RPS3000 Chassis, examine the CABLE LED of the RPS port to which the AT-RPS-CBL1.0 cable is connected. If the LED is off, go to the next step. If the LED is green, press the On/ Off button to turn off the port. The LED should turn off. For example, if you want to disconnect the cable from RPS port 3 on the AT-RPS3000 Chassis, check the CABLE LED for port 3. If the LED is on, press the port’s On/Off button to disable the port. Caution Never connect or disconnect an RPS cable from an RPS port on an operational AT-RPS3000 Chassis without first turning off the port. Failure to disable an RPS port may damage the redundant power supply system. AT-PWR800 2. Loosen the two thumbscrews that secure the cable to the RPS port on the AT-RPS3000 Chassis. 100-24 0 VAC ~12A MAX DC OU T FAUL T B 1 2 SYST EM B PoE+ / SY STEM MODU SYST EM LE A PoE+ / SY STEM MODU LE B 2211 Figure 56. Loosening the Thumbscrews that Secure the AT-RPS-CBL1.0 Cable to the AT-RPS3000 Chassis 76 AT-RPS3000 Redundant Power Supply Installation Guide 3. Remove the cable from the RPS port. 100-2 40 VAC~ 12A MAX DC OUT FAU LT AT-PWR800 AT-PWR800 Caution Be sure to remove the RPS cable squarely and evenly from the connector on the chassis. Removing the connector at an angle may cause an electrical short that might damage the device. 100-2 40 VAC~ 12A MAX DC OUT FAU LT B 1 2 SYST EM B PoE + / SY 3 SYST EM ST EM MODU LE A PoE + / SY 4 ST EM MODU LE B 2211 B B 1 2 B 1 2 SYST EM B 1 2 SYST EM B PoE + / SY MODU STEM + / SY PoE ST + / SY ST EM MODU LE A EM MODU LE A LE A SYST EM B PoE Po Po Po M M M Figure 57. Removing the AT-RPS-CBL1.0 Cable from the AT-RPS3000 Chassis 4. Loosen the two thumbscrews that secure the cable to the RPS port on the x610 Series switch. 5. Remove the cable from the RPS port on the switch. Caution Be sure to remove the RPS cable squarely and evenly from the connector on the switch. Removing the connector at an angle may cause an electrical short that might damage the device. 77 Chapter 3: Removing Power Supply Modules Removing an AC Power Supply Module To remove an AC power supply module from the chassis, perform this procedure: 1. For the AT-PWR250 or AT-PWR800 Module, raise the power cord retaining clip on the power supply module. AT-PWR800 A 100-2 40 VAC~ 12A MAX DC OUT FAU LT AT-PWR800 A 100-2 40 VAC~ 12A MAX DC OUT FAU LT B 1 2 SYSTE M B PoE + / SY STE M MODU LE A 3 SYSTE M 4 PoE + / SY STE M MODU LE B 2169 AT-PWR800 A 100-2 40 VA C~12 A MAX DC OU T FAUL T A Figure 58. Raising the Power Cord Retaining Clip 78 AT-RPS3000 Redundant Power Supply Installation Guide 2. Disconnect the power cord from the power supply module. AT-PWR800 A 100-2 40 VAC~ 12A MAX DC OUT FAU LT 100-2 40 VAC~ 12A MAX DC OUT FAU LT B 1 2 SYSTE M B PoE + / SY SYSTE M STE M MODU LE A PoE + / SY 3 4 STE M MODU LE B 2170 Figure 59. Removing the Power Cord Caution The power module is not hot-swappable. It may be damaged if you remove it from the chassis while it is powered on. If the chassis has two power modules, you do not have to power off the second module, unless you are planning to remove it. A AT-PWR800 A AT-PWR800 AT-PWR800 A 100-24 0 VAC~1 2A MAX 100-24 0 VAC~1 2A MAX DC OUT FAUL T DC OUT FAUL T 2188 79 Chapter 3: Removing Power Supply Modules 3. Loosen the two captive screws securing the power module to the chassis. AT-PWR800 A 100-2 40 VAC~ 12A MAX DC OUT FAUL T AT-PWR800 A 100-2 40 VAC~ 12A MAX DC OUT FAUL T B 1 2 SYS TEM B PoE + / SYS SYS MODU TEM LE A 3 TEM 4 PoE + / SYS MODU TEM LE B 2171 Figure 60. Loosening the Two Captive Screws 4. Slide the module from the chassis. A AT-PWR800 AT-PWR800 A 100-2 40 VAC~ 12A MAX DC OUT FAUL T 100-2 40 VAC~ 12A MAX DC OUT FAUL T B 1 2 SYS TEM B PoE + / SYS MODU TEM LE A SYS 3 TEM PoE + / SYS 4 MODU TEM LE B 2172 Figure 61. Removing the Power Supply from the Chassis Note Use care when pulling the power supply module from the chassis. You might bend the power and control pins on the backplane connectors if you roughly pull the module from the unit. 5. To install a new power supply module, perform the procedure “Installing a Power Supply Module” on page 61. 80 AT-RPS3000 Redundant Power Supply Installation Guide 6. If you are not replacing the module, cover the empty slot with one of the slot covers, labeled AT-PNL250 and AT-PNL800/1200, provided with the unit. The faceplates of the power supply modules and the slot covers are keyed so that the slot cover has to correspond to the power supply module you installed in the unit. Use the AT-PNL250 Blank Panel if the chassis contains the AT-PWR250 Power Supply Module, or the AT-PNL800/1200 Blank Panel if it has the AT-PWR800 or AT-PWR1200 Power Supply Module. A AT-PWR800 A 100-2 40 VAC~ 12A AT-P NL8 00/1 200 MAX DC OUT FAU LT B 1 2 SYSTE M B PoE + / SY STE M MODU LE A 3 SYSTE M PoE + / SY 4 STE M MODU LE B 2173 Figure 62. Installing the Slot Cover 7. Secure the slot cover to the chassis by tightening the two captive screws. A AT-P NL80 0/12 00 AT-PWR800 A 100-2 40 VAC~ 12A MAX DC OUT FAUL T B 1 2 SYS TEM B PoE + / SYS MODU TEM LE A SYS 3 TEM PoE + / SYS 4 MODU TEM LE B 2174 Figure 63. Securing the Slot Cover 81 Chapter 3: Removing Power Supply Modules 82 Chapter 4 Troubleshooting If you encounter a problem with the product, you may be able to resolve it with the information in this chapter: Problem 1: A power supply module does not seem to be receiving power because its DC OUT/FAULT LED on its faceplate is off, as well as its FAN and DC OUT LEDs in the LED panel. Solution: Try the following: ❒ Verify that the module is fully seated in the power supply slot in the chassis. ❒ Verify that the power cord is firmly connected to the power supply module and the power source. ❒ Try connecting the power module to another power source, preferably located on a different circuit. ❒ Verify that the power source is operating properly by plugging a different device into it. ❒ Try replacing the power cord. ❒ Verify that the power from the power source meets the operating specifications of the power supply module, listed in “Power Specifications” on page 88. ❒ Replace the power supply module. Problem 2: The LOAD and CABLE LEDs for an RPS port are off, but the module’s FAN and DC OUT LEDs in the LED panel are on, indicating that the module is receiving power. Solution: The RPS port may have been turned off. Try pressing the port’s On/Off button. Problem 3: The DC OUT/FAULT LED on the faceplate of the power supply module and the DC OUT LED in the LED panel are amber. Solution: The power supply module is failing or the power from the power source is not in the range of the operating specifications of the module. Try the following: ❒ Try connecting the power module to another power source, preferably located on a different circuit. 83 Chapter 4: Troubleshooting ❒ Verify that the power from the power source is within the operating specifications of the power supply module, listed in “Power Specifications” on page 88. ❒ Replace the power supply module. Problem 4: The FAN LED in the LED panel is amber. Solution: A fan in the power supply module has failed. Replace the module. Problem 5: One or both power supply modules shutdown. Solution: Try the following: ❒ Check to be sure that the chassis is not overheating. Verify that it has adequate ventilation and that the fans on the power supply modules and the ventilation vents on the front panel of the chassis are unobstructed. ❒ Verify that the module is not connected to two high-power x610 Switches or one low-power and one high-power switch. It may have shutdown because the power requirements of the switches exceeded its power reserves. A power supply module can support two low-power switches or one high-power switch at a time. Problem 6: You are unable to install a second module in the chassis because the faceplates of the new and existing modules do not align. Solution: The faceplates of the power supply modules are keyed to prevent the installation of incompatible modules in the chassis. You may not install the AT-PWR250 Power Supply Module in the same chassis as the AT-PWR800 or AT-PWR1200 Module. For more information, refer to “Power Supply Modules” on page 19. Problem 7: The chassis is not providing PoE+ power to an PoE+ x610 Series switch. Solution: Try the following: 84 ❒ Verify that the x610 Series switch supports the PoE+ feature. The model name on the front panel of the switch should contain the letters “POE+.” Switches whose model names do not include the letters do not support PoE+. ❒ Verify that the AT-RPS-CBL1.0 cable from the x610 Series switch is securely connected to RPS port 2 or 4, PoE+/System, on the chassis. ❒ Verify that the chassis has a power supply for the RPS port to which the switch is connected. For example, if the switch is connected to RPS port 4, slot B of the chassis has to contain either an AT-PWR800 or AT-PWR1200 Module. AT-RPS3000 Redundant Power Supply Installation Guide ❒ Verify that the power supply module that is suppose to be delivering the PoE+ power from the chassis is either the AT-PWR800 or AT-PWR1200 Module. The AT-PWR250 Module do not support PoE+ power. ❒ Check the FAN LED for the power supply module, in the LED panel. If the LED is amber, one or both fans in the module are not functioning properly. If this occurs, the module continues to provide system power on both of its RPS ports, but stops providing PoE+ power on the RPS PoE+/System port. ❒ Check the TEMP LED in the LED panel. If the LED is amber, the power module may be overheating. When this occurs, the module continues to provide system power on both of its RPS ports, but stops providing PoE+ power on the RPS PoE+/System port. 85 Chapter 4: Troubleshooting 86 Appendix A Technical Specifications Physical Specifications Dimensions (H x W x D): AT-RPS3000 Chassis 4.4 cm x 44.1 cm x 36.3 cm (1.7 in. x 17.4 in. x 14.3 in.) AT-PWR250 and AT-PWR800 Power Supply Modules 4.2 cm x 14.8 cm x 25,2 cm (1.7 in. x 5.8 in. x 9.8 in.) AT-PWR1200 Power Supply 4.2 cm x 14.8 cm x 30.7 cm Module (1.7 in. x 5.8 in. x 12.1 in.) Weight: AT-RPS3000 Chassis AT-PWR250 Module (AC) AT-PWR800 Module AT-PWR1200 Module Recommended Minimum Ventilation on All Sides: 4.2 kg (9.3 lb.) 1.5 kg (3.3 lb.) 1.8 kg (3.9 lb.) 2.2 kg (4.8 lb.) 10 cm (4.0 in) Environmental Specifications Operating Temperature: 0° C to 40° C (32° F to 104° F) Storage Temperature: -20° C to 60° C (-4° F to 140° F) Operating Humidity: 5% to 90% noncondensing Storage Humidity: 5% to 95% noncondensing Maximum Operating Altitude: 3,048 m (10,000 ft) Maximum Nonoperating Altitude: 4,000 m (13,100 ft) 87 Appendix A: Technical Specifications Power Specifications Maximum Power Consumption: AT-PWR250 Module (AC) AT-PWR800 Module (AC) AT-PWR1200 Module (AC) 250 watts 800 watts 1200 watts Input Voltage: AT-PWR250 Module (AC) AT-PWR800 Module (AC) AT-PWR1200 Module (AC) 100-240 VAC, 5 A maximum, 50/60 Hz 100-240 VAC, 12 A maximum, 50/60 Hz 100-240 VAC, 16 A maximum, 50/60 Hz Certifications EMI (Emissions): FCC Class A, EN55022 Class A, EN61000-3-2, EN61000-3-3, VCCI Class A, CISPR Class A, C-TICK, CE EMC (Immunity): EN55024 Electrical and Laser Safety: EN60950-1 (TUV), UL 60950-1 (CULUS) EN60825 Quality and Reliability (MTBF): AT-RPS3000 Chassis AT-PWR250 Module (AC) AT-PWR800 Module (AC) AT-PWR1200 Module (AC) Compliance Marks: 88 440,000 hrs. 100,000 hrs. 100,000 hrs. 80,000 hrs. CE, CULUS, TUV, C-Tick AT-RPS3000 Redundant Power Supply Installation Guide Port Pin-outs Figure 64 identifies the pins on the RPS ports. P4 P3 9 17 1 P2 P1 10 Figure 64. Port Pin-outs for the RSP System and PoE+/System Ports Table 11 lists the pin signals for the RPS 1 and 3 System ports. Table 11. RPS 1 and 3 System Ports Pin Description P1 Ground (12V return) P2 +12V P3 Reserved P4 Reserved 1 +12V remote sense 2 Reserved 3 RPS status 4 Reserved 5 -12V remote sense 6 RPS power good 7 Reserved 8 Reserved 9 Reserved 10 RPS present 11 Switch power good 12 Reserved 89 Appendix A: Technical Specifications Table 11. RPS 1 and 3 System Ports Pin Description 13 Reserved 14 Reserved 15 Switch present 16 Reserved 17 Reserved Table 12 lists the pin signals for the RPS 2 and 4 PoE+/System ports. Table 12. RPS 2 and 4 PoE+/System Ports Pin 90 Description P1 -12V return P2 +12V P3 +56V P4 56V return 1 +12V remote sense 2 Reserved 3 RPS status 4 Reserved 5 -12V remote sense 6 RPS power good 7 Reserved 8 56V load share 9 PoE+ positive remote sense 10 RPS present 11 Switch power good 12 Reserved 13 PoE+ ready 14 Reserved 15 Switch present 16 Reserved AT-RPS3000 Redundant Power Supply Installation Guide Table 12. RPS 2 and 4 PoE+/System Ports Pin 17 Description PoE+ negative remote sense 91 Appendix A: Technical Specifications 92