1
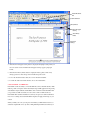
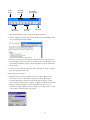
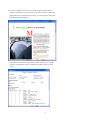
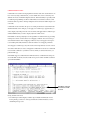
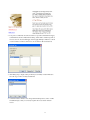
Windows Vista™, UNIX®
Adobe
®
FrameMaker® 8
WE L C O M E T O A D O B E F R A M E M A K E R 8
The world of technical communication is rapidly changing. Organizations must meet the
challenges of shrinking product lifecycles, increasing product variations, and disappearing
geographical boundaries. Technical communicators need tools to take advantage of established
and emerging trends and technologies, such as PDF, HTML, XML, and rich media.
FrameMaker 8 software is a key member of the Adobe tools for technical communicators and
supports organizations that need to author, structure, publish, repurpose, and customize information for global audiences.
This document contains examples, illustrations, and mini-tutorials that show the key features
REVIEWER’S GUIDE
Microsoft® Windows® 2000, Windows XP,
CONTENTS
We l c o m e t o A d o b e
FrameMaker 8 . . . . . . . . . . 1
Who Should Use FrameMak er? . 1
Key New Features . . . . . . . . . . 2
Comparing Document
Wor kf l o w s . . . . . . . . . . . . . . . . 3
Getting to Know
FrameMak er 8 . . . . . . . . . . . . . 5
FrameMaker 8: A Guided
To u r . . . . . . . . . . . . . . . . . . 9
and proven functionality of FrameMaker 8.
Structured or Unstructured
FrameMak er? . . . . . . . . . . . . . . 9
WHO SHOULD USE FR AMEMAKER?
Unstructured Authoring . . . . . 9
FrameMaker provides a rich feature set that supports a variety of users, from creators of XML-
S t r u c t u re d Au t h o r i ng . . . . . . 11
based information to technical writers, instructional designers, and server-based publishers, as
Developing a Structured
A p p l i c at i o n . . . . . . . . . . . . . . 13
well as anyone producing long, complex, or structured documents or books.
M i g r a t i n g t o S t r u c t u r e . . . . . 15
X M L Pu b l i s h i n g . . . . . . . . . . . 17
Te c h n i c a l w r i t e r s
FrameMaker supports writers and publishers of a broad range of technical content, including
technical manuals, specifications, data sheets, and training materials. FrameMaker software
provides a feature set that makes it easy to master complex projects, publish to multiple channels, and obtain professional-quality results. Proven authoring features support searching and
revising multiple documents and reliably processing thousands of pages of complex content,
with robust, reliable cross-references, autonumbers, tables of contents, indices, and running
headers and footers, as well as complex tables, graphics, and equations. FrameMaker has
D I TA A u t h o r i n g a n d
Pu b l i s h i n g . . . . . . . . . . . . . . . 17
Publishing 3D and Interactive
Co n te nt . . . . . . . . . . . . . . . . . 19
P D F Pu b l i s h i n g . . . . . . . . . . . 20
Complex Documents and
B o o k s . . . . . . . . . . . . . . . . . . 21
Ta b l e s o f C o n t e n t s a n d
I n d i c e s . . . . . . . . . . . . . . . . . 24
Au t o m at i c N u m b e r i n g . . . . . . 26
evolved to meet the changing requirements of technical writers, supporting both unstructured
Te x t a n d G r a p h i c s . . . . . . . . . 2 8
and structured workflows, standards-compliant authoring and publishing, and dynamic con-
Ta b l e s . . . . . . . . . . . . . . . . . . 3 0
tent publishing in combination with Adobe Flash® and Adobe Acrobat 3D® software.
Te x t E d i t T r a c k i n g . . . . . . . . . 3 1
C o n d i t i o n a l Te x t . . . . . . . . . . 3 4
C ro s s - R e fe r e n ce s . . . . . . . . . . 38
Sys t e m R e qu i re m e nt s . . . . . 40
bc
Instructional designers
KE Y NE W FE A T U RE S
PDF has long served the needs of instruc-
The following features are new to FrameMaker 8:
tional designers, who need to render rich documents formats and support the ability to
distribute documents in print and online.
Instructional designers are increasingly developing and deploying interactive content using
applications such as Adobe Flash,
Adobe Captivate®, and Adobe Acrobat 3D
software. These tools allow instructional
designers to create engaging, effective demonstration and tutorial content. With
FrameMaker 8, instructional designers can
easily integrate these rich media assets into
traditional electronic documents.
Improved Globalization
Import element formatting from a cascad-
Author and publish unstructured and XML
ing style sheet (CSS) to quickly define ele-
content based on the Unicode character set.
ment formatting for print and PDF
Use Unicode characters in documents, dia-
generation.
logs, markers, and catalog entries. Author
and maintain non-English or multi-language documents without the need for special FrameMaker versions or character code
manipulation. Generate PDF files with Unicode-based text and Unicode characters in
bookmarks. Use newly provided dictionaries for spell check and hyphenation support
in more than 30 languages.
XML authors and publishers
For XML authors and publishers,
FrameMaker provides an authoring and publishing platform that supports a variety of key
XML standards, including DITA, DocBook,
and XHTML. Writers can create XML content
in a familiar WYSIWYG interface, without
learning XML syntax. FrameMaker software’s
“guided editing” feature supports writers in
inserting XML elements in their proper context. The authoring environment continu-
Author and publish documents that conform to the Darwin Information Typing
Architecture (DITA), an industry-standard
architecture that facilitates re-use and repurposing of modular information units.
Use a rich set of DITA features, including
topic authoring, map authoring, content
fragment reuse (conref) and book building
from DITA maps.
Rich Media Integration
permitted structure, based on a Document
Create interactive PDF documents by
Type Definition (DTD) or XML Schema.
embedding SWF files directly in
FrameMaker-based XML workflows can
FrameMaker software. Include eLearning
automatically apply XSL transformations
and tutorial content created using applica-
(XSLT) for processing XML documents.
tions such as Adobe Captivate and
FrameMaker software offers an outstanding
Adobe Flash.
styling and high-end graphics support, integrated with Adobe's market-leading PDF
publishing technology.
Import 3D graphics (U3D) files created
using applications such as Adobe
ground, lighting, render mode and default
view. Create PDF files containing live 3D
FrameMaker Server 8 software brings the
models.
to the server environment. The FrameMaker
Developers Kit (FDK) is an application programming interface (API) that allows organizations to use FrameMaker as an automated
managing and publishing multiple document variations. Define behaviors based on
logical operators (AND, OR, NOT) for
overlapping conditions. Rename existing
condition tags.
Filter by Attribute
tent based on attribute values. Leverage
XML metadata for publishing multiple document versions. Create logical expressions
to define whether element content is published or suppressed. Use Filter by Attribute
or conditional text to manage document
variations in structured content. Retain
conditional text and Filter by Attribute settings when saving documents to XML.
Track Text Edits
Identify text insertions and deletions during
the document editing process. Accept or
reject text edits individually or globally. Preview documents with all edits accepted or
rejected. Maintain text edit tracking information when saving documents to XML.
Other new features
·
FrameMaker software workspace.
·
Import content from Microsoft
Office 2007.
·
Embed graphics references from a URL
or directory path.
Improved XML Support
Preserve comments in XML documents.
Use a tabbed document view to better
manage multiple documents in the
Acrobat 3D. Select parameters such as back-
Ser ver-based publishers
power of the FrameMaker publishing engine
Use improved conditional text features for
In structured documents, show or hide con-
DITA Support
ously validates documents against the
XML-to-PDF solution, with rich, rules-based
Improved Single-Source Publishing
·
Automate and customize FrameMaker
Save system variables to XML, and preserve
using the Frame Developer’s Kit (FDK),
all XML processing instructions (PIs).
which has been updated to support
FrameMaker 8 features.
2
publishing engine for database-resident content or XML data. Using the FDK, developers
can integrate FrameMaker Server into applications that automatically render customized
or personalized data in rich, complex formats.
Other key users
The capabilities of FrameMaker for creating and maintaining long, complex documents
make it a natural choice for governments, large organizations, and scientific/research organizations. Each of these entities produces large numbers of often complex documents that
must be published with a common format to multiple output channels. All must meet the
ever-changing requirements to deliver to multiple channels, including print, PDF, and the
Web, and many are facing new requirements to deliver personalized content via XML.
FrameMaker 8 software also supports organizations that need to add 3D and interactive
content to their publishing workflows.
Many commercial publishers have relied on FrameMaker software’s long-document features for textbooks and reference materials. These same publishers can use FrameMaker
software’s multichannel publishing features to generate new revenue streams from multiple output channels or XML-based personalized content delivery.
C O M P A R I N G D O C U M E N T WO R K F L O W S
Document workflows — the process by which authors create and maintain content — can
be organized into three general categories: design- and format-driven, template-driven,
and structure/XML-driven. In contrast to page layout applications or word processors,
FrameMaker excels at supporting template-driven and XML-driven process models.
Design- and format-driven workflows
Documents can be created from a broad variety of authoring tools and processes. For
example, magazine designers conceive and implement their ideas based on a page-oriented
paradigm. Their process model is a design-driven workflow, where the components of a
page (such as the story title, the lead paragraph, the body copy, the illustrations, and the
photos) are considered separate assets. Graphic designers use their artistic skills to manually position and manipulate these components on individual pages.
Word processing users, however, often follow a format-driven workflow. For example, they
select text and manually apply formatting properties — font size, font style, line spacing,
paragraph spacing, and so on.
The design-driven and format-driven process models place significant emphasis on the
user’s skill and dedication to lay out and format the content consistently and correctly. The
output of these types of workflows tends to be channel-specific. For instance, a magazine’s
graphic design and layout that is optimized for the size of the printed page is often
inappropriate for other media such as the Web. Repurposing design- or format-driven
content for other output media typically requires a substantial reformatting effort.
Te m p l a t e - d r i v e n w o r k f l o w s
A template-driven workflow can effectively address the limitations of design- and formatdriven models. In a template-driven workflow, the format of the content is controlled by a
style sheet that is part of a template, which controls the physical layout of the finished publication. Users tag the content to identify components such as chapter names, words to be
3
emphasized, product names, and
cautions and warnings. The style
sheet associates format and layout
information with these tags to
ensure, for instance, that chapter
names always start on a new recto
(right) page and appear in 16-point,
centered, Adobe Myriad® Bold type.
The template includes a set of style
sheet definitions, plus one or more
standardized master layout pages that
apply consistent parameters for the
positioning of text and graphics on
various types of pages (such as cover
and contents pages, ad pages, and
inside text pages).
FrameMaker software’s templatedriven workflow ensures consistent
formatting and layout of the content;
automated formatting and layout
reduces the need to manipulate a
publication’s components manually.
Even more valuable, however, is the
Valid XML content in the FrameMaker user interface, with the Structure View and Element Catalog.
separation of the formatting and layout decisions from the source content. This allows organizations to use a group of templates tailored to specific output media with exactly the same content.
Structured workflows
In structured or XML-based workflows, authors tag and organize content into a hierarchy
of elements, with attributes (metadata) attached to those elements. XML allows the user to
define and enforce a set of rules that apply to a specific document type (for instance, chapters must start with a chapter name and contain one or more sections; sections must start
with a section name and contain text or subsections). These rules may be expressed using a
Document Type Definition (DTD) or XML Schema. XML content that conforms to its DTD
or Schema is valid. FrameMaker software supports the production of valid content that is
often critical to XML workflows.
Because content tags can carry information about the meaning and usage of the information, tagging facilitates easier interpretation of documents than is possible based on
appearance alone. Tagging has the added power of enabling software applications to intelligently process content. For documents, this can mean the automatic production of tables
of contents, indices, lists of figures, and navigation links. Tagging is also the key to XMLbased solutions that provide personalized, customized or interactive versions of the content.
4
GETTING TO KNOW FRAMEMAKER 8
FrameMaker 8 software provides the power of many
tools in a single product. Try the features described in
this document to see how FrameMaker software can
help you create, share, customize and publish content
faster and with fewer resources.
Global Language Support
The Unicode Standard is a character coding system
designed to support the worldwide interchange, processing, and display of text in any language or character set. Unicode encoding allows you to create
documents containing characters from any number of
character sets, and allows sharing of documents
between different geographic or linguistic regions.
FrameMaker 8 supports Unicode text encoding for
creating, editing, saving, and publishing documents in
multiple languages and for creating multilingual documents. Unicode text is supported in FrameMaker
markers, catalog entries, and dialogs. PDF export supports Unicode text, bookmarks, tags, and comments.
You can import or copy Unicode content from other
applications.
FrameMaker 8 includes greatly expanded dictionary
Demonstration of the globalization capabilities of FrameMaker software. Four languages
are included within a single document.
and hyphenation support for multi-language authoring:
·
Full authoring support (including language rules, dictionary, and hyphenation) is
provided for US English, French, German, Swiss German, Canadian French, and
British English.
·
Full authoring support (without dictionaries and hyphenation) is provided for
Japanese, Korean, Traditional Chinese, and Simplified Chinese.
·
Dictionary and hyphenation support are provided for Spanish, Italian, Portuguese,
Danish, Dutch, Swedish, Norwegian, Nynorsk, Finnish, Catalan, Greek, Russian, Czech,
Polish, Hungarian, Turkish, Slovak, Slovenian, Bulgarian, Croatian, Estonian, Latvian,
Lithuanian, and Romanian.
S t r u c t u r e d Au t h o r i n g a n d Pu b l i s h i n g
FrameMaker 8 software provides a structured authoring environment that eases the process of creating and editing valid XML. You can use Document Type Definitions (DTDs)
or XML Schema to define the structure and validity of your content, and format your documents with the FrameMaker context-sensitive styling language (Element Definition Document, or EDD). Read/write rules allow you to map XML elements to document objects
such as tables, graphics, footnotes, cross-references, and index markers. You can work on
your content in full WYSIWYG mode.
5
FrameMaker 8 software provides
context-sensitive guided editing with
the Element Catalog, the Structure
View window, and the FrameMaker
continuous validation feature. The
Element Catalog quickly shows you
which elements are valid while you
develop your information and navigate the structure of your document.
The Structure View window is tightly
integrated with the WYSIWYG view,
and displays any validity errors as
they occur in real time.
You can define your own
FrameMaker structured applications, which means that FrameMaker
automatically picks the right DTD or
XML Schema, template, and settings
when you open an XML document.
FrameMaker software’s parsing
engine examines the XML at import
Example structured document that conforms to DITA (Darwin Information Typing Architecture), an industrystandard topic-based information model.
to determine whether it is wellformed and to validate the code against the appropriate DTD or XML Schema. After
authoring and tagging tasks are complete, you can save standards-compliant XML for further processing.
FrameMaker supports XML namespaces, Cascading Style Sheets (CSS), and the Unicode
character set. Namespaces are commonly used as a prefix to XML element names, particularly when content is combined from multiple sources. FrameMaker software can export
standards-compliant CSS files for use with a broad variety of media.
Adobe provides several resources to aid users who are not familiar with structured authoring. Choose Help>Complete FrameMaker Help to access the complete set of FrameMaker
resources. For example, the XML Cookbook gives users a “jump start” at designing and
implementing a structured authoring system. The XML Cookbook includes a detailed set of
procedures and examples to guide users through all aspects of authoring and publishing,
including structured template creation and XML import and export. Adobe also provides a
white paper, Migrating from Unstructured to Structured FrameMaker, to guide organizations that wish to migrate from an unstructured, template-based workflow to a structured,
XML-based workflow.
FrameMaker software includes a set of sample applications for several common types of
documents and several standard DTDs. Organizations can use these sample applications
“out of the box,” or use them as a starting point for customization. Four sample applications for standards-compliant structured authoring are integrated into FrameMaker:
DITA 1.0, DocBook 4.1, xDocBook 4.1.2, and XHTML. DocBook 4.1 and xDocBook 4.1.2
6
conform fully to the industry-standard DocBook (SGML) and xDocBook (XML) DTDs
for technical documentation. The XHTML sample application conforms to the DTD for
the next generation of HTML — the Extensible HTML version 1.0 transition DTD.
DITA (Darwin Information Typing Architecture) is an industry-standard information
model that facilitates re-use and re-purposing of modular information units.
FrameMaker 8 provides a rich environment for authoring and publishing DITA-compliant
content. FrameMaker 8 supports the authoring of DITA topics, including task, concept,
and reference types, and DITA maps. Support for content fragment reuse (conref) is provided through a graphical interface. DITA xref elements are converted to “live”
FrameMaker cross-references, and book building from DITA maps is supported. The
FrameMaker 8 DITA support is highly configurable. You can modify the provided
FrameMaker DITA templates to specify your own publishing formats, or you can create
your own DITA specializations.
Rich Media Publishing Features
FrameMaker users often choose Adobe Portable Document Format (PDF) as a publishing
format, and FrameMaker software makes the process automatic. An Adobe PDF Creation
Add-On is included with the FrameMaker software, allowing the generation of PDF documents with a simple “save as PDF” operation. Cross-references and hypertext links within
and between documents are preserved when you convert to PDF.
FrameMaker supports several graphics formats that are common in interactive content.
FrameMaker 8 adds support for U3D and SWF files. These file formats allow the authoring
and publishing of new forms of interactive PDF content from FrameMaker 8 software.
A u t h o r i n g To o l s f o r C o m p l e x D o c u m e n t s
FrameMaker offers a proven, powerful set of long-document authoring and management
tools. Master page usage can be associated to specific paragraph tags or elements, and custom master pages can be rearranged in any order. This functionality reduces manual layout
chores for custom pages. Twelve running headers and footers are available, and a Select/
Deselect All button streamlines the process of importing formats between documents. Outof-the-box layout options and a rich set of examples for skill building are provided by book
templates and structured templates. The option of saving a document in FrameMaker 7.0
format provides backward compatibility with prior versions of the software.
Accessibilit y Fe atures
FrameMaker supports accessibility for authors with impaired vision and support for the
creation of accessible documents. Accessibility features provided by Windows 2000,
Windows XP, and Windows Vista are supported, including a high-contrast user interface,
screen reader compatibility, and keyboard shortcuts.
FrameMaker supports the creation of accessible documents in many ways. Template-based
publishing makes it possible to output several versions of a document, including a largeprint edition. FrameMaker supports the generation of tagged PDF, which identifies a publication’s layout elements and contents and the visual relationships between them. This
allows logical reflow of tagged PDF files during viewing on a broad range of devices with
widely varying screen sizes. You can use conditional tags and graphics attributes to display
7
graphics at normal resolution in the standard edition of a document, in high-contrast outline mode in a large-print edition, and as textual descriptions in an edition for visually
impaired readers. Documents can be output as raw text for input to accessibility tools that
require ASCII text files.
8
F R A M E M A K E R 8 : A G U I D E D TO U R
The following sections highlight the key features of FrameMaker 8 software.
ST R U CTURE D OR UN ST R UCTU RE D FR A M EMAKER?
FrameMaker provides both unstructured and structured authoring capabilities in a single
product.
By default, FrameMaker opens in a structured interface. All features of FrameMaker are
available in the structured interface, including the paragraph and character catalogs for
formatting unstructured documents, and the element catalog and structure view for
authoring structured documents. You can work on both structured and unstructured documents in the structured interface.
If you wish to constrain FrameMaker to the unstructured interface, you can choose
File>Preferences>General and specify the unstructured FrameMaker interface. Subsequent
launches of FrameMaker will open in unstructured mode. You can use the File>Preferences>General dialog to switch between structured and unstructured modes at any time.
You must quit and restart FrameMaker for the change to take effect.
UN S T R U C T U R E D AU T H O R I N G
FrameMaker software’s unstructured authoring mode supports authors in formatting text
automatically by applying paragraph formats and character formats. FrameMaker exposes
frequently-used commands in a Formatting Toolbar, and provides a history palette and
“multiple undo” capability for reviewing and undoing previous editing operations.
FrameMaker 8 software adds a tabbed interface for managing multiple documents and a
Track Text Edit toolbar.
FrameMaker software includes both unstructured and structured templates that you can
customize for your particular needs.
Cre a t in g a n ew Un s t r u c t u re d D o c u m en t
1. Launch FrameMaker. The Structured FrameMaker interface opens. You can edit both
unstructured and structured documents in structured mode.
9
2. Choose File>New>Document. The FrameMaker New file dialog opens.
3. You can create a new document by clicking the Portrait, Landscape or Custom buttons
or by using the templates provided in this folder. FrameMaker 8 also adds an
XML_Templates folder for sample XML documents. Click Explore Standard Templates
to display the Standard Templates browser.
4. Select from the list of FrameMaker templates on the left side of the dialog. The
Template browser displays a thumbnail view and description of the selected template.
To create a new empty document based on a template, click Create, or click Show
Sample to create an example document based on the template.
10
Tabbed Document
Bar
Track Text Edit bar
History Palette
Show Paragraph
Catalog
Show History
Palette
Paragraph
Catalog
5. Click the Show Paragraph Catalog button to display the Paragraph Catalog. Park your
cursor in a block of text and click in the Paragraph Catalog to apply a paragraph
format.
6. Click the Show History Palette button to display the history palette. Click on any
editing operation to undo that operation and all subsequent actions.
7. To view the Track Text Edit toolbar, choose View>Track Text Edit Bar.
8. To enable the tabbed document interface, choose View>Tabbed Bar.
S T R U C T U R E D AU T H O R I N G
FrameMaker 8 offers the ability to work with XML files, DTDs, and XML Schema, which
makes it possible to integrate with an externally developed XML application. The parsing
and validation engines built into FrameMaker ensure well-formed and valid XML when
you open and save XML documents. You can convert a DTD or XML Schema to a
FrameMaker EDD (Element Definition Document), incorporate its element definitions
into a new or existing structured FrameMaker template, and apply element tags to your
content.
When you finish your work, you can parse and validate your XML and then save it as a
standards-compliant file for use by others. XML publishing maximizes the efficiency of
11
content creation and makes it possible to easily disseminate information from a single
source to many channels, such as Web, print, interactive media, wireless devices and PDAs.
Creating a new XML Document
FrameMaker 8 software includes new sample documents that allow you to get started
quickly with XML authoring and publishing.
1. To create a new XML document, choose File>New>Document. The FrameMaker New
file dialog opens.
2. Double-click the XML_templates folder to view example XML documents.
3. Double-click the Book folder, and choose UserGuide.xml. Click New.
4. FrameMaker chooses an appropriate structured application based on the XML
structure. The structured application defines the appropriate styles and page layouts to
format the XML document for screen display, editing, and printing.
12
5. Click Continue. FrameMaker opens the XML document.
Editing an XML Document
1. To edit an XML document, choose File>Open. In the Open dialog, select a valid XML
file and click Open. FrameMaker automatically applies the appropriate styles and page
layouts to format the XML document for screen display, editing, and printing.
After you make your revisions, you can save your document in XML format by choosing
File>Save.
DEVELOPING A STRUCTURED APPLICATION
You can define multiple FrameMaker structured applications to support editing multiple
XML document types. A structured application associates a DTD or XML Schema, a template (containing an EDD) and a set of conversion rules with a certain type of XML. When
you open a file of that XML type, FrameMaker automatically reads the proper configuration and template settings to provide you with a WYSIWYG guided editing environment.
FrameMaker 8 software provides several new example structured applications for common
documents. You can use these structured applications, or modify them to meet your own
authoring and publishing requirements.
After you save a structured FrameMaker document to an XML file, the file can be opened
or edited by other XML authoring tools, or can be used for output to other channels.
13
Creating an EDD from a DTD or Schema
You can use a DTD or XML Schema to create a FrameMaker EDD. The new EDD will
include structure rules that are already defined the DTD or XML Schema. You can then
modify the EDD to specify formatting properties for XML elements.
1. Choose StructureTools>Open DTD. If you are starting with an XML Schema, choose
StructureTools>Open Schema.
2. Select a DTD or an XML Schema. FrameMaker prompts for the name of a structured
application to use when converting the DTD or XML Schema to an EDD. The
structured application may define mappings between XML elements and structured
FrameMaker objects. Here we will choose <No Application> and use FrameMaker
software’s default mappings.
3. FrameMaker prompts for the type of DTD: SGML or XML.
14
FrameMaker reads the structure definitions from the XML DTD and creates an EDD. You
can then begin to define formatting rules in the EDD. FrameMaker 8 also allows you to
define element formats by importing a cascading style sheet.
FrameMaker EDD created from XML DTD.
Creating an EDD from a Structured Document
After you have converted an unstructured document to a structured document, you can
generate a FrameMaker EDD (Element Definition Document) from your newly-converted
document. FrameMaker uses the EDD to associate formatting information with XML elements. FrameMaker 8 improves the initial EDD that you can automatically generate by
including both structure and format information from the original sample document.
If you already have a cascading style sheet that defines the format of your XML elements,
FrameMaker 8 allows you to import the CSS style definitions into the EDD. This allows
you to quickly set up on-screen and PDF formatting and can simplify the maintenance of
your EDD formatting rules.
MIGRATING TO STRUCTURE
FrameMaker provides a sophisticated mechanism for converting unstructured content into
structured content for output as XML. Built-in conversion tables allow you to specify mappings for how to translate paragraph tags and other cues into a structured hierarchy. This
means that you can quickly repurpose content from word-processing files and unstructured FrameMaker files into structured content for use in XML-based workflows.
C r e a t i n g a C o n v e r s i o n Ta b l e
1. Open an unstructured FrameMaker document. Choose StructureTools>Generate
Conversion Table. You can generate a new conversion table, or update an existing
conversion table. FrameMaker automatically generates an initial conversion table based
on the unstructured FrameMaker document’s template formats.
15
2. Save the conversion table.
3. You will probably want to add new rules to your conversion table to improve the
accuracy of the automated conversion to structure. You can wrap sequences of
paragraph formats in XML elements, automatically creating a structured hierarchy. You
can also specify an XML root, or top-level, element.
New rule to wrap
document in root element
New rule to wrap content
of “Section” elements
Conver t in g Un s t r u ct u re d Co n te n t
1. Open an unstructured FrameMaker document and a conversion table. Activate the
unstructured FrameMaker document by clicking anywhere in the document window.
2. Choose StructureTools>Utilities>Structure Current Document. Select the appropriate
conversion table.
3. Inspect the results. Adjust the conversion table rules until the document is completely,
or nearly completely, structured. For guidance on creating conversion tables, see the
document Migrating from Unstructured to Structured FrameMaker, which is available in
the Adobe FrameMaker Help Center (Help>Complete FrameMaker Help).
After your conversion table is complete, you can batch convert entire folders of unstructured FrameMaker documents by choosing StructureTools>Utilities>Convert Documents
to Structured Format.
16
XML PUBLISHING
With FrameMaker software you can open, edit, and save valid XML, enabling the use of
XML-based technologies for interactive and dynamic content delivery. The XML transformation language (XSLT) is one such key technology.
You can automatically associate an XSLT (or CSS) file with an XML document by automatically adding an XML processing instruction. The following XML application definition
automatically inserts an XSLT processing instruction when writing an XML document.
When the XML file is opened in Microsoft Internet Explorer or most other modern Web
browsers, the browser applies the XSLT transformation and displays the result. This is a
common way of deploying XML-based Web content.
Structured application definition that associates XSLT style sheet with XML documents
U s i n g X S LT o n I m p o r t o r E x p o r t
You can specify that FrameMaker apply an XSL transformation when opening or saving an
XML document. This is useful for automatically mapping between an XML structure that
is useful for storing or exchanging content and a structure that works best for authoring
content. It can also be used for other automatic manipulation of content, such as automatically sorting glossary entries when a file is saved. The following application definition
automatically applies an XSL transformation to convert the XML document to WML
(wireless markup language) for display on small-screen devices.
Structured application definition that specifies an XSLT transformation when an XML document
is saved
D I TA A U T H O R I N G A N D P U B L I S H I N G
FrameMaker 8 software provides greatly improved support for authoring and publishing
documents that conform to the Darwin Information Typing Architecture (DITA). DITA is
an increasingly popular standard for authoring, exchanging, and publishing topic-oriented
technical content. DITA was designed to support modern business requirements, including
topic-level content management, decreased product development timeframes, multiple
document variations, and multi-channel publishing.
17
C r e a t i n g a n e w D I TA To p i c
To create a new DITA topic, choose DITA>New DITA File. You can create a generic DITA
topic, or you can create an instance of one of the specialized topic types that are defined by
the DITA specification — concept, task, or reference.
1. Enter a new DITA topic file name. You can use a .xml or .dita file extension.
2. Use the FrameMaker element catalog and structure view to create valid DITA content.
3. Choose File>Save to save your DITA content at any time.
FrameMaker 8 provides highly configurable DITA support. You can use the provided
Adobe templates for authoring and publishing DITA-compliant topics and maps. You can
also modify the Adobe DITA templates to meet your own information specialization or
formatting requirements. You can specify the default DITA applications in the
DITA>DITA Options dialog.
I n s e r t i n g a D I TA c o n r e f
The DITA conref mechanism supports information re-use at the fragment level. A referenced unit of content may be as large as an entire topic or as small as a single inline element. The referenced content is maintained in one location.
1. To insert a reusable DITA fragment, place your cursor at the location in the document
structure where you wish to insert the reusable fragment. Referenced content must be
valid at the current location.
18
2. Choose DITA>Insert Conref. The FrameMaker DITA Reference Manager appears.
3. Choose the DITA document that contains the content you are referencing. You may
reference content from the current DITA document or from an external DITA
document.
4. Choose the element tag that you are referencing. The DITA Reference Manager lists all
elements of that type in the target document which have an “id” attribute.
5. Choose the instance of the element you wish to reference.
6. Click Insert. FrameMaker inserts the conref target element at the insertion point.
C r e a t i n g a n e w D I TA M a p
DITA map files are used to define collections of topics, typically for publishing. Maps
define not only topic collections, but also define relationships between topics — sequences,
groups, navigation hierarchies, and so on.
1. To create a new DITA map file, choose DITA>New DITA File>New <map>.
2. In the element catalog, choose topicref. Click insert.
3. The Insert TopicRef dialog appears. Navigate to the DITA topic you wish to include in
the DITA map file. Select the DITA topic, and choose Insert.
PUBLISHING 3D AND INTERACTIVE CONTENT
FrameMaker 8 software provides the capability to embed U3D and SWF files in
FrameMaker documents. These files are rendered as single frames in print output, but can
retain their full interactive capabilities when published to PDF. Acrobat 3D provides the
capability to generate 3-dimensional renditions from many popular computer-aided
design software packages. SWF files are a popular output format for interactive and tutorial content produced by applications such as Adobe Captivate and Adobe Flash.
19
PDF document with embedded 3D graphic and active Adobe Acrobat 3D Toolbar.
Inserting Interactive Content
To insert a U3D or SWF file into a FrameMaker document:
1. Insert the FrameMaker text cursor at the end of a paragraph or in an empty paragraph.
2. Choose File>Import>File.
3. Select the U3D or SWF file to import. Make sure Import By Reference is checked, to
maintain a link to the original file. Click Import. FrameMaker will automatically create
an anchored frame for the imported U3D or SWF file.
4. To modify the 3D model parameters of a U3D file, select the imported graphic and
choose Graphic>3D Menu.
For files created using Adobe Flash software, the first frame of the animation will appear in
print and in generated PDF. You can activate the U3D or SWF animation in the
FrameMaker or PDF file by double-clicking on the image.
PDF PUBLISHING
FrameMaker 8 improves the already rich PDF publishing capabilities of FrameMaker software by adding Unicode support and the capability to embed U3D and SWF files.
FrameMaker fully supports Unicode in PDF content. Unicode characters render appropriately in document content and PDF bookmarks.
With the capability to embed content created with Adobe Acrobat 3D, Adobe Captivate,
and Adobe Flash software, authors can create, maintain, and publish truly interactive content with FrameMaker. For print publishing, FrameMaker displays the first frame of the
content created with Adobe Flash software. When viewed online, users can benefit from
the full capabilities of Flash-based content, including interactive demonstrations and tutorials, embedded in PDF files.
To convert a FrameMaker document or book to PDF format, you can use the File>Save As
PDF command.
To change a document’s default PDF settings, use the Format>Document>PDF Setup
command with the Book or File window active. You can specify PDF file-conversion settings within your FrameMaker document. For instance, in the Bookmarks tab, you can
20
choose which paragraph or element tags to use as PDF bookmarks from a scrolling list. In
the Tags tab, you can control tagged PDF creation. In the Links tab, you can create named
destinations for all paragraphs referenced by hyperlinks and cross-references. You can
reduce PDF file size by turning off the Create Destinations option in this tab.
FrameMaker also allows you to optimize PDF file size for files or books. To modify the
default settings, choose Format>Document>Optimize PDF Size>Options. You can specify
settings for selected documents or an entire book. You can make optimization consistent
across a group of files, choose whether to prompt when opening and overwriting existing
files, select a directory in which to save your optimized files, and specify whether to abort
the conversion process if errors occur. After you make your settings, choose Format>Document>Optimize File.
Sav ing a Book as PDF
1. To save a book in PDF format, make the Book window active and choose File>Save As
PDF. The Save Document dialog appears. Choose a file name, and click Save.
2. Use the PDF Setup dialog’s Bookmarks tab to specify which paragraphs to convert to
bookmarks and how to thread articles in the resulting PDF files. Use the Tags tab to
specify settings for the creation of a tagged PDF file if needed. Specify settings for
named destinations in the Links tab. Click Set to save the new settings.
COMPLEX DOCUMENTS AND BOOKS
The FrameMaker document authoring toolset has long been a mainstay for organizations
who need to publish complex documents. With its automated page layout, template and
style management, and imported text and graphics handling features, FrameMaker can
increase the efficiency and ease of multichannel publishing of long, complex documents.
You can associate master page usage to specific paragraph tags or elements using the Format>Page Layout>Apply Master Pages command. Master pages are mapped to tags and
elements on the MasterPageMaps reference page.
21
To quickly rearrange the sequence of custom master pages, choose the Format>Page Layout>Reorder Custom Master Pages command. In the Reorder Master Pages dialog, choose
page names in the list and use the buttons to rearrange them.
You can choose from 12 different header and footer variables, including 8 generic customizable variables that you can use to print the contents of any paragraph tag or structured
FrameMaker element on your pages.
A book file provides quick access to all files contained in the book and ensures correct
numbering of pages, paragraphs, and chapters, as well as updated cross-references. It also
allows you to create a table of contents, lists, and indices for the book.
Each file in a book can have its own numbering properties. For example, you can set the
table of contents to start on i, the first chapter to start on 1-1 and the first appendix to start
on A-1.
FrameMaker makes it easy to set up and modify a book file, change the order of the files,
and specify whether a file begins on a left or right page. To create a book file, choose
File>New>Book. A blank untitled book window appears. To add non-generated files,
choose Add>File or click the Add Files button in the lower right corner of the Book window, or just drag a file from anywhere on your Desktop to the Book window and drop it
into the book.
To rename a file, select it in the Book window and choose Edit>Rename File, or simply
pause for a moment and then click the file name again. You can view individual file names
without their full path information using this technique; to rename the selected file, simply
type a new name. To rearrange the sequence of files in a book, highlight the files you wish
to move and drag them to the desired location in the file list. You can select non-contiguous file names by holding down the Control key while you click the desired items.
To delete files, select them in the file list and choose Edit>Delete File from Book, or click
the Delete selected file from book button in the lower right corner of the Book window.
To view the range of page numbers included in a file, click its name in the file list. The page
range appears in the lower left corner of the Book window.
To display the text of the first heading in a file, select it in the Book window and click the
Display heading text button.
You can print all or part of a book, create a single PostScript file for an entire book, or save
a book file in XML or Portable Document Format (PDF).
To spell-check some or all of the files in a book, select them in the Book window and
choose Edit>Spelling Checker. To search and replace within some or all of the files in a
book, select them in the Book window and choose Edit>Find/Change.
To print some of the files in a book, select them in the Book window and choose File>Print
Selected Files.
To display and change View attributes for some or all of the files in a book, select them in
the Book window and choose any of the commands in the View menu. To display and
22
change Format attributes for some or all of the files in a book, select them in the Book window and choose any of the commands in the View menu.
Use the commands on the Add and Edit menus to set up and add generated files, including
tables of contents, lists of figures, lists of tables, and indices — both for books and for individual files.
When you set up generated files, you specify the paragraph tags that are applied to the text
you want FrameMaker to include, and the markers whose content you want to extract. For
example, you may want to include Chapter and Appendix titles and first-, second-, and
third-level headings in the book’s table of contents.
In the lower right corner of the Book window, click the Update Book and Generate Lists
and Indexes button to update and re-generate the TOC, index, and any other generated
file, and to update cross-references and pagination. If errors occur, they are reported in a
Book Error Log file and generation continues.
You can import formats and page layouts from one document into some or all other documents in a book, thereby ensuring consistency in a multi-authoring environment. To copy
formats and layouts, use the File>Import>Formats command in the Book window. The
Import Formats dialog provides a button that allows you to quickly select or deselect all the
available format categories.
You can display the Structure View, Attributes Editor, or Element Catalog by clicking the
appropriate buttons in the lower right corner of the Book window.
Wo r k i n g w i t h F r a m e M a k e r B o o k F i l e s
1. A book file contains the names of all of the chapters in the book, as well as the
generated files such as the table of contents, lists, and indices. (Generated files are
marked with a slightly different icon than non-generated files.)
23
2. To add files to a book, click the Add File button in the lower right corner of the Book
window, or choose Add>Files to display the Add Files to Book dialog. To set up and
generate tables of contents, lists, and indices, use the commands on the Add and Edit
menus.
3. To update previously generated files, choose Edit>Update Book or click the Update
Book and Generate Lists and Indexes button in the lower right corner of the Book
window. If an error occurs during generation, the book continues processing; view the
Book Error Log to determine how to fix the problem.
TA B L E S O F C O N T E N T S A N D I N D I C E S
To create a table of contents for a single document or book, you specify the tags applied to
the text you want FrameMaker to extract from one or more documents. For example. you
might want the table of contents to list the first three heading levels and include the page
number beside the text. If you later add, move, or delete sections, you can quickly update
the table of contents by generating it again.
To create an indented index, you specify the marker types whose content you want
FrameMaker to extract from one or more documents. In structured documents,
FrameMaker will also generate tables of contents and indices from structured elements.
You can even generate different types of indices, such as subject, author, reference, and
marker.
Other types of generated files include lists of figures, tables, elements, paragraphs, markers,
and references. You can also include hyperlinks to enable online readers to jump to the text
in the document or book from any generated file.
24
As with all FrameMaker documents, a table of contents or index template can be modified
to fit any design, or you can use one of the templates included with FrameMaker 8 software.
To generate a table of contents for a book, add the chapters and any other components of
the book, then set up and generate the table of contents. When you make changes to the
chapters, you can update the book file and regenerate the table of contents at any time.
The procedure is the same for indices, except that you choose the marker types whose content you want FrameMaker to include when you initially generate the book or update it
later on.
With any generated file, you can create hypertext links to the source documents. To create a
hypertext link, choose Special>Hypertext. After the files are generated and locked, online
users can click to navigate to the precise section or page listed in the generated file.
S e t t i n g u p a Ta b l e o f C o n t e n t s ( T O C )
1. To display the Set Up Table of Contents dialog, make the Book window active and
choose Add>Table of Contents. To display the Set Up Standard Index dialog, choose
Add>Standard Index. To display any of the other Set Up Index dialogs, choose
Add>Index Of. All of these dialogs display information chosen for inclusion in your
generated files.
2. To display the reference pages, make any file window active and click View>Reference
Pages. The Reference pages contain formatting specifications for the table of contents
and index.
25
AU T O M A T I C NU M B E R I N G
FrameMaker 8 software offers a high degree of power and flexibility in automatic numbering functionality. In addition to automatically numbering pages, paragraphs, footnotes,
and tables, you can also apply automatic numbering properties to chapters and volumes,
and carry these settings over into your cross-reference formats and user variables. This
greatly eases the management of complex documents.
You can add automatic numbering to any paragraph format. To set up automatic numbering, choose Format>Paragraphs>Designer and click the Numbering tab.
To incorporate page, paragraph, footnote, table, chapter, and volume numbers into your
cross-references, use the appropriate system variables when defining cross-reference formats.
To set up automatic numbering properties for volumes, chapters, pages, paragraphs, footnotes, and tables, choose Format>Document>Numbering to display the Number Properties dialog.
S e t t i n g u p Au t o m a t i c Nu m b e r i n g
1. To set up automatic volume numbering, choose Format>Paragraphs>Designer and
click Numbering to activate the Numbering properties tab. Check Autonumber
Format, then choose <$volnum> from the Building Blocks scrolling list.
26
2. To use automatic chapter numbers in a cross-reference format, click to create an
insertion point at the location in your document where you want to insert the crossreference. Then, choose Special>Cross-Reference to display the Cross-Reference dialog.
Click Edit Format to display the Edit Cross-Reference Format dialog, then click Add.
Type a name for your chapter cross-reference format in the Name text box, then click in
the Building Blocks text box and choose the <$paratext> variable from the scrolling
list. Type “in Chapter”, then choose the <$chapnum> variable from the scrolling list.
Click Done to close the Edit Cross-Reference Format dialog. In the Cross-Reference
dialog, choose the desired source type and source text from the scrolling lists, then click
Insert.
3. To set up automatic numbering properties for a chapter, make the Book window active.
Select the first chapter in the book, then choose Format>Document>Numbering. In
the Chapter tab, choose Chapter #. Set the chapter number to “1” and choose a pagenumbering format.
4. To number subsequent chapters, shift-click to select the remaining chapters in the
book. In the Chapter tab, choose Continue Numbering from Previous File in Book. You
can also choose Read from File to use the local numbering properties set for each
individual file.
27
TE X T A N D G R A P H I C S
The FrameMaker filter architecture provides consistent, reliable text and graphics import
and export capabilities across all platforms. Adobe FrameMaker 8 software includes the
following file import filters:
·
Adobe PageMaker® and QuarkXpress (Windows only)
·
Word and Excel through Office 2007
·
RTF 1.6
·
PDF 1.4 and later, including native Adobe Illustrator 9.0 and later file format support
Popular graphics file formats are supported, including GIF, TIFF, JPEG, JPEG2000, EPS,
and many more. FrameMaker 8 adds support for U3D and SWF graphics, which retain
their interactive properties when saved to PDF. Imported SVG graphics retain their original vector-based quality in print and PDF. Native Adobe Photoshop® (.psd) files are also
supported.
Use File>Import>File to import text. You can import the text by copying it into the document or import it by reference. You can reformat the imported text using the current document formats, import it as plain text, or retain the original document’s formatting. If you
import by reference, you can edit the text only in the linked document; you can choose to
automatically or manually update the text when you revise it in the source document.
You also use File>Import>File to import graphics. You can import a graphic by copying it
into the document or import it by reference. Graphics can be imported into an anchored
or unanchored frame, into a rectangle that serves as a bounding box, or directly onto a
page. If you import a graphic by reference, when you update it in the source program, it
automatically updates in FrameMaker. Imported graphics can be scaled in relation to their
original size.
You can also use drag and drop on the Windows® platform to import a graphic from its
application to FrameMaker, from one FrameMaker document to another, from
FrameMaker to another application that supports drag and drop, and from a folder or
desktop into FrameMaker.
You can also import one FrameMaker document into another, which can be a very useful
document management strategy. For instance, Notes, Cautions, and Warnings can be
28
maintained as individual flows in a FrameMaker document, and imported by reference
into the main document.
The powerful anchored frames feature allows you to keep graphics and their accompanying
text callouts with preceding, adjacent or following text. This functionality is particularly
important in situations where text is likely to reflow in a document (for instance, because
the document is undergoing revisions, or when a new template is applied to the content),
because it allows the graphics and callouts to stay with their associated text. When graphics
change their position upon reflow, callouts and captions stay with them also.
Importing a File or Graphic
1. To import a file or graphic, place the cursor where you want to include the file and
choose File>Import, or click the Import File button on the Formatting Bar. Select
Import by Reference or Copy into Document. You can specify the file format or let
FrameMaker automatically determine it. Here we are selecting an SWF file. Click
Import.
2. FrameMaker presents you with text or graphic import options that are appropriate for
the file type you have chosen.
3. FrameMaker automatically places the imported graphic in an anchored frame at the
insertion point. You can then adjust the graphic or the anchored frame as needed. Here
29
we have imported an SWF file. We can invoke Adobe Flash Player software by doubleclicking the imported graphic. SWF files also retain their interactive properties in PDF.
TA B L E S
FrameMaker table support is very rich: tables can have complex shading rules, multiple
heading and footing rows along with table footnotes, and can be composed of thousands
or even millions of cells, spanning multiple pages with repeating headings and footings.
Sophisticated methods for handling table data in XML are available, including support for
the CALS table model.
Select the Table>Insert Table command to place a table in a document. When you add or
delete text, the table adjusts itself accordingly. You can also align tables in various ways: left,
centered, right, or closest to the outside or inside margin. Table cells can include text,
graphics, equations, and hypertext links.
With FrameMaker, you can sort table rows and columns in ascending or descending order,
alphabetically, numerically, or in any combination of up to three sort criteria. You can also
sort uppercase letters separately from lowercase letters.
In addition, you can use tables created in FrameMaker in other applications, such as
spreadsheet programs. When you copy a table to the Clipboard, you can paste it into
another application using the Edit>Paste command.
Press the Tab key to easily navigate through cells in a table. You can also add and delete
rows and columns from the keyboard.
You can resize table columns to fit a cell’s content, specify a column width, or click and
drag a column’s borders. To straddle adjacent cells, select the cells and choose
Table>Straddle.
When you rotate a cell in a table, you can type into it just as you do any other cell. You can
also rotate an entire table on a page of unrotated text or on a rotated (landscape) page.
Use the Table Designer to create and store reusable formats. You can use table formats to
specify ruling, shading, titles or captions above or below, plus the paragraph format in each
cell and the precise space above and below the table. Of course, any of these properties can
be modified as needed if the table is already created.
30
To copy table formats between files or to some or all of the documents in a book, you can
use the File>Import>Formats command. The Import Formats dialog includes a Select/
Deselect All button that allows you to quickly and conveniently check and uncheck all the
available options.
TE X T E D I T TR A C K I N G
FrameMaker 8 software introduces Track Text Edit capability. As a document is modified,
FrameMaker highlights the author’s modifications. Both text insertions and deletions are
marked. The author can later accept or reject each modification, individually or for the
entire document. The Track Text Edit feature is supported for both structured and
unstructured documents. Track Text Edit information is retained when a structured document is saved to XML.
You can toggle through changes in a document that has had change tracking enabled, with
Show Next and Show Previous commands. You can accept or reject single edits or all edits,
and you can preview the document with all changes accepted, or with no changes. If you
enable, then disable change tracking, tracking information is saved until you decide to
accept or reject the changes.
FrameMaker also provides change bar capabilities and a document comparison feature.
You can compare any two documents or books to find exactly where text has been added,
deleted, or moved. You also can apply a condition tag to the text that has been added and
merge both versions into a composite document.
FrameMaker examines each of the following when comparing documents and books: text,
footnotes, anchored frames, tables, variables and their definitions, cross-reference formats
and references, footnote text, marker types, and marker text.
U s i n g Tr a c k Te x t E d i t
The Track Text Edit feature is available in all FrameMaker documents, structured or
unstructured. Track Text Edit information is retained when a structured document is saved
as XML.
1. Make sure that View>Track Text Edit Bar is enabled and the Track Text Edit bar is
visible.
31
Enable/
Disable
Accept Edit/
Reject Edit
Show Next/
Show Previous
Preview Final/
Preview Original
Accept All/
Reject All
Preview Off
2. Click the Enable/Disable button to enable the Track Text Edit feature.
3. Continue editing the document. Inserted text is marked green and underlined; deleted
text is red with strike-through formatting.
4. There are several options for reviewing edits. Click the Show Next or Show Previous
buttons to navigate to the next or previous edit. Click the Preview Final button to view
the document with all edits accepted, or Preview Original to view the document with
all edits rejected.
5. To accept or reject a single edit, click Accept Edit or Reject Edit. To accept or reject all
edits, click Accept All or Reject All.
C o m p a r i n g Tw o D o c u m e n t s
1. Open both versions of the two documents you wish to compare, make the newer
version active, then choose File>Utilities>Compare Documents. The Compare
Documents dialog appears with the older document selected in the pop-up menu.
Choose Summary and Composite Documents or Summary Document only, then click
Options to specify the appearance of inserted and deleted text and to choose a
condition tag to apply to changed text in the comparison documents. After you return
to the Compare Documents dialog, click Compare.
32
2. If you choose Summary and Composite Documents in the Compare Documents
dialog, the resulting composite document merges the contents of both documents and
displays differences as conditional text according to your selected options. Change bars
mark affected lines and paragraphs.
3. Your Summary document shows page numbers containing changes, types of changes
compared, and actual changes. It also contains hypertext links to the pages in each
version.
33
C O N D I T I O N A L TE X T
Conditional text is useful for developing different variants of the same document from one
base version. By using conditional text, you save valuable time, ensure consistency, and
eliminate the need to maintain multiple documents. This functionality is especially useful
for authoring and publishing documents with similar, but not identical, content. Conditional text makes it possible to manage multiple document variations within a single set of
source files.
Conditional text also automates the process of creating documents for customized multichannel distribution. For example, you can apply one condition tag to graphics that you
want to display only in the print version of a document, and apply another condition tag to
animated GIF files that you want to display only in the online version.
FrameMaker 8 software greatly improves the capabilities of conditional text, by providing
much greater control over the behavior of overlapping conditions. You can associate special condition indicators with overlapping conditions, and you can apply boolean operators, including AND, OR, and NOT, to define the behavior of overlapping conditions.
You can apply a condition tag to any unit of text, from a single character to entire sections.
You can also make tables, footnotes, and graphics conditional. You can also use conditional
text to include comments to yourself for reviewers, which you can later hide before you
print the final copy.
FrameMaker supports conditional text in XML documents. Conditional text settings are
saved with XML documents, and the conditions are preserved when an XML document is
opened in FrameMaker.
FrameMaker conditional
text definitions in XML
document
U s i n g C o n d i t i o n a l Te x t
1. The following document displays condition tags for Retail and Wholesale versions.
Before printing, you hide one of the tags and hide the condition indicators, such as
underlining and spot color.
34
2. To tag text as conditional, select the text and choose Special>Conditional Text>Apply
Conditional Text. In the Conditional Text dialog, double-click a condition tag name to
move it to the “In:” list, and click Apply. You may apply multiple conditions to a block
of text. Text that is common to all versions of a document is called unconditional.
3. Click Manage Tag to display a dialog in which you can modify condition indicators.
Select the tag you wish to modify, and click Edit.
4. Condition indicators include colors and special formatting features, such as overline
and strikethrough, so that you can easily recognize the text associated with each
version.
35
5. To generate a customized version of the document by hiding one or more condition
tags, click Show/Hide in the Conditional Text dialog and use the Show/Hide
Conditional Text dialog. You can suppress this special formatting when publishing the
document to print or PDF. To print conditional text with the condition indicators off,
click Show/Hide, then turn off Show Condition Indicators.
If another document contains conditional text settings that you want to use, you can
import the settings by choosing File>Import>Formats.
Using Filter by Attr ibute
FrameMaker 8 software also provides a new mechanism for filtering content in structured
documents — Filter by Attribute. This feature provides a new way to manage document
variations within structured documents. Filter by Attribute is provided in addition to all
capabilities of conditional text within structured documents. Filter by attribute can provide two advantages over conventional conditional text: filtering characteristics are based
on structured or XML metadata that is already embedded in the document, and there is no
risk of mistakenly filtering content outside element boundaries.
With a structured document active, choose Special>Filter By Attribute. The Manage Attribute Expressions dialog opens.
36
Choose New to define a new expression. The Build Expression dialog opens. Enter a name
for the expression tag, and select the attribute upon which you wish to filter.
The Expression text window allows you to specify the logic that your filter will apply. In the
example below, the filter will match attributes that have a Season attribute that does NOT
have the value of “summer.” This expression might be used to suppress content labeled
“summer” in order to print a winter version of a catalog. Click OK when you are finished
defining an expression tag.
To apply an attribute-based filter, use the Manage Attribute Expressions dialog. Select the
expression you wish to apply to the current document and click Apply.
When a structured document is saved to XML, all document content (filtered and unfiltered) is saved. Filter expressions are also saved.
37
CROSS-REFERENCES
With the FrameMaker software cross-referencing feature, you never need to type the text
you want to cross reference, nor must you edit the text when headings and page numbers
change. FrameMaker handles both of these tasks automatically.
You can create cross-references within a document, or to external FrameMaker or XML
documents.
When you insert a cross-reference, you specify its source (the text you want to cross-reference) and its format. For example, you can create a cross-reference format to contain the
section number or heading text of the source, the page number, or any combination
thereof.
A cross-reference format is a combination of boilerplate text and variables that update
dynamically when you revise or move the text that you cross-reference. FrameMaker provides built-in variables that can refer to page numbers, paragraph numbers or text, and
also to chapter numbers and volume numbers for improved management of multi-volume
document sets.
You can insert a cross-reference to text in the same document or in another document.
Later, if the page numbers or the heading text change when you edit the source document,
you can quickly update the cross-reference. If the cross-reference is to another chapter in
the same book, FrameMaker updates the cross-reference automatically when you generate
the book file. You must then regenerate the online version of your book to update the
hyperlinks.
There are two types of cross-references: those that point to paragraph text, such as headings and chapter titles, and those that point to an individual word or phrase in a paragraph. The latter are called spot cross-references. For example, you would use a spot crossreference to refer to a definition in a paragraph of text.
To insert a cross-reference to a paragraph in another document, open the source document. Click at the location where you want to insert the cross-reference. Choose Special>Cross Reference and choose the source and format of the cross-reference. To insert a
spot cross-reference, you must first insert a marker beside the source, then use the CrossReference dialog.
Creating a Cross-Reference
1. Click to create an insertion point at the desired location of the cross-reference in your
document and choose Special>Cross Reference.
38
2. In the Cross-Reference dialog, specify the source file, the paragraph format of the
source, and the source. Then choose a format and click Insert. To edit the contents of a
cross-reference format, click Edit Format.
3. FrameMaker updates cross-references automatically when you open or print
documents. To update cross-references manually, choose Edit>Update References.
39
SYSTEM REQUIREMENTS
Win dow s ®
·
Intel® Pentium® III or 4 processor
·
Microsoft® Windows® 2000 Service Pack 4, Windows XP Service Pack 2, or
Windows Vista™
·
512 MB of RAM
·
600 MB of available hard-disk space
·
CD-ROM drive
·
Video card capable of displaying 256 colors recommended
·
Adobe® PostScript®, PCL, or GDI printer (Adobe PostScript printer recommended)
UNIX
·
Sun™ SPARCstation® Solaris™ 8, 9, or 10
·
512 MB of RAM
·
256–512 MB of swap space
·
1 GB–1.2 GB of available hard-disk space
·
X Window System™ X11R6
·
CD-ROM drive
Adobe Systems Incorporated • 345 Park Avenue, San Jose, CA 95110-2704 USA • www.adobe.com
Adobe, the Adobe logo, Acrobat, Acrobat 3D, Captivate, Flash, FrameMaker, Illustrator, Myriad,
PageMaker, Photoshop, and PostScript are either registered trademarks or trademarks of Adobe
Systems Incorporated in the United States and/or other countries. Intel and Pentium are trademarks or registered trademarks of Intel Corporation or its subsidiaries in the United States and
other countries. Solaris and Sun are trademarks or registered trademarks of Sun Microsystems,
Inc. in the United States and other countries. All SPARC trademarks are used under license and
are trademarks or registered trademarks of SPARC International, Inc. Products bearing SPARC
trademarks are based upon an architecture developed by Sun Microsystems, Inc. UNIX and
X Window System are trademarks or registered trademarks of The Open Group. Microsoft,
Windows, and Windows Vista are either registered trademarks or trademarks of Microsoft Corporation in the United States and/or other countries. All other trademarks are the property of
their respective owners.
© 2007 Adobe Systems Incorporated. All rights reserved. Printed in the USA. 7/07