Transcript
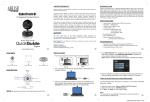
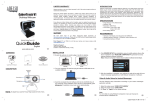
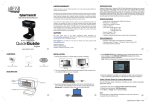
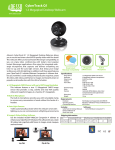
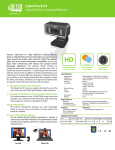
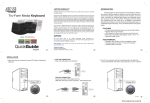
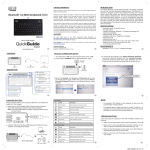
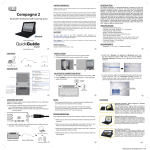
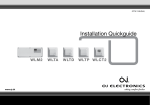
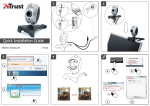
INTRODUCTION
Adesso’s CyberTrack V10 2.4 GHz Wireless Webcam takes the webcam to a new
level, giving you up to 10 feet of wireless freedom. Enjoy video chats, video recording
and broadcasting cord free! This webcam offers you broad Instant Messenger
compatibility, so you can enjoy video conferencing with today’s most popular Instant
Messenger applications. Also take advantage of the pan and tilt feature that makes
it easy to record in any direction without having to detach your webcam from your
computer. The integrated wide-angle microphone lets your voice come through loud
and clear, whether you are chatting with loved ones or doing business on a video
call. With all these great features, you can easily record and transmit your videos to
everyone!
CyberTrack V10
2.4 GHz Wireless Webcam
SPECIFICATIONS
•
•
•
•
•
•
Connection: 2.4 GHz RF Wireless Technology
Range: Up to 10 feet
Resolution: 300K Pixels
Image Sensor: 1/6” CMOS Sensor
Interface: USB 2.0
Frame Rate: 15 fps at 640 x 480 (VGA mode)
25 fps at 320 x 240 (QVGA mode, within 5 ft.)
• Focus Setting: Manual
• Power: 850 mAh Rechargeable Li-ion Battery
• Usage Time: Up to 4 hours
REQUIREMENTS
• Hardware: VGA Display Card Supported with DIRECTX
• Operating System: Windows® 7, Windows® Vista & Windows® XP
• Connectivity Interface: USB 2.0 Port
INSTALLATION
CONTENTS
1. Flip and clip webcam on monitor edge or lay flat on desktop.
QuickGuide
4. Insert the enclosed Software CD (optional) into the CD-ROM drive of
your computer to install bonus webcam software, Webcam Companion 4.
The installation menu will pop up automatically (click setup.exe if
software installation menu does not run automatically), click Webcam
Companion 4 to install software.
Note: Webcam Companion 4 license key is located on software CD envelope.
English
A
CyberTrack V10
Webcam
B
USB Wireless
Receiver
C
Quick Start
Guide
D
Software CD
E
Mini USB Cable
DESCRIPTION
Lay Flat
Flip & Clip
2. Turn your computer ON and then Plug the webcam USB Wireless Receiver
(provided) into your computer’s USB port. The USB Wireless Receiver indicator
light will light up in red after it is detected by your computer.
Note: For more help on using Webcam Companion 4 see user manual on Software CD.
Video & Audio Setup for Instant Messenger
Use the following setup instructions according to your instant messenger application
settings:
USB Port
3. Press the webcam Power Switch once to pair webcam with receiver. Webcam
Power Indicator light will turn on when connection is successful. Webcam is
now ready for use.
NOTE: To adjust focus use the Focus Ring located in front of lens.
1. Select the video source “USB Camera”
2. Select the audio source “USB Camera”
3. Hit “Save” or “Apply” for the update settings
Note
1. Adjust Focus Ring in front of the webcam lens for image focus.
2. Connect Mini USB Cable (included) to the USB port of your computer to charge
webcam.
3. Power Indicator turns red when webcam is in operation.
4. Power Indicator turns green when the webcam battery is being charged and the
webcam is not in use.
5. If the image is weak or has no response, make sure the webcam is less than
10 ft away from the USB Wireless Receiver.
CyberTrack V10 081111 V5