1
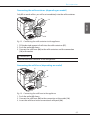
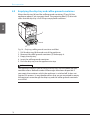
DEUTSCH ITALIANO NEDERLANDS FRANÇAIS ENGLISH Bedienungsanleitung Operating Instructions 1 Technische Daten DEUTSCH Werkseinstellungen Cappuccino Latte Macchiato Milch Heißwasser 50 Getränkemenge Bohnensorte Kaffeestärke Brühtemperatur Getränkemenge Bohnensorte Kaffeestärke Brühtemperatur Schaummenge Milchmenge Getränkemenge 130 ml 1 Stark Normal 190 ml 1 Stark Normal 120 ml 120 ml 120 ml Table of contents 1 For your safety ...................................................................................................................53 1.1 Symbols used ..........................................................................................................53 1.2 Proper use .................................................................................................................54 1.3 Danger due to electrical current ......................................................................54 1.4 Risk of burning and scalding .............................................................................55 1.5 General safety..........................................................................................................55 2 Overview of the appliance ............................................................................................56 2.1 Overview of the appliance .................................................................................56 2.2 Overview of the control panel ..........................................................................58 3 First steps .............................................................................................................................59 3.1 Unpacking the appliance ....................................................................................59 3.2 Checking the delivery contents ........................................................................59 3.3 Positioning the appliance ...................................................................................60 3.4 Connecting the appliance ..................................................................................60 3.5 Switching the appliance on for the first time ..............................................60 4 Basic operation ..................................................................................................................61 4.1 Switching the appliance on and off ................................................................61 4.2 Using the control panel .......................................................................................62 4.3 Navigating in the menu .......................................................................................63 4.4 Filling with coffee beans and using Bean Select ........................................65 4.5 Using ground coffee .............................................................................................66 4.6 Filling in water .........................................................................................................67 4.7 Adjusting the outlet ..............................................................................................68 4.8 Using milk .................................................................................................................68 4.9 Emptying the drip tray and coffee grounds container.............................70 5 Preparing beverages .......................................................................................................71 5.1 Preparing espresso and café crème ................................................................71 5.2 Preparing cappuccino ..........................................................................................71 5.3 Preparing latte macchiato ..................................................................................72 5.4 Preparing milk froth and warm milk ...............................................................72 5.5 Preparing hot water ..............................................................................................73 5.6 Changing beverage settings before and during preparation ...............73 5.7 Stopping beverage preparation .......................................................................74 5.8 Preparing two beverages simultaneously ....................................................74 6 Permanently changing beverage settings .............................................................75 6.1 Selecting recipes ....................................................................................................75 6.2 Changing default settings ..................................................................................76 51 ENGLISH Table of contents Table of contents Personal settings – "My Coffee" ..................................................................................76 7.1 Editing personal user profiles ............................................................................77 7.2 Selecting/changing personal settings ...........................................................78 7.3 Preparing beverages with personal settings ...............................................79 8 Changing basic settings.................................................................................................80 8.1 Setting the language ............................................................................................80 8.2 Setting the time......................................................................................................80 8.3 Activating/deactivating Auto Bean Select....................................................81 8.4 Setting Auto OFF ....................................................................................................81 8.5 Setting energy save mode ..................................................................................82 8.6 Resetting the appliance to the factory settings..........................................83 8.7 Displays in the System menu .............................................................................83 8.8 Setting the grinding fineness ............................................................................84 8.9 Converting the connection for the milk hose .............................................85 9 Care and maintenance....................................................................................................85 9.1 General cleaning ....................................................................................................85 9.2 Rinsing the coffee system ...................................................................................86 9.3 Cleaning the brewing unit..................................................................................86 9.4 "Easy Cleaning" programme ..............................................................................87 9.5 "Cleaning milk system" programme ...............................................................87 9.6 "Cleaning coffee system" programme............................................................89 9.7 "Descaling" programme ......................................................................................90 9.8 Setting the water hardness ................................................................................91 9.9 Using a water filter.................................................................................................91 10 Problems...............................................................................................................................93 11 Transport, storage and disposal .................................................................................94 11.1 Venting the appliance ..........................................................................................94 11.2 Transporting the appliance ................................................................................94 11.3 Disposing of the appliance.................................................................................95 12 Technical data ....................................................................................................................95 ENGLISH 7 52 For your safety Dear Customer, Thank you for purchasing the CaffeO Barista fully automatic coffee maker. Read the operating instructions through carefully. This will help to avoid personal injury and material damage. Store the operating instructions carefully. If you pass the appliance on, enclose the operating instructions with it. Melitta accepts no liability for damage caused by failure to observe the operating instructions. If you require further information or have any questions on the appliance, contact Melitta or visit our website at: www.melitta.de We hope you enjoy using your appliance. 1 For your safety The appliance conforms to the following European directives: ū 2006 / 95 / EC (low voltage), ū 2004 / 108 / EC (electromagnetic compatibility), ū 2011 / 65 / EU (RoHS), ū 2009 / 125 / EC (eco-design / ErP). The appliance has been built using the latest technology. Residual dangers nevertheless exist. You must observe the safety instructions to avoid dangers. Melitta accepts no liability for damage caused by failure to observe the safety instructions. 53 ENGLISH The operating instructions will help you to discover the diverse options offered by the appliance and enjoy your coffee to the full. For your safety 1.1 Symbols used The following symbols indicate particular risks in using the appliance or provide useful tips. CAUTION ENGLISH The signal word CAUTION indicates possible injuries. ATTENTION The signal word ATTENTION indicates possible damage to the appliance. Information The signal word "Information" indicates additional notes and tips on using the appliance. 1.2 Proper use The appliance is used to prepare beverages consisting of coffee beans or ground coffee and to heat milk and water. The appliance is intended for use in private households. Any other use is regarded as improper and may lead to personal injury and material damage. Melitta accepts no liability for damage which arises due to improper use of the appliance. 1.3 Danger due to electrical current If the appliance or the power cable is damaged, the risk of a fatal electric shock is run. Observe the following safety instructions to avoid dangers due to electrical current: ū Do not use a damaged power cable. ū A damaged power cable may only be replaced by the manufacturer, its customer service or a similarly qualified person. ū Do not open any covers firmly screwed onto the appliance housing. ū Only use the appliance when it is in a technically flawless condition. 54 For your safety 1.4 Risk of burning and scalding Escaping fluids and steam may be very hot. Parts of the appliance also become very hot. Observe the following safety instructions to avoid scalds and burns: ū Prevent skin from coming into contact with escaping fluids and steam. ū Do not touch any nozzles on the outlet during operation. 1.5 General safety Observe the following safety instructions to avoid personal injury and material damage: ū Do not reach into the interior of the appliance during operation. ū The appliance and its power cable must be kept out of the reach of children under 8 years of age. ū This appliance may be used by children over 8 years of age and by persons with reduced physical, sensory or mental capabilities or a lack of experience and knowledge if they are supervised or have been instructed in using the appliance safely and understand the resulting risks. ū Children must not play with the appliance. Cleaning and maintenance must not be undertaken by children younger than 8 years of age. Children over 8 years of age must be supervised during cleaning and maintenance. ū Disconnect the appliance from the power supply when it is left unsupervised for a long time. 55 ENGLISH ū A defective appliance may only be repaired by an authorised workshop. Do not repair the appliance yourself. ū Do not undertake any changes to the appliance, its components or its accessories. ū Do not immerse the appliance in water. Overview of the appliance 2 Overview of the appliance 2.1 Overview of the appliance 2 3 ENGLISH 4 1 5 6 7 8 9 Fig. 1: Front left of the appliance 1 Water tank 2 2-chamber bean container 3 Ground coffee chute 4 Cup rest 5 Control panel 6 Height-adjustable outlet with 2 coffee nozzles, 2 milk nozzles, 1 hot water nozzle, cup illumination 7 Coffee grounds container (inner) 8 Drip tray 9 ON/OFF button 56 Overview of the appliance ENGLISH 10 11 12 13 14 17 Fig. 2: 16 15 Front right of the appliance 10 Cover 11 "Grinding fineness adjustment" lever (behind the cover) 12 Power cable with cable insert compartment 13 Brewing unit (behind the cover) 14 Milk hose connection at the outlet (can be converted to left side) 15 Milk hose connection at the drip tray (possible on both sides) 16 Cup plate 17 Float 57 Overview of the appliance 2.2 Overview of the control panel 19 20 21 22 23 24 25 26 ENGLISH 18 27 09:52 33 Please select your beverage 28 32 Fig. 3: 31 29 Control panel Item Designation Function 18 Direct keys Preparing beverages 19 Espresso Preparing espresso 20 Café crème Preparing café crème 21 Cappuccino Preparing cappuccino 22 Latte macchiato Preparing latte macchiato 23 Milk froth/warm milk 24 Hot water Preparing milk froth or warm milk Preparing hot water 25 2 cups Two-cup dispensing 26 Beverage amount slider 27 Coffee strength slider 28 My Coffee Setting the beverage amount 29 BEAN SELECT Selecting the bean type 30 Up arrow button 31 Down arrow button 32 menu/ok Navigating up in the menu 33 Display 58 30 Setting the coffee strength Selecting personal settings for beverages Navigating down in the menu Calling up the menu or confirming inputs Display of current menus and messages Example: ready symbol First steps 3 First steps This chapter describes how to prepare your appliance for use. 3.1 Unpacking the appliance ENGLISH CAUTION Contact with cleaning agents may lead to eye and skin irritation. Store the enclosed cleaning agents out of the reach of children. Unpack the appliance. Remove the packaging material, the adhesive strips and the protective films from the appliance. Keep the packaging material for transport and possible return shipments. Information The appliance may contain traces of coffee and water. The appliance has been tested in the factory to ensure that it functions perfectly. 3.2 Checking the delivery contents Check the completeness of delivery using the following list. If parts are missing, contact your retailer. ū ū ū ū ū ū ū ū Coffee spoon with screw-in aid for the water filter, Milk hose or milk container including milk hose (depending on model), Cleaning brush, Coffee system cleaning agent, Milk system cleaning agent, Descaling agent, Water filter, Test strip for determining the water hardness. 59 First steps 3.3 Positioning the appliance ENGLISH Observe the following instructions: ū Do not position the appliance in damp rooms. ū Position the appliance on a stable, flat and dry surface. ū Do not position the appliance in the vicinity of sinks or the like. ū Do not position the appliance on hot surfaces. ū Position the appliance a sufficient distance, approx. 10 cm, away from the wall and other objects. The space above the appliance should be at least 20 cm. ū Route the power cable so that it cannot be damaged by edges or hot surfaces. 3.4 Connecting the appliance Observe the following instructions: ū Check that the supply voltage matches the operating voltage specified in the technical data (see table Technical data on page 95). ū Only connect the appliance to a properly installed earthing contact socket. If in doubt, consult a specialist electrician. ū The socket must be fused with at least a 10 A fuse. 3.5 Switching the appliance on for the first time During initial starting up, you can set the language, the time and the water hardness. The settings can be changed at a later point in time (see chapter 8 Changing basic settings on page 80 and chapter 9.8 Setting the water hardness on page 91). Use the enclosed test strip to determine the water hardness. Observe the instructions on the test strip packaging and in table Water hardness range on page 95. Information We recommend pouring away the first two cups of coffee after initially starting up. 60 Basic operation 1. Place a vessel beneath the outlet. 2. Switch the appliance on with the ON/OFF button. » The welcome display appears on the display. » The request to carry out set-up appears on the display: Please set up the machine. » The "menu/ok" button flashes. 3. Confirm with "menu/ok". » The Language menu appears. 4. Select your language with the arrow buttons. Confirm with "menu/ok". » The Clock menu appears. 5. Select the hour and minutes with the arrow buttons. Confirm each setting with "menu/ok". » The Water hardness menu appears. 6. Select the determined water hardness range with the arrow buttons or confirm the default value with "menu/ok". » The request Please refill and insert water tank appears. 7. Remove the water tank. Rinse the water tank out with clean water. Fill the water tank with fresh water and insert it. » The appliance heats up and performs automatic rinsing. » The ready symbol and the request Fill beans appear in the display 8. Fill coffee beans into the bean container. To do this, read chapter Filling with coffee beans and using Bean Select on page 65. 4 Basic operation This chapter describes basic operating steps for using the appliance on a daily basis. 4.1 Switching the appliance on and off Before switching on when initially starting up the appliance, read chapter 3.5 Switching the appliance on for the first time on page 60. Information ū The appliance performs automatic rinsing when switching on and off. ū During rinsing, rinsing water is also conducted into the drip tray. 61 ENGLISH Requirement: The appliance has been positioned and connected. Basic operation Hello ENGLISH 9 Fig. 4: ON/OFF button Fig. 5: Welcome display Switching the appliance on 1. Place a vessel beneath the outlet. 2. Press the ON/OFF button (9). » The welcome display appears on the display (see Fig. 5). » The appliance heats up and performs automatic rinsing. » The ready symbol appears on the display. Switching the appliance off 1. Place a vessel beneath the outlet. 2. Press the ON/OFF button (9). » The appliance performs automatic rinsing. » The appliance switches off. Information ū The appliance switches off automatically when it is not operated for a long time. Automatic rinsing is also carried out in this case. ū The off time can be set in the Auto OFF menu, see chapter 8.4 Setting Auto OFF on page 81. ū If no beverage has been prepared since switching on or if the water tank is empty, no rinsing takes place. 4.2 Using the control panel The essential functions can be accessed using the control panel. Press the button with a fingertip. The control panel does not react when touched with a pen or other objects. Only those buttons which can be used in the appliance's current status light up. 62 Basic operation Use the following actions to operate the control panel: Long press Press a button for longer than 2 seconds to select a second function which may be available. Press "+" or "–" Press "+" or "–" to increase or reduce the current value. Hold a button down to change the value continuously. Press the slider Press on the slider to select a value. Pull the slider Press and pull the slider to increase or reduce the current value. 4.3 Navigating in the menu To set individual beverages and for maintenance and care, you must call up the menu in the display and navigate in the menu. Observe the instructions on the display. Direct keys Espresso Coffee strength Strong Confirm with OK: Fig. 6: Example: display with buttons Use the following options to navigate in the menu: 63 ENGLISH Brief press Press a button briefly to select a function. Basic operation Calling up the menu and confirming the selection Press the "menu/ok" button for longer than 2 seconds to call up the menu. Press the "menu/ok" button briefly to confirm your selection. Navigating in the menu ENGLISH Press the arrow buttons to navigate down or up in the menu. Hold an arrow button down to quickly switch to the menu options. Exiting a menu Select the command Exit with the arrow buttons and confirm with "menu/ok" to exit a menu. Exit sub-menus, which only display information and in which you do not carry out any settings, with "menu/ok". Calling up sub-menus Certain of the appliance's functions are reached by calling up several submenus in succession. Sub-menus are always called up in a similar manner. Navigation to the Descaling programme is described here as an example. Care Exit Rinsing Easy cleaning Cleaning milk system Cleaning coffee system Descaling Filter Fig. 7: Navigating to the Descaling programme 1. Press the "menu/ok" button for 2 seconds. » The menu appears on the display. 2. Use the arrow buttons to select Care and confirm with "menu/ok". 3. Use the arrow buttons to select Descaling and confirm with "menu/ok". The selection of functions is always shown in shortened form in these operating instructions: Navigate to the Care > Descaling menu. 64 Basic operation Filling with coffee beans and using Bean Select Roasted coffee beans lose their aroma. Only fill the bean container with as many coffee beans as you will consume over the next 3 – 4 days. ATTENTION Using unsuitable types of coffee may lead to clogging of the grinder. Do not use freeze-dried or caramelised coffee beans. Do not pour ground coffee into the bean container. ENGLISH 4.4 2 35 34 29 Fig. 8: 2-chamber bean container The 2-chamber bean container (2) enables you to use two different types of coffee. Auto Bean Select ensures that the best coffee beans are automatically selected for various coffee specialities. Espresso-based beverages take their coffee beans from left bean chamber 1 (34), café crème-based beverages from right bean chamber 2 (35). The following table shows the assignment of the bean chambers to the coffee beverages. You can change the settings (see chapter 6.2 Changing default settings on page 76). Bean chamber 1 (34) Coffee beverage Espresso, cappuccino, latte macchiato 2 (35) Café crème 1. Open the lid of the 2-chamber bean container (2). 2. Fill espresso beans into left bean chamber 1 (34) and café crème beans into right bean chamber 2 (35). 3. Close the lid of the 2-chamber bean container. 4. The "BEAN SELECT" button (29) can be used to select a bean type prior to preparation (see chapter Changing beverage settings before preparation on page 73) 65 Basic operation Information ENGLISH ū The grinder is emptied during each grinding process. Minimal coffee type mixing may nevertheless occur. ū Empty grinding causes a different type of noise and is normal. 4.5 Using ground coffee You may also use ground coffee to prepare coffee beverages. ATTENTION The use of unsuitable types of coffee may lead to brewing unit clogging. Do not use any instant products. Fill a maximum of one coffee spoon of ground coffee into the ground coffee chute. 3 Fig. 9: Ground coffee chute 1. Open the lid of the ground coffee chute (3). 2. Use the enclosed coffee spoon for dosing. Fill a maximum of one coffee spoon of ground coffee into the ground coffee chute. 3. Close the lid of the ground coffee chute. 4. Proceed as described in chapters 5 to 7. Information ū Two-cup dispensing is not possible when using ground coffee. ū If you do not prepare any coffee within 3 minutes of opening the ground coffee chute, the appliance switches to operation with coffee beans and the ground coffee is discharged into the coffee grounds container. 66 Basic operation Filling in water Use only fresh, cold water without carbon dioxide for optimum coffee enjoyment. Change the water daily. Information The quality of the water extensively determines the taste of the coffee. Therefore, use a water filter (see chapter 9.8 Setting the water hardness on page 91 and chapter 9.9 Using a water filter on page 91). ENGLISH 4.6 1 Fig. 10: Water tank 1. Open the lid of the water tank and pull the water tank (1) upwards out of the appliance using the handle. 2. Fill the water tank with water. Note the maximum capacity of 1.8 litres. 3. Insert the water tank into the appliance from above and close the lid. 67 Basic operation 4.7 Adjusting the outlet ENGLISH The outlet (6) is height-adjustable. Set the greatest possible distance between the outlet and the vessel. Depending on vessel, push the outlet up or down. 6 Fig. 11: Height-adjustable outlet 4.8 Using milk Use cooled milk for optimum coffee enjoyment. Depending on model, you can use the enclosed milk container or the milk hose and conventional milk packs. Information The connection for the milk hose is installed on the right of the outlet in the factory. If you require the connection on the left side, read chapter 8.9 Converting the connection for the milk hose on page 85. 68 Basic operation Connecting the milk container (depending on model) Only fill as much milk as you will use immediately into the milk container. 6 ENGLISH 14 37 36 Fig. 12: Connecting the milk container to the appliance 1. Fill the desired amount of milk into the milk container (37). 2. Push the outlet (6) down. 3. Connect the milk hose (36) to the milk container and the connection (14) at the outlet. Information Store the filled milk container in the refrigerator. Connecting the milk hose (depending on model) 6 14 36 38 Fig. 13: Connecting the milk hose to the appliance 1. Push the outlet (6) down. 2. Connect the milk hose (36) to the connection at the outlet (14). 3. Insert the milk hose into a conventional milk pack (38). 69 Basic operation 4.9 Emptying the drip tray and coffee grounds container ENGLISH When the drip tray (8) and the coffee grounds container (7) are full, the appliance requests you to empty them. The projecting float (17) also indicates that the drip tray is full. Always empty both containers. 7 8 17 Fig. 14: Drip tray, coffee grounds container and float 1. 2. 3. 4. 5. Pull the drip tray (8) forwards out of the appliance. Remove the coffee grounds container (7) and empty it. Empty the drip tray. Insert the coffee grounds container. Push the drip tray into the appliance to stop. Information The appliance requests you to empty the drip tray and the coffee grounds container after a defined number of beverages have been dispensed. If you empty the containers whilst the appliance is switched off, it does not register this process. It may therefore occur that you are requested to empty the containers even though the drip tray and the coffee grounds container are still full. 70 Preparing beverages 5 Preparing beverages Standard dispensing is described in this chapter. Note: ū The storage containers should contain sufficient amounts of coffee and water. If the filling level is too low, the appliance requests you to refill it. ū The appliance does not indicate a lack of milk. ū The vessels for the beverages should be sufficiently large (see table Factory settings on page 95). 5.1 Preparing espresso and café crème Requirement: The ready symbol appears on the display. 1. Place a vessel beneath the outlet. 2. Press the "Espresso" or "Café crème" button. » The grinding process and beverage dispensing start. » Beverage dispensing is ended automatically. 3. Remove the vessel. » The ready symbol appears on the display. 5.2 Preparing cappuccino Requirement: The ready symbol appears on the display and milk is connected. 1. Place a vessel beneath the outlet. 2. Press the "Cappuccino" button. » The grinding process and coffee dispensing start. » Coffee dispensing is ended automatically. » Milk dispensing begins. » Beverage dispensing is ended automatically. 3. Remove the vessel. » Easy Cleaning? (OK for start) appears in the display. 4. You can execute the Easy Cleaning programme or prepare further beverages. a) Execute the Easy Cleaning programme. Follow the instructions on the display. Information on this is available in chapter 9.4 "Easy Cleaning" programme on page 87. 71 ENGLISH There are three options for preparing beverages: ū Standard dispensing, ū Preparation with recipes (see chapter 6.1 Selecting recipes on page 75), ū Use of the "My Coffee" function (see chapter 7 Personal settings – "My Coffee" on page 76). Preparing beverages b) Prepare further beverages. » The ready symbol appears on the display. 5.3 Preparing latte macchiato ENGLISH Requirement: The ready symbol appears on the display and milk is connected. 1. Place a vessel beneath the outlet. 2. Press the "Latte macchiato" button. » Milk dispensing begins. » Milk dispensing is ended automatically. » The grinding process and coffee dispensing start. » Beverage dispensing is ended automatically. 3. Remove the vessel. » Easy Cleaning? (OK for start) appears in the display. 4. You can execute the Easy Cleaning programme or prepare further beverages. a) Execute the Easy Cleaning programme. Follow the instructions on the display. Information on this is available in chapter 9.4 "Easy Cleaning" programme on page 87. b) Prepare further beverages. » The ready symbol appears on the display. 5.4 Preparing milk froth and warm milk The preparation of milk froth and warm milk is similar. Requirement: The ready symbol appears on the display and milk is connected. 1. Place a vessel beneath the outlet. 2. Press the "Milk froth/milk" button. a) Milk froth = press button briefly b) Warm milk = press button for longer (2 seconds) » Milk dispensing begins. » Beverage dispensing is ended automatically. 3. Remove the vessel. » Easy Cleaning? (OK for start) appears in the display. 4. You can execute the Easy Cleaning programme or prepare further beverages. a) Execute the Easy Cleaning programme. Follow the instructions on the display. Information on this is available in chapter 9.4 "Easy Cleaning" programme on page 87. 72 Preparing beverages b) Prepare further beverages. » The ready symbol appears on the display. 5.5 Preparing hot water Requirement: The ready symbol appears on the display. ENGLISH 1. Place a vessel beneath the outlet. 2. Press the "Hot water" button. » Hot water dispensing begins. » Beverage dispensing is ended automatically. 3. Remove the vessel. » The ready symbol appears on the display. 5.6 Changing beverage settings before and during preparation You can change beverage settings before and during beverage preparation. Information These settings only apply to current beverage preparation. Changing beverage settings before preparation You can change the bean type, the total beverage amount and the coffee strength before selecting a beverage. Before selecting a beverage, select a bean type with the "BEAN SELECT" button. Before selecting a beverage, use the "Beverage amount" slider to set a beverage amount. Before selecting a beverage, use the "Coffee strength" slider to set the coffee strength. Information ū When preparing latte macchiato and cappuccino, the total beverage amount is subdivided into a coffee and a milk amount according to a specified ratio. ū If you do not prepare a beverage within 1 minute, the appliance switches to the default settings. 73 Preparing beverages Changing beverage settings during preparation You can change the beverage amount and the coffee strength during beverage preparation. ENGLISH During beverage dispensing (coffee or milk), use the "Beverage amount" slider to set the relevant beverage amount. During the grinding process, use the "Coffee strength" slider to set the coffee strength. 5.7 Stopping beverage preparation If you want to stop beverage preparation prematurely, press the selected direct key again. 5.8 Preparing two beverages simultaneously The "2 cups" button is used to prepare two beverages simultaneously. Two-cup dispensing is possible for espresso, cappuccino, café crème and latte macchiato. Two-cup dispensing is not possible for any other type of beverage. 25 6 Fig. 15: Two-cup dispensing 1. Place two vessels beneath the outlet (6). 2. Press the "2 cups" button (25). 3. Continue as described for preparation of the relevant beverage. Information ū The setting only applies to the next beverage which is prepared. ū If you do not prepare a beverage within 1 minute, the appliance switches to single-cup dispensing. 74 Permanently changing beverage settings 6 Permanently changing beverage settings The appliance offers further options for preparing coffee specialities. You can use default recipes or permanently change the beverage settings. Selecting recipes The following coffee specialities are available: ū Espresso: Espresso (standard), ristretto, lungo, double espresso, double ristretto. ū Café crème: Café crème (standard), double café crème, americano, americano extra shot, long black. ū Cappuccino: Cappuccino (standard), espresso macchiato, café latte, café au lait. ū Latte macchiato: Latte macchiato (standard), latte macchiato extra shot, latte macchiato triple shot, flat white. Information The recipe selection remains valid until it is changed again. Recipe selection is similar for all beverages. The selection of a ristretto is described as an example here. Direct keys Espresso Recipes Exit Espresso Ristretto Lungo Double Espresso Double Ristretto Fig. 16: Recipe selection for ristretto Requirement: The ready symbol appears on the display. 1. Press the "menu/ok" button for 2 seconds. » The menu appears on the display. 2. Navigate to the Direct keys > Espresso > Recipes menu. 3. Use the arrow buttons to select Ristretto and confirm with "menu/ok". 4. Repeatedly select the Exit command to exit the menu. » The ready symbol appears on the display. » When an espresso is next prepared, the ristretto recipe will be used. 75 ENGLISH 6.1 Personal settings – "My Coffee" 6.2 Changing default settings ENGLISH You can change the following default settings depending on beverage: ū Coffee amount: in millilitres, ū Froth amount: in millilitres, ū Milk amount: in millilitres, ū Hot water amount: in millilitres, ū Beans: bean chamber 1 or 2, ū Coffee strength: very mild, mild, normal, strong, very strong, ū Temperature: low, normal, high. Information The default settings remain valid until they are changed again. Changing the beverage settings is similar for all beverages. Changing the coffee strength for an espresso is described here as an example. Direct keys Espresso Coffee strength Strong Confirm with OK: Fig. 17: Setting the coffee strength Requirement: The ready symbol appears on the display. 1. Press the "menu/ok" button for 2 seconds. » The menu appears on the display. 2. Navigate to the Direct keys > Espresso > Coffee strength menu. 3. Use the arrow buttons to select the desired coffee strength and confirm with "menu/ok". 4. Repeatedly select the Exit command to exit the menu. » The ready symbol appears on the display. » The selected coffee strength is used the next time an espresso is prepared. 7 Personal settings – "My Coffee" The "My Coffee" function enables you to save personal beverage settings and assign them to a user. 76 Personal settings – "My Coffee" Editing personal user profiles Up to four user profiles can be used. Changing the name of a user profile You can change the names of the user profiles. ENGLISH 7.1 My coffee --1-Change name AB A B C D E F G H I J K L M N O P Q R S T U V W X Y Z - , 1 2 3 4 5 6 7 8 9 0 Exit Fig. 18: Changing the name of a user profile Requirement: The ready symbol appears on the display. 1. Press the "menu/ok" button for 2 seconds. » The menu appears on the display. 2. Navigate to the My Coffee menu. 3. Use the arrow buttons to select a user and confirm with "menu/ok". 4. Use the arrow buttons to select Change name and confirm with "menu/ ok". » The menu for selecting individual characters appears. 5. Use the arrow buttons to select individual characters and confirm each with "menu/ok" (see Fig. 18). 6. Repeatedly select the Exit command to exit the menu. » The ready symbol appears on the display. Activating/deactivating a user profile You may only use users whose profile is activated. Requirement: The ready symbol appears on the display. 1. Press the "menu/ok" button for 2 seconds. » The menu appears on the display. 2. Navigate to the My Coffee menu. 3. Use the arrow buttons to select a user and confirm with "menu/ok". 4. Use the arrow buttons to select Enabled/disabled and confirm with "menu/ok". 77 Personal settings – "My Coffee" 5. Use the arrow buttons to select Enabled or Disabled and confirm with "menu/ok". 6. Repeatedly select the Exit command to exit the menu. » The ready symbol appears on the display. ENGLISH 7.2 Selecting/changing personal settings Depending on beverage, you can assign the following settings to a user: ū Coffee amount: in millilitres, ū Froth amount: in millilitres, ū Milk amount: in millilitres, ū Hot water amount: in millilitres, ū Beans: bean chamber 1 or 2, ū Coffee strength: very mild, mild, normal, strong, very strong, ū Temperature: low, normal, high. The assignment of personal settings to a user is always similar. Setting the coffee amount for a cappuccino is described here as an example. My coffee --1-Cappuccino Exit Recipes Coffee amount Froth amount Beans Coffee strength Temperature Fig. 19: Changing personal settings Requirement: The ready symbol appears on the display. 1. Press the "menu/ok" button for 2 seconds. » The menu appears on the display. 2. Navigate to the My Coffee menu. 3. Use the arrow buttons to select a user and confirm with "menu/ok". 4. Navigate to the Cappuccino > Coffee amount menu. 5. Use the arrow buttons to select an amount and confirm with "menu/ok" 6. Repeatedly select the Exit command to exit the menu. » The ready symbol appears on the display. » The next time a cappuccino is prepared by the user, the selected coffee amount is used. 78 Personal settings – "My Coffee" Preparing beverages with personal settings The preparation of beverages using the "My Coffee" function is similar for all beverages. The preparation of a cappuccino is described here as an example. Requirement: The ready symbol appears on the display and milk is connected. 1. Place a vessel beneath the outlet. 2. Press the "My Coffee" button until the desired user is shown on the display. 3. Press the "Cappuccino" button. » The grinding process and coffee dispensing start. » Coffee dispensing is ended automatically. » Milk dispensing begins. » Beverage dispensing is ended automatically. 4. Remove the vessel. » Easy Cleaning? (OK for start) appears in the display. 5. You can execute the Easy Cleaning programme or prepare further beverages. a) Execute the Easy Cleaning programme. Follow the instructions on the display. Information on this is available in chapter 9.4 "Easy Cleaning" programme on page 87. b) Prepare further beverages. » The ready symbol appears on the display. Information ū To exit the "My Coffee" function, press the "My Coffee" button until the ready symbol appears. ū If you do not prepare a beverage within 3 minutes, the appliance automatically switches to the ready symbol. 79 ENGLISH 7.3 Changing basic settings 8 Changing basic settings Operating steps which change the appliance's basic settings are described in the following chapter. 8.1 Setting the language ENGLISH You can set the display text language. Requirement: The ready symbol appears on the display. 1. Press the "menu/ok" button for 2 seconds. » The menu appears on the display. 2. Navigate to the Language menu. 3. Use the arrow buttons to select a language and confirm with "menu/ok". 4. Exit the menu with the command Exit. » The ready symbol appears on the display. 8.2 Setting the time You can set the time shown on the display. Requirement: The ready symbol appears on the display. 1. Press the "menu/ok" button for 2 seconds. » The menu appears on the display. 2. Navigate to the Clock menu. 3. Use the arrow buttons to select the hours and minutes. Confirm each setting with "menu/ok". 4. Exit the menu with the command Exit. » The ready symbol appears on the display. Information If you want to prevent the time from being shown on the display, set the time to 00:00. 80 Changing basic settings 8.3 Activating/deactivating Auto Bean Select You can activate/deactivate automatic selection of a bean type. Requirement: The ready symbol appears on the display. ENGLISH 1. Press the "menu/ok" button for 2 seconds. » The menu appears on the display. 2. Navigate to the System > Auto Bean Select menu. 3. Use the arrow buttons to select Enabled or Disabled and confirm with "menu/ok". 4. Repeatedly select the Exit command to exit the menu. » The ready symbol appears on the display. 8.4 Setting Auto OFF If you do not operate the appliance for a long time, it switches off automatically after a specified time. Set the duration until the appliance switches off in the Auto OFF menu. You can also define a specific point in time. Information If the duration and point in time are activated simultaneously, the appliance switches off after the event which occurs first. Setting the duration for Auto OFF Requirement: The ready symbol appears on the display. 1. Press the "menu/ok" button for 2 seconds. » The menu appears on the display. 2. Navigate to the Auto OFF > OFF after.. menu. 3. Use the arrow buttons to select a time and confirm with "menu/ok". 4. Repeatedly select the Exit command to exit the menu. » The ready symbol appears on the display. Information Auto OFF cannot be deactivated completely. After 8 hours without being operated, at the latest, the appliance switches off. 81 Changing basic settings Setting the point in time for Auto OFF The OFF time point is deactivated as default in the factory. Requirement: The ready symbol appears on the display. ENGLISH 1. Press the "menu/ok" button for 2 seconds. » The menu appears on the display. 2. Navigate to the Auto OFF > OFF at.. menu. 3. Use the arrow buttons to select the hours and minutes. Confirm each setting with "menu/ok" 4. Repeatedly select the Exit command to exit the menu. » The ready symbol appears on the display. Information If you want to deactivate Auto OFF, set the OFF time point to 00:00. 8.5 Setting energy save mode Energy save mode lowers the heating temperature and switches off the illumination in the control panel. The "menu/ok" button remains lit. If you do not operate the appliance for a long time, it automatically switches to energy save mode after a specified time. The period of time until energy save mode is activated is set in the Energy save mode menu. Requirement: The ready symbol appears on the display. 1. Press the "menu/ok" button for 2 seconds. » The menu appears on the display. 2. Navigate to the Energy save mode menu 3. Use the arrow buttons to select a period of time and confirm with "menu/ok". 4. Exit the menu with the command Exit. » The ready symbol appears on the display. Information ū Energy save mode is ended by pressing the "menu/ok" button. ū Energy save mode cannot be deactivated completely. After 4 hours without being operated, at the latest, the appliance switches to energy save mode. 82 Changing basic settings 8.6 Resetting the appliance to the factory settings The appliance can be reset to the factory settings. Information ENGLISH If you reset the appliance to the factory settings, all personal settings are lost, including the settings in the My Coffee menu. Requirement: The ready symbol appears on the display. 1. Press the "menu/ok" button for 2 seconds. » The menu appears on the display. 2. Navigate to the System > Factory settings menu. 3. Use the arrow buttons to select Reset and confirm with "menu/ok". 4. Repeatedly select the Exit command to exit the menu. » The ready symbol appears on the display. 8.7 Displays in the System menu The System menu provides information on the status of the appliance. The information can be accessed via the System > Statistics menu and the System > SW version menu. Press the "menu/ok" button to exit the menus. The following table provides an overview of the information content. Menu Statistics Beverages Brewing unit cleaning Descaling Progress bars SW version MAIN XXXXXXXXXXX Information Number of beverages prepared since starting up. Number of cleaning processes performed. Number of descaling processes performed. These show the number of beverages which can still be prepared until the appliance requests you to perform cleaning or descaling. Installed software version. 83 Changing basic settings 8.8 Setting the grinding fineness The grinding fineness of the coffee beans influences the taste of the coffee. The grinding fineness has been optimally set prior to delivery. We recommend adjusting the grinding fineness after around 1, 000 beverages have been dispensed (around 1 year) at the earliest. ENGLISH ATTENTION Setting the grinding fineness whilst the grinder is stationary may cause damage to the grinder. Only set the grinding fineness whilst the grinder is running. 11 10 Fig. 20: Setting the grinding fineness Requirement: The ready symbol appears on the display. 1. Open the cover (10). To do this, reach into the recess on the right of the appliance and pull the cover off upwards. 2. Prepare any coffee beverage. 3. Move the lever (11) forwards or backwards whilst the grinder is running. ū Backwards = grinding fineness coarser ū Forwards = grinding fineness finer 4. Close the cover. To do this, insert the bottom of the cover into the appliance and swing it up until it engages. » The ready symbol appears on the display. Information The grinding fineness is optimally set when the coffee flows evenly out of the outlet and a fine, dense crema appears. 84 Care and maintenance 8.9 Converting the connection for the milk hose The milk hose can be connected on the left or right side of the outlet. 41 ENGLISH 40 39 Fig. 21: Turning the inlet Proceed as follows to convert the outlet: 1. Pull the milk hose from the appliance. 2. Push the outlet down as far as it will go. 3. Release the milk unit (39) using two fingers and pull the milk unit downwards off the outlet. 4. Pull the milk distributor (40) upwards out of the milk unit. 5. Turn the inlet (41) 180°. Installation is carried out similarly in reverse order. 9 Care and maintenance Regular cleaning and maintenance ensure the consistently high quality of your beverages. 9.1 General cleaning Clean the appliance regularly. Immediately remove external soiling caused by milk and coffee. ATTENTION The use of unsuitable cleaning agents may lead to scratched surfaces. Do not use any abrasive cloths, sponges or cleaning agents. Requirement: The appliance is switched off. Clean the outside of the appliance using a soft, damp cloth and normal washing up liquid. Rinse the drip tray and the coffee grounds container using a soft, damp cloth and normal washing up liquid. Clean the bean container using a soft, dry cloth. 85 Care and maintenance 9.2 Rinsing the coffee system During rinsing, the nozzles at the outlet and the internal parts of the coffee system are rinsed. As a result, rinsing water from the interior enters the drip tray. When switching on and off, the appliance rinses the coffee system. ENGLISH Rinsing can also be carried out manually. Requirement: The ready symbol appears on the display. 1. Place a vessel beneath the outlet. 2. Press the "menu/ok" button for 2 seconds. » The menu appears on the display. 3. Navigate to the Care > Rinsing menu. 4. Use the arrow buttons to select Start and confirm with "menu/ok". » The coffee system is rinsed. » The ready symbol appears on the display. 9.3 Cleaning the brewing unit To avoid damage to the appliance, we recommend cleaning the brewing unit once a week. 10 43 13 42 Fig. 22: Removing the brewing unit Requirement: The appliance is switched off. 1. Open the cover (10). To do this, reach into the recess on the right of the appliance and pull the cover off upwards. 2. Press and hold the red lever (42) on the brewing unit handle (13) and turn the handle clockwise until it engages at the stop. 3. Pull the brewing unit out of the appliance using the handle. 86 4. Rinse the entire brewing unit thoroughly from all sides under running water. Make particularly sure that coffee residues are removed from the sieve (43). 5. Allow the brewing unit to drip dry. 6. Use a soft, dry cloth to remove coffee residues from the surfaces inside the appliance. 7. Insert the brewing unit into the appliance. Press and hold the red lever on the brewing unit handle and turn the handle counter clockwise until it engages at the stop. 8. Close the cover. To do this, insert the bottom of the cover into the appliance and swing it up until it engages. 9.4 "Easy Cleaning" programme The milk system is rinsed using the "Easy Cleaning" programme. Each time after preparing a beverage with milk, the appliance requests you to execute the "Easy Cleaning" programme. You can also run the "Easy Cleaning" programme manually. Requirement: The ready symbol appears on the display. 1. Place a vessel beneath the outlet. 2. Press the "menu/ok" button for 2 seconds. » The menu appears on the display. 3. Navigate to the Care > Easy Cleaning menu. 4. Use the arrow buttons to select Start and confirm with "menu/ok". 5. Follow the further instructions on the display up to the end of the "Easy Cleaning" programme. » The ready symbol appears on the display. 9.5 "Cleaning milk system" programme With this programme, the milk system is cleaned using a milk system cleaning agent. To maintain hygiene and avoid damage to the appliance, we recommend carrying out the cleaning programme once a week. The cleaning programme takes approximately 3 minutes and should not be interrupted. 87 ENGLISH Care and maintenance Care and maintenance ATTENTION Use of unsuitable milk system cleaning agents may cause damage to the appliance. Use Melitta® PERFECT CLEAN Espresso Machines milk system cleaning agent exclusively. ENGLISH Requirement: The ready symbol appears on the display. 1. Place a vessel with a capacity of at least 0.7 litres beneath the outlet. 2. Press the "menu/ok" button for 2 seconds. » The menu appears on the display. 3. Navigate to the Care > Cleaning milk system menu. 4. Use the arrow buttons to select Start and confirm with "menu/ok". 5. Follow the further instructions on the display up to the end of the intensive cleaning programme. » The ready symbol appears on the display. Cleaning the milk unit We additionally recommend regularly cleaning the milk unit, the milk hose and the milk container (depending on model). 41 40 39 Fig. 23: Removing the milk unit Proceed as follows to remove the milk unit: 1. Pull the milk hose from the appliance. 2. Push the outlet down as far as it will go. 3. Release the milk unit (39) using two fingers and pull the milk unit downwards off the outlet. 4. Pull the milk distributor (40) upwards out of the milk unit. 5. Pull the inlet (41) out upwards. 6. Clean the individual parts with warm water. Use the enclosed cleaning brush, a soft, damp cloth and normal washing up liquid. Installation is carried out similarly in reverse order. 88 Care and maintenance Information The milk container (depending on model) is dishwasher-safe. "Cleaning coffee system" programme This cleaning programme is used to remove residues and coffee oil residues using coffee machine cleaning agents. To avoid damage to the appliance, we recommend carrying out the cleaning programme every 2 months or as requested by the appliance. The cleaning programme takes approximately 15 minutes and should not be interrupted. CAUTION Contact with coffee machine cleaning agent may lead to eye and skin irritation. Observe the processing instructions on the coffee machine cleaning agent packaging. ATTENTION Use of unsuitable coffee machine cleaning agents may damage the appliance. Use Melitta® PERFECT CLEAN Espresso Machines cleaning tablets exclusively. Requirement: The ready symbol appears on the display. 1. Press the "menu/ok" button for 2 seconds. » The menu appears on the display. 2. Navigate to the Care > Cleaning menu. 3. Use the arrow buttons to select Start and confirm with "menu/ok". 4. Follow the further instructions on the display up to the end of the cleaning programme. » The ready symbol appears on the display. 89 ENGLISH 9.6 Care and maintenance 9.7 "Descaling" programme The descaling programme is used to remove limescale deposits in the interior of the appliance using coffee machine descaling agents. To avoid damage to the appliance, we recommend carrying out the descaling programme every 3 months or as requested by the appliance. ENGLISH The descaling programme takes approximately 25 minutes and should not be interrupted. CAUTION Contact with descaling agent may lead to eye and skin irritation. Observe the processing instructions on the descaling agent packaging. ATTENTION Use of unsuitable descaling agents may damage the appliance. Use Melitta® ANTI CALC Espresso Machines liquid descaling agent exclusively. ATTENTION A water filter may be damaged if it is screwed in during the descaling programme. Remove the water filter before starting the descaling programme (see chapter 9.9 Using a water filter on page 91). Place the water filter into a vessel filled with tap water during the descaling programme. The water filter can be reinserted and reused on completion of the descaling programme. Requirement: The ready symbol appears on the display. 1. Press the "menu/ok" button for 2 seconds. » The menu appears on the display. 2. Navigate to the Care > Descaling menu. 3. Use the arrow buttons to select Start and confirm with "menu/ok". 4. Follow the further instructions on the display up to the end of the descaling programme. » The ready symbol appears on the display. 90 Care and maintenance 9.8 Setting the water hardness The set water hardness influences the frequency of descaling. The harder the water, the more frequently the appliance has to be descaled. Information ENGLISH The water hardness cannot be set if you use a water filter (see chapter 9.9 Using a water filter on page 91). Determine the water hardness with the enclosed test strip. Observe the instructions on the test strip packaging and in table Water hardness range on page 95. Requirement: The ready symbol appears on the display. 1. Press the "menu/ok" button for 2 seconds. » The menu appears on the display. 2. Navigate to the Water hardness menu using the arrow buttons 3. Use the arrow buttons to select the water hardness range and confirm with "menu/ok". 4. Exit the menu with the command Exit. » The ready symbol appears on the display. 9.9 Using a water filter Use of a water filter extends the service life of the appliance and the appliance has to be descaled less frequently. The water filter contained in the scope of delivery filters calcium and other pollutants out of the water. 44 45 1 46 Fig. 24: Screwing/unscrewing the water filter The water filter (45) is screwed into and unscrewed from the thread (46) on the base of the water tank (1) using the screwing aid at the end of the enclosed coffee spoon (44). 91 Care and maintenance Inserting the water filter Information Place the water filter into a vessel filled with fresh tap water for a few minutes before inserting it. ENGLISH Requirement: The ready symbol appears on the display. 1. Press the "menu/ok" button for 2 seconds. » The menu appears on the display. 2. Navigate to the Care > Filter > Insert filter menu. 3. Use the arrow buttons to select Start and confirm with "menu/ok". 4. Follow the further instructions on the display. » The water hardness is automatically set to Soft. » The ready symbol appears on the display. Changing the water filter Change the water filter when the appliance requests you to do so. Requirement: The ready symbol appears on the display. 1. Press the "menu/ok" button for 2 seconds. » The menu appears on the display. 2. Navigate to the Care > Filter > Change filter menu. 3. Use the arrow buttons to select Start and confirm with "menu/ok". 4. Follow the further instructions on the display. » The ready symbol appears on the display. Removing the water filter The water filter should not be left standing dry for a long period of time. When it is not used for a long time, we recommend storing the water filter in a vessel filled with tap water in the refrigerator. Requirement: The ready symbol appears on the display. 1. Press the "menu/ok" button for 2 seconds. » The menu appears on the display. 2. Navigate to the Care > Filter > Remove filter menu. 3. Use the arrow buttons to select Start and confirm with "menu/ok". 4. Follow the further instructions on the display. » The water hardness is automatically reset to the previous setting. » The ready symbol appears on the display. 92 Problems Problems If the actions listed below fail to rectify the problems or other problems not listed here occur, contact our hotline (local rate). Germany: +49 (0)571/ 861 900 Problem Coffee only emerges from the outlet in drips. Cause Grinding fineness too fine. Appliance soiled. Action Set a coarser grinding fineness (see chapter 8.8 on page 84). Clean the brewing unit (see chapter 9.3 on page 86). Run the cleaning programme (see chapter 9.6 on page 89). Appliance calcified. Descale the appliance (see chapter 9.7 on page 90). Coffee does not flow. Water tank not filled Fill the water tank and ensure it is or inserted incorpositioned correctly (see chaprectly. ter 4.6 on page 67). Brewing unit Clean the brewing unit (see chapclogged. ter 9.3 on page 86). Fill beans appears on Beans do not drop Tap lightly on the bean container. the display although into the grinder. Clean the bean container. the bean container Coffee beans too oily. Use different is filled. coffee beans. Loud grinder noise. Foreign object in the Contact the hotline. grinder. Brewing unit cannot Brewing unit is not Check whether the handle for the be inserted after locked correctly. brewing unit locking mechanism is removing. correctly engaged (see chapter 9.3 on page 86). Drive is not in the Press and hold the "My Coffee" butcorrect position. ton. Also press the ON/OFF button. The appliance initialises. Release the buttons again. System error appears Software problem Switch the appliance off and on the display. on again (see chapter 4.1 on page 61). Contact the hotline. 93 ENGLISH 10 Transport, storage and disposal 11 Transport, storage and disposal 11.1 Venting the appliance We recommend venting the appliance when it is not used for a long while, prior to transport and when there is a risk of frost. ENGLISH During venting, remaining water is removed from the appliance. Requirement: The ready symbol appears on the display. 1. Press the "menu/ok" button for 2 seconds. » The menu appears on the display. 2. Navigate to the System > Venting menu. 3. Select Start using the arrow buttons and confirm with "menu/ok". 4. Follow the further instructions on the display. » The appliance switches off. 11.2 Transporting the appliance ATTENTION Freezing remaining water may damage the appliance. Prevent the appliance from being exposed to temperatures below 0°C. Information Transport the appliance in the original packaging. This avoids damage in transit. Before transporting the appliance, carry out the following activities: 1. Vent the appliance (see chapter 11.1 Venting the appliance on page 94). 2. Empty the drip tray and the coffee grounds container. 3. Empty the water tank. 4. Empty the bean container. 5. Clean the appliance (see chapter 9.1 General cleaning on page 85). 6. Secure loose parts (cup plate, etc.) with suitable adhesive tape. 7. Package the appliance. 94 Technical data 11.3 Disposing of the appliance Appliances marked with this symbol are subject to European Directive 2002 / 96 / EC for WEEE (Waste Electrical and Electronic Equipment). 12 ENGLISH Electrical appliances do not belong in domestic waste. Dispose of the appliance in an environmentally friendly manner via suitable collection systems. Technical data Technical data Operating voltage Power consumption Pump pressure Dimensions Width Height Depth Capacity Bean container Water tank Weight (empty) Ambient conditions Temperature Relative humidity 220 V to 240 V, 50 Hz Max. 1,450 W Static, max. 15 bar 255 mm 365 mm 465 mm 2 × 135 g 1.8 l 10.5 kg 10°C to 32°C 30% to 80% (non-condensing) Water hardness range °dH °f Soft 0 to 7.2 0 to 13 Medium 7.2 to 14 13 to 25 Hard 14 to 21.2 25 to 38 Very hard > 21.2 >38 Beverage amount Bean type Coffee strength Brewing temperature Beverage amount Bean type Coffee strength Brewing temperature 40 ml 1 Strong Normal 120 ml 2 Strong Normal Factory settings Espresso Café crème 95 Technical data Factory settings Cappuccino ENGLISH Latte macchiato Milk Hot water 96 Beverage amount Bean type Coffee strength Brewing temperature Beverage amount Bean type Coffee strength Brewing temperature Froth amount Milk amount Beverage amount 130 ml 1 Strong Normal 190 ml 1 Strong Normal 120 ml 120 ml 120 ml 97 ENGLISH Editorial department: ZINDEL AG www.zindel.de Mel 002-1v2-1.0 | 2013-06 Melitta Europa GmbH & Co. KG Division Household Products Ringstr. 99 D-32427 Minden Germany www.melitta.de 0370-0513