1
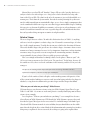
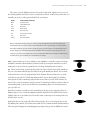
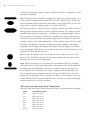
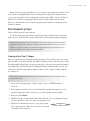
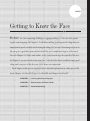
Pa r t I AL Getting to Know the Face RI Before we start animating, building, or rigging anything, let’s be sure we’re speak- TE ing the same language. In Chapter 1, I talk about talking, pointing out the things that are MA important in speech visually and isolating the things that are not. Narrowing our focus to lip sync gives a good base from which to build the more complicated aspects of the work D later. In Chapter 2, I define and outline, in the same focused way, the top half of the face. TE In Chapter 3, we zoom back to the entire face—the tilt of the head, wrinkles being a good GH thing, and even parts of the face you didn’t know were important. Each chapter in this part is expanded into a detailed explanation in a later part of the PY RI book: Chapter 1 in Part II, Chapter 2 in Part III, and Chapter 3 in Part IV. Chapter 1 n Learning the Basics of Lip Sync CO Chapter 2 n What the Eyes and Brows Tell Us Chapter 3 n Facial Landmarking Chapter 1 Learning the Basics of Lip Sync In modeling for facial animation, mix and match is the name of the game. Instead of building individual specialized shapes for every phoneme and expression, like for an F or a T, we’ll build shapes that are broader in their application, like wide or narrow, and use combinations of them to create all those other specialized shapes. On the animation front, it’s all about efficiency. You want to spend your time being creative and animating, not fighting with the complexities that often emerge from having a face with great range. It doesn’t sound like there’s much to these concepts for modeling and animating, and, yeah, they really are small and simple—but they’re huge in their details, so let’s get into them. Before we can jump into re-creating the things we see and understand on faces, we need to first identify those things we see and understand. Starting on the ground floor, this chapter breaks down the essentials of lip sync. Next, we’ll go into how basic speech can be broken into two basic cycles of movement, which is what makes the sync portion of this book so simple. Finally, at the end of this chapter, we’ll take those two things— what’s essential and the two cycles—and build them into a technique for animating. ■■ The bare-bones essentials of lip sync ■■ The two speech cycles ■■ Starting with what’s most important: visemes ■■ Building the simplest sync 4 ■ Chapter 1: Learning the Basics of Lip Sync The Essentials of Lip Sync Figure 1.1 A human mouth in the four basic poses People overcomplicate things. It’s easy to assume that anything that looks good must also be complex. In the world of 3D animation, where programs are packed with mile after mile of options, tools, and dialog boxes, overcomplication can be an especially easy trap to fall into. Not using every feature available to you is a good start in refining any technique in 3D, and not always using the recommended tools is when you’re really advancing and thinking outside the box. Many programs have controls and systems geared for facial animation, but you can usually find better tools for the job in their arsenals. If you’re fairly new to 3D, and have dabbled with lip sync, it has probably been frustrating, complicated, difficult, and unrewarding. In the end, most people are just glad to be done with it and regret deciding to involve sync in their project. We’re starting to see some amazing results come from facial motion capture techniques, but at least for now, that’s probably beyond the cost range for readers of this book. Automated techniques are always improving too, but so far, they aren’t keeping up with what a good animator or capture technique can deliver. Don’t despair. I will get you set up for the sync part of things quickly and painlessly so you can spend your time on performance (the fun stuff!). If your bag is automation, there’s still a lot of information in here you can use to bump the quality of that up too. When teased apart properly, the lip sync portion of facial animation is the easiest to understand because it’s the simplest. You see, people’s mouths don’t do that much during speech. Things like smiles and frowns and all sorts of neat gooey faces are cool, and we’ll get to them later, but for now we’re just talking sync. Plain old speech. Deadpan and emotionless and, well, boring, is where our base will be. Now, you’re probably thinking, “Hey! My face can do all sorts of stuff! I don’t want to create boring animation!” Well, you’re right on both counts: Your face can do all sorts of things, and who really wants to do boring animation? Nobody! For the basics, however, this is a case of learning to walk before you can run. For now, we’re not going to complicate it. If we jumped right into a world with hundreds or even thousands of verbal and emotional poses (which is how they do it in the movies), we’d never get anywhere. So, to make sure you’re ready for the advanced hands-on work later, we’re focusing on the most basic concept now: bare-bones lip sync. When dealing with the essentials of lip sync and studying people, there are just two basic motions. The mouth goes Open/Closed, and it goes Wide/Narrow, as illustrated in Figure 1.1. The Essentials of Lip Sync At its core, that’s really all that speech entails. When lip-syncing a character with a plain circle for a mouth (which we’ll do in just a minute), the shapes in Figure 1.2 are all that’s needed to create the illusion of speech. Your reaction to this very short list of two motions might be, “What about poses like F where I bite my lip, or L where I roll up my tongue?” Ignoring that kind of specificity is precisely the point right now. We’re ignoring those highly specialized shapes and stripping the building blocks down to what is absolutely necessary to be understood visually. If these two ranges—from Open to Closed and Wide to Narrow—are all you have to draw on, you become creative with how to utilize them. Things like F get pared back to “sort-of closed.” When you animate this way and stop the animation on the frame where the “sort of closed” is standing in for an F, it is easy to say, “That’s not an F!” But in motion, you hardly notice the lack of the specific shape—and motion is what I’m really talking about here. You should be less concerned with the individual frames and more concerned with the motion and the impression that it creates. For most animators, there is a strong instinct to add more and more complexity too early in the lip-sync process, but too much detail in the sync can actually detract from the acting. Animating lip sync is all illusion. What would really be happening isn’t nearly as relevant as the impression of what is happening. How about M? You may be thinking, “I need to roll my lips in together to say M, and I can’t do that with a wide-narrow-mouth-thingamajig.” Sure you can, or at least you can give the impression in motion that the lips are rolled in—just close the mouth all the way—and that’s usually going to be good enough. When you get the lip sync good enough to create an impression of speech and then focus your energies on the acting, others will also focus on the acting, which is precisely what you want them to do. Analyzing the Right Things Let me take you on a small real-world tutorial of what is and what is not important in speech. Animators have a tendency to slow things down to a super-slow-mo or frame-byframe level and analyze in excruciating detail what happens so as to re-create it. This is not necessarily a bad thing, but here’s an example of how that can break down as a method: Look in the mirror, and then slowly and deliberately overenunciate the word pebble: PEH-BULL. You’re trying to see exactly what happens with your face. Watch all the details of what your lips are doing: the little puff in your cheeks after the B; the way ■ 5 Figure 1.2 A circular spline mouth in the same four basic poses 6 ■ Chapter 1: Learning the Basics of Lip Sync the pursing of your lips for P is different than for B; how your tongue starts its way to the roof of your mouth early in the B sound and stays there until just a split second after the end of the word. You’d think that all these details give you a better idea of how to re-create the word pebble in animation, right? Wrong! Most often, that would be exactly the wrong way to do it. It would be the right way to animate the word pebble if, and only if, a character was speaking slowly and deliberately, and overenunciating. This hopefully illustrates how a mirror can be misleading if used incorrectly. It can very easily lead to overanalysis, and then to animation that looks poppy and disjointed. This time, at regular, comfortable, conversational speed, say, “How far do you think this pebble would go if I threw it?” How did the word pebble look that time? Check it out again, resisting the urge to do it slowly or deliberately. As far as the word pebble is concerned in this context, the overall visual impression is merely closed, a little open, closed, a little open. That’s it. In a regular delivery of that line, the word pebble will generally look the same as the word mama or papa. Say the sentence twice more, using the word mama and then papa in place of pebble and compare them. Try not to change what your mouth does, but instead notice that opening and closing the mouth are the most significant things happening during pebble, mama, and papa. The mouth doesn’t even open wide enough to see a tongue, so there’s no need to worry about it. Animating things you think should be there, but in context are not, would be like animating a character’s innards. You can’t see them, so animating them would be a silly waste of the time you could otherwise spend on—you guessed it—the acting. Not just for our pebble, but in the vast majority of situations, the Opens and the Closeds are the most important things a mouth does. That’s why puppets work. Does it really look to anyone like a puppet is actually saying anything? Of course it doesn’t, but when a skilled puppeteer times the opening and closing of the mouth to the vocals, your brain wants to make that connection. You want to believe that the character is talking, and that’s why the single most important action in the word pebble and this entire system is simply Open/Closed. This is how you properly focus on the right things in basic sync: Search for the overall impressions, and fight the urge to bury yourself in the details too quickly. Speech Cycles This approach of identifying the two major cycles and visemes (a term you’ll learn more about in just a moment) is likely very different than what you know now if you come from an animation background. If you’re looking for phonemes and a letter-to-picture chart, you’re going to be disappointed. In this approach, there is no truly absolute shape for every letter, and in a system like this, to point you in such a direction would do far more harm than good, despite what you might think you want to see. Each sound’s shape is going to be unique to its context, and you’ll learn to think of it not as a destination Speech Cycles shape, but as the sum of its critical components. To start, let’s talk about the two major speech cycles. In its simplest form, there are two distinct and separate cycles in basic sync: open and closed, as in jaw movement, and narrow and wide, as in lip movement. When I use the word cycle, I’m merely referring to how the mouth will go from one shape to the other and then back again. There are no other shapes along the way. The mouth will go open, closed, open, closed; and the lips will go wide, narrow, wide, narrow. These two cycles don’t necessarily occur at the same time, nor do they go all the way back and forth from one extreme to the other all the time. The open-and-closed motions generally line up with the puppet motion of the jaw, or flow of air—with almost any sound being created—whereas the wide-and-narrow motions have more to do with the kind of sound being created. For example, the following chart shows the Wide/Narrow sequence you get with the sentence “Why are we watching you?” Word Wide/Narrow Sequence Why Are We Watching You Narrow, wide No change in shape Narrow, wide Narrow, slightly wide Narrow Simple, right? Now take a look at the jaw, or the Open/Closed cycle described in the next chart. In this case, Closed refers to a position not completely closed, but closer to closed than to open. Word Open/Closed Sequence Why Are We Watching Closed, open, closed Closed, open, closed Closed, slightly open Closed, open, closed, slightly open, closed Closed; no change You That’s it for the essentials. The backbone of this book’s lip-sync technique has to do with this simple analysis of the Wide/Narrow and Open/Closed cycles. You will be adding more and more layers to create complex, believable performances, but that is all going to be based upon this foundation. Taking the lead from the human mouth, I’ve based this approach on the “simpler is better” mindset. Your mouth is lazy. If it can say something with less effort, it will. In contrast, you’ve probably had textbooks, teachers, and/or tutorials tell you that for good sync, you need shape keys that include things like G. My question is, why would you build a shape for or pay any special attention to the letter G? Whether it’s a hard G or a soft G, you can say it with your mouth in any of the shapes shown in Figure 1.3. ■ 7 8 ■ Chapter 1: Learning the Basics of Lip Sync Figure 1.3 All varieties of G What this tells us is that G has few visual requirements, so it won’t be something we build a specific shape for. Further, we just proved that any single pose we picked would already be wrong two-thirds of the time, even in our small test. Given that, even if we did want to build a G, how would we ever pick a single shape? Both G sounds are created invisibly—solely using mechanisms inside the mouth, not by the lips or even noticeable open/closed cues. This G example is here to begin to illustrate what is and, more importantly, what is not a viseme. Starting with What’s Most Important: Visemes For this noninclusive approach, where you’re trying to exclude extraneous mouth-tosound pairings, something you’ll need to know is what must be included. There are certain sounds that we make that absolutely need to be represented visually, no matter what. These are called visemes. Examples of visemes are Narrow for OO, as in food, and Closed for M, as in mom. You just can’t make those sounds without those contortions. Looking back, do you think G is a viseme? It isn’t. It couldn’t possibly be any less of a viseme. It requires no contortion, and it did not suffer from any other contortions. It is visually meaningless. There are going to be more visemes to address than the Open, Closed, Wide, and Narrow variety I’ve touched on, but even this greater list of must-see shapes can be “cheated” to fit into the simple circle-mouth setup you’ve seen and are about to build. Why Phonemes Aren’t Best for CGI Phonemes work fantastically in classical animation, where nothing comes for free and every frame has to be drawn. Used merely as a guide, with an animator drawing a new picture for each frame, phonemes are great. In CGI, when you’re working with phonemes as actual shapes, each a discreet pose in the rig, sync animation tends to end up overly choppy, and counteranimation becomes too large a portion of the work. In other words, when phonemes are an idea, they can and do work very well. When phonemes are unique physical manifestations built deep into the core of a character rig, they can and often do just get in the way of good sync. Starting with What’s Most Important: Visemes In the search for a better system for CGI sync, something became very apparent: There are three different kinds of sounds you can make during speech, and not all of them are easy to see! You’ve got lips, a tongue, and a throat. Phoneme-based systems lump all of these sounds together, and that is where the problems start. The only sounds you absolutely have to worry about are the sounds made primarily with the lips. I say “primarily” because combinations of all these ways to make sounds occur all the time. Also, you could argue that your throat makes all sounds, but that would be an intellectual standpoint, not an artistic one. It would be like saying we should include an X-ray of the lungs in sync—and, we’re not going to be doing that! Phonemes are sounds, but what matters in animation is what can be seen. Instead of phonemes, of which there are about 38 in English (depending on your reference), the techniques we’ll be using in this book are based on visual phonemes, or visemes. Visemes are the significant shapes or visuals that are made by your lips. Phonemes are sounds; visemes are shapes. Visemes are all you really need to see to buy into a performance. You obviously cue these shapes based on the sounds you hear, but there aren’t nearly as many to be seen as there are to be heard. The necessary visemes are listed in Table 1.1. Remember that these are shapes tied to sounds, not necessarily collections of letters exactly in the text. Viseme Example Sounds Rule B,M,P / Closed EE / Wide F,V OO / Narrow IH R T,S murder, plantation, cherub cheese, me, charity fire, fight, Virginia dude, use, fool trip, snip car, road beat, traffic Lips closed Mouth wide Lower lip rolled in Mouth narrow Sometimes taller or wider than surrounding shapes Sometimes narrower than surrounding shapes Sometimes taller or wider than surrounding shapes Words are made up of these visemes, even if they aren’t spelled this way. For example, the word you is comprised of the two visemes EE and then OO, to make the EE-OO sound of the word. As you move forward in this book, you’ll learn that if there is no exact viseme for the sound, you merely use the next closest thing. For instance, the sound OH, as in M-OH-N (moan), is not really shown on this chart, whereas OO is. They’re not really the same, but they’re close enough that you can funnel OH over to an OO-type shape. Table 1.1 includes just seven shapes to hit, and only a few of those are their own unique shape to build! Analysis and breakdown of speech has just gone from 38 sounds to account for to only seven visemes. Some sounds can show up as the same shape, such as UH and AW, which need to be represented only by the jaw opening. Table 1.1 Visemes ■ 9 10 ■ Chapter 1: Learning the Basics of Lip Sync Open Mouth Sounds Table 1.2 Example open mouth sounds Many sounds have no real shape to them, so they’re out as visemes. Another group of sounds have no shape in the sense that the lips aren’t contorting in a particular way, but they have the common characteristic that the mouth must be open. These sounds are listed in Table 1.2. I don’t consider these visemes but instead refer to them as open or jaw sounds. Visemes as we identify and animate them are really aspects of lip positions, not whole mouth positions. Because the jaw, and therefore the mouth, is open in many shapes, I’ve just kicked those shapes out of the viseme club, which makes things simpler. For example, an OH sound (which should be read Sound Example Sounds as a very short OH, not like the word oh, which would UH fun, some, thunder AH blast, bat, Vancouver be OH-OO) is just a degree of Narrow and some OH snow, foe Open—which is really the same as an OO sound but AW oxford, golly, lawn with different amounts of Narrow and Open. Instead of referring to sounds as their phonetic spellings, such as OH or AW, I like to break them down further to their components. OH and OO have the same ingredients, but they’re mixed in different amounts. By separating things out into some basic elements like that, you can animate faster and better and more precisely tailor your shape to the sound you hear. Again, this isn’t saying to break down OH in time by opening it first and then making it narrow, as in OH-OO; it’s saying to figure out the recipe for OH using Wide, Narrow, Open, and Closed. When we identify visemes, we really are ignoring the open-mouth portion of openmouth sounds. After we finish quickly keying and identifying the visemes, we go back to the start and add in the jaw motions. By treating these separately, we can move through animations very quickly. If your only goal is visemes, you can burn through a long animation extremely quickly. It doesn’t look like much at this point, but you are left with a simple version of the lip sync that you can then build on simply by going back and identifying where the jaw must be open. This approach is much faster than meticulously trying to get every sound right as you move through your animation one frame at a time. This way, you end up at a jumping-off point for finessing very quickly. The time you spend animating sync and expression will be more heavily weighted toward the quality. Disclaimer: The choices of what is and is not important are based on my own experience. This is not torn from another book, university study, website, or anything else. The way I break down words isn’t even a real phonetic representation; words are presented this way here because if you’re like me, those phonetic alphabet symbols with joined letters and little lines and marks all over them in dictionaries don’t mean much. Starting with What’s Most Important: Visemes ■ 11 Visemes Aren’t Tied to Individual Sounds One viseme shape can represent several sounds as read. For example, you might not read the AW in spa and draw as the same letters, but you can represent them with the same visual components. This is going to give you fewer things to animate and keep track of, leaving you more time to be a performer. Visemes have certain rules that must be followed. For example, you can’t say B or M without your lips closed, you can’t say OO without your mouth narrow, and so forth. These rules were listed previously in Table 1.1, and I cover them in further detail in Part II of this book. Now, this isn’t to say that for every F sound you’ll need the biggest, gnarliest, lowerlip-chewingest, gum-baringest, spit-flyingest F shape—quite the contrary, you just need to make sure something, anything, “F-like” happens in your animation to represent that sound. That’s what visemes are: the representation of the sounds through visuals that match only the necessary aspects. Visemes are not entire poses. F is not a shape—it is part of a shape. The whole shape may be smiling or frowning, wide or narrow, but the lower lip is up and the upper lip is up, giving you what you need for an F. Representative Shapes You may notice some disparity between the Wide/Narrow–Open/Closed distinctions and the viseme set, which I summarize in Table 1.3. But as long as you represent the viseme in some way, you’re all right. Viseme Description B, M, P / Closed EE / Wide Closed Somewhat open and wide F, V Somewhat open OO / Narrow Somewhat narrow and somewhat open IH Somewhat wide and open R Sometimes narrower than the shapes around it, if they’re not already narrow Sometimes wider than the shapes around it, if they’re not already wide T, S S c h e m at i c Table 1.3 The visemes’ representation on an Open/Closed Narrow/Wide mouth 12 ■ Chapter 1: Learning the Basics of Lip Sync Most of these are what I’ll call “absolute” shapes: EEs are wide, but they don’t necessarily need to be the widest shape ever—they just need to be identified as being wide. Same with OOs or OHs. They don’t need to be the narrowest, just easily identifiable as a narrow pose. That’s how the system works. Instead of creating 38 unique keys that contort the whole mouth into an unmistakable shape, we use fewer, simpler components that can be combined in different recipes to create those bigger unmistakable shapes. Working this way gives us far more flexibility to customize each recipe to each performance, with much less work than it would be to create a specific shape for each sound and then also have to layer other things on top to customize it or fight conflicts. Relative Shapes There are shapes that are relative. To make this distinction clear, in Table 1.3, anything with an er in its description is a relative shape. An OO sound is a narrow shape; it’s absolute. An R is simply narrower. Usually, that just means a shift in the direction of Narrow. That said, absolute shapes take precedence over relative shapes. A narrower between two narrows need not get narrower because it is less important. Sometimes, in that situation, a narrower may even go wider so as to strengthen the surrounding narrows. Absolutes can occasionally become relative if they are piled up next to each other. Here’s an example of absolutes becoming relative. In the phrase “How are you?” the OO in you is not as narrow as the OO of you in “Do you chew?” In the latter, because all the sounds are OOs, there need to be variations in the intensity, and the OO in you is the strongest. The process of deciding which shapes take precedence in strings of similar sounds is explained in Chapter 4, “Visemes and Lip Sync Technique.” If you’re a little confused, that’s all right—understanding comes with practice. A lot of the system involves looking at a sentence and, instead of trying to define the shapes in absolutes, seeing them in relation to the previous shapes and the shapes that follow. “Who are you and what are you doing?”: Wide/Narrow We know that we can cheat our visemes using just Wide/Narrow/Open/Closed, as per Table 1.1 and Table 1.2, so now we need some practice actually identifying some of those visemes in an example. I use the phrase “Who are you and what are you doing?” as an example here because it has all sorts of Wide/Narrow travel. I’ll identify the Wide/Narrow sequences first, and then do the Open/Closed pass in the next section. I’ve included images with both Open/ Closed and Wide/Narrow to make it easier to follow, but you should focus on the width more than the height in this section. Much of the information and reasoning here involves things not yet explained—but rest assured, these things are going to be explored later. Starting with What’s Most Important: Visemes The term rest in the following chart refers to the width of the mouth as it is at rest, in the default position, but it does not necessarily mean Closed. Another way to describe rest would be to say it is neither particularly Wide nor Narrow. Word Wide/Narrow Sequence Who Are You And What Are You Doing Rest, Narrower Little Wider (rest) Narrower Wider (rest) Narrower, rest No change in width Narrower Narrower, Wider When I talk about working in passes, I mean going through the process from start to end, dealing with only one goal, and then returning to the start to go through a second or third time with a different goal in mind. To properly grasp sync by viseme, I recommend that you work in the passes described. By pushing the Open/Closed analysis and posing to the second pass, you reduce the temptation of overcomplication. When your first pass really doesn’t look like much, you’re unlikely to noodle with it too much! who I started with rest, because without it, you wouldn’t see that the narrow OO shape to follow is narrower than anything. In other words, by leaving the mouth at rest for a moment, I created a reference point for the OO shape to look narrow in context. are This is wider. Being exclusively affected by the Open/Closed shape of the mouth in this case (the main sound being AW, which is an open mouth/jaw sound), this is made wider not because it needs any particular Wide/Narrow, but instead because it’s sandwiched between two OOs. With something wider between them, both OOs will have more punch. If you’re wondering why this has no need for a specific Wide/Narrow, it’s because R is relatively narrower, not just narrow. R should generally be narrower than its surrounding shapes, but because both of its surrounding shapes are already narrow, it gets cancelled out. you This is narrower and has an OO sound that needs to be represented, but that’s it— nothing fancy. A true viseme breakdown would be from EE to OO, EEYOO, but I went slightly wider in are to enforce the OO in this word, so that aspect of starting wider was already taken care of. and Again, this needs no specific Wide/Narrow shape, if we’re referring to our viseme list looking for a match. So I widened it to make the OO sounds around it look narrower. This concept of shaping the mouth opposite to shapes that precede or follow the sound ■ 13 14 ■ Chapter 1: Learning the Basics of Lip Sync is called (not surprisingly) opposites, and it’s explained in Chapter 4. Opposites is an idea not unlike anticipation. what This has two shapes. With the w portion of the word, we need an OO shape—it’s a viseme. With the ut portion of the word, UH-T, we’ve hit T. Like R, the T is relative. We widen the mouth on this sound to show that another viseme besides UH is present. This shape doesn’t need to be anything specific; it’s just wider than UH. are Like the previous are, this one’s tricky. It’s influenced only by Open/Closed, so there’s nothing characteristic that needs to be done with Wide/Narrow. We’re going to use this sound like many of the preceding shapes, to emphasize its surrounding shapes. Because the next sound is an OO and we’re already at a somewhat wide shape, we don’t want to narrow it because that will take away from the impact of the next sound. We don’t want to widen it either, because that would indicate a viseme, which it’s not. Instead, we “hold” the shape we already have. It may not seem like it, but this reasoning is a subcategory of opposites called stepping, also explained in Chapter 4. Briefly, stepping is used when you’ve got multiple similar shapes in a row. You can pause on each one briefly to give each a moment of its own and then move on. you As before, this sound is in the easy territory of a basic viseme. OO viseme = narrower key. The EE sound in the word you only comes into play when the word is at the beginning of a sentence or after a long pause. doing For the do portion, we need to consider the surroundings before we can choose what to do. At the end of the preceding word we went narrower. This sound should also be narrower, but by narrowing twice in a row, we risk not seeing the first shape as we breeze right by it to even narrower. This is where stepping comes into play again. You may need to take some strength away from the OO in you to allow the OO in do to be narrower. The ing portion is wider—partly because IH is a viseme, and also because ing is most definitely not an OO sound. Sometimes we need to key away from surrounding sounds as much as we need to key into them. “Who are you and what are you doing?”: Open/Closed Now take a look at the Open/Closed patterns for “Who are you and what are you doing?” Word Open/Closed Sequence Who Are You And What Are You Doing Open, semi-closed Open, semi-closed Open, semi-closed Open, semi-closed Open, semi-closed Open, semi-closed Open, semi-closed Open, semi-closed The Simplest Lip Sync Hmm, that’s interesting. It looks like we’re seeing the same motion over and over. This is a bit of an oversimplification because of timing and strength of the motions, but in essence, the Open/Closed cycle is going to be a function of syllables. The Open/Closed should be treated like a sock puppet. If all we had as a tool to work with was Open/ Closed, we should still be able to convince people that the words are coming out of the character’s mouth. The Simplest Lip Sync You’re ready for your first sync tutorial! We don’t want to get bogged down in math expressions and fancy heads and crazy shapes just yet, so for now we’re going to do some very basic point-pulling and rigging. Every practical instruction needs a tool, but you can use any of several good 3D animation programs. For my hands-on tutorials, I use Maya, but the principles will carry over to other software—you just may have to do a little bit of digging to find the specific buttons and tools you need for this and other work that will follow. Creating a Sync Tool 1: Shapes First we’re going to breeze through creating our shapes. Then, I’ll have you create a simple circle and a set of Wide/Narrow and Open/Closed keys along with an interface. With this little model in hand, you can start on some of the early practical work of the book. If you would rather not build it yourself (although I highly recommend that you do), you can load the finished setup from the book’s website—in the Chapter 1 folder, look for SplineMouth.ma. Units! For the duration of the book, I speak in terms of 24 frames per second (fps) and the Y axis as the world up. 1. Create a circle of eight points. In Maya, choose Create ➔ NURBS Primitives ➔ Circle q. 2. In the options window, select Z as the Normal Axis option (this makes the circle upright as opposed to flat), and leave the rest of the options at their defaults. 3. Name the circle Mouth. 4. Modify the shape so that it looks almost like a flat line. (It is very important not to just scale the object; make sure you’re manipulating CVs.) 5. Duplicate the Mouth object twice, so you end up with three separate objects. Move the new objects away from each other and the original. ■ 15 16 ■ Chapter 1: Learning the Basics of Lip Sync 6. Select one of the duplicates and name it OpenClosed. In component mode, reshape it to look like an open mouth. 7. Select the other duplicate and name it WideNarrow. In component mode, reshape it to be wider. Be sure to include all the points in the widening, not just the end ones. 8. Now that you have your shapes, select the two duplicates and then Shift+select Mouth last. In the Animation module, select Create Deformers ➔ Blend Shape, using the default options. This assigns OpenClosed and WideNarrow as shapes to be used by the object Mouth. 9. Select Mouth again, and in the Channel Box under Inputs, highlight blendShape1. Rename it MouthShapes. Okay, that’s it—we have the art side of things ready to go. These are the shapes we’ll use in your first setup. Creating a Sync Tool 2: Setup All we’ll be doing right now is linking the shapes we’ve built to one simple control mechanism so that we can have Mouth morph into each of these shapes and combinations of them in a very user-friendly way. We won’t be directly working in the blend shape editor. Instead, we’ll be using a homemade interface that employs a scene object to control the shapes. I’ll refer to this one and others like it as sliders. The main reason for doing things this way is so that you can easily tie multiple shapes onto controls. (Chapter 12 is dedicated entirely to creating interfaces using MEL and Python scripts to set up your own character’s head with ease.) If you are a MEL guru or expression wizard, this example setup may seem sloppy or too simple; it’s designed to be easy and accessible. If coding talents are at your disposal, feel free to re-create this in any manner you see fit, but do go through and set up the described rig to get a feel for the functionality. 1. Create a locator and duplicate it. Make locator2 the child of locator1. 2. Rotate locator2 to 45º in Z and scale it to 2,2,2. This is just to make it more selectable. 3. Rename locator2 MouthControl. 4. Open the Attribute Editor and select the MouthControl tab. Then open Limit Information ➔ Translate. (When you open the Attribute Editor, it defaults to Rotate, so be sure you’re doing this under Translate!) The Simplest Lip Sync 5. Check all the boxes and fill them in as shown in the screen shot, limiting the motion in X from –1 to 1, in Y from –1 to 0, and in Z from 0 to 0. 6. Move locator1 out of the way of the mouth. MouthControl, being the child, should follow. (As I’m sure you’ve guessed, MouthControl will be how we manipulate the shapes on Mouth.) 7. Select Mouth, and then in the Channel Box under Inputs, highlight MouthShapes. 8. Go to Window ➔ Animation Editors ➔ Expression Editor. 9. In the Objects window on the left, highlight MouthShapes. You should see WideNarrow and OpenClosed appear in the Attributes window to the right (along with “envelope,” which you can just ignore). Highlight the WideNarrow attribute. In the Expression box near the bottom, type the following: MouthShapes.WideNarrow = MouthControl.translateX Maya is case-sensitive, so be careful. Click the Create button at the bottom left. If it worked correctly, you should be able to move the control side to side and see the mouth widen and narrow. 10. Highlight the OpenClosed attribute. In the Expression box near the bottom, type this: MouthShapes.OpenClosed = -MouthControl.translateY Be sure you include the minus sign before MouthControl. If it worked, you should be able to move the control down and see the mouth open. That’s it. You’re done messing around with expressions! Now you have a super basic slider interface to work with—but hey, it’s a rigged mouth! The 45-degree rotated locator that you renamed MouthControl is now a slider for Mouth that works in two dimensions, X and Y. This mouth rig is pretty simplistic. Right now there is really only one “shape”— Wide—and you’re creating the Narrow by telling Maya to do the opposite. Pulling the slider left, you’ll see the “fake” Narrow shape. That plus some Open/Slider Down should create a pretty good OO shape. If it’s not quite how you want it, unhide the object WideNarrow and widen it, which will in turn affect Mouth’s shape. Since in Narrow we’re looking at the opposite of the WideNarrow (which is Wide), the wider you make Wide, the narrower Narrow can be. Backwards-tastic! ■ 17 18 ■ Chapter 1: Learning the Basics of Lip Sync Using the Sync Tool In this Maya scene, we’re going to continue using the slider, the shapes that slider controls, and what we’ve learned about syncing by viseme to take all of it for a test run. Let’s do a silent practice word, why, which is one of the easiest for this particular rig. If you’re finding that the frame numbers aren’t lining up for you, give your preferences a look and make sure they’re at 24 fps; film. In Maya, you can find the option for frame rate under Windows ➔ Settings/Preferences ➔ Preferences ➔ Settings. Other programs will have this setting, but you may have to poke around a bit to find it. Figure 1.4 A default mouth Figure 1.5 OO of OO-UH-EE Figure 1.6 EE of OO-UH-EE Figure 1.7 UH of OO-UH-EE First analyze the word by sound and equate that with visemes. Sound out why and you should end up with something like OO-UH-EE. OO and EE each need specific shapes, whereas UH is merely open. The way I like to do things is to first key the Narrow/Wide stuff and then go back and get the Open/Closed stuff. That said, this sync is so incredibly short we’re just going to set the height as we go. The goal here is to whet your appetite with sync and these sliders. By the end of the book, you’ll have an array of sliders hooked up to a myriad of shapes and a great character face to play, or even work, with. In your scene, on frame 0, set a key with your control at 0,0 positionally. Your mouth should be in its default state: Closed, halfway between Narrow and Wide, much like in Figure 1.4. If yours doesn’t match this perfectly, close enough is good enough. This first key is something referred to as capping and will be discussed in more detail later. Now on frame 10, move the slider down and to the left, until it looks like a good OO. X, Y values of –1, –0.2 should be about right, as in Figure 1.5. Set a key! You’ve just set the OO part of why, or of OO-UH-EE. Now go to frame 30 and move the slider to the right. That should put it at 1, –0.2, as in Figure 1.6. Set a key! You’ve just set the EE part of why. All that’s left to do is take care of the UH part. Moving back to frame 20, simply pull the control down so that it opens the mouth in the middle of the word, as in Figure 1.7. Try –1 in Y. Set a key! You’re done. You’ve keyed the visemes in the word why: OO-UH-EE. Play it through a couple of times—not bad for a few seconds’ work. Identifying visemes all on your own steam and working through the special cases will take a little time, but not too much. Now, I recommend going back and looking at the phrases we’ve dissected in this chapter, using your new toy. This little rig really is the start of how we’re going to get into some very complicated performances, and it illustrates quite well the less-is-more approach I’m preaching. There will soon be an army of sliders and controls just like this one, each custom-made for different motions and shapes. The setup we just did could directly be translated to work on some beautiful shapes and characters. It’s just a matter of getting them built so we can use them. We’re only playing with a circle for now, but that’s so you can get some practice with the basic The Simplest Lip Sync concepts of both shapes and controls before we get too crazy. With some patience, I think you’ll amaze yourself with your work in a surprisingly short time. On the book’s website, there’s some sound for you to play with. Files for each of the examples we’ve already walked through are in the Chapter 1 folder, named sentenceName.wav. (If you need help loading sounds into your software, please see Chapter 4.) If you follow the directions in the text and try lining up your new mouth rig with the sound, you should have some pretty good results fairly quickly. Then turn the page—we’re just getting started! ■ 19