1
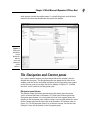
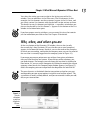
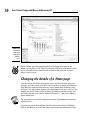
Chapter 1
RI
AL
What Microsoft Dynamics
GP Does Best
TE
In This Chapter
Familiarizing yourself with the Microsoft Dynamics GP window
MA
Understanding Dynamics GP terms
Knowing how Dynamics GP keeps your CPA happy
D
M
GH
TE
icrosoft Dynamics GP is a robust accounting package that can meet
the needs of any number of types of organizations. All installations
of Dynamics GP have certain characteristics in common. In this chapter, I
describe these common characteristics and, in the process, introduce you to
Dynamics GP lingo.
PY
RI
Introducing Microsoft Dynamics GP
CO
Familiarizing yourself with the Microsoft Dynamics GP window is the first
order of business. You’ll find it much easier to perform tasks if you know how
to find them.
In Figure 1-1, you see a typical Dynamics GP opening window. Dynamics GP
uses a Navigation pane down the left side of the window, similar to the one
found in Microsoft Outlook. The Navigation pane enables you to, well, navigate to various places in the program. In Figure 1-1, I clicked Home in the
Navigation pane.
The Home page you see in the Content pane when you open Dynamics GP
on your computer might not match the one shown in Figure 1-1 because you
can customize the Home page — and you can read about customizing your
Dynamics GP Home page in the section “At Home with the Home Page,” later
in this chapter.
8
Part I: Great Things with Microsoft Dynamics GP
Toolbar buttons
Navigation pane
Menu bar
Content pane Address bar
Figure 1-1:
A typical
opening
window in
Dynamics
GP.
The current user
Navigation pane buttons
The current company
User date
Along the top of the screen, you can use the Address bar to type locations
within Dynamics GP and then press Enter or click the Refresh button at the
right end of the Address bar to view those locations. But most people use
the Menu bar, which appears just below the Address bar, and the Navigation
pane to move around Dynamics GP.
Menus and toolbars
The Menu bar is actually one of several toolbars available in Dynamics GP.
Its official name is the Main toolbar but it functions just like the menu bars
in other programs you’ve used, so I’m going to call it the Menu bar. Below
the Menu bar (refer to Figure 1-1) you see the Standard toolbar. If you’re
a “button” person, you can display any of the available toolbars by rightclicking the toolbar area to display the shortcut menu shown in Figure 1-2.
From this shortcut menu, click any toolbar you want to display. If a check
Chapter 1: What Microsoft Dynamics GP Does Best
mark appears beside the toolbar name it’s already displayed, and clicking it
removes the check mark and hides that particular toolbar.
Figure 1-2:
Right-click
the toolbar
area to
display this
shortcut
menu and
control the
visible
toolbars.
The Navigation and Content panes
Let’s take a moment to focus on the main portion of the window, which is
divided into two parts. The Navigation pane runs down the left side of the
window, and the results of clicking something in the Navigation pane appear
in the Content pane on the right side of the window. In Figure 1-3, I clicked
the Sales series button in the Navigation pane.
Navigation pane buttons
The buttons along the bottom portion of the Navigation pane represent
series of related functions in Dynamics GP. When you click any particular
Navigation pane button, lists associated with that series appear above the
buttons in the Navigation pane, and the actions you can take within the series
fill the Content pane on the right side of the Dynamics GP window (refer to
Figure 1-3). I’ll tell you more about lists in the next section, but for the time
being let’s focus on the buttons in the Navigation pane.
9
10
Part I: Great Things with Microsoft Dynamics GP
Lists for the selected series
Content pane containing actions for the selected series
Figure 1-3:
The
Navigation
pane.
Toolbar-like buttons for additional series
Navigation pane buttons
Looking back at Figure 1-3, you see “named” buttons for Home, Financial, Sales,
Purchasing, and Inventory. In addition to these named buttons, toolbar-like
buttons appear at the bottom of the Navigation pane (in Figure 1-3 they appear
under the named Inventory button). These toolbar-like buttons function the
same way that the named buttons function — they simply represent additional
series of related functions such as Human Resources and Payroll.
If you place the mouse pointer over one of the toobar-like buttons, a tool tip
appears to identify the button.
You can increase or decrease the number of named buttons that appear in
the Navigation pane. Click the Configure Buttons button, which is the last
button in the area where the toolbar-like buttons appear. When you click the
Configure Buttons button a shortcut menu appears, as shown in Figure 1-4.
To display more buttons with names, click Show More Buttons. To display
more toolbar-like buttons, click Show Fewer Buttons. When you show more
buttons, Dynamics GP moves a toolbar-like button up and displays it as a
named button. Similarly, if you show fewer buttons, Dynamics GP removes a
named button but displays a toolbar-like button for it.
Chapter 1: What Microsoft Dynamics GP Does Best
Figure 1-4:
Add or
remove
named
buttons
in the
Navigation
pane.
The Configure Buttons button
In addition to controlling how many named buttons appear, you can control the
order in which the buttons appear. You also can prevent buttons from appearing
for business functions your company doesn’t use. For example, if you outsource
your payroll functions, you can prevent the HR & Payroll button from appearing.
To control the buttons that appear in the Navigation pane, right-click any
button in the Navigation pane and then click Navigation Pane Options. The
Navigation Pane Options dialog box appears (see Figure 1-5).
Remove check marks beside any button you do not want to display in the
Navigation pane by clicking the check box. To change the order of the
Navigation pane buttons, select a button in the list by clicking on it and
then clicking the Move Up or Move Down buttons. Click OK when you
finish, or click Reset to return to the defaults.
Lists
The Navigation pane also contains lists for the selected series. Using a list
you can view similar records, select one or more records, and then simultaneously perform actions for all of the selected records. For example, in the
Customers list shown in Figure 1-6, you can select multiple customer records
and then print statements for the selected customers.
11
12
Part I: Great Things with Microsoft Dynamics GP
Figure 1-5:
Use this
dialog box to
specify the
buttons to
display in the
Navigation
pane and
the order
in which
they should
appear.
Filter area
Action pane
Figure 1-6:
Lists help
you perform
actions
simultaneously in
Dynamics
GP.
Information pane
List area
Chapter 1: What Microsoft Dynamics GP Does Best
You select the action you want to take in the Action pane of the List
window. You can add filters in the Filter area. The list elements (in this
example, the list elements are the customers) appear in the List area, and
you select various list elements with check marks to take actions on them.
The details for any list element you highlight — regardless of whether you
place a check mark by the list element — appears at the bottom of the List
window in the Information pane.
If you have proper security privileges, you can create list views that contain
just the information you want to view. See Chapter 15 for details.
Who, when, and where you are
At the very bottom of the Dynamics GP window, the user date (usually
the current day’s date; Dynamics GP uses the date set on your computer)
appears in the lower-left corner. Beside it, you see the name of the company
in which you are working, and beside the company name you see the name of
the user who is currently logged into the company (refer to Figure 1-1).
If you move your mouse pointer over any of these three pieces of information, you’ll find that they are buttons. If you click any of these buttons, you
can make changes. For example, you can change the user date by clicking the
Date button. Or, you can switch companies by clicking the name of the current
company; when you do, the Company Login window appears (see Figure 1-7).
Select the company you want to open from the drop-down list and click OK.
The user date acts as the default date for transactions or batches you post,
and depending on your report options it might be used to filter reports. The
system date is merely a handy default, and you can override it when you add,
edit, or post transactions.
Figure 1-7:
Use this
dialog box
to log in to
a Dynamics
GP company.
13
14
Part I: Great Things with Microsoft Dynamics GP
When you click the name of the currently logged in user, a dialog box very
similar to the one shown in Figure 1-7 appears. You can select a server on
which Dynamics GP is installed and type a User ID and password, but you
have no option to select a company.
At Home with the Home Page
You can customize your Home page so that it helps you work efficiently. You
can add information, reorganize the information, change the information that
appears in each pane, and customize the To Do and Quick Links areas. Let’s
take a look at the process.
Adding to and reorganizing
the Home page
In Figure 1-8, you see a typical Home page. In the Content pane, you see areas
for To Do and My Reports on the left, and the Quick Links and Microsoft Office
Outlook areas on the right. You can move these areas around and you can
change the information that appears in some of these areas. You also can add a
Metrics area that displays graphics for information that is important to you.
Let’s add the Metrics area to the left side of the Content pane, below the My
Reports area. Follow these steps:
1. Click the Customize This Page link in the upper-right corner of the
Home page’s Content pane (refer to Figure 1-8).
The Customize Home Page dialog box appears (see Figure 1-9).
2. To add the Metrics area to the Home page, select the Metrics check box.
3. To make the Metrics area appear on the left side of the Content pane,
click Metrics in the Column 2 list and then click the arrow pointing
left towards Column 1.
You can reorder the areas in the Content pane using the Move Up and
Move Down buttons on either side of the Column 1 and Column 2 lists.
4. Click OK.
Your newly modified Home page appears (see Figure 1-10).
Chapter 1: What Microsoft Dynamics GP Does Best
The Customize This Page link
Figure 1-8:
The different areas of
the Content
pane of
a typical
Home page.
Figure 1-9:
Use this
dialog box
to customize
your Home
page.
15
16
Part I: Great Things with Microsoft Dynamics GP
Figure 1-10:
The Home
page after
adding the
Metrics
area.
Notice the left- and right-pointing arrows in the upper-left corner of the
Metrics area of Figure 1-10? Click these buttons to display other metric charts
you’ve selected to view. Read the next section for more on how to select
metric charts to view.
Changing the details of a Home page
You can change the details that appear in any area on the Home page. For
example, you can specify the metric charts you want available in the Metrics
area. Move the mouse pointer into any area (I moved into the Metrics area
in Figure 1-10) and buttons appear at the right edge of the area’s title bar. By
clicking the pencil button, you can display the details available for the area
and select the ones you want to display. In Figure 1-11, you see the Metrics
Details dialog box.
The appearance of a “details” dialog box changes, depending on the one you
choose to view.
Suppose that you want to add the Total Purchases for the Past 12 Months
chart to the Metrics you can view from your Home page. Follow these steps:
Chapter 1: What Microsoft Dynamics GP Does Best
1. In the Metrics Details dialog box, click the chart you want to add.
In this case, Total Purchases for the Past 12 Months.
2. Click the Insert button.
To change the order of the charts you display on your Home page, use
the Move Up and Move Down buttons.
3. Click OK when you finish.
Figure 1-11:
The Metrics
Details
dialog box,
where you
select the
Metrics
charts you
want available on your
Home page.
Customizing the Quick Links area
You might want to set up Quick Links to reports, macros, and data entry
screens you use regularly. You follow the same basic steps as you did in
the previous section for the Metrics area, but you have a few more options
you can set. For example, you can add a link to a Dynamics GP window, a
Dynamics GP navigation list, a Web page, or an external file or program, as
shown in Figure 1-12.
You also can provide your own name for a Quick Link entry. For example,
you’ll find a Transaction Entry window in the Purchasing series and in the
Sales series. If you add both to your Quick Link list, you’ll want a way to distinguish them. In the Quick Links Details dialog box, click the entry you want
to rename and then click the Modify button. The Properties box for the entry
you selected appears (see Figure 1-13). In the Name box, type the name you
want Dynamics GP to display in the Quick Links list and then click OK.
17
18
Part I: Great Things with Microsoft Dynamics GP
Figure 1-12:
The types
of links you
can add to
the Quick
Links list.
Figure 1-13:
In the Name
box, type
the name
you want
displayed
in the Quick
Links list.
Customizing the To Do area
You can display reminders, tasks, and, if you’re using the Workflow module,
workflow tasks and notifications in the To Do area of the Home page. You can
let Dynamics GP create reminders for you for a variety of conditions. For example, you can have Dynamics GP remind you to post various recurring batches.
Tasks may be (but are not necessarily) tied to some Dynamics GP event or
window, and you can create recurring and non-recurring tasks that you can
assign to yourself or someone else. For example, you can create a task to remind
yourself to print monthly reports or send out customer satisfaction letters.
If you don’t display reminders in the To Do area of your Home page, reminders,
along with tasks that are due today or are overdue, appear in the Reminders
window. The Reminders window appears automatically when you start Dynamics
GP, or you can open the Reminders window by choosing Microsoft Dynamics
GP➪Reminders from the Menu bar. You also can open the Task List window by
choosing Microsoft Dynamics GP➪Task List in the Menu bar.
Chapter 1: What Microsoft Dynamics GP Does Best
Familiarity Breeds Affection, Efficiency,
and Productivity . . . and a Pay Raise
Dynamics GP contains certain common features that you use as you work in
the product. If you click a series button in the Navigation pane, you’ll see that
the Content pane for each series is organized in the same manner, with headings for Cards, Transactions, Inquiry, Reports, Routines, Utilities, and Setup.
In the sections that follow, I describe these common functions, along with
some other common features available throughout all series in Dynamics GP.
Cards
When you store background information in Dynamics GP, you use a card.
What do I mean by background information? Well, for example, you need
to store names and addresses and other vital information about your customers and your vendors. For your chart of accounts, you need to store an
account name, type, and number. You store this information on cards. Then,
when you create a customer invoice or a vendor bill, Dynamics GP uses the
card information to fill in this pertinent information on the invoice or bill —
saving you the time you’d spend looking up and then filling in the information
repeatedly. In Figure 1-14, you see a sample Customer card.
Figure 1-14:
A typical
Customer
card.
19
20
Part I: Great Things with Microsoft Dynamics GP
But you can set up more than just name and address information for customers and vendors; you can set up cards for other types of related information.
For example, in addition to Customer cards, you can set up cards that associate a customer with the vendor you typically order from for the customer. You
also can set up a card that identifies items typically ordered by a customer,
and you can set up a card for each salesperson that stores his or her commission rate, address, sales territory, and sales manager, so that all sales commissions on invoices are applied to the correct salesperson and sales manager.
In Part II, I discuss more details about cards for customers, vendors, inventory
items, and the General Ledger. Cards for a particular series appear in the rightside of the Dynamics GP window when you select that series in the Navigation
pane. Or, you can find all of the cards that you can create by clicking Cards on
the Menu bar and then pointing to the appropriate series within Dynamics GP.
Transactions
Transactions are the entries you make to record accounting events in
Dynamics GP. You can enter transactions individually or in batches, and
you use different windows within a series to enter individual transactions
or transactions in batches. For example, you when you receive a bill from a
vendor, you can use the Payables Transaction Entry window, shown in Figure
1-15, to record the individual bill and track it for payment.
Figure 1-15:
Use this
window to
enter an
individual
vendor bill.
To create a batch of vendor bills, you use the Payables Batch Entry window,
shown in Figure 1-16. You can create single-use batches, where you simply enter
a series of transactions into a batch, or you can create recurring batches, which
are particularly useful if you enter the same transactions on some regular
Chapter 1: What Microsoft Dynamics GP Does Best
basis. For example, if you pay certain bills weekly, you can create a batch that
contains all of those weekly bills and avoid entering those bills every week.
The recurring batch feature is especially useful to record monthly journal
entries in the General Ledger. Those recurring batches can act as a checklist
of closing entries.
Figure 1-16:
Use this
window
to record
a batch of
vendor bills.
Using batches is a handy way to separate work into different posting periods
when you set up transactions to post by batch date. And, using the Control
Totals feature of batches, you can ensure that you record all of the transactions because you provide a total number of transactions and the associated
dollar amount when you set up the batch. Microsoft Dynamics GP monitors
the number of transactions you subsequently record in the batch and the
total dollars of each transaction; the batch totals should match the number
and dollar amount total of the individual transactions in the batch.
Microsoft Dynamics GP posts transactions to update your company files. In
Chapter 2, you read about the posting options that you can set; suffice it to
say at this point that, in most cases, when you post a transaction you post
it throughout the Dynamics GP system so that the transaction updates all
appropriate journals and ledgers.
The way you enter transactions controls the timing associated with posting. If you enter transactions individually, you can set up your company so
that Dynamics GP posts the transaction immediately, and your records are
always up to date. If you enter transactions in batches, you also post them
in batches. Saving a batch of transactions doesn’t post the batch; you take a
21
22
Part I: Great Things with Microsoft Dynamics GP
separate action to actually post the transactions. In general, you can edit or
delete transactions in unposted batches as needed.
To make a change to a posted transaction, you need to enter another transaction that corrects the effects of the original transaction. That way, Audit Trails
shows the history of each transaction and ties transactions together appropriately. You can read more about Audit Trails later in this chapter in the section
“Keeping Your CPA Happy,” and in Chapter 2.
Transactions available for a particular series appear in the Content pane
of the Dynamics GP window when you select that series in the Navigation
pane. Or, you can find all of the transactions that you can create by clicking
Transactions in the Menu bar and then pointing to the appropriate series
within Dynamics GP.
Inquiries
You can use inquiries in Dynamics GP to review information in a quick and
efficient manner. You can view summary or detailed information and, in
many cases, sort the information. For example, suppose that you’d like a
quick picture that summarizes your company’s outstanding receivables. On
the Menu bar, you can click Inquiry➪Sales➪Receivables Summary to display
the window shown in Figure 1-17. Then, to view your receivables picture
company-wide, click the Calculate button.
Figure 1-17:
Use an
inquiry to
quickly
determine
your company’s current
receivables
picture.
Chapter 1: What Microsoft Dynamics GP Does Best
You also can use this window to see the receivables status for a single customer.
Reports
You’ll find a plethora of reports available for each series in Dynamics GP —
reports that enable you to both verify and analyze company information. To
view the available reports, click Reports on the Menu bar. The categories of
reports appear; as you highlight a category, the reports in that category appear.
See Chapter 12 for details on setting report options and printing reports.
Routines
Routines are tasks you perform on a periodic basis. For example, you can
use routines to run monthly customer statements or apply finance charges
to customers. To see the routines available in Dynamics GP, click Microsoft
Dynamics GP on the Menu bar, and then choose Tools➪Routines.
Utilities
Utilities help you clean up data by removing it. You also can use utilities to
check and repair your data if discrepancies appear. For example, a power
outage while you’re using Dynamics GP can result in transactions being
partially but not completely posted. You can use utilities to track down the
problems. Also, some utilities save you time by allowing you to make mass
changes to your data. For example, the Price List utility is a wizard that lets
you copy price lists from one item to another item or a range of items. In
Chapter 13, you find more information on using utilities to find and repair
problems.
You can view the available utilities by going to the Menu bar and choosing
Microsoft Dynamics GP➪Tools➪Utilities.
Setup
If you have sufficient security rights (see Chapter 14), such as the rights of a
power user, and you click any series in the Navigation pane, you’ll see a section in the Content pane called Setup. In that section, you’ll see a list of links
you can click to set up the behavior of Dynamics GP. For example, in Figure
1-18, you see the links available in the Setup area for the Sales series.
23
24
Part I: Great Things with Microsoft Dynamics GP
Figure 1-18:
Each series
displays
an area in
the Content
pane where
you can set
up various
aspects of
the series.
If you click each of these links, you can establish the way you want Dynamics
GP to behave using the options that appear. In Figure 1-19, you see the
Receivables Management Setup window, which displays the options available
when you click the Receivables link in the Setup area of the Content pane.
Figure 1-19:
Using Setup
windows,
you can
determine
Dynamics
GP’s
behavior in
various situations.
Chapter 1: What Microsoft Dynamics GP Does Best
Yellow sticky notes
In every window in Dynamics GP, next to almost every field you’ll see an icon that
looks like a piece of paper — and functions like a sticky note (see Figure 1-20).
The Note icon
Figure 1-20:
You can
attach notes
to fields in a
window.
When you click any particular Note icon, a window like the one in Figure 1-21
appears; you can use this window to store free-form information.
Figure 1-21:
Use Note
windows to
store freeform text.
25
26
Part I: Great Things with Microsoft Dynamics GP
Working with SmartLists
SmartLists provide you with fast, easy access to information in your
Dynamics GP company. Using a SmartList query, you can quickly and easily
obtain information about accounts, customers, employees, vendors, transactions, and items. You can display the results on-screen, print the information,
or send it to Word or Excel. For example, suppose that you want to view all of
your 1099 vendors. You can use a SmartList like the one shown in Figure 1-22
to display a list of all of your 1099 vendors.
You also can export SmartList information to an Excel or Word file.
Figure 1-22:
Quickly and
easily
display
information
stored
in your
Dynamics
GP company.
SmartLists can also be used to facilitate workflow. If you assign users to monitor particular lists, you can create queues of work to be performed. Because
all users, including managers, can view the SmartLists, a bottleneck in the
workflow becomes immediately apparent.
SmartLists also can replace paper-based workflows that typically sit in a
basket on someone’s desk. For example, you can create a SmartList for Sales
Orders in a certain batch named “URGENT” and then assign the shipping
department to monitor this SmartList and ship those orders ahead of others.
To view the SmartList window, click Microsoft Dynamics GP➪SmartList in the
Menu bar. For more information on using SmartLists, see Chapter 12.
Chapter 1: What Microsoft Dynamics GP Does Best
Reminders and tasks
Dynamics GP can create reminders for you for a variety of conditions. For
example, you can have Dynamics GP remind you about overdue invoices a
specified number of days past the due date. Or, you might want to create
a reminder to post various recurring batches. You also can create custom
reminders — reminders that you define.
The Reminders window, shown in Figure 1-23, appears automatically when
you start Dynamics GP if you have reminders or tasks that are due today
or overdue. Or, you can open the window by choosing Microsoft Dynamics
GP➪Reminders.
Figure 1-23:
The
Reminders
window.
The Reminders window doesn’t appear if you choose to display reminders in
the To Do area of your Home page. See Chapter 2 for details on customizing
your Home page.
You can create tasks that you assign to yourself or someone else using
Dynamics GP. Tasks appear in the Reminders window (refer to Figure 1-23) and
in the Task List window, which you can open by choosing Dynamics GP➪Task
List. Using either window, you can monitor or set the progress of a task.
See Chapter 15 for details on creating reminders and tasks.
27
28
Part I: Great Things with Microsoft Dynamics GP
Keeping Your CPA Happy
Dynamics GP contains a feature called Audit Trails that makes accountants
very happy. Using the Audit Trails feature, you can trace a transaction from
anywhere in your Dynamics GP company back to the location where you
originally entered it. Read more about setting up the Audit Trails feature in
Chapter 2.
You also can purchase the Audit Trails module, which enables you to monitor each user’s activity in Dynamics GP. Using the Audit Trails module, you
can view before and after snapshots of records that have changed. You can
decide exactly what changes you want to track; for example, you can capture
a change made to an inventory item description. The Audit Trails module
notes the change, the date and time of the change, and the user who made
the change.