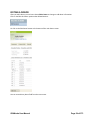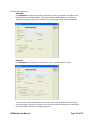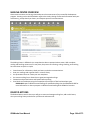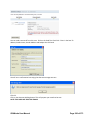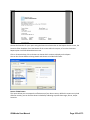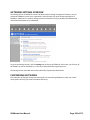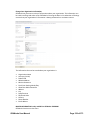
1
GiftWorks User Manual GETTING STARTED ...........................................................................2 HOME PAGE ................................................................................... 11 DONORS OVERVIEW ...................................................................... 30 MANAGING DONORS ..................................................................... 45 DONATIONS OVERVIEW ................................................................. 74 MANAGING DONATIONS ................................................................ 76 PLEDGES OVERVIEW ...................................................................... 91 MANAGING PLEDGES ..................................................................... 93 MANAGING HONORARIA AND MEMORIALS ................................. 113 MANAGING TASKS ....................................................................... 126 SMARTLISTS ................................................................................. 151 MAILING CENTER ......................................................................... 184 REPORTS ...................................................................................... 248 SETTINGS ..................................................................................... 290 GIFTWORKS GLOSSARY ................................................................ 365 GETTING STARTED IN THIS SECTION About This Manual Using the Built-in Help Getting Around GiftWorks System Requirements What You Need to Use GiftWorks To Use the Online Features Important Information for Trial Users Installing GiftWorks Installing from a CD Installing from a Download Setting up GiftWorks If You Are New to GiftWorks Creating Standards for Your Organization Names Salutations Addresses Gifts and Pledges Analyzing Your Data Solicitors Capital Campaign Membership Event Management Tasks GiftWorks User Manual Page 2 of 373 ABOUT THIS MANUAL This Manual was created to give you all the information you need to use GiftWorks fundraising software as part of a complete and effective fundraising strategy—all in one convenient document. Using the Built-in Help GiftWorks includes easy-to-understand help on almost every screen of the software. It’s contextsensitive, offering relevant guidance about the features of whatever screen you’re interacting with. Simply click the Help icon on the upper right of the GiftWorks screen. Getting Around GiftWorks Using GiftWorks is easy. Sections are on the top, things you can do that are related to your current action are on the left, your work is in the middle, and help is available on the right and follows you where you go. SYSTEM REQUIREMENTS Hardware: 1-GHz Pentium or greater 1GB, 2GB recommended 200MB available hard-disk space Software: Windows 2000 Professional (with latest service pack); Windows XP Home, Professional, Professional x64 (all with latest service pack) Windows Vista Home, Business, Ultimate, 64-bit; Windows 7 Home Premium, Professional, Ultimate, 64-bit Internet Explorer 32-bit 7/8/9 GiftWorks User Manual Page 3 of 373 GiftWorks integrates with the QuickBooks Pro and Premier Editions (including the Nonprofit Edition), for the years supported by Intuit, including the US, UK and Canada versions. Note: Please be aware that if you are using Windows Vista or Windows 7, you may need to disable user account control for the GiftWorks interface with QuickBooks to work. GiftWorks does not integrate with the QuickBooks Online or QuickBooks Simple Start Editions. GiftWorks can optionally use Microsoft Outlook to send outgoing email. GiftWorks is not compatible with Microsoft Outlook 64-bit. GiftWorks is compatible with the 32-bit version of Microsoft Outlook. Starting with GiftWorks 2012, users can also send email using their outgoing email server (SMTP). Important Information for Trial Users The GiftWorks trial is intended for evaluation purposes only. The GiftWorks trial expires 30 days after installation and you will need to purchase a GiftWorks license to continue using GiftWorks. Files created with the trial software will no longer be accessible after the trial expires. Emails to GiftWorks Customer Care are included with this trial. There is no paid technical support included with this trial. You must accept the GiftWorks License Agreement during installation before you can use this product. If you do not accept the terms of the License Agreement, do not install or use the product. INSTALLING GIFTWORKS Installing from a CD 1. Insert disk into your CD-ROM drive. Installation will automatically begin. If it does not, double-click My Computer, and then double-click your CD-ROM drive icon. Choose SETUP.EXE. 2. From the initial setup screen, click Next. You can select Back any time during installation if you want to change a previous selection. 3. Read the GiftWorks License Agreement. If you accept the terms of the License Agreement, select the I accept button and click Next. If you cannot accept the terms of the License Agreement, select Cancel and do not install or use the product. 4. Enter your name and your organization's name in the spaces indicated. If you want anyone using this computer to be able to use GiftWorks, select the Anyone button. You will be able to add additional user names after installation. If you are the only person who should be able to use GiftWorks, select the Only for me button. Click Next after making your selection. 5. GiftWorks will install into your Program Files folder by default. Click Next to accept this default setup. If you want to install into a custom folder instead, select Change and browse to the folder of your choice or create a new folder. Click OK once you have chosen a folder, then click Next. If you are creating a new folder, GiftWorks will ask you for confirmation. Click OK to confirm this. 6. GiftWorks is now ready for installation. Click Install. Installation may take several minutes. GiftWorks User Manual Page 4 of 373 7. When the installation wizard is completed, you may check the Launch Mission Research GiftWorks box and click Finish to launch GiftWorks. If you want to use GiftWorks later, click Finish. Installing from a Download 1. Download the GiftWorks installation file from http://www.giftworksconnect.com/giftworks/downloads. 2. When given the option, choose to save the downloadable file, and save it to an easy-to-remember location such as your desktop. 3. When the download is complete, double-click downloaded file to start the installation. 4. From the initial setup screen, click Next. You can select Back any time during installation if you want to change a previous selection. 5. Read the GiftWorks License Agreement. If you accept the terms of the License Agreement, select the I accept button and click Next. If you cannot accept the terms of the License Agreement, select Cancel and do not install or use the product. 6. Enter your name and your organization's name in the spaces indicated. If you want anyone using this computer to be able to use GiftWorks, select the Anyone button. You will be able to add additional user names after installation. If you are the only person who should be able to use GiftWorks, select the Only for me button. Click Next after making your selection. 7. GiftWorks will install into your Program Files folder by default. Click Next to accept this default setup. If you want to install into a custom folder instead, select Change and browse to the folder of your choice or create a new folder. Click OK once you have chosen a folder, then click Next. If you are creating a new folder, GiftWorks will ask you for confirmation. Click OK to confirm this. 8. GiftWorks is now ready for installation. Click Install. Installation may take several minutes. 9. When the installation wizard is completed, you may check the Launch Mission Research GiftWorks box and click Finish to launch Mission Research GiftWorks. If you want to use GiftWorks later, click Finish. SETTING UP GIFTWORKS 1. To launch GiftWorks, go to the Windows task bar and click Start, click Programs, click Mission Research, and then click GiftWorks, or double-click on the GiftWorks “G” icon on your Desktop. 2. If you've already purchased GiftWorks, enter your Software Key in the box indicated and click Go. To buy GiftWorks, click on Buy GiftWorks Now and submit payment through our secure Web site. To start a no-risk trial, click on Try GiftWorks Free. 3. Next, you must register your copy of GiftWorks. Enter the requested information and click Next. 4. The following page will confirm your Trial or Purchase. Click Next. 5. At the welcome screen, click Start. GiftWorks User Manual Page 5 of 373 6. If you installed GiftWorks from a CD, we recommend that you check for any software updates. Click Check for Updates to do this now. 7. GiftWorks is set to check for software updates automatically. Click Next to confirm this setting and have GiftWorks check for updates automatically. If you want to turn this feature off, deselect the Have GiftWorks check for updates box before clicking Next. 8. Enter your name in space provided and click Next. 9. If you want to try out the features of GiftWorks without setting up your own database, you can select the Use the sample database button before clicking Next. GiftWorks assumes that you want to create a new database. Click Next to set up your new database. If you have an existing GiftWorks database to use, click Select an existing database before clicking Next. If you are creating a new database, enter a name for this database in the space provided. GiftWorks will automatically save your database in a preselected GiftWorks folder. Click Next to accept this selection. If you want to save your database in a custom location, click the linked filename below and choose the folder that you want to use. Click OK once you have highlighted your selection, then click Next. If you are selecting an existing database, click Browse and choose the GiftWorks database (.GDS) file you want to use. Click Open once you have highlighted your selection. Click Next to launch your database. 10. You have completed setup! Click Sign In to open GiftWorks. If you want to change any setup selections before signing in, click the option and follow the setup instructions for that item. Helpful Tip GiftWorks Standard and Premium are initially set to Basic Security. The options available in Basic Security are the same whether you are working in GiftWorks Standard or Premium. In the Basic Security level you can: Set an Administrative Password to protect the Settings section of GiftWorks. The Settings section contains all administrative settings and includes your custom fields and values, accounting settings, and database backup settings. Any user can sign in and create a password to start working with GiftWorks. If you set an Administrative password, other users will not be able to access any settings other than to change the username. Gift Works PREMIUM USERS ONLY Before you change security levels, refer to the GiftWorks Security Guide for more information on security levels and options available in GiftWorks Premium. GiftWorks User Manual Page 6 of 373 IF YOU ARE NEW TO GIFTWORKS GiftWorks helps you support your organization’s mission more efficiently and effectively by tracking donors and donor relationships, donations and pledges, mailings, lists, and campaigns—all in one place. Maybe you’ve been working with a different database software package, or you currently use only a spreadsheet to track your donor information. GiftWorks will be an immediate improvement. Before importing or manually entering data into GiftWorks, now is the time to ask yourself these questions: What have you been doing that’s working well? What areas need to be improved? Who is responsible for tracking your donor information? Who ultimately utilizes the information and what are their needs? GiftWorks lets you store all information in one place for a comprehensive picture of a donor’s connection with and participation in your organization. But the information won’t benefit you as much as possible if it isn’t easily accessible or properly utilized. A solid database takes planning and organized implementation to ensure reliable and accessible information, to support your efforts, and to increase your revenue. CREATING STANDARDS FOR YOUR ORGANIZATION When storing the following information, be sure to create standard practices for your organization for storing the following information. In the long run, you’ll be glad you did. Names Will you use formal or informal name versions for mailing, or both? If you use formal, what will be your standard prefixes? Will you abbreviate (Rev. or Reverend)? Use the customizable prefix field (Settings/Customize/Change Field Values) to define your standards for data entry. Will your formal names include middle initials and suffixes where applicable? Take care to edit data being imported, and make this standard known to all staff or volunteers who enter donor information into GiftWorks for your organization. Helpful Tip If you typically use formal addressee or salutation information, you can also enter or import an informal version, providing flexibility in the future should your needs change. Salutations If you use informal salutations, will you always want the full name or will you want nicknames where applicable (William or Bill)? Addresses Do you use postal abbreviations or prefer to write out entire words in your addresses? Will you use formal, informal, or both? Be consistent. Edit your data for consistency in a spreadsheet prior to import. Make your standard known to all data entry staff or volunteers. GiftWorks User Manual Page 7 of 373 Gifts and Pledges Review the donation entry screen in GiftWorks. What are the mandatory fields to fill for gifts received by your organization? Does your current gift data have the basic information (date, amount, campaign, fund, appeal)? Date—how do you track the actual date of the gift (not the check date)? For donations, the Payment Date field can be edited and should be used consistently within your organization. The field defaults to the date of entry, but this does not reflect the donor’s gift date. You can enter the date you receive the gift, although the IRS considers the postmark date as the donor’s legal date of gift. Be consistent for accuracy in reporting. For Pledges, there is a Created Date (not important to the IRS), and then the pledge payments (donations) have Payment Dates as noted above. ANALYZING YOUR DATA To maximize your efforts, analyze your current data and development process and consider how to best use GiftWorks to track the following information: GiftWorks User Manual Page 8 of 373 Solicitors Do your board members cultivate and solicit major donors for annual gifts? The Assigned To field stores the primary solicitor for each donor. The Solicitor field stores solicitation information for each donation or pledge. If you have this information in your current data and plan to import it, make sure the names are consistently entered. If haven’t been tracking the information but would like to begin doing so, you can add it to your data prior to import, or manually add it while entering records. Will you be conducting a capital campaign? You may use different board or committee members to solicit a capital gift than the solicitor assigned for annual fund cultivation. Consider using a donor custom field to track capital campaign solicitors separately from annual fund solicitors. Capital Campaign Do you need to track the progress of soliciting major donors during a capital campaign? Consider using Donor Custom Fields to track general information (solicitors 1 & 2, target amount, status, etc.) for inclusion in donor-based reports for your meetings. Existing data can be imported or manually entered into the custom fields. Again be sure that data being imported is consistently entered. If there are variations in your existing data, each unique value will be added to GiftWorks. Membership Do you have basic membership—one to three levels based on the amount of the gift, for example? GiftWorks provides two date fields (member since, renewal date) to track when a donor first becomes a member and when their membership is next up for renewal. Consider using Donor or Donation Custom Fields to track the current level of membership. Event Management—Such as a Golf Tournament Do you have a golf tournament or other similar event? Consider utilizing Group Codes to segment golf players (Golf Player 2008). Consider a donor custom field to track the player’s team name and handicap (John’s Team – 18) and include it in a list of players for game day. Consider using donation Appeal codes to track player fees (paid by each player, by one player, or by an organization) and sponsorships. Consider using a Donation Custom Field to track the level of sponsorship tied to the sponsorship gift. Helpful Tip Consider carefully how many of the limited number of custom fields to dedicate to each process. Tasks Do your Executive Director and/or Development Director track the history of communications with major donors? GiftWorks includes a Tasks feature. Define task categories (Settings/Customize/Change GiftWorks Fields / Task Categories) GiftWorks User Manual Page 9 of 373 Create tasks using a category, text description, due date and time. Tasks are stored on the Notes Tasks & Files tab of a donor profile. Upcoming tasks show on the GiftWorks Start Page (click the Home button at the top of the GiftWorks window). View and customize task lists and mark tasks as completed. It is important that staff utilizing this feature have regular access to GiftWorks and actively checks on the status of tasks. GiftWorks User Manual Page 10 of 373 HOME PAGE IN THIS SECTION Home Page Overview Essentials Related Actions Change My Settings Change Preferences Configure Facebook, Twitter and LinkedIn Home Page Tasks Refresh Customize Main Column Side Column GiftWorks User Manual Page 11 of 373 HOME PAGE OVERVIEW The GiftWorks Home Page is a great place to access many areas of GiftWorks, as well as give you important information. Each GiftWorks user can customize their Home Page to best suit their needs. This means that one user may not see the same thing as another user will see on this page. ESSENTIALS The Essentials area displays messages with information about resources, upcoming events, special offers, notifications and more. GiftWorks User Manual Page 12 of 373 RELATED ACTIONS The Related Actions area has many of the same options that you will see throughout the other areas of GiftWorks. You can quickly add a donor or donation, view the Donor Dashboard, SmartLists and Task Calendar from this area. Each of these features is covered in another section of this manual. Change My Settings Each GiftWorks user can now change their preferences for some of the prompts that appear within GiftWorks, as well as configure their own social connections for Facebook, Twitter and LinkedIn. Change my Preferences – each GiftWorks user can change the follow settings for what best suits their needs. These settings only affect that user. GiftWorks User Manual Page 13 of 373 GiftWorks has a “hover help” feature that allows you to scroll your mouse over certain areas to get additional information on a feature. You can control the warning prompt for critical notes: You can control the warning prompt for zero-dollar donations: GiftWorks User Manual Page 14 of 373 You can control the warning prompt for soft credit amount: Configure Facebook, Twitter and LinkedIn – each GiftWorks user can not set up their own Social Connections within GiftWorks. GiftWorks User Manual Page 15 of 373 You will configure and disconnect these social connections from this same area on the Home Page. Click on the configure option that you want to set up and you will be walked through the process. If you decide you no longer want to have Facebook configured with GiftWorks, you can simply go to this area and click on “Disconnect from Facebook”. HOME PAGE TASKS Refresh You can click the Refresh option under Home Page Tasks to refresh the Essentials area and the other widgets on the Home Page. GiftWorks User Manual Page 16 of 373 Customize Each GiftWorks user can customize their own Home Page. Click on Customize under Home Page Tasks. Main Column You can customize the Main Column of the Home Page to show various widgets. You can check the box next to the feature(s) you would like to be displayed. You can also arrange the features in the order you would like using the Up and Down buttons. Click Ok to save your choices. GiftWorks User Manual Page 17 of 373 Your Home Page will now reflect those changes. Main Column Features Tasks – You can add Tasks to your Home Page. You can then choose the setting that best suits your needs by clicking on the down arrow. This will give you the options for Next Week’s Tasks, This Month’s Tasks, All Active Tasks, Past Due Tasks or to Hide the feature. GiftWorks User Manual Page 18 of 373 Social News Feed – You can add Social Feed to your Home Page. You can choose the settings that best suit your needs by clicking on the down arrow. You can then choose which social feed to display, the number of posts to display or to Hide the feature. Donations – You can add Donations to your Home Page. You can then choose the settings that best suit your needs by clicking on the down arrow. You can then choose to view the Sum of Donations or View the Count of the Donations. You can choose to show the Donations by Appeal, Campaign or Fund. You can choose one of the date ranges listed. You can also set the size of the pie chart to Small, Medium or Large. You can also choose to Hide the feature. GiftWorks User Manual Page 19 of 373 Donation History – You can add Donation History to your Home Page. You can then choose the settings that best suit your needs by clicking on the down arrow. You can choose one of the date ranges listed. You can choose to Show Dollars or to Show Units. You can also choose to Hide the feature. Expected Payments – You can add Expected Payments to your Home Page. You can then choose the settings that best suit your needs by clicking on the down arrow. You can choose one of the date ranges listed, or Hide the feature. Campaigns – You can add Campaigns to your Home Page. . You can then choose the settings that best suit your needs by clicking on the down arrow. You can choose to show Budgeted Expenses, Actual Expenses, Income Goal and/or Actual Income. You can choose to show Received Donations, Pledged Donations or Received and Pledged Donations. You can also set the size of the pie chart to Small, Medium or Large. You can also choose to Hide the feature. GiftWorks User Manual Page 20 of 373 You can also choose what Campaign(s) you want to include. Click on the dropdown arrow next to the Campaign field. Check the boxes next to the Campaigns you want to include. Note – if you want to show ALL Campaigns you will leave this field blank. Campaign Analysis – You can add Campaign Analysis to your Home Page. You can then choose the settings that best suit your needs by clicking on the down arrow. You can choose to show Budgeted Expenses, Actual Expenses, Income Goal and/or Actual Income. You can choose to show Received Donations, Pledged Donations or Received and Pledged Donations. You can also choose to Hide the feature. GiftWorks User Manual Page 21 of 373 You can also choose what Campaign(s) you want to include. Click on the dropdown arrow next to the Campaign field. Check the boxes next to the Campaigns you want to include. You can choose up to 5 Campaigns. Events – You can add Events to your Home Page. You can then choose the settings that best suit your needs by clicking on the down arrow. You can choose to show Upcoming Events, Current Year Events, Previous Year Events, All Past Events or All Events. You can also choose to Hide this feature. GiftWorks User Manual Page 22 of 373 Event Finances - You can add Event Finances to your Home Page. You can then choose the settings that best suit your needs by clicking on the down arrow. You can choose to show Income Goal, Potential Income, Actual Income or Total Expenses. You can choose one of the date ranges listed. You can set the size of the pie chart to Small, Medium or Large. You can also choose to Hide the feature. Event History – You can add Event History to your Home Page. You can then choose the settings that best suit your needs by clicking on the down arrow. You can choose to show Income Goal, Potential Income, Actual Income and/or Total Expenses. You can choose one of the date ranges listed. You can also choose to Hide the feature GiftWorks User Manual Page 23 of 373 Events Tasks – You can add Event Tasks to your Home Page. You can then choose the settings that best suit your needs by clicking on the down arrow. You can choose to show Next Week’s Event Tasks, This Month’s Events Tasks, All Active Events Tasks or Past Due Event Tasks. You can also choose to Hide the feature Side Column You can customize the Side Column of the Home Page to show various features. You can check the box next to the feature(s) you would like to be displayed. You can also arrange the features in the order you would like using the Up and Down buttons. GiftWorks User Manual Page 24 of 373 Click Ok to save your choices. Your Home Page will now reflect those changes along the right side of the screen. GiftWorks User Manual Page 25 of 373 Side Column Features Donor Statistics – You can add Donor Statistics to the Side Column of your Home Page. You can then choose the settings that best suit your needs by clicking on the down arrow. You can choose to show Total Donors, Total Donation, Current Year Donations, Current Fiscal Year Donations, Current Month Donations, New Donors and Recent Donations. You can also choose to Hide the feature. Reminders - You can add Reminders to the Side Column of your Home Page. Here you will see various reminders based on your version of GiftWorks, and when you have last Backed up, Compacted, Updated Seasonal Addresses (Premium only), Validated Address etc . You can only choose to Hide the feature. Favorite Reports- You can add Favorite Reports to the Side Column of your Home Page. This will show you the Reports that you have saved as your Favorites. You can click on the down arrow. And then choose Manage Favorite Reports, or can choose to Hide the feature. GiftWorks User Manual Page 26 of 373 You can check or uncheck the Reports that you want to show as your Favorite Reports, and change the order. Recent Donors – You can add Recent Donors to the Side Column of your Home Page. You can then choose the settings that best suit your needs by clicking on the down arrow. You can choose to show Recently Viewed, Recently Changed or Recently Added. You can also choose to Hide the feature. SmartEntry Pages- You can add SmartEntry Pages to the Side Column of your Home Page. This will show you the default SmartEntry Pages and the SmartEntry pages you created within Settings. You can click on the down arrow and choose to Hide the feature. GiftWorks User Manual Page 27 of 373 Campaign Thermometer - You can add Donor Statistics to the Side Column of your Home Page. You can then choose the settings that best suit your needs by clicking on the down arrow. You can choose to show Received Donations, Pledged Donations or Received and Pledged Donations. You can choose the color you would like for your thermometer. You can also choose to Hide the feature. In order to use this feature you will need to go to Settings to define a Campaign Goal. Click on the “Go to the Settings area” link . Here you can edit the Campaign and enter in the Goal information. You will now see the thermometer on the Home Page. GiftWorks User Manual Page 28 of 373 Favorite SmartLists - You can add Favorite SmartLists to the Side Column of your Home Page. This will show you the SmartLists that you have saved as your Favorites. You can click on the down arrow. And then choose Manage Favorite SmartLists, or can choose to Hide the feature. You can check or uncheck the SmartLists that you want to show as your Favorite SmartLists, and change the order. GiftWorks User Manual Page 29 of 373 DONORS OVERVIEW IN THIS SECTION Overview Understanding Relationships Understanding Profiles Understanding Donor Name Fields Donor with No Profile Donor with Household Profile Donor with Organization Profile Understanding the Main Donor Screen Change Profile Customize Heading Tabs Print Summary Donor Screen Tabs Summary Contact Info Details Relationships Donations Notes, Tasks & Files History Social GiftWorks User Manual Page 30 of 373 DONOR OVERVIEW Donors are the lifeblood of your organization. GiftWorks helps you develop stronger relationships with your donors by giving you the tools to track donors, their donations, and all of your organization’s interactions with them. Everyone you enter into GiftWorks—individuals, households, organizations, or others—are called a donor, whether they’ve donated to your organization yet or not. Donors can also be designated as an affiliate. Donors: Most of the individuals, couples, families, households, and organizations in your database will be entered as donors. In most cases, you can enter all information about a household or organization into one donor. You can also add a household or organization profile to a donor, providing visual cues that they are a household or organization, as well as some profile-specific features like household or work relationship tracking. The type of profile can also be used to choose the information you use for SmartLists, mailings, and some reports. Affiliate Donors: People or organizations you want to have information about in your database, but who you don’t typically want to solicit, and from whom you do not expect to receive donations, can be marked as affiliate donors. Affiliate donors contain the same information as regular donors, but by default, they are omitted from SmartLists. You can add them into SmartLists if you want to mail to them, but they will not receive your mailings unless you explicitly choose to send to them. Also, you cannot add donations to affiliate donors. If you want to add a donation to an affiliate donor, you must first remove the affiliate donor designation. Affiliate donors can have any of the profile types. For more information, see Understanding Profiles. UNDERSTANDING RELATIONSHIPS There are three types of relationships in GiftWorks: relationship, family relationship, and work relationship. In the Settings section of GiftWorks, you can customize the list of roles donors can play in each relationship type. GiftWorks User Manual Page 31 of 373 Relationship: A relationship can include friends, golf buddies, and many other relationship types. You can use these to track how your donors are interconnected. Knowing that John is a college friend of Carol (a board member) might change how you solicit him. Relationships can be used to define SmartLists and in some reports, giving you a powerful way to track and take advantage of your donors’ social networks. Family relationships: This relationship type can be used to define relationships among family members in your database, and also within households. See Donor with Household Profile for more information. Work relationships: This type can help you track which donors work for which organizations or companies. This can be especially helpful if you want to solicit all employees of a particular corporation for an upcoming special event. UNDERSTANDING PROFILES Donors in GiftWorks can have a profile applied to their record. By default, a donor will have no profile, which is probably suitable for many of the donors in your database. The other profile options are household and organization. You can apply or change a donor’s profile by clicking the Change Profile link at the top right of the main work area when viewing or editing a donor. The first step of the Add a Donor process also lets you specify a profile. GiftWorks User Manual Page 32 of 373 For a donor with a household profile, you can Add a Household Member from the relationships tab. This creates an affiliate donor with a relationship to the household. It also allows you to track information about household members without needing to create completely separate donors for them. The primary donor for that household will be the main household donor. When viewing that donor, you can easily see and click for more detail about the members of the household. Choosing a household or organization profile for a donor changes the color of the header that appears in the top left of the view donor screen. The type of profile is also indicated in the same area. GiftWorks User Manual Page 33 of 373 UNDERSTANDING DONOR NAME FIELDS Every donor in GiftWorks has the same available name fields: Display name Name (prefix, first, middle, last, suffix, and nickname) Organization The display name represents the donor throughout GiftWorks, including in SmartLists, when viewing a donor, and in other places. Be sure to choose a default format for this field so your donors are consistently entered, and so you can find them where you expect to (in a sorted list, for instance). “Lastname, firstname” is a good standard for individuals. “Lastname, firstname and firstname” is good for couples or households. For organization, use the actual organization name. Depending on the profile you choose when adding a donor, you are prompted for the donor name, household name, or organization name. Donor with No Profile A donor with no profile can be anything: an individual, an organization, or a household. You can track information about organizations or households without having a profile applied to the donor. When entering the name for a donor with no profile, you might enter “John Q. Smith,” “John and Mary Smith,” “The Smith Household,” or “XYZ Corporation.” As you continue through the process of adding the donor, GiftWorks will make a best guess as to how the pieces of the name you enter should be divided between the name fields. You can edit the values that GiftWorks puts in the fields. Donor with Household Profile A donor with a household profile will typically be a household, generally defined as a couple or family that gives to your organization as a unit. In most cases, you will not need to track specific information about the members of a household, though you certainly have the ability to do so in GiftWorks. An example of a household might be “John and Mary Smith,” who support your annual campaign each year and want to be recognized in your newsletter as John and Mary Smith. You will almost always want to solicit them or send them other communications as a unit. They are effectively one donor. For cases where you want or need to track household member information separately (if John or Mary is a board member, for example), but where you also receive gifts from the household, you can add an additional household member to track that individual. GiftWorks User Manual Page 34 of 373 If the household member doesn’t give money separately from the household, that member can be an affiliate donor. If they do give money separately, you can make them a donor. If you want to keep track of children’s names, you can add them as household members and leave them as affiliate donors. Donor with Organization Profile Typically, you will enter organizations (companies, agencies, foundations, etc.) into your database as a donor with an organization profile. You can link employees of a company with their company. You can add your contacts at that organization as affiliate donors related to the organization. You can link board members of a foundation with the foundation. There is a great deal of flexibility. Understanding the Main Donor Screen There are different areas to this screen. Here you can change the Profile of your donor, customize your screen and print a donor summary. There are many tabs to click on to view specific donor information. You can also use the Related Tasks, Mailing Tasks and Other Tasks options on the left to quickly process other functions. GiftWorks User Manual Page 35 of 373 Change Profile: Click on the Change Profile link to the right of the screen. Here you can change the donor profile or mark the donor as an Affiliate Donor. Customize: Click on the Customize link to the right of the screen to set up the donor screen for your individual customizations. Note- these changes are PER GIFTWORKS USER. Heading: You can control what field is displayed under the donor name at top of screen, as well as choose a size for a donor picture or no picture at all. GiftWorks User Manual Page 36 of 373 Tabs: You can control the order of how the tabs appear on your screen, or choose to not show specific tabs if you do not need to see them. Print Summary: Click on the Print Summary link to the right of the screen to quickly print a donor summary report. GiftWorks User Manual Page 37 of 373 Donor Screen Tabs: Each tab will provide you a quick glance at specific donor, donation and pledge information. Summary: View information about the donor’s category, status, group and mailing list information. GiftWorks User Manual Page 38 of 373 Contact Info: View address, phone, email and contact details about the donor. GiftWorks User Manual Page 39 of 373 Details: View Development details, Employment details, Custom fields, Record History, and Events/Volunteer info. You can now see the Donor Id under Record History area Relationships: View all Relationships set up between this donor and other donors in your database. GiftWorks User Manual Page 40 of 373 Donations: View Donation and Pledge information for your donor. You can choose to Include Donations Only, Include soft-credit recognitions only, or include both donations and soft-credits. (This is PER GiftWorks USER) Note, Tasks & Files: You have the ability to add Notes, Tasks or Files within a donor profile. All three options are located under the Related Actions option on left. Note: If you do not see the Add a File option, you will need to go to Settings and turn that feature on. You have the ability to add alert notes that provide special notification every time the donor is viewed. Other changes include the ability to specify the note date and know when a note or task is added or changed and by whom. You can choose your own Filter/Sort Options. GiftWorks User Manual Page 41 of 373 History: GiftWorks will keep a history of actions that have been performed. Examples are adding, modifying or deleting a donor or donation; adding or removing a pledge payment; receiving a pledge payment; adding, modifying or deleting a letter template; adding, modifying or deleting a SmartList and so on. It will be possible to search and print the activity for specific users, dates and actions. One practical application is that users will be able to review the actions of individual users. Go to Settings/ Database, Files and Maintenance / View and Manage GiftWorks History GiftWorks User Manual Page 42 of 373 Social: Setup your own Social Connections for each donor for Facebook, Twitter and LinkedIn. Choose the View Options you would like to view Recent Activity. GiftWorks User Manual Page 43 of 373 Click on the Edit Donor button at bottom of screen. Here you can enter in the donor’s Facebook Id, LinkedIn URL and Twitter Handle. You also have the ability to search for them and then add from there. GiftWorks User Manual Page 44 of 373 MANAGING DONORS IN THIS SECTION Adding a Donor Choosing a Donor Profile Confirming Donor Details Entering Donor Mailing Information Entering Donor Address Information Entering Donor Phone/Email Information Selecting Donor Group Selecting Donor Mailing List Add Additional Donor Information Verify Donor Editing a Donor Tracking Additional Donor Information Formal and Informal Salutation Formal and Informal Addressee Donor Website Donor Picture Gender Marital Status Facebook Id LinkedIn URL Twitter Handle Multiple Addresses Multiple Phone Numbers Multiple Email Addresses Contact Preferences Employment Details Development Details Category Status Assigned To Source Member Since Renewal Date Accepts Match Match Info Issue Receipts Receipt Group Donor Groups Custom Fields Finding a Donor Deleting a Donor Related Actions Add a Note Add a File GiftWorks User Manual Page 45 of 373 Add a Relationship Mailing Tasks Add to a Mailing List Send Mail Print Label Print Envelope Send Message Other Tasks Run a Report Donors Dashboard GiftWorks User Manual Page 46 of 373 ADDING A DONOR You can add new individuals, households, or organizations to your GiftWorks database. Organizations can include companies, nonprofits, corporations, and foundations. Click any Add a Donor link (they appear throughout GiftWorks) to begin. Look under Other Tasks (on left) when on the main donor screen. Choosing a Donor Profile Select the donor profile type you want to add on the Add a Donor screen and click Next to continue. Donor with No Profile If you choose to add a donor with no profile, you will be prompted for the donor’s name. A donor with no profile can be an individual, an organization, or a household. GiftWorks User Manual Page 47 of 373 You can track information about organizations or households without having a profile applied to the donor record. When entering the name for a donor with no profile, you might enter “John Q. Smith,” “John and Mary Smith,” “The Smith Household,” or “XYZ Corporation.” As you continue through the process of adding the donor, GiftWorks makes a best guess as to how the pieces of the name you entered should be divided between all donor name fields. You can edit the values that GiftWorks puts in the fields. Donor with Household Profile If you add a donor with a household profile, you will be prompted for the household name. Examples of household names might be “John and Mary Smith” or “The Smith Household.” A GiftWorks household can be generally defined as a couple or family that gives to your organization as a unit. Typically, you will not need to track specific information about the members of a household, though you have the ability to do so in GiftWorks. Donor with Organization Profile If you add a donor with an organization profile, you will be prompted for the organization name. GiftWorks User Manual Page 48 of 373 When you click Next on the first Add a Donor screen, you will be taken to a second screen to confirm the details for the newly added donor. Confirming Donor Details On the second step of the Add a Donor process, confirm the name you’ve entered for the donor you are adding. This will include the display name, whether you want the new donor to be an affiliate donor, and possibly the organization name or individual name fields (such as first, middle, and last). Verify that the values displayed are what you want and click Next. Entering Donor Mailing Information On the third step of the Add a Donor process, enter and/or verify the values for the salutation and addressee fields for the donor you are adding. GiftWorks User Manual Page 49 of 373 Entering Donor Address Information On the fourth step of the Add a Donor process, enter the primary mailing address information for your donor. You can always add, remove, or edit this information later. Zip Code Lookup: For United States users, GiftWorks will provide the ability to fill in the city and state based on the zip code when adding or editing an address Check this address: This link allows you to validate the address information you entered. Entering Donor Phone/Email Information On the fifth step of the Add a Donor process, enter the primary phone and email information for your donor. You can always add, remove, or edit this information later. GiftWorks User Manual Page 50 of 373 Clicking on the Show more link will allow you to enter in 2nd and 3rd phone and email information. Selecting Donor Group On the sixth step of the Add a Donor process, select any groups you want to add the new donor to. Any default group selections made when setting up your database or in the Settings section will be preselected. GiftWorks User Manual Page 51 of 373 Selecting Donor Mailing List On the seventh step of the Add a Donor process, select any mailing lists you want to add the new donor to. Any default mailing list selections made when setting up your database or in the Settings section will be preselected. Add Additional Donor Information On the eighth step of the Add a Donor process you can choose to add additional fields to the add donor process. You will set up these fields in Settings / Customize /Manage Fields for Adding Donors. GiftWorks User Manual Page 52 of 373 Verify Donor The ninth step of the Add a Donor process gives you an opportunity to verify some of the information you’ve entered for the donor you are adding. You can click the Back button to go back to any previous step and change the data you’ve entered. Or you can click Finish to complete adding the new donor to your database. There are also links available to Add another donor, Add more details to the current donor, or Add a donation for the current donor. GiftWorks User Manual Page 53 of 373 EDITING A DONOR After you add a donor you can later choose Edit a Donor to change or add donor information. Click on the Edit this Donor option under Related Actions. Or click on the Edit Donor button at the bottom of the main donor screen. You can now edit any donor field from the next screen. GiftWorks User Manual Page 54 of 373 GiftWorks User Manual Page 55 of 373 You can change any of the Donor information on this screen. Click Save to save your changes or Cancel to leave this screen without saving your changes. To change the donor's Profile, click the Change Profile link at the top right. If you change the Display Name, Name, or Organization, GiftWorks will remind you to make changes to the Salutation and Addressee fields as necessary. GiftWorks User Manual Page 56 of 373 Multiple Donor Addresses STANDARD Click Add Address to add a donor mailing, informational, 2nd or 3rd address. One address must be designated as the Mailing Address. If you add an address and designate it as the Mailing Address during editing, saving it will overwrite the existing donor mailing address designation. PREMIUM Click Add Address to add Seasonal, Informational, 2nd or 3rd addresses for a donor. You may need to enter multiple addresses for donors who reside at different places during the year (for example if they have a summer home). Entering a seasonal address lets you send them mail at their different addresses throughout the year. GiftWorks User Manual Page 57 of 373 Each time you sign in, GiftWorks checks for any seasonal addresses that need to be activated based on the current date. All mailings sent from GiftWorks will be sent to the seasonal addresses specified to be active on the day of the mailing. When the time period ends, the current mailing address automatically changes back to the Primary Address. If a donor has more than one Seasonal Address or wants to receive mail at the Seasonal Address at different times throughout the year, you will need to add each of the Seasonal Addresses and corresponding time periods for the donor. The current mailing address is indicated in the Addresses field when a donor has multiple addresses. You can also add the Delivery Point code for donor addresses. The Delivery Point code can be imported into GiftWorks if the mailing addresses have been CASS-certified or can be manually entered. Click Save after editing donor information. TRACKING ADDITIONAL DONOR INFORMATION In addition to the donor’s name, GiftWorks lets you track a wide variety of information about each donor. The fields you can track for each donor are explained below. Formal and Informal Salutation The salutation fields are used to store information you would typically like to see after the “Dear” in a letter. You can store both formal and informal salutation values for each donor, which gives you flexibility for different types of communications. An example of salutations might be “Mr. Smith” for formal and “John” for informal for the donor John Smith. Formal and Informal Addressee The addressee fields are used to store information you would typically like to see at the top of a mailing address (above the address itself). The addressee fields can have up to two lines, so you can put both a contact name and an organization name, for example. The formal and informal addressee options give you flexibility for addressing letters for different purposes. Donor Website You can enter a website URL for your donor. For example: http://www.missionresearch.com Donor Picture You can select a picture to be displayed with your donor’s record. GiftWorks User Manual Page 58 of 373 It could be a picture of the donor or a logo for an organization. The picture can, optionally, be displayed when you are viewing the donor’s record and can be included in some reports. Gender You can enter in the Gender for your donor. Marital Status You can enter in the Marital Status of your donor. Facebook Id You can set up a link to your donor’s Facebook page. LinkedIn URL You can set up a link to your donor’s LinkedIn account Twitter Handle You can set up your donor’s Twitter account. Multiple Addresses For each donor, you can enter any number of addresses. STANDARD You must designate one address as the donor mailing address, which will be used as the current mailing address for mailings sent from GiftWorks. PREMIUM You can enter multiple addresses for each donor and include a Seasonal Address. A Seasonal Address is a mailing address for a donor that has a specified active time period. See Edit a Donor for more information. In addition to the Primary Mailing address, both Standard and Premium can have a 2nd Address, a 3rd Address and Informational Addresses. Multiple Phone Numbers For each donor, you can enter any number of phone numbers. Whichever one you designate as the primary phone number will be available for listing in SmartLists and reports. You can also choose a 2nd and 3rd phone number to appear in SmartLists and reports. Multiple Email Addresses For each donor, you can enter any number of email addresses. Whichever one you designate as the primary is the one to which emails from GiftWorks will be sent. You can also choose a 2nd and 3rd email address number to appear in SmartLists and reports. GiftWorks User Manual Page 59 of 373 Contact Preferences GiftWorks tracks a number of contact preferences for each donor. For email, phone, physical mail and solicitation you can choose whether it is okay to contact the donor via that method, whether they prefer not to be emailed, called, mailed or solicited, , or if they have no preference. You can also indicate whether the donor wishes their contact information to be private, and you can indicate the donor’s preferred time of day and method of contact. Employment Details GiftWorks lets you track the following information regarding a donor’s employment: Job Title Profession Manager Contact Type Department Assistant Development Details For each donor, you can track a variety of information relating to your development and cultivation efforts. These include: Category Status Assigned To Source Member Since Renewal Date Accepts Match Match Info Issue Receipts Receipt Group Donor Groups Category Donor categories give you a way to further classify your donors. For example, you may want to divide your organizations into corporations, foundations, government agencies, and other categories. You can then use this information to create SmartLists of, for instance, all of the foundations in your database. Status Use the donor status field to record and track the donor’s current status with regard to your organization. Sample values include active, inactive, and deceased. Assigned To The Assigned To field is included in each donor record, and allows you to designate a person the donor is assigned to. This may be an employee or board member, for example. The Assigned To designation might be used for the person primarily responsible for contacting or soliciting a donor. GiftWorks User Manual Page 60 of 373 Source Use the Source field to track how your donor was obtained. Examples of this could be a specific mailing or an Event or from your website. Member Since Use the field to track how long your donors have been Members Renewal Date Use this field to track when your donors Membership expires. Accepts Match Use this field to track if your donor accepts matched gifts. Match Info Use this field to enter any notes about the Match Issue Receipts Use this field to control whether or not the donor should be issued Receipts for their donations. Receipt Group Use this field to control what Receipt Group the donations will be added to for Receipt mailings. Donor Groups These fields appear in each donor record, but they differ from other donor fields in that you can select any number of groups for each donor. Each donor can be in as many or as few groups as you need. This gives you an easy way to designate groups of donors like board members, golf tournament sponsors, or members. See Settings section for additional information. Custom Fields Each GiftWorks donor record includes over 40 fields for recording information about that donor, but organizations often want to track other information about their donors. GiftWorks includes the ability to add custom fields to donor records. See Settings section for additional information. FINDING A DONOR You can search for any donor by typing search information into the Find Donor box in the bottom left corner of GiftWorks and clicking Go. You can enter all or part of a donor’s name. GiftWorks will find all donors that contain what you enter. By default, GiftWorks will search first name, last name, organization, and display name. GiftWorks User Manual Page 61 of 373 To search additional fields, click the Advanced Search link at the bottom left corner of GiftWorks. In the advanced search window, choose which fields to search, including all Name fields, Address fields, Email Address, Phone Number, Notes, File Title, Donor Id, Nickname and any textbox donor custom fields you have added. There is also an option to “include names that sound like” when searching by the Name field. DELETING A DONOR Use this option to delete a donor from your database. Click on Delete this Donor under Other Tasks. You will see the following message and must confirm that you want to delete the donor. Note- if you delete a donor, they will be held in the Deleted Donors area in Settings / Database, Files and Maintenance / Delete Information from Your Database / Manage Deleted Donors. You will need to permanently delete the donor from that area for their history to be removed from your database. GiftWorks User Manual Page 62 of 373 RELATED ACTIONS There are many options to choose from under the Related Actions area located on the left side of the screen. See the Managing Tasks, Managing Donations and Managing Pledges sections of this manual for those features. Add a Note: You can add Notes to your donor profile. If the Note is something specific that you would need to see as soon as you view the donor, you can check the Critical Note box. GiftWorks User Manual Page 63 of 373 When you view the donor you will see a prompt appear, notifying you of the critical notes. The donor’s Notes, Tasks & Files tab will also now be red. You can customize your Note Titles in Settings / Customize / Change GiftWorks Fields. Add a File: You can attach files to your donor profiles. Note: If you do not see the Add a File option, you will need to go to Settings and turn that feature on. GiftWorks User Manual Page 64 of 373 When you click on the Notes, Tasks & Files tab, you can choose the Filter/Sort Options that best suit you. Add a Relationship: You can create Relationships to link your donor to another donor in your database. You can customize your Relationship Roles in Settings / Customize / Change GiftWorks Fields. GiftWorks User Manual Page 65 of 373 MAILING TASKS The Mailing Tasks area allows you to easily process mailings from the main donor screen. Add to a Mailing List: Add a donor to an existing Mailing list from this option. See the Mailing Center section for more details on Mailing Lists. GiftWorks User Manual Page 66 of 373 Send Mail: Send mail easily from this area. Send Mail>To this Donor: This option will start the mailing process and allow you to send a letter from the Donors section of the Letter Library. Send Mail>About this Donor’s Donations: This option allows you to pick a date range to use to send a letter based on those donations for this donor. GiftWorks User Manual Page 67 of 373 Click Next. This will start the mailing process and allow you to send a letter from the Donations section of the Letter Library. Send Mail>About this Donor’s Pledges: This option allows you to pick a date range to use to send a letter based on those pledges for this donor. Click Next. This will start the mailing process and allow you to send a letter from the Pledges section of the Letter Library. Send Mail>Quick Email: This option allows you to quickly send an email to this donor. GiftWorks User Manual Page 68 of 373 Send Mail>Quick Mail: This option allows you to quickly create and print a letter for this donor. Print Label: This option allows you to quickly create and print a label for this donor. GiftWorks User Manual Page 69 of 373 Print Envelope: This option allows you to quickly create and print an envelope for this donor. Send Message: This option allows you to quickly send a message to this donor via Facebook and Twitter. Click on the message type you wish to send and you will be walked through the rest of the steps. GiftWorks User Manual Page 70 of 373 OTHER TASKS This area allows you to quickly run Reports, Delete a donor or Add a Donor. Run a Report: Use the option to run a report for this donor. GiftWorks User Manual Page 71 of 373 Donors Dashboard The Donors Dashboard gives you a quick glance at your donor information. You can access the Donors Dashboard by clicking on the Donors icon at the top of your screen. Click on the View Donors Dashboard link Below is the Donors Dashboard Each GiftWorks user can customize their view of the Donors Dashboard. GiftWorks User Manual Page 72 of 373 GiftWorks User Manual Page 73 of 373 DONATIONS OVERVIEW IN THIS SECTION Donations Overview GiftWorks User Manual Page 74 of 373 DONATIONS OVERVIEW Donations are a vital source of revenue, and accurately tracking them is an essential function for your nonprofit. Tracking how donations were made, why they were made, and who made them helps you refine your fundraising processes and can increase both the amounts you raise per donor and the number of people who donate. GiftWorks defines a donation as a “gift” or “pledge payment” made to your organization, not including receivables. Payment types include money, in-kind contributions, and securities. You can also add custom payment types. With GiftWorks, adding a donation is easy and straightforward—just click on any Add a Donation link in the menu on the left side and follow the instructions. GiftWorks lets you to track donations, matching gifts, memorials, campaigns, and giving histories. GiftWorks optionally lets you add the donation to the Receipts mailing as well as Thank You Letters mailing list so you can easily receipt and acknowledge your donors. Using the power of SmartLists, you can view the All Donations SmartLists, or create a SmartList of donations based on criteria you choose. For instance, you can create a SmartList of donations over $500 from Pennsylvania donors, then save the list as “PA Donors Over $500.” Any time you want to see those donations, just click on the list. As you add new donations that meet those criteria, their donors will appear in that SmartList. GiftWorks User Manual Page 75 of 373 MANAGING DONATIONS IN THIS SECTION Adding a Donation Selecting a Donor Selecting Donation Type Entering Gift Details Indicating Donation Options Acknowledging Donations Completing and Editing Donations Saving Donations Soft-Credit Recognitions Viewing and Editing Donations Deleting a Donation Related Actions Other Tasks Donations Dashboard GiftWorks User Manual Page 76 of 373 ADDING A DONATION You can add unlimited donations for each donor in GiftWorks, and you can record a great degree of detail about each donation, making analysis more accurate, meaningful, and comprehensive. Each donation is tracked in the donation history of the donor and as part of your organization’s donations. There are a number of ways to add a donation for a donor. You can view a specific donor and choose Add a Donation from the Related Actions menu. You can also click on the Donations icon at the top of the screen then click Add a Donation in the Donations Overview area. Selecting a Donor To add a donation, you must first tell GiftWorks who is giving it. Using the search box provided, enter the name of the donor giving the donation. GiftWorks User Manual Page 77 of 373 If the donor has not yet been added to GiftWorks, click Add a New Donor at the bottom of the window. Once you have selected a donor, click Next to continue. Selecting Donation Type If the donor has outstanding payments due on a pledge, you must choose the donation type for your entry. Click Add a Gift, then click Next to continue. Entering Gift Details To enter a donation, you must enter fund and payment details for your donation, including the following information. Assign To Fund: Funds identify how the donation will be allocated within your organization. You can choose to assign the entire donation to one fund, or you can split it between multiple funds. To apply a gift to multiple funds, click Select Funds beside the Assign To Fund field. Click the checkbox in the Include column beside each fund you want to assign a portion of the fund to. Assign an amount to 50each of those funds by clicking the box in the Amount column next to the fund and entering the desired amount. Summary information is included at the bottom of the window, showing the GiftWorks User Manual Page 78 of 373 unassigned donation amount and ensuring that you allocate the correct total amount. See the Manage Accounts and Funds area in the Settings section for more details. Gift Amount: Here you enter the donation amount. You can use a different amount for your donation receipt by clicking the checkbox below the amount. If you use a different amount for the donation receipt, you must indicate that amount on the next page. Payment Type: Select the payment method for the donation. Payment types include money, in-kind contributions, and securities. If you select a payment method other than cash, a Payment Detail page with additional fields will appear. For example, for donations made in the form of equipment, you can enter a description of the equipment, the manufacturer, the model, serial number, and condition of the equipment. To customize the Payment Types, go to Settings / Customize / Change GiftWorks Fields . Indicating Donation Options You can indicate if the gift is given in honor of or in memory of someone, and if the gift will be matched by a donor. You can add memorials and honoraria in Settings or choose the ‘Add new honorarium/memorial’ option from the dropdown list when adding the donation. See the Managing Honoraria and Memorials section for more details. Acknowledging / Receipting Donations You can choose a method to thank the donor for the gift by clicking the desired acknowledgment method. GiftWorks User Manual Page 79 of 373 Add to ‘Thank You Letters’ mailing list: This option adds the donor to the Donation Thank You Letters mailing. You can send your Donation Thank You letters from the Mailings section at any time. If you choose this option, the donation can automatically be set as “Acknowledged” once the mailing has been completed. Acknowledge Later: If you choose to acknowledge later, GiftWorks will not add the donor to the Donation Thank You Letters mailing list. You can acknowledge the donation later from the donation view. Other: Select from four other acknowledgement methods, including phone call, thank you note, in person, and thank you gift, or enter your own information for how the gift was acknowledged. Indicate the date of the acknowledgment using the date field provided. Receipt Information: Choose whether or not you want to issue a Receipt for this donation. If so, choose the Receipt Group to add the donation to. Completing Donation After entering a donation, a screen appears that shows the full donation. You can add additional details about the donation here. GiftWorks User Manual Page 80 of 373 Saving Donations Review the information that is entered, then click Save to save the donation. After you have saved the donation, and if you chose to Acknowledge Later in the Add a Donation process, you can choose a method here by clicking Acknowledge Now. GiftWorks User Manual Page 81 of 373 SOFT-CREDIT RECOGNITION Soft credit donation recognition refers to assigning credit for a donation to one or more donors who cannot be credited for the gift from a legal or tax-credit standpoint but in some way influenced the donation. One common example is when a donor gives a gift through a charitable foundation. The charitable foundation is the legal donor and needs to be issued the receipt but the donor designating the gift needs to be recognized. GiftWorks will allow soft credit donors to be assigned when adding a donation and provide an easy way to acknowledge these donations in a mailing. Soft credit donations will be able to be displayed when viewing a donor’s giving history. In addition, soft credit donations will be available on certain reports and be optionally included in total giving for certain SmartList criteria and reports. **You cannot apply Soft-Credit to an Affiliate donor- it will change then to a “donor” To add a Soft Credit: On the ‘full page’ add donation screen, you can scroll down to the ‘Soft-Credit Recognition’ area: Click the ‘Add Soft-Credit” button, then click on the ‘Select a Donor’ link: Choose the donor to apply the Soft-Credit to and the amount. GiftWorks User Manual Page 82 of 373 You can also choose to add the Soft-Credit to the Soft-Credit Thank You Letters Mailing List You will see the Soft-Credit information listed here when adding or editing a donation: You will see the Soft-Credit information listed here when viewing a donation: GiftWorks User Manual Page 83 of 373 VIEWING AND EDITING DONATIONS There are a number of options for viewing and editing your donations. The items listed below offer detail about all of your options. Viewing the Main Donations Page When you click the Donations icon at the top of GiftWorks, you will see either the Donations Overview or the Donations Dashboard, depending on which you have chosen. To change this option: If you see the Donations Overview, you can click the Skip this screen… checkbox. The next time you click the Donations icon at the top, you will be taken to the Donations Dashboard. If you see the Donations Dashboard, click Show Donations Overview in the Other Tasks menu, then click the Skip this screen… checkbox to uncheck it. The next time you click on the Donations icon at the top, you will be taken to the Donations Overview. On the Donations Dashboard, you can choose from a variety of views to get a quick glance at the donation information you want. Click the arrow next to the “view” name to make your selection. Each view shows the donor name, campaign allocation, and fund for each donation. Additional columns vary by view. You can sort your view by clicking the column headings. GiftWorks User Manual Page 84 of 373 Latest Donations: The last 20 gifts and pledge payments added to your database. Top 10 Donations: The 10 largest donations made to your organization. You can open an individual donation from any of these views by double-clicking the donation in your view. Viewing a Donor’s Donation Summary You can view a summary of the donations by a donor when you view the donor. When viewing a donor, click the Donations tab at the top of the main work area. Donations Tab - Donation History: Options (This is PER GiftWorks USER) Can choose to Include Donations Only, Include soft-credit recognitions only, or Include both donations and soft-credits GiftWorks User Manual Page 85 of 373 Donations Tab-Donation List: Options (This is PER GiftWorks USER) Can choose to Include Donations Only, Include soft-credit recognitions only, or Include both donations and soft-credits The top of this view provides a summary of the donor’s giving history. You can see how long the donor has been a donor, the total amount pledged to your organization, the largest donation the donor has made to your organization, the total number of donations you have received from the donor, the total amount you have received from the donor, and the average donation amount. The bottom portion of this view lists all the donor’s pledges and gifts to your organization. Pledges and gifts are distinguished by the Donation Type column, and the date that the donation was given is noted in the Date column. The Expected column will display the amount Expected for a Pledge or Pledge Payment. The Received column will display the amount that has been received for the donation or pledge payment. The Outstanding column will display the amount that has not yet been received on a pledge. The Household Member column displays the name of the Household member for whom that donation was entered for. You can view the details of a donation by clicking on the View Gift link beside the donation. From the Detail view, you can edit your donation. GiftWorks User Manual Page 86 of 373 A Donation is divided into four sections. You can edit the donation by clicking Edit Gift at the bottom of the main work area. Summary and Comparison Chart: The summary information for the donation includes a link to the corresponding donor and the current payment status. The comparison pie chart provides a visual that GiftWorks User Manual Page 87 of 373 indicates the monetary significance of the gift against all other donations and payments made by the donor. Payment Details: This section shows the date the payment donation was made, the fund to which the payment is applied, the payment type and the payment amount. Donation Information: Donation information shows the defined details of your gift, including campaign and appeal attribution, donor anonymity, solicitor, honorarium and memorial information, and more. Custom Fields: This section contains the custom donation fields that you added in the Settings section. Soft-Credit Recognition: This section details Soft credit donation recognition information. Acknowledgment / Receipt Information: This section details the acknowledgment method you chose for the donation and the current status of that acknowledgment. It also shows the receipt status for the donation. If you have not acknowledged the gift, you can do so by clicking the Acknowledge Now link. DELETING A DONATION You can delete a donation from the Gift Details screen. When viewing the donation, click on the Delete this Gift option under Related Actions. This action will void all transaction associated with that donation. Note- if you delete a donation, it will be held in the Deleted Donations area in Settings / Database, Files and Maintenance / Delete Information from Your Database / Manage Deleted Donations. You will need to permanently delete the donation from that area for the history to be removed from your database. GiftWorks User Manual Page 88 of 373 RELATED ACTIONS When viewing the Gift Details screen, you will see the following options under Related Actions, Edit this Gift – click this option to edit the donation. Send Mail- you can send mail to this donor or for this donation. Send Mail>To this donor: this will start the mailing process and give you access to the letters in the DONOR section of the Letter Library. Send Mail>To this donation: this will start the mailing process and give you access to the letters in the DONATION section of the Letter Library. OTHER TASKS When viewing a Donation you can easily add a donation or add a pledge from the Other Tasks area. DONATIONS DASHBOARD The Donations Dashboard gives you a quick glance at your donor information. You can access the Donations Dashboard by clicking on the Donations icon at the top of your screen. Click on the View Donations Dashboard link GiftWorks User Manual Page 89 of 373 Below is the Donations Dashboard. Each GiftWorks user can customize their view of the Donations Dashboard. GiftWorks User Manual Page 90 of 373 PLEDGES OVERVIEW IN THIS SECTION Pledges Overview GiftWorks User Manual Page 91 of 373 PLEDGES OVERVIEW GiftWorks defines a pledge as a commitment made by a donor to your organization to donate a specified amount on a future date or dates. Pledge payments can be spread out over time. Each payment toward a pledge is recognized as a donation. Add pledges from a donor record through the Add a Pledge process. Apply pledge payments through the Add a Donation process or directly from the pledge. You can add multiple pledges for each donor in your GiftWorks database. Each pledge contains the pledge payment schedule, including received, scheduled, overdue payments, and other pledge information. You can apply payments to pledges, and create reports to view received payments versus expected payments. Each pledge is a part of the pledge history of the donor. Each time you add a pledge for a donor, you can choose to add the donor to a “Pledge Thank You Letters” mailing list. Also, each time you apply a payment to a pledge, You have the option to control the Acknowledgement and Receipting options. These mailings are ready to send in the Mailings section of GiftWorks. With GiftWorks, adding a pledge is easy and straightforward—just click any Add a Pledge option in the menu on the left side and follow the instructions. GiftWorks optionally lets you add the pledge to the Pledge Thank You Letters mailing list and the pledge payments to the Receipts mailing so you can easily receipt and acknowledge your donors. GiftWorks User Manual Page 92 of 373 MANAGING PLEDGES IN THIS SECTION Adding a Pledge Selecting a Donor Entering Pledge Details Specifying Pledge Payment Schedule Acknowledging Pledges Completing and Editing Pledges Saving Pledges Applying a Pledge Payment Selecting a Donor Selecting Donation Type Applying a Payment to a Pledge Entering Pledge Payment Details Specifying Donation Options Acknowledging Pledges Confirming Payment Summary Soft-Credit Recognition Viewing and Editing Pledges Related Actions Deleting a Pledge Other Tasks Viewing and Editing Pledge Payments Related Actions Deleting a Pledge Payment Other Tasks GiftWorks User Manual Page 93 of 373 ADDING A PLEDGE There are two ways to add a pledge to your database. You can first view a donor then click on Add a Pledge from the Related Actions menu on the left. Or you can click the Donations icon at the top of GiftWorks, then click on Add a Pledge in the Donations Overview area. Selecting a Donor Using the search box provided, you can find and select an existing donor. If the donor has not yet been added to your database, you can add a new donor by clicking the Add a Donor link at the bottom of the window. GiftWorks User Manual Page 94 of 373 Entering Pledge Details You are required to enter the date that the pledge was made and the total amount pledged. You can also indicate the number of payments that will be made on the pledge as well as the Expected Payment Type. Specifying Pledge Payment Schedule If there will be more than one payment made on the pledge, you must specify a schedule for payment. Indicate when you will receive the first payment using the First Payment Date selection box. GiftWorks User Manual Page 95 of 373 Then select a payment frequency from the list provided. This describes how frequently you will receive payments on the pledge. An Approximate Payment Schedule based on the selection you make will appear. Acknowledging Pledges You can choose a method to thank the donor for the pledge. Click the desired acknowledgment method from the following: Add to “Thank You Letters” mailing list: Choosing this option will add the donor to the “Pledge Thank You Letters” mailing. Simply go to the Mailings section of GiftWorks and proceed with the pledge mailing process to send the letter. If you choose this option, the donation can automatically be set as “Acknowledged” once the mailing has been completed. Acknowledge Later: If you choose to acknowledge later, you will be able to choose a method of acknowledgment for the pledge later. Other: This option lets you choose a method of acknowledgment that is not related to mailing. You can select from four other methods, including phone call, thank you note, in person, and thank you, or enter your own information for how the gift was acknowledged. Indicate the date of the acknowledgment using the date field provided. Completing Pledge After entering a pledge, a screen appears that shows the full pledge. You can add additional details about the pledge here. GiftWorks User Manual Page 96 of 373 Saving Pledges Review the information that is entered, then click Save to save the pledge. After you have saved the pledge, and if you chose to Acknowledge Later in the Add a Pledge process, you can choose a method here by clicking Acknowledge Now. APPLYING A PLEDGE PAYMENT GiftWorks User Manual Page 97 of 373 There are two ways to apply a payment to a pledge. You can apply the payment through the Add a Donation process, or by opening the pledge and clicking Apply Payment next to the appropriate payment. To apply a payment through the Add a Donation process, click Add a Donation from the Related Actions menu on the left and follow the instructions. Selecting a Donor Using the available search box, you can find and select an existing donor for the donation. Once you have selected a donor, click Next to continue. Selecting Donation Type This part of the process lets you choose the donation type for your entry. Click Apply a Payment and click Next to continue. Donations can be “gifts” or “pledge payments.” Either way, donation types are only for “received” donations. Applying a Payment to a Pledge You must choose a pledge payment from a list of the donor’s open pledges. Select the pledge to which the received payment applies and click Next to continue. GiftWorks User Manual Page 98 of 373 Entering Pledge Payment Details This part of adding a pledge allows you to enter donation fund and payment details for your pledge payment. Actual Payment Date: You can change the date the payment was made if it differs from the scheduled due date. Assign to Fund (Directed Gifts): You can choose to assign the entire donation to one fund, or split it between multiple funds. Set up your own funds by going to Settings / Accounting / Manage Accounts and Funds To direct a payment to multiple funds, click the Select Funds link beside the Assign to Fund field. Click the checkbox in the Include column beside each fund to which you want to assign a portion of the fund. Assign a specific amount to each of those funds by clicking the box in the Amount column next to the fund and entering the desired amount. Summary information is included at the bottom of the window, showing the unassigned donation amount. This ensures that you allocate the correct total amount. GiftWorks User Manual Page 99 of 373 Actual Payment Amount: You can indicate if the donor is making a payment amount that is different from the amount anticipated. Note that you can use a different amount for your donation receipt by clicking the checkbox provided If applying a payment amount that is different from the anticipated payment, an adjustment page will appear after you click Next. GiftWorks gives different options for an adjustment depending on the amount of the payment relative to the expected amount. If the payment amount is less than expected you will see the following options: GiftWorks User Manual Page 100 of 373 If the payment amount is more than expected you will see the following options: GiftWorks User Manual Page 101 of 373 GiftWorks User Manual Page 102 of 373 Payment Type: Select the payment type for the donation. Default payment types include money, in-kind contributions, and securities. If you select a payment type other than cash, a Payment Detail page with additional fields will appear. Enter the details about the payment. For example, for donations made in the form of equipment you can enter a description of the equipment, the manufacturer, the model, serial number, and condition of the equipment. Specifying Donation Options This step of the process lets you choose to match the gift by another donor, if applicable. Acknowledgment / Receipting Pledges You can choose a method to thank the donor for the pledge payment. Click the desired acknowledgment method and click Next to continue. GiftWorks User Manual Page 103 of 373 Add to “Thank You Letters” mailing list: Choosing this option adds the donation to the “Donation Thank You Letters” mailing. Simply go to the Mailings section of GiftWorks and proceed with the donation mailing process to send the letter. If you choose this option, the donation can automatically be set as “Acknowledged” once the mailing has been completed. Acknowledge Later: If you choose to acknowledge later, you will be able to choose a method of acknowledgment for the donation later. Other: This option lets you choose a method of acknowledgment not related to mailing. You can select from four other methods, including phone call, thank you note, in person, and thank you gift, or enter your own information for how the gift was acknowledged. Indicate the date of the acknowledgment using the date field provided. Receipt Information: Choose whether or not you want to issue a Receipt for this pledge payment. If so, choose the Receipt Group to add the pledge payment to. Confirming Payment Summary After entering a pledge payment, there is a summary of the pledge payment information you have entered. Click Finish to confirm the summary information and complete the payment. GiftWorks User Manual Page 104 of 373 SOFT-CREDIT RECOGNITION In order to apply soft-credit recognition, you must first apply the pledge payment and then “edit” the payment. Then follow same steps to apply Soft-Credit for a donation. See the Managing Donations section for more details. VIEWING AND EDITING PLEDGES There are a number of options for viewing and editing your pledges. The items listed below offer detail about all of your options. Viewing the Main Donations Page When you click the Donations icon at the top of GiftWorks, you will see either the Donations Overview or the Donations Dashboard, depending on which you have chosen. To change this option: If you see the Donations Overview, you can click the Skip this screen… checkbox. The next time you click the Donations icon at the top, you will be taken to the Donations Dashboard. If you see the Donations Dashboard, click Show Donations Overview in the Other Tasks menu, then click the Skip this screen… checkbox to uncheck it. The next time you click on the Donations icon at the top, you will be taken to the Donations Overview. On the Donations Dashboard, you can choose from a variety of views to get a quick glance at the pledge information you want. Click the arrow next to the “view” name to make your selection. Each view shows GiftWorks User Manual Page 105 of 373 the donor name, campaign allocation, and fund for each pledge. Additional columns vary by view. You can sort your view by clicking the column headings. Latest Pledges: The last 20 pledges added to your database. Upcoming Payments: The next 20 scheduled payments you are expecting to receive. Overdue Payments: The list of expected pledge payments that are overdue. You can open an individual pledge from any of these views by double-clicking the pledge in your view. Viewing a Donor’s Donation Summary You can view a summary of the pledges, pledge payments, and gifts by a donor when you view the donor. When viewing a donor, click the Donations tab at the top of the main work area. Donations Tab - Donation History: Options (This is PER GiftWorks USER) Can choose to Include Donations Only, Include soft-credit recognitions only, or include both donations and soft-credits GiftWorks User Manual Page 106 of 373 Donations Tab-Donation List: Options (This is PER GiftWorks USER) Can choose to Include Donations Only, Include soft-credit recognitions only, or Include both donations and soft-credits The top of this view provides a summary of the donor’s giving history. You can see how long the donor has been a donor, the total amount pledged to your organization, the largest donation the donor has made to your organization, the total number of donations you have received from the donor, the total amount you have received from the donor, and the average donation amount. The bottom portion of this view lists all the donor’s pledges and gifts to your organization. Pledges and gifts are distinguished by the Donation Type column, and the date that the donation was given is noted in the Date column. The Expected column will display the amount Expected for a Pledge or Pledge Payment. The Received column will display the amount that has been received for the donation or pledge payment. The Outstanding column will display the amount that has not yet been received on a pledge. The Household Member column displays the name of the Household member for whom that donation was entered for. Pledges show the scheduled payment dates and the expected and received (if any) amounts for each payment. You can view the detailed individual pledges by clicking the View Pledge link beside the pledge. From the Detail view, you can edit your pledge. GiftWorks User Manual Page 107 of 373 A Pledge is divided into four sections. You can edit the pledge by clicking Edit Pledge at the bottom of the main work area. Summary and Payments: The summary information on a pledge includes a link to the corresponding donor and the current status of expected payments on the pledge. The payments information lists the schedule of pledge payments for the pledge, including the expected date of payment and the amount GiftWorks User Manual Page 108 of 373 that you expect to receive. Additionally, you can view individual pledge payments for each fulfilled payment by clicking its link. Modify or remove a scheduled payment by clicking the payment and then clicking Modify or Remove. Payment modifications allow you to change the payment amount, the payment date, or the payment type. Apply payments to the pledge by clicking Apply Payment beside the appropriate scheduled payment. To change the amount of the pledge, you can either add an additional payment, or modify the amount of one of the existing un-received payments. Note that you cannot remove or edit a payment that has already been entered into GiftWorks as received. You must first go to that payment and delete it, then return to this pledge screen. To do so, click Cancel, then click on the linked payment listing and then click Delete this Payment in the Related Actions menu. You also cannot remove any pledge payment (received or expected) from this screen once the pledge’s details have been posted to QuickBooks or to a file. To remove such a payment, click Cancel, then click on the linked payment listing and then click Delete this Payment in the Related Actions menu. The payment type will be set to what you chose as your default payment type under Settings/Customize GiftWorks/Change Default Values for GiftWorks Fields. Payment type details are specified when you apply a payment. You can also add a new scheduled payment by clicking Add Scheduled Payment, but doing so will increase the total pledged amount. Pledge Information: Pledge information shows the details of your pledge, including fund allocation, campaign and appeal attribution, donor anonymity, pledge status, honorarium and memorial information, and more. Custom Fields: This section contains the custom donation fields that you added in the Settings section. Acknowledgment/Receipt Information:: This section details the acknowledgment method you chose for the pledge and the current status of that acknowledgment. If you have not acknowledged the pledge, you can do so by clicking the Acknowledge Now link. This section also shows you the Receipt option you have chosen. RELATED ACTIONS When viewing a Pledge you will see the following options under Related Actions. You can Edit a pledge, Delete the pledge or Send Mail. GiftWorks User Manual Page 109 of 373 Delete this Pledge-this feature will delete the pledge and void all of the transactions associated with each of its payments. Note- if you delete a pledge, it will be held in the Deleted Donations area in Settings / Database, Files and Maintenance / Delete Information from Your Database / Manage Deleted Donations. You will need to permanently delete the pledge from that area for the history to be removed from your database. Send Mail- you can send mail to this donor or for this pledge. Send Mail>To this donor: this will start the mailing process and give you access to the letters in the DONOR section of the Letter Library. Send Mail>To this pledge: this will start the mailing process and give you access to the letters in the PLEDGE section of the Letter Library. OTHER TASKS When viewing a Pledge you can easily add a donation or add a pledge from the Other Tasks area. VIEWING AND EDITING PLEDGE PAYMENTS View a pledge payment by first opening the pledge to which the payment applies. GiftWorks User Manual Page 110 of 373 Next, click on the pledge payment’s link located at the top of the main work area in the Payments section. A pledge payment is divided into five sections. You can edit the payment in the same ways that you edit a gift/donation—by clicking Edit Payment at the bottom of the main work area Summary and Comparison Chart: The summary information includes a link to the corresponding donor and a link to the corresponding pledge. The current status of the payment is also shown. The comparison pie chart provides a visual that indicates the monetary significance of the payment against all other donations and payments made by the donor. Payment Details: This section shows the date that the payment was applied to its pledge, the fund to which the payment is applied, the payment type, and the payment amount. Donation Information: Donation information shows the defined details of your payment, including campaign and appeal attribution, donor anonymity, solicitor, honorarium and memorial information, and more. Custom Fields: This section contains the custom donation fields that you added in the Settings section. Acknowledgment / Receipt Information:: This section details the acknowledgment method you chose for the pledge payment and the current status of that acknowledgment. It also shows the receipt status for the payment. If you have not acknowledged the payment, you can do so by clicking the Acknowledge Now link. RELATED ACTIONS When viewing a Pledge Payment you will see the following options under Related Actions. GiftWorks User Manual Page 111 of 373 You can View Pledge, Delete the payment, Edit this payment or Send Mail. Delete this Payment-this feature will delete all of the transactions associated with the pledge payment. Note- if you delete a pledge payment, they will be held in the Deleted Donations area in Settings / Database, Files and Maintenance / Delete Information from Your Database / Manage Deleted Donations. You will need to permanently delete the payment from that area for the history to be removed from your database. Send Mail- you can send mail to this donor or for this donation (once the pledge payment is received, GiftWorks considers it a donation). Send Mail>To this donor: this will start the mailing process and give you access to the letters in the DONOR section of the Letter Library. Send Mail>To this donation: this will start the mailing process and give you access to the letters in the DONATION section of the Letter Library. OTHER TASKS When viewing a Pledge Payment you can easily add a donation or add a pledge from the Other Tasks area. GiftWorks User Manual Page 112 of 373 MANAGING HONORARIA AND MEMORIALS IN THIS SECTION GiftWorks Honoraria and Memorials Overview Adding Honoraria and Memorials Editing Honoraria and Memorials Deleting Honoraria and Memorials Hiding Honoraria and Memorials Sorting Your View of Honoraria and Memorials Adding a Donation in Honor of/In Memory of Adding a Pledge in Honor of/In Memory of Acknowledging and Receipting Honorarium and Memorial Donations Sending Honorarium and Memorial Notifications GiftWorks User Manual Page 113 of 373 GIFTWORKS HONORARIA AND MEMORIALS OVERVIEW From time to time, people may make donations to your organization in honor or in memory of someone or something. GiftWorks helps you distinguish donations like these from other donations with honorarium and memorial options. GiftWorks makes honoraria and memorials a standard part of donation tracking. When you add honoraria and memorials to your GiftWorks database, you can record a donation as a gift given in honor or in memory of someone. Each time an honorarium or memorial is accredited with a donation or pledge, you can acknowledge the donor and notify donors associated with the honorarium or memorial (for example family members). The items listed below show you how to create, edit, and delete honoraria and memorials. They also show you how to add a donation made in honor or in memory of someone, how to acknowledge the donation, and how to notify necessary donors of the donation. ADDING HONORARIA AND MEMORIALS To add a donation given in honor or in memory of someone, you can either add an honorarium or memorial in the Settings area or add an honorarium or memorial as you enter the donation. To do this in Settings, click the Settings icon at the top of your screen, then click the Additional Settings & Tools link in the main work area. Next, click the Manage Honoraria and Memorials link in the main work area GiftWorks User Manual Page 114 of 373 The resulting screen offers a view of all honoraria and memorials you have created. The view includes the name, title and description of each honorarium and memorial, the display status of each record, and a count of donors that should be notified each time a donation is accredited to the honorarium or memorial. The display column indicates if that honorarium or memorial is visible or hidden from the selection box that appears each time you add a donation. From this view, you have the ability to add new honoraria and memorials, show or hide the memorials or honoraria and sort the list. To add a new honorarium or memorial, click Add in the main work area of the Manage Honoraria and Memorials screen. GiftWorks User Manual Page 115 of 373 In the window that appears, assign a name, title and description to your honorarium or memorial. Note that the title should begin with “In honor of” or “In memory of.” This ensures that the information for you honorarium or memorial merges seamlessly into your honorarium or memorial letter templates. Hove your mouse over the “more” link next to the Honorarium/ Memorial Name field and the Honorarium/ Memorial Title field to see more information on these fields. You can enter a brief description in the description box. At the bottom of the window, you can add donors to the notification list. Each time a donation is accredited to the honorarium or memorial, these donors will be queued for notification. Click Add Donor, and using the search field provided, find or select a donor from your GiftWorks database or add a new donor. You can enter in as many donors to notify as needed. GiftWorks User Manual Page 116 of 373 You can also remove donors (if any) from the notification list by clicking the red X beside their names. Click the checkbox beside Visible in the Add an Honorarium/Memorial window to indicate that you want to be able to choose the honorarium or memorial when you add new donations. When you are finished, click Save. GiftWorks User Manual Page 117 of 373 EDITING HONORARIA AND MEMORIALS When editing an honoraria or memorial, you can change its name, title and description, add or remove donors for notification, and hide or show the record when new donations are being added. To edit an honoraria or memorial, click the record you want to change and then click Edit. Change the existing name, title or description by typing in the appropriate text boxes. Add new donors to the notification list by clicking Add Donor. Remove a donor from the notification list by clicking the red X beside the donor name. Change the record’s display status for new donations added in honor or in memory of someone by clicking the checkbox beside Visible. Once you have made your changes, click Save. DELETING HONORARIA AND MEMORIALS GiftWorks User Manual Page 118 of 373 To delete an honoraria or memorial, click the desired record title, then click on the Delete button. You will need to confirm this action. HIDING HONORARIA AND MEMORIALS The Display column in your Honoraria/Memorials view indicates the current display status for your records. Visible records can be selected each time you indicate that a new donation is given in honor or in memory of someone. Hidden records are not available in the selection box. To hide a record that is currently visible, click the record and then click Hide on the right side of your screen. To show a record that is currently hidden, click the record and then click Show on the right side of your screen. GiftWorks User Manual Page 119 of 373 Sorting Your View of Honoraria and Memorials You can move an individual record in your view up or down by clicking on the record and clicking Up or Down on the right side of your screen. Sort the records by title by clicking the Sort button. Clicking Sort again will sort them in reverse order by title. In the Add a Donation/Add a Pledge process, you can specify if the new donation or pledge is given in honor or in memory of someone. GiftWorks will log this information in the donation or pledge record. Accrediting an honorarium or memorial allows you to thank the donor as well as notify the donors associated with the honorarium or memorial. To add a donation or pledge made in honor or in memory of someone, you can either add an honorarium or memorial in the Settings area (as mentioned above) or add an honorarium or memorial as you enter the donation. ADDING A DONATION IN HONOR OF/IN MEMORY OF Click Add a Donation in the Related Actions menu on the left side of your screen. In the window that appears, proceed with adding the donation as normal. (See the Managing Donations section for more details on adding donations) This includes indicating the donor of the donation, the donation type, the fund the donation will be assigned to, the gift amount, and the payment type. Click Next after each step of the donation process. When the Donation Options section appears, click the checkbox beside “This gift is given in honor of or in memory of someone.” GiftWorks User Manual Page 120 of 373 From the selection box that appears, choose the existing honorarium or memorial toward which the donation is made. Click Next to continue through the process and complete adding the donation. You can also click on the ‘--Add New Honorarium/Memorial--’ option at the bottom of list. GiftWorks User Manual Page 121 of 373 Enter the new honorarium/memorial from here. Then click OK. Click Next to continue through the process and complete adding the donation. NOTE: If you add a new Honorarium/Memorial from within the donation entry process, the Name and Title fields will both have the same information in them in Settings. You also cannot set up the Donor to Notify either. You will want to go to Settings / Additional Settings & Tools / Manage Honoraria and Memorials and edit these fields. ADDING A PLEDGE IN HONOR OF/IN MEMORY OF Click Add a Pledge in the Related Actions menu on the left side of your screen. In the window that appears, proceed with adding the pledge as normal. (See the Managing Pledges section for more details on adding pledges)This includes indicating the donor of the donation, the pledge date, amount, number of payments, schedule, and acknowledgment information. Click Next after each step of the pledge process. When you get to the main Add a Pledge screen, scroll down the Pledge Information area. GiftWorks User Manual Page 122 of 373 Choose the existing honorarium or memorial toward which the pledge is made. When you are done making modifications to the pledge, click Save at the bottom of the main work area to commit your changes. You can also click on the ‘--Add New Honorarium/Memorial--’ option at the bottom of list. GiftWorks User Manual Page 123 of 373 Enter the new honorarium/memorial from here. Then click OK. NOTE: If you add a new Honorarium/Memorial from within the donation entry process, the Name and Title fields will both have the same information in them in Settings. You also cannot set up the Donor to Notify either. You will want to go to Settings / Additional Settings & Tools / Manage Honoraria and Memorials and edit these fields. When you are done making modifications to the pledge, click Save at the bottom of the main work area to commit your changes. ACKNOWLEDGING AND RECEIPTING HONORARIUM AND MEMORIALS DONATIONS Donations and pledges given in honor or in memory of someone are each acknowledged and receipted in the same way as other donations. See the Managing Donations and Managing Pledges sections for more details. GiftWorks provides a built-in letter template for honorarium and memorial mailings. The Honorarium/Memorial Thank You Letter can be found in the Donations section of the Letter Library. This template can be used to acknowledge a donor for their donation that was made in honorarium or memorial of someone. SENDING HONORARIUM AND MEMORIAL NOTIFICATIONS GiftWorks provides a built-in letter template for honorarium and memorial notifications mailings. The Honorarium/Memorial Notification letter can be found in the Donors section of the Letter Library. This template can be used to inform donors associated with the honorarium or memorial of all donations made towards it. GiftWorks User Manual Page 124 of 373 Identify these donors when you set up the Honorarium/Memorial under the Donors to Notify list. Refer to the Edit Honoraria/Memorials section for details on adding or removing donors from the notification list. The donors included in this list are automatically added to the Honorarium and Memorial Notifications mailing each time you add a donation to their corresponding honorarium or memorial. To send notifications, click the Mailings icon at the top of your screen. Then click the Honorarium and Memorial Notifications link in the donation mailings section. Next, click the honorarium or memorial you want to send notification to and select the Date Range you would like to use Proceed with the normal mailing process. GiftWorks User Manual Page 125 of 373 MANAGING TASKS IN THIS SECTION Tasks Overview Adding a Task Adding a Donor Task Viewing and Managing Tasks Task Calendar Task List / View and Manage Tasks Using SmartUpdate to Add, Complete or Open Tasks Donor Tasks Report GiftWorks User Manual Page 126 of 373 TASKS OVERVIEW GiftWorks lets you enter tasks related to a donor, as well as Tasks not associated with a particular donor. You can use Tasks to keep track of things not associated with a particular donor, like ordering toner for your printer. You can use Donor Tasks to keep track of things you need to do, such as phone, email, or meet with that donor. There are many ways to Add a Task in GiftWorks. You can add a task two different ways from the Home Page, when viewing the Task Calendar, from the Donors Dashboard, when viewing a Donor profile, or through a SmartUpdate. ADDING A TASK You can use the Add a Task feature to keep track of anything that is not related to a specific donor. You can add a Task for yourself or for ANY of your GiftWorks users. There are many ways to add a Task in GiftWorks. Home Page - You can customize your Home Page to show Tasks. Click on Customize under Home Page Tasks on left. Click on the Main Column tab and check the Tasks option. GiftWorks User Manual Page 127 of 373 Click Ok. Your Home Page will now look similar to this. Click on the Add New Task link. Task Calendar – Click on the Add a Task option under Related Actions. Donors Dashboard - Click on the Add a Task option in the Related Actions area. GiftWorks User Manual Page 128 of 373 You will see the same dialog box whether you started the process from the Home Page, Task Calendar or Donors Dashboard. Choose the Add a Task option. Click Next. Task: Pick a Category for your Task from the dropdown list. The Task Categories can be managed in Settings / Customize / Change GiftWorks Fields /Task Categories. GiftWorks User Manual Page 129 of 373 You can also add a new Task Category from here as well. Click on the Add New Task Category option. Enter in the name for the new Task Category. Click OK. GiftWorks User Manual Page 130 of 373 Notes: You can use the Notes field to display specific information on that Task. Due: Use this field to enter a date ad time that the Task is due. User: Pick which GiftWorks user the task will be assigned to. GiftWorks User Manual Page 131 of 373 Completed: If the Task has already been completed, but you still want to keep track of it, you can check this box. Click Save when you are done entering the information. ADDING A DONOR TASK You can add a Donor Task for specific donors in GiftWorks. You can use Donor Tasks to keep track of things you need to do, such as making a phone call, sending an email, or meeting with that donor. There are many ways to add a Donor Task in GiftWorks. You can add a Donor Task two different ways from the Home Page, when viewing the Task Calendar, from the Donors Dashboard, when viewing a Donor profile, or through a SmartUpdate. The steps for starting this process from the Home Page, Task Calendar and Donor Dashboard are the as listed above in the Adding a Task section. You will choose the Add a Donor Task option instead of the Add a Task option. Click Next to search for the donor to add the Donor Task to. You may also add a new donor as well. GiftWorks User Manual Page 132 of 373 Choose the donor from the list and click Next. Donor Profile- View the donor that you want to add the Donor Task for. Click on the Add a Task option in the Related Actions area. GiftWorks User Manual Page 133 of 373 You will see the same dialog box whether you started the process from the Home Page, Task Calendar, Donors Dashboard or from the Donor Profile. Task: Pick a Category for your Donor Task from the dropdown list. The Task Categories can be managed in Settings / Customize / Change GiftWorks Fields /Task Categories. You can also add a new Task Category from here as well. Click on the Add New Task Category option. GiftWorks User Manual Page 134 of 373 Enter in the name for the new Task Category. Click OK. Notes: You can use the Notes field to display specific information on that Donor Task. Due: Use this field to enter a date ad time that the Donor Task is due. GiftWorks User Manual Page 135 of 373 User: Pick which GiftWorks user the task will be assigned to. Completed: If the Task has already been completed, but you still want to keep track of it, you can check this box. Click Save when you are done entering the information. VIEWING AND MANAGING TASKS There are many ways to view and manage Tasks within GiftWorks. You can view a specific donor’s Tasks from within the Notes, Tasks & Files tab from their main Donor screen. Each task is recorded so you can track past activities related to that donor. GiftWorks User Manual Page 136 of 373 You can edit, delete and mark the Donor Task as complete by clicking on the Options link. When you click on the Notes, Tasks & Files tab, you can choose the Filter/Sort Options that best suit you. TASK CALENDAR You can view the Task Calendar from many areas of GiftWorks. You can view the Task Calendar from the Home Page. Click on the “View Task Calendar” option under Related Actions, or the View Calendar option in the main column of the Home Page. GiftWorks User Manual Page 137 of 373 You can view the Task Calendar from the Donors Dashboard by clicking on the View Task Calendar option under Related Actions. All of the above options will take you to the Task Calendar. GiftWorks User Manual Page 138 of 373 TASK LIST / VIEW AND MANAGE TASKS The Task List and the View and Manage Tasks options will are available from many areas of GiftWorks. They will both take you to the same area where you can view or manage the Tasks. Task List You can view the Task List from the Task Calendar by clicking on the View Task List option under Related Actions. You can view the Task List from the Donor Overview area. GiftWorks User Manual Page 139 of 373 You can view the Task List from the Donors Dashboard by clicking on the View Task List option under Related Actions. View and Manage Tasks You can view and manage Tasks by clicking on the View and Manage Tasks option within the Main Column of the Home Page. Any of the above ways will get you to the same screen (shown below): GiftWorks User Manual Page 140 of 373 You can click on a specific date on the calendar to see the Tasks for that date. You can change the Filters for what Tasks are displayed. You can type a key word into the Search field and any Task with that keyword will appear. You can choose to see Tasks for Any User (which will show you the Tasks for every GiftWorks User) or you can choose one specific User. You can choose which Task Status to see. You can pick specific dates And you can choose the View you would like to see the Tasks displayed in (Summary or Title Only). The legend will tell you the status of each Task. GiftWorks User Manual Page 141 of 373 This is shown to the left of each Task. USING SMARTUPDATE TO ADD, COMPLETE OR OPEN TASKS SmartUpdate allows you to update certain fields within GiftWorks to an entire SmartList. For more information on the SmartUpdate feature, please see the Settings section of this manual. ADD A TASK You can add the same Task to multiple donors at the same time using the SmartUpdate feature. You will need to create a SmartList of these donors. You can then click on the ‘Run SmartUpdate for List’ option under Related Actions on left side of the SmartList screen. Or you can go to Settings / Additional Settings & Tools / Run a SmartUpdate. Either way you will be taken to the screen below. Be sure to back up your database file before proceeding. GiftWorks User Manual Page 142 of 373 Here you will click on the Add a task to SmartList Members option under the Choose an Update area. Click Next. If you started the SmartUpdate process from Settings you will now need to pick the SmartList from the dropdown list. GiftWorks User Manual Page 143 of 373 Click Next. Here you will need to specify the Task information. Task: Pick a Category for your Donor Task from the dropdown list. Notes: You can use the Notes field to display specific information on that Donor Task. Due: Use this field to enter a date ad time that the Donor Task is due. Assigned To: Pick which GiftWorks user the task will be assigned to. Click on the Add Task button. You will be prompted to confirm this request. GiftWorks User Manual Page 144 of 373 Click Yes. When the process is complete you will see the following: Click Finish. This task will now appear in the Notes, Tasks & Files tab in each of the donors that were on the SmartList. COMPLETE/OPEN A TASK You can mark a Task as Complete or Open for multiple donors at the same time using the SmartUpdate feature. You will need to create a SmartList of these donors. You can then click on the ‘Run SmartUpdate for List’ option under Related Actions on left side of the SmartList screen. Or you can go to Settings / Additional Settings & Tools / Run a SmartUpdate. Either way you will be taken to the screen below. Be sure to back up your database file before proceeding. GiftWorks User Manual Page 145 of 373 Here you will click on the Complete/open task for SmartList Members option under the Choose an Update area. Click Next. GiftWorks User Manual Page 146 of 373 If you started the SmartUpdate process from Settings you will now need to pick the SmartList from the dropdown list. Click Next. Here you will need to specify the Task information. Task: Specify the task that you want to complete/open Completed: Check this box if you want to mark this Task as completed. If you want to Open the Task, leave the box unchecked. Click on the Complete/Open Task button. You will be prompted to confirm this request. Click Yes. When the process is complete you will see the following: GiftWorks User Manual Page 147 of 373 Click Finish. DONOR TASKS REPORT AND SMARTLISTS DONOR TASK REPORT The Donor Tasks Report will allow you to view Tasks based on the due date and whether they are active or completed. Click on the Reports icon at the top of the screen, then choose Donor Reports. GiftWorks User Manual Page 148 of 373 Choose the DONOR TASKS Report. Choose the Report Choices that best suit you and click Ok. GiftWorks User Manual Page 149 of 373 SMARTLISTS You can create Donor SmartLists using Tasks criteria. The Task criteria options are Task Date, Has Open Tasks, Has Past Dues Tasks, Task Category, User, Created Date, Changed Date, Completed Date. See the SmartList section of this manual for more information on SmartLists. GiftWorks User Manual Page 150 of 373 SMARTLISTS IN THIS SECTION SmartLists Overview Using the Built-in SmartLists Understanding SmartList Types Creating a SmartList Related Actions Balloon Help Auto Refresh Adding Criteria Set Refining Criteria Removing Criteria Using Show/Don’t Show Options Using the Options Tab Saving a SmartList Customizing a SmartList Customizing SmartList Columns Grouping SmartLists Categorizing SmartLists Allowing other Users to Change your List Sharing a SmartList Adding a SmartList to Your Favorites Browsing a Temporary SmartList Viewing and Managing SmartLists My Favorite SmartLists Related Actions Export this list Run SmartUpdate for List Run Report for List Mapping Mailing Tasks Send Mail Print Labels for List Print Envelopes for List SmartList Tasks Edit this SmartList Copy this SmartList Delete this SmartList View Criteria View and Manage SmartLists Create a New SmartList Printing a SmartList GiftWorks User Manual Page 151 of 373 SMARTLISTS OVERVIEW The most important thing about the information you have in GiftWorks is the ability to analyze it, understand it, and act on it. Even if you have hundreds or thousands of donors, SmartLists let you choose sets of criteria and then see which donors or donations meet those criteria at any given time. You can use SmartLists to generate reports, send mailings, create call lists, and more. You can even update all donors or donations in a SmartList at one time. Creating a SmartList may at first seem somewhat daunting, but GiftWorks makes it relatively simple. Once you’ve made a few SmartLists, you’ll see how simple and powerful SmartLists really are. USING THE BUILT-IN SMARTLISTS GiftWorks includes a number of built-in SmartLists. Almost any time you view a list of donors, donations, or pledges, you’re looking at a SmartList. In fact, the “All Donors SmartList” is really just a SmartList of donors with a creation date of “All Dates.” You can see this by creating a copy of the All Donors SmartList: 1. Click SmartLists at the top of GiftWorks. 2. Click Create a New SmartList. GiftWorks User Manual Page 152 of 373 3. Click Create a new SmartList based on an existing one, then select All Donors from the drop-down list. 4. Click Next, and you will be taken to the SmartList definition screen. Near the top of the main work area, you’ll see the only criteria set for this SmartList (Show donors whose: creation date is ‘All Dates’). In the Results preview in the bottom half of the work area, you’ll see donors that meet the criteria. To see only donors created within the last six months, click Refine to the right of the criteria set. GiftWorks User Manual Page 153 of 373 Next, click the linked criteria creation date is ‘All Dates’. This shows the currently selected criteria. If you click the drop-down (where All Dates is currently selected), you’ll see all available date options, including Last 6 months. Select Last 6 months, click OK, then click Done. This takes you back to the main SmartList definition screen. The criteria you changed is visible near the top: Show donors whose: creation date is ‘Last 6 months’. On the bottom half, where the results are listed, you’ll now see the donors created in the last six months. If you were to save this SmartList, the “Last 6 months” date range would be saved with the SmartList. GiftWorks User Manual Page 154 of 373 To see how to build a SmartList from scratch, see Creating a SmartList. UNDERSTANDING SMARTLIST TYPES When creating a SmartList, you’ll usually begin with a need such as: “I need to see all donations from board members last year,” or “I want to invite everyone in a certain area to a special event.” SmartLists make it easy to capture this sort of information. There are three types of SmartLists: donors, donations, and pledges. A Donors SmartList is one where the result is a list of donors. Each donor shows up in the list only once, even if they meet multiple criteria. A Donations SmartList is one where the result is a list of donations (gifts and/or pledge payments). Multiple donations from the same donor can appear in the list. When sending a mailing, it is possible to choose to send the mailing for each donation in the list (meaning that each donor might get multiple mailings), or to send a mailing to each donor in the list (meaning that each donor will only get one mailing). A Pledges SmartList is one where the result is a list of pledges. Multiple pledges from the same donor can appear in the list. When sending a mailing, it is possible to choose to send the mailing for each pledge in the list (meaning that each donor might get multiple mailings), or to send a mailing to each donor in the list (meaning that each donor will only get one mailing). Different criteria are available for the different types of SmartLists. For example, pledge-specific criteria like “Pledged Amount” or “Next Payment Date” are only available for a pledges SmartList. CREATING A SMARTLIST To create a SmartList, click the SmartLists icon at the top of GiftWorks, then click Create a New SmartList. Choose the type of SmartList you want to create: donors, donations, or pledges. The next step is where you will choose your first criteria. The criteria are categorized to make them easier to locate. Choose criteria, then set the values for that criteria. GiftWorks User Manual Page 155 of 373 You can also create a SmartList based on any existing SmartList. Click Create a new SmartList based on an existing one, then choose an existing SmartList from the dropdown menu. This takes you to the main SmartList definition window. Near the top of the screen is the criteria you just added. The bottom half of the screen shows the result set for the SmartList. The left side of the screen will show you the Related Actions. Related Actions: Here you can Turn Balloon Help On or Off and also Turn Auto Refresh On or Off. Balloon Help- allows you to hover over the underlined areas of the screen to see additional information on that area. GiftWorks User Manual Page 156 of 373 Auto Refresh- allows you to control when the SmartList refreshes/updates. If it is ON, the SmartList will continually refresh with each command. If it is OFF, the SmartList will not update until you click on the blue “Refresh SmartList” link. From here, there are several options, each of which is explained in the items below. Adding Criteria Set Once you’ve established your first criteria, you can modify the SmartList in several ways. One is to Add a Criteria Set. When you Add a Criteria Set, you’re defining a whole new set of donors, donations, or pledges to include in your SmartList. If we call your first criteria set “A” and the criteria set you’re adding “B,” you’re asking the SmartList definition screen to “Show me everything meeting A and ALSO show me everything meeting B”. GiftWorks User Manual Page 157 of 373 When you click the Add Criteria Set link, you will be presented with a list of criteria. Choose your new criteria, enter the detail, and click Next. The SmartList is now the combination of the two criteria sets, and any donor, donation, or pledge that meets either criteria set is included. A donor, donation, or pledge will only be included in the SmartList one time regardless of how many criteria sets it meets. The SmartList definition screen automatically eliminates duplicates from the list. Refining Criteria Another way to modify your SmartList is to refine your existing criteria. You can do this by clicking the Refine link to the right of any criteria sets. When you refine your criteria, you can append additional criteria to the existing set, change one of the criteria in the set, or remove one of the criteria in the set. When you click Refine, you are taken to the Refine Criteria Set window. Clicking the criteria detail lets you modify that criteria. Clicking the red X removes that criteria. Clicking Append takes you to the Add List Criteria window and allows you to add additional criteria to this set, further limiting the results. GiftWorks User Manual Page 158 of 373 Click Done to return to the SmartList definition window. Removing Criteria To remove a criteria set from a SmartList, click the Remove link to the right of the set. The set will be removed, and the results area updated accordingly. Using Show/Don’t Show Options At the top of the SmartList definition screen, there are always two tabs: Show and Don’t Show. For Donor SmartLists only, there is a third tab: Options. The first two modify the criteria you add to your SmartList. If you add criteria sets to the Don’t Show tab, items meeting those criteria will be filtered from the Show criteria. You can only see either Show or Don’t Show criteria at one time. Click on the tabs to move back and forth between them. Using the Options Tab The Options tab in the SmartList definition screen (donor SmartLists only) lets you define up to four time periods for which you want to see specific information in your SmartList. For each time period, you can see total giving, average gift, largest donation, and number of donations. You can also use total donations for the custom time periods as criteria for your SmartList. GiftWorks User Manual Page 159 of 373 By default, GiftWorks includes Current Year, Current Fiscal Year, Previous Year, and Previous Fiscal Year. Use the custom time periods to define other periods. The periods can be fixed (such as February 1, 2008 through February 29, 2008), or can be floating (Current Week, Year to Date, or Next 3 Months). To define a fixed date range, choose the Custom Dates option from the Date Range drop-down list. You can give each time period a Name, such as “Next 3 Months”. These custom periods can be useful for viewing comparative data on your SmartLists for multiple time periods. For example, to compare quarterly giving for each quarter of last year, set up a period for each quarter, then add the total giving field for each quarter to your SmartList (for more information, see Customizing a SmartList). The Options tab in the SmartList definition screen (donor SmartLists only) lets you define up to four locations for which you want to see specific information in your SmartList. This will allow you to create lists based on where your donors are located. GiftWorks User Manual Page 160 of 373 Saving a SmartList When you have finished creating or editing a SmartList and clicked Next, you will see the options for naming and saving your SmartList. The name you give your SmartList will be the name displayed in the lists of SmartLists throughout GiftWorks. The optional description can be used to provide more information about the SmartList, its contents, and how it should be used. You can also choose a SmartList Category to segment your lists. GiftWorks User Manual Page 161 of 373 You can share you list with other users and also add it to your Favorite SmartLists. If you share the list with other users, you can then also have the option to “Allow other users to change this list” Once you have set the options for your SmartList, click Save List to save it or Cancel to leave without saving your changes CUSTOMIZING A SMARTLIST There are two ways to customize SmartLists in GiftWorks. When you first build or define a SmartList, you can set the default customizations for that SmartList, which will be seen by other users when they first view the SmartList. Each user can also set customizations for each SmartList. The customizable parts of a SmartList are the columns displayed in the SmartList results, and, optionally, a grouping of those results by the values in one of the columns. Customizing SmartList Columns When you first build a SmartList, GiftWorks displays a set of default columns, which differ by SmartList type. To customize the list of columns displayed in the SmartList, click the Customize link in the top right corner. Check or uncheck column names to add or remove them from the display. The list of available columns varies by SmartList type, but generally includes all fields for the donors, gifts, or pledges in the list, plus GiftWorks User Manual Page 162 of 373 some aggregate fields from other types of records (donations for donors SmartLists, for example) as well as custom fields. Clicking the Reset button at the bottom left of the customize window resets the columns to the default set for that SmartList type. The customizations you make will be saved with the SmartList and will be seen by other users if they view the SmartList (see also Sharing a SmartList). Users can make their own customizations (see also Customizing a SmartList), but if they reset their customizations, it will revert to the options you choose here. Grouping SmartList Results When customizing a SmartList view, you can choose the grouping for the result set of the SmartList. The grouping selection is at the bottom of the customize screen and includes the full list of columns available for the SmartList you are customizing. If you choose a column to group the rows by, rows with the same value will be grouped together under a header with that value. You can collapse or expand each grouped set by clicking the plus or minus at the top left of each group. CATEGORIZING SMARTLISTS GiftWorks gives you the option of categorizing your SmartLists, which makes it easier to keep them organized so you can quickly locate them. On the Name and Save screen, select an existing category or add a category by selecting the appropriate option in the SmartList Category drop-down list. GiftWorks User Manual Page 163 of 373 A SmartList’s category can only be changed by the creator of that SmartList. When you view your SmartLists by going to the SmartList section and clicking View all SmartLists, the SmartLists will be displayed in collapsible/expandable categories. SHARING A SMARTLIST When saving or editing a SmartList, you can choose to share that SmartList with other users of GiftWorks. If you check the Share this list with other users checkbox, the SmartList will be available to all users of GiftWorks within your organization. They will be able to view the SmartList and customize their own view of that SmartList. Only the creator of a SmartList can edit a SmartList or change its default customizations. If you choose not to share a SmartList with others, it will only be visible to you. GiftWorks User Manual Page 164 of 373 ALLOWING OTHER USERS TO CHANGE YOUR LIST If you check the Share this list with other users checkbox, you will then also have the option to allow other users to change the list. ADDING A SMARTLIST TO YOUR FAVORITES When saving or editing a SmartList, you can choose to add the SmartList to your Favorites. GiftWorks User Manual Page 165 of 373 The list of Favorite SmartLists appears throughout GiftWorks and gives you easy, one-click access to the SmartLists you use most often. You can also manage your list of Favorite SmartLists by clicking the Manage button wherever your Favorites are displayed. BROWSING A TEMPORARY SMARTLIST On the Name and Save your SmartList screen, you have the option to browse results without saving the SmartList. This can be useful if you are creating a SmartList that you will only need temporarily. You can use the SmartList to produce a report, mailing, or just to browse. If you navigate away from the SmartList (to another SmartList, for example), the temporary SmartList goes away. VIEW AND MANAGE SMARTLISTS From the main SmartLists screen, you can view all available SmartLists by clicking on View and Manage SmartLists. This displays a categorized list of the names, descriptions, and creators of all SmartLists you can view from your user account. This includes built-in SmartLists, SmartLists you have created (which can optionally be shared with other users), and SmartLists that other users created and shared. GiftWorks User Manual Page 166 of 373 You can sort the lists within each Category by clicking on the Sort option. You can sort by name, by creator or by description. You can click on the name of any SmartList, or click Options then choose View Contents to view the SmartList. You can also collapse or expand the SmartList categories. GiftWorks User Manual Page 167 of 373 This will allow you to see the donors, donations or pledges on the SmartList. You can click on a specific row (in this case a donor) and then click on the tabs at the bottom of the screen to see specific information about that donor. You can right click on a row of the SmartList (in this case a donor) to see other available actions. GiftWorks User Manual Page 168 of 373 NOTE- If you choose the Delete Donor option from here, you are NOT deleting the donor from the SmartList, you are deleting the donor from your Database. You can view the SmartList criteria by clicking on Options and choosing “View criteria”. You can also click on ‘View Criteria” under Related Actions area on left when viewing a specific SmartList. You can then view the criteria in the Show, Don’t Show and also the Option tab (for Donor SmartLists only). GiftWorks User Manual Page 169 of 373 You can also edit, rename, delete and copy the SmartList from Options. These features are reviewed in the SmartList Tasks section below. You can also create a new SmartList, Manage SmartList Categories and Manage other Users SmartLists (THIS FEATURE IS ONLY AVAILABLE IN GIFTWORKS PREMIUM). GiftWorks User Manual Page 170 of 373 Create a New SmartList – You can Create a New SmartList from this area. See the Creating a SmartList section above Manage SmartList Categories- You can add, edit and delete SmartList Categories. You can also Manage SmartList Categories from Settings / Additional Settings & Tools. Manage Other Users SmartLists - If you have GiftWorks Premium, you will also have this feature. However it will only be there if you are an Administrator using the Standard Security level or if your User Role for the Advanced Security has access to Manage other users SmartLists. Here you can click on Options and have access to view contents, view criteria, delete, copy or make yourself the owner of the SmartList. GiftWorks User Manual Page 171 of 373 Click on the Make Me the Owner option to make you the owner of that list. You will need to confirm this change. The original owner will not be able to view or edit the SmartList unless it is shared. Click Yes. MY FAVORITE SMARTLISTS You can view your favorite SmartLists from the main SmartLists page. Click on MANAGE to select which SmartLists you would like to appear in this area as well as change the order in which they appear. GiftWorks User Manual Page 172 of 373 RELATED ACTIONS When viewing a SmartList, you see additional options under the Related Actions area on the left. Export this List- You can export the results of a SmartList to a Microsoft Excel, CSV, or XML file. This option is available when viewing a SmartList in the Related Actions menu, or from the Settings section under Import and Export Data. When you click on Export this List you will have the option to ‘Save to File’ or “Send as Email’ Save to File You can choose the file name and location you want to export the SmartList to. The columns that are displayed in the SmartList will be exported to the file, which can be used for other applications. GiftWorks User Manual Page 173 of 373 Send as Email You can email the SmartList as an attachment. Choose the format and filename. Enter in the email address of the recipient as well as a Subject. Fill out the Sender Information and click Send. Run SmartUpdate for List – GiftWorks gives you the ability to change a select number of items for each of the donors, donations, or pledges in a SmartList. You can choose which changes to make to which SmartList. The changes you make will be applied to each of the donors, donations, or pledges in the SmartList. GiftWorks User Manual Page 174 of 373 Run Report for List- You can run a Report based on the specific SmartList you are viewing. Mapping – You can choose the view the donors of this SmartList on a map or validate the donors address from this area. View These Donors on a Map GiftWorks User Manual Page 175 of 373 Validate These Donor Addresses - Validating is the process of checking the addresses for accuracy. This process will also store geocode information with each address. This includes latitudinal and longitudinal coordinates. This will support the ability to create reports that plot addresses on a map, donor lookups based on distances from a map point, and more powerful mapping tools. MAILING TASKS You can send mail, print labels and print envelopes from the Mailing Tasks area when viewing a SmartList. GiftWorks User Manual Page 176 of 373 Send Mail- You can choose to send mail to the Donors on this SmartList as well as add the Donors to an existing Mailing List. Click on Send Mail to These Donors to start the mailing process. This will give you access to a letter in the DONORS section of the Letter Library. Click in the Add These Donors to a Mailing List option to add the donors to an existing mailing list. GiftWorks User Manual Page 177 of 373 You can also Send Mail to a SmartList from the main SmartLists screen. Click Send Mail to a SmartList. Print Labels for List – you can easily print labels for the entire SmartList. Print Envelopes for List – you can easily print envelopes for the entire SmartList. GiftWorks User Manual Page 178 of 373 SMARTLISTS TASKS This area allows you to manage many aspects of this SmartList. Edit This SmartList- You can you change the criteria, default customizations, custom time periods, and other attributes of a SmartList. GiftWorks User Manual Page 179 of 373 Copy This SmartList- You can create a SmartList based on this existing SmartList (including the built-in SmartLists that are included with GiftWorks or SmartLists created by other users). This option is also available on the first step of the Create a New SmartList process. GiftWorks User Manual Page 180 of 373 When you create a SmartList based on an existing SmartList, all of the criteria, default customizations, and custom time periods are created in the copy. You can then edit any of the SmartList settings and save your new SmartList. Delete This SmartList- Deleting a SmartList will delete the SmartList from the list of available SmartLists. You can only delete a SmartList that you created. Deleting a SmartList has no effect on the donors, donations, or pledges in that SmartList. View Criteria- You can view the SmartList criteria from here. This will display the criteria of the Show, Don’t Show and also the Option tab (for Donor SmartLists only). GiftWorks User Manual Page 181 of 373 View and Manage SmartLists – Click here to view and manage the SmartLists. See the VIEW AND MANAGE SMARTLISTS section above. Create a New SmartList- this option allows you to easily add a new SmartList. See the CREATING A SMARTLIST section above. PRINTING A SMARTLIST When viewing a SmartList, you can print that SmartList as displayed on the screen by clicking the Print link in the top right corner. GiftWorks User Manual Page 182 of 373 MAILING CENTER IN THIS SECTION Mailing Center Overview Related Actions Create and Manage Mailing Lists Add a Mailing List Edit a Mailing List Delete a Mailing List My Favorite Mailing Lists Manage Letter Library Add Letter Edit Letter Delete Letter View Mailing History Set up Honoraria and Memorials Understanding the Mailing Process Mailing to a Donor Mailing to a Mailing List or SmartList Donor vs. Donation/Pledge mailings Sending Emails Configuration Options Sending Emails Select Options Choose Recipients Select Letter Generate Mailing Finish Mailing Sending Letters Select Options Choose Recipients Select Letter Generate Mailing Finish Mailing Printing Letters, Labels, or Envelopes Printing and Recording Labels Printing and Recording Envelopes Saving Letters, Labels, or Envelopes Donation Mailings Donation Receipts Donation Thank You Letters Pledge Thank You Letters Soft-Credit Thank You Letters Matching Pledge Thank You Letters Honorarium and Memorial Notifications GiftWorks User Manual Page 183 of 373 MAILING CENTER OVERVIEW Great communications and strong relationships are the cornerstones of any successful development program. Creating such a solid foundation requires the timely sharing of news and information with your constituency, prompt thank-you letters, and frequent personal communications. The Mailing Center in GiftWorks is a comprehensive donor communications center. With complete mailing and emailing resources all in one place, the process of informing, asking, thanking, and tracking has never been so quick or simple. Create letters for solicitations, thank you letters, and other communications Save your mailings and organize them in a Letter Library Use prewritten letters or create your own templates Use custom mailing lists or SmartLists to generate targeted mailings Customize and preview letters and layouts before printing Print labels and envelopes using the comprehensive selection of label and envelope types PREMIUM Prepare USPS discounted mailings for qualified mailings. See the MAILING GUIDE for more information on how to prepare a USPS discounted mailing with GiftWorks Premium. RELATED ACTIONS The Related Actions area is where you will go to create and manage mailing lists, add or edit letters, view your mailing history and also set up honoraria and memorials. GiftWorks User Manual Page 184 of 373 CREATE AND MANAGE MAILING LISTS Mailing Lists let you create a list of donors grouped together for the purpose of sending each donor the same mailing. There are two default Mailing Lists you can add donors to: Welcome Letters and Newsletter. You can also create your own Mailing Lists for specific groups (for example, Annual Report Mailing or Golf Classic Promotion List). CREATE A MAILING LIST- To create a Mailing List, click Create a Mailing List in the Related Actions menu on the left side of the main Mailings screen. Type the name you want to assign to your list and include a description of the list. You can add your new list to your favorites by checking the box shown in the Mailing List Details window. Click OK to finish creating your list. GiftWorks User Manual Page 185 of 373 MANAGE MAILING LISTS- To manage and edit your Mailing Lists, click on Manage Mailing Lists in the Related Actions menu on the left side of the main Mailings screen. Mailing Lists are listed on the top half of the screen and Donation Mailings are listed on the bottom half of the Manage Mailing Lists screen. From here you can Add, Edit or Delete a Mailing List. To Add a List, click on the Add List button. GiftWorks User Manual Page 186 of 373 Type the name you want to assign to your list and include a description of the list. You can add your new list to your favorites by checking the box shown in the Mailing List Details window. Click OK to finish creating your list. To Edit an existing Mailing list, click on the Mailing list and then click on the Edit List button. Details Tab: GiftWorks User Manual Page 187 of 373 From the Details tab you can change the name of your list by clicking Edit beside the current list name. You can change the description of your list by clicking Edit beside the current list description. You can also change the default letter for your list by clicking Select Letter beside the letter template currently set for default and choosing a new one from the list. Donors Tab: From the Donors tab, click Add Donor to select individual donors to your Mailing List. GiftWorks User Manual Page 188 of 373 From the Donors tab, click Add Donors to select an existing Mailing List or SmartList of donors to add to your Mailing List. Remove donors from your Mailing List by clicking the checkbox beside their names and then clicking Remove. Use the links at the top right of the list area to Check or Uncheck all items in the list. You can also click individual boxes to the left of items to select them, then use the Remove button to remove those items from the mailing list. There is also a Print link at the top right to print the list of items. GiftWorks User Manual Page 189 of 373 Click Done when you’ve finished editing your Mailing List. To Delete a List, click on the Mailing list and then click on the Delete List button. You can change the order in which the Mailing Lists appear by clicking on the Up or Down buttons. You can also add and remove donors from Mailing Lists in several other ways. From a SmartList, click Send Mail under Mailing Tasks, then click Add these donors to a Mailing List. You can then choose which Mailing List(s) to add those donors to. GiftWorks User Manual Page 190 of 373 From a Donor record, click Add to a Mailing List in the Mailing Tasks menu on the left. You can then choose which Mailing List(s) to add that donor to. To remove a donor from the Mailing List, hover your mouse over the gray X next to the mailing list under the Summary tab. The X will now turn red. Click on it to remove the donor from the mailing list. GiftWorks User Manual Page 191 of 373 View and Edit Donation Mailings Donation Mailings are built-in mailing lists that you can view and edit from here (with the exception of the Donation Receipts Mailing List). Click on the link for the donation mailing to view or edit the settings for that mailing. When viewing or editing a donation mailing, there are two tabs listed at the top of the screen Details and Donations/Pledges. The Details tab shows the name and description of the donation mailing, as well as the name of the currently selected letter template for that mailing. To choose a different letter template, or to view the current template, click Select Letter. The next screen shows the currently selected template, as well as other appropriate letter templates for this mailing. You can add, edit, or delete a template by clicking the appropriate button. Click Ok to save your changes, or Cancel to return to the donation mailing without saving your changes. GiftWorks User Manual Page 192 of 373 The Donations/Pledges tab shows all donations or pledges currently queued to receive the donation mailing. Click on Add Donations to select an existing SmartList of donations to add to your Mailing List. Use the links at the top right of the list area to Check or Uncheck all items in the list. You can also click individual boxes to the left of items to select them, then use the Remove button to remove those items from the donation mailing. There is also a Print link at the top right to print the list of items. When you are done viewing or editing the donation mailing, click Done to return to the previous screen. GiftWorks User Manual Page 193 of 373 View and Edit Donation Receipts Mailing List This Mailing List is handled differently than the other Donation Mailing Lists. You will first need to create a SmartList of donations. You can create a SmartList of all the donations that are ‘to be receipted’ or ‘not to be receipted’ - along with whatever other criteria you need to get to all of those donations you wish to add or remove onto the SmartList. There are two ways to update the items included in the SmartList. Option 1: From Settings: Go to Settings / Additional Settings & Tools / Run a SmartUpdate Option 2: From a SmartList: When viewing a SmartList, click on “Run SmartUpdate for List” on the left side of screen **Back up GiftWorks here. Choose the 'Change receipt settings for received donations' option / click Next / choose the SmartList you want to update / click Next Choose the option you want in the "Issue Receipt" field. If you want to ADD the donations to the Donation Receipts Mailing List, choose Issue Receipts. If you want to REMOVE the donations from the Donation Receipts Mailing List, choose Do Not Issue Receipts. If you are ADDING the donations to the Donation Receipts Mailing List, you will also need to choose a Receipt Group. If you are REMOVING the donations from the Donation Receipts Mailing List, choose Do Not Change. Click 'Change Receipt Settings' button, choose Yes to continue and Click Finish when done. GiftWorks User Manual Page 194 of 373 My Favorite Mailing Lists- When you add a Mailing list, you have the option to check the box to add that list to your My Favorite Mailing Lists. If you check this box, that list will now appear in the My Favorite Mailing Lists area on the main Mailings screen. You can click the MANAGE link to add or remove Mailing Lists from this area, and also change the order that the Mailing Lists appear. MANAGE LETTER LIBRARY GiftWorks lets you create and store multiple letters in the Letter Library. You can maintain templates for letters you have sent so you can refer to them when creating new letters. You can also store the templates for all of your different acknowledgements and receipts. To create or modify your letters, click Manage Letter Library in the Related Actions menu on the main Mailings screen. GiftWorks User Manual Page 195 of 373 The Letter Library is divided into different types of letters: Donors, Donations, Pledges, and Receipts. Each letter type can only be sent to a list of the corresponding type. Donor Letters Donor letters must be sent to a donor or list of donors. The fields available to insert into a donor letter are primarily donor fields, but you can also insert summary donation information, donor and donation custom fields, and information about your organization. Donation Letters Donation letters must be sent for a donation or list of donations. Donation letters are available to choose as the letter for the Donation Thank You Letters Donation Mailing. You can insert all available donor fields in a donation letter. You can also insert information about the specific donations in the list, as well as donation summary information, donor and donation custom fields, and information about your organization. Pledge Letters Pledge letters must be sent for a pledge or list of pledges. Pledge letters are available to choose as the letter for the Pledge Thank You Letters and Matching Pledge Thank You Letters Donation Mailings. You can insert all available donor fields in a pledge letter. You can also insert information about the specific pledges in the list, as well as donation summary information, donor and donation custom fields, and information about your organization. Receipts Receipts are sent to your donors as tax receipts for their donations. Receipts can only be used for the Donation Receipts Donation Mailing. You can insert all available donor fields in a receipt. You can also insert information about the specific donations in the list, as well as donation summary information, donor and donation custom fields, and information about your organization. ADD A LETTER To add a donor letter, click the Add button at the bottom left corner and select the type of letter you wish to add. For example if you are adding a new Donor letter, choose the Add Letter for Donors option. GiftWorks User Manual Page 196 of 373 Enter the Letter Name and click Next. You will now have a blank letter template. This screen will look the same for any type of letter you choose to add. You can change the letter name, change the page layout, change the section layout or print the letter from the Related Actions area on the left. GiftWorks User Manual Page 197 of 373 Change Letter Name- Click here to change the name of your letter. Change Page Layout- Click here to change the margins and header/footer. Change Section Layout- Click here to create columns, change the orientation, text flow, paper size and paper source. Print Letter- Click here to print the letter as you see it on the screen. GiftWorks User Manual Page 198 of 373 Toolbar and RulerOn the letter editor screen, you can show or hide the toolbar and ruler by clicking the links in the top right corner of the main work area. The toolbar contains buttons for formatting the text in your letter, including font style, color and size, alignment, bullet or outline formats, and inserting tables, images or hyperlinks. You can change the formatting of any part of your letter document using the toolbar. You can check the spelling in your letter by clicking the blue check mark button with ABC on it. The ruler shows you the measurements of where your letter will fall on the printed page. GiftWorks does limit the size of your letter (as well the image size that you are able to insert). It is important to keep the images and letter size as small as possible. You can see the size of your letter at the top right corner when creating or editing a letter. Inserting fields One of the most important features of GiftWorks is the ability to insert database fields into a letter template. Using this feature, you can insert the name of a donor, donation, or pledge field into your template and, when the mailing is generated, the corresponding information from each donor, donation, or pledge record will be inserted into the letter. This ability is frequently referred to as “mail merge.” To insert fields into a letter template, click the Insert Field button at the top left of the letter editor screen. Next, click one of the field categories, and then click the field you want to insert. The available fields will vary based on the type of letter you are creating. GiftWorks User Manual Page 199 of 373 When you are viewing or editing the template, fields inserted into a letter will appear with a gray background and will show the name and field type. This will be replaced with the actual value when you preview or generate your mailing. If you want to delete an Inserted field, click on that field (it will now be black) Click on the Delete Field button beside Insert Field button. You can now type the body of the letter. Click Save at the bottom when finished. The letter template will now be saved in the Letter Library. GiftWorks User Manual Page 200 of 373 Adding an existing letter You can also add an existing letter into GiftWorks. GiftWorks is not designed to use the copy/paste function from a Word document. You will first need to open your Word document and clear all formatting. Then choose "save as" and change the file type to Rich Text Format. Then open GiftWorks and go to the Letter Library. Choose to create a new letter and choose a name for it. You will then see a blank page. Click on the yellow folder (located under the Insert Field button). Search for the Rich Text Format file you just saved and click on it and then click on Open. A message may appear, saying that the file was modified and asks you if you wish to save the modifications. If this appears, choose no. The letter will be inserted into GiftWorks. GiftWorks User Manual Page 201 of 373 Make any necessary changes/insert fields as needed. Then click on Save at the bottom of the screen. EDIT LETTER To edit a letter, select the letter you want to edit and click the Edit button. The Edit Letter screen is allows you to modify the letter template as needed. You will see all of the same options as mentioned above in the ADD LETTER section. When you are done with your Edits, click on Save. You will have the option to overwrite the existing letter or add to letter library. GiftWorks User Manual Page 202 of 373 If you want to replace the existing letter with the changes you made then choose the option to Overwrite. If you would like to save the changes you made as a separate letter, choose the Add to letter library option. Give the letter a name and click Save. This letter template will now be saved in the Letter Library. OPTIONS You can delete a letter, hide/show a letter or rename a letter from the Options area. Delete this letter- Click here to delete a letter you no longer need from the Letter Library. GiftWorks User Manual Page 203 of 373 Hide /Show Letter- You can hide a letter so it is not visible on the list of letters to choose when processing a mailing. This allows you to still keep a letter that you are not currently using, rather than deleting it. Click on Options then choose “Hide this Letter” The letter name will now appear in pale grey when viewing letters in Library and will also show that the letter is hidden at the top of the screen. GiftWorks User Manual Page 204 of 373 To show a letter that was previously hidden, click Rename this Letter- If you need to rename a letter click here and then type in a new letter name. VIEW MAILING HISTORY Each time you send a mailing in GiftWorks, you have the option of recording the mailing to the GiftWorks User Manual Page 205 of 373 recipients’ records. Doing so allows you to track the communications sent to each donor. You can enter a name for the mailing (like “Board Solicitation March 2012”), a description, and the date and time that the mailing was sent. For each recipient, that mailing will appear on the Notes, Tasks & Files tab. You can also view and modify the history of all mailings sent through GiftWorks by going to the main Mailings page and clicking View Mailing History in the Related Actions menu. The Mailing History screen shows you each mailing sent, how many donors received the mailing, and which GiftWorks user created the mailing. You can Edit the details of the mailing by double-clicking on any mailing, or right clicking and choosing Edit. Note that any changes you make here will be applied to each recipient record. You can also delete the Mailing history. Right click in the mailing and choose Delete. GiftWorks User Manual Page 206 of 373 Note that by deleting this mailing, all associations with this mailing will be removed too. SET UP HONORARIA AND MEMORIALS You have the option to set up your Honoraria and Memorials from the Related Actions menu on the main Mailing screen. See the Managing Honoraria and Memorials section of this manual for more details. UNDERSTANDING THE MAILING PROCESS There are several ways to start the mailing process in GiftWorks. You can send mail to a single donor, or to an entire SmartList or Mailing List. When you send a mailing using GiftWorks, you will always go through the same five main steps of the process, with minor variations depending on what you’re sending. These steps are reviewed in detail in the Sending Emails and Sending Letters sections below. You can move back and forth through the mailing process by using the Back and Next buttons at the bottom left of the main work area. You can also skip to any main step of the mailing process by clicking the underlined step names listed across the top of the main work area. You can click the Send Mail link from the main work area of your Mailings screen GiftWorks User Manual Page 207 of 373 You can click the Send Mail link from the Mailing Tasks menu when viewing a SmartList or a Donor. You can click the Send Mail link from the Related Actions menu when viewing a Donation or a Pledge. Mailing to a Donor From the main Mailings page, click Send Mail then click To a Donor. Search for the donor you would like to send the letter to and click Next. GiftWorks User Manual Page 208 of 373 If you are viewing a donor SmartList, you can click Send Mail under the Mailing Tasks area, then click on Send Mail to these Donors. Mailing to a List From the main Mailings page, click Send Mail then click To a List. Choose the type of list (Mailing List or SmartList) then pick the specific list and click Next. GiftWorks User Manual Page 209 of 373 If you are viewing a donations or pledges SmartList, you have the option of sending mail to the donors in the list, or of sending mail for the donations or pledges in the list. Donors vs. Donations/Pledges When mailing to a donations or pledges SmartList, you have the option of sending to the donors in the list or of sending for the donations or pledges in the list. Sending to the donors generates one letter or email for each donor in the list, regardless of how many donations that donor has in the list. You might use this if you want to send mail to everyone who donated to a certain campaign or during a certain time period last year. Sending mail for the donations or pledges in a list allows you to generate one letter or email for each donation or pledge in the SmartList OR one letter per donor. You might use this to send thank you letters or some other acknowledgement of those donations or pledges. Please note: you typically acknowledge donations and pledges using the built-in donation mailings. SENDING EMAILS Flexible options are available for configuring email to work with GiftWorks. In the past, users were required to have Microsoft Outlook installed on any computer they wanted to use to send email from GiftWorks during the mailing process. Now, users will be able to choose to send email using Microsoft Outlook or by configuring standard email settings to use their outgoing mail server. Configuring these standard email settings will be similar to what users have experienced when setting up any email client. Using your own Outgoing Mail Server allows the emails to go to that server to be sent out, which frees up GiftWorks. GiftWorks Anywhere users do not have an option to use Microsoft Outlook. CONFIGURATION OPTIONS GiftWorks User Manual Page 210 of 373 Each GiftWorks user will need to configure their email options. To start this process, click on the Mailings icon. Click on Send Mail and choose a list or donor. Choose Send Email – you will then see the screen below. Click on the “click here to configure email settings” link. Then choose the option you would like to use. If you choose to Send email through Microsoft Outlook, you must have Microsoft Outlook installed on this computer. There are no other set up steps for this option. Enter in the email address to send the test email to and click on the Send Test Email button. GiftWorks User Manual Page 211 of 373 If the email was sent you will see the following. Click Finish. If you choose to Send email using your own email server settings, you will be able to set up your own email server settings. GiftWorks User Manual Page 212 of 373 You may need to contact your IT person to get the specific server information needed to set this up. Click Next. Enter in the email address to send the test email to and click on the Send Test Email button. If the email was sent you will see the following. GiftWorks User Manual Page 213 of 373 Click Finish. For more information on configuring email set up in GiftWorks, click Here. SENDING EMAILS After you configure your email options you will be able to start the email process. As mentioned above in the Understanding the Mailing Process section, there are several ways to start the mailing process in GiftWorks. No matter which way you start your mailing, you will be taken to the same area to process the mailing. SELECT OPTIONS Mailing Format: To start the email process, click on Send Email in this area. Email Options: GiftWorks User Manual Page 214 of 373 Choose the option you would like for your email(s). Letter is included in the body of the email – if you choose this option, the letter will be in the body of the email(s) you send. Letter is attached to the email as a PDF- if you choose this option, the letter will be attached to the email as a PDF file. You can use the Email body text field to enter in what you would like to appear in the body of the email(s). Letter is attached to the email as a PDF and in the body of the email - if you choose this option, the letter will be attached to the email as a PDF file as well as be in the body of the email(s) you send. Recipients Some mailing types give you recipients options on the options step of the mailing process. Choose whether to send one mailing per donation/pledge or to send one mailing per donor. Attachment: If you are sending an email, you can choose to attach files to the outgoing emails. Click the Browse button to locate the file. GiftWorks User Manual Page 215 of 373 Click Next to continue. Choose Recipients This step lets you choose whether to send to all donors in the list for your mailing. There are buttons at the bottom right of the main work area that let you choose how to narrow the list. GiftWorks provides a warning at the bottom left if there are recipients with incomplete or invalid addresses, recipients marked as deceased, do not mail, or do not email in their contact preferences, or, if sending a donation or pledge thank you letter, donations or pledges already marked acknowledged. The number of selected recipients is also indicated in the bottom left. PREMIUM GiftWorks will display a warning at the bottom of the screen if a seasonal address update has not been run on the current day. Email Options button: Gives you the option to Send email to the primary email address of the selected recipients or Send email to all the email addresses of the selected recipients. Check button: Gives you the options of checking all recipients, checking every other recipient, checking every third recipient, checking the top 100 or 500 recipients, or choosing a number of recipients to check. If you have a large mailing (a large number of recipients and/or a large letter template), you may want to use one of these options to reduce the number of letters you generate at one time. Uncheck button: Gives you the options of unchecking all recipients, unchecking all recipients with invalid addresses, unchecking recipients whose status is deceased, unchecking all recipients with any warning note, unchecking all recipients marked as ‘Do Not Mail’ or unchecking all recipients marked as ‘Do Not Solicit’. GiftWorks User Manual Page 216 of 373 **Note: a donor mailing has additional Uncheck options. These options are Uncheck members of included households, Uncheck members of included organizations, Uncheck households of included members and Uncheck organizations of included members. Invert button: Reverses the currently selected recipients. If you have all recipients checked, the Invert button deselect them. If you have some recipients checked, this button will deselect those and select all other recipients. Add button: A donor mailing will also include an Add button. This gives you the options of Add members of included households, Add members of included organizations, Add households of included members and Add organizations of included members. You can Customize the Recipients screen to show different columns of information. Click on the Customize link on the right. You will see different customize options depending on the type of mailing you are processing (donor vs. donation vs. pledge vs. receipt) Here you can choose the columns to include on the recipient list, you can use the Move Up or Move Down buttons to change where they appear on the screen as well. Click Ok to refresh the screen. Click Next to continue. Select Letter This step is where you choose the letter template you want to use for your mailing. The type of list you are sending to will determine which templates are available for your mailing. For example, if you are GiftWorks User Manual Page 217 of 373 sending to a list of donations, you can only use a donation template. If you want to edit the letter template before you send out the mailing, click the Edit Letter button at the bottom left of the main work area. This will take you to the same screen you would see if you were editing a letter within the Letter Library. Refer to that section above for more details. NOTE: If you make an edit that you want to be a permanent change for this letter, you will need to click on the Save Letter to Library option on left under Related Actions. GiftWorks User Manual Page 218 of 373 You can then choose to overwrite the letter or add it to letter library as a new letter. Click Save. Click Ok to get back to the mailing process. Click Next to continue. Generate Mailing This step shows you a summary of the mailing you are preparing to send. The Mailing Options Summary box displays information about your mailing, including the number of recipients, sorting information, and whether you are sending one mailing per donor or per donation/pledge. Any warnings or errors with your mailing are displayed here as well. GiftWorks will notify you if there are any recipient problems (like incomplete or invalid information), or if the overall size of your mailing might cause problems. You can go back and correct these problems before you continue. GiftWorks User Manual Page 219 of 373 You can send a test email from this area. Click on the Send Test Email Link. Enter in the Sent To address, Sender Name, Sender Address and Subject the click Send. You will see a confirmation box saying that the test message was sent. Click Ok. Click on the Generate Mailing button. This will prepare your emails to be sent. NOTE: THIS DOES NOT SEND THE EMAILS GiftWorks User Manual Page 220 of 373 Click Next to Continue. Finish Mailing On this step, you will complete the sending of the email and choose options for recording it to the donor, donation, or pledge records. GiftWorks User Manual Page 221 of 373 Click on the Send Now link to send the emails. Enter in the Sender Name, Sender Address and Subject then click Send. You will see a confirmation box saying that the test message was sent. GiftWorks User Manual Page 222 of 373 Click Ok. You can also Print and Export the list as well as Record this mailing. If you Record the mailing, it will track that this specific mailing was sent in the Notes, Tasks & Files tab within the donor profile. Click on Done to finish the process. SENDING LETTERS As mentioned above in the Understanding the Mailing Process section, there are several ways to start the mailing process in GiftWorks. No matter which way you start your mailing, you will be taken to the same area to process the mailing. SELECT OPTIONS GiftWorks User Manual Page 223 of 373 The options on this screen will vary based on the mailing Format you choose and also if you are using GiftWorks Standard or GiftWorks Premium. Mailing Format: This step lets you choose some basic options for your mailing. Choose the option you would like for your mailing. Send Letters only – You have the option to send letters only. Send Letters & Labels- You can choose to process your letters and labels at the same time. Label Type: If you are creating labels as part of your mailing, you will see the option to choose the type of label or envelope. You can set or change the label options by clicking the available links. Send Letters& Envelopes- You can choose to process your letters and envelopes at the same time. Envelope Type: If you are creating envelopes as part of your mailing, you will see the option to choose the type of envelope. You can set or change the envelope options by clicking the available links. GiftWorks User Manual Page 224 of 373 Sort: Choose a primary and secondary sort for the documents. For example, if you choose ZIP/Postal Code as primary and Display Name as secondary, the mailing documents will be generated in ZIP Code order, then in alphabetical order for recipients who are in the same ZIP Code. Recipients: Some mailing types give you recipients options on the options step of the mailing process. Choose whether to send one mailing per donation/pledge or to send one mailing per donor. PREMIUM If you are using GiftWorks Premium, the Select Options screen will have the Mailing Discount area. Mailing Discount If your mailing has more than 200 pieces and meets weight and shape standards, the mailing may qualify for discounted rates. Choose whether to send the mailing with No discount/First Class Mail, USPS Standard Mail Machinable Letters or USPS Standard Mail Automation Letters. GiftWorks Premium will automatically sort addresses, print postal sortation tray labels and print the necessary information to complete postage statements for USPS discounted mailings. Click Next to continue. Choose Recipients This step lets you choose whether to send to all donors in the list for your mailing. There are buttons at the bottom right of the main work area that let you choose how to narrow the list. GiftWorks User Manual Page 225 of 373 GiftWorks provides a warning at the bottom left if there are recipients with incomplete or invalid addresses, recipients marked as deceased, do not mail, or do not email in their contact preferences, or, if sending a donation or pledge thank you letter, donations or pledges already marked acknowledged. The number of selected recipients is also indicated in the bottom left. PREMIUM GiftWorks will display a warning at the bottom of the screen if a seasonal address update has not been run on the current day. Check button: Gives you the options of checking all recipients, checking every other recipient, checking every third recipient, checking the top 100 or 500 recipients, or choosing a number of recipients to check. If you have a large mailing (a large number of recipients and/or a large letter template), you may want to use one of these options to reduce the number of letters you generate at one time. Uncheck button: Gives you the options of unchecking all recipients, unchecking all recipients with invalid addresses, unchecking recipients whose status is deceased, unchecking all recipients with any warning note, unchecking all recipients marked as ‘Do Not Mail’ or unchecking all recipients marked as ‘Do Not Solicit’. Choosing the Uncheck all invalid option will automatically uncheck any recipients with invalid addresses or whose status is deceased. **Note: a donor mailing has additional Uncheck options. These options are Uncheck members of included households, Uncheck members of included organizations, Uncheck households of included members and Uncheck organizations of included members. Invert button: Reverses the currently selected recipients. If you have all recipients checked, the Invert button will deselect them. If you have some recipients checked, this button will deselect those and select all other recipients. Add button: A donor mailing will also include an Add button. This gives you the options of Add members of included households, Add members of included organizations, Add households of included members and Add organizations of included members. You can customize the Recipients screen to show different columns of information. Click on the Customize link on the right. GiftWorks User Manual Page 226 of 373 You will see different customize options depending on the type of mailing you are processing (donor vs. donation vs. pledge vs. receipt) Here you can choose the columns to include on the recipient list, you can use the Move Up or Move Down buttons to change where they appear on the screen as well. Click Ok to refresh the screen. Click Next to continue. Select Letter This step is where you choose the letter template you want to use for your mailing. The type of list you are sending to will determine which templates are available for your mailing. For example, if you are sending to a list of donors, you can only use a donor template. GiftWorks User Manual Page 227 of 373 If you want to edit the letter template before you send out the mailing, click the Edit Letter button at the bottom left of the main work area. This will take you to the same screen you would see if you were editing a letter within the Letter Library. Refer to that section above for more details. NOTE: If you make an edit that you want to be a permanent change for this letter, you will need to click on the Save Letter to Library option on left under Related Actions. GiftWorks User Manual Page 228 of 373 You can then choose to Overwrite the letter or add it to letter library as a new letter. Click Save. Click Ok to get back to the mailing process. Click Next to continue. Generate Mailing This step shows you a summary of the mailing you are preparing to send. The Mailing Options Summary box displays information about your mailing, including the number of recipients, sorting information, and whether you are sending one mailing per donor or per donation/pledge. Any warnings or errors with your mailing are displayed here as well. GiftWorks will notify you if there are any recipient problems (like incomplete or invalid information), or if the overall size of your mailing might cause problems. You can go back and correct these problems before you continue. GiftWorks User Manual Page 229 of 373 If you are sending letters (and envelopes or labels), you can preview the documents by clicking the Preview links. GiftWorks shows you what the documents will look like with the information from your database merged in. On the preview screen, use the Prev or Next buttons at the bottom right to move between pages of the document. Click OK to return to the Generate Mailing step. When you are ready to send your mailing, click the Generate Mailing button. If you are sending letters and labels or envelopes, this will prepare your documents for printing and saving. Finish Mailing On this step, you will Print and/or Save the Letters (and Envelopes or Labels), choose options for recording it to the donor, donation, or pledge records. You can also Export the Recipient list. See the Printing Letters, Labels or Envelopes and the Saving Letters, Labels and Envelopes sections below for more details on these options. GiftWorks User Manual Page 230 of 373 Recording a Mailing-If you check the Record this mailing box during the mailing process, you can enter a title and description for the mailing, as well as a date and time that it was sent. All details will be recorded to the recipient, donation or pledge records, as well as to the GiftWorks Mailing History. You can view a donor’s mailing history on the Notes, Tasks & Files tab of the donor record. You can view the GiftWorks Mailing History by clicking View Mailing History in the Related Actions menu on the main Mailings page. Removing Recipients- If you are sending your mailing to a Mailing List, you can click the Remove recipients box to remove the recipients from the Mailing List once you complete the mailing. For example, if you are sending a welcome mailing to new members of your organization, you may want to remove them from the Welcome Letters list. If you are sending newsletters, you might want to keep them on so that they will receive the next newsletter. Export Recipient List- You can export the recipient list to your computer. Choose this option under Other Tasks on the left. GiftWorks User Manual Page 231 of 373 Click Done to finish the mailing process. PREMIUM If you are using GiftWorks Premium, the Finish Mailing screen will look like this. If you select to send your mailing as USPS Standard Mail Machinable or Automation Letters, make sure you: - Print the labels for each postal sort tray - Print the qualification report, and - Print the mailing instructions to complete the Postage Statement before taking the mailing to your Post Office. PRINTING LETTERS, LABELS, OR ENVELOPES If you are sending letters and labels or envelopes, there will be a Print link for each item. When you click the Print link, you will be presented with some options for the printing. Click the Print Setup button to access the settings for the selected printer or to choose a different GiftWorks User Manual Page 232 of 373 printer. Checking the Pause printer after each letter box will cause a prompt to come up after each individual item is printed. The Start Printing button starts the printing process with whatever options you have selected. Once printing has begun, you can pause it by clicking Pause Printing. The Click to control printing link gives you additional options, including being able to select individual items or a number of items to print. Click the Done button when you are finished. Printing Labels To print labels for a donor or list, click the Print Labels link on the main Mailings page. You can then choose to create labels for just one donor or for a list (SmartList or Mailing List). GiftWorks then creates your labels and displays them on the screen. To choose a different label type, click the Change button at the top of the Mailing Labels screen. GiftWorks includes support for a wide variety of Avery labels, including most standard label sizes. See the size and layout details for the selected labels on the bottom half of the Select Mailing Label window. Click OK to return to the Mailing Labels screen. GiftWorks User Manual Page 233 of 373 To change label formatting, click the Label Options link and then choose Format Labels. On the Label Formatting Options screen, choose the database fields you want to insert into your labels by clicking the Insert Field button. The fields you select will be replaced by information from each recipient’s record when your labels are created. To delete a field from the label, click that field and then click Delete Field. The database fields added to your label will appear in gray, surrounded by double angle brackets, like: <<Labels: Addressee - Formal>>. To modify the font, use the buttons at the top right of the window. **Note: you must first highlight the fields and then choose the font. You can choose a specific font, and you can make text bold, italicized, or underlined. You can also choose a color for the text. The options you choose here will be applied to each label as it is generated. If you want to format individual labels, you can modify them in the main Labels window using the toolbar. To set options for printing and sorting the labels, look on the bottom half of the Label Formatting Options screen. You can choose to print successive labels across or down the page, how to sort the labels, and, if you have a partially used sheet of labels, where on the sheet to start printing. Click OK when you have finished formatting your labels and setting options. To show or hide the toolbar and ruler, click the links in the top right corner of the main work area of the main Mailing Labels screen. The toolbar contains buttons for formatting your labels, including font style, color and size, alignment, and bullet or outline formats. Change the formatting of any part of your label document using the toolbar. The ruler shows you the measurements of where your labels fall on the printed page. When you are done making changes to your labels, click Print or Save at the bottom of the main work GiftWorks User Manual Page 234 of 373 area. The Print button brings up the print options window. The Save button lets you choose a filename and location to save the labels document in rich text format (.rtf), which you can then open in Microsoft Word. When you have finished printing or saving your labels, click the Done button to exit the Mailing Labels screen. GiftWorks will warn you if you have not recorded the labels. Recording Labels Record the printing of labels as a mailing in each recipient’s record by clicking Record These Labels in the Other Actions menu. You might want to record labels, for example, if you are printing them to put on preprinted newsletters and you want a record that the newsletters were sent out. If you click the Done button at the bottom of the Mailing Labels screen without recording the labels, GiftWorks will warn you that you have not recorded the labels. Printing Envelopes To print envelopes for a donor or list, click the Print Envelopes link on the main Mailings page. GiftWorks User Manual Page 235 of 373 You can then choose to create envelopes for just one donor or for a list (SmartList or Mailing list). GiftWorks then creates your envelopes and displays them on the screen. To choose a different envelope type, click the Change button at the top of the Mailing Envelopes screen. GiftWorks includes support for a wide variety of standard envelope sizes. Click OK to return to the Mailing Envelopes screen. To change the formatting for your envelopes, click the Envelope Options link and then choose Format Envelopes. On the Envelope Formatting Options screen, choose the database fields you want to insert into your envelopes by clicking the Insert Field button. The fields you select will be replaced by information from each recipient’s record when your envelopes are created. To delete a field from the envelope, click that field and then click on Delete Field. The database fields that have been added to your envelope will appear in gray, surrounded by double angle brackets, like: <<Labels: Addressee Formal>>. GiftWorks User Manual Page 236 of 373 To modify the font, use the buttons at the top right of the window. **Note: you must first highlight the fields and then choose the font. You can choose a specific font, and you can make text bold, italicized, or underlined. You can also choose a color for the text. The options you choose here will be applied to each envelope as it is generated. If you want to format individual envelopes, modify them in the main Envelopes window using the toolbar. On the bottom half of the Envelope Formatting Options screen, choose whether to print a return address on the envelopes, and enter or modify the return address you want to use. You can modify the font for the return envelope using the buttons at the top right of that section of the screen. At the bottom of the Mailing Envelope Options screen, choose the sorting of the envelopes. Click OK when you have finished formatting your envelopes and setting options. On the main Mailing Envelopes screen, show or hide the toolbar and ruler by clicking the links in the top right corner of the main work area. The toolbar contains buttons for formatting your envelopes, including font style, color and size, alignment, and bullet or outline formats. Change the formatting of any part of your envelope document using the toolbar. The ruler shows you the measurements of where your envelopes fall on the printed page. When you are done making changes to your envelopes, click the Print or Save buttons at the bottom of the main work area. The Print button brings up the print options window. The Save button lets you choose a filename and location to save the envelopes document in rich text format(.rtf), which you can then open in Microsoft Word. When you have finished printing or saving your envelopes, click the Done button to exit the Mailing Envelopes screen. GiftWorks will warn you if you have not recorded the envelopes. Recording Envelopes You can record the printing of envelopes as a mailing in each recipient’s record by clicking Record These Envelopes in the Other Actions menu. You might want to record envelopes, for example, if you are printing them out to send a mailing generated outside of GiftWorks. This gives you a record that the mailing was sent out. GiftWorks User Manual Page 237 of 373 If you click the Done button at the bottom of the Mailing Envelopes screen without recording the envelopes, GiftWorks will warn you that you have not recorded the envelopes. SAVING LETTERS, LABELS, OR ENVELOPES To individualize some of the documents you are sending, or if you just want to save the documents for future reference, click one of the Save links on the last step of the mailing process. You will be presented with some options for saving the documents. You can choose the file format (Rtf or Pdf). You can choose to save as 1 letter per file or All letters in 1 file. Clicking the Change button lets you choose a location to save the document files to. The Save button starts the saving process. Once saving has begun, you can pause it by clicking the Pause button. The Click to control saving link gives you additional options, including selecting individual items or a number of items to save. Click the Done button when you are finished. GiftWorks User Manual Page 238 of 373 DONATION MAILINGS GiftWorks has built-in donation mailings to help you acknowledge and send notifications about new donations or pledges. On the main Mailings page, donation mailings are listed in a gray box at the top right of the main work area. There are five donation mailings: Donation Receipts Donation Thank You Letters Soft-Credit Thank You Letters Pledge Thank You Letters Matching Gift Thank You Letters Honorarium and Memorial Notifications Each serves a specific purpose in your donation processing and acknowledgement process. Donation mailings differ from regular mailings sent through GiftWorks in that they can be used to automatically mark donations or pledges as receipted or acknowledged. The automation of these acknowledgement processes allows your organization to easily track your donations and ensures that your donor’s generosity is acknowledged in a timely manner. Donation Receipts You can control the way receipts are issued and tracked. This improved control will also help your year-end receipting process. Many of the receipting requirements will be satisfied by creating more flexibility in the way receipts are generated rather than creating specific processes such as Year-End receipting. This type of flexibility will allow Canadian customers to print year-end receipts. It will also provide more flexibility and tracking will be created around the process of editing and re-printing receipts. When you are ready to send out receipts for these donations, go to the main Mailings page and select Donation Receipts in the Donation Mailings Box at the top right of the main work area. GiftWorks User Manual Page 239 of 373 You will now get a dialog which allows you to choose a Date Range and Receipt Group to more easily send Receipts You can now choose to send one Receipt for multiple donations where the donations will all have the same Receipt number GiftWorks User Manual Page 240 of 373 You can create or modify the receipt letter template set to be used as your receipt. Please note: only a letter of type Receipt can be used for the Donation Receipts mailing. During the Finish Mailing step of the mailing process, you have the option of recording that the receipts were sent. This automatically assigns a receipt number to each donation, and removes the donations from the Donations Receipts mailing. GiftWorks User Manual Page 241 of 373 You also have the option of creating a receipt that doubles as an acknowledgement (or thank you letter) for the donations. If you do so, you can check the box labeled Receipts are also used as our Thank You Letters on the Finish Mailing step. This marks the donations as acknowledged when the receipt is sent. Donation Thank You Letters When you add donations into GiftWorks, there is an acknowledgement step that includes the option of adding the donation to the Thank You Letters mailing list. Donations added to the list are automatically queued for sending. When you are ready to send the thank you letters, go to the main Mailings page and click the Donation Thank You Letters donation mailing at the top right of the main work area. This takes you into the mailing process for the thank you letters. You can create or modify the letter template set to be used as the thank you letter for this mailing. Please note: only a donation-type letter can be used for the Donation Thank You Letters mailing. On the Finish Mailing step of the mailing process, you have the option of marking the donations in the list as acknowledged by the sending of this mailing. This automatically marks each donation as acknowledged with the details of the mailing, and removes the donations from the Donations Thank You Letters mailing. GiftWorks User Manual Page 242 of 373 Soft-Credit Thank You Letters When you add a soft-credit into GiftWorks, there is an acknowledgement step that includes the option of adding the soft-credit to the Soft-Credit Thank You Letters mailing list. Soft-Credit Donations added to the list are automatically queued for sending. When you are ready to send the thank you letters, go to the main Mailings page and click the Soft-Credit Thank You Letters donation mailing at the top right of the main work area. This takes you into the mailing process for the soft-credit letters. You can create or modify the letter template set to be used as the thank you letter for this mailing. Please note: only a donation-type letter can be used for the Soft-Credit Thank You Letters mailing. On the Finish Mailing step of the mailing process, you have the option of marking the donations in the list as acknowledged by the sending of this mailing. This automatically marks each donation as acknowledged with the details of the mailing, and removes the donations from the Soft-Credit Thank You Letters mailing. Pledge Thank You Letters When you add pledges into GiftWorks, there is an acknowledgement step that includes the option of adding the pledge to the Thank You Letters mailing list. Pledges added to the list are automatically GiftWorks User Manual Page 243 of 373 queued for sending. When you are ready to send the thank you letters, go to the main Mailings page and click the Pledge Thank You Letters donation mailing at the top right of the main work area. This takes you into the mailing process for the thank you letters. You can create or modify the letter template set to be used as the thank you letter for this mailing. Please note that only a pledge-type letters can be used for the Pledge Thank You Letters mailing. On the Finish Mailing step of the mailing process, you have the option of marking the pledges in the list as acknowledged by the sending of this mailing. This automatically marks each pledge as acknowledged with the details of the mailing, and removes the pledges from the Pledges Thank You Letters mailing. Matching Pledge Thank You Letters When you enter donations into GiftWorks that are going to be matched by another donor (an employer, for example), you can automatically create a pledge for the matching donor. These matching pledges can then be optionally added to the Matching Pledge Thank You Letters mailing. When you are ready to send the thank you letters, go to the main Mailings page and click the Matching Pledge Thank You Letters Donation Mailing at the top right of the main work area. GiftWorks User Manual Page 244 of 373 This takes you into the mailing process for the thank you letters. You can create or modify the letter template set to be used as the thank you letter for this mailing. Please note that only a pledge-type letter can be used for the Pledge Thank You Letters mailing. On the Finish Mailing step of the mailing process, you can choose to record the details of the mailing in each donor’s record. Each pledge will also automatically be removed from the Matching Pledges Thank You Letters mailing. Honorarium and Memorial Notifications Once set up, a notification will be added to the Honorarium and Memorial Notifications for each donation received to the honorarium or memorial, and for each donor (family members, for example) that you indicated wants to be notified of new donations. When you are ready to send notifications, go to the main Mailings page, and click on Honorarium and Memorial Notifications at the top right of the main work area. Next, choose an honorarium or memorial from the list. You can now also specify the Date Range for the donations. GiftWorks User Manual Page 245 of 373 You can create or modify the letter template set to be used as the notification for this mailing. Please note: only a donor letter can be used for the notification mailing. GiftWorks User Manual Page 246 of 373 REPORTS IN THIS SECTION Reports Overview Viewing Donor Reports Donors by SmartList Donor Summary Sheets Source of New Donors Donor Growth Donors by Profile Donors by Category Top Donors Donors by Giving Level Recently Lapsed Donors Lapsed Donors Donors By Group Donor Assignments Donor Relationships Donor Addresses Donor Phones/Emails Donor Tasks Donor Notes Honorarium/Memorial Notifications Viewing Donation Reports Donation History Top Donations Donation History by Donor Profile Donation History by Donor Category Donation History by Campaign Campaign Analysis Donation History by Fund Donation History by Appeal Donation Summary by Fund/Appeal Pledges and Gifts By Campaign Received Pledges and Gifts Pledge List Pledge History Unfulfilled Pledges Upcoming Payments Past Due Payments Pledge Balances Matching Gift Members Matching Gift Fulfillment Matching Gifts Outstanding Customizing Donor and Donation Reports Running a Report on a SmartList Running a Report on a Donor Choosing a Report Style GiftWorks User Manual Page 247 of 373 Viewing My Favorite Reports Printing, Exporting and Emailing Reports Save and Share Report Design GiftWorks User Manual Page 248 of 373 REPORTS OVERVIEW After entering your donors and donations, GiftWorks Reports let you review, analyze, and share your information. You can report on giving trends for your board of directors, review your top donors with your annual campaign chair, analyze opportunities with your executive committee, and much more. Reports let you create the reports you need in formats that are both concise and informative. GiftWorks provides two groups of reports that enable your organization to monitor productivity and achievements at a glance: donor reports, and donation reports. The reports you find most useful can be accessed quickly in My Favorite Reports at the bottom of the main work area of your Reports screen. When you need a report to show data for a specific group of donors or donations, you can run a report on a SmartList. GiftWorks reports offer a variety of report styles so you can present your data in the most meaningful way for your organization. Reports can be viewed as lists, summaries, bar, line, and pie charts. When you click on a report, the Report Choices screen opens. GiftWorks User Manual Page 249 of 373 This allows you to set up the parameters of your report before generating it. The choices available on this screen vary depending on the report you have chosen. If you want, you can tell GiftWorks not to show you this screen by unchecking the box Always show before report. You can see the screen again by clicking Customize Report on the left under Related Actions. VIEWING DONOR REPORTS GiftWorks offers 15 donor reports that consolidate donor information into views that let you analyze and evaluate your organization. On all donor reports, you can view donor information. Some reports contain donation information as well. GiftWorks User Manual Page 250 of 373 Click View Donor Reports in the work area of your main Reports screen to view a list of available donor reports. To view any of the reports, click the name of the report. See the items below to learn more about each report. Donors by SmartList This report provides a view of the donors contained in any one of your donor SmartLists. Choose the SmartList for your report using the SmartList selection box on the Report Choices screen, the SmartList Filter dropdown list at the bottom of the screen within the report, or from the Customize Report option in the Related Actions menu. This report also has a Phone List option under Change Report Style that lets you create a phone list for the donors contained in your chosen SmartList. Donor Summary Sheets This report provides the opportunity to print out a donor summary sheet for each of the donors in the SmartList that you select. If you are generating summary sheets for a large list of donors, you will see a window that indicates the progress of the report generation. It may take a long time to generate a large number of summary sheets. GiftWorks User Manual Page 251 of 373 Choose the SmartList for your report using the SmartList selection box on the Report Choices screen, the SmartList Filter dropdown list at the bottom of the screen within the report, or from the Customize Report option in the left Related Actions menu. Click on Customize then click on Sections to choose which sections to display on the Report. You can also choose different Giving Details and choose to include Soft Credits. Source of New Donors This report allows you to compare the effectiveness of your donor sources. While this report can include all donor records, you can limit the donors included by indicating a specific date range, source, and/or SmartList. GiftWorks User Manual Page 252 of 373 Choose the options for your report using the Report Choices screen or at the bottom of the screen within the report. Donor Growth This report lets you see how the number of donors in your GiftWorks database has grown over time. It shows a snapshot of the number of donors in GiftWorks at a given point in time. You can further narrow your results using the date range selection field. You can also choose a SmartList for this report using the Report Choices screen, Customize options, or at the bottom of the screen within the report. This report is particularly powerful when viewed as a line or bar graph. Donors by Profile This report allows you a breakdown of donors in your database by Profile (Household, Organization, and/or No Profile). GiftWorks User Manual Page 253 of 373 Choose the options for your report using the Report Choices screen, under Customize Report, or at the bottom of the screen within the report. Donors by Category This report shows you a breakdown of donors in your database by donor category. Choose the options for your report using the Report Choices screen, under Customize Report, or at the bottom of the screen within the report. Top Donors This report shows a list of the top donors based on how much they have donated in total to your organization. Donation information is included per donor record. You can choose from top 10, 25, 50, 100, 500, or all donors by SmartList. Note that if you have a number of top donors selected, the report will include no fewer than the selected number, but will include more if some donors have given the same amount. GiftWorks User Manual Page 254 of 373 Choose the options for your report using the Report Choices screen, under Customize Report, or at the bottom of the screen within the report. Donors by Giving Level This report allows you to view your donors by customized giving levels. You can select a SmartList and can further narrow the results by selecting a date range and/or specific campaign. The customized giving levels for this report can be modified by clicking Customize Report in the Related Actions menu. You can define up to eight giving levels. You can give each level a label (for example, friend or patron) and then define the donation range for that level. This report can be very useful if you need to generate a list of your donors by your organization’s defined giving levels for a program, newsletter, or other recognition. Choose the options for your report using the Report Choices screen, under Customize Report, or at the bottom of the screen within the report. GiftWorks User Manual Page 255 of 373 Recently Lapsed Donors Also known as a LYBUNT (Last Year But Unfortunately Not This year) report, this report shows a list of donors who contributed to your organization last calendar year or last fiscal year, but who have not contributed in the current calendar year or fiscal year. Donation information is included per donor record. The donors in this report might make a good target for a solicitation to encourage them to renew their commitment to your organization. Choose the options for your report using the Report Choices screen, under Customize Report, or at the bottom of the screen within the report. Lapsed Donors Also known as a SYBUNT (or Some Year But Unfortunately Not This year) report, this report provides a list of all donors who contributed to your organization in the past but have not contributed in the current calendar or fiscal year. Donation information is included per donor record. The donors in this report might make a good target for a solicitation to encourage them to renew their commitment to your organization. GiftWorks User Manual Page 256 of 373 Choose the options for your report using the Report Choices screen, under Customize Report, or at the bottom of the screen within the report. Donors By Group This report provides a breakdown of donors who are in a certain group or groups. A donor might be included on the report multiple times since donors can be in more than one group. Choose the options for your report using the Report Choices screen, under Customize Report or at the bottom of the screen within the report. Donor Assignments This report provides a breakdown of donors by whom they are assigned to within the database. You can choose to show or hide unassigned donors. GiftWorks User Manual Page 257 of 373 Choose the options for your report using the Report Choices, under Customize Report, screen or at the bottom of the screen within the report. Donor Relationships This report provides a list of donors who have relationships, the donors to whom each is related, and the type of relationship. Donors who have relationships may show up on the report multiple times, showing everyone that is related to them and showing all of the donors they are related to. Choose the options for your report using the Report Choices screen, under Customize Report, or at the bottom of the screen within the report. GiftWorks User Manual Page 258 of 373 Donor Addresses This report provides a list of donors and donor addresses, and indicates if the addresses are the current mailing addresses. Choose the options for your report using the Address Type and SmartList Filter options at the bottom of the screen. Donor Phones/Emails This report provides a list of donor phones/emails. Choose the options for your report using the Donor SmartList Filter at the bottom of the screen. Donor Tasks View your donor tasks. Select tasks based on the due date, User and whether they are active or completed. GiftWorks User Manual Page 259 of 373 Donor Notes View your donor notes. Select notes based on the date and user. GiftWorks User Manual Page 260 of 373 Honorarium/Memorial Notifications View donors who receive honorarium/memorial notifications. VIEWING DONATION REPORTS GiftWorks offers 17 different donation reports that organize donation information in a way that lets you assess your organization’s fundraising effectiveness. Click View Donation Reports in the work area of your main Reports screen to view a list of the available donation reports. To view any of the reports, click the report name. GiftWorks User Manual Page 261 of 373 Read the sections below to learn more about each donation report. Donation History This report lets you view how the total donations to your organization have changed over time. You can narrow your results by using the date range selection field, by selecting a specific SmartList, and by indicating the types of donations to include. GiftWorks User Manual Page 262 of 373 Choose the options for your report using the Report Choices screen, under Customize Report, or at the bottom of the screen within the report. Top Donations This report lets you view your largest received donations (gifts or pledge payments) within a specified time frame. You can choose from top 10, 25, 50, 100, 500, or all donations by SmartList. You can further narrow your results using the date range selection field. Choose the options for your report using the Report Choices screen, under Customize Report, or at the bottom of the screen within the report. Donation History by Donor Profile This report shows a breakdown of donations according to the profile of the donor who made the donation. You can choose one, two or all three of the profile options by SmartList. You can further narrow your results using the date range selection field and by indicating the types of donations to include. GiftWorks User Manual Page 263 of 373 This report includes bar chart, pie chart, and line chart styles. Choose between styles by clicking Change Report Style in the Related Actions menu. The pie chart shows total donations by type of profile for the selected date range. The bar and line charts show the total donations over time, broken into time units (month, year, etc.) for each profile type. Choose the options for your report using the Report Choices screen, under Customize Report, or at the bottom of the screen within the report. Donation History by Donor Category This report shows a breakdown of donations according to the donor categories of the donors based on any or all custom categories by SmartList. You can further narrow your results using the date range selection field, and by indicating the types of donations to include. This report includes bar chart, pie chart, and line chart styles. Choose between styles by clicking Change Report Style in the Related Actions menu. The pie chart shows total donations by donor category for the selected date range. The bar and line charts show the total donations over time, broken into time units (month, year, etc.) for each donor category. GiftWorks User Manual Page 264 of 373 Choose the options for your report using the Report Choices screen, under Customize Report, or at the bottom of the screen within the report. Donation History by Campaign This report shows a breakdown of how donations generated by an individual campaign or several different campaigns have changed over time. You can indicate a specific campaign for your report by choosing from the campaign selection. If you choose the blank option in the campaign dropdown, the report will show data for all campaigns. You can further narrow your results by choosing a SmartList, using the date range selection field, and by indicating the types of donations to include. This report includes bar chart, pie chart, and line chart styles. Choose between styles by clicking Change Report Style in the Related Actions menu. The pie chart shows total donations by campaign for the selected date range. The bar and line charts show the total donations over time, broken into time units (month, year, etc.) for each campaign. GiftWorks User Manual Page 265 of 373 Choose the options for your report using the Report Choices screen, under Customize Donations, or at the bottom of the screen within the report. Campaign Analysis This report allows you to analyze campaign income and expenses, including budgeted and actual income. This report includes bar chart, pie chart, and line chart and summary styles. Choose between styles by clicking Change Report Style in the Related Actions menu. The pie chart shows totals for all of the campaigns you chose. The bar and line charts show the totals for each campaign. GiftWorks User Manual Page 266 of 373 Donation History by Fund This report shows a breakdown of how donations to each fund have changed over time. You can indicate a specific fund for your report by choosing from the fund selection. If you choose the blank option in the fund dropdown list, the report will show information for all funds. You can further narrow your results by choosing a SmartList, using the date range selection field, and by indicating the types of donations to include. This report includes bar chart, pie chart, and line chart styles. Choose between styles by clicking Change Report Style in the Related Actions menu. The pie chart shows total donations by fund for the selected date range. The bar and line charts show the total donations over time, broken into time units (month, year, etc.) for each fund. Choose the options for your report using the Report Choices screen, under Customize Report, or at the bottom of the screen within the report. Donation History by Appeal This report shows a breakdown of how donations as a result of an appeal or several appeals have changed over time. You can indicate a specific appeal for your report by choosing from the appeal selection. If you choose the blank option in the appeal dropdown list, the report will show information for all appeals. You can further narrow your results by choosing a SmartList, using the date range selection field, and by indicating the types of donations to include. This report includes bar chart, pie chart, and line chart styles. Choose between styles by clicking Change Report Style in the Related Actions menu. The pie chart shows total donations by appeal for the selected date range. The bar and line charts show the total donations over time, broken into time units (month, year, etc.) for each appeal. GiftWorks User Manual Page 267 of 373 Choose the options for your report using the Report Choices screen or at the bottom of the screen within the report. Donation Soft-Credit Recognition This report shows soft-credit recognitions and/or donations with soft-credit recognitions. You can further narrow your results by choosing a SmartList, using the date range selection field, and by indicating the types of donations to include. Donation Summary by Fund/Appeal This report shows a breakdown of donations per fund and appeal. You can indicate specific funds and/or appeals for your report by choosing from the fund and appeal list selections. If you choose a blank option in either the fund or appeal dropdown list, the report will show information for all funds and/or appeals. You can further narrow your results by choosing a SmartList or using the date range selection field. GiftWorks User Manual Page 268 of 373 Choose the options for your report using the Report Choices screen, under Customize Report, or at the bottom of the screen within the report. Pledges and Gifts By Campaign View all gifts and pledges according to the campaign that prompted the donor to make the gift or pledge. GiftWorks User Manual Page 269 of 373 Received Pledges and Gifts View all gifts and received (or partially received) pledges in a single report. Pledge List View all your pledges within a specified time frame. GiftWorks User Manual Page 270 of 373 Pledge History This report shows you a breakdown of how expected pledge payments to your organization have changed over time. The bar chart style of this report further breaks down the pledge information by expected amounts and how much of the expected amounts have been received. This lets you see if your donors have made their expected payments. You can further narrow your results using the date range selection field, or by choosing a SmartList. GiftWorks User Manual Page 271 of 373 Choose the options for your report using the Report Choices screen, under Customize Report, or at the bottom of the screen within the report. Unfulfilled Pledges This report lets you see a list of pledges with outstanding payments from a specific SmartList.. You can further narrow your results using the date range selection field, and by selecting a specific SmartList and/or campaign. If you choose the blank option in the campaign dropdown list, the report will include information for all campaigns. Choose the options for your report using the Report Choices screen, under Customize Report, or at the bottom of the screen within the report. Upcoming Payments This report shows the upcoming scheduled pledge payments for pledges made to your organization. You can further narrow your results using the date range selection field, and by selecting a specific SmartList and/or campaign. If you choose the blank option in the campaign dropdown list, the report will show information for all campaigns. This report includes a bar chart and pie chart. The pie chart shows totals by campaign for the date range. The bar charts show the totals over time (by month, year, etc.) for each campaign. GiftWorks User Manual Page 272 of 373 Choose the options for your report using the Report Choices screen, under Customize Report, or at the bottom of the screen within the report. Past Due Payments This report lets you keep track of overdue pledge payments. You can further narrow your results using the date range selection field, and by selecting a specific SmartList and/or campaign. If you choose the blank option in the campaign dropdown list, the report will show information for all campaigns. This report includes a bar chart and pie chart. The pie chart shows totals by campaign for the date range. The bar charts show the totals over time (by month, year, etc.) for each campaign. Choose the options for your report using the Report Choices screen, under Customize Reports, or at the bottom of the screen within the report. GiftWorks User Manual Page 273 of 373 Pledge Balances This report allows you to view pledge balances and activity for a specified period of time. Matching Gift Members This report shows a list of donors associated with other donors that match gifts. You can run this report on any SmartList. GiftWorks User Manual Page 274 of 373 Choose the options for your report using the Report Choices screen, under Customize Report, or at the bottom of the screen within the report. Matching Gift Fulfillment This report shows a breakdown of all matched donations, plus information about the matching pledge for each. You can further narrow your results using the date range selection field, and by selecting a specific SmartList and/or campaign. If you choose the blank option in the campaign dropdown list, the report shows information for all campaigns. Choose the options for your report using the Report Choices screen, under Customize Report, or at the bottom of the screen within the report. Matching Gifts Outstanding This report shows a breakdown of matched donations whose matching pledges have payments that are overdue. You can further narrow your results using the date range selection field, and by selecting a specific SmartList and/or campaign. If you choose the blank option in the campaign dropdown list, the report shows information for all campaigns. GiftWorks User Manual Page 275 of 373 Choose the options for your report using the Report Choices screen, under Customize Report, or at the bottom of the screen within the report. CUSTOMIZING DONOR AND DONATION REPORTS You can customize donor and donation reports by choosing Customize Report located on the left under Related Actions. The Details tab lets you choose the SmartList with the data you want to view in the report. You can also select whether you want to choose report options each time you view this report. If you uncheck the box, the currently selected SmartList will always be used by default for this report. For certain reports, you can choose date options on the Date tab. You can choose time units to organize the report data by (days, weeks, months, quarters, years, etc.), and date ranges for the report. GiftWorks User Manual Page 276 of 373 From the Columns tab, you can choose to add or remove columns displayed on the report. You can also choose to show totals for the report, whether and how to group the data, and, if it is grouped, whether to show group totals. Some specialized reports (such as Donors by Giving Level) include additional tabs for customizing the report. Search GiftWorks help for the report title for specific information about each report. Some reports also include customization options in drop-down lists at the bottom of the report window, such as date range or SmartList. Displaying Soft-Credits in Reports: Soft credit donations will be available on certain reports and be optionally included in total giving for reports. “Show Report Totals” check box when setting up Report Choices – must check this box in order for the totals to show on Graphs/Charts – also this will “round up” the totals “Move Up/Move Down” options when customizing Reports: GiftWorks User Manual Page 277 of 373 The Date Range has an explanation-hover your mouse over the Date Range area to see this. GiftWorks User Manual Page 278 of 373 RUNNING A REPORT ON A SMARTLIST Depending on the SmartList you're viewing (whether it's a donor, donation, or pledge SmartList), you can run certain reports directly on that SmartList. When browsing a SmartList, click Run Report for List in the Related Actions menu. GiftWorks will give you a list of the reports that can be run on that list. This gives you the ability to get deeper information about a SmartList. To run a report on a SmartList, open a view of the SmartList. Then, from the Related Actions menu, click Run Report for List. Choose from the list of reports in the next screen to view the desired report and click Next to continue. Your SmartList report is now ready for viewing and customization. RUNNING A REPORT ON A DONOR With GiftWorks, you can create reports from a donor, donation, or pledge record.. Reports range from a summary report of the donor’s information, to a comprehensive view of a donor’s total giving history. Donor Report: Open a donor record and click Run a Report from the menu on the left. Choose from the list of reports that will provide visuals of information taken from the open donor record. GiftWorks User Manual Page 279 of 373 Donation/Pledge Report: Open a donation/gift, pledge, or pledge payment record. Click Run a Report from the menu on the left. You will have different report options depending on the type of record you were viewing. CHOOSING A REPORT STYLE Once you run a report, you can choose the viewing style. Click Change Report Style in the Related Actions menu on the left. GiftWorks User Manual Page 280 of 373 Most reports have a list view that shows a list of the records that make up your report. The information in the list style report can be sorted for a view that suits your preferences. Simply click on the column heading by which your information should be sorted. You can further customize the following information in your reports by clicking Customize Report in the Related Actions menu: Change the columns of information shown in the list style. From the Columns tab in the Customize Report window, click the checkboxes next to the columns you want to view. Indicate which fields are totaled using groups and totals by adjusting the settings on the Columns tab. Select a specific date range for reports that show information plotted over time. From the Date tab in the Customize Report window, use the drop-down menus to select the date range for the information you want to view. You can also adjust the time unit used to generate your report by clicking the Details tab and selecting the desired time unit from the drop-down menu. Choose the monetary value for the donations included in the report. From the Details tab, select the value for your report by choosing from the drop-down menu. Reports with data that can be quantified have an available graphical representation of your information. These reports also have a summary view that lets you see the table the graph was generated from. VIEWING MY FAVORITE REPORTS My Favorite Reports, available in the work area of the main Reports screen, offers quick access to your favorite reports. GiftWorks User Manual Page 281 of 373 You can choose your favorite reports by clicking Manage in the My Favorite Reports header, then clicking the checkbox beside each report you want to appear in the favorites section. You can change the order that they appear in, and Edit or Delete from the My Favorites area as well. PRINTING AND EXPORTING REPORTS You can print any style of report by clicking Print in the Related Actions menu on the left. When you print or preview a report, you have the options of changing the heading, subheading and print orientation. You can also choose fit to page and repeat header options. GiftWorks User Manual Page 282 of 373 You can also export reports to another file format. First, view your report in list style by clicking Change Report Style in Related Actions. The Export Report option will then be available in the Related Actions menu. You can export in XML, .csv, or Microsoft Excel format, and choose the location for your list to be saved. When you click on Export Report you will have the option to ‘Save to File’ or “Send as Email’ Save to File Choose the format and filename. Click the ‘Change’ link to choose where to save the file onto your computer. Send as Email You can email the Report as an attachment. Choose the format and filename. Enter in the email address of the recipient as well as a Subject. Fill out the Sender Information and click Send. GiftWorks User Manual Page 283 of 373 SAVING AND SHARING REPORT FORMATS Each User can save a report just how they like it and quickly produce a report with their personal settings. This enhancement will provide each user with the ability to save the specific format customizations for a report, providing a name and description to identify the customizations. A report could have more than one format saved. The user will be allowed to select from these saved formats whenever the report is run. Also, users will be able to manage these report formats. You can also choose to SHARE your Report with other users. The Saved Report Formats will be added to your ‘My Favorite Reports’ area ***NOTE: you will not see an option to Save the Report if you created the Report FROM the SmartList screen. Click on the Save Report Design on left under Related Actions Name your Report and enter a Description if you would like. Check the box beside “Share this report with other users” if you would like to share it. GiftWorks User Manual Page 284 of 373 When you click on Save it will add your saved report format to the MY FAVORITE REPORTS area on the main Reports screen. If you chose to share a Report, the other user(s) will need to choose to Manage their My Favorite Reports, then check the box next to that Shared Report. GiftWorks User Manual Page 285 of 373 They will now be able to see any report that was shared – it will be listed as Saved Report. The user will need to check the box next to the report and click on Save. It will now show under their My Favorite Reports. GiftWorks User Manual Page 286 of 373 SETTINGS IN THIS SECTION GiftWorks Settings Overview Customize Change GiftWorks Fields Acknowledgment Methods Address Names Appeals Assigned To Campaigns Contact Types Countries Credit Card Types Directed Purpose Donor Categories Donor Source Email Names Gift Solicitors Job Titles Note Titles Payment Types Phone Names Prefixes Receipt Groups Relationship Roles States / Provinces Status Suffixes Task Categories Manage Donor / Donation Custom Fields Change Default Values for GiftWorks Fields Manage Fields for Adding New Donors Manage Donor Groups Accounting Post Transactions to QuickBooks or File View Transaction Register Configure GiftWorks to Work with QuickBooks Manage Accounts and Funds Transfer Donations Change Receipt Options Security GiftWorks Standard GiftWorks Premium Database, Files and Maintenance Import and Export Data View and Manage GiftWorks History Manage Your GiftWorks Database GiftWorks User Manual Page 287 of 373 Delete Information from Your Database Configure Your GiftWorks File Storage Seasonal Address Update (Premium) GiftWorks Checkup Additional Settings & Tools Change Your Organization Information Manage Honoraria and Memorials Manage SmartList Categories Manage SmartEntry Pages Run a SmartUpdate Validate Donor Addresses Constant Contact Find Duplicate Donors Merge Donors GiftWorks User Manual Page 288 of 373 GIFTWORKS SETTINGS OVERVIEW The Settings section of GiftWorks contains all administrative settings. Among other features, you can customize GiftWorks to meet your organization’s specific needs, set up the accounting features of GiftWorks, administer the security settings, perform maintenance on your database and database file, and make batch updates to your database. To get to the Settings section, click the Settings icon at the top of GiftWorks. From there, you click any of the headers to visit the subsections, or click any of the linked tasks to go directly to it. The Settings section is divided into the five subsections, explained in detail below. CUSTOMIZING GIFTWORKS This subsection of Settings contains the main options for customizing GiftWorks to meet your needs. These options will help you ensure consistent data entry. GiftWorks User Manual Page 289 of 373 The Customizing GiftWorks subsection offers the options explained below. CHANGE GIFTWORKS FIELDS Most of the drop-down lists that appear in GiftWorks donor, donation, and pledge records are customizable. You can modify these lists to meet your organization’s needs. All the lists are prepopulated with values, but you can modify or delete these values (with some exceptions). See below for more information on specific customizable fields. Acknowledgment Methods Add your own types of Acknowledgment options (e.g. Phone Call, Thank You Note) Address Names Add your own Address Name options for your donor addresses (e.g. home Address, Business Address) GiftWorks User Manual Page 290 of 373 Appeals An Appeal is a Fundraising activity. Each solicitation your organization sends out or event it holds can be entered as a separate appeal in GiftWorks. Each incoming donation should be attributed to the appeal it resulted from, letting you track the effectiveness of each fundraising tactic. For example, if you have a phonathon, dinner, and golf tournament in support of your annual campaign, you can track each as separate appeals to see how many donation dollars each generates. GiftWorks User Manual Page 291 of 373 By using similar appeal information for recurring items (for example, Golf Tournament 2007, Golf Tournament 2008), you can compare the performance of appeals from year to year. Assigned To The Assigned To field is included in each donor record, and allows you to designate a person to whom the donor is assigned. This may be an employee or board member, for example. The Assigned To designation might be used for the person who is primarily responsible for contacting or soliciting a donor. GiftWorks users within your organization are automatically included in the Assigned To list and cannot be removed. If you want, you can add other non-users to the Assigned To list. Campaigns A campaign is a series of events and/or solicitations (each of which may be entered in GiftWorks as an appeal) that make up a cohesive push for donations, generally for a specific purpose. The Campaign field is included in each gift and pledge record. Tracking donations by campaign allows you to monitor the progress of the campaign and to compare the effectiveness of recurring campaigns (such as successive annual campaigns). Contact Types GiftWorks User Manual Page 292 of 373 Contact Type is a field that appears in the Employment Details section of each donor record. It can be used to record the type of contact the donor is for their employer -- for instance if they are the billing contact. Countries The list of countries that can be selected when entering donor addresses can be customized. You can add or remove countries to suit your needs. You can also change the order in which countries appear in the list to make data entry easier. Credit Card Types Credit Card types (e.g. Visa, Master Card GiftWorks User Manual Page 293 of 373 Directed Purposes The purpose to which a donation is directed or restricted Donor Categories Donor Category is a field that appears in each donor record and can be used to categorize donors more granularly than donor profiles. GiftWorks User Manual Page 294 of 373 For example, in addition to designating organizations in your database with organization profiles, you can use Donor Category to indicate which are corporations, foundations, religious institutions or government agencies. The categories can be used to generate SmartLists and reports, letting you segment mailings or report on donation totals from different categories. Donor Source Donor Source is a field in each donor record that lets you track how each donor came to know about your organization. You can use this to track the effectiveness of your outreach or recruitment efforts. For example, if you held a special informational event to introduce your organization to the community and handed out cards for people to fill out who want more information, you could enter a distinct “source” for that event and then track which new donors you entered as a result. Email Names Names for Donor Email addresses (e.g. Personal Email, Business Email) GiftWorks User Manual Page 295 of 373 Gift Solicitors Solicitor is a field that appears in each gift or pledge record and allows you to track who, if anyone, was responsible for soliciting that donation. You can use this field to track solicitation effectiveness of your board members, for example, if you assign them each specific donors to ask for donations. Job Titles Job Title is a field that appears in each donor’s record. The default list includes many values, but you can customize it if you need additional values. An example of how you might use this field is if you want to contact all attorneys in your database to inquire about pro bono services for your organization or a client. GiftWorks User Manual Page 296 of 373 Note Titles Titles for your Donor Notes Payment Types For each gift or pledge payment entered into GiftWorks, you will select a payment type. The default values include cash, check, credit card, and stocks. GiftWorks User Manual Page 297 of 373 If your organization receives a donation type not included as a default value, you can add a custom payment type. When you add the payment type, you can provide instructions for users entering payments of that type into the system, as well as a name, description, and the types of data you want to record for that payment type. Phone Names Names for donor phone numbers (e.g. Home Phone, Mobile Phone) Prefixes GiftWorks includes Mr., Mrs., Ms., and Dr. by default for donor prefixes. You can customize this list by adding additional prefixes. You can also change the order of the list so that the most commonly used values appear at the top. GiftWorks User Manual Page 298 of 373 Receipt Groups Create Receipt Groups to segment donations for specific receipt mailings. Relationship Roles When you define a relationship between two donors, a two-way link is created between those donors, and you need to designate a role for each of the donors in that relationship. For example husband and wife, brother and sister, partners, or parent and child. GiftWorks User Manual Page 299 of 373 You can customize the default list of roles if your organization has needs in addition to those included with GiftWorks. States/Provinces The list of states/provinces that can be selected when entering donor addresses can be customized. You can add or remove states to suit your needs. You can also change the order in which states appear in the list, putting the most commonly used at the top to make data entry easier. Status Each donor record has a Status field that can be used to record the donor’s current status with regards to your organization. GiftWorks User Manual Page 300 of 373 Default values include active donor, inactive donor, customer, and Deceased. You can use the values in this field to create SmartLists and reports, allowing you, for example, to target solicitations at specific statuses of donor. Suffixes Donor suffixes (eg. Jr., Sr.) Task Categories The category for adding tasks for donors GiftWorks User Manual Page 301 of 373 MANAGE DONOR / DONATION CUSTOM FIELDS Each GiftWorks donor record includes over 40 fields for recording information about that donor. Often, however, organizations want to track other information about their donors. To address this need, GiftWorks includes the ability to add custom fields to both donor and donation records. STANDARD You can add up to 28 custom fields each to donor and donation records, choosing from up to five types of custom fields: List Dropdown: A fixed but customizable list of values that a user can select from a dropdown menu. You can have up to six fields of this type for donor and donation records. Dates: A date field that includes a popup calendar for choosing a date when a user is entering data. You can have up to two fields of this type for donor and donation records. Numbers: Allows users to store numeric values which can be sorted in Reports and SmartLists based on numeric values (not text) Currency: Allows users to store currency values which can be sorted in Reports and SmartLists based on currency values (not text) Other: Textbox: A simple box where a user can enter any textual or numeric data. Textbox dropdown: a combination of textbox and list dropdown. You can enter a list of values that the user can choose from, but the user can also enter any textual or numeric data. GiftWorks User Manual Page 302 of 373 Checkbox: A box that the user can click to check or uncheck. PREMIUM You can add up to 75 custom fields each to donor and donation records, choosing from up to five types of custom fields: List Dropdown: A fixed but customizable list of values that a user can select from a dropdown menu. You can have up to 20 fields of this type for donor and donation records. Dates: A date field that includes a popup calendar for choosing a date when a user is entering data. You can have up to 10 fields of this type for donor and donation records. Numbers: Allows users to store numeric values which can be sorted in Reports and SmartLists based on numeric values (not text) Currency: Allows users to store currency values which can be sorted in Reports and SmartLists based on currency values (not text) Other: Textbox: A simple box where a user can enter any textual or numeric data. Textbox dropdown: a combination of textbox and list dropdown. You can enter a list of values that the user can choose from, but the user can also enter any textual or numeric data. Checkbox: A box that the user can click to check or uncheck. You can also Organize your Custom Fields . You can change the category and layout for how the fields appear within donors and donations. GiftWorks User Manual Page 303 of 373 Click on Add Category button to create your own Categories. CHANGE DEFAULT VALUES FOR GIFTWORKS FIELDS You can set default values for a variety of donor and donation fields in GiftWorks. These values automatically appear for each newly added donor or donation, and can save time and encourage consistency in data entry. Changing default values will not affect existing records in your database, only new entries. GiftWorks User Manual Page 304 of 373 GiftWorks User Manual Page 305 of 373 The donor fields you can set defaults for are: Phone Settings Address Name City State/Province ZIP/Postal Code Country Phone Name Email Name Status Assigned To Display Name Format Guess Gender Guess Prefix Individual Female Prefix Household Female Prefix Organization Addressee Organization Attention Issue Receipts Receipt Group Donor Groups Mailing Lists The donation fields you can set defaults for are: Payment Type Campaign Appeal Fund Number of Pledge Payments Payment Frequency Acknowledgement GiftWorks User Manual Page 306 of 373 MANAGE FIELDS FOR ADDING NEW DONORS You can choose additional fields to make available when adding a new donor. These fields can be ordered and will be displayed on a separate dialog page. MANAGING DONOR GROUPS Donor Groups are fields that appear in each donor record, but they differ from other donor fields in that you can select any number of groups for each donor. Each donor can be in as many or as few groups as you need. This gives you an easy way to designate groups of donors like board members, golf tournament sponsors, or Members. GiftWorks User Manual Page 307 of 373 You can browse each group directly by clicking the View Group button on the Manage Donor Groups screen, or use group values to create SmartLists, which can then be used for Mailings, reports, and in other ways throughout GiftWorks. ACCOUNTING The Accounting subsection of the Settings section contains the main options for customizing GiftWorks for your organization’s accounting needs. The Accounting subsection has the options explained below. Posting Transactions to QuickBooks or File Periodically, you will want to post your accounting transactions, either to a file or printout for your accountant, or directly to QuickBooks or other accounting software. GiftWorks User Manual Page 308 of 373 Transactions can be posted only once. Once posted, are no longer available for posting. You can print or re-export previous posts to view the transactions that were posted. During posting, you must choose some accounting options, including whether to post on a cash or accrual basis, and whether to post all details for the transactions or just a summary of the transactions. You will also choose whether to post to a file or directly to QuickBooks. If you plan to integrate with QuickBooks, please refer to Configuring GiftWorks to Work with QuickBooks for instructions. View Transaction Register To view transactions that GiftWorks has stored for your donations, go to Settings, then click Accounting, then View Transaction Register. GiftWorks maintains a detailed history of all accounting transactions generated by the donations you enter, as well as any changes or deletions you make to those donations. You can filter and customize the data display. You can also print or export the data. Configure GiftWorks to Work with QuickBooks GiftWorks User Manual Page 309 of 373 See the guide Configuring GiftWorks to Work with QuickBooks. Manage Accounts and Funds Each donation entered into GiftWorks is applied to a fund. GiftWorks funds are set up to point to specific accounts for each payment type. Since the way you set up these fields affects your transaction posts for your accountant or to your accounting software, you may want to consult with your accounting professional when setting them up. Step 1: Accounts - If you configure GiftWorks to work with QuickBooks, that process will handle the setup of accounts. If you are not configuring to QuickBooks you will not use this area. Step 2: Funds – You can add or edit Funds here. You can only delete a Fund if it has not been used. If you configure to QuickBooks, be sure to pick the accounts you need to post to when setting up the Fund(s). GiftWorks User Manual Page 310 of 373 Transfer Donations To transfer some or all of a donor’s donations to another donor (to correct a data entry error, or if you have duplicate records for a donor, for example), you can do so from the Transfer Donation subsection of the Accounting section. First search to find the donor you want to transfer from. You will then see the following dialog GiftWorks User Manual Page 311 of 373 Choose the donations, and choose the donor you want to transfer to and click Next You will have a chance to review the donation transfer. Press Finish GiftWorks takes care of moving the donations from one record to the other, and adjusts the transaction register accordingly. Change Receipt Options GiftWorks User Manual Page 312 of 373 Receipt Number By default, GiftWorks starts with receipt number 1 and increases the receipt number by one for each system-generated receipt. If you have an existing receipt numbering system (from a previous fundraising software or other system), you can change the GiftWorks starting receipt number to match your previous system. Note that if you reset the receipt number to a lower number than the last receipt number generated by GiftWorks, you may end up with duplicate receipt numbers. Receipt Letter You can choose a default Receipt letter template Receipt Status You can specify the wording for these specific fields when using the “Receipt Status Description Field” in your Receipt letters. Reissue Receipt Prompt You can indicate whether users should be prompted to reissue receipts for edited donations and pledge payments that were already receipted. GiftWorks User Manual Page 313 of 373 SECURITY FOR STANDARD USERS The Security subsection of the Settings section contains the options for limiting access to certain areas of GiftWorks. The Security subsection has the following options: Set or Change Administrative Password Remove Administrative Password (If you have set an Administrative Password) Manage User Accounts Set or Change Administrative Password You can set a password to protect the Settings section of GiftWorks. The Settings section includes administrative settings such as custom fields and values, accounting settings, and database backup settings. Enter an administrative password and hint to sign in to protect the Settings section. Users still have access to all other areas of the GiftWorks database but will not be able to access or change the settings without the administrative password. GiftWorks User Manual Page 314 of 373 Manage User Accounts In Basic Security, you can change any user’s name. User names cannot be deleted and are used to track history as information is added or changed. FOR PREMIUM USERS The Security subsection has the following options: Change Your User Password Remove Administrative Password GiftWorks User Manual Page 315 of 373 Manage User Accounts Change Security Level Manage Roles (only available if the security level is set to Advanced Security) Control Direct Database Access (only available if the security level is set to Advanced Security) GiftWorks Premium is initially set to Basic Security. Before you set an administrative password or change security levels, see the Security Guide for more information about choosing the security options that are right for your organization. Set or Change Administrative Password You can set a password to protect the Settings section of GiftWorks. The Settings section includes administrative settings such as custom fields and values, accounting settings, and database backup settings. Enter an administrative password and hint to sign in to protect the Settings section. Users still have access to all other areas of the GiftWorks database, but will not be able to access or change the settings without the administrative password. Change Security Levels You can customize user access to and use of GiftWorks by selecting a security level. GiftWorks User Manual Page 316 of 373 The three security level options for protecting your database are Basic, Standard and Advanced. You can change security levels by selecting a different security level and clicking Next to continue. Basic Security Any user can sign in to start working with GiftWorks. If you set an Administrative password, other users will not be able to access any database settings other than to change their user name. Standard Security Only users created by the administrator are allowed to sign in to GiftWorks. Passwords are required for all users to sign in, and an account must be activated prior to sign in. Users are designated as Standard or Administrator users. Any user can be designated as an Administrator and any Administrator user can modify all settings. Standard users still have access to all other areas of GiftWorks. You can also manage user accounts and change security levels. Advanced Security Every user must sign in with a password, and each user is assigned a role. Each role is assigned certain features in GiftWorks that users in that role may access. In addition to managing user accounts and roles, you can change security levels and control direct database access. Manage User Accounts A GiftWorks Premium Administrator can add, edit and delete users depending on which security level is set. Each security level provides different levels of control over user access to GiftWorks. Select the user account you want to manage and click on a task to continue. GiftWorks User Manual Page 317 of 373 Managing User Accounts in Different Security Levels Options for managing user accounts depend on the Security Level you have selected for GiftWorks. Each security level provides different levels of control over user access to GiftWorks. Click on the User account you want to manage to begin. Manage User Accounts in Basic Security The only option you have is to change the user's name. Click on the Change Name link to change the User name and then click Done. Manage User Accounts in Standard Security You can change the user type, add a new user account, change the user name, set the password, activate/disable or delete a user account. Click on the user account you want to manage and then select the link for the option you want to manage. User Type in Standard Security Users in the Standard Security setting can be designated as a Standard user or as an Administrator. Standard Users can access all areas of GiftWorks except the administrative options in the Settings section. GiftWorks User Manual Page 318 of 373 When a Standard user selects the Settings section at the top, the only settings option for the Standard user is to change their user name and password. Click on Change Your User Settings and select Change User Name or Change User Password to continue. Administrator users can access all areas of GiftWorks including the Settings section. Administrators can also add a new user account, change user name, delete user accounts, set user passwords, and activate/disable user accounts. Users cannot sign in to GiftWorks until their user account is activated. To activate an account, you must enter a password and select Activate Account. Deleting an Account in Standard Security User accounts can only be deleted if the user has not ever signed in to GiftWorks. Once the user has signed in, their account cannot be deleted because it would affect the history that is maintained for each user account. Accounts that cannot be deleted can still be disabled. When a user account is disabled, that user cannot sign in to GiftWorks. Make any changes and click Save to continue. GiftWorks User Manual Page 319 of 373 Advanced Security Manage User Accounts in Advanced Security Administrators can add a new user account, change user name, delete user accounts, set user passwords, and activate/disable user accounts. Users cannot sign in to GiftWorks until their user account is activated. To activate an account, you must enter a password and select Activate Account. Delete an Account in Advanced Security User accounts can only be deleted if the user has not ever signed in to GiftWorks. Once the user has signed in, their account cannot be deleted because it would affect the history that is maintained for each user account. Accounts that cannot be deleted can still be disabled. When a user account is disabled, that user cannot sign in to GiftWorks. Manage Roles in Advanced Security In the Advanced Security level every user is assigned a role as Guest, User, Manager or Administrator. Each role is predefined with access to certain features in GiftWorks. Roles can be customized by the administrator. GiftWorks User Manual Page 320 of 373 Select a role for the user from the dropdown box. You can edit the selected role by clicking on Edit Role. If you edit a role, the changes will be applied to all users assigned to that role. When you have finished making changes, click Save. Customize User Role GiftWorks User Manual Page 321 of 373 If you want to customize database features an individual user can access, select the user from the Manage User Accounts screen and click on the Change link. Select Choose specific operations from the dropdown box and then select the features the user should and should not be able to access in the database. Click Save to continue. Control Direct Database Access in Advanced Security Secure your database from being viewed or modified by third-party tools and programs by setting a database password. If you change your database security level from Advanced to Standard or Basic security, your Database Password will be cleared during the change. The feature is only available in Advanced Security. GiftWorks User Manual Page 322 of 373 DATABASE, FILES AND MAINTENANCE The Database and Maintenance subsection of the Settings section contains the options for working with your database file. PREMIUM Seasonal Address Update is only available in GiftWorks Premium. The Database and Maintenance subsection has the options explained below. Import and Export Data This area allows you to Import and also Export data. Import A File GiftWorks can import data from Microsoft Excel (.xls, .xlsx), Comma-separated value (.csv), or Microsoft Access (.mdb, .accdb) files. If your existing data is not in one of these formats, you can probably export it from your current application to one of the formats. Consult your existing application’s manual for information on exporting data. See the GiftWorks Import Guide for more details. GiftWorks User Manual Page 323 of 373 Quick Import Quick Import uses a GiftWorks formatted file to import donations into GiftWorks. See the GiftWorks Import Guide for more details. Export Records GiftWorks can export data to Microsoft Excel (.xls), XML or Comma-separated value (.csv) files. You can export the data of your choice from any SmartList. View and Manage GiftWorks History Allows you to view and clean up actions of your GiftWorks Users. GiftWorks User Manual Page 324 of 373 Manage Your GiftWorks Database This subsection contains maintenance tasks for your GiftWorks database file, including backup and restore, renaming, and compacting. Back up The Database It is recommended that you regularly back up your database file, and also that you back it up before and after any major changes (such as an import, batch update, or large data-entry effort). GiftWorks User Manual Page 325 of 373 Step 1: Click Browse and choose the location Step 2: Type in a name for your back up file Click Backup Now GiftWorks User Manual Page 326 of 373 Restore The Database You can restore a back up file at any time. You can do this from Settings or from the Sign In screen. Here you will see a dialog box with 3 steps Step 1: Find your back up file (the .gbf file) Step 2: Choose a location for your restored GiftWorks database file (the .gds file). Step 3: Give your new database file a name GiftWorks User Manual Page 327 of 373 Click Restore Sign In to the database file. To do this, click on the “Options” tab to the right of the Database name. Choose “Select an existing database” and then click “Browse”. Find the database file you restored, click on it, and then click open. Click Next. Now choose your User Name and then click Done. Now click on Sign in. **NOTE: If you want to restore the back up file into an existing database file, you will need to choose the exact same location (Step 2) and the exact same database name (Step 3) GiftWorks User Manual Page 328 of 373 Click on Restore - If you have chosen to overwrite an existing database file, a prompt will appear stating “You have chosen to restore over an existing file. Are you sure you want to continue” Click Yes A dialog box will appear when the Restore is complete – click Ok ***NOTE: If you have GiftWorks installed on multiple computers and you have created a new database file, you will need to make sure that all of the users sign in to the new database file in the new location. Rename The Database You can change the way the Database name is displayed within GiftWorks On the Sign In screen you will see the name of your Database. The example below shows the Database as: Sample Database To change this, click on the Rename the Database option. You will see the current name. GiftWorks User Manual Page 329 of 373 Remove this and type in a new name. Now when you go back to the Sign In screen you will see the new name. Compact The Database Compacting your database can decrease the amount of disk space it takes up, and may make it operate more efficiently. GiftWorks will also create a backup copy of your GiftWorks database in the same folder when you compact the database in case of compact errors. You can then restore the backup file (named as databasename~database~compact.gbf) of your database. GiftWorks User Manual Page 330 of 373 You will see a prompt when the process is finished Click Ok. Deleting Information from Your Database When you delete a donor or donation from GiftWorks using delete this donor, or delete this donation, each is marked for deletion, but is not permanently deleted from your database. You must visit this area of GiftWorks to permanently delete them. You can also restore donors that you do not want to delete. This area is not meant as a place to “hold” donors. You should clear out the Deleted Donors and the Deleted Donations area on a regular basis. Manage Deleted Donors You can print the list of Deleted Donors by clicking on Print List under the Related Actions area on left GiftWorks User Manual Page 331 of 373 You can view a donor in this area by checking the box next to their name and clicking on View Donor button. You can also Restore any or all donors in this area. Check the box next to the Donors to restore or click Check All to check all donors on the list. Click Yes to Restore. You can also permanently delete the donors from your database file. You can also delete any or all donors in this area. Check the box next to the donors to delete or click Check All to check all donors on the list. Click on Delete Permanently. You will see the following warning message GiftWorks User Manual Page 332 of 373 Click Yes to continue or No to Cancel. Manage Deleted Donations You can print the list of Deleted Donations by clicking on Print List under the Related Actions area on left You can also permanently delete the donations from your database file. You can also delete any or all donations in this area. Check the box next to the donations to delete or click Check All to check all donations on the list. Click on Delete Permanently. You will see the following warning message Click Yes to continue or No to Cancel. GiftWorks User Manual Page 333 of 373 Delete SmartList Contents You can also permanently delete the contents of any SmartList. NOTE: that this is not reversible, so it should be used with care. Always back up your database before you make a significant change. Choose a SmartList from the Select SmartList field Click on Delete SmartList Contents button. You will see the following warning. Click Yes to continue or No to Cancel. If you click Yes, you will then see a second warning message. GiftWorks User Manual Page 334 of 373 Click Yes to continue or No to Cancel. Configure Your GiftWorks File Storage You can attach documents to donors to keep that important information easily accessible. This could be used to save additional pictures, documents, contracts, information sheets, etc. for a donor. The attachments will show in the Notes/Tasks/Files tab The Administrator has to turn this feature on and can set file limits per donor. GiftWorks Standard can have up to 5 files per donor and GiftWorks Premium can have up to 200 files per donor The Administrator can also set a maximum file size These attached files will not be stored in the .gds file (they will be saved in the same location that the .gds file is saved in – the folder will be named “giftworks-file-storage….” These attached files will be included within a back up file ****If you move the .gds file you will also need to move the folder that contains the attached files – or just restore the back up file (this is the easiest way) Click on the ‘Turn GiftWorks Files Storage On’ button to activate it. GiftWorks User Manual Page 335 of 373 Click Yes to confirm Choose the Maximum number of files per donor and the Maximum file size. Then click Save. Seasonal Address Update (PREMIUM only) You can run a seasonal address update and all donor mailing addresses will be updated. Any active seasonal addresses will become the current mailing addresses for those donors based on the current date. Note that this update is automatically run each time you sign in to GiftWorks, so you should not normally need to run this update manually. GiftWorks User Manual Page 336 of 373 GiftWorks Checkup GiftWorks can perform a variety of tests on your database to check for inconsistencies or other problems. Normally, you will only need to run the checkup if advised to do so by GiftWorks Support. Click on Run Checkup. If there are no errors, you will see the following: If there are check up errors you see a screen stating that errors were found You can click on Backup and Fix. If the errors are corrected you will see the following: GiftWorks User Manual Page 337 of 373 If the checkup errors are not fixed, contact GiftWorks Customer Care for further instructions. ADDITIONAL SETTINGS & TOOLS The Additional Settings subsection of the Settings section contains other administrative options for your GiftWorks database. See below for more information on Additional Settings. GiftWorks User Manual Page 338 of 373 Change Your Organization Information GiftWorks lets you enter a variety of information about your organization. This information can be used in mailings and other areas of GiftWorks. Entering the data in this subsection of Settings ensures that your organization’s information is always presented in a consistent manner. The information that can be stored about your organization is: Organization Name Acronym (initials) Federal EIN Website Address Mission Statement Fiscal Year Starting Month/Day Allow Zero-Dollar Donations Address City State/Province ZIP/Postal Code Country Phone Number Email Address MAILER INFORMATION is only available in GiftWorks PREMIUM GiftWorks Premium can also store: GiftWorks User Manual Page 339 of 373 o o o o o o o Post Office City Post Office State Post Office ZIP/Postal Code Sectional Center Facility Mailing Fee Expiration Date Mailer Identifier Service Type Identifier Manage Honoraria and Memorials GiftWorks lets you track donations given “in honor of” or “in memory of” someone or something. You can enter information about those honoraria or memorials in this subsection of Settings. See the Managing Honoraria and Memorials section of this manual for more details. The information you can track for honoraria or memorials is: Name of the honorarium or memorial (for example, John Doe) Title of the honorarium or memorial (for example, In Memory of John Doe) Description Donors that should be notified of new gifts (for example, family members) You can also “hide” existing entries that are no longer used As you enter donations attributed to an honorarium or memorial, GiftWorks automatically keeps a list of notifications that need to be sent, in addition to the acknowledgements to the donors who gave the donations. Manage SmartList Categories GiftWorks includes a number of SmartLists by default. As you create new SmartLists, you can place them in categories so they are easier to maintain and locate. GiftWorks User Manual Page 340 of 373 Manage SmartEntry Pages SmartEntry lets you create pages that are designed to match how you enter donor and donation information. For example, you may have an event in which you collect specific information from the donors who attend. You can create a page that lets you quickly and easily enter the information you want. You also have the ability to save SmartEntry items entered and finish later. You can use the Saved SmartEntry as a “Template” for weekly/monthly giving etc. Click on Create a new SmartEntry Page GiftWorks User Manual Page 341 of 373 Click next and chose the fields. Click on the field on left side of screen then click Add button GiftWorks User Manual Page 342 of 373 Choose field defaults where desired GiftWorks User Manual Page 343 of 373 Change the order of how the fields will be displayed when using the SmartEntry Page Save the new Page GiftWorks User Manual Page 344 of 373 To use the SmartEntry Pages Click on the Use this Page link GiftWorks User Manual Page 345 of 373 Enter in the data Click on Verify SmartEntry: GiftWorks User Manual Page 346 of 373 Click on Process SmartEntry: Click Yes: GiftWorks User Manual Page 347 of 373 Click Done Save SmartEntry session – click Save SmartEntry Session on left. To process a SAVED SmartEntry session, go to Settings / Additional Settings & Tools / Manage SmartEntry Pages / Manage Saved SmartEntry Sessions GiftWorks User Manual Page 348 of 373 Choose the session then click Next. Run a SmartUpdate A batch update is when you update all of the records in a SmartList. GiftWorks gives you a variety of options for performing batch updates on your database. For each update, you can choose a SmartList that contains the records you want to update, and then choose how you want to update those records. If you have a large number of records that need to be changed in the same way, this can save you lots of time. Validate Donor Addresses GiftWorks can check your donor address to ensure they are accurate. Validating the addresses will also store geocode information with each address. Geocoding is the process of determining the latitudinal and longitudinal coordinates for a specific address. This will support the ability to create reports that GiftWorks User Manual Page 349 of 373 plot addresses on a map, donor lookups based on distances from a map point, and more powerful mapping tools. When doing this process from a SmartList or from within Settings, it will only validate the “Mailing” address If you add/edit ANY TYPE of address, you can validate from there as well. SmartList Criteria and Options for validating: GiftWorks User Manual Page 350 of 373 Set up “Locations” under Options tab: Customize options: GiftWorks User Manual Page 351 of 373 Constant Contact Configure GiftWorks to work with Constant Contact and view Constant Contact campaign details. Click on Synchronize with Constant Contact to integrate GiftWorks with Constant Contact. Enter your Username and Password then click Next to continue. Here you will pick the synchronization options for each list. GiftWorks User Manual Page 352 of 373 Click Next to continue. Here you will need to choose the synchronizations options for the first time you synchronize as well as the options for every time you synchronize. Click Next to continue. This is the last step of the synchronization process. Review the summary information then click on the Connect GiftWorks and Constant Contact button. GiftWorks User Manual Page 353 of 373 When the process is complete, you will see the following screen. Click Finish. To update your lists and fields click on Synchronize with Constant Contact. GiftWorks User Manual Page 354 of 373 Click Update Now or click on one of the Change Integration Settings options to the right. Your Constant Contact lists will now show in GiftWorks as Mailing Lists. You can click on the Social tab within a donor profile to see the Constant Contact Summary. You can control the View Options as well. GiftWorks User Manual Page 355 of 373 REMOVING CONSTANT CONTACT INTEGRATION Click on Synchronize with Constant Contact, then click on “Click here to stop using Constant Contact”. After you have configured GiftWorks and Constant Contact, you can click on the View Email Campaigns option. Here you can view your Constant Contact campaigns and process information. GiftWorks User Manual Page 356 of 373 This area allows you to view and manage the ‘Bounces’ from here. Find Duplicate Donors This feature allows you to search for potential duplicate donors based on up to 5 criteria that you choose. GiftWorks User Manual Page 357 of 373 GiftWorks will then show you a list of the potential duplicates that were found. You can then merge the duplicate donors from here. Click on the row for the donor that you want to keep. Then click the ‘Select Donor’ link under the Donor to Keep area (on right). Now click on the row for the donor that you want to merge (discard). Then click the ‘Select Donor’ link under the Donor to Merge area (on left). You will see a summary for both donors. GiftWorks User Manual Page 358 of 373 Click Merge. You will see a prompt to confirm the process Click Yes You will see a prompt confirming the process is finished. Click Ok. ****NOTE: Be sure to back up your database before merging donors as this step cannot be undone. Merge Donors This feature allows you to merge two donors into a single donor. The information from one donor will be moved into another donor resulting in a single donor. GiftWorks User Manual Page 359 of 373 Click on the ‘Select Donor’ link under the Donor to Keep area (on right) and search for the donor. Then click the ‘Select Donor’ link under the Donor to Merge area (on left) and search for the donor you want to merge (discard). You will see a summary for both donors. Click Merge You will see a prompt to confirm the process Click Yes GiftWorks User Manual Page 360 of 373 You will see a prompt confirming the process is finished. Click Ok. ****NOTE: Be sure to back up your database before merging donors as this step cannot be undone. GiftWorks User Manual Page 361 of 373 GIFTWORKS GLOSSARY Account An accounting field that indicates which general ledger account donations and pledges should be debited or credited to. In GiftWorks, the account is accessed by applying the donation to a fund. If you use GiftWorks with QuickBooks accounting software, you can automatically configure GiftWorks to match up with your QuickBooks chart of accounts. Acknowledged This field indicates whether or not a donation was acknowledged, and if so, how it was acknowledged. You can either enter this information manually, or, when you enter a donation, you can schedule it to be acknowledged through a mailing. When the thank you letter mailing is processed, the donation is marked acknowledged with information about when the letter, and which letter, was sent. For a multipayment pledge, there is an Acknowledged field for each payment, as well as for the overall pledge. Acknowledgement For any donation or pledge entered into GiftWorks, there is an acknowledged flag. As you enter the donation, you can choose to add the donation to a thank you letter mailing. Sending a thank you letter mailing lets you mark the donation as acknowledged automatically. You can also manually mark donations as acknowledged. This is helpful if you, for example, thank the donor with a handwritten note or phone call. Addressee Addressee fields are used to store information you would typically like to see on the first line of a mailing address. There are both formal and informal addressee fields, letting you address donors differently for different purposes. Based on the type of donor and the name information you enter, GiftWorks will attempt to fill in a default value for you. Examples: Donor: John Smith Formal: Mr. John Q. Smith Informal: John Smith Donor: John and Mary Smith Formal: Mr. and Mrs. John and Mary Smith Informal: John and Mary Smith Donor: Acme Corporation (with a primary contact) Formal: Mr. John Smith Acme Corporation Informal: Acme Corporation John Smith Donor: Acme Corporation (without a primary contact) Formal: Acme Corporation GiftWorks User Manual Page 362 of 373 Informal: Acme Corporation Addresses For each donor, you can enter multiple addresses. In GiftWorks Standard, donors must have a Mailing Address and can have multiple Informational Addresses. The Mailing Address will always be used for mailings sent from GiftWorks. In GiftWorks Premium, donors must have a Primary Address and can have multiple Seasonal and Informational Addresses. Either the Primary Address or Seasonal Address will be used for mailings sent from GiftWorks based on the current date of the mailing. Administrative Password In the Settings section of GiftWorks, you can add an administrative password. The password is then required to access all administrative settings, including database restore and backup, editing the default values, and many others. Affiliate Donor When you want to track information about a donor, but don’t necessarily want to include that donor in mailings or in your count of donors, you can add a person to GiftWorks as an affiliate donor. An example might be a board member whose donations typically come from his or her household. The household would be the donor in your database, but you might add the board member as an affiliate related to that household. This allows you to track individual information about the board member, and contact him or her when you want, but would not add the board member to most of your mailings -typically, mailings would go to the household. Affiliate donors are not expected to make gifts or pledges. To add a gift or pledge from an affiliate, the affiliate donor must be converted to a donor. Amount For a gift, the amount is the actual amount of the single payment that makes up that gift. For a pledge, the amount is the sum of all scheduled payments (or the total amount pledged). For pledges, there is also the received amount, which is the total of all received payments to date towards that pledge. For pledge payments, there is an actual amount (the actual amount received toward that payment), and an expected amount (the amount you are scheduled to receive). Ideally, these are the same number. Anonymous If a donor chooses, any donation can be listed as anonymous by using an available donation field. This field serves only as a reminder to the user that a donation has been designated anonymous. It does not affect the donation in any other way, including how it is used in reports and SmartLists. Appeal Each mailing or other contact (a phone call or newsletter, for example) that might generate donations is considered an appeal. If a campaign consists of multiple appeals, then analyzing which appeals resulted in the most donations can show you which are most effective. GiftWorks User Manual Page 363 of 373 CASS-certified Addresses (PREMIUM) Your address list must be validated and corrected by a CASS-certified process for a mailing to qualify for Standard Mail Automation letters rates. This can be done through a vendor that provides these services, or with USPS approved software. Refer to the USPS guidelines for the frequency of certification. Campaign A campaign is a series of events and solicitations (for example, mailings, phone calls, and special events) that make up a cohesive push for funds for a specific purpose. In GiftWorks, a campaign is made up of several appeals. An example of a campaign might be “Fall Membership Drive 2004” or “Annual Spring Cleaning Festival 2003.” Comma-Separated Value (.csv) File A comma-separated value, or .csv, file is a data format where each line contains a row of data, separated or delimited into columns by commas. The fields can also be delimited by quotation marks, which is necessary if any of the fields contain a column. GiftWorks can import data from .csv files, which is a common format for export from other programs. GiftWorks also exports data into .csv format. Custom Fields GiftWorks includes a wide variety of fields for donors and donations, but occasionally your organization may need to store information for which there is no standard field. For these cases, GiftWorks lets you create custom fields for both donors and donations. There are different types of custom fields, including lists of fixed values and textboxes where you can enter text or numbers, date fields, and checkboxes. Custom Periods (SmartLists) For each donor SmartList, you can define up to four custom periods. Each custom period is defined by either a relative date range (such as the “last 30 days”) or a specifically defined range ( “Jan 15 to March 30, 2007”). You can also provide a name for each custom period, and you can show a number of statistics in your SmartList results, including total donations, average donation, largest donation, and number of donations per donor for that period. This lets you easily research and report on historical giving by your donors. Date For a gift, the gift date is the actual date the gift is received. In some cases, this may be the actual date the gift is processed (which may be later than the date it was actually received). This date can be set when the gift is entered into GiftWorks. For a pledge, the pledge date is the actual date the pledge is received (the date of the promise). For a payment, there are two dates. The actual date is the date the payment is actually received. The expected date is the date the payment is (or was) scheduled to be received. Delivery Point GiftWorks User Manual Page 364 of 373 The USPS assigns every address a two digit code that is used for USPS discounted mailings. The Delivery Point for each address is returned by the CASS-certified ZIP+4 or delivery point code address matching process and can be imported in to GiftWorks or can be manually entered. Directed (or Restricted) When donors give a donation, they can indicate that the donation should be directed (or restricted) to a specific purpose. The organization then has a legal obligation to use the donation only for that purpose. There is a field available to indicate such a direction (or restriction). Direction (or restriction) can be set per gift or per pledge. Display Name This is the primary field that GiftWorks uses for each donor entered into the system. Based on the information entered for the donor’s name, GiftWorks suggests a few display name options. The display name is used in reports, SmartLists, and for finding and displaying donors. Examples: For a household, it might be “Smith, Mr. and Mrs. John.” For an individual, “Smith, John Q.” For an organization, “Acme Corporation (Jack Sprat).” Donation In GiftWorks, a donation is a gift or a pledge payment. Although pledges are included in the Donations section of GiftWorks, they are not technically considered donations. Donation SmartLists, for example, include gifts and pledge payments, but not pledges. Donor Every person, household, or organization entered in GiftWorks is considered a donor. You might be more familiar or comfortable with the term contact or constituent, but in GiftWorks, they are referred to as donors. (See also affiliate donors.) Donor Category A field used to indicate the donor type with more precision than profile. The default categories are Individual/Household, Corporation, Foundation, Government Agency, and Religious Institution. The list of donor categories is customizable, so you can add, change, or remove items in the list, either from the category list on the Edit Donor screen, or from the Settings section. Donor Group Donor groups give you flexibility and power for classifying your donors. The list of groups is customizable, and you can add each donor to any number of groups. Examples of groups you might use include Board Members, Golf Tournament Participants 2008, Golf Tournament Sponsors 2008, or Member. You can create SmartLists based on group membership, and you can run reports, send mailings, and more. Fiscal Year GiftWorks lets you indicate the starting day and month of your organization’s fiscal year. This feature gives you the ability to create SmartLists and reports based on your fiscal year and the calendar year. Fund GiftWorks User Manual Page 365 of 373 An accounting field used to record which fund a donation is applied to for fund accounting purposes. Certain campaigns may have their own funds (capital campaigns, for example). Directing (or restricting) a donation can have an effect on which fund it goes into. Each fund is linked to multiple debit and credit accounts (see account). If you use GiftWorks with QuickBooks accounting software, you can automatically configure GiftWorks to match up with your QuickBooks chart of accounts. Gift A gift is a one-time transaction, where the payment is received on the same day as the gift. (See also pledge and pledge payment.) GiftWorks Backup File (.gbf) When you create a backup of your GiftWorks data file, it will be saved with a .gbf extension. When you want to restore a backup, you will need to locate the .gbf file to start the restore process. GiftWorks Data Source (.gds) File All of your GiftWorks data is stored in a GiftWorks Data Source, or .gds, file. When you first create your database, you can choose a name and location for the file. If you ever move the file, you will need to redirect GiftWorks to the new location. GiftWorks Import Configuration (.gic) File When you import data into GiftWorks, you have the option to save the import configuration to a file. This file is called a GiftWorks Import Configuration, or .gic, file. Saving the configuration can save you time if you need to perform an import multiple times. You can restore almost all import settings by loading the .gic file at the beginning of the import process. Honorarium/Memorial An honorarium is a gift or pledge received in honor of someone (or something). A memorial is a gift or pledge received in memory of someone (or something). In GiftWorks, you can set up honoraria or memorials so donations can be applied to them. In addition to a name (for example, “In Memory of Michael Duvall”), you can enter a description and select donors from your database that should be notified of donations to the honorarium or memorial. This lets you acknowledge the donations to the donors who sent them, and also send honorarium or memorial notifications. Informational Address Informational Addresses are any addresses for a donor that you want to record as donor information, but that are not used as a current mailing address for the donor. Mailing Address One address for a donor must be designated as the donor mailing address and will be used as the current mailing address for mailings sent from GiftWorks. It will also be used in SmartLists and Reports. Mailing List A list of donors for a particular mailing. A mailing list differs from a SmartList in that you can explicitly put donors into a mailing list, whereas they are only included in a SmartList if they meet the criteria set GiftWorks User Manual Page 366 of 373 up for that SmartList. Once the mailing has been sent, you can choose (as part of the mailing process) to remove the donors from the mailing list or not. Examples: “Welcome Letter” mailing list: You can add donors to this list when they are first entered into GiftWorks. Once the Welcome Letter is sent, you can set GiftWorks to automatically remove them from the list. “Newsletter” mailing list: You can add donors to (or remove them from) this list to manage their subscription to your newsletter. For example, you may want volunteers or clients to receive your newsletter, but not necessarily your other donor communications. Matched Gift When a donation is received and that donation is being matched by the donor’s employer (or another donor), you can indicate this during the Add a Donation process, or you can add it to an existing donation. This gift is then marked as matched, and a corresponding matching pledge is created for the donor matching the gift. Matching Pledge Created when a matched gift is entered. The donor (typically a donor’s employer) that will be matching the gift will have a pledge added to their record in the amount of the match and with an estimated date of receipt. This allows you to track matching gifts and follow up on them if they do not come in. Memorial (see Honorarium) Name Tool The name tool is part of the GiftWorks importer. It takes a name and splits it into the separate fields that compose it. Example: John D. Smith, Jr. First Name: John Middle: D. Last Name: Smith Suffix: Jr. To access the name tool, go to the fourth step of the importer, the “Assign fields from your import file” or mapping screen. Choose Special options when mapping to a GiftWorks field, then choose Name Tool. Online/Offline GiftWorks detects if it is online or offline by checking its ability to connect to the internet. If your computer is connected to the internet, GiftWorks indicates it is online in the bottom left corner. If it indicates it is offline, it may be blocked by a firewall or other security software. Consult your security software documentation to determine how to grant internet access to GiftWorks. GiftWorks must be online to receive free online updates, to send error information to Mission Research, to access the map feature available for donor addresses, and for some other functions. GiftWorks User Manual Page 367 of 373 Payment Types GiftWorks includes several default payment types: check, credit card, cash, monthly bank draft, online payment, services, goods, and equipment. For each payment type, additional fields are available to record information about the payment. For example, the check payment type includes check number and check date fields. You can also include custom payment types. If your organization receives payments that do not fit into one of the default types, you can create a new type and select the additional fields you want to record for payments of that type. Phone Settings To support both US and international phone number formats, GiftWorks lets you choose a default format. You can also override that format for any individual phone number you choose. In the Settings section, under Customize and Change Default Values for GiftWorks Fields, there is an option to either restrict phone numbers to the US format, or to allow phone numbers in any format. The option you choose will be applied to any new phone numbers entered. You can either enter phone numbers that fit your default choice. Or by clicking on the down arrow to the right of any phone number, you can “Relax the masking,” allowing you to enter anything. The masking applies only at entry time. If you return later to edit a phone number, the masking is not enforced and you can enter a phone number in any format. Pledge A pledge is a promise from a donor to make one or more payments in the future. If the pledge has many payments, they are normally received over some time period defined when the pledge is received. When you enter a pledge, you initially enter the date the pledge was made, total amount that you expect to receive, and the number of payments that will make up the pledge. GiftWorks then helps you build a payment schedule for the pledge and enters both the pledge and all expected payments. See pledge payment. Pledge Payment A pledge payment is a gift received that is applied toward a pledge. When you enter a pledge, one or more pledge payments are created, including an expected date and expected amount. Until the payment is received, the received amount is $0. When the payment is received, it is applied toward the pledge. Primary Address (PREMIUM) A Primary Address is a donor’s usual mailing address. If a donor has an active Seasonal Address, that Seasonal Address will be used as the current mailing address for mailings sent from GiftWorks during a designated period. When the Seasonal Address time period expires, the Primary Address will automatically be reset as the current mailing address for the donor. Profile GiftWorks User Manual Page 368 of 373 A profile lets you define the donor type. Profiles are household, organization, and no profile. Typically, an individual donor has no profile. A couple or household has a household profile, and an organization has an organization profile. You can use profiles in SmartLists to create a list of donors of a certain profile, and you can then report on donors by profile. Different profiles display with visual differences (color and icon primarily) so it is easy to identify a donor type. Proxy Server Settings If you have trouble getting GiftWorks online, it may be necessary to set it up to use a proxy server. This is only necessary if you also need a proxy server for your web browser. To determine if this is the case, open your Internet Explorer browser and click Tools > Internet Options > then on the Connections tab > then on LAN settings. If the bottom half of that window has information regarding a proxy server (specifically address and port), make note of that information. Enter your proxy server settings into GiftWorks by clicking Internet Updates in the bottom right corner, then click Customize Updates. Check the Use a proxy server box and enter the same proxy information that you retrieved from your Internet Explorer settings. Relationship You can link donors in GiftWorks using relationships. There are three different types of relationships in GiftWorks: relationship, household relationship, and work relationship. Relationship is for any relationship between two donors. The donors may be friends, neighbors, cousins, or have any other non-household or non-work relationship. Household relationships include relationships among household members, and relationships of the members to the household itself. Typically, all information for a household is entered in a single donor record with a household profile. To track individual information about household members (for example, if one is a volunteer and another is a board member), you can relate those individual donor records back to the household. Work relationships are typically used for employer/employee relationships. If you have a record for an organization, and also have employees of that organization who are donors, you can create relationships between the two. Among other benefits, this lets you send a mailing to all donors who are employees of an organization. Relationship Role When you define a relationship among donors, each donor will have a role in that reciprocal relationship. The list of roles in GiftWorks is customizable, but includes by default: husband, wife, partner, father, mother, employer, employee, friend, and others. Each role is defined as applicable to a certain type of relationship: relationship, household relationship, or work relationship. Reset Content Updates GiftWorks User Manual Page 369 of 373 If your computer has a problem with one or more updates, it may be necessary to reset your content updates. Normally, you should do this in consultation with GiftWorks Support. To reset your content updates, click Internet Updates at the bottom left of GiftWorks, then click Customize Updates. The Reset button is on the bottom half of the window. Restricted (see Directed) Salutation Salutation fields are used to store information you would typically see after the “Dear” in a letter. There are formal and informal salutation fields, so you can greet donors differently for different purposes. Based on the type of donor and name information you enter, GiftWorks attempts to fill in a default value. Examples: Donor: John Smith Formal: Mr. Smith Informal: John Donor: John and Mary Smith Formal: Mr. and Mrs. Smith Informal: John and Mary Donor: Acme Corporation (with a primary contact) Formal: Mr. Smith Informal: John Donor: Acme Corporation (without a primary contact) Formal: Friends Informal: Friends Sample Database GiftWorks includes a sample database filled with donors, donations, and other information. This sample database lets you preview and work with GiftWorks before you import or input your own information. To use the sample database, sign out of GiftWorks. Then, on the sign-in screen, click Change next to the name of your database. Then choose Use the sample database. When you are ready to start working with your own data, be sure to create a new empty database by following the same process, but by clicking Create a new database. Seasonal Address (PREMIUM) A Seasonal Address is a recurring address for a donor who resides at that address for a specified, active time period every year. All mailings sent from GiftWorks will be sent to the seasonal addresses during the specified active time periods. When the time period expires, the current mailing address for each donor will automatically change back to the Primary Address. GiftWorks User Manual Page 370 of 373 If a donor has more than one Seasonal Address or uses the Seasonal Address for mailing purposes at different times throughout the year, you will need to add each of the Seasonal Addresses and corresponding time periods for the donor. A donor’s Seasonal Addresses active time periods cannot overlap. The Primary Address will be used as the current mailing address unless a Seasonal Address is active. The current mailing address is indicated in the Addresses field when a donor has multiple addresses. Sectional Center Facility (SCF) The GiftWorks Mailing Center can assist you in preparing USPS discounted mailings with lower postage rates for qualified mailings. To qualify for the lowest postage rates, USPS discounted mailings must be sent from a Sectional Center Facility (SCF). A SCF is a postal facility that serves as the processing and distribution center for post offices in a designated geographic area as defined by the first three digits of the ZIP Codes of those offices. Some SCFs serve more than one 3–digit ZIP Code range. Check with your local post office to verify that it is an SCF. Security GiftWorks lets you protect the Settings section with a password, limiting access to most administrative settings and functions. Click the Settings icon at the top of GiftWorks, click Security, then click Set or Change Administrative Password. PREMIUM You can protect your database in Basic, Standard or Advanced Security. Each setting offers different levels of control over user access. SmartList To create a SmartList, you designate a set of criteria in the SmartList builder. Any donors or donations that meet those criteria automatically appear in the SmartList whenever you view it. SmartLists can be used to send mailings, create reports, and many other functions in GiftWorks. There are three types of SmartLists: donors, donations, and pledges. A donors SmartList results in a list of donors. Each donor will show up in the list only once, even if they meet multiple criteria. A donations SmartList results in a list of donations (gifts and/or pledge payments). Multiple donations from the same donor can appear in the list. When sending a mailing, it is possible to consolidate so that each donor gets only one mailing. A pledges SmartList results in a list of pledges. Multiple pledges from the same donor can appear in the list. When sending a mailing, it is possible to consolidate so that each donor gets only one mailing. Software Key GiftWorks User Manual Page 371 of 373 When you purchase GiftWorks, you will receive a software key. You enter the software key into GiftWorks to convert it from a free trial to the purchased version. GiftWorks software keys look like MGWX-XXXX-XXXX-XXXX. The keys are case-sensitive and must be entered exactly as they appear. If you need to know what your current software key is, click the Help menu at the top left of GiftWorks, then click About GiftWorks. Your software key will be listed to the right of the word “License.” Solicitor The Solicitor is a person (perhaps staff, board member, or volunteer) personally involved in asking a donor for a donation. Donations received in response to such a solicitation are entered with the person’s name in the solicitor field. Using reports and SmartLists, you can then keep track of the effectiveness of different solicitors. Tasks GiftWorks lets you enter tasks related to a donor or donors. You can use these tasks to keep track of things you need to do, such as phone, email, or meet with those donors. In the Other Tasks menu on the left side of the Donor dashboard and many other screens, the task calendar can be viewed by clicking View Task Calendar. Each task is also recorded in the donor’s record so you can track past activities related to that donor. GiftWorks keeps notes and a history of mailings that were sent to that donor in the same location. Transaction Register GiftWorks stores ledger transactions for each gift, pledge payment, pledge, and the deletion of any of these. In the Settings section, under Accounting, you can view and filter the transaction register. The register is also the basis for the information that is posted to QuickBooks or to a file for import into another accounting application. USPS Standard Mail Automation Letters (PREMIUM) A mailing can qualify for automation letter rates if it is machinable and the letters display the correct barcode. It must also meet weight, shape and size standards. USPS Standard Mail Machinable Letters (PREMIUM) A letter is machinable if it can be sorted on Postal Service processing equipment, display an accurate address, and meets specific standards, including size, shape, and weight. Machinable letters are eligible for presort (discounted) rates. Updates Periodically, Mission Research releases GiftWorks updates. If you are online, GiftWorks checks for updates each time you start it. To manually check for an update, click Internet Updates in the bottom left corner, then click Check for Updates. If an update is found, GiftWorks will download it and prompt you through how to install it. It may be necessary for you to sign out of GiftWorks to complete the update. XML GiftWorks User Manual Page 372 of 373 XML stands for eXtensible Markup Language. It is a common format used to transfer or store data. GiftWorks can export data into this format, which may be useful depending what you plan to do with the data after export. ZIP Code Verified Addresses (PREMIUM) For a mailing to qualify for presorted Standard Mail machinable rates, you must check the accuracy of ZIP Codes prior to mailing. When you fill out and sign your postage statement you are certifying your mailing qualifies for the rates claimed. Your post office can help you choose the best option for verifying your mailing list addresses. GiftWorks User Manual Page 373 of 373