1
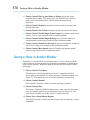
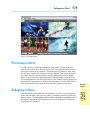
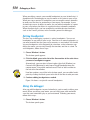
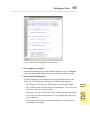
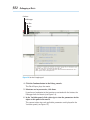
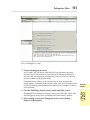
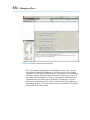
Chapter 1: Testing and Debugging
a Flash Project
AL
In This Chapter
✓ Testing a movie
RI
✓ Previewing a movie
TE
✓ Debugging a movie
A
GH
Testing a Movie
TE
D
MA
fter you slave and toil to create a compelling Flash movie, you have
to make sure that it works as expected. Otherwise, you’ll end up with
copious amounts of egg on your face. And, if you created the Flash project for a client, after the client wipes the egg off his face, you’ll get a nasty
phone call — hopefully, not from that person’s lawyer. So, no matter how
large or small your project, you need to test and retest your project
to make sure that it performs as planned.
CO
PY
RI
When you’re creating a Flash project, you should
test the project after you make a major change.
When you test often, you can detect a mistake or
an inconsistency right after you create a new animation or create a new ActionScript rather than
after you do a couple of hundred other things
to the document and have no idea how to track
down the rotten smell in the state of Denmark.
You can perform quite a few tests in Flash authoring
mode. This option is handy when you don’t want to wait
for Flash to publish the document as an SWF file and play
it in another window. You can test a movie in authoring mode by
choosing one of these methods:
✓ Drag the playhead to scrub the Timeline. This option comes in handy
when you want to check a few frames of animation or preview the
manner in which a sound is synchronized to the Timeline.
578
Testing a Movie in Another Window
✓ Choose Control➪Play or press Enter or Return to play the movie
in movie editing mode. This action plays the Timeline in its entirety,
unless you use ActionScript to stop the movie on one or more
keyframes.
✓ Choose Control➪Rewind to rewind the movie to the first frame after
playing the movie.
✓ Choose Control➪Go To End to navigate to the last frame in the movie.
✓ Choose Control➪Enable Simple Frame Actions to preview simple frame
actions, such as stop and goto in Flash authoring mode.
✓ Choose Control➪Enable Simple Buttons to test the functionality of
simple buttons when testing a movie in Flash authoring mode.
✓ Choose Control➪Enable Live Preview to preview component animation
and 9-slice scaling when working in Flash authoring mode.
✓ Choose Control➪Mute Sounds to mute Timeline and button sounds
when testing a movie in Flash authoring mode.
Testing a Movie in Another Window
Sometimes it’s important to see the entire movie, such as when you make
radical changes to your ActionScript or extensively modify an animation or
swap several symbols. When you need to preview the entire movie, follow
these steps:
1. Choose Control➪Test Movie.
Flash displays a dialog box telling you that it’s exporting the Flash
movie. After a few seconds, the movie appears in another window (see
Figure 1-1). The movie plays in its entirety and loops continuously.
2. Choose Control➪Rewind.
Flash rewinds the movie to the first frame and stops playing it.
3. Choose Control➪Play.
Flash plays the movie. While the movie plays, make sure that the animations are smooth and that any ActionScript executes flawlessly. Test
each button to make sure it does what it’s supposed to do.
4. Choose View➪Show Redraw Regions.
Flash displays a red rectangle around all areas that are redrawn, such as
animations.
Debugging a Movie
579
Figure 1-1: Testing a movie.
Previewing a Movie
Testing a movie is all well and good, but there comes a point when you
want to see what viewers will see on the Web. You can preview your movie
in the Flash Player or in a browser. To preview a Flash movie as your viewers will see it, choose File➪Publish Preview➪Default. This action publishes
the movie using the default Publish settings and displays it in the default
device. You can choose a different option from the Publish Preview menu.
The available options are those you select in the Publish Settings dialog box.
For example, if you choose to publish the document as a Flash SWF movie, a
JPEG image, and a Flash projector, those options appear on the menu.
Book VIII
Chapter 1
Debugging a Movie
Testing and
Debugging a
Flash Project
If you have gobs of ActionScript in a document, or even just a paragraph or
three, you can make sure that your code is performing flawlessly when you
debug a movie. The debugging interface differs depending on whether you’re
debugging a document with ActionScript 2.0 or ActionScript 3.0. The available options are identical.
580
Debugging a Movie
When you debug a movie, you can add breakpoints to your ActionScript. A
breakpoint tells the debugger to stop the movie at this point in your script.
When you stop a movie at a breakpoint, you can examine various elements
to make sure that they’re performing as you expect. For example, if your
ActionScript causes an object to move, you can add a breakpoint at a point
in your script where the object is supposed to be at a known coordinate.
When the movie halts, you can examine the variable data for the object,
such as the X and Y position, in the Variables pane of the debugger.
Setting breakpoints
The first step in debugging a project is setting breakpoints. You can set
breakpoints at any point in your script. You can set as many breakpoints as
you need to make sure that your script executes as envisioned. You should
set your breakpoints at the beginning of a function, so that whenever you
debug the movie, you can step through the function, one line at a time. To
set breakpoints, follow these steps:
1. Choose Window➪Actions.
The Actions panel appears.
2. Click the blank space to the left of the line number of the code where
you want a breakpoint to appear.
Alternatively, you can select a line of code, right-click (Windows) or
Control+click (Macintosh) and choose Toggle Breakpoint from the
context menu. Using either method causes Flash to add a red dot to
the left of the line number.
If no line numbers are visible in the Actions panel, you can add a breakpoint by clicking the blank space to the left of the line of code you want.
3. Continue adding breakpoints as needed.
Figure 1-2 shows a script with several breakpoints.
Using the debugger
After you add breakpoints to your ActionScript, you’re ready to debug your
movie. When you debug your movie, you can check your code and make
sure that your animations play as you envisioned. To debug your movie,
follow these steps:
1. Choose Window➪Actions.
The Actions panel opens.
Debugging a Movie
581
Figure 1-2: Don’t confuse breakpoints with breakdances.
2. Set breakpoints as needed.
If you fast-forwarded to this section and don’t know how to set breakpoints
or, for that matter, don’t know what they are, read the previous section.
3. Choose Debug➪Debug Movie.
The Flash workspace is reconfigured to show the debug options (see
Figure 1-3). The debugging workspace is divided into five panels:
• The Debug console: Has the controls you use to debug the movie.
• The Variables panel: Displays values for parameters, such as the size
of an object and its current position.
• Your script: Lies directly beneath the list of symbols and scenes lists
the breakpoints.
• The Output panel: Displays information about the tasks being performed by the Debugger.
Testing and
Debugging a
Flash Project
• The panel to the right of the Debug console: Displays symbols and scenes.
Book VIII
Chapter 1
582
Debugging a Movie
Continue
Exit Debugger
Step Over
Step In
Figure 1-3: So what’s bugging you?
4. Click the Continue button in the Debug console.
The Flash Player plays the movie.
5. If buttons are in your movie, click them.
If you have a breakpoint at the function associated with the button, the
Debugger halts the movie (see Figure 1-4).
6. In the Variables panel, click a plus sign to view the parameters for the
object at this point in the movie.
The current values for each applicable parameter are displayed in the
Variables panel (see Figure 1-5).
Debugging a Movie
583
Figure 1-4: Debugger says “Stop.”
7. Continue debugging the movie.
At this point, you can either click the Step Over button to step over
the next step in the function or click the Step In button to advance to
the next step in the function. Alternatively, you can click the Continue
button to continue playing the movie.
If you find errors in your script, note the line or lines on which the
errors appear. If you find errors in your script, you have to correct them
in Flash authoring mode and debug the movie again to make sure that it
plays properly.
The default Flash workspace appears and you can edit your movie. Run
the Debugger as many times as needed until your movie is perfect.
9. After running an error-free debugging session, choose Debug —
Remove All Breakpoints.
Testing and
Debugging a
Flash Project
8. Click the End Debug Session button, which looks like a red X.
Book VIII
Chapter 1
584
Debugging a Movie
Figure 1-5: This panel shows the winds of change.
This step removes all breakpoints you added to your script. You can
also remove individual breakpoints in the Debugger by right-clicking
(Windows) or Ctrl+clicking (Macintosh) a line of code with a breakpoint
and then choosing Toggle Breakpoint from the context menu. You can
also remove all breakpoints by choosing the Remove All Breakpoints
command from the context menu. Removing a breakpoint is useful
when you’ve identified that the code associated with the breakpoint is
performing perfectly. The same context menu is available in the Actions
panel in Flash authoring mode.