1
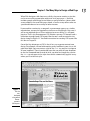
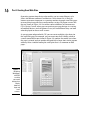
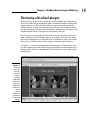
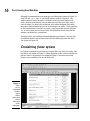
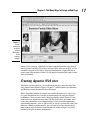
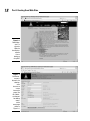
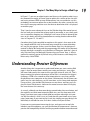
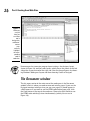
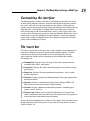
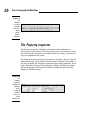
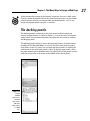
Chapter 1
RI
AL
The Many Ways to
Design a Web Page
TE
In This Chapter
Comparing Web design options
MA
Understanding browser differences
Developing a Web site
D
Customizing your workspace
TE
W
RI
GH
eb design is an art and a science. I think that’s what makes it so hard.
Most of us don’t have the artistic talent to create great Web designs,
the science and math skills to develop all the technical elements, and the
understanding of interface design and usability that make a Web site easy to
use and intuitive to navigate. But you need all those skills to create a great
Web site. That’s why most of the best Web sites were created by a team of
people with many different specialties.
CO
PY
In the early days, Web design was relatively easy — and vanilla boring. You
could combine images and text, but that was about it; no complex layouts,
no fancy fonts, and certainly no multimedia or animation.
Over the years, Web design has evolved into an increasingly complex field
and Dreamweaver has evolved with it, adding new features that go way
beyond the basics of combining a few words and images.
When I first started learning to creating Web sites in the mid 1990s, it was
easy to learn and easy to teach others how to do it. More than 10 years and a
dozen books later, it’s a lot more complex, and I’ve come to realize that one of
the first things you have to understand about Web design is that there isn’t
just one way to create a Web site anymore.
Today, you can find out how to design simple Web sites with HTML in a
matter of hours or you can spend years developing the advanced programming skills it takes to create complex Web sites like the ones you see at
Amazon.com or MSNBC.
12
Part I: Creating Great Web Sites
For everything in between, Dreamweaver is the clear choice among professional Web designers as well as among a growing number of people who want
to build sites for their hobbies, clubs, families, and small businesses.
But before we dive into the details about how you create a Web page in
Dreamweaver, I think it’s helpful to start by introducing the many ways you
can create a Web site. The more you understand about the various approaches
to Web design, the better you can appreciate your options.
Comparing Web Designs
Throughout this book, you find chapters covering a variety of aspects of Web
design, from the basics of creating a page and adding images and links to more
complex concepts such as creating rollover effects and pop-up windows with
Dreamweaver’s behaviors, which use JavaScript to create advanced interactive features.
You also find a few chapters that explore different page layout techniques.
You can create Web designs using HTML tables, frames, or Cascading Style
Sheets. You can even use these different technologies in combination. The
next few sections are designed to help you understand the differences in
these approaches before you decide which one is best for your Web site.
Appreciating the advantages of CSS
Today, the W3C, which sets standards for the Internet, recommends CSS for
nearly every aspect of Web design. That’s because the best CSS designs are
accessible, flexible, and adaptable. Also, the fact that they follow standards
has become increasingly important over the years.
If everyone who designed Web sites and everyone who created the browsers
that displayed them followed the same standards, we’d have a much better
Internet today. Unfortunately, over the years Web technology has evolved
but Web browsers haven’t always displayed the features of Web sites in the
same way. As a result, the same Web page can look quite different from one
browser to another, especially in older browsers. (You find more about
browser differences and testing your designs in Chapter 4.)
Today, there is a growing movement among some of the best designers in the
world to get everyone to follow the same standards, create Web sites with
CSS, and make sure they are accessible to everyone.
Chapter 1: The Many Ways to Design a Web Page
When Web designers talk about accessibility, they mean creating a site that
can be accessed by anyone who might ever visit your pages — and that
includes people with limited vision who use special browsers (often called
screen readers) that read Web pages aloud, as well as many others who use
specialized browsers for a variety of other reasons.
If you work for a university, a nonprofit, a government agency, or a similar
organization, you may be required to create accessible designs. But even if
you’re not required to use CSS or to design for accessibility, it’s still good
practice. That’s why Dreamweaver CS3 includes so many CSS features and a
collection of predesigned CSS layouts like the one I used to create the site
design shown in Figure 1-1. You find instructions for creating CSS layouts like
this one in Chapter 6.
One of the big advantages of CSS is that it lets you separate content from
design. For example, instead of formatting every headline in your site as 24point Arial bold, you can create a style for the <h1> tag and use it to format
all your headlines. Then if you decide later that you want all your headlines
to use the Garamond font instead of Arial, you need to change the style for
the <h1> tag only once in the style sheet and it automatically applies everywhere you’ve used that style.
Figure 1-1:
This site
was
designed
using one of
Dreamweaver’s
CSS layouts.
13
14
Part I: Creating Great Web Sites
Separating content from design also enables you to create different style
sheets for different audiences and devices. In the future this is likely to
become even more important as a growing number of people view Web pages
on everything from giant flat-screen monitors to tiny cell phone screens like
the one shown in Figure 1-2. One of the coolest additions to Dreamweaver
CS3 is Device Central, where you can preview your page designs in a variety
of handheld devices and cell phones to see just how different they can look
when displayed on these small screens.
As you get more advanced with CSS, you can create multiple style sheets for
the same Web page. For example, you can create one that’s ideally suited to
a small screen like the one shown in Figure 1-2, another that works best when
the page is printed, and yet another designed with a larger font size for anyone
who may have a trouble reading the small print that is so common on Web
pages.
Figure 1-2:
Designing
Web pages
with CSS
can help
you create
designs that
display
better on
large and
small
screens.
Chapter 1: The Many Ways to Design a Web Page
Reviewing old-school designs
Although CSS is by far the best option for creating Web designs today, many
sites on the Web were created using tables to control the layout, like the one
shown in Figure 1-3. Old-school sites like this one were created using the
HTML table tag. To help you appreciate how this page was created, I altered
the original design to display the table borders, although most designers turn
off table borders when using them to create layouts like this.
Because you can merge and split table cells, you can control the layout of a
page, positioning text and images more or less where you want them. And if
you set the table border to 0 (instead of 10 as I did here to show you the borders), you can hide the table so that it doesn’t interfere with the design.
In Chapter 7, you find an introduction to Dreamweaver’s Table features and
tips for creating accessible table designs by including the table header tag in
all your tables. You can even combine CSS with tables to create more streamlined designs.
Figure 1-3:
In the old
days, the
only way
you could
create a
complex
Web page
design was
by using a
HTML table
like the one
shown
here to
control the
placement
of text and
images.
15
16
Part I: Creating Great Web Sites
Although I recommend that you redesign sites like the one shown in Figure 1-3
with CSS and <div> tags, as you’ll find out how to do in Chapter 6, I do
understand that many designers still find it easier to create layouts with
tables, and not everyone has time to redesign their Web sites right away. I
have to admit, I’ve been guilty of leaving sites online designed with tables
long after I learned better myself. So in the chapter on tables, I show you how
to use Dreamweaver’s features to create a page layout like the one in Figure
1-3, as well as how best to create tables for displaying tabular data like the
content you’d find in a spreadsheet.
Although tables are no longer recommended for page layouts, they are still
considered the best way to format data like the order page from the artist
site shown in Figure 1-4.
Considering frame options
In Chapter 8 you find instructions for creating Web sites that use frames, like
the family site shown in Figure 1-5. Many designers make a face much like the
one my niece is displaying in the photo in Figure 1-5 because they think
Frames are a terrible way to design Web sites.
Figure 1-4:
Tables
are still
considered
the best
way to
display
tabular data
like the
information
on this
order page.
Chapter 1: The Many Ways to Design a Web Page
Figure 1-5:
Frames
enable you
to display
multiple
Web pages
in one
browser
window.
Frames have a bad rep, and there are some compelling reasons why they’re
not used much anymore. But frames still have their place on the Web, so I’ve
included a chapter on the basics of using Dreamweaver’s frame features to
create pages like the one in Figure 1-5 that display multiple Web pages in one
browser window.
Creating dynamic Web sites
When you use Dreamweaver’s most advanced features, you can create Web
sites (like the one shown in Figures 1-6 and 1-7) which connect to a database
and display content dynamically on a Web page.
What’s happening behind the scenes of a site like the one at www.PowerYoga.
com gets complicated fast, but one of the advantages of using this kind of
technology is that you can create a Web page like the one in Figure 1-7 and
make it easy for anyone to enter data, like the details for a new event, even
if they don’t know how to use Dreamweaver. If you’ve used Dreamweaver’s
programming features, such as PHP or ASP, to set up a system that saves that
data into a database automatically, you can then serve the contents of the
form back to the live site on a page like the one shown in Figure 1-6, which
includes a long list of events and retreats.
17
18
Part I: Creating Great Web Sites
Figure 1-6:
PowerYoga.
com is a
dynamic
Web site
that displays
content
from a
database
using PHP.
Figure 1-7:
Use Dreamweaver’s
dynamic site
development
features to
create
interactive
pages like
this administrative tool
for adding
events
to the
event page
shown in
Figure 1-6.
Chapter 1: The Many Ways to Design a Web Page
In Figure 1-7, you see an administrative tool that was designed to make it easy
for someone who works at Power Yoga to update this section of the site without having to know HTML or even Dreamweaver, but you could also use this
technology to create an online discussion board or any other system that collects data in one page and then uses that data to determine what is displayed
on another page.
That’s how the most advanced sites on the Web do things like remind you of
the last book you searched for or keep track of your order as you select products in an online shopping cart. Although I can’t cover all these advanced features in this book, you find an introduction to creating database-driven Web
sites in Chapters 13, 14, and 15.
One other thing I feel compelled to mention at this point is that most of the
big, complicated Web sites in the world were created by a team of developers, not just one person. In the case of the Power Yoga site, the design was
created by Kathy McCarthy and the programming that makes all the dynamic
features work was created by my friend Anissa Thompson. And that’s part of
why Christine Fang, the Managing Director who runs Power Yoga, is able to
update the training section by herself using a Web browser, even though she
knows only a little HTML.
Understanding Browser Differences
Another thing that’s important to understand before you start creating Web
pages is that no matter how carefully you create your designs, your pages
will never look exactly the same to every possible visitor to your site. That’s
because one of the greatest advantages of the Web is also one of the biggest
challenges. HTML was created to share information in a way that could be
displayed on every computer on the planet. Unfortunately, not all those computers use the same browsers, or the same fonts, or the same-sized monitors.
On top of that, a lot of older Web browsers are out there, and they can’t display the latest Web features. And even the newer browsers don’t all display
the same features the same way.
As a result, although you have more design control today than ever before, and
the capability to create more interesting Web sites, you also have more challenges if you want your pages to look good to everyone who might visit your
site. My best advice is to test, test, test, and then ask your friends to test your
pages some more. If you want to play it safe, the simpler your page design, the
more likely it will look the same, or at least similar, to all your visitors.
If you want to create more interesting designs, and you want to reach the
broadest possible audience, pay special attention to Dreamweaver’s browser
preview and compatibility features and be prepared to look for more advanced
19
20
Part I: Creating Great Web Sites
books and training programs when you finish with this one. Entire books and
Web sites are dedicated to creating layouts that work on a variety of computers and browsers.
Because you’re reading this book, I assume you are relatively new to Web
design or looking for a refresher course and a chance to update your skills
with CSS and the new features in Dreamweaver CS3, so I begin with the
basics. In the next sections of this chapter, you find a few tips and suggestions for planning a Web site. At the end of this chapter, you find an introduction to Dreamweaver’s interface.
Over the course of the nearly 400 pages that follow, you find a variety of
approaches to Web design, from old-school techniques like tables and frames
to the newest and most advanced features like CSS and multimedia.
Developing a New Site
In a nutshell, building a Web site involves creating individual pages and linking them to other pages. You need to have a home page (the first page visitors will see when they arrive at your URL) and that page needs to bring
them into the rest of the pages of the site, usually with links to each of the
main sections of the site. Those pages, in turn, link to subsections that can
then lead to deeper subsections.
A big part of planning a Web site is determining how to divide the pages of
your site into sections and how those sections should link to one another.
Dreamweaver makes creating pages and setting links easy, but how you organize the pages is up to you.
If you’re new to this, you may think you don’t need to worry much about how
your Web site will grow and develop. Think again. All good Web sites grow,
and the bigger they get, the harder they are to manage. Planning the path of
growth for your Web site before you begin can make a tremendous difference
later. Neglecting to think about growth is probably one of the most common
mistakes among new designers. This becomes even more serious when more
than one person is working on the same site. Without a clearly established
site organization and some common conventions for tasks such as naming
files, confusion reigns.
Managing your site’s structure
Managing the structure of a Web site has two sides: the side that users
see, which depends on how you set up links, and the behind-the-scenes
side, which depends on how you organize files and folders.
Chapter 1: The Many Ways to Design a Web Page
What the user sees
The side that the user sees is all about navigation. When users arrive at your
home page, where do you direct them? How do they move from one page to
another in your site? A good Web site is designed so that users navigate
easily and intuitively and can make a beeline to the information most relevant
to them. As you plan, make sure that users can
Access key information easily from more than one place in the site
Move back and forth easily between pages and sections
Return to main pages and subsections in one step
Setting links is easy in Dreamweaver; the challenge is to make sure that those
links are easy for visitors to follow.
What’s behind the scenes
The second side to managing your Web site structure happens behind the
scenes (where your users can’t see the information, but you want some kind
of organizational system to remember what’s what). Before you get too far
into building your site with Dreamweaver, spend some time thinking about
the management issues involved in keeping track of all the files you create for
your site. Files are all the images, HTML pages, animations, sound files, and
anything else you put in your Web site.
Once your Web site grows past a handful of pages, organizing them in separate folders or directories can help you keep track. Fortunately, Dreamweaver
makes this easy by providing a Files panel, shown in Figure 1-8, where you
can see all the files of your site and even move and rename files and folders.
(You find detailed instructions for organizing the files and folders in a Web
site in Chapters 2 and 4.)
Under construction? No hard hats here!
All good Web sites are under construction —
always. It’s the nature of the Web. But build your
site in such a way that you can add pages when
they’re ready instead of putting up placeholders. Don’t greet your viewers with a guy in a
yellow hat who seems to say, “You clicked this
link for no good reason. Come back another day,
and maybe we’ll have something for you to
see.” Instead of creating “Under Construction”
placeholders, create directory structures that
make adding new pages later easy. You can let
readers know that new things are coming
by putting notices on pages that already have
content — a message like “Come here next
Thursday for a link to something even cooler” is
a great idea. But never make users click a link
and wait for a page to load, only to find that nothing but a guy with a hard hat is waiting for them.
21
22
Part I: Creating Great Web Sites
Preparing and planning a Web site
One of the most common mistakes new Web designers make is plunging into
developing a site without thinking through all their goals, priorities, budget,
and design options. The instinct is to simply start creating pages, throw
them all into one big directory, and then string stuff together with links.
Then, when designers finally test the site out on an audience, they’re often
surprised when users say the site is hard to navigate and they can’t find
what they want.
Save yourself some grief by planning ahead, and you stand a much better
chance of creating an attractive Web site that’s easy to maintain and update.
Visualizing your site
Before you get too far into building Web pages, take some time to plan your
site and think about its structure and organization. A good place to begin is
by answering the following questions:
What do you want to accomplish with your Web site? (What are your
goals and objectives?)
Who is your target audience?
Who will be working on your site? How many developers do you have
to manage?
How will you create or collect the text and images you need for your site?
How will you organize the files in your site?
Will you include multimedia files such as Flash, audio, or video?
Will you want interactive features such as a feedback form or chat room?
What kind of navigation system will you have for your site (that is, how
can you make it easy for visitors to move from one page or section to
another in your site)?
How will you accommodate growth and further development of the site?
(Good Web sites always grow over time.)
Taking the time to get clear on your goals and objectives is time well spent. It
can help you set the tone for a successful Web project from the beginning
and ensure you spend your precious time, money, and energy on the elements and features that matter most.
Preparing for development
One of the first things many professional Web designers do when they’re working on a new site with a group or a company is hold a brainstorming session
with a few key people who understand the mission for the Web site. The purpose of this session is to come up with proposed sections and features for the
Chapter 1: The Many Ways to Design a Web Page
site, what should be included, and how the site should be organized. A good
brainstorming session is a nonjudgmental free-for-all — a chance for everyone
involved to share all the ideas they can think of, whether realistic or not.
Not discrediting ideas at the brainstorming stage is important. Often an unrealistic idea leads to an innovation that no one may have thought of otherwise, especially when you’re working on the Internet, where the best ideas
are almost always new ones.
After a brainstorming session like this, you’ll probably have a long list of possible features to develop into your site. Your next challenge is to edit that list
to the most important ones and then plan your course of development to
ensure that everything will work well together when you’re finished.
Customizing the Workspace
in Dreamweaver CS3
Dreamweaver can seem a bit overwhelming at first. It has so many features,
and they are spread out in so many panels, toolbars, and dialog boxes that
you can easily get lost. If you prefer to understand by poking around, have at
it (and feel free to skip ahead to the next chapter, where you start building
your first Web page right away). If you want a tour before you get started,
the last few sections of this chapter introduce you to the interface and are
designed to give you a quick overview of the features in this powerful program.
When you launch Dreamweaver, the Start screen appears in the main area of
the program (and reappears anytime you don’t have a file open unless you
close it permanently by selecting the Don’t Show Again option). From the
Start screen, you can choose to create a new page from one of the many
Dreamweaver predesigned sample files, or you can create a new blank page
by selecting HTML from the Create New options in the middle column. When
you select HTML, Dreamweaver creates a new blank HTML page in the main
workspace, as shown in Figure 1-8.
You build HTML pages, templates, style sheets, and other files in the workspace, which consists of a main window that shows the page you’re working
on surrounded by a number of panels and menus that provide tools you can
use to design and develop your pages. The Dreamweaver workspace consists
of the following basic components: the menu bar (at the very top), the Insert
bar (just below it), the Document window (the main area of the screen, just
below the Insert bar), the Property inspector (at the bottom of the screen),
and the vertical docking panels (to the right of the Document window) that
expand and collapse as needed. More detailed descriptions of each of these
follows.
23
24
Part I: Creating Great Web Sites
Figure 1-8:
When you
use split
view, you
can select
text in
design view,
and Dreamweaver
automatically
highlights
the corresponding
code in
code view.
Dreamweaver has two main program layout settings: the designer layout,
shown in Figure 1-8, and the coder layout, which places the panels on the left
side of the screen instead of the right side. You can change layouts by choosing Window➪Workspace Layout and then choosing Coder or Designer.
The Document window
The big, open section in the main area of the workspace is the Document
window, which is where you work on new and existing pages. If you use the
Designer interface in design view, you see your page as it would appear in
a Web browser. If you want to see the HTML code behind your page, click
the Code button at the top of the work area. Choose the Split button to see
the HTML code and design view simultaneously (which you can see in
Figure 1-8).
Chapter 1: The Many Ways to Design a Web Page
Customizing the interface
The docking panels, palettes, and bars in Dreamweaver provide easy access
to most of the program’s features, and you can drag these elements around
the screen. You can also close any panels on the right by clicking the tiny
Options icon in the top right of each panel and choosing Close Panel from the
drop-down list. (The Options icon looks like three bullet points with lines
next to them and a little arrow underneath, and it’s really, really small.) You
can also close all the panels at once by choosing Window➪Hide Panels (or by
clicking the arrow in the middle of the row of panels). If you want to open a
panel, select it from the Window menu. For example, to open the CSS Styles
panel, choose Window➪CSS Styles.
The Insert bar
The Insert bar, located at the top of the screen, includes seven subcategories,
each with a different set of icons representing common features. Click the
small arrow to the right of the name to access the drop-down list and
switch from the buttons of one subcategory to the buttons for another.
The options are
Common bar: Displays icons for many of the most common features,
including links, tables, and images.
Layout bar: Displays div, table, and frame options essential for creating
page layouts.
Forms bar: Features the most common form elements, such as radio
buttons and boxes.
Data bar: Displays options for building dynamic Web pages powered by
database material.
Spry bar: Features a collection of widgets that combines HTML, CSS,
and JavaScript to create interactive page elements.
Text bar: Displays common text-formatting features, including paragraphs, breaks, and lists.
Favorites bar: Enables you to right-click (Windows) or Control+click
(Mac) to add any of the icons from any of the other Insert bar options to
create your own collection of favorite features.
At the end of the drop-down list is Show as Tabs option, which enables you to
display the names of the Insert bars as tabs across the top of the screen, as
shown in Figure 1-9.
25
26
Part I: Creating Great Web Sites
Figure 1-9:
The
Common
Insert bar
provides
access for
forms,
tables,
images,
and more.
The Property inspector
The Property inspector is docked at the bottom of the workspace in
Dreamweaver. If you prefer it at the top of the screen, you can drag it to the
top and it will lock into place; but I rather like that it’s handy, yet out of the
way, at the bottom of the screen.
The Property inspector displays the properties, or options, for any selected
element on a page, and it changes based on what’s selected. For example, if
you click an image, the Property inspector displays image properties. If you
click a Flash file, it displays Flash properties. Figure 1-10 shows the image
options displayed in the Property inspector, including height and width,
alignment, and link settings.
Figure 1-10:
The
Property
inspector
displays the
attributes
of any
selected
element,
such as an
image
shown here.
Chapter 1: The Many Ways to Design a Web Page
At the bottom-right corner of the Property inspector, you see a small arrow.
Click this arrow (or double-click in any open inspector space) to reveal additional attributes that let you control more advanced features, such as the
image map options when a graphic is selected.
The docking panels
The docking panels are located to the right of the work area when you
choose designer layout, as shown in Figure 1-11, or on the left if you choose
coder layout. You can move the panels anywhere on the screen by clicking
and dragging them.
The docking panels display a variety of important features in Dreamweaver,
including all the files and folders in a site in the Files panel and Cascading
Style Sheets in the CSS panel. You can open and close panels by clicking the
small arrow to the left of each panel’s name. To display more panels, select
the panel name from the Window menu. To hide all the visible panels at once,
click the tab with the small arrow in the middle of the row of panels.
Figure 1-11:
Panels
provide
easy access
to all the
files, styles,
and many
other assets
in a Web
site.
27
28
Part I: Creating Great Web Sites
The menu bar
Like most programs you’ve used, the menu at the top of the screen provides
easy access to most program features, including the options you find in the
Insert bar, Property inspector, and panels, as well as a few others that are
available only from the menu.
The status bar
The status bar, at the bottom of the Document window, includes a number of
useful details about the page that’s open in the program, as well as access to
a number of useful features. On the right side of the status bar are tool icons
that control the on-screen display of your document. On the left end, you
find the Tag selector, which features a collection of HTML tags that change
depending on your cursor’s location on the page. The tags indicate how elements on your page are formatted. If you click a tag in the Tag selector, you
can select the tag and everything it contains in the main Document window, a
handy feature for making precise selections in Dreamweaver.
The more you use Dreamweaver, the more you are likely to appreciate the
capability to customize its features. Remember that you can always change
the workspace to better suit the way you like to work, and you can easily
alter Dreamweaver’s preference settings using the Preferences dialog box
shown in Figure 1-12 by choosing Edit➪Preferences on a Windows computer,
or Dreamweaver➪Preferences if you’re using a Mac.
Figure 1-12:
You can
change how
Dreamweaver
creates
code,
displays
elements,
and
manages
accessibility
options.