1
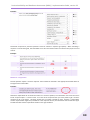
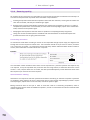
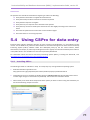
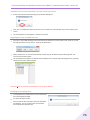
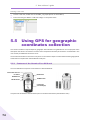
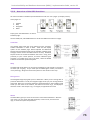
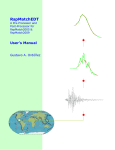
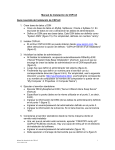
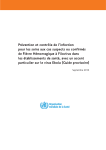
HEALTH FACILITY ASSESSMENT OF SERVICE AVAILABILITY AND READINESS Service Availability and Readiness Assessment (SARA) An annual monitoring system for service delivery Implementation Guide WHO/HIS/HSI/2015.5 © World Health Organization 2015 All rights reserved. Publications of the World Health Organization are available on the WHO website (www.who.int) or can be purchased from WHO Press, World Health Organization, 20 Avenue Appia, 1211 Geneva 27, Switzerland (tel.: +41 22 791 3264; fax: +41 22 791 4857; e-mail: [email protected]). Requests for permission to reproduce or translate WHO publications –whether for sale or for non-commercial distribution– should be addressed to WHO Press through the WHO website (www.who.int/about/licensing/copyright_form/en/index.html). The designations employed and the presentation of the material in this publication do not imply the expression of any opinion whatsoever on the part of the World Health Organization concerning the legal status of any country, territory, city or area or of its authorities, or concerning the delimitation of its frontiers or boundaries. Dotted and dashed lines on maps represent approximate border lines for which there may not yet be full agreement. The mention of specific companies or of certain manufacturers’ products does not imply that they are endorsed or recommended by the World Health Organization in preference to others of a similar nature that are not mentioned. Errors and omissions excepted, the names of proprietary products are distinguished by initial capital letters. All reasonable precautions have been taken by the World Health Organization to verify the information contained in this publication. However, the published material is being distributed without warranty of any kind, either expressed or implied. The responsibility for the interpretation and use of the material lies with the reader. In no event shall the World Health Organization be liable for damages arising from its use. Service Availability and Readiness Assessment (SARA) An annual monitoring system for service delivery Implementation Guide Version 2.2 September 2015 Acknowledgements The service availability and readiness assessment (SARA) methodology was developed through a joint World Health Organization (WHO) – United States Agency for International Development (USAID) collaboration. The methodology builds upon previous and current approaches designed to assess service delivery including the service availability mapping (SAM) tool developed by WHO, and the service provision assessment (SPA) tool developed by ICF International under the USAID-funded MEASURE DHS project (monitoring and evaluation to assess and use results, demographic and health surveys) project, among others. It draws on best practices and lessons learned from the many countries that have implemented health facility assessments as well as guidelines and standards developed by WHO technical programmes and the work of the International Health Facility Assessment Network (IHFAN). Particular thanks are extended to all those who contributed to the development of the service readiness indicators, indices, and questionnaires during the workshop on "Strengthening Monitoring of Health Services Readiness" held in Geneva, 22–23 September 2010. Many thanks to The Norwegian Agency for Development Cooperation (Norad) whom has supported Statistics Norway to take part in the development of the SARA tools. The support has contributed to the development and implementation of a new electronic questionnaire in CSPro and data verification guidelines. A special thanks to the Medicines Information and Evidence for Policy unit at WHO for their contribution to the SARA training materials and to the Unidad de Calidad y Seguridad de la Atención Médica-Hospital General de México for their contribution of photographs to the SARA data collectors' guide. Project Management Group The SARA methodology and tool were developed under the direction and management of Kathy O’Neill and Ashley Sheffel with valuable inputs from Ties Boerma and Marina Takane. Project Advisory Group Carla AbouZahr, Maru Aregawi Weldedawit, Sisay Betizazu, Paulus Bloem, Krishna Bose, Maurice Bucagu, Alexandra Cameron, Daniel Chemtob, Meena Cherian, Richard Cibulskis, Mario Dal Poz, Sergey Eremin, Jesus Maria Garcia Calleja, Sandra Gove, Neeru Gupta, Teena Kunjumen, Thierry Lambrechts, Richard Laing, Blerta Maliqi, Shanthi Mendis, Claire Preaud, Andrew Ramsay, Leanne Riley, Cathy Roth, Willy Urassa, Adriana Velasquez Berumen, Junping Yu, Nevio Zagaria, and Evgeny Zheleznyakov. 4 Service Availability and Readiness Assessment (SARA) | Implementation Guide, version 2.2 Table of contents Acknowledgement .............................................................................................................4 CHAPTER 1 | PLANNING AND METHODOLOGY ...................................................................7 1.1 Background ....................................................................................................................................9 1.2 Objectives.......................................................................................................................................9 1.3 Key topics of the assessment .......................................................................................................10 1.4 Methodology ................................................................................................................................11 1.5 Roles and responsibilities.............................................................................................................12 1.6 Survey steps .................................................................................................................................12 1.7 Requirements ...............................................................................................................................14 1.8 Budget ..........................................................................................................................................17 Annexes ..................................................................................................................................................19 CHAPTER 2 | SAMPLING ................................................................................................... 29 2.1 Sampling strategies ......................................................................................................................31 2.2 National estimates .......................................................................................................................32 2.3 Probability sampling in Excel........................................................................................................39 Annex | Calculating the sample size for SARA .......................................................................................42 CHAPTER 3 |QUESTIONNAIRE ADAPTATION ..................................................................... 43 3.1 3.2 3.3 3.4 3.5 Country adaptation ......................................................................................................................45 Editing the structure of the questionnaire ..................................................................................46 Important tips ..............................................................................................................................46 Questionnaire implementation....................................................................................................47 Adding modules ...........................................................................................................................47 CHAPTER 4 | CSPRO FOR SARA + DATA VERIFICATION ..................................................... 49 CHAPTER 5 | DATA COLLECTOR’S GUIDE .......................................................................... 53 5.1 5.2 5.3 5.4 5.5 Overview of data collection procedures ......................................................................................55 Interviewer skills ..........................................................................................................................60 Completing the SARA questionnaire ............................................................................................64 Using CSPro for data entry ...........................................................................................................71 Using GPS for geographic coordinates collection ........................................................................74 CHAPTER 6 | SUPERVISOR’S GUIDE ................................................................................. 79 6.1 6.2 6.3 Roles and responsibilities.............................................................................................................81 Conducting field activities ............................................................................................................81 Using CSPro for data checking and validation .............................................................................87 5 5. Data collector’s guide 53 Service Availability and Readiness Assessment (SARA) | Implementation Guide, version 2.2 5.1 Overview of data collection procedures The Service availability and readiness assessment (SARA) is designed to function as a systematic tool to support annual verification of data and service delivery at the facility level. It intends to cover public as well as private and faith-based health facilities. The goals of the survey is to provide evidence based data on health system progress to inform the annual health sector review, identify gaps and weaknesses responsible for sub-optimal service provision and intervention coverage that need to be addressed. It also provides a baseline for planning and monitoring scale-up intervention for service delivery improvement for maternal and child health, HIV, TB, malaria and NDCs among others. The Data Collector's Guide is designed to provide interviewers with the knowledge and skills necessary to effectively conduct a health facility assessment. It is intended to support and guide staff members who have been identified as interviewers for conducting health facility assessments. The guide provides general instructions on the interviewing skills required to gather information; detailed explanations and definitions of specific questions to ensure a uniform understanding of the content and a consistent approach to recording results by different data collectors across different facilities; and instructions on how to collect data at a facility. The primary objectives of the Data Collector's Guide are to: • Introduce participants to the Service Availability and Readiness Assessment tool (SARA) as well as the Facility Reporting Data Verification Tool (record review). • Gain an understanding of the rationale for conducting a health facility assessment • Instruct participants on how to conduct an interview and complete the questionnaires • Familiarize participants with paper-based and CSPro data collection methodologies 5.1.1 Survey approach Objectives of the Service Availability and Readiness Assessment tool The Service Availability and Readiness Assessment tool has been developed for interviewers to collect information on core functional capacities and availability of services in health facilities. The assessment tool is designed to rapidly assess and monitor service availability and readiness with a focus on a number of core health interventions. It does not attempt to measure the quality of services or resources, nor is it disease specific. The SARA methodology has been developed by USAID and WHO in close collaboration with Ministries of Health and global partners to: • Assist countries in assessing and monitoring service availability at district and health facility levels; • Monitor scale up programs; • Assess equitable and appropriate distribution of services and resources; and • Support decision making by providing national and district planners with the skills and tools required to map and monitor service and resource availability on a regular basis. This approach aims to fill critical data gaps required for monitoring health systems strengthening and is designed to be implemented as a routine monitoring system of services at district and national levels. 55 5. Data collector’s guide Objectives of the facility reporting data verification tool The Facility Reporting Data Verification Tool is jointly administered with the SARA and allows record review in health facilities being surveyed. The goal of the data verification module is to provide key information on data quality of monthly reported data from health facilities to the superior level by comparing discrepancies between data in primary source and monthly report). This crucial information is integrated in the data quality report card (DQRC). Data collection instruments A standard core questionnaire has been developed for the SARA. This questionnaire is typically adopted in its entirety and then adapted at country level with adaptations to certain elements such as names and types of facilities, personnel, first line drugs, etc. It is usually tested during an in-country pilot visit for final adjustments and validation. The tool is usually used in conjunction with supplemental modules such as the Facility Reporting Data Verification tool (enclosed at the end of the SARA questionnaire). The collection instruments are paper based or used in conjunction with electronic collection devices (tablets, laptops, etc.). Role of the interviewer The interviewer's main responsibility is to use the questionnaire appropriately to collect information that is as accurate as possible by asking questions of the appropriate respondents and accurately recording responses. The health facility assessment will be completed in teams. Typically, each team will include 2 persons responsible for data collection who work closely with a field supervisor. The data collectors’ main tasks include: • Visit health facilities and collect information. • Verify geographic coordinates (if relevant). • Complete a SARA data collection paper form and/or an electronic form, as well as the facility reporting data verification and other modules if relevant. • Back up electronic data on a memory card/USB key. • Report back to the field supervisor at the end of each day. Survey regulations The following survey regulations have been established to ensure the success of the Service Availability and Readiness Assessment tool and will be closely adhered to by all interviewers. 56 • The interviewer's attendance during each day of the fieldwork is required. Any person who is tardy or absent during any part of the fieldwork (whether it is a whole day or part of a day) without prior approval may be dismissed from the survey. • Throughout the fieldwork period, interviewers are representing the implementing agency. Your conduct must be professional and your behaviour must be congenial when dealing with the public. You must always be aware of the fact that we are only able to do our work with the good will and cooperation of the people we interview. Therefore, any team member who is consistently overly aggressive, abrupt, or disrespectful to others may be dismissed from the survey team. • For the survey to succeed, each team must work closely together. Any team member who, in the judgment of the survey manager, is a disruptive influence on the team may be asked to transfer to another team or dismissed. Service Availability and Readiness Assessment (SARA) | Implementation Guide, version 2.2 • It is critical that the data gathered during the fieldwork be both consistent and accurate. Field staff may be dismissed at any time during the fieldwork if the quality of their work is inadequate. • Vehicles and gasoline are provided for the survey for official use only. Any person using a vehicle for an unauthorized personal reason will be dismissed. • Data are confidential. Under no circumstances should confidential information be passed on to third parties. Persons breaking these rules, and therefore the confidence placed in them by respondents, will be dismissed. 5.1.2 Planning the SARA fieldwork The following describes the activities that concern data collectors in the planning the SARA fieldwork. Fieldwork schedule The field supervisor will assign each team a list of facilities to be visited for data collection. The list will include the name and location of the facility as well as the facility identification information required in the SARA questionnaire. If the information is available, the list may include the name of the person in-charge at the facility, telephone numbers or other information on how to contact the facility, and the hours during which the facility is open and/or various services offered. The field supervisor will also provide the team with a map showing the location (or approximate location) of all of the facilities on their list. The team generally will need to arrive at a facility on or before the official opening hours; therefore, the lodgings that the team will use each night must be within a reasonable distance of the facility that is to be visited on the next day. Advance contact with authorities/facilities Generally, the survey manager or another senior member of the team will have notified appropriate authorities of the nature and purpose of the health facility assessment in advance of the fieldwork. An official letter from the managing authority for the facilities being surveyed should have been sent to the regional or district offices for that organization. Each team should also have a copy of the letter to show at facilities if necessary Logistical arrangements Prior to departure for fieldwork, the field supervisor must ensure that the team has the questionnaires and other materials necessary to complete the assignment. Each morning before leaving for field visits, the team should check that they have all necessary materials. 57 5. Data collector’s guide Checklist of materials for data collectors: A list of data collection teams and contact information. The contact details of the field supervisor, including a mobile phone number to call in case of difficulty in the field (with sufficient credit) . A schedule of visits to survey sites. The contact details of the sites to be visited. Details of backup facilities to be visited if scheduled visits are not possible. Copies of letter of introduction. The SARA data collectors' guide (part1 and part2). A SARA data collection form for each health facility to be visited that day (with cover page pre-filled by field supervisor). A SARA data collection form for each backup site that may need to be visited that day. An EDC/tablet/laptop (fully charged with CSPro installed and loaded with the SARA questionnaire) a charger and battery. A memory card/USB stick for data backup. A fully charged and accurately configured GPS unit (if relevant). A fully charged cell phone with credit Pens (pencils should not be used to record data), a clipboard and other supplies. A notebook to record any significant events or findings. A field allowance for local expenses. An identity document with a photograph for each data collector. 5.1.3 Activities during facility visit There are a number of general procedures to be followed by a survey team during a visit to a survey facility. These procedures are outlined in the following sections. Locating and verifying the survey facility The field supervisor has provided you with a list of the facilities you are responsible for surveying. Every attempt should be made to conduct the survey at each facility on your list. If after contacting local authorities, you cannot locate a health facility on your list, or are not sure about whether a facility that you have found is actually the one identified on the facility list, contact your field supervisor. If a facility included in the assignment has closed, no interview will be necessary, just note that fact on the cover sheet of the assigned questionnaire. Finally, no facility not listed in the sample should be visited and interviewed unless specifically approved by the survey manager. Validating the cover page of the questionnaire Before starting the data collection, the data collectors should check that the information on the first page of the data collection form (cover page) is complete and correct (pre-filled by the field supervisor). If there is any mistakes, inform the field supervisor at the end of the day. If applicable, enter this information on the electronic form on the electronic data collection device/tablet or laptop. 58 Service Availability and Readiness Assessment (SARA) | Implementation Guide, version 2.2 The following information should be completed by the data collectors on the first page of the data collection form prior to starting the survey: • Date • Name of the data collectors (interviewer) • Number/code of the interviewers’ team (given by the field supervisor prior to the fieldwork) Geographic Positioning System data collection Upon arrival at the health facility to be surveyed, fill out the geographic coordinates section of the questionnaire included in the cover page. The global positioning system (GPS) which is a space-based satellite system will be used to precisely locate the geographic position of the site. Step-by-steps instruction on using a GPS device is available on Section V. Gaining permission to survey the health facility Data collection teams will be visiting facilities operated by the government, others operated by nongovernmental organizations, and perhaps other private health facilities. All facilities must give permission for the survey to be conducted on their premises. The day of the survey data collectors may provide reassurance to facility staff that results will only be provided so that no individual respondent can be identified. The first contact at the site should be made by asking to speak with the person in charge. If the official “incharge” is not present the day of the survey, the data collection team should ask to see the person acting “incharge” for the day. The data collectors will then: • introduce themselves • explain the purpose of the visit and the activities that are a part of the survey • give the person in-charge the introductory letters from the relevant organization and the letters explaining the survey and giving the authorization to visit the facility. • when consent is obtained, sign the informed consent section on the cover page of the questionnaire to indicate the consent from the person in-charge has been obtained. If you are refused an interview in the facility and nothing you say can make the in-charge reconsider, contact the field supervisor, and provide the name of the facility, its managing authority, and location. The field supervisor will make every attempt to contact appropriate persons who can help to convince the health facility staff to allow the interview. Meeting with the person in-charge of the facility An important objective of the survey is to obtain correct and consistent answers to the questions. As the questions relate to a facility and not to a specific person, the information can be obtained from a variety of respondents as long as they are knowledgeable about the topic. During the interview, interviewers may need to speak with various respondents in order to obtain complete and correct information. The data collectors are responsible for working out a plan for completing all components of the questionnaire at each facility. They should discuss the plan with the in-charge. It may be helpful to meet with relevant supervisors (at large facilities) and other staff who may be requested to allow interviews and observations during the team’s visit. For a small facility this may be relatively easy since most services are in the same general area. For larger facilities, this may involve different departments. 59 5. Data collector’s guide Duration of the survey Duration of the interview will depend on the size of the facility and the availability of suitable staff to provide the answers to the questions, but generally should be 3 – 5 hours for a small health post or health centre and up to a day for a hospital*. * For conducting both the SARA and the Facility Reporting Data Verification Tool 5.2 Interviewer skills Collecting data that accurately reflect health services available at a facility, whether it is a small health post or an urban hospital, requires skill and practice. This section provides general instructions on the skills required for gathering this information. The data collectors should remember that the survey findings are only as good as the data from which they are calculated. The quality of that data depends to a large extent on the interviewer. Below are some basic instructions on the practices that should be used when interviewing respondents and tips for how to handle difficult situations that you might encounter while conducting an interview. 5.2.1 General interviewing practices and techniques In order to obtain accurate information from a health provider at work in a health service setting, it is very important that they be engaged in the data collection process. There are several basic ways to gain the provider’s cooperation while collecting accurate and specific information. Showing respect for the respondent The interaction between the interviewer and all respondents is very important. All respondents should be treated respectfully and politely. The respondents should know that their cooperation and the time they are taking to help make the survey successful is very much appreciated. A respondent's first impression of the interviewer will strongly affect his/her willingness to fully participate in the interview. Therefore, it is important that the interviewer approach each person to be interviewed and his/her colleagues at work in a friendly, respectful, and professional manner. One basic way to show respect for a health worker at work is to be considerate of what they need to accomplish during their workday and to let them know that there will be no interference with their client-related tasks. Two ways to accomplish this are: 1) If the health worker to interview is busy with a client, the interviewer should wait until that visit is completed before approaching him/her; and 2) the interviewer should wait until there are no clients around or until there is a qualified person available to complete the questionnaire. The interviewer will discover other ways to fit smoothly into the health worker's busy schedule while gaining more experience gathering data in a variety of health service settings during the survey implementation. If it appears that there will never be a convenient time for collecting the data, the interviewer should discuss with the health worker or the staff member in charge to determine the best approach for collecting the required data with the least interference possible. 60 Service Availability and Readiness Assessment (SARA) | Implementation Guide, version 2.2 Listening carefully to the respondent Listening carefully to what the respondents say is as important as asking the questions on the questionnaire, and demonstrates respect. Some questions in the questionnaire require the interviewer to listen to what the respondent says and record it by simply circling a printed response category. Sometimes, the interviewer must write down exactly the answer given by the respondent if the answer does not fit in any of the listed categories. In either case, the interviewer should listen well. He/she should not rush into circling the code category before he/she has really listened to the respondent. This may be taken as a sign of disrespect or not paying attention. More importantly, people who rush into coding a response are often in danger of attributing their own biases, preferences, and favourite response categories to their respondents. Requesting consent from the respondent prior to asking questions There is a consent form and some background information that should be read to the respondent prior to beginning the interview. This is located at the start of each questionnaire. The interviewer is required to read the information in its entirety to the respondent and then request his/her consent before starting to ask questions. Without the respondent's consent the interview cannot proceed beyond the cover section. Answering the respondent's questions without pressuring them Some respondents may question the interviewer about the purpose of the survey before agreeing to participate. In this situation, the interviewer should answer the respondent's questions as directly as possible. If the respondents feel that the information is important and that the interviewer is sympathetic to their situation, they will be more straightforward with responses and will be more likely to answer questions to the best of their ability. If they feel pressured to respond, or feel that the interview is a burden, they may not carefully think about responses. Offering no opinions or advice on specific health facility practices or patient care issues If a respondent has specific questions that require the interviewer’s medical opinion or advice, he/she should politely respond by saying that he/she is here to collect information to provide an overview of the services, and that he/she is interested in the systems and practices at this facility. Explaining this and then simply stating, “I am not in a position to provide any advice or opinions” may be sufficient. It is important to remember that the job is not to educate respondents, but only to collect information from them. Reading every question exactly as written and in sequence The wording of each question has been carefully chosen and for that reason it is essential that the interviewer read each question to the respondent exactly as it is written. It is very important for this survey that each question is asked to each respondent in exactly the same manner. Each section of the questionnaire also has an introductory paragraph that must be read to the respondent (when applicable) in its entirety. The interviewer should speak slowly and clearly so that the people who are interviewed will have no difficulty in hearing or understanding the question. At times, the interviewer may need to repeat a question in order to be sure the respondent understands it. In these cases, the interviewer should not paraphrase the question but repeat it exactly as it is written. If, after the question has been repeated the respondent still does not understand it, the question may have to be restated. The interviewer should be very careful when changing the wording not to alter the meaning of the original question. During the practice sessions conducted at a facility not included in the survey sample, if the interviewer find that they have to repeat the same question to several respondents, a note of this should be made and reported to the field supervisor so that if necessary, the wording can be changed on the questionnaire. 61 5. Data collector’s guide Being straightforward There are some questions in the survey where the interviewer is asking about the availability of items, and then asking to see them. Providers will be more cooperative if they know beforehand what to expect. If the interviewer ask questions and then later ask to see items, people may think you are trying to trick them, or “checking up” on their answer. In order to have the greatest amount of cooperation, the interviewer should always tell the respondent what is coming. For example: “I am interested in knowing if the following basic equipment and supplies used in the provision of client services are available in the general outpatient area of this facility. For each item, please tell me if it is available today and functioning. I will need to see the item so that I can completely fill in this questionnaire.” Probing for a response Occasionally, a respondent may answer a question incompletely, or seems to have misunderstood the question. The first thing to do is simply to repeat the question as written a second time. If this does not help, the interviewer will have to probe to obtain the response. Probing is a way of asking for further information without influencing the response. For example, “Could you explain that a little more?” or “Could you be more specific about that?” The interviewer must never interpret a respondent's answer and then ask the respondent if the interpretation is correct. There is not a uniform understanding, even between health service providers within the same health facility, on some of the issues for which we are collecting data or on terms used to describe items or practices. If it appears that the respondent is not understanding what the interviewer is asking, or the response does not seem consistent with other information the interviewer has collected, he/she may rephrase or describe in more detail the item or practice that he/she is asking about, using examples, to ensure that the respondent completely understands the question to which he/she is responding. In cases where it may be necessary to provide additional clarification, the interviewer should provide only the minimum information required for an appropriate response. If, however, the respondent appears to understand the question and the response still is not consistent, the interviewer must record the response as given by the respondent. Never suggesting answers to the respondents If the respondent's answer is not relevant to a question, the interviewer should not prompt them by saying something like “I suppose you mean that…Is that right?” In many cases, the informants will agree with the interviewer’s interpretation of their answer, even when that is not what they meant. Rather, in most cases, the interviewer should probe in such a manner that the informants themselves come up with the relevant answer, e.g. “Can you explain a little more?” “There is no hurry. Take a moment to think about it”. Specific questions for which it may be necessary to provide additional clarification will be discussed in the detailed instructions for completing the SARA questionnaires. Even in these cases, the interviewer should provide only the minimum information required for an appropriate response. Except when specifically instructed, the interviewer should never read out the list of coded answers to the respondents, even if they have trouble in answering the question. Remaining neutral The job as an interviewer is to obtain the facts. An interviewer should be friendly, but firm; neutral, but interested. The tone of voice, facial expressions, and even bodily postures all combine to establish the rapport you create with your respondent. The interviewer should not express surprise, pleasure, or disapproval at any response or comment made by the respondent. 62 Service Availability and Readiness Assessment (SARA) | Implementation Guide, version 2.2 Asking all applicable questions In most cases, the interviewer will ask questions in the sequence in which they appear in the questionnaire. However, because the organization of facilities often differs, the interviewer may find that to complete one section he/she has to talk to more than one respondent, or go to different areas of the facility. It is up to the interviewer to ensure that when sections of the questionnaire are skipped because the information must be collected from a different respondent or location, that those sections are completed before departure from the facility. Not raising expectations of immediate changes in the situation of the staff or facility The interviewer should not raise expectations that he/she can immediately assist with solving problems that the staff or clients raise as problems. He/she is going to provide information to decision makers and health planners and administrators, but any changes as a result of the survey will most likely occur over an extended period of time, and be gradual in implementation. If clients or staffs complain about the poor state of repair of the facility, equipment, or supplies or other problems, the interviewer should provide a neutral or nonjudgmental response (e.g., “I know these things are difficult”). Not separating questionnaires The interviewer should never separate stapled or bound questionnaire forms to speed up the process of data collection. Experience has shown that this strategy may result in lost pages. Thank the respondent at the end of the interview At the end of every interview, the interviewer should thank the respondent for taking time out of his/her busy schedule, telling him/her it was very much appreciated. They should be asked if he/she can direct the interviewer to the next appropriate clinic/unit and/or person. 5.2.2 Tips on handling difficult interview situations The respondent is reluctant to participate Occasionally, a potential respondent will refuse to participate in the survey. The interviewer should not take the initial unwillingness of a respondent to cooperate to mean a final refusal. He/she should try to put himself/herself in the position of the respondent and think of factors that might have brought about this reaction. The respondent may not be in the right mood at that particular time or he/she may have misunderstood the purpose of the visit. The interviewer should try to find out why the respondent is unwilling to participate, and respond accordingly. Some points can be used to persuade a respondent to participate: • The information he/she provides will help the Ministry of Health and the government to better understand the effectiveness of programs and make improvements to the program that will ultimately help the clients. • If confidentiality is an issue, the interviewer should reassure the respondent that everyone working on the survey has pledged to maintain confidentiality and that the respondent's name will not be shared with others, including his/her supervisors or colleagues. • The respondent cannot be replaced by anyone else. However, in some circumstances a respondent may continue to refuse. In this situation, the interviewer should respect the respondent's right to refuse, and thank the respondent for his/her time. The interviewer should not take these refusals personally. 63 5. Data collector’s guide The respondent seems bored There may be other situations where the respondent simply says, “I don’t know”, gives an irrelevant answer, acts bored or detached, contradicts something they have already said, or refuses to answer the question. This happens most when the respondent is concerned about their other clinic/unit responsibilities and wants to get back to them. In these cases the interviewer must try to re-interest the respondent in the conversation. For example, if the interviewer sense that the respondent is growing restless, he/she should be reassured that there are not many more questions and that his/her responses are very valuable. The respondent is very talkative If an informant is giving irrelevant or elaborate answers or complaining about something, the interviewer should not stop him/her abruptly or rudely, but listen to what they have to say. Then the interviewer should try to steer him/her gently back to the original question. The interviewer can also write down what he/she says and tell him/her that it is duly noted. A good atmosphere must be maintained throughout the interview. The best atmosphere for an interview is one in which the respondent see the interviewer as a friendly, sympathetic, and responsive person who cares about him/her. 5.3 Completing the SARA questionnaire The interviewer's main responsibility is to use the questionnaire to appropriately collect information that is as accurate as possible by asking questions to the appropriate respondents and accurately record the responses. The instructions and examples below explain the questionnaire form, the various types of questions and instructions, and procedures for correctly recording information. 5.3.1 Recording the responses When completing a paper version of the questionnaire, all responses are to be recorded using pens with blue ink. Blue ink is used because it can be distinguished from the black ink in which the questionnaires are printed. Red or green ink should never be used in recording responses since these colours are reserved for the survey manager and field supervisor to use in correcting the questionnaires in the office. The information recorded in the fields of the questionnaire form will eventually be entered into an electronic database. At that point, it is very difficult to correct for errors or omissions in the questionnaires. Consequently, it is very important that all answers be correctly recorded and special instructions in the questionnaire be followed. The procedures for recording responses will vary according to the type of question being asked. There are some basic types of questions in the questionnaire such as pre-coded questions and questions requiring a numeric response. Samples of all types of questions, and combinations of them, are reviewed below giving examples. NEVER LEAVE A RESPONSE BLANK! A blank is recorded as “missing information” because it is not known if the question was asked or not. If a response is negative, the negative response must be circled. Likewise, if a response is “don’t know”, the number corresponding to the “don’t know” response must be circled. 64 Service Availability and Readiness Assessment (SARA) | Implementation Guide, version 2.2 This questionnaire is typically divided into four columns, as shown below. The first column contains the question number with each question numbered separately within each section. The second column contains the questions and instructions to the interviewer for posing questions, the third column contains the response categories, and the fourth column contains skip and other instructions, if necessary. 5.3.2 Instructions Instructions for the interviewer It is important to ask the questions exactly as they are written in the questionnaire and in the order in which they appear. Questions are often accompanied by a set of instructions for the interviewer. Instructions are usually located in the question column and appear as bold faced CAPITAL LETTERS. Instructions will help you to remember important directions for asking questions, making correct observations, and recording information. These instructions should not be read to respondents. Example: It is important to pay attention and follow consistently the instructions because they will help the interviewer complete the questionnaire as accurately and completely as possible. 65 5. Data collector’s guide Introducing a set of questions There are sentences throughout the questionnaire that provide information to the respondent about the next set of questions to be asked. These sentences must be read to the respondent, so that they know what to expect from the next set of questions. Respondents who are provided information up front are less likely to be surprised or uncomfortable about certain questions and much more likely to respond sincerely. Below is an example of a set of sentences found in the questionnaire that are to be read to the respondent so that they will know what to expect. Example: If, during the training or the pretest, the interviewer finds that information such as this would be useful prior to a set of questions where there is no narrative, it should be reported to the field supervisor so that the questionnaire can be modified if necessary. Skip Instructions The questionnaire is set up to avoid as much redundancy as possible and to ask only appropriate questions given a situation. This is accomplished through the use of skip patterns. It is very important to follow these skips for they will make the questionnaire more concise and relevant and thus increase the cooperation of the respondent. In the sample question below, if the answer to question 301 is “No”, the providers in the health facility do not have to answer the following question about overnight observations. The interviewer will skip the following questions (302-304) and go to question 305. If the answer is “Yes” the interviewer will ask question 302. Example: 66 Service Availability and Readiness Assessment (SARA) | Implementation Guide, version 2.2 Available and functional instructions Throughout the questionnaire many questions ask if equipment and supplies used in different services are available and if so if there functional. The following pattern should be followed to fully answer the question: Section A: “Available” The respondent is asked if a specific item is available. It the answer is NO, the response “2” should be circled. As indicated by skip on the questionnaire, the interviewer will go directly to the next item. If the answer is YES, the answer “1” should be circled. The interviewer should now skip to the section B “functional” Section B: “Functioning” The interviewer will need to determine if the item available is functioning at the time of the visit. For these cases the following criteria will be used: • “1” for “YES”: Staff reports that the item is in working order thus functional. • “2” for “NO”: The item does not function if the staff member indicates that it is not in working order. • “8” for “DON’T KNOW”: The respondent is not certain if the item is in working condition or not, and you cannot verify the functioning condition (e.g. the place where the item might be is locked and cannot be accessed at the time of the survey and the respondent does not know about the item). 67 5. Data collector’s guide Observation Instructions Throughout the questionnaire many questions ask if drugs and commodities are present. The following criteria are to be used for classifying the presence of the item (observed and with valid expiration date on the day of the assessment): • "1" for "OBSERVED AND VALID": The item was seen in the service provision area or in an adjacent room where it can easily be used. The expiration date of the drug or commodities (at least one of them) has been checked and confirmed valid. • “2” for “OBSERVED BUT NOT VALID”: The item was seen in the service provision area or in an adjacent room where it can easily be used. The expiration date of the drugs or commodities has been checked and confirmed not valid. • "3" for "REPORTED AVAILABLE BUT NOT SEEN": Staff reports that the item is located in the facility or immediately adjacent, where it can easily be used, but for some reason (e.g., key to cabinet is missing or room is locked), the interviewer cannot observe the item. This answer should also be selected when staff indicates that the item is brought to the service delivery area only at the time services are provided (thus not being observed by the interviewer). • “4” for “NOT AVAILABLE TODAY”: Staff reports that the item is usually available in the facility but not on the day of the assessment. • “5” for “NEVER AVAILABLE”: Staff reports that the item is never available in the facility. 5.3.3 Question types Pre-coded questions For some questions, we can predict the types of responses a respondent will give. The responses to pre-coded questions are listed in the questionnaire. To record a respondent’s answer, the number (code) that corresponds to the response should be circled. When numbers indicate coding categories, the interviewer records only one response for each question. The interviewer should make sure that each circle surrounds only a single number. Example: In some cases, a pre-coded question will include an “other” category. The “other” code should be circled when the answer provided is different from any of the pre-coded responses. The “other” response should be specified and written in the space provided. If more room is needed, the margins can be used. The interviewer should also pay attention to any skip linked to a pre-coded answer. 68 Service Availability and Readiness Assessment (SARA) | Implementation Guide, version 2.2 Example: Sometimes responses to particular questions must be entered in response grid (table). When recording a response in one of these grids, the interviewer has to be sure that the answer is entered in the proper row and column. Example: Numeric responses Several questions require a numeric response. These should be recorded in the appropriate available boxes in the right column of the table. Example: Whenever respondents do not know the answer to a numeric question, the interviewer must circle the “Don't know” response option. If “Don't know” is not one of the responses then you must probe to get a numeric response to fill in the boxes. All boxes should have a number recorded in them. Anytime a respondent's answer requires fewer digits than provided for in the response column, the interviewer must record zeros (0) in the left-hand box and the respondent's answer in the right hand box. 69 5. Data collector’s guide 5.3.4 Ensuring quality All members of the survey team are responsible for ensuring that the data that is collected at each facility is as accurate and comprehensive as possible. Each interviewer is responsible for: • Checking that questionnaires filled are complete at the end of each interview, ensuring that all answers are clear and reasonable, and that your handwriting is legible. • Returning to the original respondent(s) if questions are omitted or there appears to be errors, in order to complete the questionnaire. In this situation, the interviewer should apologize, explain that a mistake was made, and then ask the question again. • Notifying the field supervisor whenever there are problems in completing the daily assignment. • Taking into account the field supervisor’s feedback and recommendation on the field work/interview procedures based on the on-going assessment work. Correcting mistakes If a mistake was made while recording an answer or the respondent changes his/her reply, two diagonal lines through the incorrect response should be used. The interviewer should not try to erase an answer, use whiteout, or write over an answer. It is particularly hard for data entry staff to understand which of two numbers is correct, if the interviewer has tried to write over a response. Example: The interviewer should remember that if there are two responses for a particular question that requires only one response, it may be impossible later, when the data are being entered, to determine which the correct answer is. Also, if he/she writes over an answer, the data input staff frequently cannot determine which of the two responses you meant as the correct response. Questionnaire editing Interviewers are required to edit their questionnaires before considering an interview complete. If questions are omitted or there appear to be errors, he/she must returns to the original respondent(s) if possible. He/she should apologize, explain that an error was made, and ask the question again. Editing should be done on the spot in order to avoid the need for re-contacting respondents, which is impractical given the time frame for fieldwork completion, as well as inconvenient for both the interview teams and the respondents. 70 Service Availability and Readiness Assessment (SARA) | Implementation Guide, version 2.2 Check list All questionnaires should be reviewed from beginning to end for the following: Verify that the interviewer has signed the verbal consent. Verify that all skip and filter instructions have been respected. Verify that the responses are legible. Verify that only one response code is ticked for each question. Verify that any corrections made by the interviewer are done legibly according to the instructions above. Check that all questionnaires contain the correct number of pages. Check that there are no missing responses. 5.4 Using CSPro for data entry Electronic data collection facilitates collection of more accurate and reliable data in a more efficient, timely manner. For the SARA survey, electronic data collection is carried out through the use of the Census and Survey Processing System (CSPro) software. CSPro was developed jointly by the U.S. Census Bureau, Macro International, and Serpro, SA, with major funding from the U.S. Agency for International Development. CSPro is in the public domain. It is available at no cost and may be freely distributed. For information about the Census and Survey Processing System (CSPro), including free download, visit: http://www.census.gov/population/international/software/cspro/ 5.4.1 Installing CSPro The following is based on a Windows 7 setup. Your steps may vary if using a different operating system. 1. Download the CSPro application from http://www.census.gov/population/international/software/cspro/csprodownload.html 2. Install CSPro 6.0 to your computer by double-clicking on cspro6.0.1.exe (the two last digits of the version number might change as new releases are published). This will start the installation wizard. 3. CSPro allows you to select which components of the system you want to install. During the installation you will see the following component screen: 71 5. Data collector’s guide You have the following choices: • CSPro (all components): Select this if you plan to develop applications. • Data Entry Operator (only): Select this if you are installing a data entry application on a production machine. The operator will be able to run an already-created data entry application, but will not be able to make any changes to it. The Data Entry, Compare Data, Text Viewer, and Table Viewer components are installed. • For SARA, please install ALL COMPONENTS even on tablets to use in the field as there are tools in the full application that are required for the program to run properly. • The rest of the default settings for the installation are OK, so just click “next” until finished. 5.4.2 SARA data entry application Open the SARA data entry application in CSPro • To open the SARA data entry application, click on the “SARA_2.0_Simple.pff” shortcut available on the desktop. • A new form (Case) opens. Case number Text of the question Questions number and pop-up boxes for answer options Filling in the SARA data entry forms • You can now start filling the Cover page information. • The question text is located on the yellow top window. For each question a pop-up window will appear. Select your answer and validate your choice by clicking on the green check mark (or press the ENTER button). • Fill in all the responses for the cover page. When you complete all the questions on the cover page (ending with consent for the survey), the next form will appear with the next set of questions. Note: saving the new case will only be possible when the cover page has been completed through question QINTERVIEWER. Save a data entry form during data collection 72 • To save the file go to: File/Save partial case • The following pop-up window appears. Click “Ok” to continue the data entry. Service Availability and Readiness Assessment (SARA) | Implementation Guide, version 2.2 Remember to save regularly while filling in the case to avoid any lost data. • At the end of the form the following pop-up window will appear: • Click “Yes” to validate the data entry for the form. You will then automatically return to the CSEntry main screen. • The completed form now appears in the tree on the left. Stopping data entry in middle of a form • If you are in the middle of filling a form and need to exit the form for some reasons click on the “X” at the top right end of the form to close it . A pop-up window opens: • Select “Partial save” to save the data entered. Another pop-up window will open indicating that “The current case has been saved”. • The incomplete form appears on left side tree of CSEntry with a red plus sign indicating that it is a partially saved case and may not be complete. Note that all forms should be completed prior to leaving the facilities. Finalizing an incomplete form • To complete a form, double click on it in the left hand tree of the CSEntry window. • The form will open and ask: • Click yes and the form will open at the last place data was entered. You can now continue to enter data and complete the questionnaire. 73 5. Data collector’s guide Starting a new case • To start a new case, double click on the SARA_2.0_Simple.pff icon to start CSEntry. • In the menu bar go to Mode -> Add case to begin a new questionnaire. 5.5 Using GPS for geographic coordinates collection This section introduces required steps for geographic data collection using GPS devices. For the purpose of the description the Garmin eTrex device has been used. Complete functionality of the device are described in the user manual provided with the Garmin eTrex. The functions described on this section only focus on the essential steps to collect health facilities geographical coordinates to complete the national Master Facility List. 5.5.1 Features of the Garmin eTrex GPS unit The eTrex GPS device comprises 5 main buttons as described below: Internal GPS Antenna UP button PAGE button DOWN button POWER button ENTER button LCD Display (with backlight) It requires two AA batteries that should be place on the back of the device (take off back cover). 74 Service Availability and Readiness Assessment (SARA) | Implementation Guide, version 2.2 5.5.2 Overview of the GPS functions All of the information needed to operate the GPS is found on 4 main “pages” (or display screens). These pages are: 1. 2. 3. 4. Satellite Map Navigation Menu Simply press the PAGE button to switch between pages. Use the ENTER, UP, and DOWN buttons to access the different functions of a page. Satellite The satellite page shows the eTrex gathering all the necessary satellite information in order to work. There are two display options on the Satellite page: Normal Skyview and Advanced Skyview. Normal Skyview shows you the satellites, satellite signal strength, and the eTrex's estimated location accuracy. Advanced Skyview shows the numbered satellites the eTrex is using, their proximity to your current position, and their individual signal strengths. To navigate from one to the other, select the ENTER button and choose the preferred skyview. Map The Map Page shows where you are (the animated figure) and provides a real picture of where you are going. As you travel (the animated figure "walks") and leaves a "trail" (track log). Waypoint names and symbols are also shown on the map. Navigation The Navigation Page helps guide you to a destination. When you are moving with no particular destination in mind, the navigation page shows you your moving direction and speed. When you are moving towards a specific destination, the navigation page shows you the name of the location, the distance and time to go, and displays a direction arrow in the compass ring. To navigate, simply follow the arrow. Menu The Main Menu gives you access to the eTrex's more advanced features. With the main menu, you can create and view waypoints, create a route, save and track logs, or access the system setup features. 75 5. Data collector’s guide 5.5.3 Setup for map units From the MENU page, select SETUP, then select the category UNITS in order to specify units of measure. POSITION FRMT hddd.ddddd MAP DATUM WGS 84 UNITS metric NORTH REF magnetic ANGLE degree 5.5.4 Where to collect GPS coordinates The rules for GPS data collection are as follows: 1. Single facility in a building • The geographic coordinates should be recorded in front of the main sign attached to the building of the facility. • If there is no sign attached to the building then the geographic coordinates should be recorded in front of the main door or reception area of the facility. 2. Multiple facilities in a single building • The geographic coordinates should be recorded in front of the sign(s) that lists what facilities are located in that building (if the sign is outdoors and attached to the building). • If there is no sign listing what is in the building (or if the sign is indoors), the geographic coordinates should be recorded in front of the main entrance door or reception area of the building. 3. Single facility in multiple buildings • The geographic coordinates should be recorded in front of the door or main entrance to the reception area of the facility (preferably where the main sign for the facility is). If there is no reception area, the geographic coordinates should be recorded in front of the door to the administrative offices of the facility. 5.5.5 Using the GPS for collecting geographic data Once you have configured the settings on the GPS receiver, you can use it to record the geographic coordinates of a facility. Make sure that if the receiver had been previously used to collect data, the internal memory has been cleared. 1. 76 Move to main entrance of the building and stand within 30 meters of the main door. It is necessary to be placed in an open area that has a clear view of the sky and hold the GPS receiver parallel to the ground so that its antenna is able to receive signals. Service Availability and Readiness Assessment (SARA) | Implementation Guide, version 2.2 2. Collect coordinate only when the receiver indicates that is has acquired signal from enough satellites to produce and accurate reading. The message "Ready to navigate" should appear on the GPS receiver (SATELLITE page) and the accuracy should be lower than 20 meters. In case you do not get the message "Ready to navigate", wait at the same place for 5 minutes. 3. When the signal is sufficient and the accuracy is at the recommended level, the geographic coordinates can be recorded: • Go to the MENU page and select MARK • Highlight the WAYPOINT number and press ENTER. You can now enter the facility code (maximum 6 digits or letters) • Press ENTER and scoll down to OK • Press ENTER to go back to the MARK page • Highlight OK using the UP and DOWN button and press ENTER • The WAYPOINT is now registered 5.5.6 Retrieving waypoints list from the GPS receiver To retrieve the waypoints from the list of GPS coordinates collected: • Go to the MENU page and select WAYPOINTS • Using the UP and DOWN button you can now look for a waypoint just or previously entered You can now report the geographic coordinates on the SARA paper questionnaire as well as electronic form (if applicable). Latitude and longitude Latitude is the north/south value measured from the equator. Longitude is the east/west value measured from the Prime Meridian that runs through West Africa and Western Europe. A latitude and longitude identifies an exact location on the earth’s surface. Thus, based on the location of the health facility positive (+) (North/East) or negative (-) (South/West) coordinates should be properly reported. In order to conserve battery life, switch off the GPS receiver once the geographic coordinates are recorded. 77 5. Data collector’s guide 5.5.7 Checklist for GPS units Each morning before you leave for visits, check that you have all the necessary materials with you and remember the following when collecting GPS coordinates. Check battery level and verify that the device is properly working. Check the settings of your GPS receiver. Have questionnaire for data collection ready to be used. Make sure to be properly placed for reliability of data collection. Report coordinates taking into account location to the Equator and Greenwich meridian. Make sure that all information relative to the collected point has been reported (in the paper SARA form as well as electronic form if applicable). 78