1
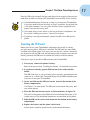
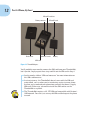
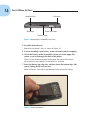
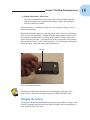
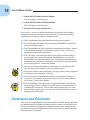
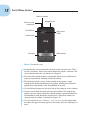
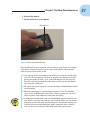
1
AL
That New Phone Experience
In This Chapter
RI
▶ Liberating your phone from its box
TE
▶ Installing the SIM card and battery
▶ Charging the battery
MA
▶ Identifying important things
▶ Reviewing optional accessories
D
▶ Keeping the phone in one place
TE
I
PY
RI
GH
remember my first cell phone. I bought it in the early 1990s, and the gizmo
cost me $600. The plan cost $45 per month plus $1.50 per minute of talk
time. The cell signal didn’t reach my house, so I could use it only in town —
or if I wandered up to the roof and stood there during a call. Even
so, I was thrilled to have a device unlike anything I’d ever
owned, especially a gadget that let me do something wonderful, such as place a phone call from anywhere (well,
anywhere it received a signal).
CO
Your HTC ThunderBolt can be your first phone,
your first cell phone, your first smartphone, and
probably your first 4G LTE phone. It’s an amazing
gizmo, full of potential and loaded with things that
will confound and confuse you. Before all that happens, you need to free the device from the confines
of its box, give it a look-see, and complete other preliminary but important tasks.
Liberation
The first thing you do with a new electronic item is liberate it from the confines of its box or container. You repeat the same process for a new phone,
though because most folks buy their phones at the Phone Store, odds are
good that the people in the store have already freed your ThunderBolt from
the confines of its HTC packaging.
10
Part I: A Phone, By Zeus!
Yes, it’s akin to having your mom open your Christmas presents for you, but,
as I was told at the Phone Store, it’s “company policy.” How devastating.
Whether the phone was manhandled by the salesperson in the Phone Store
or you received the phone in another manner, this section covers removing
the phone from its pretty box, setting up a few things, and getting the battery
charged.
✓ Odds are good that the phone has already been configured to work on
the Verizon cellular network. If not, you need to contact Verizon to get
your ThunderBolt working. Someone there will be more than happy to
help you set things up:
www.verizonwireless.com
(800) 922-0204
✓ The initial setup done at the Phone Store involves identifying the
ThunderBolt with the cellular network. Basically, the phone’s network ID
is associated with the network and then magically mapped to your cell
phone bill.
✓ Additional setup beyond configuring the phone for the cellular network
involves setting up Google accounts for the ThunderBolt. This process
might have been done with help from the people at the Phone Store, or
you can do it on your own. This topic is covered in Chapter 2.
Unpacking the phone
Opening the box that the HTC ThunderBolt comes in can be a thrill. It’s
a pretty box, or at least the box my ThunderBolt came in had its charm.
Opening the box is like opening a Christmas present or jewelry. It’s fun.
A cling sheet of plastic on the front of the phone. It says, “Remove before
use,” which is printed on the cling sheet and not displayed on the phone’s
screen. The plastic is used for shipping purposes only, so feel free to peel it
off your phone.
Along with the phone, you find some other items in the box:
✓ The battery, which may have already been installed into the phone by
the cheerful Phone Store employee.
✓ A USB cable, which is used to connect the ThunderBolt to a computer or
to a wall charger.
✓ A wall charger, or power adapter, which plugs into the USB cable.
✓ Pamphlets, warnings, and warranties that you can merrily avoid reading.
Chapter 1: That New Phone Experience
Free the USB cable and wall charger from their plastic wrapping because you
need them in order to charge the ThunderBolt, covered later in this chapter.
✓ I recommend keeping the box for as long as you own your ThunderBolt.
If you ever need to return the thing, or ship it anywhere, the original box
is the ideal container. You can shove all those useless pamphlets and
papers back into the box as well.
✓ One handy thing to have, which is missing in the box: headphones. See
the section “Adding accessories,” later in this chapter.
✓ If anything is missing or damaged, contact the folks who sold you the
phone.
Inserting the SIM card
Before you can use your ThunderBolt, and before you install its battery,
you must ensure that its SIM card is installed. The SIM card was most likely
installed at the Phone Store. If so, great; you can skip this section. Otherwise,
you need to install the SIM card, and you need to do so before you insert the
battery (because the SIM card sits behind the battery inside the phone).
Obey these steps to install the SIM card into your ThunderBolt:
1. If necessary, remove the phone’s battery.
Refer to the next section, “Installing the battery,” for removal instructions.
2. If you haven’t already, pop the SIM card out of its credit-card-like
holder.
The SIM card ships as part of a larger piece of plastic, approximately the
same size as a credit card. You need to pop out the SIM card before you
can insert it into your ThunderBolt.
3. Locate and slide out the SIM card carrier, found at the bottom of the
battery compartment.
Use Figure 1-1 as your guide. The SIM card carrier works like a tiny, delicate, metal drawer.
4. Place the SIM card into the carrier, as illustrated later, in Figure 1-6.
The notch in the corner of the SIM card sits in the lower left corner; it fits
in only one way. The gold-plated connectors are face-down in the phone.
5. Slide the SIM and its carrier back down into the bottom of the battery
compartment.
6. Replace the battery and the phone’s back cover.
See the next section for proper battery-replacement directions.
11
12
Part I: A Phone, By Zeus!
MicroSD card slot
Battery contacts
Back cover
MicroSD card
SIM card carrier
Battery
SIM card
Figure 1-1: ThunderBolt guts.
You’ll probably never need to remove the SIM card from your ThunderBolt,
but if you do, simply repeat these steps and lift out the SIM card in Step 4.
✓ See the nearby sidebar “SIM card nonsense” for more information on
this SIM card nonsense.
✓ In a few instances, the ThunderBolt doesn’t come with the SIM card
preinstalled, such as when you’re transferring service to a new phone
or when you’ve ordered your phone from an outfit that doesn’t supply
SIM cards. Either way, you need to install the SIM card to use the
ThunderBolt as a phone.
✓ The ThunderBolt requires a 4G, LTE SIM card compatible with Verizon’s
GSM network. You can’t just use any old SIM card and expect the phone
to work.
Chapter 1: That New Phone Experience
SIM card nonsense
The HTC ThunderBolt features a SIM card,
which sets the phone’s identity. The SIM, which
stands for Subscriber Identity Module, contains
a special serial number that’s used by your cellular provider to help identify your phone and
keep track of the calls you make. Additionally,
the SIM can be used to store information,
such as electronic messages and names and
addresses, though you probably won’t use this
feature on your ThunderBolt.
A typical way to use a SIM is to replace a
broken phone with a new one: You plug the SIM
from the old phone into the new phone, and
instantly the phone is recognized as your own.
Of course, the two phones need to use similar
cellular networks for the transplant operation to
be successful. For the ThunderBolt, that means
the other phone must be a GSM-based, 4G, LTE
device.
On the ThunderBolt, it’s the MicroSD card that’s
used as the phone’s primary storage device,
where you keep your music, photos, and other
types of information as described throughout
this book. But you still need a SIM card to make
phone calls on the cellular network.
Installing the battery
As with the SIM card (see the preceding section), the ThunderBolt’s battery
may have already been installed by a cheerful Phone Store employee, depriving you of the opportunity of doing so yourself. If so, you can skip this section. If not, the battery comes loose inside the ThunderBolt’s box and you
need to install the battery inside the phone.
Follow these steps to install the battery into your phone:
1. Ensure that the phone isn’t connected to anything.
You should disconnect the phone from the USB cable, headsets, or anything else that might be attached.
2. Flip the phone over so that the front (the glassy part) is facing away
from you.
3. Remove the back cover.
The thumbnail notch at the top of the phone is illustrated in Figure 1-2:
Stick your fingernail into the slot and pry off the phone’s back cover.
It takes some effort, but eventually the cover pops off, making a horrid
crunchy sound as it’s removed.
13
14
Part I: A Phone, By Zeus!
Headphone jack
Back cover
Microphone
Power Lock button
Thumbnail notch
Figure 1-2: Removing the ThunderBolt’s back cover.
4. Set aside the back cover.
Marvel at the phone’s guts, as shown in Figure 1-1.
5. If you’re installing a new battery, remove it from its plastic wrapping.
6. Orient the battery so that its metallic contacts are in the upper left
corner as you’re looking at the back of the phone.
There’s a tiny arrow or triangle in the upper left part of the battery,
which points at the contacts as the battery is inserted.
7. Insert the battery top edge first, and then lower the bottom edge, like
you’re closing the lid on a tiny box.
Refer to Figure 1-3 for help in positioning and inserting the battery.
Figure 1-3: Inserting the battery.
Chapter 1: That New Phone Experience
8. Replace the phone’s back cover.
After you’re oriented with the phone, press the back cover onto the
phone. Keep pressing around the back cover’s edges until you don’t
hear any crunching sounds.
After the battery is installed, the next step is to charge the battery, conveniently covered next.
Removing the battery works by repeating these steps, but with two changes:
First, ensure that the phone is turned off before you remove the back cover.
See Chapter 2 for directions on turning off the phone. Second, rather than
insert the battery in Step 7, you yank it out: Insert a fingernail at the bottom
left part of the battery, as illustrated in Figure 1-4. Lift the battery, like you’re
lifting the lid on a box, and then remove the battery.
Lift here.
Figure 1-4: Removing the battery.
Installing or removing the battery isn’t something you do often in your
phone, but it’s necessary in order to access the SIM or MicroSD card.
Charging the battery
The very first thing I recommend doing with your new phone is giving it a full
charge. Assuming that the battery has been installed (see the preceding section), proceed with these steps:
15
16
Part I: A Phone, By Zeus!
1. Attach the USB cable to the wall charger.
The cable plugs in only one way.
2. Attach the USB cable to the ThunderBolt.
The cable plugs in only one way.
3. Plug the wall charger into the wall.
Upon success, you see an orange notification light appear in the phone’s
speaker mesh (at the top front part of the phone). It’s the charging lamp,
showing that the phone’s battery is being rejuiced.
✓ Don’t be alarmed if the orange notification light fails to appear.
✓ The notification light glows green when the ThunderBolt’s battery has
been completely charged.
✓ The ThunderBolt may have come fully charged from the factory, though
I still recommend giving it an initial charge just in case, as well as to
familiarize yourself with the process.
✓ The USB cable is used for both charging the phone and connecting it
to a computer for sharing information, exchanging files, or using the
ThunderBolt as a computer modem. See Chapter 20 for information on
connecting your phone to the computer; see Chapter 19 for information
on using the phone as a computer modem.
✓ You can also charge the phone by connecting it to a computer’s USB
port. As long as the computer is on, the phone charges.
✓ The battery charges more efficiently if you plug it into a wall, as opposed
to charging it on a computer’s USB port.
✓ You can charge the ThunderBolt using the power adapter in your car,
if you have a car adapter charging accessory. See the section “Adding
accessories,” later in this chapter.
✓ The ThunderBolt’s charging cable is a type of USB cable. The end that
plugs into the phone is called a micro-USB connector. The other end is a
standard USB A connector. Such a cable can be purchased at any computer or office supply store, or if you want to pay more money, you can
get one at the Phone Store.
Examination and Orientation
Years ago, the telephone had a dial and a handset. The only ordeal you faced
was determining which end of the handset to put to your ear and which end
to put to your mouth. Things have changed in recent years, enough so that
you need a more formal introduction to the various parts of your phone and
what those parts are called.
Chapter 1: That New Phone Experience
Finding things on the phone
To peruse those things strange and wonderful on your phone, take a look at
Figures 1-5 and 1-6. Every knob, hole, doodad, and smooth place has a name
and purpose, as illustrated in the figures.
Front speaker
Notification light
Power lock
Front camera
(1.3 MP)
Proximity sensor
Volume up
Volume down
Touchscreen
Soft buttons
Soft buttons
Figure 1-5: Your phone’s face.
The items illustrated in Figures 1-5 and 1-6 are named using terms referenced
throughout this book as well as in any ThunderBolt document you may have
found with your phone or available online.
✓ The Power Lock button is found atop the phone, as shown in Figure
1-5 and 1-6. The button is used to turn the ThunderBolt on or off, as
described in Chapter 2.
✓ The biggest part of the ThunderBolt is its touchscreen display, which
occupies almost all the real estate on the front of the telephone. The
touchscreen display is a touch-see gizmo. You look at it — and also
touch it with your fingers.
17
18
Part I: A Phone, By Zeus!
Power Lock button
Headphone jack
Noise-canceling
microphones
Dual LED flash
Main camera
(8 MP)
Volume button
Kickstand
with
™
USB connector
Figure 1-6: Your phone’s rump.
✓ Festooning the area just beneath the touchscreen are four icons. These
are the soft buttons, which are used to control the phone’s software. You
can read more about the soft buttons in Chapter 3.
✓ The back of the phone features a kickstand, which can be pulled out to
prop up the phone for tabletop horizontal viewing.
✓ The kickstand covers a large, beefy speaker on the phone’s rump.
Deploying the kickstand uncovers the speaker, allowing for a hoard of
people to be entertained by the ThunderBolt all at once.
✓ Use the Volume buttons on the right side of the phone to set the volume.
✓ Cameras are on both the front and rear of the phone. The front-facing
camera can be used for video chat, though no app is preinstalled on the
ThunderBolt to take advantage of video chat. Using either camera to
shoot pictures or videos is covered in Chapter 14.
✓ Visit my website at www.wambooli.com/help/phone for information
on video chat apps that may appear in the future, after this book goes to
press.
Chapter 1: That New Phone Experience
✓ The front-facing camera is a 1.3 megapixel (MP) camera, which is good
enough for video chat and pictures you send to the Internet. The rear
camera is the main camera, which weighs in at 8MP. Its higher resolution allows for more-detailed images, but the phone’s primitive lens
doesn’t take pictures that look as good as ones taken by a dedicated
digital camera.
Using earphones
One item you need in order to use the ThunderBolt, something that didn’t
come in the box, is a pair of earphones. They help you use the phone in a
hands-free manner, and they also come in handy for privately listening to
music or other media.
The most common type of cell phone earphones are the earbud type: The
buds set into your ears. The sharp, pointy end of the earphones (the part you
don’t want to stick into your ear) plugs into the top of the phone.
Between the earbuds and the pointy thing is a doodle. On that doodle, you
find a teensy microphone hole. The doodle might also serve as a button,
which you can use to answer the phone, hang up, call someone back, play or
pause music, or do other potentially useful things.
✓ The earbuds are labeled L for your left ear and R for the right ear.
✓ The ThunderBolt can use any standard set of earphones; remember,
though, that you want earphones with a microphone attached.
✓ The volume is set on the ThunderBolt by using the Volume buttons on
the side of the phone.
✓ Some earphones feature extra buttons on the doodle, such as Pause,
Play, Fast-Forward, and Volume. These buttons have no effect when
used on the ThunderBolt.
✓ Chapter 16 covers playing music on your ThunderBolt phone.
✓ It’s also possible to go wireless by using a Bluetooth headset or earphone. See Chapter 19 for information on connecting a Bluetooth headset to your phone.
✓ To avoid tangling the earphone cables, consider folding the wires when
you put them away: Put the earbuds in one hand and the pointy thing
in the other. Fold the wire in half, and then in half again, and then again.
You can then put the earphones in your pocket or set them on a tabletop. By folding the wires, you avoid looping them into an impossible
Gordian knot.
19
20
Part I: A Phone, By Zeus!
Removing and inserting the MicroSD card
The MicroSD card is the phone’s removable storage device, like a media card
in a camera or a USB thumb drive on a computer. You use the MicroSD card
to store stuff on the phone, such as pictures, music, and contacts — just like
on a computer.
The phone’s MicroSD card is preinstalled at the factory; you don’t have to
insert the card when you first configure the ThunderBolt. The only time you
need to remove the card is when you want to replace it with another card or
when you need to remove the card to use it in another device.
To remove the MicroSD card, follow these steps:
1. Turn off your phone.
Specific directions are offered in Chapter 2, but for now: Press and hold
the Power Lock button (refer to Figure 1-5) and choose the Power Off
command from the Device Options menu.
If the phone isn’t turned off, you can damage the media card when you
remove it.
To ensure that the phone is turned off, press and release the Power
button quickly. The phone shouldn’t come back to life. If it does, repeat
Step 1.
2. Remove the phone’s back cover and then remove the battery.
Specific directions for removing the phone’s back cover and battery are
found in the section “Installing the battery,” earlier in this chapter.
3. Use your fingernail to drag out the MicroSD card, as illustrated in
Figure 1-7.
The MicroSD card is truly an itty-bitty thing, much smaller than your typical
media card. I would advise not leaving the MicroSD card lying about.
To insert a MicroSD card into your phone, follow these steps:
1. Ensure that the ThunderBolt is turned off.
2. Open the phone’s back cover.
3. Remove the battery.
4. Orient the MicroSD card so that the printed side is facing up.
5. Gently insert the MicroSD card into its slot, using Figure 1-7 as your
guide.
Chapter 1: That New Phone Experience
6. Reinsert the battery.
7. Put the back cover on the phone.
MicroSD card
Figure 1-7: Accessing the MicroSD card.
After the MicroSD card is installed, you can turn on your phone. See Chapter
2 for details, though, basically, you just press and hold the Power button
until the touchscreen comes to life.
✓ You can buy an SD card adapter, into which you can insert the MicroSD
card. The SD card adapter can then be used in any computer or digital
device that reads SD cards. Also, some USB adapters let you plug the
MicroSD card into a thumb-drive-like device, which can be attached to
any computer’s USB port.
✓ SD stands for Secure Digital. It’s but one of about a zillion different media
card standards.
✓ MicroSD cards come in a smattering of capacities. The ThunderBolt
ships with a 32GB MicroSD card, which is beefy, though you can buy a
larger capacity if you and your credit card are willing.
✓ In addition to the MicroSD card, the ThunderBolt features internal storage, which is used for the programs you install as well as for the phone’s
operating system and other control programs. The internal storage isn’t
used for your personal information, media, and other items, which is
why it’s necessary to keep the MicroSD card inside your phone.
21
22
Part I: A Phone, By Zeus!
Adding accessories
It’s hard to leave the Phone Store without first perusing the vast array of
available phone accessories, including these standard items: earphones,
vehicle chargers, genuine leatherette carrying cases, cables, and screen protectors. These items are all worthy of your attention, but two key accessories
affect the phone’s behavior: the Multimedia Desktop Charging Dock and the
Window and Dash Vehicle Mount.
✓ No accessory is essential to using the ThunderBolt phone.
✓ Accessories also include various phone jackets and holsters.
✓ To find out more about earphones, see the section “Using earphones,”
earlier in this chapter.
✓ I recommend buying a screen protector. It clings to the touchscreen
and truly helps keep it clean. Ensure that you get a screen protector
designed for the HTC ThunderBolt and not for a lesser phone, especially
one of those fruit-company phones.
The Multimedia Desktop Charging Dock
When nestled into the official HTC Multimedia Desktop Charging Dock, your
phone displays a special multimedia menu, allowing you to play music or
watch media while the phone charges.
The Multimedia Desktop Charging Dock also features an adapter that lets you
charge a spare battery, if you have one of those for your ThunderBolt. (I suppose it’s another accessory.)
The Window and Dash Vehicle Mount
There are quite a few car mounts and vehicle chargers you can get for your
ThunderBolt. Any standard vehicle charger that features a micro-USB connector works with your phone. But of the lot of vehicle mounts, the Window
and Dash Vehicle Mount from HTC is nifty.
In addition to allowing you to use the phone in both horizontal and vertical
orientations, the Window and Dash Vehicle Mount is positioned in such a
way that you can use the phone’s main camera while you’re driving. That
way, you can record video of your trip (if the MicroSD card has enough storage). Make your own police chase videos!
Seriously, any car mount allows you to use your ThunderBolt while you drive.
You can talk on the phone “hands free” or use the fancy navigation software to
help you get where you’re going. In fact, whenever the ThunderBolt is cradled
in a car mount, the Navigation program, or app, runs automatically.
See Chapter 13 for more information on using your phone as your copilot.
Chapter 1: That New Phone Experience
A Home for the Phone
Your ThunderBolt phone ranks right up there with a lot of important things
you use and don’t want to lose, such as your car keys, glasses, wallet, and jet
pack. As such, you should store and keep the phone in a handy, memorable
location — even when you’re carrying it around.
Toting your HTC ThunderBolt
The ThunderBolt is compact enough that it easily fits into your pocket or
purse. The phone is designed so that you can carry it around without the risk
of activating it or making one of those infamous “butt calls” — when you sit
down and the phone in your pocket decides to dial up a friend.
The key thing to remember when carrying the ThunderBolt is not to forget
that it’s in your pants, purse, or coat. I consider myself fortunate that I’ve
never sent my phone, in my pants pocket, through the wash. I have, however,
tossed my coat on a couch and been mortified to watch the phone slide out
and onto the floor.
✓ The ThunderBolt features a proximity sensor (refer to Figure 1-5), which
disables the touchscreen while the phone is next to your face during a
call or in your pocket or purse.
✓ Do not touch the Power Lock button when the phone is in your pocket.
Doing so activates the touchscreen, making buttons such as End Call
and Mute active.
✓ If you fear leaving your phone in your coat or purse, or sitting on the
phone accidentally, consider buying one of those handsome carrying cases or belt clips. These accessories come in fine Naugahyde or
leatherette.
✓ Also see Chapter 21 for information on using your ThunderBolt on the
road.
✓ Rather than put your phone through the laundry, refer to Chapter 23 for
proper phone-cleaning directions.
Storing the phone
I recommend finding a place for your phone when you’re not taking it with
you. Choose a location, such as on your desk by the computer, in the kitchen,
on your nightstand, or in the same spot where you keep your car keys. The
idea is to be consistent so that you can quickly find the phone when you
need it.
23
24
Part I: A Phone, By Zeus!
✓ You can always find your phone by having someone call you and then
hunting for the ring.
✓ A great place to store the phone when you’re not using it is the
Multimedia Desktop Charging Dock. See the section “The Multimedia
Desktop Charging Dock,” earlier in this chapter.
✓ I keep my ThunderBolt next to my computer when I’m not using it. This
location has the bonus of my being able to attach the phone to the computer with the USB cable. I can charge the phone — and also synchronize my music, photos, videos, and other information while the phone
is connected to the computer. See Chapter 20 for more synchronization
information.
✓ Avoid storing the ThunderBolt in direct sunlight, because heat is bad for
any electronic thingamabob.
✓ Don’t put your phone on a coffee table or in a location where people
stack magazines, the mail, or other items. You can too easily lose the
phone in a pile of random stuff, or — worse — have someone do some
cleaning and accidentally throw out the phone with the trash.