1
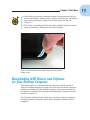
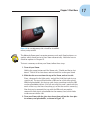
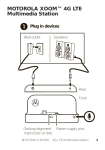
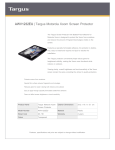
1
AL
Start Here
In This Chapter
RI
▶ Removing the Xoom from its box
TE
▶ Giving the battery a charge
▶ Identifying the Xoom’s pieces
▶ Checking your Xoom for missing features
D
▶ Inserting memory and SIM cards
MA
▶ Getting the computer drivers and software you need
TE
T
GH
he Motorola Xoom is a tablet computer — a new breed of computer
that resembles a laptop with a lopped-off keyboard, which you control
by poking the screen with your fingers. Your Xoom tablet is many things
rolled into one: a music player, movie viewer, e-book reader, web
browser, and e-mail system.
CO
PY
RI
It’s quite intelligent, actually. It listens to your commands and dutifully trots off to do your bidding — be
that bidding fetching the latest news or grabbing
your e-mail. What it won’t do, unfortunately, is extricate itself from its box, set itself up, and tell you
whether anything’s missing.
That’s where this chapter comes in. It explains how
to remove your shiny new tablet and accessories
from the box, charge its battery, and peel away the
plastic packaging film. If you bought a memory card
to add more storage space, this chapter also explains
how to maneuver that tiny card into the even tinier spot
in your Xoom.
While you wait for your Xoom’s battery to charge, read how to prepare your desktop computer to recognize your Xoom, making the first Xoom–
computer hookup much less awkward.
8
Part I: Introducing the Motorola Xoom
Finally, this chapter explains why certain things may be mysteriously missing
from your Xoom and (if Motorola’s promises come true) when those items
will magically appear.
The Grand Unboxing
The Xoom’s gray cardboard box opens much like a box of candy. Pull off the
top, and the Motorola Xoom sits inside, neatly wrapped in plastic and sitting
on top of a pile of goodies.
Here are the sweet things hiding inside the box:
Your Motorola Xoom: Your Xoom tablet can be either of two models. One
type can access both Wi-Fi and cellphone towers for “always on” Internet.
The other model connects to the Internet only through Wi-Fi networks.
And which version sits in your hands? You can tell by looking at the white
bar-code-ridden sticker on your Xoom’s cardboard box, shown in Figure 1-1,
as well as the sticker on the back of the Xoom’s plastic wrap.
Look for the letters MZ followed by three numbers to see the model number,
which determines how the device can connect with the Internet. Here’s the
rundown:
Model Number
Capabilities
MZ600
United States: Verizon Wireless data service and Wi-Fi
MZ601/MZ603
Asia/Europe: AT&T and Sprint data service and Wi-Fi
MZ604
All regions: Wi-Fi only; no cell data service
If you’re in the United States, for example, a model MZ600 Xoom can connect
to both Wi-Fi and the cellphone network (if you pony up the money to your
cellular carrier for a data plan, that is). The MZ604, by contrast, costs less
because it’s limited to Wi-Fi Internet access.
Manuals: You’ll probably find the following manuals and papers inside the
box:
✓ Master Your Device: This 20-page manual explains the basics of your
Xoom. It’s too skimpy to be of much use.
✓ Future Ready: This pamphlet, if included, explains that your Xoom can
be upgraded to 4G (a topic that I cover in this chapter’s “Checking Your
Chapter 1: Start Here
Xoom for What’s Missing” section). You can also find instructions online
at www.verizonwireless.com/xoom4glteupgrade.
✓ Important Consumer information: Here’s some oh-so-boring information
about Federal Communications Commission rules and regulations.
✓ Consumer Information about Radio Frequency Emissions and Responsible
Driving: This booklet contains even more boring information about
radio-frequency emissions, as well as common-sense warnings about
playing with your Xoom while driving.
✓ Product Safety and Warranty Information: This item explains that the glass
will break when the Xoom is dropped, among other things, and that you
shouldn’t try to dry a wet Xoom in a microwave oven. Your eyes may
light up when you read about the warranty, though: It’s for one year,
detailed in five pages of fine print.
Model number
Figure 1-1: The letters MZ followed by three numbers show your Xoom’s model.
9
10
Part I: Introducing the Motorola Xoom
Micro USB cable: The bundled USB cable has a normal USB port on one end
and a tiny micro USB port on the other end. (Don’t confuse micro with mini
when you’re shopping for a replacement or second cable.) To transfer files
between the Xoom and your PC, plug the tiny end into the bottom of your
Xoom and the large end into your PC. (I cover file transfers in Chapter 5.)
Unlike most gadgetry, the Xoom can’t charge its battery through its USB
cable. The USB cable only lets you transfer files and other information. To
charge your Xoom, you must use either the bundled AC adapter or the car
charger that’s sold separately.
Charger (AC adapter): Like most chargers, the Xoom’s charger is a black
boxy thing known as a “wall wart” with a long black cable. The black boxy
end plugs in to the wall; the cable’s tiny pinlike plug fits into the tiniest hole
in the bottom of your Xoom. Examine that tiny pinlike plug closely. If you buy
an auto charger, you’ll need one with that same-size plug.
To keep the charger as small as possible, the outlet’s prongs fold inward
when not in use. You can flip them in and out fairly easily with your fingers.
Charging the Battery
Your Xoom’s battery may be partially charged on arrival. To eliminate potential problems, though, you should fully charge the battery before turning on
your Xoom.
Should I keep my Xoom plugged in?
Extending your Xoom’s battery life will quickly
become a priority. Should the battery die while
you’re on the road, your tablet would turn into
an expensive Etch A Sketch, so it’s tempting to
leave it plugged in all the time while you’re at
home.
Resist that temptation, though. Your Xoom’s batteries are designed to be charged to the brim
and then fully run down. If you leave the Xoom
plugged in, the batteries can become lazy and
stop holding their full charge as long as they
should.
So charge your Xoom, use up the batteries,
and then leave the tablet plugged in overnight
to recharge fully. Don’t leave it plugged in constantly when you’re using it at home.
Chapter 1: Start Here
To charge the battery, follow these steps:
1. Fold out the charger’s prongs so that they extend from the charger’s
base.
The charger is cleverly designed to slip easily into suitcases; its prongs
fold into a notch on the charger itself. Pull the prongs outward, and they
snap into place.
2. Push the charger’s prongs into the wall outlet.
Any wall outlet will do; you don’t need a three-prong outlet.
If the charger covers both outlets, turn the charger around so that it’s
facing away from the other outlet. That leaves you room to plug in a
second gadget.
3. Plug the charge cable’s tiny prong into the tiny charger port on the
Xoom’s bottom side, as shown in Figure 1-2.
On the bottom of your Xoom, you’ll spot a tiny hole that matches the
pinlike plug on the end of your charger’s cable. Push the plug into the
hole until it snaps into place.
Figure 1-2: Push the tiny prong on the end of the charger cable into the
tiny hole on the bottom end of your Xoom.
11
12
Part I: Introducing the Motorola Xoom
When it’s plugged in, the Xoom shows its first signs of life: A little light
near the charger’s plug begins glowing. This light glows a frightening
red when the battery’s power drops below 15 percent, turns white when
battery power ranges from 15 percent to 95 percent, and shines bright
green when the battery charge is 95 percent or greater.
If your battery ever drops below a 4-percent charge level, your Xoom
turns off automatically. If you want to keep working, you must plug your
Xoom into a charger.
4. Keep charging until the little light turns green, which can take one to
three hours.
5. Unplug your Xoom and start playing with it as I describe in the next
chapter.
✓ The charger light comes on only if your Xoom is turned off while charging.
✓ Unlike most portable gadgets, your Xoom hides its battery deep within
its innards, where you can’t remove or replace it even if you want to.
You need to take your Xoom to an authorized Motorola service center to
have the battery replaced.
✓ Motorola warrants that your battery will hold at least 50 percent of its
charge within your first year of purchase.
Should your battery go bad or not hold a 50-percent charge within a
year, contact Motorola to have it replaced. You can visit the Support
area on Motorola’s Xoom web page (www.motorola.com/xoom) or call
Motorola directly at (800) 734-5870.
Peeling Off the Plastic
While you’re waiting for your Xoom to charge, peel off the protective screen
covering on its front and back. Grab the plastic by one corner and give it a
slow pull, as shown in Figure 1-3. The front covering comes off fairly easily
and in one piece.
The plastic surrounding the back and sides probably breaks into pieces,
making your job a little tougher.
✓ You can leave the front cover on, if you want, for use as a screen protector. The cover isn’t designed for that purpose, though, so it not only
obscures the screen, but also makes your front-facing camera shots a
little blurry.
Chapter 1: Start Here
✓ Little labels on the plastic covering the front screen point out the positions of your Xoom’s volume switch, webcam, webcam light, notification
light, and charging light. (I point out all those things and more in
Chapter 3.)
✓ The plastic surrounding the back and sides probably breaks into pieces
when you remove it, making your job a little tougher.
Figure 1-3: Grab hold of the plastic by the corner and carefully peel it
off your screen.
Downloading USB Drivers and Software
for Your Desktop Computer
Your Xoom works as a self-contained unit; you never need to connect it
with your desktop computer or laptop. But if you want to transfer large files
between your Xoom and your desktop computer, you want to connect the
two devices. (I explain how to connect your Xoom with a computer to transfer files in Chapter 5.)
You’ll run into problems if you simply plug your Xoom into your computer
or laptop, however. Computers won’t always recognize a Xoom when it’s
plugged in.
13
14
Part I: Introducing the Motorola Xoom
So while you’re waiting for the battery to charge, download and install this
software on your desktop computer.
Windows XP, Windows Vista, or Windows 7 USB drivers: Windows PCs
usually recognize USB gadgets as soon as they’re plugged in to a USB port.
The Xoom’s an exception; it requires special USB drivers. The easiest way to
install those USB drivers is to download and run MotoHelper software from
this page on Motorola’s website:
www.motorola.com/Support/US-EN/Support-Homepage/Software_and_
Drivers/USB-and-PC-Charging-Drivers
Mac OS X computers: Download Android File Transfer from the Android
website:
www.android.com/filetransfer
Download and install the right software for your type of computer —
MotoHelper for Windows PCs or Android File Transfer for Mac OS X computers. Then, when you connect your computer and your Xoom in Chapter 5,
they’ll embrace like old friends.
Checking Your Xoom for What’s Missing
Although you paid full price, you may not have received everything as advertised. The Xoom was missing a few things when it first shipped.
If your Xoom didn’t come with the following items, you have one of those first
Xooms. You can get most of these things fixed for free by Motorola, though.
Here’s the scoop:
Memory-card support: Your Xoom comes with a slot along its top side where
you can slip in a memory card. Adding a 32GB memory card, for example,
would double your Xoom’s storage space to 64GB. Unfortunately, your Xoom
can’t recognize any SD cards. Google promises to issue a free update to
let the Xoom notice and begin using those cards. (I describe how to insert
memory cards later in this chapter.)
To see whether your Xoom has received the update for memory card support, touch Apps➪Settings➪Storage. If your SD Card update has arrived, that
screen will list an entry for External Storage.
Chapter 1: Start Here
Adobe Flash support: Although Motorola made Flash a major selling point,
the Xoom doesn’t support Flash out of the box. Without Flash, you won’t be
able to view some websites and web videos. (Fortunately, the lack of Flash
support also means that you can’t see annoying ads on many websites.)
To download your Xoom’s Adobe Flash update, visit the Android Market,
covered in Chapter 9, and download Flash Player by Adobe Systems.
4G support: Many cellular carriers are rapidly updating their cellphone
networks to something called 4G, which is faster than the current 3G speed.
Your Xoom doesn’t support 4G, but Motorola promises to upgrade your
Xoom to 4G for free. The catch? You must mail your Xoom to Motorola inside
a prepaid box and wait about six business days for its return. For more
details, visit Verizon’s “getting ready” page here:
http://support.vzw.com/information/xoom_grg.html
Music store: Google mentioned that it would provide a Xoom music store
where you could buy music online and send it straight to your tablet. The
music store wasn’t finished before the Xoom hit the shelves, but Google will
most likely send it in a free update. When it does, you’ll find it in the Android
Market, described in Chapter 9.
HDMI cable: A little jack on the bottom of your Xoom lets you plug in an
HDMI cable and connect your Xoom to a high-definition television (HDTV)
set. Motorola didn’t toss a cable into the box, though, nor did they promise
one. But if you want to view your Xoom on an HDTV set, you must buy your
own HDMI cable. It’s a special cable with a micro HDMI plug on one end and
a normal HDMI plug on the other. (I explain how to connect your Xoom to a
HDTV in Chapter 5.)
Accepting updates
When Motorola, Google, or one of their partners
finishes an update for your Xoom, they send the
notice to your Xoom. The update notice subsequently appears on your screen the next time
your Xoom connects with the Internet, either
through Wi-Fi or your cellular provider’s data
plan.
When you spot an Android Update notice, touch
the button labeled Install or Restart & Install to
begin installing the update.
By accepting the updates, you keep your Xoom
up-to-date with today’s ever-changing technology for as long as possible.
15
16
Part I: Introducing the Motorola Xoom
Upgrading Storage with a Memory Card
Your Xoom comes with 32GB of storage. That’s enough for about 20,000
e-books, 2,500 songs, or a half-dozen high-definition movies. Songs, books,
and movies come in different sizes, of course, so your own mileage may vary.
Need more storage space? You can add it by buying a memory card and sliding it into the card slot on your Xoom. The Xoom requires either a microSD
(Micro Secure Digital) or microSDHC (Micro Secure Digital High Capacity)
memory card, like the one shown in Figure 1-4. Commonly used in cellphones
and some small digital cameras, these fingernail-size pieces of plastic come in
sizes of 2GB, 4GB, 8GB, 16GB, and 32GB.
What’s the difference among Wi-Fi, 3G, and 4G?
Wi-Fi, 3G, and 4G all refer to different ways to
access the Internet. The biggest difference?
The speed at which information can flow into
your Xoom.
Speed isn’t a big deal when you’re merely
browsing websites, but you need speed for
downloading large files or watching Internet
video. Without fast speeds, your YouTube video
will keep stopping and starting, waiting for more
data to arrive.
Here’s the rundown:
✓ Wi-Fi: The fastest speed, Wi-Fi lets gadgets
talk through the same wireless networks
computers have been using for years. If
you’ve set up a wireless network in your
home, your Xoom can use that network.
Alternatively, you can drop by a coffee shop
that offers Wi-Fi and access the Internet
that way. Wi-Fi is almost always faster than
3G, and it’s not subject to any data-plan
limits imposed by your cellphone provider.
✓ 3G: Most smartphones — phones that let
you chat with your friends and access the
Internet — send and receive information at
3G (third-generation) speeds. Although it’s
not as fast as wireless, 3G was once considered to be the fastest you could expect
from a cellphone’s data connection.
✓ 4G: As technology races ever forward, the
new 4G (fourth-generation) networks scoot
Internet information to phones and tablets up to ten-times more quickly than 3G
networks. 4G networks work in only a few
dozen major cities right now, but 4G is the
future. Verizon, for example, promises to
switch all its towers to 4G by the end of 2013.
Straight out of the box, Motorola’s Xoom works
at either Wi-Fi or 3G speed, switching to whatever’s faster at the time. Motorola says it will
update your Xoom to 4G capability for free if
you mail your Xoom to Motorola for an update.
(I explain more about 4G upgrades in “Checking
Your Xoom for What’s Missing” earlier in this
chapter.)
Chapter 1: Start Here
Figure 1-4: You can add memory with a microSD or microSDHC
memory card up to 32GB.
The Motorola Xoom won’t recognize memory cards until Google releases an
update, which should arrive in your Xoom automatically. I describe how to
check for updates in Chapter 16.
To insert a memory card into your Xoom, follow these steps:
1. Turn off your Xoom.
Hold in the power button until the Xoom asks, “Would you like to shut
down?” Touch OK to shut down, and wait until the screen goes blank.
2. Slide the slot cover out from the top of the Xoom, and set it aside.
Place a fingernail in the little notch, and pull the little black plastic tray
straight out. The tray will hold either a SIM card or a little clear plastic
SIM-card placeholder. Set the tray aside, being careful not to let the SIM
card or placeholder fall out. (If it falls out, align the card’s notch with the
notch in the tray; that lines everything up so that the card fits correctly.)
Now that you’ve removed the tray with the SIM card, you need to
remove the little plastic placeholder for the memory card, which hides
inside an even smaller slot.
3. Turn your Xoom with the glass face down; then pull out the clear plastic memory-card placeholder, as shown in Figure 1-5.
17
18
Part I: Introducing the Motorola Xoom
Figure 1-5: Place the Xoom glass side down on a towel, and pull out the
clear placeholder card with tweezers.
You’ll probably need tweezers for this delicate operation, as you’re
working in very cramped quarters.
As you remove the plastic placeholder, note the position of the plastic
card’s notches; the notches on your memory card must face in the same
direction for the card to fit.
4. Slide the new card into the now-vacant slot.
The card fits in only one way, so if it’s not sliding in smoothly, flip it over
and try again. Again, tweezers may help you position it just right, as
shown in Figure 1-6.
5. Slide the tray back into the slot.
Make sure that the tray contains either the plastic SIM placeholder or, if
you’ve upgraded your Xoom to 4G speed, the actual SIM card.
✓ The memory card fits in only one way: the right way. If it’s not fitting in
smoothly, make sure that you’re sliding it into the right slot.
✓ The notches of the card must line up with the notches inside the slot.
You may need to turn the card upside down for it to fit.
Chapter 1: Start Here
What’s new in Android 3.0?
Your Xoom runs Google’s Android 3.0 operating
system. Like Windows on a PC, Android controls
your Xoom, runs programs, juggles memory
and storage space, and keeps things running
smoothly.
✓ Three-dimensional desktop for easier
navigation
Android 3.0 introduces some improvements
over earlier Android versions, which lived primarily on cellphones. If you’ve already used
Android on a cellphone, here are the improvements you’ll notice in Android 3.0:
✓ Video chat support through Google Talk and
similar chat programs
✓ Support for larger screens
Google will undoubtedly keep tweaking Android
3.0, so don’t be surprised when an update
arrives to give your Xoom more features or fixes
existing problems.
✓ New music player and music store
✓ New video player, video recording software, and video editor
✓ Web browser with tabbed pages, automatic
form fill, bookmark syncing with Google
Chrome, and private browsing
✓ Support for a larger keyboard and faster,
more powerful hardware
Figure 1-6: Slide the memory card into the tiny slot until it stops.
19
20
Part I: Introducing the Motorola Xoom
What’s New in Android 3.1?
Shortly after your Xoom connects with the Internet through either Wi-Fi or
your cellular data plan, you’ll see updates waiting to be downloaded. Always
download the updates, as they add new features to your Xoom and fix old
problems.
The biggest update, Android 3.1, arrived in May, 2011. Once downloaded and
installed, Android 3.1 adds these enhancements to your Xoom:
Support for USB accessories: Your Xoom’s USB port now lets you plug in keyboards, mice, joysticks, and digital cameras for viewing or transferring photos.
Scrollable recent apps display: Pushing the Recent Apps button, covered in
Chapter 3, fetches thumbnail photos of your five last-used apps. The list now
scrolls, letting you see more apps.
Resizable widgets: Information-filled windows called widgets, which I cover in
Chapter 9, constantly update their information. The update lets you adjust a
widget’s size, letting you decide how much information it should display.
Mouse support: Plugging in a mouse places a mouse cursor on the screen,
letting you point at, tap, select, drag, and scroll through items onscreen.
Enhanced browser: Faster than before, the browser now lets you save pages for
offline viewing, handy when traveling through areas with no Internet coverage.
Fully searchable contacts: You can now search any text on a contact’s page,
not just his or her name.
To see the version of Android running on your Xoom, touch Apps➪Settings➪
About Tablet. The version number appears in the Android Version area,
shown in Figure 1-7.
Figure 1-7: The Android Version area displays your current version of Android.