1
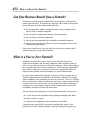
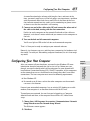
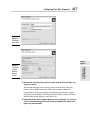
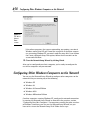
Chapter 1: Setting Up a
Peer-to-Peer Network
AL
In This Chapter
Figuring out the business benefits of a network
RI
Finding out about a peer-to-peer network
Connecting your network hardware
Configuring your network
TE
Getting a handle on hardware requirements
MA
Installing and using a networked printer
D
Sharing resources on the network
T
GH
TE
he subject of setting up a peer-to-peer network may seem off-point. Isn’t
this book supposed to be about QuickBooks? Well, my friend, you’re
right on both accounts. Networking is a little off-point, and this book is
about QuickBooks.
CO
PY
RI
However, I want to provide you with this quick overview of setting up your
network anyway. For one thing, in many small business settings, you’ll find it
extremely useful to set up a network. (A network is simply a group of computers that are connected and that can communicate and share resources.)
For another thing, if you want to let more than one person work with the
QuickBooks data file, you can do so simply by setting up a network and then
installing QuickBooks on each computer.
Therefore, in this chapter, I explain how to set up a small Windows XP
network — just the kind that you may want to use in a business with a
handful of computer users working in the office. In Book VII, Chapter 2, I
explain how to administer a QuickBooks accounting system — including the
stuff that you need to do in order to have several different people working
on different computers on a network and with the same QuickBooks data.
Can I share an opinion? These days, a computer network in a business is not
just something that’s nice to have; it’s a necessity if you have more than one
computer. A network will save you time and, therefore, save you money. No
kidding.
452
What Is a Peer-to-Peer Network?
Can Your Business Benefit from a Network?
Should you set up your own network? How do you know if a network can
benefit your business? To consider this question, take a look at some of the
things that even a small network makes possible:
✦ You can open files, folders, and applications on one computer while
you’re sitting at another computer.
✦ You can share a single printer among several computers.
✦ You can share an Internet connection.
✦ You can back up important files and folders to another computer.
✦ You can communicate with other users on the network via e-mail and
conferencing applications.
Not to beat a dead horse, but truly, after you set up your network, you’ll
wonder how you ever got along without it.
What Is a Peer-to-Peer Network?
Networks are of two basic types: client/server and peer-to-peer. In a
client/server network, one (or more) computer stores resources and supplies; it serves those resources to the other computers. All the other computers are connected to this central computer(s), which manages applications,
files, printers, and so on. In general, big monster corporate networks are
client/server networks and are managed by a system administrator.
In a peer-to-peer network, all computers are equals. Each computer has its
own hard drive and can see and talk to all the other computers on the network. In addition, each computer can share its resources, such as a CD-ROM
drive, a printer, files, folders, applications, and so on. A peer-to-peer network
is ideal if you have no more than, say, ten people in the office working on a
computer. On a peer-to-peer network, all users decide which of their files
and folders they want to share and with whom.
You can connect the computers in a peer-to-peer network in several ways:
✦ Use the electrical or telephone wiring already installed in your office.
✦ Install a wireless system.
✦ Connect each computer on the network to a central hub.
Connecting to a central hub is the easiest configuration, and it’s also
inexpensive. In this chapter, therefore, I walk you through the process of
Hardware Requirements
453
connecting a network of computers to a central hub. The process consists of
three basic steps:
✦ Connecting all the necessary hardware
✦ Configuring your host computer
✦ Configuring all the other computers on your network
Throughout this chapter, I show you how.
Just for the sake of thoroughness, let me also say that you can create a simple
wireless peer-to-peer network, too. With a wireless network, you don’t cable
your computers together using wires and a central hub. Instead, the computers on the network communicate through a hub (actually called a wireless
router, but who cares) using radio waves. In fact, in a wireless network, no kidding, little radio antennas often stick out the back of computers and the hub!
A wireless network is very convenient in a peer-to-peer setting because you
don’t have to worry about tripping over network cabling. However, a wireless
network requires a bit more fiddling in order to get your network secure. (If
you’re not careful, anyone else with one of those little antennas on the back of
his computer can sneak into your network.) For this reason, I’m not going to
discuss the wireless option here. If you’re interested in going wireless, find a
local networking consultant and ask her to make your network wireless.
Book VII
Chapter 1
You need three essential components to set up your wired network:
✦ The hub or a router
✦ Some cable
✦ A network interface card (NIC) in each computer
A hub is the central device that connects all the computers on the network,
and it is slightly smaller than the size of this book. The hub itself doesn’t
require any software or configuration; it is simply the device that allows all
the computers to communicate. The number of connections on the hub —
or the number of places to which you can connect — determines the number
of computers that can be on the network. Be sure to buy a hub that has
enough connections for the number of computers that you want to connect.
Cables are the physical connection between the computers on the network
and the hub. The cable, or more specifically Ethernet cable, attaches to the
network hardware with RJ-45 jacks, which are snap connectors that look like
a wider version of the plastic jacks used by your landline phone system.
Cables are commonly available in lengths of 10, 15, 20, 25, and 50 feet.
Setting Up a Peerto-Peer Network
Hardware Requirements
454
Connecting Your Network Hardware
A NIC goes into each computer on the network and connects to one of the
slots on the computer’s motherboard. (The motherboard is the main printed
circuit board in a computer.) Most computers on the market today come
with NICs already installed, but if you are networking older computers, you
will probably need to buy NICs.
If you have older computers that you want to network, be sure to check
them for two things before you purchase any NICs. First, verify that the
motherboard has an empty slot, and second, verify that the slots are of the
Peripheral Component Interconnect (PCI) type. Some older computers use
Industry Standard Architecture (ISA) slots, and it’s just about impossible to
find an ISA NIC these days.
You can shop for these items at your local electronics store or on the
Internet. Another option is to buy a starter kit that contains everything that
you need to connect a couple of computers — NICs, cable, and a hub — from
companies such as Intel (www.intel.com), Linksys (www.linksys.com/
products), 3Com (www.3com.com), or Netgear (www.netgear.com). If you
need to connect more than two computers, however, you’ll probably save
money if you buy the parts separately rather than buying multiple kits.
Before you buy your NICs and hub, be sure that the packaging explicitly
states that the hardware has been certified by Microsoft as being suitable for
Windows XP. If you are in doubt, check Microsoft’s Hardware Compatibility
List at www.microsoft.com/whdc/hcl.
Connecting Your Network Hardware
Setting up your network hardware is easy. Get yourself the appropriate
screwdriver, and follow these steps:
1. Turn off all computers and peripherals and unplug them.
2. For each computer, open the case (this is likely to be the most difficult
step), remove the slot cover from a free expansion slot, and insert the
NIC in the empty slot, according to the manufacturer’s instructions.
Would it be terribly redundant if I repeated that last bit of information?
You need to follow the manufacturer’s instructions. Seriously. Also, be
sure that the card bracket is sitting snugly in the case and secure it with
the screw that originally held the slot cover.
3. Replace the case.
4. Find a good central location for the hub and plug the power adapter
into a power socket.
Configuring Your Host Computer
455
A central location helps to keep cable lengths short, and most of the
time, you won’t need access to the hub unless you experience a problem
with the network. Most hubs have small LEDs on the front of the case
that indicate network activity, and it can be comforting to glance across
at them to see that the network is still running.
5. Connect one end of the cable to the NIC and connect the other end of
the cable to the hub, starting with the first connection.
Do this for each computer on the network. Both ends of the cable are
identical, so it doesn’t matter which end you connect to the computer or
the hub.
6. Turn on the hub and all connected computers.
You’ll see a light or LED on the hub for each connected computer.
That’s it. Now you’re ready to configure your network software.
Honestly, just between you, me, and the piano, connecting the hardware isn’t
that tough. I’m with you. Networking computer hardware just ain’t that tough
any more.
Configuring Your Host Computer
✦ Run Windows XP
✦ Be turned on at all times so that the other computers on the network
can access the Internet
If one of your networked computers has an existing DSL hookup or a cable
modem, that computer is an excellent choice to be the ICS host.
To configure your network, be sure that you’re logged on as Computer
Administrator and then, at the computer that will host ICS, follow these
steps:
1. Choose Start➪All Programs➪Accessories➪Communications➪Network
Setup Wizard to start the Network Setup Wizard.
The Welcome screen appears.
2. Click Next.
Setting Up a Peerto-Peer Network
After you connect all your hardware, you need to give Windows XP some
information about the network that you’ve just set up. Before you start,
though, you need to decide which of the computers on your network will
host Internet Connection Sharing (ICS). With ICS turned on, all the computers
on the network can access the Internet even though they don’t have direct
connections. The host computer must meet the following requirements:
Book VII
Chapter 1
456
Configuring Your Host Computer
3. Click Checklist for Creating a Network to display a help page summarizing the steps in network planning that I discuss earlier in this chapter, or click Next.
The Select Connection Method screen appears (see Figure 1-1).
Figure 1-1:
Selecting an
Internet
connection.
4. Select This Computer Connects Directly to the Internet, and then
click Next.
The Select Your Internet Connection screen appears.
5. Select the connection that you want to use when you connect to the
Internet (modem, local area connection, and so on) and click Next.
The dialog box lists connections that are already set up, so what you see
here will make sense to you when you do this.
6. In the Give This Computer a Description and Name screen (see
Figure 1-2), enter a short text description for the computer in the
Computer Description field and then click Next.
The Name Your Network screen appears.
(The Computer Name box holds the name that you gave to this computer when you installed Windows XP. It’s best to retain this name.)
7. Enter a Workgroup name, and then click Next.
The Ready to Apply Network Settings screen appears, as shown in
Figure 1-3.
Configuring Your Host Computer
457
Figure 1-2:
Providing a
description.
Book VII
Chapter 1
Setting Up a Peerto-Peer Network
Figure 1-3:
The Ready
to Apply
Network
Settings
screen.
8. Review the selections that you have made and click Next if those settings are correct.
The wizard will apply these settings when you click Next. After the
process starts, don’t interrupt it. You’ll see a progress indicator.
If you need to change any settings, click Back to return to the screen
that you want to change. After the wizard has done its work, the You’re
Almost Done screen appears (see Figure 1-4).
9. (Optional) In the You’re Almost Done screen (see Figure 1-4), you can
create a Network Setup Disk with which to configure the other computers on your network.
458
Configuring Other Windows Computers on the Network
Figure 1-4:
The You’re
Almost
Done
screen.
If the other computers that you are networking are running a version of
Windows earlier than XP, you’ll need the setup disk. If the other computers are running Windows XP, you won’t need the setup disk. If you choose
the Create a Network Setup Disk option, follow the instructions on the
screen and click Next.
10. Close the Network Setup Wizard by clicking Finish.
After you’ve configured your host computer, you’re ready to configure the
rest of the computers on your network.
Configuring Other Windows Computers on the Network
You can use the Network Setup Wizard to configure other computers on the
network if they are running any of the following:
✦ Windows XP
✦ Windows 98
✦ Windows 98 Second Edition
✦ Windows 2000
✦ Windows Millennium Edition
On other computers running Windows XP, configure the network connection
by running the Network Setup Wizard as directed in the previous section,
“Configuring Your Host Computer.” On computers running the other versions
of Windows listed here, you also use the Network Setup Wizard, but you
have to first insert the Network Setup Disk. Follow these steps:
Installing and Using a Networked Printer
459
1. Insert the Network Setup Disk in the floppy drive.
2. Open Windows Explorer to the floppy drive, and double-click the
Netsetup (or Netsetup.exe) file.
This launches the Network Setup Wizard.
3. In the first screen of the wizard, click Yes when asked if you want to
install network support files on your system.
4. At the next screen, remove the floppy disk and click OK.
5. The next screen asks if you want to restart your computer. Click Yes.
6. After the restart, the wizard displays the Welcome to the Network
Setup Wizard screen. Follow the instructions in the wizard.
Installing and Using a Networked Printer
One of the most common reasons for setting up a network is to share a
printer. You can physically connect a printer to your network in a couple
of ways:
✦ If your printer doesn’t have a NIC in it, connect the printer to one of the
computers on the network and turn on the printer. (This is more common
in a small network and is the kind of printer described in this section.)
Before you can set up a shared printer, you must install it as a local printer. If
you’ve already installed a local printer, skip to the section “Sharing Resources
on the Network,” later in this chapter. If you haven’t set up a local printer,
connect the printer to the computer, turn it on, log on to that computer as
Computer Administrator, and then follow these steps:
1. Choose Start➪Control Panel➪Printers and Faxes to open the Printers
and Faxes folder.
2. Click the Add a Printer button to start the Add Printer Wizard.
The Welcome screen appears.
3. Click Next.
4. In the next Add Printer Wizard screen, select Local Printer Attached
To This Computer and click Next.
Setting Up a Peerto-Peer Network
✦ If your printer has a NIC in it, you can connect it directly by running a
cable to the network hub. (This configuration is found more commonly
in a corporate environment. This section doesn’t cover this kind of
setup.)
Book VII
Chapter 1
460
Sharing Resources on the Network
5. In the next Add Printer Wizard screen that appears, enter a name for
the printer, and click Next.
6. Click Yes if you want this printer set as the default.
7. Click Next, review your choices, and then click Finish to close the
wizard.
Now you are ready to share this printer with other users on the network.
Follow these steps:
1. In the Printers and Faxes folder (accessed by choosing Start➪Control
Panel➪Printers and Faxes), right-click the icon for your printer, and
choose Sharing from the shortcut menu.
This opens the Properties dialog box at the Sharing tab for that printer.
If you will be sharing a printer with users who are running a different
version of Windows, click the Additional Drivers button on the Sharing
tab to open the Additional Drivers dialog box. Select the check boxes for
all the versions of Windows that will be sharing this printer, and then
click OK.
2. Accept the name that is generated in the Share Name field, or enter a
new name, and then click OK.
Click the General tab if you want to enter a description of this printer in
the Comment field. Sometimes you use this field to describe the printer’s
location. Click Apply.
You now see a hand under the icon for this printer in the Printer and
Faxes folder, indicating that this printer is shared.
One final task remains, and that is to run the Add Printer Wizard on the
other computers on the network so that each can access the shared printer.
In the Local or Network Printer screen, select the A Network Printer or A
Printer Attached To Another Computer radio button, click Next, and then
follow the remainder of the wizard’s instructions.
Sharing Resources on the Network
Before users on your network can share resources — drives, files, folders,
applications, and so on — the resources must be enabled for sharing. Each
user at each workstation must specifically share the resources on that computer. To mark resources as shared, follow these steps:
1. Right-click the Start button, and then click Explore to open Explorer.
Sharing Resources on the Network
461
2. Navigate to the resource that you want to share, right-click it, and
choose Sharing from the shortcut menu to open a Properties dialog
box at the Sharing tab (see Figure 1-5).
Figure 1-5:
The Local
Disk
Properties
dialog box
at the
Sharing tab.
3. Select the Share This Folder radio button.
This name must be unique on this computer, and it is the name that
others on the network will see when they browse this computer.
4. Enter a comment by briefly describing the share in the Comment box.
Users will also use this information when browsing the network.
5. In the User Limit area, select either the Maximum Allowed or Allow
This Number of Users radio button to specify the maximum number of
simultaneous users.
Windows allows a maximum of ten users. When the eleventh user tries
to log on, she will see this message: “No more connections can be made
to this remote computer at this time because there are already as many
connections as the computer allows.”
6. To specify the kind of access that users have to this resource, click
the Permissions button to open the Permissions dialog box for this
resource. To set a permission, select its check box. After you’re finished, click OK.
Setting Up a Peerto-Peer Network
In the Share Name box, accept the name that Windows suggests or enter
another name.
Book VII
Chapter 1
462
Accessing Shared Resources
For an explanation of the types of permissions, see the Help and Support
Center. Note that you can set permissions for a resource only if you are
using the NTFS file system, which is Windows’ high security file system.
Note that you can check whether your disk uses NTFS by clicking on the
General tab and looking at the description.
7. Close the Properties dialog box by clicking OK.
Accessing Shared Resources
To access a shared resource on the network, open Explorer, and click the plus
sign next to My Network Places to display a list of all the shared computers,
hard drives, and folders. Simply navigate to the resource that you want to
access and open it as you would any resource on your own computer.
If you frequently use a particular network resource, you can access it quickly
by mapping a network drive to it. That resource then appears in Explorer as
though it were a drive on your own computer. To map a drive, follow these
steps:
1. Click the Start button, right-click My Network Places, and choose Map
Network Drive from the shortcut menu to open the Map Network Drive
dialog box.
2. In the Drive drop-down list box, click the down arrow, and select an
unused letter.
The default is the next drive in sequence.
3. Tell Windows whether you want to map to this drive whenever you
log on.
4. Windows automatically remaps drives for you each time you log on.
If you don’t want to reconnect to this drive the next time you log on,
deselect the Reconnect at Logon check box.
5. In the Folder drop-down list, enter the path to the share, or click
Browse to locate it.
6. Click Finish.
Now, the mapped drive appears just like any other drive in Explorer.
You can use the Windows Troubleshooters to track down problems with
your network. Click the Start button, and open Help and Support. Click
Fixing a Problem, and then choose Networking Problems. You’ll find the
usual question-and-answer screens.