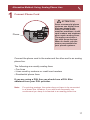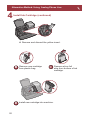
1
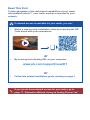
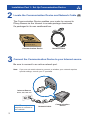
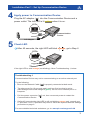
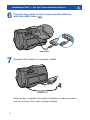
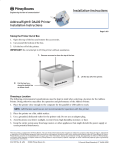
with
Digital Postage Meter
Install Guide
US English Version
Contents
Communication Device
Network Cable
USB Cable
Communication Device
For Pitney Bowes Digital Mailing System
mailstation
Ink Cartridge
Reorder #797-0
Scale
T
FRONT
DEVAN
Power Cord
Meter
nds
Fu
Menu
PQRS
Back
mailstation 2
Ink Cartridge
Reorder #797-M
T
FRONT
DEVAN
Sample Pack of
Tape Sheets
Reorder #612-9
w
Revie
MNO
JKL
GHI
Class
DEF
ABC
*#_
Lock
OR
TUV
no
WXYZ
Enter
Shift
.
Space
yes
Install Guide
Meter
tage
l Pos g Guide
Digita
ratin
Ope
ABC
*#_
Lock
Class
GHI
DEF
JKL
PQRS
Funds
Menu
Review
MNO
TUV
Back
no
Enter
WXYZ
Space
Shift
.
yes
Scale Extension
Cable #978-6
(Optional)
Phone Cord
Read This First
To take advantage of the web-based capabilities of your meter
with pbWebConnect™, your meter must be connected to your
network.
If network access is available for your meter, you can:
•
Watch a step-by-step installation video by scanning the QR
Code below with your smartphone
or
•
By entering the following URL at your computer:
www.pb.com/support/new/K7
or
•
Follow this printed installation guide, starting on page 1
If you do not have network access for your meter, go to
page 17 “Alternative Method: Using an Analog Phone Line”
Installation Part 1 - Set Up Communication Device
1
Preparing for Installation
To install your meter using the Internet, you will need the following:
•
Two power outlets
An Internet source, such as a router, hub or network wall jack.
Note: DO NOT use a port in a computer to connect to your network.
•
Access to a computer during installation is recommended.
Wireless: Step 2 through Step 8 must be completed for
wireless installation.
Technical Requirements:
IP Address
-Automatic assignment with DHCP and DNS server capability, or
-Manually specified static IP (not shared with other devices on your network).
If your network requires special settings, such as static IPs or proxy settings, your IT specialist should use the Special Network Settings instructions in this booklet, as part of the installation.
Proxy Server (if needed)
If your network uses Static IPs or Proxies, the setup software requires:
Operating System:
• Windows 2000, Windows XP, Windows Vista, Windows 7
• Mac OS X (PowerPC: Ver10.3.x ~ Ver10.5.5)
Compatible Browsers:
Internet Explorer 7.x, 8.x, 9.x, Chrome 16.x, 17.x, 18.x, Firefox 10.x, 11.x, 12.x
Safari 5.1
1
Installation Part 1 - Set Up Communication Device
2
Locate the Communication Device and Network Cable (
)
The Communication Device enables your meter to connect to
Pitney Bowes via the Internet to access postage downloads.
It’s packaged in its own cardboard box.
Communication Device
For Pitney Bowes Digital Mailing System
Communication Device
3
Network Cable
Connect the Communication Device to your Internet source
Be sure to connect to an active network port.
Note: If you are not certain where to connect, or whether your network requires special settings, consult your IT specialist.
Internet Source
Router, Hub, Wall Jack
DO NOT use a port in a
computer to connect to
your network.
2
Network Cable
Communication
Device
Installation Part 1 - Set Up Communication Device
4
Apply power to Communication Device
Plug the AC adapter ( ) into the Communication Device and a
power outlet. The left LED is lit yellow when it is on.
LEDs
Communication
Device
5
AC Adapter
Check LED
After 45 seconds, the right LED will blink orange, go to Step 6
LEDs
If the right LED is solid orange (not blinking), follow Troubleshooting 1, below.
Troubleshooting 1
Communication Device may not be communicating to an active network port.
Try the following:
• Be sure the Network Cable (
) is properly connected at both ends.
• Try other ports (for 10 seconds each) until you find one that is active
(LED changes from solid orange to green). Do not use a network port in a
computer.
• Pull the power connector (
Communication Device.
) out, then reconnect power to restart the • If after 45 seconds, the right LED is still not blinking orange only, consult your IT specialist. Your IT specialist may need to follow the Special Network Settings procedure on page 6.
For more detailed technical assistance, go to: www.pb.com/support/LAN
3
Installation Part 1 - Set Up Communication Device
6
Connect the meter to the Communication Device
with the USB Cable ( )
USB Cable
7
Connect the meter to a power outlet
Power Cord
When power is applied, the meter will display its startup screens
and you will hear the meter’s printer initialize.
4
Installation Part 1 - Set Up Communication Device
8
Confirm Connection
About 10 seconds after the meter completes its startup routine, it displays the message:
Meter connected to
internet-Press Enter
Also, the right LED changes from
blinking orange to blinking green only.
LEDs
If the right LED lights orange, either solid or blinking,
see Troubleshooting 2 below.
DO NOT press Enter on the meter yet.
For wireless connection and meter setup go to Step 9 on page 7.
Troubleshooting 2
If the meter does not display the message, “ Meter connected to Internet”,
your meter is not communicating with the Internet.
Try the following:
• Check that the USB Cable (
) is connected properly.
• If the right LED is solid orange (not blinking), then the network cable is connected to an inactive port. Try other ports (for 10 seconds each) until you find one that is active (LED changes from solid orange to green).
• Restart the Communication Device by pulling the power connector (
reconnecting the power.
) out, then • If, after 60 seconds the message, “Meter connected to internet” is not displayed,
consult your IT specialist.
Your IT specialist can refer to online troubleshooting assistance at:
www.pb.com/support/LAN
5
Special Network Settings
This section is needed only if your network requires special settings
to operate properly, such as static IPs and proxy server IDs, the
settings will need to be added to the Communication Device.
Consult your IT specialist to determine if this is necessary.
To enter special settings
a. Disconnect power ( ) from the meter.
b. Be sure the Communication Device is:
Communication
- connected to an active Internet port
Device
- plugged into a power outlet
- the right LEDs are blinking in an orange and/or green pattern.
c. Download the setup software to your computer by going to:
www.pb.com/support/netsetup.
Click the button for your type of computer.
Note: If a firewall message appears, click the button that allows the download to proceed.
d. Save the software “pbSmartLAN” to your computer, then
open and run it.
e. Click the Setup for Network Cable Connection button.
Follow the setup wizard and enter the appropriate special settings.
6
Installation Part 2 - Set Up Meter
9
Wireless Connection (Optional)
To set up wireless capability, go to:
www.pb.com/support/LAN
Scroll down to select the link Wireless Setup Instructions.
Once your meter is connected to the internet wirelessly, begin
meter installation on Step 10 below.
10
Meter Installation
There are two options for installing the meter.
Option 1. Follow online instructions by signing into
www.pbwebconnect.com/mymeter
using you Pitney Bowes user name and password.
Your pb.com user name and password were sent to you by email.
The online instructions will provide animations and other helpful
assistance for the installation process.
or
Option 2. Follow printed instructions starting on page 8.
7
Installation Part 2 - Set Up Meter
11
Install scale
s
Fund
Menu
PQRS
Back
w
Revie
MNO
JKL
GHI
s
Clas
DEF
ABC
*#_
Lock
WXYZ
TUV
e
Spac
Shift
.
no
Enter
yes
Position the scale on top of the meter as shown.
Connect the scale cable to the scale connector on the back of the
meter at the scale icon.
Tighten the screws to ensure a secure connection.
8
Installation Part 2 - Set Up Meter
12
Install Ink Cartridge
Add ink cartridge.
Continue-Press Enter
A
1. Press the Enter key on the control panel.
2.Lift the cover.
3.Press unlock symbol
open cartridge cover.
NOTE: If the carriage is not visible close the cover and press Enter.
to
4.Remove and discard the yellow insert.
9
Installation Part 2 - Set Up Meter
12
Install Ink Cartridge (continued)
FRONT
DEVANT
B
Remove new cartridge
from plastic bag.
C
Remove silver foil
strip from bottom of ink
cartridge.
NT
FRONT
FRO
ANT
DEV
DEVANT
D
Install new cartridge into machine.
E
Press ink cartridge cover
near the front edge to lock
the cartridge in place.
F
Close Cover. Press Enter.
IMPORTANT - Is Ink
Cartridge installed?
G
10
Press Enter. Please wait about 2 minutes.
Installation Part 2 - Set Up Meter
13
Create a Test Print
ATTENTION
Lock
s
Fund
Menu
PQRS
Back
To print correctly, insert
tape or envelope against
the rear and side walls.
The system will detect the
envelope and automatically
begin printing.
w
Revie
MNO
JKL
GHI
s
Clas
DEF
ABC
*#_
WXYZ
TUV
e
Spac
Shift
.
no
Enter
yes
When prompted, insert a spare envelope or a tape sheet for a test
print.
NOTE: The test print will appear in red ink.
Good test print - no missing inside lines
Poor test print - missing inside lines
If the test print is poor, press no to perform additional printer
maintenance and print another test image.
If the test print is good, press yes.
11
Installation Part 2 - Set Up Meter
14
Checking Your Account Balance and
Adding Postage to Your System
Your postage meter does not come with pre-loaded postage. Any
postage that may be included in your order is on your account.
You must connect to the Pitney Bowes Data Center to check your
account balance and download postage to the meter.
Digital Postage Meter
dials into PB
Send money to PB
Prepaid Account
Prepaid Account
Funds transferred
to Digital Postage Meter
1. When your meter has successfully connected to the Pitney
Bowes Data Center, your account balances will display.
Prepaid: Other: $0.00
Prepaid Account
Credit
$20.00
If you are using a credit card to pay for postage, Prepaid and other
balances may display $0.00 even though funds for postage are
available.
2. Press Enter to type in amount of postage to add to the meter.
3. If you would like to add postage in an amount other than the
initial default, key in the amount of postage you want to add and
press Enter. You can only enter whole dollar amounts. Confirm
this amount by pressing yes.
fter adding postage you will be asked if you want a receipt.
4. A
Press yes if you want a receipt. You will then be prompted to
insert an envelope or tape sheet. Press no to skip the receipt.
12
Installation Part 2 - Set Up Meter
15
Updating Your Software
After loading postage into your system, the meter will automatically
download any relevant updates.
You will see the screen displaying the status of the update.
Complete 53%
remaining
16
2of5
4:21 min
Congratulations! Your meter is operational
$0.45
1st cl Ltr
0lb 0.0oz
MAY 26
Your system is now ready to use.
Also use the Quick Reference Guide under your meter for
How To’s on:
• Printing Postage
• Locking the meter
• Replacing Ink Cartridge
• Using Ads / Messages
• Changing the Display Contrast
• And More
Log into www.pbwebconnect.com using your pb.com user name
and password to take advantage of new features and capabilities,
like:
• Package tracking
• Online US Postal Service postage
• Printing USPS shipping label
13
Contact List
If You Need Assistance
• Product Name: mailstation™ or mailstation 2™
or Communication Device with pbWebConnect • For Setup or Getting Started questions go to:
www.pb.com/support /LAN or call 1-800-522-0020
• For Product support go to:
www.pb.com/support/mailstation2-pbwc
or
www.pb.com/support/mailstation-pbwc
• To order Pitney Bowes supplies and accessories, call
1-800-243-7824 or go to:www.pb.com and click on Online Store.
15
Alternative Method: Using Analog Phone Line
1
Connect Phone Cord
ATTENTION
Phone
Some commercial phone
systems use digital lines
that may damage the
meter. Like the meter,
most fax machines, credit
card readers and modems
also require analog lines.
The meter can share a
line with these devices.
When in doubt, ask the
person responsible for
your phone systems.
Connect the phone cord to the meter and the other end to an analog
phone line.
The following are usually analog lines:
• Fax lines
• Lines used by modems or credit card readers
• Residential phone lines
If you are using a DSL line you should use a DSL filter
obtained from your DSL provider.
Note: For printing postage, the meter does not have to be connected to a phone line. However, if you add funds frequently, we recommend you keep it connected to an analog phone line.
17
Alternative Method: Using Analog Phone Line
2
Install scale
s
Fund
Menu
PQRS
Back
w
Revie
MNO
JKL
GHI
s
Clas
DEF
ABC
*#_
Lock
WXYZ
TUV
e
Spac
Shift
.
no
Enter
yes
Position the scale on top of the meter as shown.
Connect the scale cable to the scale connector on the back of the
meter at the scale icon.
Tighten the screws to ensure a secure connection.
3
Connect Power
Power
Plug the power cord into the unit as shown and into a convenient
outlet that is not controlled by a switch or power strip. There is
no on/off switch on your meter.
18
Alternative Method: Using Analog Phone Line
3
Connect Power (continued)
Do you have Internet
access for meter?
2. Press no on the control panel.
Install with analog
phone line - Enter
3. Press Enter.
4
Install Ink Cartridge
Add ink cartridge.
Continue-Press Enter
A
1. Press the Enter key on the control panel.
2.Lift the cover.
3.Press unlock symbol
open cartridge cover.
NOTE: If the carriage is not visible close the cover and press Enter.
to
19
Alternative Method: Using Analog Phone Line
4
Install Ink Cartridge (continued)
4.Remove and discard the yellow insert.
FRONT
DEVANT
20
C
B
Remove new cartridge
from plastic bag.
D
Install new cartridge into machine.
Remove silver foil
strip from bottom of ink
cartridge.
Alternative Method: Using Analog Phone Line
4
Install Ink Cartridge (continued)
E
Press ink cartridge cover
near the front edge to lock
the cartridge in place.
F
Close Cover. Press Enter.
IMPORTANT - Is Ink
Cartridge installed?
G
5
Press Enter. Please wait about 2 minutes.
Create a Test Print
ATTENTION
Lock
s
Fund
Menu
PQRS
Back
w
Revie
MNO
JKL
GHI
s
Clas
DEF
ABC
*#_
WXYZ
TUV
e
Spac
Shift
.
no
Enter
yes
To print correctly, insert
tape or envelope against
the rear and side walls.
The system will detect the
envelope and automatically
begin printing.
When prompted, insert a spare envelope or a tape sheet for a test
print.
21
Alternative Method: Using Analog Phone Line
5
Create a Test Print
NOTE: The test print will appear in red ink.
Good test print - no missing inside lines
Poor test print - missing inside lines
If the test print is poor, press no to perform additional printer
maintenance and print another test image.
If the test print is good, press yes.
6
Connect to Pitney Bowes Data Center
Your postage meter does not come with pre-loaded postage. Any
postage that may be included in your order is on your account.
You must connect to the Pitney Bowes Data Center to download
postage from your account to the meter.
• If the connection is successful, you can begin downloading postage
• If the connection is not successful, you will be asked if your phone needs a prefix to get an outside line (for example if you have to dial 9).
- Press yes to enter a prefix.
- Press the number(s) you use to reach an outside line
- Press decimal for a pause.
- Press yes to set this dialing prefix.
If you are using the same analog line as the fax machine, check if
the fax requires a dialing prefix.
22
Alternative Method: Using Analog Phone Line
7
Checking Your Account Balance and Adding Postage
to Your System
Digital Postage Meter
dials into PB
Send money to PB
Prepaid Account
Prepaid Account
Funds transferred
to Digital Postage Meter
1. When your meter has successfully connected to the Pitney
Bowes Data Center, your account balances will display.
Prepaid: Other: $0.00
Prepaid Account
Credit
$20.00
If you are using a credit card to pay for postage, Prepaid and other
balances may display $0.00 even though funds for postage are
available.
2. Press Enter to type in amount of postage to add to the meter.
3. If you would like to add postage in an amount other than the
initial default, key in the amount of postage you want to add and
press Enter. You can only enter whole dollar amounts. Confirm
this amount by pressing yes.
fter adding postage you will be asked if you want a receipt.
4. A
Press yes if you want a receipt. You will then be prompted to
insert an envelope or tape sheet. Press no to skip the receipt.
23
Alternative Method: Using Analog Phone Line
8
Updating Your Software
After loading postage into your system, the meter will automatically
download any relevant updates.
You will see the screen displaying the status of the update.
Complete 53%
remaining
9
2of5
4:21 min
Congratulations! Your meter is Operational
Your system is now ready to use.
Also use the Quick Reference Guide under your meter for
How To’s on:
• Printing Postage
• Locking the meter
• Replacing Ink Cartridge
• Using Ads / Messages
• Changing the Display Contrast
• And More
24
Alternative Method: Using Analog Phone Line
Troubleshooting
No Dial Tone Check that you are using an analog line such as
a) most fax machine lines
b) lines used by computer modem or credit card reader
c) residential phone lines
Check that you have entered a dialing prefix if your phone
system needs a code to reach an outside line.
If you are using a DSL line you should use a DSL filter obtained from your DSL provider.
Cannot Reach Data Center Check that you have entered a dialing prefix if your phone
system needs a code to reach an outside line.
Not Enough Funds You have tried to add more postage to the meter than you
have in your account at Pitney Bowes.
To Change information entered during setup • Press Clear key on numeric keypad.
• When prompted to Quit press yes.
• At “Change communication settings?” press yes.
• Press the down arrow key until you see the item you want
• Press Enter to modify information.
to modify.
• To return to installing your meter, press the up or down
arrow until “Continue Installation?”
• Press yes
For additional Troubleshooting please see user guide.
It can be downloaded from http://support.pb.com/K700
or http://support.pb.com/K7M0
25
Contacts
If You Need Assistance
• Product Name: mailstation™ or mailstation 2™
or Communication Device with pbWebConnect
• For Setup or Getting Started questions, call 1-800-522-0020
• For Product support go to:
http://support.pb.com/K700 or
http://support.pb.com/K7M0
• To order Pitney Bowes supplies and accessories, call
1-800-243-7824 or go to:www.pb.com and click on Online Store.
26
1 Elmcroft Road
Stamford, Connecticut 06926-0700
www.pitneybowes.com
For Service or Supplies
Support Web Site: http://support.pb.com/K700
http://support.pb.com/K7M0
Product Customer Support: 1(800) 522-0020
Product Name: mailstation™ / mailstation 2™ /
Communication Device with pbWebConnect
Model Number: K700 / K7M0
AW31214 Rev. F 09/21
© 2012 Pitney Bowes Inc.
All Rights Reserved
Printed in the USA
*AW31214REVF*