1
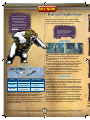
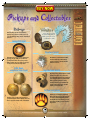
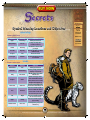
Answer every
Alethiometer
question
Master
every
deception
game
Interview
with the
Golden
Compass
teams
Huge
Pullout
Poster
© SEGA. SEGA is registered in the U.S. Patent and Trademark Office. SEGA and the SEGA logo are either
registered trademarks or trademarks of SEGA Corporation. All rights reserved. © MMVII New Line
Productions, Inc. The Golden Compass™ and all related characters, places, names and other indicia are
trademarks of New Line Productions, Inc. All Rights Reserved.
The Prima Games logo is a registered trademark of Random House, Inc., registered in the United States and other
countries. Primagames.com is a registered trademark of Random House, Inc., registered in the United States.
U.S. $19.99 Can. $22.95 U.K. £12.99
Visit us online at primagames.com®
HUGE PULLOUT ART POSTER
Written by Fernando Bueno
THE GOLDEN COMPASS™ PRIMA OFFICIAL GAME GUIDE
All Symbol
Meaning
locations
revealed
Contents
Introduction .....................................................................3
The Power to Control ......................................................4
The Cast .........................................................................12
Pickups and Collectables ...............................................15
Walkthrough ...................................................................22
Prelude ........................................................................22
Jordan College ............................................................30
London ........................................................................38
Noorderlicht Day .......................................................43
The Inspectors ............................................................49
Trollesund ...................................................................52
The Showdown ............................................................57
The North ...................................................................63
Camp Ambush ............................................................74
Bolvangar .................................................................... 79
The Rescue ..................................................................85
Svalbard Courtyard ....................................................90
Zeppelin Assault .........................................................94
Secrets and Unlockables ................................................99
Lyra’s World ................................................................ 112
2
Protected by copyright. Unauthorized or unlawful copying or downloading expressly prohibited.
At th
adven
heart
Borou
brave
and M
serie
This b
ous m
the w
fame
the e
only
of Mo
L
than
my cr
wom
than
A
The G
unive
12-ye
who’
emba
T
fierce
creat
that a
perso
powe
lies a
Evade and Deception Events
Iorek’s perfectly capable of unleashing
complex attacks on enemies. To do so,
press the Slash button repeatedly to
unleash devastating slash combos.
By pressing the Slash button three
times, Iorek will strike enemies with an
amazing uppercut slash. Press Slash four
times to finish off foes with a fierce
four-hit combo!
1
Rather than engage in combat like Iorek, Lyra prefers to evade
enemies. Similarly, rather than use force to arrive at a desired end,
Lyra would rather use her quick wit and silver tongue.
Evasion and Deception events can be
affected by collectables you’ve acquired
along the way. To know what each
collectible does, skip to the
“Pickups and Collectables” chapter.
Evade Events
Evade events are situations where Lyra engages the enemy in battle
but evades the rival’s attacks. When an enemy attacks, pay very
close attention to the onscreen prompts in order to dodge the
incoming blow.
When you do, the attacker slips, speeds, or tumbles past Lyra
and injures himself in the process. Keep a close eye on the attacker’s
challenge points (shown in a guage on the right of the screen),
however, as that is the only way to know how many successful
evasions it takes to bypass a dangerous adversary.
If you don’t follow the evasion prompts fast enough, the enemy
will grab you. Quickly follow the onscreen prompts to perform a
grapple evasion, and your attacker will let you go.
Grab Attacks
Deception Events
Action
Xbox 360 Command
PS3 Command
Grab
3+ 1
p+u
Spin attack
After grabbing
enemy, press 3+ 1
After grabbing enemy,
press p + u
Whip attack
After grabbing
enemy, press 3
After grabbing enemy,
press p
Deception events are a lot less dangerous than Evade events because
they are completely conversational. In a Deception event, you must
complete short, challenging minigames in order for Lyra to convincingly deceive whomever she is talking to.
Sometimes she must get information, and sometimes she must
get past a particular person. Your success at the Deception minigames
will determine Lyra’s success (or lack thereof) at the Deception event.
The following pages provide a short description of each Deception
minigame with tips on how to succeed.
The key to winning the Deception minigames is to complete the
task and fill up your Progress bar before the timer runs out. When
you start the game, your Deception meter will be yellow (neutral).
If your Deception is successful, the meter will turn green (persuaded).
If your subject resists Deception, the meter will turn red.
Iorek can also deal with some rivals by tossing them around like
rag dolls. Approach an enemy and press the Slash and Block buttons
simultaneously to grab the enemy in Iorek’s crushing grasp.
While the enemy’s in your grasp, either press the Slash and Block
buttons again to spin the enemy around and toss him, or press the
Slash button to whip him over your head back and forth until he can’t
take any more punishment.
8
Protected by copyright. Unauthorized or unlawful copying or downloading expressly prohibited.
squa
the w
from
betw
The Cast
T
Adventurers: Player-controlled
Lyra Belacqua
Lyra is a 12-year-old girl who’s been raised
by the scholars of Jordan College at the behest
of her mysterious uncle, Lord Asriel. Headstrong, rebellious, and willful, Lyra is skilled
at deceit and yet is seemingly innocent.
Unfortunately, Lyra’s carefree existence
comes to an end after numerous children,
including her best friend, Roger, mysteriously
begin to disappear.
Iorek Byrnison
An ice bear, or Panserbjørne, Iorek was the
rightful king of the far northern island of
Svalbard—that is until his rival, Ragnar
Sturlusson, plotted against him and caused
his exile. Lyra helps Iorek get his armor—
made of sky iron—back, and he devotes
himself to her cause. Like many of his kind,
Iorek possesses incredible strength and is an
expert metalsmith.
As the rightful leader of the Panserbjørne,
Iorek’s great strength is an extremely valuable
asset to Lyra on her adventure. His powerful
paws and razor-sharp claws can pound
enemies into submission with little effort.
Pantalaimon
Regardless of her unfortunate circumstances,
Lyra always has her trusty dæmon, Pantalaimon (Pan), at her side. Pan is a wily and
level-headed creature. He’s protective of Lyra
and will go to great lengths to keep her safe.
Pan’s transformation ability allows
him to take the shape of different creatures,
each with its own special talent. As such, he
proves to be Lyra’s most valuable companion
on her journey.
Lord
uncle
to be
explo
dyna
consu
undi
any l
Stelm
Roge
is Lyr
two,
incid
that t
fulfil
12
Protected by copyright. Unauthorized or unlawful copying or downloading expressly prohibited.
Pickups and Collectables
Courage Orb (Lyra)
Introduction
The Power
to Control
Pick-ups
The following objects are available as
pick-ups. You use these items as soon as
you pick them up. They can’t be collected for
later use.
PRIMA®
Official Game Guide
The Cast
Pan is always capable
of transforming into an
ermine. He doesn’t need
a coin for that form.
Pickups and
Collectables
Walkthrough
Secrets and
Unlockables
Lyra’s World
Bloodmoss (Iorek)
This fills Lyra’s Courage meter. When Lyra
picks up an orb, it fills one of the three
Courage slices above her Courage meter.
When all three slices are full, Lyra earns a
Courage Point in her Courage meter.
Sloth, Hawk,
and Wildcat Coins (Lyra)
Bloodmoss is a medicinal herb that
treats wounds. By picking this up,
Iorek’s wounds are healed and his
health is restored.
Sky Iron Armor (Iorek)
Sky Iron armor—a Panserbjørne’s most
prized possession—is a rare armor
worn by the Northern bears. Pick these
up to add protection to Iorek’s health.
After you pick up Sky Iron armor,
enemies will have to break through
Iorek’s armor before they can take
chunks out of his health.
Full Rage Icon (Iorek)
Picking up one of these completely
fills Iorek’s Rage meter, allowing him
to release a devastating Rage attack.
You might also encounter Rage Icons;
these will only fill a portion of Iorek’s
Rage meter.
Picking up one of these will grant Pan a
particular transformation ability. There are
three coins total: hawk, sloth, and wildcat.
15
Protected by copyright. Unauthorized or unlawful copying or downloading expressly prohibited.
The Alethiometer (aka the Golden Compass)
When the Alethiometer pops up, it gives
you three words (or meanings) that pertain
to your question. Match the words to their
respective symbols (any 3 of the 36 along the
Alethiometer’s outer ring) by pointing the
Alethiometer’s three red hands at the symbols
you’ve chosen.
Instead of true north, the Alethiometer’s
needle seeks truth itself. The device’s face
is divided into 36 arcane symbols, each of
which may convey a variety of meanings in
combination with any of the others and based
on the subtleties of the swinging needle. By
setting the three dials on the side, one can
ask any sort of question imaginable. Reading
the Alethiometer is difficult—so difficult, in
fact, that no one possesses the ability, except
perhaps Lyra.
For example, if you’re given the word
“Cunning,” set one red hand to the Serpent
symbol, as it represents Cunning. After
matching all three meanings with their
respective symbols, press the Accept button.
The Alethiometer will then verify the symbols
and their meanings. If you choose the wrong
symbol, you can try again.
Using the Alethiometer
After you’ve accurately paired all three
meanings with their respective symbols, you
can then divine the answer to your question.
The final phase of answering an Alethiometer question is to press the onscreen
prompts while focusing your attention on the
compass’s center. Maintain the Focus Cursor
at the compass’s center as it slips and slides
around the compass face. When the button
prompt appears, press it. Do this three times
to get your answer.
The closer you keep the cursor to the
center, the longer the button prompts
will stay onscreen.
You cannot use the Alethiometer without first
having the most important component of the
process—a question. To divine an answer to
a question, open the journal and flip to the
“Questions” chapter. Scroll to the question
you’d like to answer and select it.
18
Protected by copyright. Unauthorized or unlawful copying or downloading expressly prohibited.
Prelude
Tundra
On the Hunt
As you land back on the sturdy ice
sheathe, turn right and storm toward the
large ice mounds in the distance.
CHECKPOIN T
Our adventure picks up in the frigid North.
Lyra, Pan, and Iorek brave the frozen mountains and biting winds of the tundra. They’re
pressing forward, past harsh weather and
terrible terrain.
They’re in Samoyed territory, in search
of a missing boy. Wolves chase Iorek and
Lyra, who manage to fend off a rabid pack.
Still, they must press on.
Proceed along the snow-laden mountain
path until you reach a small gap in the ice
sheathe. Leap over the chasm toward the
large ice island. On the small gap’s other
side, veer left toward the large derelict ship
crashed along the icy waters.
Climb atop the ship and leap off its
starboard side. On the shipwreck’s other side
is a lot more snow.
On the ice mound’s other side is another
rabid pack of wolves. They gather around,
gnashing their teeth and snarling, anticipating your arrival. Don’t disappoint them. Leap
over the next chasm—this is a large one.
Don’t hesitate upon landing. As Iorek’s paws
land on solid, frozen ground, immediately
attack! Launch at the wolves and ram the
pack’s center. When you make contact, the
pack scatters. Turn around and finish off the
wolves one at a time.
22
Protected by copyright. Unauthorized or unlawful copying or downloading expressly prohibited.
A
myst
large
at the
the p
F
pack
rush
your
the w
stum
isola
comb
PRIMA®
Official Game Guide
Introduction
The Power
to Control
Ramble farther along the mountain path until you reach a high
peak overlooking a small Samoyed camp below. Fires burn and smoke
billows out of the camp’s center, signaling a Samoyed presence.
The screen goes black after a short cutscene that pans over the
camp below. When the black fades and the screen clears up, you’re
standing directly in front of a large cavern.
e
other
d,
ipatLeap
After defeating the pack of wolves, the
mysterious green force field barring the
large stone blockade ahead disappears; slash
at the stone debris until it is gone, clearing
the path ahead.
Farther along the frosty path, another
pack of wolves awaits. As you approach, they
rush out and attack. By now you’ve filled
your Rage meter; unleash a Rage attack on
the wolves as they circle around you. As they
stumble back from your initial attack,
isolate each wolf and finish it off with
combination strikes.
paws
ly
e
he
f the
You don’t have to destroy the debris
ahead, but doing so begins to refill your
Rage meter.
After spying on the camp below, explore the large dark cavern
ahead. Gather the bloodmoss just inside the cavern’s entrance and heal
your wounds.
When you reach the cavern’s end, carefully approach the ledge.
Slowly drop from ledge to ledge (there are five) until you’re back on
solid ground.
The Cast
Pickups and
Collectables
Walkthrough
Prelude
Jordan College
London
Noorderlicht Day
The Inspectors
Trollesund
The Showdown
The North
Camp Ambush
Bolvangar
The Rescue
Svalbard Courtyard
Zeppelin Assault
Secrets and
Unlockables
Lyra’s World
Head toward the next large
gap and make a daring leap over
it. Upon landing, slowly move
along the mountain ledge. Just
ahead are several bear traps
strewn along the path. You can
either swat them shut with your
paws or navigate around them. There is no benefit to snapping them
shut, so it’s best to avoid them for now. However, if you want to sharpen
your agility, go ahead and shut them.
After passing the first smattering of bear traps, leap over a large
gap. On the other side is another small group of bear traps and a few
bushes of bloodmoss. Heal your wounds and carefully bypass the bear
traps to avoid incurring damage. Make one final leap over another small
gap and prepare to wage war against a pack of wolves.
23
Protected by copyright. Unauthorized or unlawful copying or downloading expressly prohibited.
If you miscalculate your jump,
you can accidentally fall into
the gap and meet with a most
unfortunate end.
After battling the wolf pack, gather
the bloodmoss to heal your wounds, then
continue on your quest.
CHECKPOIN T
Run and gain speed as you explore
farther along the icy landscape. As you blast
forward, watch the path ahead for a pack of
five wolves. Just as you’re about to collide
with the pack, press the Slash button to ram
them head-on.
After scattering the pack, focus on the
closest wolf and thrash him. Finish off the
remaining wolves with powerful combos,
making sure to block if they attack two at
a time.
Just beyond the bloodmoss and fallen
wolves is a large rocky blockade. As you
examine it, the ground gives way and you fall
paws-first into a long, glittering tunnel made
of ice. A long ice-blue pathway stretches
ahead, and the walls around you shimmer
with the water’s reflection from below.
When you tread deeper into the tunnel,
it’s clear that the path is anything but stable.
Cracks adorn the icy walkway, and large ice
pillars threaten to fall onto the path ahead.
As soon as you set paw to snow, the path
begins to crumble. Jump into full gallop and
utilize your monstrous gait to stay ahead of
the crumbling ice. Maintain full speed and
leap over the broken ice onto soft and stable
ground. The first platform you land on is
solid. Back up and gain a bit of speed to clear
the next gap.
Upon landing, continue running at full
speed while the ground crumbles once again.
Watch the precarious ice pillars ahead as you
drive deeper into the tunnel. Two pillars fall,
one after the other, and threaten to send
you headlong into the water below. Don’t
break stride. Leap over the fallen pillars and
continue dashing deep into the tunnel. After
clearing the second fallen pillar, you’re back
on stable ground.
If you falter at any point along
the crumbling pathway,
you’ll meet your end at the
bottom of the tundra’s
uninviting waters.
24
Protected by copyright. Unauthorized or unlawful copying or downloading expressly prohibited.
E
the m
ridge
gap a
right
cover
O
derel
cover
anoth
T
and m
your
piece
conti
Secrets
Symbol Meaning Locations and Objectives
Jordan College
Introduction
The Power
to Control
The Cast
Pickups and
Collectables
SYMBOL MEANINGS
Walkthrough
Symbol
Meaning
Objective
Apple
Knowledge
Finish previous level
Alpha/Omega
Process
Pick up on ledge above
corridor’s entrance
Candle
Learning
Hit all three scholars with
peach pits
Crocodile
Rapacity
Pick up after first encounter
with Fra Pavel
Serpent
Evil
Deceive Fra Pavel
Cornucopia
Autumn
Deceive the tutorial servant
a second time
SYMBOL MEANINGS
PRIMA®
Official Game Guide
Secrets and
Unlockables
Lyra’s World
London
Symbol
Meaning
Objective
Thunderbolt
Fate
Finish previous level
Madonna
Motherhood
The last pick up gained from
jumping on Lyra’s bed
Baby
The Future
Hit the monkey every time
with the vase
Dolphin
Water
Find the tub stopper downstairs and fill the tub with
water; then use Pan’s ermine
insight on the dolphin toy
Marionette
Obedience
Use Pan’s ermine insight on the
marionette in the drawing room
Tree
Firmness
Use Pan’s ermine insight on
the tree outside the window
in the south corridor (the
one closest to Lyra’s room)
Owl
Night
Use Pan’s ermine insight on
the owl on the balcony
Apple
Vanity
Use Pan’s ermine insight on
Lyra’s vanity
Walled Garden
Innocence
Pick it up after going out to
the balcony
99
Protected by copyright. Unauthorized or unlawful copying or downloading expressly prohibited.
Diary of an Inside Man
From the Blog of David “Asset Wrangler” Allen
My name’s David Allen, and I am a very lucky guy. I’m an ordinary
bloke with an extraordinary job. I have, to the best of my knowledge,
one of the best jobs in the world. That’s a big statement to make. I
might not rock in a band or play pro football, but for someone with
no musical talent or ball skills, this runs high on the list.
My job has taken me on an incredible adventure, journeying
from Oxford, England, to the frozen waters of the Arctic. Along the
way, I’ve ridden in zeppelins, air balloons, and sleds. I’ve seen
witches flying en masse through frozen skies and [have] heard
armored fighting bears talk. I even sat on the throne of the king
of the bears. I’ve held an actual truth-telling Alethiometer in my
hands and followed in the footsteps of an unknowing hero [who
has] the weight of the world on her shoulders.
I’ve managed to do all of this in the space of just a few square
miles in Shepperton Film Studios on the outskirts of London,
England. This is largely because New Line Cinema has invested a
rather large amount of money in bringing to life the first of British
author Phillip Pullman’s His Dark Materials trilogy of books, The
Golden Compass (aka The Northern Lights in Great Britain).
For those of you not familiar with the book (check out the
online theatrical trailer for the upcoming movie version starring
Nicole Kidman and Daniel Craig if you haven’t already), The Golden
Compass tells of an unforgettable journey into an alternate
universe filled with elaborate twists and fascinating characters.
You’ll follow the harrowing exploits of Lyra, the young protagonist, on a quest to rescue her imprisoned uncle and mysteriously
kidnapped best friend. Joining Lyra along the way is her animal
dæmon, Pan, as well as a badass bear, Iorek, and the mysterious
Golden Compass—a truth-telling device that will help lead the way.
This compass is actually called an “Alethiometer,” and when I held
it in my hand, it told me you were going to love this diary series.
SEGA is making the official The Golden Compass video game
set to release alongside the movie later this year. Which is lucky for
me, because I get to be SEGA’s official asset wrangler. You may be
thinking, “What’s an asset wrangler?”
114
Protected by copyright. Unauthorized or unlawful copying or downloading expressly prohibited.
PRIMA®
Official Game Guide
Written by Fernando Bueno
The Prima Games logo is a
registered trademark of
Random House, Inc., registered
in the United States and other
countries. Primagames.com is
a registered trademark of Random House,
Inc., registered in the United States.
© 2007 by Prima Games. All rights
reserved. No part of this book may be
reproduced or transmitted in any form or
by any means, electronic or mechanical,
including photocopying, recording, or
by any information storage or retrieval
system without written permission from
Prima Games. Prima Games is a division
of Random House, Inc.
Product Manager: Todd Manning
Editor: Shaida Boroumand
Design and Layout: Melissa Smith
Manufacturing: Suzanne Goodwin
© SEGA. SEGA is registered in the U.S.
Patent and Trademark Office. SEGA and
the SEGA logo are either registered trademarks or trademarks of SEGA Corporation.
All rights reserved. © MMVII New Line
Productions, Inc. The Golden Compass™
and all related characters, places, names
and other indicia are trademarks of New
Line Productions, Inc. All Rights Reserved.
All products and characters mentioned
in this book are trademarks of their
respective companies.
Special thanks to Suzanne Goodwin for all
of her hard work and effort.
Please be advised that the ESRB Ratings
icons, “EC,” “E,” “E10+,” “T,” “M,” “AO,”
and “RP” are trademarks owned by the
Entertainment Software Association, and
may only be used with their permission
and authority. For information regarding
whether a product has been rated by the
ESRB, please visit www.esrb.org. For permission to use the Ratings icons, please contact
the ESA at esrblicenseinfo.com.
Important:
Prima Games has made every effort to
determine that the information contained in
this book is accurate. However, the publisher
makes no warranty, either expressed or
implied, as to the accuracy, effectiveness, or
completeness of the material in this book;
nor does the publisher assume liability for
damages, either incidental or consequential,
that may result from using the information
in this book. The publisher cannot provide
any additional information or support
regarding gameplay, hints and strategies, or
problems with hardware or software. Such
questions should be directed to the support
numbers provided by the game and/or device
manufacturers as set forth in their documentation. Some game tricks require precise
timing and may require repeated attempts
before the desired result is achieved.
Prima Games
A Division of Random House, Inc.
3000 Lava Ridge Court, Suite 100
Roseville, CA 95661
www.primagames.com
Fernando “Red Star” Bueno
has been a gamer since
opening his first Atari, and
has been writing creatively
since his early years in high
school. During college he
combined his loves for gaming and writing
and began freelancing for popular gaming
websites. The San Diego native found his
way to Northern California shortly after
high school. After graduating from the
University of California, Davis, with a
dual degree in English and Art History,
he was able to land a job as an editor for
Prima Games. Though happy with his
position as an editor, his life called him to
Las Vegas where he now resides. During
the move to Nevada, he also made the
move to author and has since written
a number of game books, including 50
Cent: Bulletproof, Prince of Persia: Two
Thrones, AND 1, and Stubbs the Zombie.
In his off time he enjoys the works
of Hermann Hesse, Johann Van Goethe,
Franz Kafka, Thomas Mann, and EGM.
When not writing for Prima, he continues
to perfect his craft as a poet.
We want to hear from you!
E-mail comments and feedback to
[email protected].
ISBN: 978-0-7615-5824-8
Library of Congress Catalog Card Number:
2007938558
Printed in the United States of America
07 08 09 10 LL 10 9 8 7 6 5 4 3 2 1
Protected by copyright. Unauthorized or unlawful copying or downloading expressly prohibited.