1
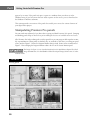
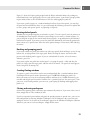
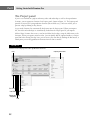
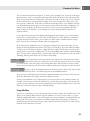
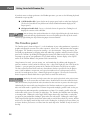
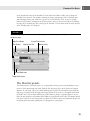
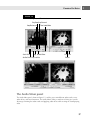
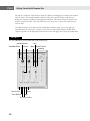
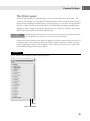
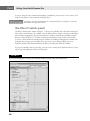
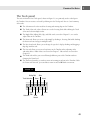
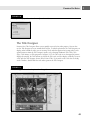
TE
RI
AL
Premiere Pro Basics
MA
T
GH
TE
D
he Adobe Premiere Pro user interface is a combination of a videoediting studio and an electronic image-editing studio. If you’re familiar with film, video editing, or audio editing, you should feel right at
home working within Premiere Pro’s Project, Monitor, and Audio windows.
If you have worked with such programs as Adobe After Effects, Macromedia
Flash, or Macromedia Director, then Premiere Pro’s Timeline, digital tools,
and panels should also be familiar to you. If you’re completely new to video
editing and computers, don’t worry; Premiere Pro panels, windows, and
menus are efficiently designed to get you up and running quickly.
PY
RI
To help get you started, this chapter provides an overview of Premiere Pro
windows and menus. Consider it a thorough introduction to the program’s
workspace and a handy reference for planning and producing your own digital video productions.
CO
Premiere Pro’s Panels
After you first launch Premiere Pro, several panels automatically appear
onscreen, each vying for your attention. Why do you need more than one
panel opened at once? A video production is a multifaceted undertaking. In
one production, you may need to capture video, edit video, and create titles,
transitions, and special effects. Premiere Pro windows help keep these tasks
separated and organized for you.
You can access any Premiere Pro panel by clicking its name in the Windows
menu. For example, if you want to open the Timeline, Monitor, Audio Mixer,
History, Info, or Tools panel, you can choose the Window menu and then
click the desired panel name. If the panel is already open, a check box
29
IN THIS CHAPTER
Premiere Pro’s panels
Premiere Pro’s menus
Part I
Getting Started with Premiere Pro
appears by its name. If the panel isn’t open, it opens in a window when you choose it in the
Windows menu. If you have more than one video sequence on the screen, you see them listed in
the Window ➪ Timelines submenu.
This section provides an overview of the panels that enable you to create the various elements of
your digital video project.
Manipulating Premiere Pro panels
You can work more efficiently if you know how to group and dock Premiere Pro’s panels. Grouping
and docking panels helps to ensure that you’re making the best use of available screen real estate.
All of Premiere Pro’s video-editing tools reside in panels that you can group or dock together in virtually any combination. When panels are docked, they are attached to each other, so resizing one panel
resizes another. Figure 1.1 shows the Program Monitor being resized. Notice in the second frame of
Figure 1.1 that enlarging the Program Monitor reduces the size of the Source Monitor panel.
The images in Figure 1.1 are from the Premiere Pro CS3 QuickStart chapter. The Clock
image (bc0104.mov) is in the FilmDisc folder. The Airport image (BG113.mov) is in the
Artbeats folder.
FIGURE 1.1
Resizing panels
30
Premiere Pro Basics
Figure 1.1 shows the Project panel grouped with the Effects and Audio Mixer tabs peeking out
from behind in the same panel group. You can easily add or remove a panel from a group by clicking the indented dots at the left-hand corners of the tabs and dragging the panel tab.
If you want a panel to appear as a standard window that floats above other panels, you can drag
the panel out from behind the others. As you read through the following sections that explain how
to resize, group, and separate panels, try adjusting a few panels.
Resizing docked panels
Windows that are grouped together are referred to as panels. To resize a panel, move the cursor over
the dividing line between panels. When the cursor changes to two arrows, as shown in Figure 1.1,
you can drag left or right on the vertical border between panels, or up and down on the horizontal
border between panels. If you want to resize the panel both horizontally and vertically, position the
mouse cursor over a panel corner. When the mouse pointer changes to four arrows, click and drag
the corner.
Docking and grouping panels
If you want to dock one panel with another one (the target panel), click and drag it over to the top,
bottom, left, or right portion of the target panel. Before releasing the mouse, wait for the dim
preview of the docked panel to appear. If you are satisfied with the results, release the mouse;
otherwise, press Esc.
If you want to place one panel into another panel — or group the panels — click and drag the
panel’s tab. Drag it into the target panel, and then release the mouse. The panel’s tab now appears
on the far right of all existing tabs.
Creating floating windows
To separate a panel so that it floats on the screen independently like a standard window, choose
Undock panel in the panel’s menu. Alternatively, press Ctrl/Ô while clicking the panel’s tab.
Release the mouse to create the new floating window, and then release Ctrl/Ô. Alternatively, you
can click and drag the panel outside of Premiere Pro — provided you have the screen space. Once
you create a new floating window, you can create a panel group by clicking and dragging other
panels to it.
Closing and saving workspaces
Premiere Pro’s primary panels sometimes open automatically onscreen. If you want to close one of
them, simply click its Close window (X) icon.
If you have organized your windows and panels in specific positions at specific sizes, you can save
this configuration by choosing Window ➪ Workspace ➪ New Workspace. After you name your
workspace and save it, the name of the workspace appears in the Window ➪ Workspace submenu.
Whenever you want to use that workspace, simply click its name.
31
1
Part I
Getting Started with Premiere Pro
The Project panel
If you’ve ever worked on a project with many video and audio clips as well as other production
elements, you can appreciate Premiere Pro’s Project panel, shown in Figure 1.2. The Project panel
provides an overview of your production elements (often called assets), and even enables you to
preview a clip by clicking its Play button.
As you work, Premiere Pro automatically loads items into the Project panel. When you import a
file, the video and audio clips are automatically loaded into the Project panel. If you import a
folder of clips, Premiere Pro creates a new bin (or folder) for the clips, using the folder name as the
bin name. When you capture sound or video, you can quickly add the captured media to a Project
panel bin before closing the clip. Later, you can create your own bins by clicking the Bin button, at
which point you can drag production elements from one bin to another.
FIGURE 1.2
Premiere Pro’s Project panel stores production elements.
Play
Project panel menu
List View
Icon View
Clear
New Item
Automate to Bin
Sequence
Find
32
Premiere Pro Basics
The New Item button (shown in Figure 1.2) enables you to quickly create a new title or other production element, such as a transparent video clip (often used with Premiere Pro’s Timecode video
effect to overlay timecode over other clips), color matte (covered in Chapter 15), or bars and tone
(used to calibrate color and sound when editing). The New Item button also allows you to add
new sequences, offline files, black video, and universal counting leaders. If you click the Icon button, all production elements appear as icons onscreen rather than in list format. Clicking the List
button returns the display of the Project panel to List view. If you want to quickly add Project
panel elements to the Timeline, you can simply select them and then click the Automate to
Sequence button.
If you expand the Project panel by clicking and dragging the panel border, you see that Premiere
Pro lists the start and stop times as well as the in and out points and the duration of each clip. If
you click the Project panel’s menu, you can choose to add or remove columns from the Project
panel. You can also rearrange the column order by dragging them.
In the Project panel, production assets are grouped according to the current sort order. You can
change the order of production elements so that they are arranged by any of the column headings.
To sort by one of the column categories, simply click the category. The first time you click it, production items are sorted in ascending order. To sort in descending order, click the column heading
again. The sort order is represented by a small triangle. When the arrow points up, the sort order is
ascending. When it points down, the sort order is descending.
To find a production item in the Project panel, simply click in the Project panel’s Find
field and type what you’re looking for. Next, choose the category that you are searching
for (such as Name, Scene, Shot/Take) in the In drop-down menu. After the item or items are found,
you can return the Project panel view back to normal by clicking the X that appears in the Find field.
TIP
TIP
To play a clip in the thumbnail monitor in the Project panel, click the clip and then click
the Play button — the small triangle next to the thumbnail monitor.
To preserve space and hide the Project window’s thumbnail monitor, choose View ➪ Preview Area in
the Project Panel Menu. This toggles the monitor display off and on.
To keep your production assets well organized, you can create bins to store similar elements. For
example, you can create a bin for all sound files or a bin for all interview clips. If the bin gets full,
you can see more elements at one time by switching from the default Thumbnail view to List view,
which lists each item but doesn’t show a thumbnail image.
Using FlexBins
If you create several bins, you can easily manage them by using Premiere Pro’s FlexBin feature. This
allows you to open up different bins in separate windows, or as tabs. To open a bin as a separate
window, simply double-click it. Once the bin opens in a separate window, it can function like any
other panel. This means you can dock it or embed it within other panel groups. To change the
default preferences for how flex bins open, choose Edit ➪ Preferences ➪ General. On a Mac, choose
Premiere Pro ➪ Preferences ➪ General.
33
1
Part I
Getting Started with Premiere Pro
If you don’t want to change preferences for FlexBin operations, you can use the following keyboard
commands to open up bins:
n Ctrl/Ô+Double-click: Opens the bin in the project panel, with no other bins displayed.
(To close the bin click the tiny folder icon beneath thumbnail monitor display in the
Project panel.)
n Alt/Option+Double-click: Creates a tab for the bin in the parent bin. Clicking the tab
displays the contents of the child bin.
You can change the speed and duration of a clip by right-clicking the clip in the Project
panel and choosing Speed/Duration. You can also quickly place the clip in the Source
Monitor by right-clicking the clip and choosing Open in Source Monitor.
TIP
The Timeline panel
The Timeline panel, shown in Figure 1.3, is the foundation of your video production. It provides a
graphic and temporal overview of the video sequences, effects, titles, and transitions that comprise
your project. The Timeline is not just for viewing — it is also interactive. Using your mouse, you
can build your production by dragging video and audio clips, graphics, and titles from the Project
panel to the Timeline. By clicking and dragging the current-time indicator (the blue triangle), you
can jump to any part of your production. As you click and drag, the time display at the top-left
corner of the Timeline indicates the position of the current frame.
Using Premiere Pro tools, you can arrange, cut, and extend clips. By clicking and dragging the
work area markers at either end of the work area bar — edges of the light-gray bar at the top of the
Timeline — you can specify the portion of the Timeline that Premiere Pro previews or exports.
The thin, colored bar beneath the work area bar indicates whether a preview file for the project
exists. A red bar indicates no preview, and a green bar indicates that a video preview has been
created. If an audio preview exists, a thinner, light-green bar appears. (To create the Preview file,
choose Sequence ➪ Render Work Area or press Enter to render the work area.)
Rendering the work area helps ensure that your project plays back at the project frame
rate. If you create video and audio effects, the Preview file stores the rendered effects.
Thus, the next time you play back the effect, Premiere Pro does not have to process the effect again.
TIP
Undoubtedly, the most useful visual metaphor in the Timeline window is its representation of
video and audio tracks as parallel bars. Premiere Pro provides multiple, parallel tracks so that you
can both preview and conceptualize a production in real time. For example, parallel video and
audio tracks enable you to view video as audio plays. The Timeline also includes icons for hiding
or viewing tracks. Clicking the video Toggle Track Output button (Eye icon) hides a track while
you preview your production; clicking it again makes the track visible. Clicking the audio Toggle
Track Output button (Speaker icon) turns audio tracks on and off. Beneath the Eye icon is another
icon that sets the display mode for clips in the track. Clicking the Set Display Style icon allows you
to choose whether you want to see frames from the actual clip in the Timeline or only the name of
the clip.
34
Premiere Pro Basics
At the bottom-left corner of the window, the Time Zoom Level slider enables you to change the
Timeline’s time intervals. For example, zooming out shows your project over less Timeline space,
and zooming in shows your work over a greater area of the Timeline. Thus, if you are viewing
frames in the Timeline, zooming in reveals more frames. You can also zoom in and out by clicking
the edges of the Viewing Area bar at the top of the Timeline. To learn more about the many features
of the Timeline panel, see Chapter 6.
FIGURE 1.3
The Timeline panel provides an overview of your project and enables you to edit clips.
Set Display Style
Toggle Track Output
Time Display
Current Time Indicator
Viewing Area Bar
Work Area Bar
Change Zoom Level
Toggle Track Output
The Monitor panels
The Monitor panels, shown in Figure 1.4, are primarily used to preview your production as you
create it. When previewing your work, click the Play button to play it in the Source or Program
Monitor. As you work, you can also click and drag in the tread area (serrated lines just below the
clip) to jog, or slowly scroll, through your footage. Below the tread area is a triangular icon called
the shuttle slider. You can click and drag the shuttle slider to jump to a specific clip area. As you
click, the time display in the Monitor panel indicates your position in the clip. The Monitor panels
can also be used to set in and out points. As discussed in The Premiere Pro QuickStart chapter, the
in and out points determine which part of a clip appears in your project.
35
1
Part I
Getting Started with Premiere Pro
The images in Figure 1.4 are from the SP123.mov file in the Artbeats folder on the
Premiere Pro Bible CS3 DVD.
Premiere Pro provides five different monitor panels: the Source Monitor, the Program Monitor, the
Trim Monitor, the Reference Monitor, and the Multi-Camera monitor. You can access the Trim,
Reference, and Multi-Camera monitors from the Program Monitor’s panel menu.
Premiere Pro provides five different monitor panels: the Source Monitor, the Program Monitor, the
Trim Monitor, the Reference Monitor, and the Multi-Camera monitor. You can access the Trim,
Reference, and Multi-Camera monitors from the Program Monitor’s panel menu.
n Source Monitor: The Source Monitor shows source footage that has not yet been placed
on the video sequence in the Timeline. You can use the Source Monitor to set in and out
points of clips and then insert or overlay them into your production. The Source Monitor
can also display audio waveforms of audio clips. (To display the audio waveform, set the
Take Audio/Video button to audio or double-click unlinked audio. See Chapter 7 for
more details.)
n Program Monitor: The Program Monitor displays your video program: the clips, graphics, effects, and transitions that you have assembled in a video sequence in the Timeline
window. You can also use the Lift and Extract buttons in the Program Monitor to remove
footage. To play a sequence in the Program Monitor, you can either click the window’s
Play button or press the Spacebar.
n Trim Monitor: The Trim Monitor allows you to precisely fine-tune edits. You can access
the Trim Monitor from the Program Monitor, either by clicking Trim in the Program
Monitor panel menu or by clicking the Trim button.
In the Trim panel, the left and right sides of an edit are shown on either side of the window. To edit, you can click and drag between the two monitor views of the edit to add or
subtract frames from either side of the edit (see Figure 1.4). You can also click and drag
in the left or right monitor to edit only the left or right side of the edit. You can also
choose to edit one frame or five frames at a time by simply clicking a button. Using the
Trim Monitor is covered in Chapter 12.
n Reference Monitor: In many respects, the Reference Monitor is a second Program
Monitor. Many Premiere Pro editors use it when making color and tonal adjustments
because it allows them to view video scopes (which display hue and saturation levels) in
the Reference Monitor while simultaneously viewing the actual footage in the Program
Monitor. The Reference Monitor can be ganged, or set to play in sync, with the Program
Monitor, or it can be unganged. Using the Reference Monitor is discussed in Chapter 17.
n Multi-Camera Monitor: The Multi-Camera Monitor allows you to view four different
clips simultaneously in one monitor. As footage plays in the monitor, you can use the
mouse or keyboard to select a scene to insert into your program sequence. The MultiCamera Monitor is most helpful when editing event footage shot simultaneously from
different cameras. See Chapter 12 to learn more about using the Multi-Camera Monitor.
36
Premiere Pro Basics
FIGURE 1.4
The Source, Program, and Trim Monitors
Play/Stop Step Forward
Step Backward
Set In Point
Take Audio/Video
Jog Shuttle Slider
Set Out Point Play In to Out
Lift
Trim
Extract
The Audio Mixer panel
The Audio Mixer panel, shown in Figure 1.5, enables you to mix different audio tracks, create
audio effects, and record narration. The Audio Mixer’s ability to work in real time gives you the
advantage of mixing the audio tracks and applying audio effects while viewing the accompanying
video.
37
1
Part I
Getting Started with Premiere Pro
You can raise and lower audio levels for tracks by clicking and dragging the volume fader controls
with the mouse. The round, knob-like controls enable you to pan or balance audio. You can
change the settings by clicking and dragging the knob icon. The buttons below the balance controls let you play all tracks, select the tracks that you want to hear, or select the tracks that you
want to mute.
The familiar controls at the bottom of the Audio Mixer window enable you to start and stop
recording while the audio runs. Chapter 4 covers how to record audio using the Audio Mixer.
Chapter 8 provides an in-depth discussion of how to mix and apply effects using the Audio Mixer.
FIGURE 1.5
Use the Audio Mixer to mix audio and create audio effects.
Left/Right balance
Show/Hide Effects
Go to In Point
Volume
Solo
Mute
Record
Go to Out Point
Loop
Play Play In to Out
38
Enable Track for
recording
Premiere Pro Basics
The Effects panel
The Effects panel allows you to quickly apply a variety of useful audio effects, video effects, and
transitions. For example, the Video Effects bin (folder) includes effects that correct color, change an
image’s contrast, and distort and blur images. As shown in Figure 1.6, the effects are organized into
bins. For example, the Distort bin contains effects that distort clips by bending or pinching them.
Applying an effect is simple: Just click and drag the effect over a clip in the Timeline. You can then
edit the effect using controls in the Effect Controls panel.
TIP
The Effects panel allows you to create your own bins and move effects into them so that
you can quickly access the effects you want to use in each project.
Premiere Pro’s Video Transitions bin, which also appears in the Effects panel, features more than 70
transitional effects. Some transitions, such as the Dissolve group, can provide a smooth transition
from one video clip to another. Other transitions, such as Page Peel, can be used as a special effect
to dramatically jump from one scene to another.
FIGURE 1.6
Use the Effects panel to apply transitions and special effects.
Delete
New Custom folder
39
1
Part I
Getting Started with Premiere Pro
If you are using the same transitions throughout a production, you can create a bin, name it, and
keep the transitions in the custom bin for quick access.
CROSS-REF
See Chapter 9 for more information on creating transitions; see Chapter 13 for more
information on using video effects.
The Effect Controls panel
The Effect Controls panel, shown in Figure 1.7, allows you to quickly create and control audio and
video effects and transitions. For example, you can add an effect to a clip by selecting it in the Effects
panel and then dragging the effect over the clip in the Timeline or directly into the Effect Controls
panel. As shown in Figure 1.7, the Effect Controls panel includes its own version of the Timeline
as well as a slider control for zooming into the Timeline. By clicking and dragging the Timeline and
changing effect settings, you can change effects over time. As you change settings, you create
keyframes (indicated by diamond icons) in the Effect Controls panel and in the Timeline.
If you create multiple effects for one clip, you can see the settings for the different effects by selecting the clip and opening the Effect Controls panel.
FIGURE 1.7
The Effect Controls panel enables you to quickly display and edit video and audio effects.
40
Premiere Pro Basics
The Tools panel
The tools in Premiere Pro’s Tools panel, shown in Figure 1.8, are primarily used to edit clips in
the Timeline. You can activate each tool by clicking it in the Tools panel. Here is a brief summary
of the tools:
n The Selection tool is often used for selecting and moving clips on the Timeline.
n The Track Select tool selects all items on a track. Pressing Shift while clicking the Track
Select tool selects multiple tracks.
n The Ripple Edit, Rolling Edit, Slip, and Slide tools, covered in Chapter 12, are used to
adjust edits on the Timeline.
n The Razor tool allows you to cut a clip simply by clicking it. Pressing Shift while clicking
the Razor tool cuts footage in multiple tracks.
n The Rate Stretch tool allows you to change the speed of a clip by clicking and dragging a
clip edge with the tool.
n The Pen tool allows you to create keyframes on the Timeline when adjusting video
and audio effects. Audio effects are covered in Chapter 7. Video effects are covered in
Chapter 13.
n The Hand tool enables you to scroll through different parts of the Timeline without
changing the Zoom level.
n The Zoom tool provides yet another means of zooming in and out in the Timeline. With
the Zoom tool activated, you can click to zoom in and Ctrl/Ô-click to zoom out.
FIGURE 1.8
Premiere Pro’s Tools panel
Rolling Edit
Track Selection
Selection
Ripple
Edit
Slide
Razor
Hand
Slip
Rate
Stretch
Zoom
Pen
41
1
Part I
Getting Started with Premiere Pro
The History panel
Premiere Pro’s History panel, shown in Figure 1.9, lets you perform virtually unlimited Undo
operations.
FIGURE 1.9
The History panel provides virtually unlimited Undo operations.
As you work, the History panel records your production steps. To return to a previous version of
your project, just click that history state in the History panel. After you click and begin working
again, you rewrite history — all past steps following the state you returned to are removed from the
panel as new ones appear. If you want to clear all history from the panel, choose Clear in the panel
menu (opened by clicking the right triangle icon). To delete a history state, select it and then click
the Delete button (trashcan icon) in the panel.
CAUTION
If you click a history state in the History panel to undo an action and then begin to
work, all steps after the one you clicked are removed from your project.
The Info panel
The Info panel provides important information about clips and transitions, and even about gaps
in the Timeline. To see the Info panel in action, click a clip, transition, or empty gap in the
Timeline. The Info window shows the size, duration, and starting and ending points of the clip
or gap, as shown in Figure 1.10.
The Info panel can be very useful when editing because the panel displays starting and ending
points of the clips as you edit them in the Timeline panel.
The Event panel
The Event panel lists errors that may occur when using third-party video and audio plug-ins.
Selecting the error message in the Event panel, and then clicking Details, provides more information about the specific error.
42
Premiere Pro Basics
FIGURE 1.10
The Info panel displays information about clips and transitions.
The Title Designer
Premiere Pro’s Title Designer allows you to quickly create titles for video projects. You can also
use the Title Designer to create animated title effects. To aid title placement, the Title Designer can
display video behind the titles you are creating. Tools and other options for creating titles can be
opened onscreen from the Title Designer’s menu, or by choosing Window ➪ Title Tools, Title
Styles, Title Actions, or Title properties. In Figure 1.11, the Title tools are in the upper-left corner,
displayed vertically; the Title Actions are below the Title tools, and also display vertically. To create
a title with the Title Designer, choose File ➪ New ➪ Title. If you wish to edit a title that is already
on the Timeline, double-click the title and it opens in the Title Designer.
FIGURE 1.11
The Title Designer with tools and options for editing titles
43
1
Part I
Getting Started with Premiere Pro
Premiere Pro’s Menus
Premiere Pro features nine main menus: File, Edit, Project, Clip, Sequence, Marker, Title, Window,
and Help. The following sections provide an overview of the different menus and include tables
that summarize each menu’s commands.
The File menu
The File menu consists of standard Windows commands such as New, Open, Close, Save, Save As,
Revert, and Quit. The menu also includes commands for loading movie clips and folders full of
files. You can use the File ➪ New ➪ Sequence command to add Timelines to a project. Table 1.1
summarizes the File menu commands.
TABLE 1.1
File Menu Commands
Command
Shortcut
Description
New ➪ Project
Ctrl/Ô+Alt+N
Creates a new file for a new digital video production
New ➪ Sequence
Ctrl/Ô+N
Adds a new sequence to the current project
New ➪ Bin
Ctrl/Ô+/
Creates a new bin in the Project panel
New ➪ Offline File
New ➪ Title
Creates a new file entry in the Project panel that can be used
for footage to be captured
F9
Opens the Title Designer for creating text and graphic titles
New ➪ Photoshop File
Creates a new, blank Photoshop file using project dimensions
New ➪ Bars and Tone
Adds color bars and a sound tone to the bin in the Project panel
New ➪ Black Video
Adds a pure-black video clip to the bin in the Project panel
New ➪ Color Matte
Creates a new color matte in the Project panel
New ➪ Universal
Counting Leader
Automatically creates a countdown clip
New ➪ Transparent
Video
Creates a transparent video that can be placed in a track,
and used to display a timecode
Open Project
Ctrl/Ô+O
Open Recent Project
Opens a Premiere Pro project file
Opens a recently used Premiere Pro movie
Browse
Ctrl/Ô+Alt/
Option+O
Opens Adobe Bridge
Close
Ctrl/Ô+W
Closes the Project panel
44
Premiere Pro Basics
Command
Shortcut
Description
Save
Ctrl/Ô+S
Saves a project file to disk
Save As
Ctrl/Ô+Shift+S
Saves a project file under a new name, or saves it to a
different disk location; this command leaves the user in the
newly created file.
Save a Copy
Ctrl/Ô+Alt/
Option+Shift
Creates a copy of the project on disk, but the user remains
in the current project
Revert
Reverts a project to the previously saved version
Capture
Captures clips from videotape
Batch Capture
Automatically captures multiple clips from the same tape; this
command requires device control.
Adobe Dynamic
Link ➪New After
Effects Composition
Allows you to create a new Adobe After Effects
Composition linked to a Premiere Pro project
Adobe Dynamic
Link ➪ Import After
Effects Composition
Creates a link and imports the file from Adobe After Effects
Import
Ctrl/Ô+I
Imports a video clip, audio clip, or graphic
Import Recent File
Imports recently used files into Premiere Pro
Import Clip
Notes Comments
Imports clip comments from Adobe Acrobat
Export ➪ Movie
Exports a movie to disk according to the settings in the Export
Movie dialog box
Export ➪ Frame
Exports a frame to be used as a still image
Export ➪ Audio
Exports Timeline audio to disk according to the settings in the
Audio Settings dialog box
Export ➪ Title
Exports a title from the Project panel
Export ➪ Export to Tape
Exports a Timeline to videotape
Export ➪ Export to DVD
Burns a DVD from the Timeline
Export ➪ Export to EDL
Exports the Edit Decision List
Export ➪ Adobe
Media Encoder
Exports in different formats: MPEG1, MPEG2, Real Media,
QuickTime, Windows Media
Get Properties for ➪ File
Provides size, resolution, and other digital information about
a file
Get Properties for ➪
Selection
Provides size, resolution, and other digital information about
a selection in the Project panel
continued
45
1
Part I
Getting Started with Premiere Pro
TABLE 1.1
Command
(continued)
Shortcut
Description
Reveal in Bridge
Opens information about a file in Adobe Bridge
Interpret Footage
Changes the frame rate and pixel aspect ratio of a selected
item in the Project window; this command also inverts and
ignores the alpha channel
Timecode
Sets the timecode starting point of a selected clip in the
Project panel
Exit
Ctrl/Ô+Q
Quits Premiere Pro
The Edit menu
Premiere Pro’s Edit menu consists of standard editing commands, such as Copy, Cut, and Paste,
which you can use throughout the program. The Edit menu also provides special paste functions
for editing, as well as preferences for Premiere Pro’s default settings. Table 1.2 describes the Edit
menu commands.
TABLE 1.2
Edit Menu Commands
Command
Shortcut
Description
Undo
Ctrl/Ô+Z
Undoes the last action
Redo
Ctrl/Ô+Shift+Z
Repeats the last action
Cut
Clipboard
Ctrl/Ô+X
Cuts a selected item from the screen, placing it into the
Copy
Ctrl/Ô+C
Copies a selected item into the Clipboard
Paste
paste area
Ctrl/Ô+V
Changes the out point of a pasted clip so that it fits in the
Paste Insert
Ctrl/Ô+Shift+V
Pastes and inserts a clip
Paste Attributes
Ctrl/Ô+Alt+V
Pastes attributes of one clip to another
Clear
Backspace
Cuts an item from the screen without saving it in the Clipboard
Ripple Delete
Ctrl/Ô+Shift+Delete
Deletes selected clips without leaving a gap in the Timeline
Duplicate
Ctrl/Ô+Shift+/
Copies a selected element in the Project panel
Select All
Ctrl/Ô+A
Selects all elements in the Project panel
Deselect All
Ctrl/Ô+Shift+A
Deselects all elements in the Project panel
46
Premiere Pro Basics
Command
Shortcut
Description
Find
Ctrl/Ô+F
Finds elements in the Project panel (the Project must be
opened)
Label
Allows a choice of label colors in the Project panel
Edit Original
Ctrl/Ô+E
Loads a selected clip or graphic from disk in its original
application
Edit in Adobe
Soundbooth
Opens an audio file for editing in Adobe Soundbooth
Edit in Adobe
Photoshop
Opens a graphic file for editing in Adobe Photoshop
Keyboard
Customization
Assigns keyboard shortcuts
Preferences
Allows you to access a variety of setup preferences
The Project menu
The Project menu provides commands that change attributes for the entire project. The most
important commands enable you to set compression, frame size, and frame rate. Table 1.3
describes the Project menu commands.
TABLE 1.3
Project Menu Commands
Command
Description
Project Settings ➪ General
Sets the video movie, timebase, and time display; displays video and audio
settings
Project Settings ➪ Capture
Provides settings for capturing audio and video
Project Settings ➪ Video
Rendering
Sets options for rendering video
Project Settings ➪ Default
Sequence
Sets Timeline defaults for video and audio tracks
Link Media
Replaces an offline file in the Project panel with a captured file on disk
Make Offline
Makes a clip offline, so that it is unavailable in a project
Automate to Sequence
Sequentially places the contents of Project panel files into the Timeline
Import Batch List
Imports a Batch list into the Project panel
continued
47
1
Part I
Getting Started with Premiere Pro
TABLE 1.3
(continued)
Command
Description
Export Batch List
Exports a Batch list from the Project panel as text
Project Manager
Opens the Project Manager; this command allows the creation of a trimmed
version of a project
Remove Unused
Removes unused assets from the Project panel
Export Project as AAF
Exports a project in Advanced Authoring Format for use in other applications
The Clip menu
The Clip menu provides options that change a clip’s motion and transparency settings. It also
includes features that help you edit clips in the Timeline. Table 1.4 describes the Clip menu
commands.
TABLE 1.4
Clip Menu Commands
Command
Shortcut
Description
Rename
Renames the selected clip
Make Subclip
Creates a subclip from a clip that was edited in the Source Monitor
Edit Subclip
Allows editing of in and out points of a subclip
Capture Settings ➪
Set Capture Settings
Sets capture settings for offline files
Capture Settings ➪
Clear Capture Settings
Clears capture settings for offline files
Insert
Automatically inserts a clip into the Timeline at the current-time
indicator
Overlay
Drops a clip into the area of the current-time indicator position,
overlaying any existing footage
Replace with Clip ➪
From Source Monitor
Replaces selected clip in Timeline with clip from Source monitor
Replace with Clip ➪
From Source Monitor,
Match Frame
Replaces selected clip in Timeline with clip from Source monitor and
matches frame
48
Premiere Pro Basics
Command
Shortcut
Description
Replace with
Clip ➪From Bin
Replaces selected clip in Timeline with clip from Project panel bin
Enable
Allows clips in the Timeline to be enabled or disabled. Disabled clips
are not viewed in the Program Monitor and are not exported
Link/Unlink
Unlinks audio from a video clip, and links audio to video
Group
Ctrl/Ô+G
UnGroup
Ctrl/Ô+Shift+G
Places Timeline clips in a group so they can be manipulated together
Ungroups clips
Synchronize
Lines up a clip on the Timeline according to the clip’s start, end, or
timecode
Multicamera ➪
Camera 1,2,3, or 4
Replaces footage created in a multicamera edit with footage from a
different camera
Video Options ➪
Frame Hold
Specifies settings for making a still frame from a clip
Video options ➪
Field Options
Sets interlace options; also sets reverse field dominance
Video options ➪
Frame Blend
Smoothes the motion of clips whose speed or frame rate has been
changed
Video options ➪
Scale to Frame Size
Scales a clip or graphic to the project size
Audio Options ➪
Audio Gain
Allows a change of audio level
Audio Options ➪
Source Channel
Mappings
Allows mapping of a mono audio clip as stereo
Audio Options ➪
Render and Replace
Replaces a selected audio clip with a new clip and maintains effects
Audio Options ➪
Extract Audio
Creates a new audio clip from a selected clip
Speed/Duration
Allows changing speed and/or duration
The Sequence menu
The Sequence menu enables you to preview the clips in the Timeline window and to change the
number of video and audio tracks that appear in the Timeline window. Table 1.5 describes the
Sequence menu commands.
49
1
Part I
Getting Started with Premiere Pro
TABLE 1.5
Sequence Menu Commands
Command
Shortcut*
Description
Render Work Area
Enter
Creates a preview of the work area; stores the preview file
on disk
Delete Render Files
Removes render files from disk
Razor at Current-time
Indicator
Ctrl/Ô+K
Cuts a project at the current-time indicator in the Timeline
Lift
;
Removes frames from in to out points set in the Program
Monitor and leaves a gap in the Timeline
Extract
‘
Removes frames from a sequence from in to out points set in
the Program Monitor without leaving a gap in the Timeline
Apply Video Transition
Ctrl/Ô+D
Applies a default video transition between two clips at the
current-time indicator
Apply Audio Transition
Ctrl/Ô+Shift+D
Applies a default audio transition between two clips at the
current-time indicator
Zoom In
=
Zooms into the Timeline
Zoom Out
-
Zooms back from the Timeline
Snap
S
Turns on/off snap to edges for clips
Add Tracks
Adds tracks to the Timeline
Delete Tracks
Deletes tracks from the Timeline
The Marker menu
Premiere Pro’s Edit menu provides commands for creating and editing clip and sequence markers.
Markers are designated by pentagon-like shapes just below the Timeline ruler or within a clip in a
Timeline. You can use markers to quickly jump to a specific area of the Timeline or to a specific
frame in a clip. Table 1.6 summarizes the Marker menu.
TABLE 1.6
Marker Menu Commands
Command
Description
Set Clip Marker
Sets a clip marker for a clip in the Source Monitor at a point specified in
the submenu
Go to Clip Marker
Goes to a clip marker at a point specified in the submenu
Clear Clip Marker
Clears a selected clip marker
50
Premiere Pro Basics
Command
Description
Set Sequence Marker
Sets a sequence marker specified in the submenu
Go to Sequence Marker
Goes to a sequence marker specified in the submenu
Clear Sequence Marker
Clears a sequence marker specified in the submenu
Set Encore Chapter Marker
Creates an Encore chapter marker at the current-time indicator position
Go to Encore Chapter Marker
Sends the current-time indicator to an Encore chapter marker
Clear Encore Chapter Marker
Removes an Encore chapter marker
Edit Encore Chapter Marker
Allows editing of an Encore chapter marker
Edit Sequence Marker
Allows editing of Timeline markers
The Title menu
Most of Premiere Pro’s Title menu is activated after you create a new title in Premiere Pro’s Title
Designer. The commands in the Title menu alter text and graphics created in the Title Designer.
Table 1.7 summarizes the Title menu commands.
TABLE 1.7
Title Menu Commands
Command
Shortcut
Description
New Title ➪ Default Still
Creates a new title screen with options for creating still titles
New Title ➪ Default Roll
Creates a new title screen with options for creating rolling
titles
New Title ➪ Default Crawl
Creates a new title screen with options for creating crawling
titles
New Title ➪ Based on
Current Title
Creates a new title screen from current titles
New Title ➪ Based
on Template
Creates a new title screen from a template
Font
Provides a choice of fonts
Size
Provides a choice of sizes
Type Alignment
Allows left, center, or right alignment
Orientation
Controls horizontal and vertical orientation of objects
Word Wrap
Turns word wrap on and off
Tab Stops
Sets tabs in a text box
continued
51
1
Part I
Getting Started with Premiere Pro
TABLE 1.7
(continued)
Command
Shortcut
Description
Templates
Ctrl/Ô+J
Allows the use and creation of templates for titles
Roll/Crawl Options
Allows the creation and control of animated titles
Logo
Allows graphics to be imported into a title
Transform
Provides visual transformation commands: Position, Scale,
Rotation, and Opacity
Select
Provides commands for selecting stacked objects
Arrange
Sends stacked objects forward and backward
Position
Positions a selected item onscreen
Align Objects
Aligns deselected objects
Distribute Objects
Distributes or spreads out selected objects onscreen
View
Allows viewing of title and action-safe areas, text baselines,
tab markers, and video
The Window menu
The Window menu enables you to open Premiere Pro panels. Most of the commands work identically to each other. When you choose the name of the panel that you want to open in the menu,
that panel opens. (Open panels display with a check mark in front of them.)
Premiere Pro’s panels include the following: Effects, Effect Controls, Events, History, Info, Tools,
Title Tools, Title Styles, Title Actions, Title Properties, Audio Master Meters, Audio Mixer, DVD
Layout, Multi-Camera Monitor, Project, Program Monitor (choose sequence in submenu),
Reference Monitor Project, Source Monitor, Timelines (choose sequence in submenu), Title
Designer and VST Editor (for third-party audio effects).
You can open panels that are specific to different types of editing work by choosing Window ➪
Workspace ➪ Editing, Window ➪ Workspace ➪ Effects, Window ➪ Workspace ➪ Audio, or
Window ➪ Workspace ➪ Color Correction.
You can also save your viewing setup by choosing Window ➪ Workspace ➪ New Workspace
Workspace. Later, you can delete the workspace by choosing Window ➪ Workspace ➪ Delete. To
reset the current workspace to its original settings choose Window ➪ Workspace ➪ Reset Current
Workspace.
The Help menu
Premiere Pro’s Help menu provides formatted documents that are viewable in the Adobe Help
Center. Choose Help ➪ Adobe Premiere Pro Help to load the main Help screen. From this screen,
you can choose to view help about different Adobe applications and search for a topic to learn
52
Premiere Pro Basics
about it. Figure 1.12 shows the Help screen after choosing help for Premiere Pro. If you click
Index, the alphabet appears. Clicking a letter loads the index listings for terms that begin with that
letter. If you click the Search button, you can search for help by entering a word or words to search
for. For example, if you type the word edit and click Search, a long list of topics related to the word
edit appears. Clicking one of the edit topics brings you to the Help page for that item. To work efficiently when searching, put quotes around search phrases. For example, searching for “timecode
effect” produces one listing related to the Timecode effect. If you type timecode effect without
quotes, the search responds with a long list containing all content with the words timecode or effect.
FIGURE 1.12
Premiere Pro’s online help allows you to search for help topics.
Other Help menu commands access information from the Web. You can choose Help ➪ Online
Support to access Adobe’s Web site. To register your version of Premiere Pro online, you can
choose Help ➪ Registration.
Summary
Premiere Pro’s panels and menus provide you with an efficient interface and powerful tools to
create digital video productions. This chapter covered the following topics:
n The Project panel displays production elements.
n The Timeline panel provides a visual display of your project. You can edit audio and
video directly in the Timeline.
53
1
Part I
Getting Started with Premiere Pro
n You can use the Effect Controls panel to create video and audio effects and audio
transitions.
n The Monitor panels allow you to edit and preview your production.
n The Audio Mixer enables you to mix audio and create audio effects.
54