1
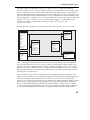
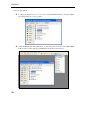
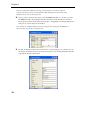
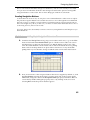
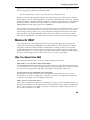
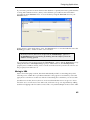
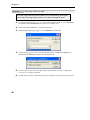
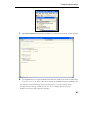
Designing Applications
Access 2002 is mostly a very intuitive and easy to use application. From the early days of
Access, usability has always been one of the primary development focuses behind Access. In
fact it was this ease of use that was a major factor in the incredible speed with which Access
came to be accepted as the definitive desktop database development tool.
But Access has always appealed to a wider audience than simply end users and inexperienced
developers. Behind its ease of use, Access has always provided a very powerful database and
application development tool – more recent releases of Access have extended this power even
further with the introduction of features such as Access Database Projects (ADPs), Data Access
Pages (DAPs) and the adoption of VBA (Visual Basic for Applications) version 6 as its
programming language.
In this chapter, we introduce the application we will be developing throughout the course of
this book. After that, we'll contrast the differences between macros and VBA, and highlight one
of the limitations you will encounter when using macros.
But before any of this, let's begin by defining what an Access Application is, and take you
through the design processes you ought to consider before you even begin coding.
Chapter 1
What Is an Access Application?
An Access application is just the same as any other kind of application, but one built using
Access tools. It is a collection of interrelated objects working together to achieve a specific
objective, usually business-orientated.
That didn't tell us that much, did it? Maybe we should have asked a different question:
What makes an Access application different from any other kind of application?
The main difference is that Access is designed from the ground up to handle data, quickly,
efficiently, and lots of it. Access applications therefore tend to be data intensive. Using Access
to create such applications can be easier and faster and can produce better results than using
anything else. Obviously today's applications also need to be able to present a modern and
efficient graphical user interface and to allow for all sorts of additional functionality, like
connections to other applications or to the Internet – Access provides for this as well, but this is
not its primary goal. It is, for example, entirely possible to create an Access application that
simulates shooting missiles at alien spacecraft as they move across a Martian landscape but this
would certainly not be the best way to do it!
When you create a new database file (.mdb file) in Microsoft Access 2002, the first thing that
you see is the database window. This is a container that will eventually hold a wide variety of
different objects. Tables will be used to store data; queries will be designed to retrieve data in
meaningful ways; forms, reports, and data access pages will all be used to display the results of
those queries in ways that users can understand; and macros and VBA modules will provide
the program logic which 'glues' the whole application together.
If you use Access 2002 to create a project (.adp file) instead, then the database window will
also show additional server-side objects (such as database diagrams and stored procedures),
which may also be included to make up the application.
All of these objects can play an important role in providing the functionality of the end product
– whether it is hosted solely in an Access database or uses a client-server database project.
The aim of this book is to illustrate the important role played by VBA in orchestrating these
objects, in binding them together through the use of logic to control workflow and to
implement specific business rules, and in turning a collection of individual objects into a
coherent and effective application. Yes, we want to teach you how to use VBA, but to do that
without first telling you how to design an application would be irresponsible.
12
Designing Applications
The Development Process
There are many skills involved in the development and delivery of successful Microsoft Access
2002 applications. The database designers need to be able to understand the principles of
relational database design, so that they can design the tables that will hold the data and the
relationships between those tables. The application developers need to have a feel for the
graphical user interface (GUI) design, so that the forms they design for users to interact with
will be intuitive and easy to use. They will also need to understand both SQL (Structured Query
Language) and VBA so that they can write queries and procedures that not only return the
correct data or perform the required task, but also do so quickly and efficiently.
There are other less technical (but no less complex) skills to master. Analysts need to be able to
understand the business requirements of the users for whom the application is being designed,
and to translate these requirements into a design specification from which the developers can
work. Technical documenters need to be able to articulate how the application works, to
anticipate confusions that users might experience and to clearly express their thoughts in
documentation that is both accessible and informative. Test engineers need to be rigorous in
their approach, perhaps using formal methodologies to check for errors, and must not take
anything for granted when evaluating the application. Last, but certainly not least, project
managers need to know how to monitor progress and track resource usage to ensure that the
application is delivered on time and within budget.
Sometimes, if the application being developed is large-scale or complex, then there will be
many different people involved in the application development lifecycle. Some will be
responsible purely for analysis or design, others will work solely on designing queries or
developing forms, and yet others will be responsible for other tasks, such as migrating legacy
data into the Access database or producing user documentation. But at other times, particularly
if the application is less complex, or if resources (such as money or people) are scarcer, then it is
not uncommon for many of these tasks to be undertaken by individuals. Indeed, in many
situations, a single person can be responsible for the entire analysis and development process.
Irrespective of the number of people involved, or the development methodology employed, the
development lifecycle for an Access application will typically involve the following steps:
Analysis
Design Coding Testing Documentation Acceptance Review
In practice, however, these steps do not rigidly follow one after another. There can be
significant overlaps and the project can iterate through some of these steps before progressing
on to others. It is beyond the scope of this book to enter into a detailed discussion of different
project lifecycle plans. However, it is undoubtedly true that the speed with which Access forms
and reports can be produced makes Access an excellent tool for using in a more iterative
lifecycle model. In such a situation, the lifecycle would look more like this:
13
Chapter 1
Preliminary
Analysis
High-Level
Design
Detailed
Design
Detailed
Design
Detailed
Design
Coding
Coding
Coding
Testing
Testing
Testing
Documentation
Documentation
Documentation
Review
Acceptance
Acceptance
Acceptance
Review
Review
Review
The Analysis Phase
Irrespective of the type of project lifecycle mode, the first stage, and one of the most important
to get right, is inevitably one of analysis. Without adequate analysis you will not be able to
determine what the user wants from the application, the technical infrastructure within which
the application will be implemented, and the constraints imposed by the data with which you
will be working. Repairing the damage done by inadequate analysis, at a later date, can prove
very costly or even kill a project completely.
Requirements Analysis
The starting point for creating any successful Access application is to have a clear
understanding of what the users of an application want out of it. You need to know this before
you can even start to think about how to design any solution. The sorts of questions you will
need to ask in this stage include, among others:
14
❑
What is the business process we are trying to automate?
❑
What benefit is the new application designed to achieve? How will we measure
the benefit?
❑
Do we simply want to automate the existing process, or restructure the process and
automate it?
❑
Will the application have to interoperate with other existing or planned systems
or processes?
❑
What volume of data will the application be expected to handle?
Designing Applications
❑
How many users will be using the system at the same time (concurrently)? How many
in total?
❑
What is the anticipated mix of insert and update activity compared to query and
reporting activity?
The problem is that the only people who can answer these questions are the customers who will
use the finished application, and sometimes it can prove difficult to get answers out of them. It
might be that the demands of their current business are so pressing that they have little time to
answer questions about some future application. It might be that the sensitivities of internal
office politics will make them unwilling to be too helpful in designing an application in which
they feel they have too little ownership. Or it may be that they are trying to be helpful, but just
don't know the answers to these questions, because it is something they have never thought
about. Don't feel bashful about asking questions, however stupid some of them might sound.
What might seem illogical and "obviously wrong" to an outsider might turn out to be a vital,
but unspoken, business practice that simply must be implemented in order for the application
to be acceptable. Once you think you understand a process it is often useful to run it past the
client again for confirmation. Use these discussions to prompt further questioning to fill in any
gaps. In any case, it is vital to try to approach this phase of the project with as few
preconceptions as possible.
Requirements analysis is a skilled art and many organizations fail to appreciate the fact that
good developers do not necessarily make good analysts. In fact, in many ways, developers
make the worst analysts. By their very nature, good developers are constantly looking for
detailed solutions to problems. Someone mentions a business requirement and you can almost
hear the cogs whirring in their brains as their eyes glaze over and they start working out how
they will produce a solution to that requirement; without stopping to ask what the value of
satisfying that requirement is, or even if the requirement truly exists. That is not what you want
from an analyst. You want an analyst to be able to take an objective look at the requirement
expressed by the user, to check that they understand it correctly, to ask what the relevance of
this requirement is to the business, to determine the metrics (ways of measuring) by which the
successful implementation of the requirement can be judged and to express that requirement in
a way that other parties involved in the project will understand.
A variety of tools and methods are available to assist the requirements analysis process. For
example, JAD (Joint Application Development) is a technique that assists requirements
definition by bringing all of the various parties who are interested in the development together
in intense off-site meetings to focus on the business problem to be solved rather than worrying
about specific technical issues.
Whether you use such techniques is up to you. What is important is that you value the
requirements analysis process. This phase of a project is so important because it is the
fundamental mechanism for defining both the scope of the project and the critical success
factors that show when the project has achieved its requirements. It forms the basis for the
contract between the users and the developers, and is the touchstone to be used when resolving
conflict or confusion later on in the project lifecycle.
15
Chapter 1
Ironically, the importance of sound requirements analysis is most clearly seen in its absence.
When requirements are not properly defined or documented, one of two consequences almost
inevitably follows. Either the requirements remain unmodified, with the result that the
application fails to achieve its client's objectives; or the requirements are modified later in the
development cycle. Late changes such as these can have a huge impact on project costs as their
effects 'ripple' out and affect other areas such as documentation, design, coding, testing,
personnel assignments, subcontractor requirements, and so on. Indeed, some studies indicate
that such changes can be 50 to 200 times more expensive than they would have been if they had
been made at the appropriate time!
Prototyping
Prototypes, pre-development versions, proof of concepts, nailed-up versions – it doesn't matter
what name you give them; they are all attempts to further refine the analysis phase of the
project. Access used to be seen as being "only" a prototyping tool with the "real" development
given over to something more "industrial strength". This is no longer the case, however (if
indeed it ever really was). Access is perfectly up to the job of all but the most demanding
projects. It still makes a marvellous tool for prototyping though.
A prototype is a scaled-down version of the final application, which can be achieved at low cost
and within a short timescale. It may have certain functionality incomplete or missing entirely. It
may even only implement a tiny part of the whole project. The whole point of the prototype is
to test those areas of the design that are currently uncertain. This may include a number of
different methods to achieve the desired functionality, or perhaps alternative GUI designs to
see which is easiest to use, or maybe sample queries with test data to determine what kind of
hardware platforms will be required to attain the desired performance.
One thing you should never see is a prototype as v1.0 of the application. This is invariably a
recipe for disaster. The temptation is to take the prototype and keep developing it without first
going through all the other formal processes described below. You should always see the
prototype as part of the analysis phase of the project and not the end of it; it exists to ask
questions and to get them answered. If certain parts of the prototype later make their way into
the final application (the GUI design would be a good example) then all well and good, but
ideally you should plan and cost the work separately.
Technical Analysis
As well as determining the nature of the solution required by the users of the application, it is
also necessary to determine the technical infrastructure that will support this solution. The
types of questions posed are ones such as these:
16
❑
What operating system will the application run on?
❑
Will we need different versions of the application for different clients (for example,
one for customers and one for managers)?
❑
What is the specification (that is, in terms of processor, memory, disk space) of the
machines that the application will run on?
Designing Applications
❑
What type of network will connect the computers? Will lack of available bandwidth
prove a problem?
❑
What security policy will the application need to operate?
❑
What type of fault tolerance or recovery issues will need to be considered?
The purpose of the technical analysis should be to produce an application architecture and
implementation framework within which the resultant application will nestle. Again, it may
well turn out that developers are not the best people to undertake this type of analysis.
Technical analysis requires a good understanding of networking, security, and technical issues
and these skills may not be present in all of your developers.
Data Analysis
By this stage, you should have a contract in place that defines what the application is meant to
provide and you will probably have a good idea of the technical infrastructure within which
the design will be implemented. The next stage is to analyze the data that you will be working
with. Now, I must confess that I frequently find this task less than stimulating, but I know that
it is imperative if I am to achieve a sound database design. As tedious as data analysis is, it sure
beats the pants off rewriting an application because a fundamental misunderstanding of the
underlying data only comes to light two weeks before the project is due to be delivered.
Now this is not a primer on data analysis. Although simple enough in theory, data analysis can
be quite complex in practice and if you are new to the subject, you would do well to get some
specialized training in this discipline.
One term you are likely to come across again and again is normalization. This is a formal
technique for the elimination of dependencies in our data. This, in turn, realizes the twin
benefits of reducing redundancy and minimizing opportunities for inconsistency being
introduced into our data. Some of the principles of normalization are intuitive and you
probably already follow them (like trying not to store a company's address twice in two
different tables), but it can take a high degree of skill and substantial experience to know when
and how to apply some of the more detailed rules, and gains can be elusive. Because of this we
will not attempt to cover the subject here. In any case, for smaller projects, formal
normalization is rarely useful.
If you are likely to be doing a lot of data analysis or are simply interested in the subject
then one of the most authoritative discussions of the theory of normalization can be found
in 'An Introduction to Database Systems' by CJ Date (Addison-Wesley, 1995, ISBN 0201-54329-X). A less theoretical (and thus much more accessible) approach can be found
in Database Design for Mere Mortals: A Hands-On Guide to Database Design by Michael
J. Hernandez (Addison-Wesley, 1997, ISBN 0-201-69471-9) and Professional SQL Server
2000 Database Design by Louis Davidson (Wrox Press, 2001, 1-861004-76-1).
17
Chapter 1
The principles behind sound data analysis are straightforward enough:
❑
Identify all of the data entities you will be dealing with
❑
Establish the attributes of these entities
❑
Define the relationships between these entities
❑
Document, document, document…
As with the requirements analysis and the technical analysis, a variety of methods and tools can
be employed to assist in the task of data analysis. Whichever you choose to employ, I would
encourage you to bear the following two principles in mind.
First, when selecting a tool, it is paramount that you choose one that allows you to clearly
document the results of the analysis in formats that everyone involved can understand.
Remember that you may have to present your designs to a wide range of people from clients
through developers and possibly up to management – they will all have different technical
abilities and focus, so bear in mind that you will need to be able to easily vary the level of detail
included. Your primary audience, however, is technical, so use diagrams to illustrate the
relationships between your entities, by all means, but don't forget the fine detail (however
boring it might be to gather!). Complex entity relationship diagrams may look very impressive
and professional, but if you can't use your documentation to tell you whether Widget Part
Codes are 8 or 9 characters long, then you are going to struggle.
Second, it is very seldom that I have come across data analysis that has suffered from being too
detailed. Document everything – data types, field lengths, allowable values, calculated values –
get it all down on paper and do so while it is fresh in your mind. If there is something you are
not sure about, don't guess. Go back, check it out, and write it down. The temptation is always
there to wrap up the data analysis early and get on with the fun part of the project (design and
development). Resist the temptation. You'll thank yourself for it later on.
Design and Coding
So then, now that the analysis is out of the way, it's time to get on with coding. Right? Wrong!
As tempting as it might be to just plunge in and start coding straight away, you first need to
spend some time deciding on an appropriate design for the application. One of the chief aims of
the design process is to establish the blueprints from which the application can be built. A few
of the issues that you will need to consider when designing the solution are:
18
❑
Data Storage / Location
❑
Import / Export Mechanisms
❑
Error Handling
❑
Portability Issues
Designing Applications
❑
Performance Considerations
❑
Calculation Methods
But design is not just about establishing an immutable set of blueprints. Successful applications
are normally those where the application designers have designed for change.
Designing for Change
The concept of "Designing for Change" was first discussed by David Parnas in the early 1970s.
It is a principle that recognizes the fact that, however good the analysis has been, there will
frequently occur during the lifetime of a project a number of influences that will necessitate
change to occur after the initial design has been completed. It might be a change in the legal or
business environment in which the customers operate, a change in available technology, or
simply a change in understanding on the part of either the customer or the developer. The
purpose of designing for change is to ensure that these changes can be accommodated into the
project with the minimum possible disruption or delay.
Three of the most important techniques involved in designing for change are described below:
Identify Volatile Areas
Some issues are more liable to change than others during a development project. These include
business rules, file formats, sequences in which items will be processed, and any number of other
difficult design areas. The first step is to identify all such volatile areas and document them.
Use Information Hiding
Once these issues have been listed, you can employ information hiding. The principle here is to
wrap up, or encapsulate, these volatile issues in a module or procedure that hides, or partitions
off, the complexity or volatility of the processes involved. These modules or procedures should
have an interface that can remain the same, irrespective of any changes that may occur within
the module or procedure as a result of any of the influences we identified earlier. If a change
occurs, it should only affect that module or procedure. Other modules that interact with it
should not need to be aware of the fact that anything has changed. This is often called "black
box" coding, in that "stuff goes in" and "stuff comes out" but what happens in the box is hidden.
For example, you might be designing an application that is used for sending out pre-renewal
reminder notices to customers prior to the expiry of their insurance policies. Perhaps a business
rule states that pre-renewal notices are to be sent out 2 months before expiry. This is just the
type of rule that could easily change and a good design will account for this. Accordingly, a
procedure could be written which encapsulated that rule and which was invoked whenever
various parts of the application needed to know when the reminder should be sent. Changes to
the business rule would only need to be incorporated in a single procedure; the procedure
would still be invoked in the same way and yet the effects of the change would be available
throughout the application. We will look at this subject in more detail when we examine the use
of classes in Access in Chapter 13.
19
Chapter 1
Employ a Change Plan
As well as information hiding, there are other techniques that can assist in reducing the impact
of change, and these should be prescribed in a change plan. For example, the change plan might
specify that:
❑
Named constants should be used wherever possible in place of hard-coded values.
❑
If the application is to be multi-lingual, then care must be taken to identify and
separate out all the text to be used so that it can be easily localized (translated). This
may mean allowing additional screen space to accommodate certain languages or
considering the use of pictorial icons in place of text.
❑
Settings and configuration options should be stored in the Registry rather than hardcoded within the application itself.
❑
Generic and widely used processes should be identified and grouped together in
modules, separate from code with specialized functionality only called by specific
parts of an application.
One of the best ways to determine which elements to incorporate into a change plan is to
perform post-implementation reviews just after a project has been delivered (or post-mortems if
they don't get that far!). Identify what changed during the project lifecycle, what impact that
change had, and how the impact of that change could have been lessened. Then put that
knowledge into your next change plan and make sure you don't make the same mistake twice!
Coding
Once your design is complete, you can start to code. That's the part of the process that we will
be examining in most detail throughout the rest of this book. We will start by looking at the
specifics of the VBA language and the structure of VBA procedures and modules. Then we will
look at the Access object model and how this can be manipulated in code. After a short look at
some more advanced programming techniques, we will look at how to handle errors that might
occur in our application, how to make the best use of class modules, libraries and add-ins, and
how to optimize the performance of our application. We will also look at some of the issues we
need to be aware of if our application is being used in a multi-user environment and how we
can bring some of the power of the Internet to our Access application. Finally, we will look at
the finishing touches we can apply to round out our application and give it a more professional
look and feel.
Testing
There are a number of quality assurance practices that you can apply to your project, but by far
the most basic is testing. This involves unit testing (or component testing) where the developer
verifies that the code he or she has written works correctly; system testing where someone
checks that the entire application works together as expected; and acceptance testing, where the
users of the application check that the results the application produces are those they desire (or,
at least, that they are those they asked for in the first place!).
20
Designing Applications
The purpose of testing is to break code, to determine ways of making an application misbehave,
to expose flaws in either the design or execution of the development process. For this reason,
many developers dislike the testing phase (in the same way that many authors dislike the
editing phase). If you have spent endless weeks working late to get a tough reporting module
finished, if you have missed the ball game for the last four weeks in a row trying to get that
import routine to work, if you couldn't make the Christmas party because you were wrestling
with a suite of reports that you had to finish, then it is unlikely that you will approach the
testing phase with anything other than fear and loathing.
The problem is that testing has a propensity for delivering bad news at the wrong time. The
solution is to allow plenty of time for testing, to test early in the development cycle, and to
build plenty of time for reworking code after the testing has completed. Being told that a
routine you have written does not produce the right results is seldom welcome news to any
developer, but it is a lot easier to bear if the developer is told this early on and knows that there
is plenty of time to correct the offending code. Test early and allow for rewrites!
It also bears mentioning that a proper test plan is essential for both system and user acceptance
testing, and the basis for this test plan should be the documentation that was produced during
the requirements analysis stage. In particular, the test plan should define not just what is to be
tested, but also what results the application should generate in response to that testing.
One particularly effective technique that is growing more and more popular is the use of
"Use Cases". These provide a method for describing the behavior of the application from a
user's standpoint by identifying actions and reactions. For more information on how to
produce Use Cases, you might want to have a look at Jake Sturm's VB6 UML Design and
Development, ISBN 1-861002-51-3, from Wrox Press.
Documentation
Documentation is a bit like ironing. It's one of those things you have to do, but I have yet to
meet anyone who enjoys doing it. It's one of those things that we all know we should do, but
we all find boring. It's not surprising. I enjoy playing soccer, but I would soon get bored if I had
to write a detailed game report every time I played, explaining what tactics we employed, why
we employed them, when we scored, and so on. It's the same with documenting development
projects. For most developers, the fun is in creating the solution and putting it into action.
Writing it up is major-league boredom.
However, few people who play soccer are called upon to remember what color boots they were
wearing at a match 2 years ago, what the coach said before the game started, and how many
oranges were on the refreshments table at half-time. Programmers are frequently called upon to
fix or update code many months after it was first written. Often they will be in the middle of an
entirely different project, maybe even 2 or 3 projects down the line. It might not even be their
code! It's at times like these that those little notes you made to yourself when you wrote the
original code are worth their weight in gold. A few well chosen words can save days or weeks
of making exactly the same mistakes you did the first time around.
21
Chapter 1
Yes, I know it is important. I know that I am as likely to benefit from it as anyone else when I
revisit my code later. I know that the users have paid for it! I know it makes the difference
between a good application and a great application. That's why I do it and why I make sure
that everyone working with me does it and does it well. But I am not going to pretend for a
moment that I enjoy it!
In practice, the best approach to this time-consuming chore is a mixture of notes and in-line
comments made as you write the code, followed by reports and descriptions when you're done.
Then all you have to do is check everything through carefully and keep everything up to date
every time anything gets changed at the last minute!
Acceptance
Ah, the bliss! It's all over and the users love the application you have written for them. Great! If
you have any sense, you will seize the moment and make sure that three things happen.
First, get the users to sign off the project. If you have drawn up a comprehensive requirements
definition and have met all of the success factors identified by the users at the start of the
project, this should be a formality. But it is no less an important step for all that.
Second, get the users to tell their colleagues about the new application they are using. Many
users have very short memories, and it won't be long before the users forget just how bad the
manual processes were that they had to rely on before you wrote this application for them and
just what a difference this application makes. Get them to sing your praises while they are still
hooked. That's when you will get the best recommendations, whether you are collecting them
for your company's marketing brochure or for your own personnel review (and, hopefully, pay
rise) in three months' time.
Finally, get the users to start thinking about the next release. Some features might have been
axed because there wasn't time to implement them; others might have been identified too late
to make it into this release; and others might have always been destined for future releases.
Once you are convinced that the users love the product you have given them, remind them
about what it doesn't do… yet!
Review
The final stage is the post-implementation review. This is the point where you look back at the
project and decide what worked and what didn't, what caused problems, and how those
problems could have been avoided or their impact minimized. Did you hit all of your
deadlines? Did all of the intended functionality make it into the final product? How are
relations with the customer at the end of it all? What state are your developers in at the end of
it all? Given the opportunity, would you do it all again?
22
Designing Applications
The purpose of the post-implementation review is not just to give everyone a chance to whine
and moan about what went wrong. Instead, the purpose is to identify the changes that need to
be made to your project methodology and practices to make sure that the same problems don't
happen again next time. At the same time, it is an opportunity to identify the successes and to
make sure that the benefits of these can be reaped by future projects.
A final benefit of conducting post-implementation reviews is that it gives an appropriate
opportunity for recognizing the efforts and contributions of everyone who worked on the
project. Sincere praise in response to specific achievements is essential to the self-respect of
individual developers and the continued morale of the team as a whole.
Further Reading
OK, that's enough for now on the theory behind designing and delivering software projects. If
you want to learn some more about this subject there is ample reading material available, but
perhaps one of the most interesting books on this subject is "Clouds to Code" (Wrox Press, 1998,
ISBN 1-861000-95-2) in which Jesse Liberty documents the design and delivery of a real project
with no holds barred. But this is where we leave behind the theory. From now on, this book
will be a hands-on guide with real code examples for you to try out yourself and as we go
through the book, we will rapidly find that we are building up a fully functional Access application.
The Ice Cream Shop Application
Once we have completed the design phase of our project, we should be in a position to answer
the two following questions:
❑
What data items (or entities) and application objects will we need?
❑
How should these entities and objects fit together?
This book is not about how to design the data items and other application objects that make up
the application. We are assuming that you know enough about tables, forms, reports, and
queries from your previous exploration of Access. This book is about how you use VBA (Visual
Basic for Applications) to control the way that these objects interoperate as part of a larger
system. In one sense, VBA can be thought of as the 'glue' that holds the whole application together.
The best way to understand how VBA fits in is, of course, not through theory but through
practice. In the rest of this chapter, we will run through the process of starting to create an
application – the Ice Cream Shop database that accompanies this book. At a certain point we
will hit a brick wall, when we try to automate our application and get it to display some
intelligence. We'll then look at the two options available to us for solving the problem: VBA or
macros. We will see why VBA is often the best and sometimes the only satisfactory choice.
You may find that this section covers a lot of familiar territory. However, if you do take the time
to read it, it will acquaint you with the structure of the Ice Cream Shop database so that, when the
crunch comes, and we have to use VBA, we will have a familiar database structure to work with.
23
Chapter 1
Designing the Ice Cream Shop Database
As its name suggests, the Ice Cream Shop database is an application that has been designed to
track stock and sales for an ice cream wholesaler called Dave and Rob's Ice Cream Shop. The
requirements analysis we conducted indicated to us that the primary purpose of the database is
to store information about the following things:
❑
Stock carried by the Ice Cream Shop
❑
Orders placed by companies
❑
Customer and supplier details
Our analysis has also indicated that ease of data entry and maintenance is a key requirement
for the application, and that the forms used by the staff at the shop must be intuitive and
simple to use. The fact that there will a fair amount of data to handle is enough for us to decide
to use Access to build the application with (which is just as well or we wouldn't have an
example to write about).
We have also conducted the appropriate technical analysis, which indicates that Access 2002 is
an appropriate application development tool for the delivery of this database solution
(otherwise this would be a very short book!).
Our data analysis has indicated that there are five primary objects or entities. We decided on
these particular entities by dividing up the data requirements into self-contained "lumps". For a
complex application there may be several different possible entity models (or ways of arranging
your data) and at the end of the day the choice of which model to use will come down to your
judgement, your experience and the type of requirements to be met. In this case the basic model
is fairly obvious:
❑
Suppliers
❑
Customer Companies
❑
Ice Creams
❑
Ingredients
❑
Sales
The four key processes that indicate the relationships between the entities are as follows:
24
❑
Ice Creams are sold to Customer Companies
❑
Each Ice Cream is composed of one or more Ingredients
❑
Each Ingredient can be used in one or more Ice Creams
❑
Ingredients are purchased from Suppliers
Designing Applications
A more detailed analysis has revealed the attributes of the five entities that we need to record
and our preliminary entity relationship diagram (ERD, or more simply, database design) looks
like this:
tblCustomer
CustomerID
CompanyName
Address
City
State
ZipCode
Country
Phone
Fax
Email
Web
ContactName
tblSales
SalesID
fkCustomerID
fkIceCreamID
Quantity
DateOrdered
DateDispatched
DatePaid
AmountPaid
ContactName
tblIceCream
IceCreamID
IceCream
Description
Price
Picture
tblSupplier
1
SupplierID
CompanyName
Address
City
State
ZipCode
Country
Phone
Fax
Email
Web
ContactName
tblSupplierList
1
fkSupplierID
fkIngredientID
PricePerUnit
LeadTime
tblIngredient
IngredientID
Name
Description
Unit
UnitsInStock
ReOrderPoint
1
tblIceCreamIngredient
fkIngredientID
fkIceCreamID
Quantity
1
As you can see from the database diagram above, five tables have been created to represent the
five basic entities identified in the data analysis:
tblSupplier
represents
the Suppliers entity
tblCustomer
represents
the Customers entity
tblIceCream
represents
the Ice Creams entity
tblIngredient
represents
the Ingredients entity
tblSales
represents
the Sales entity
25
Chapter 1
One-to-many relationships between the entities have been denoted by creating straightforward
one-to-many relationships between the tables:
tblCustomer
(1)
(n)
tblSales
A sale can only involve one customer, but a customer can have more than one sale
tblIceCream
(1)
(n)
tblSales
Only one type of ice cream can be sold in a particular sale, but an ice cream can be sold more than once
Many-to-many relationships have been handled by creating two intermediate tables
(tblIceCreamIngredient and tblSupplierList) and placing one-to-many relationships on
either side of the intermediate table:
tblIce
Cream
(1)
(n)
tblIceCream
Ingredient
(n)
(1)
tblIngredient
An ice cream is composed of many ingredients and the same Ingredient can be used in many ice creams
tbl
(1)
(n) tblSupplier
(n)
(1) tblIngredient
Supplier
List
A supplier can provide many ingredients and the same ingredient could be provided by many suppliers
This use of intermediate tables is the standard way in which we join two tables together when
the two tables have a many-to-many relationship. It is part of a process called normalization,
which is a series of steps you go through to make sure your database is designed correctly. This
process is really beyond the scope of this book, but there are plenty of books specializing in it.
One such book is (as we've mentioned earlier) 'Database Design for Mere Mortals', Michael J.
Hernandez, Addison-Wesley, ISBN 0-201-69471-9.
Typical Dilemmas Regarding Data Storage
A few features of this database structure are worthy of note. Firstly, note the duplication of the
ContactName attribute in the tblSupplier, tblCustomer, and tblSales tables. This is
deliberate and caters for the fact that although there is one primary contact for each supplier
and for each customer, the Ice Cream Shop also wants to be able to assign separate contacts to
individual sales.
26
Designing Applications
Secondly, note the fact that the tblSupplier and tblCustomer tables have identical
structures. Whenever we see this in a database structure it should alert us to the fact that what
we have represented as two discrete entities might instead be represented as a single entity. So
what is it that differentiates a supplier from a customer? Obviously, we buy from suppliers and
customers buy from us. But is that sufficient reason for treating them as separate entities? After
all, what happens if a supplier is also a customer? If this was to occur, and we were maintaining
separate tblSupplier and tblCustomer tables, then changes to, say, the address of the
company involved would necessitate a change to both the tblSupplier and
tblCustomer tables.
A better alternative might be to combine the two tables into a generic tblCompany table:
tblCustomer
CustomerID
CompanyName
Address
City
State
ZipCode
Country
Phone
Fax
Email
Web
ContactName
Supplier
tblSupplierList
1
tblSales
SalesID
fkCustomerID
fkIceCreamID
Quantity
DateOrdered
DateDispatched
DatePaid
AmountPaid
ContactName
tblIceCream
IceCreamID
IceCream
Description
Price
Picture
fkSupplierID
fkIngredientID
PricePerUnit
LeadTime
1
tblIngredient
IngredientID
Name
Description
Unit
UnitsInStock
ReOrderPoint
1
tblIceCreamIngredient
fkIngredientID
fkIceCreamID
Quantity
This is actually the database design that has been employed in the Ice Cream Shop database
that accompanies this book. The tblCompany table now holds details of both suppliers and
customers. In order to distinguish between those companies that appear in the tblCompany
table (because they are either customers or suppliers) we have added a new Supplier field to
the table. This field has a Yes/No data type and we will use to indicate whether the company
should appear in supplier lists.
This is not the only way that we could have chosen to implement the physical design of the
database. There is often no one correct database design. A fully normalized design might please
the relational database theorists, but they are not the ones who will have to maintain the
database or account for its performance in a production environment. Database design, as with
most aspects of system design and development, is all about achieving the best compromise.
There is nothing inherently wrong with denormalizing a database and it can be an excellent
tool for increasing query performance. However, before you decide to denormalize a database,
you should ensure that it doesn't introduce any significant data anomalies and that either:
27
Chapter 1
❑
It will allow you to achieve a measurable improvement in performance, with a
minimal increase in administrative overhead, or
❑
It will allow you to achieve a measurable reduction in administrative overhead, with a
minimal degradation of performance
Another aspect of the tblCompany table that required careful consideration was the question
of how to hold address information. Look at the structure of the table. The address information
has been broken down into five fields (Address, City, State, ZipCode, and Country). Why
do you think this has been done, instead of holding the address in a single field? The answer is
that by breaking it into five fields, we make it easier for our users to analyze their orders by
city, state, zip code and country individually. This would be difficult, if not impossible, if the
address were stored in a single field.
Note, however, that only one field is used for the first part of the address (the lines that
precede the city, state, zip code and country).
Address:
City:
State:
Postcode/Zip Code:
Country:
37 Walnut Grove
Nutbush
Tennessee
38053
USA
Even though this first part of the address might contain more than one line (especially if the
address contains a building name) we can store it in a single field, because Access allows us to
store and display multi-line values in one field. We store these in one field because they
logically belong together and you shouldn't need to split them up at all. Sometimes you will see
databases with tables that store this part of the address in multiple fields, because the database
cannot easily handle carriage returns as part of the data in a field. That's not a problem with
Access though.
The other advantage with storing the first part of the address in a single field is that it makes it
a lot easier to amend the address. Just imagine if you had stored the above address with a
separate field for every line of the address and then had to change it to:
Address:
City:
State:
Postcode/Zip Code:
Country:
28
Unit 17
37 Walnut Grove
Nutbush
Tennessee
38053
USA
Designing Applications
Choosing a Storage Engine
Another choice which developers of Access 2002 applications will now need to make is which
database engine they will use to store the application's data in. Traditionally, Microsoft Access
has always used JET as its native database engine. Additionally, however, Access developers
are offered the choice of using a second desktop database engine, the Microsoft SQL Server
2000 Desktop Engine (henceforth MSDE).
To keep this chapter concise and to the point, we have placed the discussion of which storage
engine to use in Chapter 20. It is also worth reiterating at this point that the purpose of this
book is to teach how to use VBA in Access and for that reason all of the data access examples
will be against JET databases.
Entering and Viewing Data
So far, we've considered the need for careful analysis and table design. But that's only the start.
Now we have to consider how the users of our system are going to enter information into the
tables. Of course, they could type information straight into the tables in datasheet mode, but
that would be inelegant and inefficient, and would make it difficult to check data entry
properly. There may also be security issues involved as it is unlikely that we will want all the
users to be able to access sensitive data and this is impossible to achieve if the users have access
to the "raw" data tables. We therefore need to put an acceptable face on our application and
shield the users from the complexity of the table structure.
Designing a Form
The simplest way to create a quick-and-easy form is to use one of the Form Wizards. Using a
wizard to produce a form will give you all the fields you require from one or more tables. This
is great, but sometimes you'll need to add extra functionality to the form, in which case you'll
have to make any additional modifications yourself. We're going to use a Form Wizard to
create one of the key forms in the application – the form for maintaining company information.
Try It Out
Creating a Form Using the AutoForm Wizard
As we explained in the Introduction, your starting point for the Try It Out
sections in this book is the IceCream.mdb database, found on the CD-ROM.
We have also included on the CD partially completed databases that reflect
each chapter's development, in case you lose your own copy, or want to jump
in at a later chapter. The databases are numbered such that they correspond
to the state at the end of a chapter – in other words, IceCream03 is the
database you'd get when you'd worked through to the end of Chapter 3. We
think it's better if you work through all of the Try It Outs, though, so you
can really get a feel for how everything works and fits together.
29
Chapter 1
OK. Let's get started!
30
1.
Load up the database file IceCream.mdb. In the Database window, select the Tables
tab and then the tblCompany table:
2.
Select AutoForm from the Insert menu, or click the down arrow next to the New Object
button on the toolbar and select AutoForm from the drop-down menu:
Designing Applications
3.
Access will now generate a form with all the fields from the tblCompany table and
display the first record:
This is OK, but it's not perfect. There are several things that we can improve:
❑
The form caption is tblCompany, which isn't very instructive to the user.
❑
We will probably want to hide the CompanyID field, as it's of little relevance to the user.
❑
Some of the fields are the wrong shape. For example, we will want to make the
Address textbox taller, to accommodate larger addresses.
❑
The navigation buttons at the bottom of the form are a bit small and fiddly – this is a
key form and must be as easy to use as possible.
So let's change the form so that it looks a little more professional.
Try It Out
1.
Changing a Form's Appearance in Design View
Save the form you've just created by choosing Save from the File menu or by hitting
Ctrl + S. A dialog box will appear allowing you to type in a name for the form. Call it
frmCompany:
31
Chapter 1
32
2.
Now switch to Design view for the newly saved form by selecting Design View from
the View menu or by clicking the Design View button:
3.
We can now attempt to make the changes that we highlighted earlier. To change the
form's caption, you bring up the form's property sheet by double-clicking the Form
Selector (the small gray box in the upper left corner of the form where the rulers meet),
or by clicking the Properties button on the toolbar:
4.
When the Properties window appears, make sure that the Format tab is selected, and
then change the text of the Caption property to Company Details:
Designing Applications
5.
Next we must delete the CompanyID textbox and its label. To do this, we must select
the textbox on the form by clicking it once, and then hitting the Delete key. The
CompanyID textbox and its label will be deleted:
6.
Next we'll change the size of the Address textbox. To do this, first select all of the
controls on the form below the Address textbox. You can do this by dragging a
rectangle around them with the primary mouse button held down or by clicking them
in turn with the Shift key held down. Once the controls have been selected, place the
mouse over one of the selected controls. The mouse pointer will turn into a small
hand, indicating that the controls can be moved:
7.
Hold down the primary mouse button and drag the controls down the form to leave
some space for the Address text box, which we are going to resize.
You may have noticed that the wizard initially generated the form with just enough room
for the controls. Don't worry about it, the form will automatically extend when you move
the controls down.
33
Chapter 1
There is an alternative method for moving controls around on a form once they are
selected: Use the arrow keys on your keyboard whilst holding down the Ctrl key. This
method is slower, but can be more precise.
8.
Once you have created some space, resize the Address textbox. To do this, we select
the Address textbox by clicking it and then click the resizing handle (it looks like a
black square) at the bottom center of the text box. Dragging the resizing handle down
will give us a taller shape for the textbox:
You can also use a similar method to move, by using the arrow keys plus the Shift key, to
more precisely resize all the controls selected.
9.
34
Finally, change the form back to Form View to see the changes you've made. You can
do this by selecting Form View from the View menu or by clicking the button that has
replaced the Design View button:
Designing Applications
We've now made the first three changes we decided on, and our form certainly looks a little
more professional. But what about the other change? We still need to put more manageable
navigation buttons on the screen. This is where things get a little more advanced!
Creating Navigation Buttons
To make the form easier to use, we can place some command buttons on the screen to replace
the present navigation buttons. We can then use macros to move through the records behind
the form. A macro is simply a stored collection of instructions that correspond to the actions
that a user might carry out. So, in this case, our macro would contain the instructions to move
to the next, previous, first or last records.
Of course, this book is about VBA, not macros. However, using them here will help show you
their limitations.
Try It Out
Adding Simple Navigation Buttons to a Form
1.
Switch back to Design View. We're going to use headers and footers, so go to the View
menu and select the Form Header/Footer option. A header section and footer section
will then appear on the form. We don't have to add the buttons to the footer of the
form. We could add them onto the Detail section of the form instead. However, putting
them on the footer keeps them in one place and we don't have to worry about them
getting in the way if we decide to change around the other controls in the Detail section:
2.
Next, we must remove the navigation buttons that Access supplies by default. So, click
the Form Selector to bring up the form's property sheet, and on the property sheet's
Format tab, change the value of the Navigation Buttons property from Yes to No. You
can do this by double-clicking the property value or by clicking on the arrow and
selecting No from the drop-down list that appears:
35
Chapter 1
3.
36
Once you have done this, you can also set the following form properties:
Scroll Bars
Neither
Record Selectors
Dividing Lines
No
No
4.
Now you can add the first of your own navigation buttons. We'll start by creating a
Next Record button.
5.
Check that the Toolbox is visible. If it isn't, then click the Toolbox button on the toolbar:
6.
Then, make sure the Control Wizards button isn't depressed (that's the one in the
toolbox with the magic wand on it), and select the Command Button tool from the
toolbox. This will allow us to place a command button on the form:
Designing Applications
7.
Draw the button a suitable size on the footer:
8.
Now go to the property sheet and change the Name property of the button (found
under the Other tab) to cmdNext and its Caption property (found under the Format
tab) to Next.
Note that when you name controls on a form it is a good idea to use a prefix that matches
their type (like cmd for a command button). This makes the type obvious when you come
to use the control in your VBA code, which makes your programs more readable and can
help to reduce errors. Unfortunately there is no common standard for prefixes. Every
company I've ever seen seems to use different ones (for example tb, txb, txtbx,
textbox, for text boxes) and Microsoft have never published consistent guidelines. The
best advice I can give is to find out what standards your company uses or, if none, use
your own (sensible) prefixes and then be ready to change them at a later date!
9.
Now we must instruct the button to display the next record whenever it is clicked. To
do this, you right-click on the button and select Build Event... from the pop-up menu
which appears:
37
Chapter 1
10. This will, in turn, bring up the Choose Builder dialog. For the moment, we want to use
a macro, so select Macro Builder and hit the OK button:
11. We've said that we want a macro behind the button, so Access now helps us to build
it. It displays the macro design window and prompts us for the name that we want to
give the macro. We will call it macNextButton, so you should type in macNextButton
and then press OK.
12. Now we get to specify the macro commands that will be carried out when we hit the
command button. We want the button to make the form go to the next record. To get it
to do this, you must click the down arrow in the Action column and select
GoToRecord from the drop-down list that appears:
13. We then need to specify which record we want the command button to move us to.
Click in the Record box in the lower pane of the screen, click the down arrow and
select which record you want to go to from the drop-down list. We want to go to the
next record, so make sure Next is selected. In fact, Next is the default selection in the
drop-down list:
38
Designing Applications
14. Now close the macro window and choose Yes when prompted to save the macro you
have just created. Then change the frmCompany form to Form view and save the changes
you made to it. When you open the form in form view, there should be a navigation
button on it that allows you to move forward through the records in the form.
If you look at the button's properties, you will see that the name of the macro is listed in
the On Click property on the Event tab. This is how Access knows to run the macro when
the button is clicked. The macro name was inserted automatically into the event property
because you right-clicked the button to select Build Event... and the Click event is the
default event for buttons. If you had built the macro yourself, you could still make Access
use it whenever you click the cmdNext button, but you would have to insert the macro's
name manually into the On Click event property before it would work. We'll look at this
whole area in a lot more detail in the next chapter.
15. Finally, complete the form by adding navigation buttons to enable you to move to the
previous, first, last, and new records. You should be able to work out how to do this
simply enough by referring to the steps described above.
The Finished Product
So there we have it! Your own handcrafted navigation buttons! You can customize these further if
you wish – you may want to change the caption on the Next button to add a 'greater than' sign
(>). You may even want to add a tooltip by modifying the ControlTipText property of each button.
You can also provide a hotkey for each of the buttons. This allows the user to activate the
button from the keyboard by pressing Alt and a particular letter. To set this up, you simply type
an ampersand (&) in the button's Caption property, before the letter that you want to activate
the button. So, for example, if you typed &Next the user could select the button by pressing AltN. The hot key (in this case N) will appear underlined on the button.
Once you have added the other buttons, your form should look something similar to the one
shown overleaf:
39
Chapter 1
The form looks better, but it's still not perfect. If you haven't already done so, try clicking the
First button to move to the first record. Now try clicking the Previous button to move to the
previous record. Obviously, there's no record previous to the first record, so an error occurs
and an error message box appears:
This is quickly followed by another error message which just gives you some additional
information to try to help you debug (fix) the problem:
40
Designing Applications
In this case of course, we know exactly what caused the problem: the user, right? Wrong. Ask
the user: sloppy programming caused the problem!
Rule #1 of programming – the user is always right because they pay the bills.
While we cannot guard against absolutely every single incorrect action the user may take, we
really ought to try to do something against a common possibility like this. One way to solve the
problem would be to make the buttons intelligent so that they only allowed you to click them if
they represented a valid choice? In other words, if you were already at the first record, the
Previous button should appear grayed out or disabled.
Sure, you may say, but how? There doesn't appear to be any way to determine where you are in
the table when you're using macros. So how is it done? You have just come across one of the
shortcomings of macros. Macros are good at automating simple tasks, but they're less useful
when the task (or the logic behind the task) becomes more complex. The only way to make
these buttons intelligent is to use VBA, and we'll show you how to do this in the next chapter.
Macros Or VBA?
Obviously, there are some simple tasks that can be performed happily by macros, but the
example above should have highlighted one of their limitations. We could create navigation
using macros, but we could not disable or enable them according to where we were in the
records behind the form. That may not be a problem for some people, but if you want a slick
interface that will win over your end-users, you'll probably want to enable and disable buttons.
Our users will be sitting in front of this screen a lot, so we want to get it right.
Why You Should Use VBA
The advantages that VBA has over macros can be summarized as follows:
VBA enables you to provide complex functionality.
You'll remember that when we tried to move back to the previous record from the first record
we encountered an error and Access displayed an error message. What if we wanted to display
our own error message instead? This type of intelligence isn't possible with macros.
You can trap (intercept) and handle errors using VBA.
Handling errors is impossible with macros but simple enough with VBA. Also, in some
circumstances, you have to handle errors yourself. If you don't, your application could easily
crash! We look in detail at error handling in Chapter 12.
VBA is faster to execute than macros.
VBA code is executed faster than macros. Although you may not notice the difference in a oneline macro, the difference in speed becomes more noticeable the longer and more complex the
macro you are creating. Since speed is normally a critical factor in impressing end-users, we
have another notch in favor of VBA.
41
Chapter 1
Using VBA makes your database easier to maintain.
Macros are completely separate from the objects that call them. Although we created the
navigation button macro from within the form, the macro is actually stored as a separate object
in the database window. Click the Macros tab and you'll see it's there. In contrast, you can save
VBA code with the form itself. This means that if you want to move the form into another
database, the code automatically goes with it. With macros, you would have to find out for
yourself which macros you needed to take as well.
Using VBA allows you to interact with other applications.
With VBA you are able to make full use of Automation. This facility allows you to access the
functionality of applications like Excel and Word from within your Access application. It also
allows you to control Access programmatically from applications like Excel and Word. More on
this in Chapter 15.
Using VBA gives you more programmatic control.
Macros are good at performing set tasks where there's little need for flexibility. They can't pass
variables from one macro to another in the form of parameters, are unable to ask for and
receive input from the user, and they have extremely limited methods for controlling the
sequence in which actions are performed.
VBA is easier to read.
Because you can only view one set of Action arguments at a time in the lower pane of the macro
window, it is difficult to see the details of a macro. You have to select each action one after the
other and look at its arguments in turn. In contrast, VBA is very easy to read with its colorcoded text and Full Module View.
VBA is common to all Microsoft applications (well, almost!)
Finally, VBA is the language on which all Microsoft applications are now standardizing. VBA
code written in Access is easily portable to Excel, Word, and any other applications that use
VBA (we shall be showing you more about this in Chapter 15). In contrast, macros are highly
specific to their native application.
When to Use Macros
By this stage, you may be wondering why you should ever bother to use macros if VBA has so
much in its favor! Well, there are still a couple of things that you can't do in VBA that you need
macros for, and we'll look at these below. They are:
42
❑
Trapping certain keystrokes throughout the application
❑
Carrying out a series of actions whenever a database is opened (this is done via the
Autoexec macro)
Designing Applications
But, apart from these, you'll find that with VBA you can do all that you could with macros and
lots more besides.
In early versions of Access, you also had to use macros if you wanted to create custom
menu bars or attach custom functionality to buttons on toolbars. However, from Access
97 onwards, both of these tasks are now achieved from the Customize… dialog box
available from Toolbars on the View menu.
Before we move on to the next chapter and completely discard macros in favor of VBA, let's just
take a look at the two things mentioned above where we still need macros.
Trapping Keystrokes Throughout an Application
Something you may want to do to make your application more user-friendly is to assign
frequently used actions to certain keystrokes. For example, you may want your application to
print the current record when your users hit Ctrl+P.
We have already seen that on a specific form you can implement a hotkey by using an
ampersand (&) in the caption for a control. That's what we did with the navigation button on
the Company Details form. However, if you want to implement a global keyboard shortcut –
one that is available throughout your application – you can do so by creating a special macro.
First create a new macro (click the down arrow next to the New Object button on the toolbar
and select Macro from the drop-down menu). You will need to save the macro with the name
Autokeys, as this is the name of the macro in which Access looks for keyboard shortcuts. To
display the Macro Name column, click on the Macro Names button on the toolbar. This button
toggles the column between visible and invisible. You can also do this by selecting
Macro Names from the View menu:
Then you specify the keystroke that you wish to instigate the required action in the
Macro Name column, and the action itself in the Action column. For example, the following
macro will cause the currently selected records to be printed whenever Ctrl+P is pressed:
43
Chapter 1
The lower pane of the macro window lists the arguments that you can pass to the PrintOut
action to define exactly how it should operate. For example, we've specified Selection as the
Print Range argument. This causes Access to only print out those records that were selected
when the key combination Ctrl+P was pressed. If we had only wanted to print out the first two
pages of the currently selected object, we could have chosen Pages as the Print Range
argument and then typed 1 as the Page From argument and 2 as the Page To argument.
The caret sign (^) is used to indicate that the Ctrl key is held down at the same time as the
P key. For more information on these key codes, search Microsoft Access Help using the
phrase "Autokeys Key Combinations".
Carrying Out Actions when a Database is Opened – the Autoexec Macro
When you open up an existing database, the first thing that Access does is to set any options
that have been specified in the Tools/Startup... dialog. After this, it checks to see if a macro
called Autoexec is present. If it is, then Access executes it immediately. This handy feature
allows you to carry out actions such as writing a record to a log file to indicate that your
application has started up.
Users of versions of Access 2.x and earlier should note that many of the conventional uses
of the Autoexec macro have now been replaced by the Startup... option on the Tools
menu. If you're converting an application from a version 2.x or earlier, you may want to
remove the functionality from the Autoexec macro and use the Startup... dialog instead.
44
Designing Applications
If you want to perform an action whenever the database is opened, but want to get the benefits
of using VBA rather than macros, then you should write a procedure in VBA and call the
procedure from the Autoexec macro. You can do this by using the RunCode action in your
Autoexec macro:
In this situation, when the database opens, the Autoexec macro is executed and this causes the
MyCode() procedure – written in VBA – to be executed.
Be aware, however, that a user can prevent the Tools/Startup... options or
the Autoexec macro from running by holding down the Shift key when the
database is being opened.
You can prevent a user from bypassing the Tools/Startup... options and the Autoexec macro by
setting the database's AllowBypassKey property to False. However, the AllowBypassKey
property isn't available normally, and so can't be set in the usual way. We'll look at how to set
this property from VBA later on.
Moving to VBA
Macros have their purposes then, but while undoubtedly useful for some things, they don't
offer the power of VBA. We've just demonstrated in a few pages how and where you should
apply macros. We'll now use the rest of the book describing how and where you can use VBA.
Just before we do that, however, there is one last useful trick that macros can give us: Access
will allow us to convert macros into VBA code, and it can even go one step further by adding
useful error trapping code if we ask it to. This can be a very useful technique for those new to VBA.
45
Chapter 1
Try It Out
Converting a Macro to VBA
Your first sight of the Visual Basic Editor can be a bit daunting. Don't panic!
We'll lead you through all the details as we continue through the book.
46
1.
Load up the database file IceCream.mdb. In the Database window, select the Macros
tab and then the macNextButton macro that we created earlier.
2.
Select File and then Save As… from the main menu.
3.
When the Save As dialog appears select As Module and click OK:
4.
Another dialog appears. Just accept the default settings of Add error handling and
Include macro comments and press the Convert button:
5.
Access will now open the Visual Basic editor and finish the conversion. When the
conversion is complete, click OK.
6.
Double-click on the new module that Access has created for us in the project viewer pane:
Designing Applications
7.
The Project Explorer will open the module for us, and we can view the code it created:
8.
You might be able to recognize that the line that does all the work is the one that starts
DoCmd.GoToRecord. Most of the rest is (necessary) padding and error handling code.
This technique is a useful learning tool and can help you to convert any existing macros
you may have into working code that you can use 'as is' or simply copy into your own
modules as you become more proficient with VBA.
47
Chapter 1
Summary
In this chapter, we've worked our way through the process of creating part of an Access
application with one aim in mind – to deliberately hit a brick wall. That brick wall is the
implementation of the intelligent navigation buttons. We just can't implement them properly
using macros. Instead, we need VBA…
So, in brief, we have covered:
❑
How to go about designing an application
❑
An introduction to the application that forms the basis of this book – IceCream.mdb
❑
Creating the main form for the application and adding custom navigation buttons
❑
Why macros aren't sufficient for our needs
❑
When to use VBA and when to use macros
In the next chapter, we'll look at how you can polish up the Company Details form using VBA.
If this chapter has been a success, you'll hunger for the power to solve the problems we've come
up against – so let's get on with it.
Exercise
1.
48
The Autokeys macro is used to associate macro actions with keyboard shortcuts. Try
using the Autokeys macro to display the property window whenever you hit F4. When
does this shortcut not work? What happens if you try to associate this action with
Alt+F4 and why?
Designing Applications
49
Chapter 1
50