1
MA
CHAPTER 1: Visual Studio 2010
TE
RI
Language Constructs
and Environment
AL
PART I
CHAPTER 2: Objects and Visual Basic
TE
D
CHAPTER 3: Custom Objects
CHAPTER 4: The Common Language Runtime
GH
CHAPTER 5: Declarative Programming with Visual Basic
RI
CHAPTER 6: Exception Handling and Debugging
CO
PY
CHAPTER 7: Test-Driven Development
1
Visual Studio 2010
WHAT YOU WILL LEARN IN THIS CHAPTER
➤
Versions of Visual Studio
➤
An introduction to key Visual Basic terms
➤
Targeting a runtime environment
➤
Creating a baseline Visual Basic Windows Form
➤
Project templates
➤
Project properties — application, compilation, debug
➤
Setting properties
➤
IntelliSense, code expansion, and code snippets
➤
Debugging
➤
Recording and using macros
➤
The Class Designer
➤
Team Foundation Server — Team Explorer
You can work with Visual Basic without Visual Studio. In fact, Appendix A focuses on using the
Visual Basic compiler from the command line. In practice, however, most Visual Basic developers
treat the two as almost inseparable; without a version of Visual Studio, you’re forced to work
from the command line to create project fi les by hand, to make calls to the associated compilers,
and to manually address the tools necessary to build your application. While Visual Basic supports
this at the same level as C#, F#, C++ and other .NET languages, this isn’t the typical focus of a
Visual Basic professional.
Visual Basic’s success rose from its increased productivity in comparison to other languages when
building business applications. Visual Studio 2010 increases your productivity and provides assistance
in debugging your applications and is the natural tool for Visual Basic developers.
Accordingly, the current edition of this book is going to start off by introducing you to Visual Studio
2010 and how to build and manage Visual Basic applications. The focus of this chapter is on ensuring
that everyone has a core set of knowledge related to tasks like creating and debugging applications in
Visual Studio 2010. Visual Studio 2010 will be used throughout the book for building solutions. Note
while this is the start, don’t think of it as an ‘intro’ chapter. This chapter will intro key elements of
working with Visual Studio, but will also go beyond that. You may fi nd yourself referencing back to
4
❘
CHAPTER 1 VISUAL STUDIO 2010
it later for advanced topics that you glossed over your fi rst time through. Visual Studio is a powerful and, at
times, complex tool and you aren’t expected to master it on your fi rst read through this chapter.
When Visual Studio 2005 was released, Microsoft expanded on the different versions of Visual Studio
available for use. At the low- cost end, and currently free, is Visual Basic Express Edition. This tool enables
you to build desktop applications with Visual Basic only. Its companion for Web development is Visual Web
Developer Express, which enables you to build ASP.NET applications. At the high end, Microsoft offers
Visual Studio Ultimate. Each of the high- end, Professional, Premium, and Ultimate editions is available as
part of an MSDN subscription and each of these editions further extends the core Visual Studio 2010
capabilities beyond the core Integrated Development Environment (IDE) to help improve design, testing, and
collaboration between developers.
Of course, the focus of this chapter is how Visual Studio enables you to use Visual Basic to build
applications geared toward “better, faster, cheaper” business goals. To this end, we’ll be examining features
of Visual Studio starting with those in the core Visual Basic 2010 Express Edition and building up to the
full Visual Studio Team Suite.
This chapter provides an overview of many of the capabilities of Visual Studio 2010. It also provides a
brief introduction to the features available by using one of the more feature -rich versions of Visual Studio.
Experienced developers will probably gloss over much of this information although I encourage them
to review the new historical debugging features available in Visual Studio 2010 Ultimate covered in this
chapter. The goal is to demonstrate how Visual Studio makes you, as a developer, more productive and
successful.
VISUAL STUDIO 2010: EXPRESS THROUGH ULTIMATE
For those who aren’t familiar with the main elements of .NET development there is the common language
runtime (CLR), the .NET Framework, the various language compilers and Visual Studio. Each of these plays
a role, for example the CLR — covered in Chapter 4 — manages the execution of code on the .NET platform.
Thus code can be targeted to run on a specific version of this runtime environment.
The .NET Framework provides a series of classes that developers leverage across implementation languages.
This framework or Class Library is versioned and targeted to run on a specific minimum version of the CLR.
It is this library along with the language compilers that are referenced by Visual Studio. Visual Studio
allows you to build applications that target one or more of the versions of what is generically called .NET.
In some cases the CLR and the .NET Framework will be the same; for example, .NET Framework version 1.0
ran on CLR version 1.0. In other cases just as Visual Basic’s compiler is on version 10, the .NET Framework
might have a newer version targeting an older version of the CLR.
The same concepts carry into Visual Studio. Visual Studio 2003 was focused on .NET 1.1, while the
earlier Visual Studio .NET (2002) was focused on .NET 1.0. Originally, each version of Visual Studio was
optimized for a particular version of .NET. Similarly, Visual Studio 2005 was optimized for .NET 2.0,
but then along came the exception of the .NET Framework version 3.0. This introduced a new Framework,
which was supported by the same version 2.0 of the CLR, but which didn’t ship with a new version of
Visual Studio.
Fortunately, Microsoft chose to keep Visual Basic and ASP.NET unchanged for the .NET 3.0 Framework
release. However, when you looked at the.NET 3.0 Framework elements, such as Windows Presentation
Foundation, Windows Communication Foundation, and Windows Workflow Foundation, you found that
those items needed to be addressed outside of Visual Studio. Thus, while Visual Studio is separate from
Visual Basic, the CLR and .NET development, in practical terms Visual Studio was tightly coupled to each
of these items.
With Visual Studio 2008, Microsoft loosened this coupling by providing robust support that allowed the
developer to target any of three different versions of the .NET Framework. Visual Studio 2010 continues
this, enabling you to target an application to run on .NET 2.0, .NET 3.0,.NET 3.5, or .NET 4.
Visual Studio 2010: Express through Ultimate
❘5
However, as you’ll discover, this support doesn’t mean that Visual Studio 2010 isn’t tightly coupled to a
specific version of each compiler. In fact, the new support for targeting frameworks is designed to support
a runtime environment, not a compile-time environment. This is important because when projects from
previous versions of Visual Studio are converted to the Visual Studio 2010 format, they cannot be reopened
by a previous version.
The reason for this is that the underlying build engine used by Visual Studio 2010 accepts syntax changes
and even language feature changes, but previous versions of Visual Studio do not recognize these new
elements of the language. Thus, if you move source code written in Visual Studio 2010 to a previous version
of Visual Studio, you face a strong possibility that it would fail to compile. There are ways to manually
work with a project across versions of Visual Studio on the same team, but they are not supported. Bill
Sheldon, one of the authors of this book, has a blog post from August 2007 that deals with his experience
doing this in Visual Studio 2008. The post titled “Working with Both VS 2005 and VS 2008 B2 on
the Same Project” is still applicable for those working with Visual Studio 2010: http://nerdnotes
.net/blog/default,date,2007-08-29.aspx.
Multi-targeting support by Visual Studio 2010 ensures that your application will run on a specific version
of the framework. Thus, if your organization is not supporting .NET 3.0, .NET 3.5, or .NET 4, you can still
use Visual Studio 2010. The compiler generates byte code based on the language syntax, and at its core that
byte code is version agnostic. Where you can get in trouble is if you reference one or more classes that aren’t
part of a given version of the CLR. Visual Studio therefore manages your references when targeting an older
version of .NET allowing you to be reasonably certain that your application will not reference fi les from one
of those other framework versions. Multi-targeting is what enables you to safely deploy without requiring
your customers to download additional framework components they don’t need.
With those ground rules in place, what versions of Visual Studio 2010 are available, and what are the
primary differences between them? As already mentioned, Visual Basic 2010 Express is at the bottom tier
in terms of price and features. It is accompanied there by Visual Web Developer 2010 Express Edition, for
those developers who are developing Web applications, rather than desktop applications. These two tools
are separate, but both support developing different types of Visual Basic applications, and both are free.
Note, however, that neither is extensible; these tools are meant to be introductory, and Microsoft’s license
prevents vendors from extending these tools with productivity enhancements.
However, each of the Express Edition development tools also ships with two additional components
covered briefly here: MSDN Express Edition and SQL Server 2008 Express Edition. MSDN is, of course,
the Microsoft Developer Network, which has placed most of its content online. It’s the source for not
only the core language documentation for Visual Basic, but also articles on almost every product oriented to
developers using Microsoft technology. Full versions of Visual Studio ship with the full MSDN library so
that you can access its content locally. However, the Express Edition tools actually ship with a pared- down
set of documentation fi les.
Similar to the language and Web -based tools, Microsoft has a SQL Server Express Edition package. This
package has a history, in that it replaces the MSDE database engine that was available with SQL Server
2000. The SQL Server Express engine provides the core SQL Server 2008 database engine. For more
information on SQL Server Express go to www.microsoft.com/express/database. Note that a free
database management application is available via a separate download from Microsoft.
When you install Visual Studio 2010, including the Express Editions, you also have the opportunity to
install this core database engine. The elements of this engine are freely redistributable, so if you are looking
for a set of core database features based on ADO.NET, you can create your application and deploy your
SQL Server 2008 Express Edition database without being concerned about licensing.
Getting back to the differences in versions, the Express Edition tools provide the core components necessary
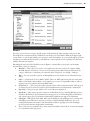
to create Visual Basic applications (Windows or Web) based on the core IDE. Table 1-1 provides a quick
summary of what versions are available, including a description of how each extends Visual Studio.
6
❘
CHAPTER 1 VISUAL STUDIO 2010
TABLE 1 -1: Visual Studio Editions
VISUAL STUDIO EDITION
DESCRIPTION
Visual Basic 2008 Express
Edition
This is the core set of functionality required for creating Windows- based
applications. It includes the IDE with full local debugging support and support
for five project types: Windows Forms Application, Dynamic Link Library, WPF
Application, WPF Browser Application, and Console Application.
Visual Web Developer 2008
Express Edition
The core set of functionality required for building Web applications. It
supports both Visual Basic and C# and allows for local debugging of your Web
application.
Visual Studio 2010 Standard
Edition
Provides a combined development language for the core Visual Studio languages
(J#, VB, C# and C++). It adds the Object Modeling tool, and provides combined
support for both Windows and Web applications. It also provides additional support
for application deployment, and support for Mobile Application Development,
integration with a source control tool, and macros within Visual Studio; it is also
extensible.
Visual Studio 2010
Professional Edition
Expands on Visual Studio Standard Edition with additional integration to SQL
Server and support for XSLTs. It also includes support for Visual Studio Tools
for Office (VSTO), which enables you to create custom client (Word, Excel,
Outlook, etc.) and SharePoint Workflow applications. This version also allows
for remote debugging of Web applications, and unit testing of all projects. (This
edition supports VSTO but the associated MSDN subscription does not include
a license for Office.)
Visual Studio 2010 Premium
Edition
This version begins to pull in many of the extensions that were originally
introduced with what was known as Team Suite. This version has expanded
test features like Code Coverage and coded UI test support. It includes tools
to support database development, change management, testing, and so on, as
well as tools for static code analysis and code metrics.
Visual Studio 2010 Ultimate
Edition
This version includes all of the core features of Visual Studio 2010 Premium
Edition. It then adds historical debugging, Web and load -testing tools, and a
variety of related tools to enhance development. This tool, like the Premium
version of Visual Studio, is focused on enabling developers to be productive in
a shared collaborative environment.
The Express Edition tools are best described as targeting students and hobbyists, not because you can’t
create serious applications but because they provide only limited support for team development, have limited
extensibility, and offer a standalone environment. The Express Tools are oriented toward developers who
work independently, while still providing full access to features of the Visual Basic language. This chapter
begins working in the IDE using features available in this version, which is essentially the lowest common
denominator, and then goes beyond the capabilities of this free tool.
Eventually, however, a developer needs additional tools and projects. This is where the full versions of
Visual Studio 2010 (Standard, Professional, Premium and Ultimate) come in. With an increasing level
of support for team development, these feature-rich versions add macro support, and, more important,
an Object Modeling tool. As discussed in the section titled “Class Diagrams,” later in this chapter, Visual
Studio enables you to create a visual representation of the classes in your solution and then convert that
representation into code. Moreover, the tool supports what is known as round - trip engineering. This means
that not only can you use the graphical model to generate code, you can also take a project’s source fi les and
regenerate an updated version of the graphical model — that is, edit that model in its graphical format and
then update the associated source fi les.
For those choosing Visual Studio 2008 Professional or above, Visual Studio Tools for Office (VSTO) is
targeted primarily at enterprise developers, those who work in corporate organizations (either as employees or
consultant/contractors). This tool provides a way for users of the enterprise editions of Microsoft Office 2007
Visual Basic Keywords and Syntax
❘7
and Microsoft Office 2010 to extend these office productivity tools with application-like features. Many
organizations use Microsoft Office for tasks that border on custom applications. This is especially true for
Microsoft Excel. VSTO provides project templates based on these Microsoft Office products that enable, for
example, a spreadsheet to retrieve its contents from an SQL Server database instead of the local file system.
These tools provide the capability not only to manipulate data retrieval and saving, but also to customize the
user interface, including direct access to the task pane and custom toolbar options within Microsoft Office
products; they are covered in more detail in Chapter 25.
Visual Studio 2010 Premium and Ultimate focus on extending a developer’s reach beyond just writing
code. These tools are used to examine code for flaws, manage the deployment environment, and defi ne
relationships between applications. The high- end versions are focused on tools that support repeatable
software processes and best practices. They are geared toward examining source code for hidden flaws that
might not cause the code to fail, but might hide a hidden security flaw or make it difficult to maintain or
deploy the application. More important, the suite includes tools for creating unit test tools that attempt to
cause the code to fail, whether through bad input data or heavy load.
Complete coverage of all of Visual Studio Ultimate’s features warrants a book of its own, especially when
you take into account all of the collaborative features introduced by Team Foundation Server and its tight
integration with both Team Build and SharePoint Server. Team Foundation Server goes beyond just being a
replacement for Visual Source Safe. It is the basis for true process- driven development, and it even includes
documentation to help train your organization on two process models supported by Microsoft.
VISUAL BASIC KEYWORDS AND SYNTAX
Those with previous experience with Visual Basic are already familiar with many of the language keywords
and syntax. However, not all readers will fall into this category so this introductory section is for those new
to Visual Basic. A glossary of keywords is provided after which this section will use many of these keywords
in context.
Although they’re not the focus of the chapter, with so many keywords, a glossary follows. Table 1-2 briefly
summarizes most of the keywords discussed in the preceding section, and provides a short description of
their meaning in Visual Basic. Keep in mind there are two commonly used terms that aren’t Visual Basic
keywords that you will read repeatedly including in the glossary:
➤
Method — A generic name for a named set of commands. In Visual Basic, both subs and functions
are types of methods.
➤
Instance — When a class is created, the resulting object is an instance of the class’s defi nition.
TABLE 1-2: Commonly Used Keywords in Visual Basic
KEY WORD
DESCRIPTION
Namespace
A collection of classes that provide related capabilities. For example, the
System.Drawing namespace contains classes associated with graphics.
Class
A definition of an object. Includes properties (variables) and methods, which can be Subs
or Functions.
Sub
A method that contains a set of commands, allows data to be transferred as parameters,
and provides scope around local variables and commands, but does not return a value
Function
A method that contains a set of commands, returns a value, allows data to be transferred as
parameters, and provides scope around local variables and commands
Return
Ends the currently executing Sub or Function. Combined with a return value for functions.
Dim
Declares and defines a new variable
New
Creates an instance of an object
continues
8
❘
CHAPTER 1 VISUAL STUDIO 2010
TABLE 1-2 (continued)
KEY WORD
DESCRIPTION
Nothing
Used to indicate that a variable has no value. Equivalent to null in other languages and
databases.
Me
A reference to the instance of the object within which a method is executing
Console
A type of application that relies on a command-line interface. Console applications are
commonly used for simple test frames. Also refers to a .NET Framework Class that manages
access of the command window to and from which applications can read and write text data.
Module
A code block that isn’t a class but which can contain Sub and Function methods. Used
when only a single copy of code or data is needed in memory.
Even though the focus of this chapter is on Visual Studio, during this introduction a few basic elements of
Visual Basic will be referenced and need to be spelled out. This way as you read, you can understand the
examples. Chapter 4, for instance, covers working with namespaces, but some examples and other code
are introduced in this chapter that will mention the term, so it is defi ned here.
Let’s begin with namespace. When .NET was being created, the developers realized that attempting
to organize all of these classes required a system. A namespace is an arbitrary system that the .NET
developers used to group classes containing common functionality. A namespace can have multiple levels of
grouping, each separated by a period (.). Thus, the System namespace is the basis for classes that are used
throughout .NET, while the Microsoft.VisualBasic namespace is used for classes in the underlying .NET
Framework but specific to Visual Basic. At its most basic level, a namespace does not imply or indicate
anything regarding the relationships between the class implementations in that namespace; it is just a
way of managing the complexity of both your custom application’s classes, whether it be a small or large
collection, and that of the .NET Framework’s thousands of classes. As noted earlier, namespaces are covered
in detail in Chapter 4.
Next is the keyword Class. Chapters 2 and 3 provide details on object- oriented syntax and the related
keywords for objects and types, but a basic defi nition of this keyword is needed here. The Class keyword
designates a common set of data and behavior within your application. The class is the defi nition of an
object, in the same way that your source code, when compiled, is the defi nition of an application. When
someone runs your code, it is considered to be an instance of your application. Similarly, when your code
creates or instantiates an object from your class defi nition, it is considered to be an instance of that class,
or an instance of that object.
Creating an instance of an object has two parts. The fi rst part is the New command, which tells the
compiler to create an instance of that class. This command instructs code to call your object defi nition
and instantiate it. In some cases you might need to run a method and get a return value, but in most cases
you use the New command to assign that instance of an object to a variable. A variable is quite literally
something which can hold a reference to that class’s instance.
To declare a variable in Visual Basic, you use the Dim statement. Dim is short for “dimension” and comes
from the ancient past of Basic, which preceded Visual Basic as a language. The idea is that you are telling
the system to allocate or dimension a section of memory to hold data. As discussed in subsequent chapters
on objects, the Dim statement may be replaced by another keyword such as Public or Private that not only
dimensions the new value, but also limits the accessibility of that value. Each variable declaration uses a Dim
statement similar to the example that follows, which declares a new variable, winForm:
Dim winForm As System.Windows.Forms.Form = New System.Windows.Forms.Form()
In the preceding example, the code declares a new variable (winForm) of the type Form. This variable is
then set to an instance of a Form object. It might also be assigned to an existing instance of a Form object
or alternatively to Nothing. The Nothing keyword is a way of telling the system that the variable does not
currently have any value, and as such is not actually using any memory on the heap. Later in this chapter, in
the discussion of value and reference types, keep in mind that only reference types can be set to Nothing.
Visual Basic Keywords and Syntax
❘9
A class consists of both state and behavior. State is a fancy way of referring to the fact that the class has
one or more values also known as properties associated with it. Embedded in the class defi nition are zero
or more Dim statements that create variables used to store the properties of the class. When you create an
instance of this class, you create these variables; and in most cases the class contains logic to populate them.
The logic used for this, and to carry out other actions, is the behavior. This behavior is encapsulated in
what, in the object- oriented world, are known as methods.
However, Visual Basic doesn’t have a “method” keyword. Instead, it has two other keywords that are brought
forward from Visual Basic’s days as a procedural language. The first is Sub. Sub, short for “subroutine,” and
it defines a block of code that carries out some action. When this block of code completes, it returns control to
the code that called it without returning a value. The following snippet shows the declaration of a Sub:
Private Sub Load(ByVal object As System.Object)
End Sub
The preceding example shows the start of a Sub called Load. For now you can ignore the word Private
at the start of this declaration; this is related to the object and is further explained in the next chapter. This
method is implemented as a Sub because it doesn’t return a value and accepts one parameter when it is called.
Thus, in other languages this might be considered and written explicitly as a function that returns Nothing.
The preceding method declaration for Sub Load also includes a single parameter, object, which is declared
as being of type System.Object. The meaning of the ByVal qualifier is explained in chapter 2, but is
related to how that value is passed to this method. The code that actually loads the object would be written
between the line declaring this method and the End Sub line.
Alternatively, a method can return a value; Visual Basic uses the keyword Function to describe this behavior.
In Visual Basic, the only difference between a Sub and the method type Function is the return type.
The Function declaration shown in the following sample code specifies the return type of the function as
a Long value. A Function works just like a Sub with the exception that a Function returns a value, which
can be Nothing. This is an important distinction, because when you declare a function the compiler expects
it to include a Return statement. The Return statement is used to indicate that even though additional lines
of code may remain within a Function or Sub, those lines of code should not be executed. Instead, the
Function or Sub should end processing at the current line, and if it is in a function, the return value should
be returned. To declare a Function, you write code similar to the following:
Public Function Add(ByVal ParamArray values() As Integer) As Long
Dim result As Long = 0
'TODO: Implement this function
Return result
'What if there is more code
Return result
End Function
In the preceding example, note that after the function initializes the second line of code, there is a Return
statement. There are two Return statements in the code. However, as soon as the fi rst Return statement is
reached, none of the remaining code in this function is executed. The Return statement immediately halts
execution of a method, even from within a loop.
As shown in the preceding example, the function’s return value is assigned to a local variable until returned as
part of the Return statement. For a Sub, there would be no value on the line with the Return statement, as a
Sub does not return a value when it completes. When returned, the return value is usually assigned to something
else. This is shown in the next example line of code, which calls a function to retrieve the currently active control
on the executing Windows Form:
Dim ctrl = Me.Add(1, 2)
The preceding example demonstrates a call to a function. The value returned by the function Add is a Long,
and the code assigns this to the variable ctrl. It also demonstrates another keyword that you should be aware
of: Me. The Me keyword is how, within an object, that you can reference the current instance of that object.
10
❘
CHAPTER 1 VISUAL STUDIO 2010
You may have noticed that in all the sample code presented thus far, each line is a complete command. If
you’re familiar with another programming language, then you may be used to seeing a specific character
that indicates the end of a complete set of commands. Several popular languages use a semicolon to
indicate the end of a command line.
Visual Basic doesn’t use visible punctuation to end each line. Traditionally, the BASIC family of languages
viewed source files more like a list, whereby each item on the list is placed on its own line. At one point the term
was source listing. By default, Visual Basic ends each source list item with the carriage-return linefeed, and treats
it as a command line. In some languages, a command such as X = Y can span several lines in the source file until
a semicolon or other terminating character is reached. Thus previously, in Visual Basic, that entire statement
would be found on a single line unless the user explicitly indicates that it is to continue onto another line.
To explicitly indicate that a command line spans more than one physical line, you’ll see the use of the
underscore at the end of the line to be continued. However, one of the new features of Visual Basic 10, which
ships with Visual Studio 2010, is support for an implicit underscore when extending a line past the carriagereturn linefeed. However, this new feature is limited as there are still places where underscores are needed.
When a line ends with the underscore character, this explicitly tells Visual Basic that the code on that
line does not constitute a completed set of commands. The compiler will then continue to the next line to
fi nd the continuation of the command, and will end when a carriage -return linefeed is found without an
accompanying underscore.
In other words, Visual Basic enables you to use exceptionally long lines and indicate that the code has been
spread across multiple lines to improve readability. The following line demonstrates the use of the underscore
to extend a line of code:
MessageBox.Show("Hello World", "A Message Box Title", _
MessageBoxButtons.OK, MessageBoxIcon.Information)
Prior to Visual Basic 10 the preceding example illustrated the only way to extend a single command line
beyond one physical line in your source code. The preceding line of code can now be written as follows:
MessageBox.Show("Hello World", "A Message Box Title",
MessageBoxButtons.OK, MessageBoxIcon.Information)
The compiler now recognizes certain key characters like the “,” or the “=” as the type of statement where a
line isn’t going to end. The compiler doesn’t account for every situation and won’t just look for a line extension
anytime a line doesn’t compile. That would be a performance nightmare; however, there are several logical
places where you, as a developer, can choose to break a command across lines and do so without needing to
insert an underscore to give the compiler a hint about the extended line.
Finally, note that in Visual Basic it is also possible to place multiple different statements on a single line, by
separating the statements with colons. However, this is generally considered a poor coding practice because
it reduces readability.
Console Applications
The simplest type of application is a console application. This application doesn’t have much of a user
interface; in fact, for those old enough to remember the MS -DOS operating system, a console application
looks just like an MS -DOS application. It works in a command window without support for graphics
or input devices such as a mouse. A console application is a text-based user interface that displays text
characters and reads input from the keyboard.
The easiest way to create a console application is to use Visual Studio. For the current discussion let’s just
look at a sample source file for a Console application, as shown in the following example. Notice that the
console application contains a single method, a Sub called Main. By default if you create a console application
in Visual Studio, the code located in the Sub Main is the code which is by default started. However, the
Sub Main isn’t contained in a class, instead the Sub Main that follows is contained in a Module:
Module Module1
Sub Main()
Console.WriteLine("Hello World")
Visual Basic Keywords and Syntax
❘ 11
Dim line = Console.ReadLine()
End Sub
End Module
A Module isn’t truly a class, but rather a block of code that can contain methods, which are then referenced
by code in classes or other modules — or, as in this case, it can represent the execution start for a program.
A Module is similar to having a Shared class. The Shared keyword indicates that only a single instance of a
given item exists.
For example in C# the Static keyword is used for this purpose, and can be used to indicate that only a single
instance of a given class exists. Visual Basic doesn’t support the use of the Shared keyword with a Class
declaration; instead Visual Basic developers create modules that provide the same capability. The Module
represents a valid construct to group methods that don’t have state-related or instance-specific data.
Note a console application focuses on the Console Class. The Console Class encapsulates Visual Basic’s
interface with the text-based window that hosts a command prompt from which a command-line program is run.
The console window is best thought of as a window encapsulating the older non-graphical style user interface,
whereby literally everything was driven from the command prompt. A Shared instance of the Console class is
automatically created when you start your application, and it supports a variety of Read and Write methods. In
the preceding example, if you were to run the code from within Visual Studio’s debugger, then the console window
would open and close immediately. To prevent that, you include a final line in the Main Sub, which executes a
Read statement so that the program continues to run while waiting for user input.
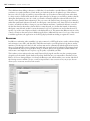
Creating a Project from a Project Template
While it is possible to create a Visual Basic application working entirely outside of Visual Studio 2010,
it is much easier to start from Visual Studio 2010. After you install Visual Studio you are presented with
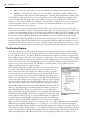
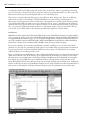
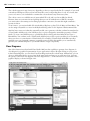
a screen similar to the one shown in Figure 1-1. Different versions of Visual Studio may have a different
overall look, but typically the start page lists your most recent projects on the left, some tips for getting
started, and a headline section for topics on MSDN that might be of interest. You may or may not
immediately recognize that this content is HTML text; more important, the content is based on an RSS feed
that retrieves and caches articles appropriate for your version of Visual Studio.
FIGURE 1 -1
12
❘
CHAPTER 1 VISUAL STUDIO 2010
The start page looks similar regardless of which version of Visual Studio 2010 you are running.
Conceptually, it provides a generic starting point either to select the application you intend to work on, to
quickly receive vital news related to offers, as shown in the figure, or to connect with external resources via
the community links.
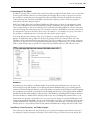
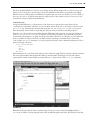
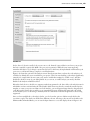
Once here, the next step is to create your fi rst project. Selecting File ➪ New Project opens the New Project
dialog, shown in Figure 1-2. This dialog provides a selection of templates customized by application type.
One option is to create a Class Library project. Such a project doesn’t include a user interface; and instead
of creating an assembly with an .exe fi le, it creates an assembly with a .dll fi le. The difference, of course,
is that an .exe fi le indicates an executable that can be started by the operating system, whereas a .dll fi le
represents a library referenced by an application.
FIGURE 1 -2
One of the ongoing challenges with describing the menu options for Visual Studio
is that the various versions have slight differences in look and feel too numerous to
mention. For example File ➪ New Project in Visual Basic Express becomes File ➪
New ➪ Project in Visual Studio. Thus, your display may vary slightly from what is
shown or described here, although we attempt to showcase signifi cant differences.
Figure 1-2 includes the capability to target a specific .NET version in the drop - down box located above the
list of project types. In Figure 1-2 this shows .NET 2.0, and with only six project types below the selection
listed. With .NET 4 selected, as shown in Figure 1-3, the number of project types has increased.
Targeting keeps you from attempting to create a project for WPF without recognizing that you also need at
least .NET 3.0 available on the client. Although you can change your target after you create your project,
be very careful when trying to reduce the version number, as the controls to prevent you from selecting
dependencies don’t check your existing code base for violations. Changing your targeted framework version
for an existing project is covered in more detail later in this chapter.
Visual Basic Keywords and Syntax
❘ 13
FIGURE 1 -3
Not only can you choose to target a specific version of the framework when creating a new project, but
this window has a new feature that you’ll fi nd all over the place in Visual Studio 2010. In the upper-right
corner, there is a control that enables you to search for a specific template. As you work through more of the
windows associated with Visual Studio, you’ll fi nd that a context-specific search capability has often been
added to the new user interface.
Expanding the top level of the Visual Basic tree in Figure 1-3 shows that a project type can be further
separated into a series of categories:
➤
Windows — These are projects used to create applications that run on the local computer within
the CLR. Because such projects can run on any operating system (OS) hosting the framework, the
category “Windows” is something of a misnomer when compared to, for example, “Desktop.”
➤
Web — You can create these projects, including Web services, from this section of the New Project
dialog.
➤
Office — Visual Studio Tools for Office (VSTO). These are .NET applications that are hosted under
Office. Visual Studio 2010 includes a set of templates you can use to target Office 2010, as well as a
separate section for templates that target Office 2007.
➤
Cloud Services: — These are projects that target the Azure online environment model. These projects
are deployed to the cloud and as such have special implementation and deployment considerations.
➤
Reporting — This project type enables you to create a Reports application.
➤
SharePoint — This category provides a selection of SharePoint projects, including Web Part projects,
SharePoint Workflow projects, Business Data Catalog projects, as well as things like site defi nitions
and content type projects. Visual Studio 2010 includes significant new support for SharePoint.
➤
Silverlight — With Visual Studio 2010, Microsoft has fi nally provided full support for working with
Silverlight projects. Whereas in the past you’ve had to add the Silverlight SDK and tools to your
existing development environment, with Visual Studio 2010 you get support for both Silverlight
projects and user interface design within Visual Studio.
➤
Test — This section is available only to those using Visual Studio Team Suite. It contains the template
for a Visual Basic Unit Test project.
14
❘
CHAPTER 1 VISUAL STUDIO 2010
➤
WCF — This is the section where you can create Windows Communication Foundation projects.
➤
Workflow — This is the section where you can create Windows Workflow Foundation (WF) projects.
The templates in this section also include templates for connecting with the SharePoint workflow engine.
Visual Studio has other categories for projects, and you have access to other development languages and far
more project types than this chapter has room for. When looking to create an application you will choose
from one or more of the available project templates. To use more than a single project to create an application
you’ll leverage what is known as a solution. A solution is created by default whenever you create a new
project and contains one or more projects.
When you save your project you will typically create a folder for the solution, then later if you add another
project to the same solution, it will be contained in the solution folder. A project is always part of a solution, and
a solution can contain multiple projects, each of which creates a different assembly. Typically for example you will
have one or more Class Libraries that are part of the same solution as your Windows Form or ASP.NET project.
For now, you can select a Windows Application project template to use as an example project for this chapter.
For this example, use ProVB_VS2010 as the project name to match the name of the project in the sample code
download and then click OK. Visual Studio takes over and uses the Windows Application template to create a
new Windows Forms project. The project contains a blank form that can be customized, and a variety of other
elements that you can explore. Before customizing any code, let’s first look at the elements of this new project.
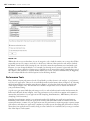
The Solution Explorer
The Solution Explorer is a window that is by default located on the right-hand side of your display when
you create a project. It is there to display the contents of your solution and includes the actual source fi le(s)
for each of the projects in your solution. While the Solution Explorer window is available and applicable for
Express Edition users, it will never contain more than a single project. Those with a version of Visual Studio
above the Express Edition level have the capability to leverage multiple projects in a single solution. A .NET
solution can contain projects of any .NET language and can include the database, testing, and installation
projects as part of the overall solution. The advantage of combining these projects is that it is easier to
debug projects that reside in a common solution.
Before discussing these fi les in depth, let ’s take a look at the next step, which
is to reveal a few additional details about your project. Click the second
button on the left in the Solution Explorer to display all of the project fi les,
as shown in Figure 1- 4. As this image shows, many other fi les make up your
project. Some of these, such as those under the My Project grouping, don’t
require you to edit them directly. Instead, you can double- click the My Project
entry in the Solution Explorer and open the pages to edit your project settings.
You do not need to change any of the default settings for this project, but the
next section of this chapter walks you through the various property screens.
The bin and obj directories shown are used when building your project. The obj
directory contains the first-pass object files used by the compiler to create your
final executable file. The “binary” or compiled version of your application is
then placed in the bin directory by default. Of course, referring to the Microsoft
intermediate language (MSIL) code as binary is something of a misnomer, as the
FIGURE 1 -4
actual translation to binary does not occur until runtime when your application
is compiled by the just-in-time (JIT) compiler. However, Microsoft continues to
use the bin directory as the default output directory for your project’s compilation.
Figure 1-4 also shows that the project does not contain an app.config file by default. Most experienced ASP
.NET developers are familiar with using web.config files. app.config files work on the same principle in
that they contain XML, which is used to store project-specific settings such as database connection strings and
other application-specific settings. Using a .config file instead of having your settings in the Windows registry
enables your applications to run side-by-side with another version of the application without the settings from
either version affecting the other. Because each version of your application resides in its own directory, its
Visual Basic Keywords and Syntax
❘ 15
settings are contained in the directory with it, which enables the different versions to run with unique settings.
Before we are done going through the project properties, we will add an app.config file to this project.
For now however, you have a new project and an initial Windows Form, Form1, available in the Solution
Explorer. In this case, the Form1.vb fi le is the primary fi le associated with the default Windows form Form1.
You’ll be customizing this form shortly, but before looking at that, it would be useful to look at some of
the settings available by opening your project properties. An easy way to do this is to right- click on the My
Project heading shown in Figure 1- 4.
Project Properties
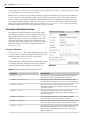
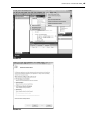
Visual Studio uses a vertically tabbed display for editing your project settings. The project properties display
shown in Figure 1-5 provides access to the newly created ProVB_VS2010 project settings. The project
properties window gives you access to several different aspects of your project. Some, such as Signing,
Security, and Publish, are covered in later chapters. For now, just note that this display makes it easier to
carry out several tasks that once required engineers to work outside the Visual Studio environment.
FIGURE 1 -5
You can customize your assembly name from this screen, as well as reset the type of application and
object to be referenced when starting your application. However, resetting the type of your application is
not recommended. If you start with the wrong application type, it is better to create a new application,
due to all the embedded settings in the application template. In the next section you will look at a button
for changing your assembly information, as well as the capability to defi ne a root namespace for your
application classes. Namespaces are covered in detail in Chapter 4.
You can also associate a given default icon with your form (refer to Figure 1-5), and select a screen other
than the default Form1 as the startup screen.
Near the middle of the dialog are two buttons. Assembly Information is covered in the next section. The
other button, labeled View Windows Settings refers to User Access Control settings, which enable you to
16
❘
CHAPTER 1 VISUAL STUDIO 2010
specify that only certain users can successfully start your application. In short, you have the option to limit
your application access to a specific set of users.
Finally, there is a section associated with enabling an application framework. The application framework
is a set of optional components that enable you to extend your application with custom events and items,
such as a splash screen, with minimal effort. Enabling the framework is the default, but unless you want
to change the default settings, the behavior is the same — as if the framework weren’t enabled. The third
button, View Application Events, adds a new source fi le, ApplicationEvents.vb, to your project, which
includes documentation about which application events are available.
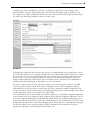
Assembly Information Screen
Selecting the Assembly Information button from within
your My Project window opens the Assembly Information
dialog. Within this dialog, shown in Figure 1- 6, you can
defi ne fi le properties, such as your company ’s name and
versioning information, which will be embedded in the
operating system’s fi le attributes for your project ’s output.
Note these values are stored as assembly attributes in
AssemblyInfo.vb.
Assembly Attributes
The AssemblyInfo.vb file contains attributes, that are used
to set information about the assembly. Each attribute has an
assembly modifier, shown in the following example:
<Assembly: AssemblyTitle("")>
All the attributes set within this file provide information that
is contained within the assembly metadata. The attributes
contained within the file are summarized in Table 1-3:
FIGURE 1 - 6
TABLE 1-3: Attributes of the AssemblyInfo.vb File
ATTRIBUTE
DESCRIPTION
Assembly Title
This sets the name of the assembly, which appears within the
file properties of the compiled file as the description.
Assembly Description
This attribute is used to provide a textual description of the
assembly, which is added to the Comments property for the file.
Assembly Company
This sets the name of the company that produced the
assembly. The name set here appears within the Version tab
of the file properties.
Assembly Product
This attribute sets the product name of the resulting
assembly. The product name appears within the Version tab
of the file properties.
Assembly Copyright
The copyright information for the assembly. This value
appears on the Version tab of the file properties.
Assembly Trademark
Used to assign any trademark information to the assembly. This
information appears on the Version tab of the file properties.
Assembly Version
This attribute is used to set the version number of the assembly.
Assembly version numbers can be generated, which is the
default setting for .NET applications. This is covered in more
detail in Chapter 31.
Visual Basic Keywords and Syntax
❘ 17
ATTRIBUTE
DESCRIPTION
Assembly File Version
This attribute is used to set the version number of the
executable files. This and other deployment-related settings are
covered in more detail in Chapter 34.
COM Visible
This attribute is used to indicate whether this assembly should
be registered and made available to COM applications.
Guid
If the assembly is to be exposed as a traditional COM object,
then the value of this attribute becomes the ID of the resulting
type library.
NeutralResourcesLanguageAttribute
If specified, provides the default culture to use when the current
user’s culture settings aren’t explicitly matched in a localized
application. Localization is covered further in Chapter 27.
Compiler Settings
When you select the Compile tab of the project properties, you should see a window similar to the one shown
in Figure 1-7. One update to Visual Studio 2010 is the return of the Build Configuration settings. In Visual
Studio 2008, the Visual Basic Settings for Visual Studio removed these items from the display; and instead,
when developers asked to debug their code, a debug version was built and executed, and only if the developer
did an explicit build. (Note that if you are using Beta 2, you won’t see these settings restored by default.)
FIGURE 1 -7
18
❘
CHAPTER 1 VISUAL STUDIO 2010
This presented a challenge because this wasn’t the situation for any other set of Visual Studio settings; and
Visual Basic developers were sometimes caught- out when sending what they thought was the latest build of
their source code. If on their last “build” they were testing a fi x and starting the debugger, then they hadn’t
rebuilt the release version. Thus, instead of sending a copy of the released version of their application with
that last tested fi x, they were really sending the last release build made before the fi x. The return of these
settings means that you, as the developer, have explicit control over the type of executable (release or debug,
x64 or x86) that Visual Studio produces.
If you don’t see these drop - downs in your display, you can restore them by selecting Tools ➪ Options, and
then turning on the Advanced compile options. The main reason to restore these options has to do with two
key features that are dependent on this setting. The fi rst is Edit and Continue, which provides the capability
to make a change in executing code and without restarting, having that change available in your running
code while you continue to debug. This is a great tool for simple mistakes that are found during a debug
session, and it is only supported for x86 (32-bit) targeted assemblies. This means you must explicitly target
x86, as shown in Figure 1-7.
In Visual Studio 2008, the default was to target AnyCPU, but this meant that on a 64 -bit developer
workstation, Visual Studio was targeting a 64 -bit assembly for your debug environment. When working
on a 64 -bit workstation, you must explicitly target an x86 environment in order to enable both Edit and
Continue as well as the other dependency, COM-Interop. The second key feature related to x86 is COM.
COM is a 32-bit protocol (as you’ll see in Chapter 28 on COM-Interop, so you are required to target a
32-bit/x86 environment to support COM-Interop.
Aside from your default project file output directory, this page contains several compiler options. The Option
Explicit, Option Infer, and Option Strict settings directly affect your variable usage. Each of the following
settings can be edited by adding an Option declaration to the top of your source code file. When placed
within a source file each of the following settings applies to all of the code entered in that source file, but only
to the code in that file:
➤
Option Explicit — This option has not changed from previous versions of Visual Basic. When
enabled, it ensures that every variable is explicitly declared. Of course, if you are using Option Strict,
then this setting doesn’t matter because the compiler won’t recognize the type of an undeclared
variable. To my knowledge, there’s no good reason to ever turn this option off unless you are
developing pure dynamic solutions, for which compile time typing is unavailable.
➤
Option Strict — When this option is enabled, the compiler must be able to determine the type of each
variable, and if an assignment between two variables requires a type conversion — for example, from
Integer to Boolean — then the conversion between the two types must be expressed explicitly.
➤
Option Compare — This option determines whether strings should be compared as binary strings or
whether the array of characters should be compared as text. In most cases, leaving this as binary is
appropriate. Doing a text comparison requires the system to convert the binary values that are stored
internally prior to comparison. However, the advantage of a text-based comparison is that the character
“A” is equal to “a” because the comparison is case-insensitive. This enables you to perform comparisons
that don’t require an explicit case conversion of the compared strings. In most cases, however, this
conversion still occurs, so it’s better to use binary comparison and explicitly convert the case as required.
➤
Option Infer — This option was new in Visual Studio 2008 and, was added due to the requirements
of LINQ. When you execute a LINQ statement, you can have returned a data table that may or may
not be completely typed in advance. As a result, the types need to be inferred when the command
is executed. Thus, instead of a variable that is declared without an explicit type being defi ned as an
object, the compiler and runtime attempt to infer the correct type for this object.
Existing code developed with Visual Studio 2005 is unaware of this concept, so this option will be off
by default for any project that is migrated to Visual Studio 2008 or Visual Studio 2010. New projects
will have this option turned on, which means that if you cut and paste code from a Visual Studio
2005 project into a Visual Studio 2010 project, or vice versa, you’ll need to be prepared for an error in
the pasted code because of changes in how types are inferred.
Visual Basic Keywords and Syntax
❘ 19
From the properties page Option Explicit, Option Strict, Option Compare, and Option Infer can be set to
either On or Off for your project. Visual Studio 2010 makes it easy for you to customize specific compiler
conditions for your entire project. However, as noted, you can also make changes to the individual
compiler checks that are set using something like Option Strict.
Notice that as you change your Option Strict settings in particular, the notifications with the top few
conditions are automatically updated to reflect the specific requirements of this new setting. Therefore, you
can literally create a custom version of the Option Strict settings by turning on and off individual compiler
settings for your project. In general, this table lists a set of conditions that relate to programming practices
you might want to avoid or prevent, and which you should defi nitely be aware of. The use of warnings for
the majority of these conditions is appropriate, as there are valid reasons why you might want to use or
avoid each but might also want to be able to do each.
Basically, these conditions represent possible runtime error conditions that the compiler can’t detect in
advance, except to identify that a possibility for that runtime error exists. Selecting a Warning for a setting
bypasses that behavior, as the compiler will warn you but allow the code to remain. Conversely, setting a
behavior to Error prevents compilation; thus, even if your code might be written to never have a problem,
the compiler will prevent it from being used.
An example of why these conditions are noteworthy is the warning of an Instance variable accessing a
Shared property. A Shared property is the same across all instances of a class. Thus, if a specific instance
of a class is updating a Shared property, then it is appropriate to get a warning to that effect. This action
is one that can lead to errors, as new developers sometimes fail to realize that a Shared property value is
common across all instances of a class, so if one instance updates the value, then the new value is seen by
all other instances. Thus, you can block this dangerous but certainly valid code to prevent errors related to
using a Shared property.
As noted earlier, option settings can be specific to each source fi le. This involves adding a line to the top of
the source fi le to indicate to the compiler the status of that Option. The following lines will override your
project’s default setting for the specified options. However, while this can be done on a per-source listing
basis, this is not the recommended way to manage these options. For starters, consistently adding this line
to each of your source fi les is time- consuming and potentially open to error:
Option
Option
Option
Option
Explicit On
Compare Text
Strict On
Infer On
Most experienced developers agree that using Option Strict and being forced to recognize when type
conversions are occurring is a good thing. Certainly, when developing software that will be deployed in a
production environment, anything that can be done to help prevent runtime errors is desirable. However,
Option Strict can slow the development of a program because you are forced to explicitly defi ne each
conversion that needs to occur. If you are developing a prototype or demo component that has a limited life,
you might fi nd this option limiting.
If that were the end of the argument, then many developers would simply turn the option off and forget
about it, but Option Strict has a runtime benefit. When type conversions are explicitly identified, the system
performs them faster. Implicit conversions require the runtime system to fi rst identify the types involved in a
conversion and then obtain the correct handler.
Another advantage of Option Strict is that during implementation, developers are forced to consider every
place a conversion might occur. Perhaps the development team didn’t realize that some of the assignment
operations resulted in a type conversion. Setting up projects that require explicit conversions means that the
resulting code tends to have type consistency to avoid conversions, thus reducing the number of conversions
in the final code. The result is not only conversions that run faster, but also, it is hoped, a smaller number
of conversions.
Option Infer is a powerful feature. It is used as part of LINQ and the features that support LINQ, but it affects
all code. In the past, you needed to write the AS <type> portion of every variable definition in order to have a
variable defined with an explicit type. However, now you can dimension a variable and assign it an integer or
20
❘
CHAPTER 1 VISUAL STUDIO 2010
set it equal to another object, and the AS Integer portion of your declaration isn’t required, it is inferred as
part of the assignment operation. Be careful with Option Infer; if abused it can make your code obscure, since
it reduces readability by potentially hiding the true type associated with a variable. Some developers prefer to
limit Option Infer to per file declarations to limit its use to when it is needed, for example with LINQ.
How to use Option Infer in LINQ is covered in Chapter 10.
In addition, note that Option Infer is directly affected by Option Strict. In an ideal world, Option Strict
Off would require that Option Infer also be turned off or disabled in the user interface. That isn’t the case,
although it is the behavior that is seen; once Option Strict is off, Option Infer is essentially ignored.
Below the grid of individual settings in Figure 1-7 is a series of check boxes. Two of these are self-explanatory
and; the third is the option to generate XML comments for your assembly. These comments are generated
based on the XML comments that you enter for each of the classes, methods, and properties in your source file.
Visual Basic Express has fewer check boxes, but users do have access to the Advanced Compile Options
button. This button opens the Advanced Compiler Settings dialog shown in Figure 1-8. Note a couple of
key elements on this screen, the fi rst being the “Remove integer overflow checks” check box. When these
options are enabled, the result is a performance hit on Visual Basic applications in comparison to C#.
The compilation constants are values you shouldn’t need to touch normally. Similarly, the generation of
serialization assemblies is something that is probably best left in auto mode.
FIGURE 1 -8
However, the last item on the screen enables you to target different environments. If you select a version prior to
version 4, then, when you begin to add references, the Add References tab recognizes which version of .NET you
are targeting and adjusts the list of available references to exclude those that are part of version 4 — similarly
excluding 4, 3.5, and 3.0 if you are targeting .NET 2.0.
Visual Basic Keywords and Syntax
❘ 21
Note that this check occurs when adding references; there is no check when you change this value to see
whether your updated value confl icts with any existing references. Therefore, if you change this value,
then make sure you update any of your existing references to remove any that are part of .NET 4. You are
bound to have at least one because when the template creates your project it automatically adds a series of
references determined in part by the target framework specified when you created your application.
Debug Properties
The Express Edition of Visual Basic 2010 supports local debugging. This means it supports not only
the .NET-related Debug and Trace classes discussed in Chapter 6, but also actual breakpoints and the
associated interactive debugging available in all versions of Visual Studio. However, as noted, the full
versions of Visual Studio provide enhanced debugging options not available in Visual Basic 2010 Express
Edition. Figure 1-9 shows the project debugger startup options from Visual Studio 2010.
The default action shown is actually the only option available to Express users — which is to start the
current project. However, Visual Studio 2010 developers have two additional options. The fi rst is to start
an external program. In other words, if you are working on a DLL or a user control, then you might want
to have that application start, which can then execute your assembly. Doing this is essentially a shortcut,
eliminating the need to bind to a running process.
FIGURE 1 - 9
Similarly for Web development, you can reference a specific URL to start that Web application. This is often a
mixed blessing, as with ASP.NET 2.0, Visual Studio automatically attempts to start an ASP.NET application
based on the page you are currently editing. This is a change from ASP.NET 1.x, which allowed you to define
a start page. Because ASP.NET 2.0 does not use project files, the new behavior was introduced. In most cases
it works just fine, but if you have a Web application requiring authentication, then in most cases it makes
more sense to actually place that URL into the debug settings for your application.
However, developers have three options related to starting the debugger. The fi rst is to apply command-line
arguments to the startup of a given application. This, of course, is most useful for console applications, but
in some cases developers add command-line parameters to GUI applications. The second option is to select a
different directory, a working directory, to be used to run the application. Generally, this isn’t necessary; but
it’s desirable in some cases because of path or permission requirements or having an isolated runtime area.
22
❘
CHAPTER 1 VISUAL STUDIO 2010
As noted, Visual Studio 2010 provides support for remote debugging, although such debugging is involved
and not configured for simple scenarios. Remote Debugging can be a useful tool when working with an
integration test environment where developers are prevented from installing Visual Studio but need to be
able to debug issues. However, you shouldn’t be limited by just using the debugger for understanding what is
occurring in your application at runtime.
Another alternative for determining what is occurring within a remote application is using the Debug and Trace
classes. As noted in Chapter 6, the Debug and Trace classes combined with effective error handling, often make it
faster and easier to determine remote errors then setting up the remote debugger. However, for those environments
where an application runs only on a central server, and for which developers have the necessary permissions to
run the debugger but not install a copy of Visual Studio, it is possible to leverage remote debugging.
Finally, as might be expected, users of Visual Studio 2010 who work with multiple languages, and who use
tools that are tightly integrated with SQL Server, have additional debuggers. The fi rst of these is support
for debugging outside of the CLR — what is known as unmanaged code. As a Visual Basic developer, the
only time you should be using unmanaged code is when you are referencing legacy COM components.
The developers most likely to use this debugger work in C++.
The next option turns on support for SQL Server debugging, a potentially useful feature. In short, it’s possible,
although the steps are not trivial, to have the Visual Studio debugging engine step directly into T-SQL stored
procedures so that you can see the interim results as they occur within a complex stored procedure.
References
It’s possible to add additional references as part of your project. Similar to the default code fi les that are
created with a new project, each project template has a default set of referenced libraries. Actually, it has
a set of imported namespaces and a subset of the imported namespaces also referenced across the project.
This means that while you can easily reference the classes in the referenced namespaces, you still need to
fully qualify a reference to something less common. For example, to use a StringBuilder you’ll need
to specify the fully qualified name of System.Text.StringBuilder. Even though the System.Text
namespace is referenced it hasn’t been imported by default. For Windows Forms applications targeting
.NET 4, the list of default referenced namespaces is fairly short, as shown in Table 1- 4.
TABLE 1 -4: Default References in a New Project
REFERENCE
DESCRIPTION
System
Often referred to as the root namespace. All the base data types (String,
Object, and so on) are contained within the System namespace. This
namespace also acts as the root for all other System classes.
System.Core
This dll contains a collection of namespaces, some of which are required to support
LINQ to in-memory objects, as well as support for several OS-level interfaces.
System.Data
Classes associated with ADO.NET and database access. This namespace is the
root for SQL Server, Oracle, and other data access classes.
System.Data
.DataSetExtensions
Defines a collection of extension methods used by the core DataSet class.
These are used when working with LINQ to DataSets.
System.Deployment
Classes used for ClickOnce Deployment. This namespace is covered in more
detail in Chapter 34.
System.Drawing
Provides access to the GDI+ graphics functionality
System.Windows.Forms
Classes used to create traditional Windows- based applications. This
namespace is covered in more detail in Chapters 14 and 15.
System.XML
Root namespace for all of the XML classes
System.XML.Linq
Root namespace to support the Language Integrated Query (LINQ) native
language queries for XML data sources.
Visual Basic Keywords and Syntax
❘ 23
The preceding list of referenced libraries is for .NET 4, so if you instead create a project that targets .NET
2.0, this list will be shorter. Keep in mind that changing your target framework does not update any existing
references. If you are going to attempt to target the .NET 2.0 Framework, then you’ll want to remove references
that have a version higher than 2.0.0.0. References such as System.Core enable new features in the System
namespace that are associated with .NET 3.5.
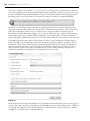
To review details about the imported and referenced namespaces, select the References tab in your project
properties display, as shown in Figure 1-10. This tab enables you to check for unused references and even
defi ne reference paths. More important, it is from this tab that you select other .NET Class Libraries and
applications, as well as COM components. Selecting the Add drop - down button gives you the option to add
a reference to a local DLL or a Web service.
FIGURE 1 -10
When referencing DLLs you have three options: Reference an assembly from the GAC, reference an assembly
based on a fi le path, or reference another assembly from within your current solution. Each of these options
has advantages and disadvantages. The only challenge for assemblies that are in the GAC is that your
application is dependent on what is potentially a shared resource. In general, however, for assemblies that
are already in the GAC, referencing them is a straightforward, easily maintainable process.
In addition to referencing libraries, you can reference other assemblies that are part of your solution. If
your solution consists of more than a single project, then it is straightforward and highly recommended
to use project references in order to enable those projects to reference each other. While you should avoid
circular references — Project A references Project B which references Project A — using project references
is preferred over fi le references. With project references, Visual Studio can map updates to these assemblies
as they occur during a build of the solution. It’s possible for Visual Studio to automatically update the
referenced assemblies in your executable project to be the latest build of the referenced DLLs that are part
of the same solution. Note that the target needs to be an executable. Visual Studio will automatically update
references between DLL projects in a common solution.
24
❘
CHAPTER 1 VISUAL STUDIO 2010
This is different from adding a reference to a DLL that is located within a specified directory. When you create
a reference via a path specification, Visual Studio can check that path for an updated copy of the reference,
but your code is no longer as portable as it would be with a project reference. More important, unless there
is a major revision, Visual Studio usually fails to detect the types of changes you are likely to make to that file
during the development process. As a result, you’ll need to manually update the referenced file in the local
directory of the assembly that’s referencing it. For your own code often it’s best to leverage project references,
rather than path-based references. However, for third party controls where you’ll often only have an installed
location, one which isn’t likely to change as you move between machines, a path based reference can work.
On the other hand an alternative solution which is commonly used, is to ensure that instead of referencing
third party controls based on their location, that instead ‘copy local’ references are used so that the version
specific copy of the control deploys with the code that depends on it. This means that different versions of the
controls can exist on the same server in different applications. Additionally because a local copy of the control
is with the application, the application can be XCopy deployed without needing to register the controls.
Resources
In addition to referencing other assemblies, it is quite common for a .NET application to need to reference things
such as images, icons, audio, and other files. These files aren’t used to provide application logic but are used at
runtime to provide support for the look, feel, and even text used to communicate with the application’s user. In
theory, you can reference a series of images associated with your application by looking for those images based
on the installed file path of your application. Doing so, however, places your application’s runtime behavior at
risk, because a user might choose to replace, copy for profit, or just delete your files.
This is where project references become useful. Instead of placing the raw fi les onto the operating system
alongside your executable, Visual Studio will package these fi les into your executable so that they are less
likely to be lost or damaged. Figure 1-11 shows the Resources tab, which enables you to review and edit all
the existing resources within a project, as well as import fi les for use as resources in your project. It even
allows you to create new resources from scratch.
FIGURE 1 -11
Visual Basic Keywords and Syntax
❘ 25
Note one little-known feature of this tab: Using the Add Resource drop - down button and selecting an image
(not an existing image but one based on one of the available image types) will create a new image fi le and
automatically open Microsoft Paint (for Express Edition developers); this enables you to actually create the
image that will be in the image fi le.
Users of Visual Studio 2010 have additional capabilities not supported by Visual Basic’s Express Edition.
For one thing, instead of using Paint, Visual Studio provides a basic image- editing tool, so when Visual
Studio developers add a new image (not from a fi le), this editor opens within Visual Studio.
Additionally, within the list of Add Resource items, Visual Studio users can select or create a new icon.
Choosing to create a new icon opens Visual Studio’s icon editor, which provides a basic set of tools for
creating custom icons to use as part of your application. This makes working with .ico fi les easier because
you don’t have to hunt for or purchase such fi les online; instead, you can create your own icons.
However, images aren’t the only resources that you can embed with your executable. Resources also apply
to the fi xed text strings that your application uses. By default, people tend to embed this text directly into
the source code so that it is easily accessible to the developer. Unfortunately, this leaves the application
difficult to localize for use with a second language. The solution is to group all of those text strings together,
thereby creating a resource fi le containing all of the text strings, which is still part of and easily accessible
to the application source code. When the application is converted for use in another language, this list
of strings can be converted, making the process of localization easier. Localization is covered in detail in
Chapter 27.
The next tab is the Services tab. This tab is discussed in more detail in Chapter 13, which
addresses services.
Settings
As noted earlier in the discussion of the Solution Explorer, the default project template does not create any
application settings; accordingly, an app.config fi le is neither needed nor created. app.config fi les are
XML fi les that defi ne any custom application settings that a developer wants to be able to change without
needing to recompile the application. Because these settings live in an XML fi le, they can be modified in
between or even during application execution.
One original goal of .NET was to reduce the version confl ict that can occur when a component has
registered with global settings. A confl ict would occur if two different applications were attempting to
reference two different versions of that component. Because the settings were global and stored in the
central system registry, only one could be registered correctly. Since the different applications each wanted
its specific version of the component and related settings, one of the applications worked while the other
application broke.
.NET provided the capability to place version-specific project references in a local directory with the
application, enabling two different applications to reference the appropriate version of that component.
However, the second part of the problem was the central application settings. The app.config fi le
provides the same capability, but its goal is to allow for local storage of application settings. Under .NET
1.x, support for application settings was still minimal, as most developers were still looking to the central
system registry for this purpose. At the same time, the developer tools associated with settings were also
minimal.
Fortunately, under .NET 2.0 this changed dramatically. Visual Studio 2010 provides significant support
for application settings, including the Settings tab, shown in Figure 1-12. This tab enables Visual
Basic developers to identify application settings and automatically create these settings within the
app.config fi le.
26
❘
CHAPTER 1 VISUAL STUDIO 2010
FIGURE 1 -12
Figure 1-12 illustrates several elements related to the application settings capabilities of Visual Basic.
The fi rst setting is of type String. Under .NET 1.x, all application settings were seen as strings, and this
was considered a weakness. Accordingly, the second setting, LastLocation, exposes the Type drop - down,
illustrating that under Visual Studio 2010 you can create a setting that has a well- defi ned type.
However, strongly typed settings are not the most significant set of changes related to application settings.
The very next column defi nes the scope of a setting. There are two possible options: application wide or user
specific. The settings defi ned with application scope are available to all users of the application. As shown in
Figure 1-12, this example creates a sample connection string to store for the application.
The alternative is a user-specific setting. Such settings have a default value; in this case, the last location
defaults to 0,0. However, once a user has read that default setting, the application generally updates and
saves the user-specific value for that setting. As indicated by the LastLocation setting, each user of the
application might close it after having moved it to a new location on the screen; and the goal of such a
setting would be to reopen the application where it was last located. Thus, the application would update
this setting value, and Visual Basic makes it easy to do this, as shown in the following code:
My.Settings.LastLocation = Me.Location
My.Settings.Save()
That’s right — Visual Basic requires only two lines of code that leverage the My namespace in order for
you to update a user’s application setting and save the new value. Meanwhile, let’s take a look at what is
occurring within the newly generated app.config fi le. The following XML settings demonstrate how the
app.config fi le defi nes the setting values that you manipulate from within Visual Studio:
<?xml version="1.0" encoding="utf-8" ?>
<configuration>
<configSections>
<sectionGroup name="userSettings" type="System.Configuration.
UserSettingsGroup, System, Version=4.0.0.0, Culture=neutral,
PublicKeyToken=b77a5c561934e089" >
Visual Basic Keywords and Syntax
❘ 27
<section name="ProVB_VS2010.My.MySettings" type="System.
Configuration.ClientSettingsSection, System, Version=4.0.0.0, Culture=neutral,
PublicKeyToken=b77a5c561934e089" allowExeDefinition="MachineToLocalUser"
requirePermission="false" />
</sectionGroup>
<sectionGroup name="applicationSettings" type="System.Configuration.
ApplicationSettingsGroup, System, Version=4.0.0.0, Culture=neutral,
PublicKeyToken=b77a5c561934e089" >
<section name="ProVB_VS2010.My.MySettings" type="System.Configuration.
ClientSettingsSection, System, Version=4.0.0.0, Culture=neutral,
PublicKeyToken=b77a5c561934e089" requirePermission="false" />
</sectionGroup>
</configSections>
<system.diagnostics>
<sources>
<!-- This section defines the logging configuration for My.Application.Log -->
<source name="DefaultSource" switchName="DefaultSwitch">
<listeners>
<add name="FileLog"/>
<!-- Uncomment the below section to write to the Application Event Log -->
<!--<add name="EventLog"/>-->
</listeners>
</source>
</sources>
<switches>
<add name="DefaultSwitch" value="Information" />
</switches>
<sharedListeners>
<add name="FileLog"
type="Microsoft.VisualBasic.Logging.FileLogTraceListener, Microsoft.
VisualBasic, Version=8.0.0.0, Culture=neutral, PublicKeyToken=b03f5f7f11d50a3a,
processorArchitecture=MSIL"
initializeData="FileLogWriter"/>
<!-- Uncomment the below section and replace APPLICATION_NAME with the
name of your application to write to the Application Event Log -->
<!--<add name="EventLog"
type="System.Diagnostics.EventLogTraceListener" initializeData="APPLICATION_NAME"/>-->
</sharedListeners>
</system.diagnostics>
<userSettings>
<ProVB_VS2010.My.MySettings>
<setting name="LastLocation" serializeAs="String">
<value>0, 0</value>
</setting>
</ProVB_VS2010.My.MySettings>
</userSettings>
<applicationSettings>
<ProVB_VS2010.My.MySettings>
<setting name="ConnectionString" serializeAs="String">
<value>server=(local);Database=adventureworks</value>
</setting>
</ProVB_VS2010.My.MySettings>
</applicationSettings>
</configuration>
Code snippet from app.config
As shown here, Visual Studio automatically generated all the XML needed to define these settings and save
the default values. Note that individual user settings are not saved back into the config file, but rather to a
user-specific working directory. In fact, it is possible not only to update application settings with Visual Basic,
28
❘
CHAPTER 1 VISUAL STUDIO 2010
but also to arrange to encrypt those settings, although this behavior is outside the scope of what you can
do from Visual Studio.
Other Project Property Tabs
In addition to the tabs that have been examined in detail, there are other tabs which are more specific. In
most cases these tabs are used only in specific situations that do not apply to all projects.
Signing
This tab is typically used in conjunction with deployment. If you are interested in creating a commercial
application that needs to be installed on client systems, you’ll want to sign your application. There are
several advantages to signing your application, including the capability to publish it via ClickOnce
deployment. Therefore, it is possible to sign an application with a developer key if you want to deploy an
application internally.
My Extensions
The My Extensions tab enables you to create and leverage extensions to Visual Basic’s My namespace. By
default, Visual Studio 2010 ships with extensions to provide My namespace shortcuts for key WPF and Web
applications.
Security
This tab enables you to defi ne the security requirements of your application. You’ll need these as part of the
ClickOnce publishing process, which is covered as part of deployment in Chapter 34.
Publish
This tab is used to configure and initiate the publishing of an application. From this tab you can update
the published version of the application and determine where to publish it. This tab is also covered in more
detail in Chapter 34.
Code Analysis
This tab is only available for Visual Studio 2010 Premium or Ultimate. The tab enables the developer to
turn on and configure the static code analysis settings. These settings are used after compilation to perform
automated checks against your code. Because these checks can take significant time, especially for a large
project, they must be manually turned on.
PROJECT PROVB_VS2010
The Form Designer opens by default when a new project is created. If you have closed it, then you can
easily reopen it by right- clicking Form1.vb in the Solution Explorer and selecting View Designer from the
pop -up menu. From this window, you can also bring up the Code view for this form. However, Figure 1-13
illustrates the default view you see when your project template completes. On the screen is the design surface
upon which you can drag controls from the Toolbox to build your user interface and update properties
associated with your form.
The Properties pane, shown in more detail in Figure 1-14, is by default placed in the lower-right corner of
the Visual Studio window. Like many of the other windows in the IDE, if you close it, it can be accessed
through the View menu. Alternatively, you can use the F4 key to reopen this window. The Properties pane is
used to set the properties of the currently selected control, or for the Form as a whole.
Project ProVB_VS2010
FIGURE 1 -13
Each control you place on your form has its own distinct set
of properties. For example, in the Design view, select your
form. You’ll see the Properties window adjust to display the
properties of Form1 (refer to Figure 1-14). This is the list of
properties associated with your form. If you want to limit how
small a user can reduce the display area of your form, then you
can now defi ne this as a property.
For your sample, go to the Text property and change the
default of Form1 to “Professional VB.NET.” Once you have
accepted the property change, the new value is displayed as
the caption of your form. Later in this section, you’ll set form
properties in code. You’ll see that .NET properties are defi ned
within your source fi le, unlike other environments where
properties you edit through the user interface are hidden in
some binary or proprietary portion of the project.
Now that you’ve looked at the form’s properties, open the code
associated with this fi le by either right- clicking Form1.vb in the
Solution Explorer and selecting Code view, or right- clicking
the form in the Design view and selecting View Code from the
pop -up menu.
The initial display of the form looks very simple. There is no
code in the Form1.vb fi le. Visual Basic 2005 introduced a
capability called partial classes. Partial classes are covered
briefly in Chapter 2, and Visual Studio leverages them for the
code, which is generated as part of the user interface designer.
FIGURE 1 -14
❘ 29
30
❘
CHAPTER 1 VISUAL STUDIO 2010
Visual Studio places all the generated source code for your form in the fi le Form1.Designer.vb. Because
the “Designer” portion of this name is a convention that Visual Studio recognizes, it hides these fi les by
default when you review your project in the Solution Explorer. As noted earlier, by asking Visual Studio to
“show all fi les,” you can fi nd these generated fi les. If you open a “Designer.vb” fi le, you’ll see that quite a
bit of custom code is generated by Visual Studio and already in your project.
To do this, go to the toolbar located in the Solution Explorer window and select the Show All Files button. This
will change your project display and a small plus sign will appear next to the Form1.vb file. Expanding this entry
displays the Form1.Designer.vb file, which you can open within the IDE. Doing this for Form1.Designer.vb
for the ProVB_VS2010 project you created will result in a window similar to the one shown in Figure 1-15.
FIGURE 1 -15
Note that the contents of this fi le are generated. For now, don’t try to make any changes. Visual Studio
automatically regenerates the entire fi le when a property is changed, so any changes you make will be lost.
The following lines start the declaration for your form in the fi le Form1.Designer.vb:
<Global.Microsoft.VisualBasic.CompilerServices.DesignerGenerated()> _
Partial Class Form1
Inherits System.Windows.Forms.Form
Code snippet from Form1.Designer
The first line is an attribute that can be ignored. Next is the line that actually declares a new class called Form1.
Note that in spite of the naming convention used by Visual Studio to hide the generated UI class implementation,
the name of your class and the file in which it exists are not tightly coupled. Thus, your form will be referenced
in the code as Form1 unless you modify the name used in the class declaration. Similarly, you can rename the file
that contains the class without changing the actual name of the class.
One powerful result of forms being implemented as classes is that you can now derive one form from another
form. This technique is called visual inheritance, although the elements that are actually inherited may not be
displayed.
Project ProVB_VS2010
❘ 31
Form Properties Set in Code
As noted earlier, Visual Studio keeps every object’s custom property values in the source code. To do this, it
adds a method to your form class called InitializeComponent. As the name suggests, this method handles
the initialization of the components contained on the form. A comment before the procedure warns you that the
Form Designer modifies the code contained in the procedure, and that you should not modify the code directly.
This module is part of the Form1.Designer.vb source file, and Visual Studio updates this section as changes
are made through the IDE.
'NOTE: The following procedure is required by the Windows Form Designer
'It can be modified using the Windows Form Designer.
'Do not modify it using the code editor.
<System.Diagnostics.DebuggerStepThrough()> _
Private Sub InitializeComponent()
Me.SuspendLayout()
'
'Form1
'
Me.AutoScaleDimensions = New System.Drawing.SizeF(8.0!, 16.0!)
Me.AutoScaleMode = System.Windows.Forms.AutoScaleMode.Font
Me.ClientSize = New System.Drawing.Size(328, 258)
Me.Name = "Form1"
Me.Text = "Professional VB.NET"
Me.ResumeLayout(False)
End Sub
Code snippet from Form1.Designer
The seven lines of the InitializeComponent procedure assign values to the properties of your Form1 class.
All the properties of the form and controls are now set directly in code. When you change the value of a
property of the form or a control through the Properties window, an entry is added to InitializeComponent
that assigns that value to the property. Previously, while examining the Properties window, you set the
Text property of the form to Professional VB.NET, which caused the following line of code to be added
automatically:
Me.Text = "Professional VB.NET"
The properties of the form class that are set in InitializeComponent are shown in Table 1-5.
TABLE 1 -5: Properties Set by InitializeComponent
PROPERTY
DESCRIPTION
SuspendLayout
Specifies that the form should not make updates to what is displayed to the
user. It is called so that as each change is made, the form doesn’t seem to
appear in pieces.
AutoScaleDimensions
Initializes the size of the font used to lay out the form at design time. At
runtime, the font that is actually rendered is compared with this property, and
the form is scaled accordingly.
AutoScaleMode
Indicates that the form will use fonts that are automatically scaled based on
the display characteristics of the runtime environment.
ClientSize
Sets the area in which controls can be placed (the client area). It is the size of
the form minus the size of the title bar and form borders.
Name
This property is used to set the textual name of the form.
ResumeLayout
This tells the form that it should resume the normal layout and displaying of its
contents.
32
❘
CHAPTER 1 VISUAL STUDIO 2010
Code Regions
Source files in Visual Studio allow you to collapse blocks of code. The idea is that in most cases you can reduce
the amount of onscreen code, which seems to separate other modules within a given class, by collapsing the
code so it isn’t visible; this feature is known as outlining. For example, if you are comparing the load and
save methods and in between you have several other blocks of code, then you can effectively “hide” this code,
which isn’t part of your current focus.
By default, there is a minus sign next to every method (sub or function). This makes it easy to hide or show
code on a per-method basis. If the code for a method is hidden, the method declaration is still shown and
has a plus sign next to it indicating that the body code is hidden. This feature is very useful when you are
working on a few key methods in a module and you want to avoid scrolling through many screens of code
that are not relevant to the current task.
It is also possible to create custom regions of code so you can hide and show portions of your source fi les.
For example, it is common to see code where all of the properties are placed in one region, and all of the
public methods are placed in another. The #Region directive is used for this within the IDE, though it has
no effect on the actual application. A region of code is demarcated by the #Region directive at the top and
the #End Region directive at the end. The #Region directive that is used to begin a region should include a
description, which appears next to the plus sign shown when the code is minimized.
The outlining enhancement was in part inspired by the fact that the original Visual Studio designers generated
a lot of code and placed all of this code in the main vb fi le for that form. It wasn’t until Visual Studio
2005 and partial classes that this generated code was placed in a separate fi le. Thus the region allowed the
generated code section to be hidden when a source fi le was opened. Being able to see the underpinnings
of your generated UI does make it is easier to understand what is happening, and possibly to manipulate
the process in special cases. However, as you can imagine, it can become problematic; hence the #Region
directive, which can be used to organize groups of common code and then visually minimize them.
Visual Studio 2010 developers, but not Express Edition developers, can also control outlining throughout a
source file. Outlining can be turned off by selecting Edit ➪ Outlining ➪ Stop Outlining from the Visual Studio
menu. This menu also contains some other useful functions. A section of code can be temporarily hidden by
highlighting it and selecting Edit ➪ Outlining ➪ Hide Selection. The selected code will be replaced by ellipses
with a plus sign next to it, as if you had dynamically identified a region within the source code. Clicking the
plus sign displays the code again.
Tear-Away Tabs
You may have noticed in Figure 1-15 that the Code View and Form Designer windows open in a tabbed
environment. This environment is the default for working with the code windows inside Visual Studio, but
you can change this. As with any other window in Visual Studio 2010, you can mouse down on the tab and
drag it to another location.
What makes this especially useful in Visual Studio 2010 is that you can drag a tab completely off of the main
window and have it open as a standalone window elsewhere. Thus, you can take the current source file you
are editing and drag it to a separate monitor from the remainder of Visual Studio — examples of this are the
screens earlier in this chapter showing the project properties. If you review those images you’ll see that they are
not embedded within the larger Visual Studio 2010 frame but have been pulled out into their own window.
Running ProVB_VS2010
Now that you’ve reviewed the elements of your generated project, let’s test the code before continuing. To
run an application from within Visual Studio, you have several options; the fi rst is to click the Start button,
which looks like the Play button on a tape recorder. Alternatively, you can go to the Debug menu and select
Start. Finally, the most common way of launching applications is to press F5.
Once the application starts, an empty form is displayed with the standard control buttons (in the upperright corner) from which you can control the application. The form name should be Professional VB.NET,
which you applied earlier. At this point, the sample doesn’t have any custom code to examine, so the next
step is to add some simple elements to this application.
Project ProVB_VS2010
❘ 33
Customizing the Text Editor
In addition to being able to customize the overall environment provided by Visual Studio, you can customize
several specific elements related to your development environment. More so than in any previous version,
the capability to modify the environment has been enhanced. With Visual Studio 2010, the user interface
components have been rewritten using WPF so that the entire display provides a much more graphical
environment and better designer support.
Both Visual Studio 2010 and Visual Basic 2010 Express Edition have a rich set of customizations related
to a variety of different environment and developer settings. Admittedly, Visual Studio 2010’s feature set
offers a larger number of options for editing, but rest assured that the Express Edition contains many more
options for editing than most people expect. For example, common to both IDEs is a text editor that allows
for customization. If you’ve ever had to show code to an audience — for example, in a group code review —
the capability to adjust things such as font size and other similar options is great.
To leverage Visual Studio’s settings, select Tools ➪ Options to open the Options dialog, shown in
Figure 1-16. Within the dialog, make sure the Show all settings check box is selected. Next, select the
Text Editor folder, and then the All Languages folder. This section enables you to make changes to the text
editor that are applied across every supported development language. Additionally, you can select the Basic
folder to make changes that are specific to how the text editor behaves when you edit VB source code.
FIGURE 1 -16
From this dialog, it is possible to modify the number of spaces that each tab will insert into your source code
and to manage several other elements of your editing environment. Within this dialog you see settings that are
common for all text editing environments, as well as the ability to customize specific settings for specific languages.
For example the section specific to Visual Basic includes settings that allow for word wrapping and line numbers.
One little-known but useful capability of the text editor is line numbering. Checking the Line numbers check box
will cause the editor to number all lines, which provides an easy way to unambiguously reference lines of code.
Visual Studio also provides a visual indicator so you can track your changes as you edit. Enabling the Track
changes setting under the Text Editor options causes Visual Studio to provide a colored indicator in places where
you have modified a file. This indicator appears as a colored bar at the left margin of your display. It shows
which portions of a source file have been recently edited and whether those changes have been saved to disk.
IntelliSense, Code Expansion, and Code Snippets
One of the reasons why Microsoft Visual Studio is such a popular development environment is because it
was designed to support developer productivity. That sounds really good, but let’s back it up. People who
34
❘
CHAPTER 1 VISUAL STUDIO 2010
are unfamiliar with Visual Studio might just assume that “productivity” refers to organizing and starting
projects. Certainly, as shown by the project templates and project settings discussed so far, this is true, but
those features don’t speed your development after you’ve created the project.
This section covers three features that target your productivity while writing code. They are of differing
value and are specific to Visual Studio. The fi rst, IntelliSense, has always been a popular feature of
Microsoft tools and applications. The second feature, code expansion, is another popular feature available
since Visual Studio 2005: It enables you to type a keyword, such as “select,” and then press the Tab key to
automatically insert a generic select- case code block, which you can then customize. Finally, going beyond
this, you can use the right mouse button and insert a code snippet at the location of your mouse click. As
you can tell, each of these builds on the developer productivity capabilities of Visual Studio.
IntelliSense
IntelliSense has been enhanced in Visual Studio 2010. Early versions of IntelliSense required you to first identify a
class or property in order to make uses of the IntelliSense feature. Beginning with Visual Studio 2008, IntelliSense
is activated with the first letter you type, so you can quickly identify classes, commands, and keywords that you
need. This capability continues with Visual Studio 2010, but the IDE team worked hard to enhance IntelliSense
performance so that it won’t sometimes feel like the IDE is trying to keep up with your typing.
Once you’ve selected a class or keyword, IntelliSense continues, enabling you to not only work with the
methods of a class, but also automatically display the list of possible values associated with an enumerated
list of properties when one has been defi ned. IntelliSense also provides a ToolTip -like list of parameter
defi nitions when you are making a method call.
Figure 1-17 illustrates how IntelliSense becomes available with the first character you type. Note that the dropdown window has two tabs on the bottom; one is optimized for the items that you are likely to want, while
the other shows you everything that is available. In addition, IntelliSense works with multiword commands.
For example, if you type Exit and a space, IntelliSense displays a drop-down list of keywords that could
follow Exit. Other keywords that offer drop-down lists to present available options include Goto, Implements,
Option, and Declare. In most cases, IntelliSense displays more ToolTip information in the environment than in
past versions of Visual Studio, and helps developers match up pairs of parentheses, braces, and brackets.
FIGURE 1 -17
Project ProVB_VS2010
❘ 35
Finally, note that IntelliSense is based on your editing context. While editing a fi le, you may reach a point
where you are looking for a specific item to show up in IntelliSense but when you repeatedly type slightly
different versions, nothing appears. IntelliSense recognizes that you aren’t in a method or you are outside of
the scope of a class, so it removes items that are inappropriate for the current location in your source code
from the list of items available from IntelliSense.
Code Expansion
Going beyond IntelliSense is code expansion. Code expansion recognizes that certain keywords are
consistently associated with other lines of code. At the most basic level, this occurs when you declare a new
Function or Sub: Visual Studio automatically inserts the End Sub or End Function line once you press
Enter. Essentially, Visual Studio is expanding the declaration line to include its matching endpoint.
However, true code expansion goes further than this. With true code expansion, you can type a keyword
such as For, ForEach, Select, or any of a number of Visual Basic keywords. If you then use the Tab key,
Visual Studio will attempt to recognize that keyword and insert the block of code that you would otherwise
need to remember and type yourself. For example, instead of needing to remember how to format the
control values of a Select statement, you can just type this fi rst part of the command and then press Tab to
get the following code block:
Select Case VariableName
Case 1
Case 2
Case Else
End Select
Unfortunately, this is a case where just showing you the code isn’t enough. That’s because the code that is inserted
has active regions within it that represent key items you will customize. Thus, Figure 1-18 provides a better
representation of what is inserted when you expand the Select keyword into a full Select Case statement.
FIGURE 1 -18
When the block is inserted, the editor automatically positions your cursor in the first highlighted block —
VariableName. When you start typing the name of the variable that applies, the editor automatically clears that
36
❘
CHAPTER 1 VISUAL STUDIO 2010
static VariableName string, which is acting as a placeholder. Once you have entered the variable name you want,
you can just press Tab. At that point the editor automatically jumps to the next highlighted item. This capability
to insert a block of boilerplate code and have it automatically respond to your customization is extremely useful.
Code expansion enables you to quickly shift between the values that need to be customized, but these values
are also linked where appropriate, as in the next example. Another code expansion shortcut creates a new
property in a class. If at the class level you type the letters “prop” and then press the Tab key twice, after the
first tab you’ll find that your letters become the word “Property”; and after the second tab the code shown in
Figure 1-19 will be added to your existing code. On the surface this code is similar to what you see when you
expand the Select statement. Note that although you type prop, even the internal value is part of this code
expansion. Furthermore, although Visual Basic implemented a property syntax that is no longer dependent on
an explicit backing field, this expansion provides the more robust syntax that uses an explicit backing field.
FIGURE 1 -19
The difference, however, is that the same value String in Figure 1-19 is repeated for the property. The value
you see is the default. However, when you change the first such entry from String to Integer, Visual Studio
automatically updates all three locations because it knows they are linked. Using the code shown in Figure 1-19,
update the property value to be m_Count. Press Tab and change the type to Integer; press Tab again and label
the new property Count. This gives you a simple property on this form for use later when debugging.
The completed code should look like the following block:
Private m_Count As Integer
Public Property Count() As Integer
Get
Return m_Count
End Get
Set(ByVal value As Integer)
m_Count = value
End Set
End Property
Code snippet from Form1
Project ProVB_VS2010
❘ 37
This capability to fully integrate the template supporting the expanded code with the highlighted elements,
helping you navigate to the items you need to edit, makes code expansion such a valuable tool.
Code Snippets
You can, with a click of your mouse, browse a library of code blocks, which, as with code expansion,
you can insert into your source fi le. However, unlike code expansion, these snippets aren’t triggered by a
keyword. Instead, you right- click and (as shown in Figure 1-20) select Insert Snippet from the context menu.
This starts the selection process for whatever code you want to insert.
FIGURE 1 -20
The snippet library, which is installed with Visual Studio, is fully expandable, as discussed later in this chapter.
Snippets are categorized by the function on which each is focused. For example, all the code you can reach via
code expansion is also available as snippets, but snippets go well beyond that list. There are snippet blocks for
XML-related actions, for operating system interface code, for items related to Windows Forms, and, of course,
a lot of data-access-related blocks. Unlike code expansion, which enhances the language in a way similar to
IntelliSense, code snippets are blocks of code focused on functions developers often write from scratch.
As shown in Figure 1-21, the insertion of a snippet triggers the creation of a placeholder tag and a context
window showing the categories of snippets. Each of the folders can contain a combination of snippet fi les or
subdirectories containing still more snippet fi les. Visual Basic 2010 Express contains a subset of the folders
provided with Visual Studio 2010. In addition, Visual Studio includes the folder My Code Snippets, to
which you can add your own custom snippet fi les.
Selecting a folder enables you to select from one of its subfolders or a snippet fi le. Once you select the
snippet of interest, Visual Studio inserts the associated code into your source fi le. Figure 1-22 shows
the result of adding an operating system snippet to some sample code. The selected snippet was Windows ➪
Event Logs ➪ Read Entries Created by a Particular Application from the Event Log, which
isn’t included with Visual Basic 2010 Express, although the code is still valid.
38
❘
CHAPTER 1 VISUAL STUDIO 2010
FIGURE 1 -21
FIGURE 1 -22
Project ProVB_VS2010
❘ 39
As you can see, this code snippet is specific to reading the Application Log. This snippet is useful because
many applications log their errors to the Event Log so that they can be reviewed either locally or from another
machine in the local domain. The key, however, is that the snippet has pulled in the necessary class references,
many of which might not be familiar to you, and has placed them in context. This reduces not only the time
spent typing this code, but also the time spent recalling exactly which classes need to be referenced and which
methods need to be called and customized.
Finally, it is also possible to shortcut the menu tree. Specifically, if you know the shortcut for a snippet, you
can type that and then press Tab to have Visual Studio insert the snippet. For example, typing evReadApp
followed by pressing Tab will insert the same snippet shown in Figure 1-22.
Tools such as code snippets and especially code expansion are even more valuable when you work in
multiple languages. Keep in mind, however, that Visual Studio isn’t limited to the features that come in the
box. It’s possible to extend Visual Studio not only with additional controls and project templates, but also
with additional editing features.
Additional Components for Visual Studio
You might be interested in two additional tools that work with Visual Studio. Even better, both are free.
The fi rst is a tool for creating your own Visual Basic snippets. As discussed, snippets can be powerful tools
when you need to replicate relatively small but commonly used blocks of code that will be customized.
While Visual Studio ships with several such snippets, Microsoft probably hasn’t included the snippet you
want the most.
This is where the fi rst tool comes in: a Snippet Editor for Visual Basic code snippets. This editor doesn’t
actually live within Visual Studio; it just updates the snippet fi les you want to use from Visual Studio.
Behind the scenes, snippets are actually XML fi les with embedded text that represents the code used in the
snippet. What the Snippet Editor does is read that XML and interpret all of the embedded logic related to
things such as replacement blocks. This tool makes it possible for Visual Basic developers to create custom
snippets without worrying about the XML formatting details. It is available from MSDN at http://msdn2
.microsoft.com/en-us/vbasic/ms789085.aspx.
The second tool is a true add-in to Visual Basic. When Microsoft was announcing features for .NET 2.0,
it was apparent that Visual Basic and C# had different feature lists. Over time, the developers in each
community started to better understand what these features represented, and in many cases demanded their
inclusion. One such feature was native support in C# for refactoring, the capability to modify a variable
name — for example, to take “i” and call it “loopControl” so that it’s more readable. Modifying code to
improve structure, performance, and maintainability is referred to generically as refactoring.
Traditionally, such changes might make the code more maintainable but it often entailed more risk than
reward; as a result they seldom were made. The problem, of course, is that a human tends to miss that one
remaining reference to the old version of that method or variable name. More important, it was a timeconsuming task to fi nd all of the correct references. Fortunately, the compiler knows where these are, and
that’s the idea behind automated refactoring: You tell Visual Studio what you want to change and it goes
through your code and makes all the necessary changes, using the same rules the compiler uses to compile
your code.
This is a great maintenance tool; unfortunately, by the time most Visual Basic developers understood
what it implied, it was too late for the Visual Basic team to implement a solution in Visual Studio 2005.
However, the team did do better than just say, “So sad, too bad.” They found a commercial product
that actually had more features than what the C# team was developing from scratch. Then they bought
a license for every Visual Studio developer, allowing free download of the tool. This solution worked so
well for everyone involved that they chose to continue it in Visual Studio 2008 and Visual Studio 2010.
With refactoring, you can quickly clean up gnarly, hard-to -read code and turn it into well-structured logic
that’s much more maintainable. The free version of the refactoring tool is available at www.devexpress
.com/Products/NET/IDETools/VBRefactor/.
40
❘
CHAPTER 1 VISUAL STUDIO 2010
ENHANCING A SAMPLE APPLICATION
To start enhancing the application, you are going to use the control Toolbox. Close the Form1.designer.vb
fi le and switch your display to the Form1.vb [Design] tab. The Toolbox window is available whenever a form
is in Design view. By default, the Toolbox, shown in Figure 1-23, is docked to the left side of Visual Studio
as a tab. When you click this tab, the control window expands, and you can drag controls onto your form.
Alternatively, if you have closed the Toolbox tab, you can go to the View menu and select Toolbox.
If you haven’t set up the Toolbox to be permanently visible, it will slide out of the way and disappear whenever
focus is moved away from it. This helps maximize the available screen real estate. If you don’t like this feature
and want the Toolbox to be permanently visible, just click the pushpin icon on the Toolbox’s title bar.
The Toolbox contains literally dozens of standard controls, which are categorized so it’s easier to fi nd them.
Figure 1-23 shows the result of dragging a Button control from the Toolbox and depositing it on the form: a
new button displaying the text “Button1.” Adding another button would trigger the default naming and text
of “Button2.”
FIGURE 1 -23
Before customizing the fi rst control added to this form, take a closer look at the Visual Studio Toolbox.
The tools are broken out by category, but this list of categories isn’t static. Visual Studio 2010 Standard
and above editions enable you to create your own custom controls. When you create such controls, the IDE
will — after they have been compiled — automatically add them to the display when you are working in the
same solution as the controls. These would be local references to controls that become available within
the current solution.
Additionally, depending on whether you are working on a Web or a Windows Forms application, your list
of controls in the Toolbox will vary. Windows Forms has a set of controls that leverages the power of the
Windows operating system. Web applications, conversely, tend to have controls oriented to working in a
disconnected environment.
Enhancing a Sample Application
❘ 41
It’s also possible to have third-party controls in your environment. Such controls can be registered with Visual
Studio and are then displayed within every project you work on. When controls are added to the Toolbox they
typically appear in their own custom categories so that they are grouped together and therefore easy to find.
Return to the button you’ve dragged onto the form; it’s ready to go in all respects. However, Visual Studio has
no way of knowing how you want to customize it. Start by going to the Properties window and changing the
Text property to Run Code. You can then change the button’s (Name) property to ButtonTest. Having made
these changes, double-click the button in the display view. Double-clicking tells Visual Studio that you want
to add an event handler to this control, and by default Visual Studio adds an On_Click event handler for
buttons. The IDE then shifts the display to the Code view so that you can customize this handler (Figure 1-24
shows the code for this event handler being edited).
FIGURE 1 -24
Although the event handler can be added through the designer, it’s also possible to add event handlers from
Code view. After you double- click the button, Visual Studio will transfer you to Code view and display your
new event handler. Notice that in Code view there are drop - down lists on the top of the edit window. The
boxes indicate the current object on the left — in this case, your new button — and the current method on
the right — in this case, the click event handler. You can add new handlers for other events on your button
or form using these drop - down lists.
The drop - down list on the left side contains the objects for which event handlers can be added. The drop down list on the right side contains all the events for the selected object. For now, you have created a new
handler for your button’s click event, so let’s look at customizing the code associated with this event.
Customizing the Code
With the code window open to the newly added event handler for the ButtonTest control, you can start to
customize this handler. Note that adding a control and event handler involves elements of generated code.
42
❘
CHAPTER 1 VISUAL STUDIO 2010
Visual Studio adds code to the Form1.Designer.vb fi le. These changes occur in addition to the default
method implementation shown in the editable portion of your source code.
Adding XML Comments
One of Visual Studio’s features is the capability to generate an XML comments template for Visual Basic.
XML comments are a much more powerful feature than you might realize, because they are also recognized
by Visual Studio for use in IntelliSense. To add a new XML comment to your handler, go to the line before
the handler and type three single quotation marks: ‘‘‘. This triggers Visual Studio to replace your single
quotation marks with the following block of comments. You can trigger these comments in front of any
method, class, or property in your code:
'''
'''
'''
'''
'''
'''
<summary>
</summary>
<param name="sender"></param>
<param name="e"></param>
<remarks></remarks>
Visual Studio provides a template that offers a place to include a summary of what this method does.
It also provides placeholders to describe each parameter that is part of this method. Not only are the
comments entered in these sections available within the source code, when it ’s compiled you’ll also fi nd an
XML fi le in the project directory, which summarizes all your XML comments and can be used to generate
documentation and help fi les for the said source code. By the way, if you refactor a method and add new
parameters, the XML comments also support IntelliSense for the XML tags that represent your parameters.
Customizing the Event Handler
Now customize the code for the button handler, as this method doesn’t actually do anything by default.
Start by adding a new line of code to increment the property Count you added to the form earlier. Next,
use the System.Windows.Forms.MessageBox class to open a message box and show the message indicating
the number of times the Hello World button has been pressed. Fortunately, because that namespace is
automatically imported into every source fi le in your project, thanks to your project references, you can
reference the MessageBox.Show method directly. The Show method has several different parameters; and
as shown in Figure 1-24, not only does the IDE provide a ToolTip for the list of parameters, it also provides
help regarding the appropriate value for individual parameters.
The completed call to MessageBox.Show should look similar to the following code block. Note that the
underscore character is used to continue the command across multiple lines. In addition, unlike previous
versions of Visual Basic, for which parentheses were sometimes unnecessary, in .NET the syntax best
practice is to use parentheses for every method call:
Private Sub ButtonTest_Click(ByVal sender As System.Object,
ByVal e As System.EventArgs) Handles ButtonTest.Click
Count += 1
MessageBox.Show("Hello World shown " + Count.ToString() + " times.",
"Hello World Message Box",
MessageBoxButtons.OK,
MessageBoxIcon.Information)
End Sub
Code snippet from Form1
Once you have entered this line of code, you may notice a squiggly line underneath some portions of your
text. This occurs when there is an error in the line you have typed. The Visual Studio IDE works more like
the latest version of Word. It highlights compiler issues while allowing you to continue working on your
code. Visual Basic is constantly reviewing your code to ensure that it will compile; and when it encounters a
problem it immediately notifies you of the location without interrupting your work.
Enhancing a Sample Application
❘ 43
Reviewing the Code
Now that you have created a simple Windows application, let’s review the elements of the code that have
been added by the IDE. Following is the entire Form1.Designer.vb source listing. Highlighted in this
listing are the lines of code that have changed since the original template was used to generate this project:
<Global.Microsoft.VisualBasic.CompilerServices.DesignerGenerated()> _
Partial Class Form1
Inherits System.Windows.Forms.Form
'Form overrides dispose to clean up the component list.
<System.Diagnostics.DebuggerNonUserCode()> _
Protected Overrides Sub Dispose(ByVal disposing As Boolean)
Try
If disposing AndAlso components IsNot Nothing Then
components.Dispose()
End If
Finally
MyBase.Dispose(disposing)
End Try
End Sub
'Required by the Windows Form Designer
Private components As System.ComponentModel.IContainer
'NOTE: The following procedure is required by the Windows Form Designer
'It can be modified using the Windows Form Designer.
'Do not modify it using the code editor.
<System.Diagnostics.DebuggerStepThrough()> _
Private Sub InitializeComponent()
Me.ButtonTest = New System.Windows.Forms.Button()
Me.SuspendLayout()
'
'ButtonTest
'
Me.ButtonTest.Location = New System.Drawing.Point(13, 13)
Me.ButtonTest.Name = "ButtonTest"
Me.ButtonTest.Size = New System.Drawing.Size(104, 23)
Me.ButtonTest.TabIndex = 0
Me.ButtonTest.Text = "Run Code"
Me.ButtonTest.UseVisualStyleBackColor = True
'
'Form1
'
Me.AutoScaleDimensions = New System.Drawing.SizeF(8.0!, 16.0!)
Me.AutoScaleMode = System.Windows.Forms.AutoScaleMode.Font
Me.ClientSize = New System.Drawing.Size(328, 258)
Me.Controls.Add(Me.ButtonTest)
Me.Name = "Form1"
Me.Text = "Professional VB.NET"
Me.ResumeLayout(False)
End Sub
Friend WithEvents ButtonTest As System.Windows.Forms.Button
End Class
Code snippet from Form1.Designer
After the class declaration in the generated fi le, the fi rst change made to the code is the addition of a new
variable to represent the new button:
Friend WithEvents ButtonTest As System.Windows.Forms.Button
44
❘
CHAPTER 1 VISUAL STUDIO 2010
When any type of control is added to the form, a new variable is added to the form class. Controls are
represented by variables; and, just as form properties are set in code, form controls are added in code. The
Button class in the System.Windows.Forms namespace implements the Button control on the Toolbox. Each
control added to a form has a class that implements the functionality of the control. For the standard controls,
these classes are usually found in the System.Windows.Forms namespace. The WithEvents keyword has been
used in the declaration of the new variable so that it can respond to events raised by the button.
The bulk of the code changes are in the InitializeComponent procedure. Nine lines of code have been
added to help set up and display the Button control. The fi rst addition to the procedure is a line that creates
a new instance of the Button class and assigns it to the button variable:
Me. ButtonTest = New System.Windows.Forms.Button()
Before a button is added to the form, the form’s layout engine must be paused. This is done using the next
line of code:
Me.SuspendLayout()
The next four lines of code set the properties of the button. The Location property of the Button class sets
the location of the top -left corner of the button within the form:
Me. ButtonTest.Location = New System.Drawing.Point(13, 13)
The location of a control is expressed in terms of a Point structure. Next, the Name property of the button
is set:
Me. ButtonTest.Name = "ButtonTest"
The Name property acts exactly as it did for the form, setting the textual name of the button. The Name
property has no effect on how the button is displayed on the form; it is used to recognize the button’s
context within the source code. The next four lines of code assign values to the Size, TabIndex, Text, and
UseVisualStyleBackColor properties of the button:
Me.ButtonTest.Size = New System.Drawing.Size(104, 23)
Me. ButtonTest.TabIndex = 0
Me. ButtonTest.Text = "Run Code"
Me. ButtonTest.UseVisualStyleBackColor = True
Code snippet from Form1.Designer
The Size property defi nes the height and width of the control; it is being set because the default button size
didn’t display the full label, and so the button’s size was increased. The TabIndex property of the button
is used to set the order in which the control is selected when a user cycles through the controls on the form
using the Tab key. The higher the number, the later the control gains focus. Each control should have a
unique number for its TabIndex property. The Text property of a button sets the text that appears on
the button. Finally, the UseVisualStyleBackColor property indicates that when this button is drawn, it
uses the current visual style. This is a Boolean value and typically you can accept this default, but you can
customize the background so that a given button doesn’t default to the current visual style.
Once the properties of the button have been set, it needs to be added to the form. This is accomplished with
the next line of code:
Me.Controls.Add(Me.ButtonTest)
The System.Windows.Forms.Form class (from which your Form1 class is derived) has a property called
Controls that keeps track of all of the child controls of the form. Whenever you add a control to a form in
the designer, a line similar to the preceding one is added automatically to the form’s initialization process.
Finally, near the bottom of the initialization logic is the fi nal code change. The form is given permission to
resume the layout logic:
Me.ResumeLayout(False)
In addition to the code that has been generated in the Form1.Designer.vb source fi le, you have created
code that lives in the Form1.vb source fi le:
Enhancing a Sample Application
❘ 45
Public Class Form1
Private m_count As Integer
Public Property Count() As Integer
Get
Return m_count
End Get
Set(ByVal value As Integer)
m_count = value
End Set
End Property
''' <summary>
'''
''' </summary>
''' <param name="sender"></param>
''' <param name="e"></param>
''' <remarks></remarks>
Private Sub ButtonTest_Click(ByVal sender As System.Object,
ByVal e As System.EventArgs) Handles ButtonTest.Click
Count += 1
MessageBox.Show("Hello World shown " + Count.ToString() + " times.",
"Hello World Message Box",
MessageBoxButtons.OK,
MessageBoxIcon.Information)
End Sub
End Class
Code snippet from Form1
This code reflects the event handler added for the button. The code contained in the handler was already
covered, with the exception of the naming convention for event handlers. Event handlers have a naming
convention similar to that in previous versions of Visual Basic: The control name is followed by an underscore
and then the event name. The event itself may also have a standard set of parameters. At this point, you can
test the application, but to do so let’s first look at your build options.
Building Applications
For this example, it is best to build your sample application using the Debug build configuration. The fi rst
step is to ensure that Debug is selected as the active configuration. As noted earlier in this chapter around
Figure 1-7 you’ll fi nd the setting available on your project properties. It ’s also available from the main Visual
Studio display in the Solution Configurations drop - down list box that’s part of the Standard Toolbar.
Visual Studio provides an entire Build menu with the various options available for building an application.
There are essentially two options for building applications:
➤
Build — This option uses the currently active build configuration to build the project or solution,
depending upon what is available.
➤
Publish — For Visual Basic developers, this option starts the process of creating a release build, but
note that it also ties in with the deployment of your application, in that you are asked to provide an
URL where the application will be published.
The Build menu supports building for either the current project or the entire solution. Thus, you can
choose to build only a single project in your solution or all of the projects that have been defi ned as part
of the current configuration. Of course, anytime you choose to test-run your application, the compiler will
automatically perform a compilation check to ensure that you run the most recent version of your code.
You can either select Build from the menu or use the Ctrl+Shift+B keyboard combination to initiate a
build. When you build your application, the Output window along the bottom edge of the development
46
❘
CHAPTER 1 VISUAL STUDIO 2010
environment will open. As shown in Figure 1-25, it displays status messages associated with the build
process. This window should indicate your success in building the application.
If problems are encountered while building your application, Visual Studio provides a separate window to
help track them. If an error occurs, the Task List window will open as a tabbed window in the same region
occupied by the Output window (refer to Figure 1-25). Each error triggers a separate item in the Task List; if
you double- click an error, Visual Studio automatically repositions you on the line with the error. Once your
application has been built successfully, you can
run it.
Once your application has been built successfully,
you will fi nd the executable fi le located in
the targeted directory. By default, for .NET
applications this is the \bin subdirectory of your
project directory.
FIGURE 1 -25
Running an Application in the Debugger
As discussed earlier, there are several ways to start your application. Starting the application launches a
series of events. First, Visual Studio looks for any modified fi les and saves those fi les automatically. It then
verifies the build status of your solution and rebuilds any project that does not have an updated binary,
including dependencies. Finally, it initiates a separate process space and starts your application with the
Visual Studio debugger attached to that process.
When your application is running, the look and feel of Visual Studio’s IDE changes, with different windows and
button bars becoming visible (see Figure 1-26). While your code remains visible, the IDE displays additional
windows — by default, the Immediate Window appears in the same location as the Output Window as a new
tabbed window. Others, such as the Call Stack, Locals, and Watch windows, may also be displayed over time as
you work with the debugger. (Not all of these windows are available to users of Visual Studio Express Edition.)
These windows are used by the debugger for reviewing the current value of variables within your code.
FIGURE 1 -26
Enhancing a Sample Application
❘ 47
The true power of the Visual Studio debugger is its interactive debugging. To demonstrate this, with your
application running, select Visual Studio as the active window. Change your display to the Form1.vb Code
view (not Design view) and click in the border alongside the line of code you added to increment the count
when the button is clicked. Doing this creates a breakpoint on the selected line (refer to Figure 1-26). Return
to your application and then click the “Hello World” button. Visual Studio takes the active focus, returning
you to the code window, and the line with your breakpoint is now selected.
Visual Studio 2010 introduces a new window that is located in the same set of tabs as the Solution Explorer.
As shown in Figure 1-26, the IntelliTrace window tracks your actions as you work with the application in
Debug mode. Figure 1-27 focuses on this new feature available to the Ultimate edition of Visual Studio.
Sometimes referred to as historical debugging, the IntelliTrace window provides a history of how you got to a
given state.
FIGURE 1 -27
When an error occurs during debugging, your fi rst thought is likely to be “What just happened?” But how
do you reproduce that error? As indicated in Figure 1-27, the IntelliTrace window tracks the steps you have
taken — in this case showing that I had used the Run Code button a second time since the steps shown in
Figure 1-26. By providing a historical trail, IntelliTrace enables you to reproduce a given set of steps through
your application. You can also fi lter the various messages either by message type or by thread.
The ability to select these past break points and review the state of variables and classes in your running
application can be a powerful tool for tracking down runtime issues. The historical debugging capabilities
are unfortunately only available in Visual Studio 2010 Ultimate, but they take the power of the Visual
Studio debugger to a new level.
However, even if you don’t have the power of historical debugging, the Visual Studio debugger is a powerful
development ally. It is, arguably, more important than any of the other developer productivity features of
Visual Studio. With the execution sitting on this breakpoint, it is possible to control every aspect of your
running code. Hovering over the property Count, as shown in Figure 1-28, Visual Studio provides a debug
ToolTip showing you the current value of this property. This “hover over” feature works on any variable
in your local environment and is a great way to get a feel for the different values without needing to go to
another window.
Windows such as Locals and Autos display similar information about your variables, and you can use
these to update those properties while the application is running. However, you’ll note that the image in
Figure 1-28 includes a small pin symbol. Using this you can keep the status window for this variable open
in your Code view. This was done in Figure 1-29, and now as I step past the line where my breakpoint
was set, the information in the window is updated to show the new value of Count. Visual Studio has just
allowed you to create a custom watch window to reflect the value of Count.
48
❘
CHAPTER 1 VISUAL STUDIO 2010
FIGURE 1 -28
FIGURE 1 -29
Enhancing a Sample Application
❘ 49
This isn’t the end of it. As you’ll note in Figure 1-29, by clicking on the down arrows you see on the right
hand side of your new custom watch window, just below the pin, you can add one or more comments
to your custom watch window for this value. You also have the option to unpin the initial placement of
this window and move it off of your Code view display. Not only that but, the custom watch window is
persistent in Debug mode. If you stop debugging and restart, the window is automatically restored and
remains available until you choose to close it using the close button.
Next, move your mouse and hover over the parameter sender. This will open a window similar to the one for
Count as you review the reference to this object. More important, note the small plus sign on the right-hand
side, which if clicked expands the pop-up to show details about the properties of this object. As shown in
Figure 1-30, this capability is available even for parameters like sender, which you didn’t define. Figure 1-30
also illustrates a key point about looking at variable data. Notice that by expanding the top-level objects you
can eventually get to the properties inside those objects. Next to some of those properties, on the right-hand
side, is a little magnifying glass icon. That icon tells you that Visual Studio will open the potentially lengthy
string value in any one of three visualization windows. When working with complex XML or other complex
data, these visualizers offer significant productivity benefits by enabling you to review data.
FIGURE 1 -30
Once you are at a breakpoint, you can control your application by leveraging the Debug
buttons on the Standard toolbar. These buttons, shown in Figure 1-31, provide several
FIGURE 1 -31
options for managing the flow of your application. From the left are the following
buttons: Start Debugging, Break All, Stop Debugging, and three buttons that
look like a carriage return next to a set of lines. The first of these, which is the fourth button overall represents
stepping into code. The last two buttons represent stepping over and stepping out, respectively. In this case
you should use the Step Into or Step Over buttons to move to the next line of code as shown in Figure 1-29.
Step -In tells the debugger to jump to whatever line of code is fi rst within the next method or property you
call. Keep in mind that if you pass a property value as a parameter to a method, then the fi rst such line
50
❘
CHAPTER 1 VISUAL STUDIO 2010
of code is in the Get method of the parameter. Once there, you may want to step out. Stepping out of a
method tells the debugger to execute the code in the current method and return you to the line that called
the method. Thus, you could step out of the property and then step in again to get into the method you are
actually interested in debugging.
Of course, sometimes you don’t want to step into a method; this is where the Step-Over button comes in. It
enables you to call whatever method(s) are on the current line and step to the next sequential line of code in
the method you are currently debugging. The final button, Step-Out, is useful if you know what the code in a
method is going to do, but you want to determine which code called the current method. Stepping out takes
you directly to the calling code block.
Each of the buttons shown on the debugging toolbar in Figure 1-31 has an accompanying shortcut key for
experienced developers who want to move quickly through a series of breakpoints.
Of course, the ability to leverage breakpoints goes beyond what you can do with them at runtime. You can
also disable breakpoints that you don’t currently want to stop your application flow, and you can move a
breakpoint, although it’s usually easier to just click and delete the current location, and then click and create
a new breakpoint at the new location.
Keeping in mind that Visual Basic 2010 Express Edition does not support the advanced properties of
breakpoints, Visual Studio provides additional properties for managing and customizing breakpoints. As
shown in Figure 1-32, it’s also possible to add specific properties to your breakpoints. The context menu
shows several possible options.
FIGURE 1 -32
More important, it’s possible to specify that a given breakpoint should execute only if a certain value is defined
(or undefined). In other words, you can make a given breakpoint conditional, and a pop-up window enables
you to define this condition. Similarly, if you’ve ever wanted to stop, for example, on the thirty-seventh iteration
of a loop, then you know the pain of repeatedly stopping at a breakpoint inside a loop. Visual Studio enables
you to specify that a given breakpoint should only stop your application after a specified number of hits.
Enhancing a Sample Application
❘ 51
The next option is one of the more interesting options if you need to carry out a debug session in a live
environment. You can create a breakpoint on the debug version of code and then add a filter that ensures
you are the only user to stop on that breakpoint. For example, if you are in an environment where multiple
people are working against the same executable, then you can add a breakpoint that won’t affect the other
users of the application.
Similarly, instead of just stopping at a breakpoint, you can also have the breakpoint execute some other
code, possibly even a Visual Studio macro, when the given breakpoint is reached. These actions are rather
limited and are not frequently used, but in some situations this capability can be used to your advantage.
Note that breakpoints are saved when a solution is saved by the IDE. There is also a Breakpoints window,
which provides a common location for managing breakpoints that you may have set across several different
source files.
Finally, at some point you are going to want to debug a process that isn’t being started from Visual Studio — for
example, if you have an existing website that is hosting a DLL you are interested in debugging. In this case,
you can leverage Visual Studio’s capability to attach to a running process and debug that DLL. At or near
the top (depending on your settings) of the Tools menu in Visual Studio is the Attach to Process option. This
menu option opens a dialog showing all of your processes. You could then select the process and have the
DLL project you want to debug loaded in Visual Studio. The next time your DLL is called by that process,
Visual Studio will recognize the call and hit a breakpoint set in your code.
Other Debug- Related Windows
As noted earlier, when you run an application in Debug mode, Visual Studio .NET 2010 can open a series of
windows related to debugging. Each of these windows provides a view of a limited set of the overall environment
in which your application is running. From these windows, it is possible to find things such as the list of calls
(stack) used to get to the current line of code or the present value of all the variables currently available. Visual
Studio has a powerful debugger that is fully supported with IntelliSense, and these windows extend the debugger.
Output
Recall that the build process puts progress messages in this window. Similarly, your program can also
place messages in it. Several options for accessing this window are discussed in later chapters, but at the
simplest level the Console object echoes its output to this window during a debug session. For example,
the following line of code can be added to your sample application:
Console.WriteLine("This is printed in the Output Window")
This line of code will cause the string “This is printed in the Output Window” to appear in the Output
window when your application is running. You can verify this by adding this line in front of the command to
open the message box. Then, run your application and have the debugger stop on the line where the message
box is opened. If you check the contents of the Output window, you will find that your string is displayed.
Anything written to the Output window is shown only while running a program from the environment. During
execution of the compiled module, no Output window is present, so nothing can be written to it. This is the
basic concept behind other objects such as Debug and Trace, which are covered in more detail in Chapter 6.
Call Stack
The Call Stack window lists the procedures that are currently calling other procedures and waiting for their
return. The call stack represents the path through your code that leads to the currently executing command.
This can be a valuable tool when you are trying to determine what code is executing a line of code that you
didn’t expect to execute.
Locals
The Locals window is used to monitor the value of all variables currently in scope. This is a fairly selfexplanatory window that shows a list of the current local variables, with the value next to each item. As in
previous versions of Visual Studio, this display enables you to examine the contents of objects and arrays via a
52
❘
CHAPTER 1 VISUAL STUDIO 2010
tree- control interface. It also supports the editing of those values, so if you want to change a string from empty
to what you thought it would be, just to see what else might be broken, then feel free to do so from here.
Watch Windows
There are four Watch windows, numbered Watch 1 to Watch 4. Each window can hold a set of variables or
expressions for which you want to monitor the values. It is also possible to modify the value of a variable
from within a Watch window. The display can be set to show variable values in decimal or hexadecimal
format. To add a variable to a Watch window, you can either right- click the variable in the Code Editor and
then select Add Watch from the pop -up menu, or drag and drop the variable into the watch window.
Immediate Window
The Immediate window, as its name implies, enables you to evaluate expressions. It becomes available while
you are in Debug mode. This is a powerful window, one that can save or ruin a debug session. For example,
using the sample from earlier in this chapter, you can start the application and press the button to stop on
the breakpoint. Go to the Immediate window and enter ?Button1.Text = “Click Me” and press Enter. You
should get a response of false as the Immediate window evaluates this statement.
Notice the preceding ?, which tells the debugger to evaluate your statement, rather than execute it. Repeat
the preceding text but omit the question mark: Button1.Text = “Click Me”. Press F5 or click the Run button
to return control to your application, and notice the caption on your button. From the Immediate window
you have updated this value. This window can be very useful if you are working in Debug mode and need to
modify a value that is part of a running application.
Autos
Finally, as the chapter prepares to transition to features that are only available in Visual Studio and not
Visual Basic 2010 Express, there is the Autos window. The Autos window displays variables used in the
statement currently being executed and the statement just before it. These variables are identified and listed
for you automatically, hence the window’s name. This window shows more than just your local variables. For
example, if you are in Debug mode on the line to open the MessageBox in the ProVB_VS2010 sample, then
the MessageBox constants referenced on this line are shown in this window. This window enables you to
see the content of every variable involved in the currently executing command. As with the Locals window,
you can edit the value of a variable during a debug session. However, this window is in fact specific to
Visual Studio and not available to users of Visual Basic 2010 Express.
Reusing Your First Windows Form
As you proceed through the book and delve further into the features of Visual Basic you’ll want a way to
test sample code. Chapter 2 in particular has snippets of code which you’ll want to test. One way to do this
is to enhance the ProVB_VS2010 application. Its current use of a MessageBox isn’t exactly the most useful
method of testing code snippets. So let’s update this application so it can be reused in other chapters and at
random by you when you are interested in testing a snippet.
At the core you’ll continue to access code to test where it can be executed from the ButtonTest Click event.
However, instead of using a message box, you can use a text box to hold the output from the code being tested.
The fi rst step in this process as shown in Figure 1-33 is to drag a TextBox control onto the display and then
click on the small arrow in the upper-right corner of the control’s display. This will open the TextBox tasks
menu, which contains some of the most common customizations for this control. This small arrow appears
on all Windows Forms controls, although what is listed will vary between controls. In this case you should
select the MultiLine property.
Once you have selected that property it is possible to expand the TextBox to allow you to fill the entire bottom
portion of the window. As shown in Figure 1-34, you can then move to the properties for the TextBox control
and update the Anchor property to anchor the current control’s size based on the window containing it. Having
tied this control to all four sides of the window, when the window is resized, this control will automatically
resize with the window. You’ll find if you review the properties of ButtonTest that it is anchored only to the
top and left sides of the window, so it remains unchanged while the window changes size.
Enhancing a Sample Application
FIGURE 1 -33
FIGURE 1 -34
❘ 53
54
❘
CHAPTER 1 VISUAL STUDIO 2010
Additionally, you can follow the example shown here, which is to access the font property for the textbox
and increase the size of the font from the default to 14pt. This was done only to make the sample results
more readable within the screenshots used for the book. It has no other impact on the application.
At this point you have a display that will allow you to show the results from various code snippets simply by
updating the Text property on the TextBox1 control of your window. Keep in mind that you’ll want to remove
(or as some of the chapters will show) comment out code that you are done working with, for example, the
Count property and the related message box code used during the debugging demonstration in this chapter.
USEFUL FEATURES OF VISUAL STUDIO 2010
The focus of most of this chapter has been on creating a simple application, working in either Visual Basic
2010 Express Edition or Visual Studio 2010. It’s now time to completely leave the set of features supported
by the Express Edition and move on to some features that are available only to Visual Studio developers.
These features include, but are not limited to, the following items, beginning with features available to all
Visual Studio 2010 developers.
When Visual Studio 2010 is fi rst started, you configure your custom IDE profi le. Visual Studio enables
you to select either a language-specific or task-specific profi le and then change that profi le whenever you
desire.
Configuration settings are managed through the Tools ➪ Import and Export Settings menu option. This menu
option opens a simple wizard, which first saves your current settings and then allows you to select an alternate
set of settings. By default, Visual Studio ships with settings for Visual Basic, Web development, and C#, to
name a few, but by exporting your settings you can create and share your own custom settings files.
The Visual Studio settings fi le is an XML fi le that enables you to capture all your Visual Studio
configuration settings. This might sound trivial, but it is not. This feature enables the standardization of
Visual Studio across different team members. The advantages of a team sharing settings go beyond just a
common look and feel.
Build Configurations
Prior to .NET, a Visual Basic project had only one set of properties. There was no way to have one set of
properties for a debug build and a separate set for a release build. As a result, you had to manually change
any environment-specific properties before you built the application. This has changed with the introduction
of build configurations, which enable you to have different sets of project properties for debug and release
builds.
Visual Studio does not limit you to only two build configurations. It ’s possible to create additional custom
configurations. The properties that can be set for a project have been split into two groups: those that are
independent of build configuration and therefore apply to all build configurations, and those that apply
only to the active build configuration. For example, the Project Name and Project Location properties are
the same irrespective of what build configuration is active, whereas the code optimization options vary
according to the active build configuration.
The advantage of multiple configurations is that it’s possible to turn off optimization while an application
is in development and add symbolic debug information that helps locate and identify errors. When you are
ready to ship the application, you can switch to the release configuration and create an executable that is
optimized for production.
At the top of Figure 1-35 is a drop - down list box labeled Configuration. Typically, four options are listed
in this box: the currently selected configuration, Active; the Debug and Release options; and a fi nal
option, All Configurations. When changes are made on this screen, they are applied only to the selected
Useful Features of Visual Studio 2010
❘ 55
configuration(s). Thus, when Release is selected, any changes are applied only to the settings for the
Release build. If, conversely, All Configurations is selected, then any changes made are applied to all of
the configurations, Debug, and Release. Similarly, if Active is selected, then in the background the changes
are made to the underlying configuration that is currently active.
FIGURE 1 -35
Alongside this is a Platform drop - down. In the past it was recommended that you not change this, as it was
set to Any CPU, which was an acceptable setting. However, with Visual Studio 2010 you’ll want to consider
this value, since in most cases it will default to x86. x86 represents 32-bit operating system environments
and as a result, so if you are targeting a 64 -bit environment you would want to change this value to be
64 -bit. As mentioned earlier in this chapter, keep in mind that certain capabilities such as COM-Interop
and Edit and Continue debugging are dependent on an x86 environment.
All of your compile settings are project-specific, but when you are working with a solution it is possible
to have more than one project in the same solution. Although you are forced to manage these settings
independently for each project, there is another form of project configuration related to multiple projects.
You are most likely to use this when working with integrated Setup projects, where you might want to build
only the Setup project when you are working on a release build.
To customize which projects are included in each build configuration, you need the Configuration Manager
for the solution. Projects are assigned to build configurations through the Configuration Manager. You can
access the Configuration Manager from the Build menu. Alternatively, the Configuration Manager can be
opened using the drop - down list box to the right of the Run button on the Visual Studio toolbar. The Active
Configuration drop - down box contains the following options: Debug, Release, and Configuration Manager.
The fi rst two default options are the currently available configurations. Selecting the bottom option,
Configuration Manager, opens the dialog shown in Figure 1-36.
56
❘
CHAPTER 1 VISUAL STUDIO 2010
FIGURE 1 -36
The Configuration Manager contains an entry for each project in the current solution. You can include or
exclude a project from the selected configuration by enabling or disabling the check box in the Build column
of the grid. This is a valuable capability when a solution has multiple projects, as time isn’t wasted waiting
while a project that isn’t being worked on is recompiled. The build configuration is commonly used when
a Setup project is added to a solution. The normal plan is to rebuild only the Setup package when a release
version of the actual application project is created. Note that regardless of the build configuration, you can
build any assembly by right- clicking that project and selecting the Build option from the pop -up menu.
The Task List
The Task List is a great productivity tool that tracks not only errors, but also pending changes and
additions. It’s also a good way for the Visual Studio environment to communicate information that the
developer needs to know, such as any current errors. The Task List is displayed by selecting Task List from
the View menu. It offers two views, Comments and User Tasks, and it displays either group of tasks based
on the selection in the drop - down box that is part of this window.
The Comment option is used for tasks embedded in code comments. This is done by creating a standard
comment with the apostrophe and then starting the comment with the Visual Studio keyword TODO. The
keyword can be followed with any text that describes what needs to be done. Once entered, the text of these
comments shows up in the Task List. Note that users can create their own comment tokens in the options
for Visual Studio via Tools ➪ Options ➪ Environment ➪ Task List. Other predefi ned keywords include
HACK and UNDONE.
Besides helping developers track these pending coding issues as tasks, leveraging comments embedded in
code results in another benefit. Just as with errors, clicking a task in the Task List causes the Code Editor
to jump to the location of the task without hunting through the code for it. Also of note, though we are not
going to delve into it, the Task List is integrated with Team Foundation Server if you are using this for your
collaboration and source control.
The second type of tasks is user tasks. These may not be related to a specific item within a single fi le.
Examples are tasks associated with resolving a bug, or a new feature. It is possible to enter tasks into the
Task List manually. Within the Task List is an image button showing a red check mark. Pressing this button
creates a new task in the Task List, where you can edit the description of your new task.
Useful Features of Visual Studio 2010
❘ 57
In early versions of Visual Studio, the Task List window was used to display compilation errors, but starting
with Visual Studio 2005 the Error List became a separate window.
The Command Window
The Command window can be opened from the Other Windows section of the View menu. When opened, the
window displays a > prompt. This is a command prompt at which you can execute commands — specifically,
Visual Studio commands. While Visual Studio is designed to be a GUI environment with limited shortcuts, the
Command window enables you to type — with the assistance of IntelliSense — the specific command you want.
You can use the Command window to access Visual Studio menu options and commands by typing them
instead of selecting them in the menu structure. For example, type File.AddNewProject and press Enter —
the dialog box to add a new project will appear. Similarly, if you type Debug.Start , you initiate the same
build and start actions that you would from the Visual Studio UI.
Server Explorer
As development has become more server-centric, developers have a greater need to discover and manipulate
services on the network. Visual InterDev, used for building classic ASP web sites, and which was available around
the same time as Visual Basic 6, started in this direction with a Server Object section in the InterDev Toolbox. The
Server Explorer feature in Visual Studio takes this concept and makes working with servers easier. The Server
Explorer is more sophisticated in that it enables you to explore and alter your application’s database or your
local registry values. With the assistance of an SQL Database project template (part of the Other Project types),
it’s possible to fully explore and alter an SQL Server database. You can define the tables, stored procedures, and
other database objects as you might have previously done with the SQL Server Enterprise Manager.
If the Server Explorer hasn’t been opened, it can be opened
from the View menu. Alternatively it should be located near the
control Toolbox. It has behavior similar to the Toolbox in that
if you hover over or click the Server Explorer’s tab, the window
expands from the left-hand side of the IDE. Once it is open,
you will see a display similar to the one shown in Figure 1-37.
Note that this display has three top -level entries. The fi rst, Data
Connections, is the starting point for setting up and configuring
the database connection. You can right- click on the top -level
Data Connections node and defi ne new SQL Server connection
settings that will be used in your application to connect to
the database. The Server Explorer window provides a way
to manage and view project-specific database connections such
as those used in data binding.
The second top-level entry, Servers, focuses on other server data
that may be of interest to you and your application. When you
FIGURE 1 -37
expand the list of available servers, you have access to several
server resources. The Server Explorer even provides the capability to stop and restart services on the server.
Note the wide variety of server resources that are available for inspection or use in the project. Having the
Server Explorer available means you don’t have to go to an outside resource to find, for example, what
message queues are available.
By default, you have access to the resources on your local machine; but if you are in a domain, it is possible
to add other machines, such as your Web server, to your display. Use the Add Server option to select and
inspect a new server. To explore the Event Logs and registry of a server, you need to add this server to your
display. Use the Add Server button in the button bar to open the dialog and identify the server to which you
would like to connect. Once the connection is made, you can explore the properties of that server.
The third top -level node, SharePoint Connections, enables you to defi ne and reference elements associated
with one or more SharePoint servers for which you might be creating solutions.
58
❘
CHAPTER 1 VISUAL STUDIO 2010
Recording and Using Macros in Visual Studio 2010
Visual Studio macros are part of the environment and are available to any language. Macro options are
accessible from the Tools ➪ Macros menu, as shown in Figure 1-38. The concept of macros is simple: Record a
series of keystrokes and/or menu actions, and then play them back by pressing a certain keystroke combination.
FIGURE 1 -38
For example, suppose that one particular function call with a complex set of arguments is constantly being
called on in code, and the function call usually looks the same except for minor variations in the arguments.
The keystrokes to code the function call could be recorded and played back as necessary, which would insert
code to call the function, which could then be modified as necessary.
Macros can be far more complex than this, containing logic as well as keystrokes. The macro capabilities of Visual
Studio are so comprehensive that macros have their own IDE (accessed via Tools ➪ Macros ➪ Macros IDE).
Macros can also be developed from scratch in this environment, but more commonly they are recorded
using the Record Temporary Macro option on the Macros menu and then renamed and modified in the
development environment. Here is an example of recording and modifying a macro:
1.
Start a new Windows Application project.
2.
3.
In the new project, add a button to Form1, which was created with the project.
4.
Select Tools ➪ Macros ➪ Record Temporary Macro. A small toolbar (see Figure 1-39)
will appear on top of the IDE with buttons to control the recording of a macro (Pause,
Stop, and Cancel).
5.
Press Enter and then type the following line of code:
Double- click the button to get to its Click event routine.
TextBox1.Text = “Macro Test”
6.
Press Enter again.
FIGURE 1 -39
Useful Features of Visual Studio 2010
❘ 59
7.
In the small toolbar, press the Stop button.
8.
Select Tools ➪ Macros ➪ Macro Explorer. The Macro Explorer will appear (in the location normally
occupied by the Solution Explorer), with the new macro in it (see Figure 1-40). You can name the macro
anything you like. Note that the Macro Explorer ships with several sample macros that you can “explore.”
FIGURE 1 -40
9.
Right- click the macro and select Edit to get to the Macro Editor. You will see the following code, as
shown in Figure 1- 41, in your macro:
DTE.ActiveDocument.Selection.NewLine()
DTE.ActiveDocument.Selection.Text = TextBox1.Text = “Macro Test”
DTE.ActiveDocument.Selection.NewLine()
FIGURE 1 -41
60
❘
CHAPTER 1 VISUAL STUDIO 2010
The code that appears in step 9 may vary depending on how you typed in the line. For example, if you made
a mistake and backspaced, those actions will have their own corresponding lines of code. As a result, after
you record a macro, it is worthwhile to examine the code and remove any unnecessary lines.
The code in a macro recorded this way is just standard VB code, and it can be modified as desired.
However, there are some restrictions regarding what you can do inside the macro IDE. For example,
you cannot refer to the namespace for setting up database connections, because this might constitute a
security violation.
To run a macro, you can just double-click it in the Macro Explorer or select Tools ➪ Macros ➪ Run Macro. You
can also assign a keystroke to a macro in the Keyboard dialog in the Tools ➪ Options ➪ Environment folder.
One fi nal note on macros is that they essentially enable you to generate code that can then be transferred to
a Visual Studio Add-In project. An Add-In project is a project designed to extend the properties of Visual
Studio. To create a new Add-In project, open the New Project dialog and select Other Project Types —
Extensibility. You can then create a Visual Studio Add-In project. Such a project enables you to essentially
share your macro as a new feature of Visual Studio. For example, if Visual Studio 2010 didn’t provide a
standard way to get formatted comments, you might create an add-in that enables you to automatically
generate your comment template so you wouldn’t need to retype it repeatedly.
Class Diagrams
One of the features introduced with Visual Studio 2005 was the capability to generate class diagrams. A
class diagram is a graphical representation of your application’s objects. By right- clicking on your project
in the Solution Explorer, you can select View Class Diagram from the context menu. Alternatively, you can
choose to Add a New Item to your project. In the same window where you can add a new class, you have
the option to add a new class diagram. The class diagram uses a .cd fi le extension for its source fi les. It is a
graphical display, as shown in Figure 1- 42.
FIGURE 1 -42
Useful Features of Visual Studio 2010
❘ 61
Adding such a fi le to your project creates a dynamically updated representation of your project ’s classes.
As shown in Figure 1- 42, the current class structures for even a simple project are immediately represented
when you create the diagram. It is possible to add multiple class diagrams to your project. The class diagram
graphically displays the relationships between objects — for example, when one object contains another
object or even object inheritance. When you change your source code the diagram is also updated. In other
words, the diagram isn’t something static that you create once at the start of your project and then becomes
out- of- date as your actual implementation changes the class relationships.
More important, you can at any time open the class diagram, make changes to one or more of your existing
objects, or create new objects and defi ne their relationship to your existing objects, and when done, Visual
Studio will automatically update your existing source fi les and create new source fi les as necessary for the
newly defi ned objects.
As shown in Figure 1- 42, the class diagram fi les (*.cd) open in the same main display area used for the
Visual Studio UI designer and viewing code. They are, however, a graphical design surface that behaves
more like Visio than the User Interface designer. You can compress individual objects or expose their
property and method details. Additionally, items such as the relationships between classes can be shown
graphically instead of being represented as properties.
In addition to the editing surface, when working with the Class Designer a second window is displayed. As
shown at the bottom of Figure 1- 42, the Class Details window is generally located in the same space as your
Output, Tasks, and other windows. The Class Details window provides detailed information about each of
the properties and methods of the classes you are working with in the Class Designer. You can add and edit
methods, properties, fields, and even events associated with your classes. While you can’t write code from
this window, you can update parameter lists and property types. The Class Diagram tool is an excellent tool
for reviewing your application structure.
Application Lifecycle Management
The focus of this chapter has been on how you, as a Visual Basic developer, can leverage Visual Studio 2010.
At the top end of the Visual Studio 2010 product line is the full Ultimate edition, and just below that is the
Premium Edition. These two versions of Visual Studio have replaced the umbrella of products referred to as
Application Lifecycle Management (ALM). In order to reduce confusion, this section takes a brief look at
some of the tools from ALM that are part of Visual Studio 2010 These tools are focused less on languages
and developing code than on managing development and the development of applications.
Architecturally, ALM had two main elements: the server-side components, which operate under Team
Foundation Server (TFS); and the client components, which are part of Visual Studio. TFS is the
replacement for Visual Source Safe (VSS), although thinking of it only in those terms is a bit like thinking of
the modern automobile as the replacement for the horse and carriage. TFS was updated with Visual Studio
2010, and includes a client installation package: Team Explorer. Team Explorer is installed as an add-in to
Visual Studio and provides access to TFS. However, the Team Explorer client package, isn’t just a Visual
Studio add-in, it also includes add-ins to Office, implemented using Visual Studio Tools for Office that you
need in order to work with the TFS features like task and bug lists.
Team Foundation Server (TFS)
The server components of Visual Studio Application Lifecycle Management (ALM) are not automatically
integrated into Visual Studio, but it is appropriate to mention a couple of key attributes of TFS that extend it
beyond VSS. Similar to VSS, the primary role most developers see for TFS is that of source control. This is the
capability to ensure that if multiple people are working on the same project and with the same set of source
files, then no two of them can make changes to the same file at the same time.
Actually, that’s a bit of an oversimplification. The default mode for TFS allows two people to work on the
same fi le, and then the second person attempting to save changes merges them with the previously saved
changes. The point of this is to ensure that developers check fi les in and out of source control so that they
62
❘
CHAPTER 1 VISUAL STUDIO 2010
don’t overwrite or lose each other’s changes. In terms of its features and usability compared with VSS, TFS
is much more capable of supporting remote team members. A project that literally takes hours to download
remotely from VSS can download in a few minutes from TFS.
However, that covers just the source control features; and as mentioned previously, TFS goes well beyond
source control. In particular, TFS approaches project development from the role of the project manager. It
doesn’t consider a Visual Studio project fi le to represent the defi nition of a project. Instead, it recognizes
that a project is based on a customer or contract relationship, and may consist of several seemingly
unrelated projects in Visual Studio. Thus, when you defi ne a project you create an area where all of the
projects and solutions and their associated source fi les can be stored.
As part of the creation process you select a process template — and third-party templates are available —
and create a SharePoint website based on that template. The SharePoint website becomes the central point of
collaboration for the project ’s team. In addition to hosting the documentation associated with your selected
software development process, this site acts as a central location for task lists, requirements, Microsoft
project fi les, and other materials related to your project. In essence, TFS leverages SharePoint to add a group
collaboration element to your projects.
As important as this is, an even more important capability TFS supports is that of a build lab. TFS
provides another optional product called Team Foundation Build, which leverages the Visual Studio build
engine to enable you to schedule automated builds. This isn’t just a simple scheduling service; the Team
Foundation Build engine not only retrieves and compiles your application fi les, but also sends update notices
regarding the status of the build, and can be instructed to automatically leverage some of the ALM tools
such as Code Analysis and Unit Testing. The capability to automate your builds and deploy them on a daily
basis to a test environment encourages processes that both focus on product quality and mirror industry
best practices.
Team Explorer is a Visual Studio add-in on steroids. It includes not only new menu items for Visual Studio, but
also a new window similar in concept to the Solution Explorer but that instead provides access to your TFS
projects. It also provides a series of windows in Visual Studio, some of which are related to source control, and
others related to tasks. TFS is in many ways the single most important tool in the ALM product line.
Team Foundation Server also includes new features for 2010. One of these, Team Project Collections,
provides a means of better organizing your TFS server. In the past all of your TFS projects were in one
giant collection and any form of hierarchy was entirely voluntary. With TFS 2010 and Team Project
Collections it is possible to create divisions within your projects. Thus, you can create different groups
for different departments and can group access control, storage, and backup operations as appropriate for
each division.
Be aware that there are two versions of TFS 2010. One is designed to provide a rich
collaborative environment for a large organization. The other is a simpler version
which omits some of the high - end integration with things like Project Server but which
enables a small organization to replace any legacy VSS installations. The details of TFS
are beyond the scope of this book.
Code Analysis
Code analysis, or static code analysis, is a tool for reviewing your source code — although that’s not quite
how it works. The basic paradigm reflects the fact that there are certain common best practices when
writing code; and that once these best practices have been documented, a tool can be written that examines
source code and determines whether these practices have been followed. Visual Studio’s static code analysis
is incorporated into your project settings for Windows Forms-based projects, as shown in Figure 1- 43. For
Web applications, there isn’t a project fi le to hold the project settings, so it is possible to configure and run
static code analysis from the website menu in Visual Studio.
Useful Features of Visual Studio 2010
❘ 63
FIGURE 1 -43
In fact, the tool doesn’t actually look at your source code. Instead, it uses reflection; and once your project
has been compiled, it queries the MSIL code your project generates. While this may seem surprising,
remember that this tool is looking for several best practices, which may be implemented in different ways in
your source code but will always compile in a standard manner.
Figure 1-43 shows the optional Code Analysis screen. Note that even when you have the code analysis tools
available, by default, they are not enabled for your project. This is because enabling code analysis significantly
extends your compile time. In most cases you’ll want to enable these settings for a build or two, and then
disable the checks for most of your debug builds. As you can see, to enable analysis you merely check the
Enable Code Analysis on Build check box.
Below this check box is a check box to suppress results from generated code. One of the code analysis issues for
which Microsoft was criticized after the Visual Studio 2005 release was that if you used the standard project
template to create your project and then ran Code Analysis, you would get warnings related to the generated
code. Microsoft’s solution was to enable you to automatically bypass checking their generated code, which
at least enables you to avoid having to manually mark all of the issues related to the generated code as being
suppressed.
Once you have enabled the code analysis checks, you also have the option to defi ne exactly which rules
you want to apply. The checks are divided into different rule sets. Selecting a rule set such as the Microsoft
Minimum Recommended Rules, you can use the Open button to access the display shown in Figure 1- 44.
64
❘
CHAPTER 1 VISUAL STUDIO 2010
FIGURE 1 -44
Within the rule set you see that there is a set of categories, each of which contains one or more rules. When
expanded, next to each category and rule is a check box to indicate if that particular rule will be checked.
By default, Visual Studio issue warnings if your code fails to meet the requirements associated with a rule.
However, you can change the default — for example, by selecting an error status if a given rule fails. This
enables you to have some rule violations act as compilation errors instead of warnings. Outside the scope of
this chapter is the capability to actually identify within your source code those items that may be flagged by
the code analyzer but that are valid exceptions to the rule being checked.
Performance Tools
Every developer wants performance checks. Visual Studio provides dynamic code analysis, or performance,
tools for your application. These tools are available from the Analyze menu, shown in Figure 1- 45. Selecting
the Performance Explorer from the menu shown in Figure 1- 45 opens the window shown on the left side
of the display in Figure 1- 45. This window has a small bar and provides access to details and results of
your performance testing.
A good way to get started with the performance tools is to select the fi rst item from the Analyze menu, the
Performance Wizard, shown in Figure 1- 46. The performance tools provide four runtime environments to
measure the performance of your application: CPU Sampling, Instrumentation, .NET Memory Allocation
(Sampling), and Concurrency.
Sampling for performance testing is a non-intrusive method of checking your application performance.
Essentially, Visual Studio starts your application normally, but behind the scenes it is interfaced into the
system performance counters. As your application runs, the performance monitoring engine captures system
performance, and when your application completes it provides reports describing that performance. Details
about what your application was actually doing to cause a behavior isn’t available, but you can get a realistic
idea of the impact on the system.
Useful Features of Visual Studio 2010
FIGURE 1 -45
FIGURE 1 -46
❘ 65
66
❘
CHAPTER 1 VISUAL STUDIO 2010
Concurrency checks are designed to detect issues with multi-threaded applications. The concurrency
checks support two modes. The fi rst checks for resource contention issues. This occurs when two threads
are, for example, attempting to write output to the same data fi le or data table, thus forcing your parallel
processing to behave in a serial manner. The second mode enables you to better track how threaded events
are behaving.
Instrumentation, conversely, is an intrusive form of performance monitoring. Choosing to make an
instrumentation run the performance tools triggers the addition of special MSIL commands into your
compiled executable. These calls are placed at the start and fi nish of methods and properties within your
executable. Then, as your code executes, the performance engine can gauge how long it takes for specific
calls within your application to execute.
Keep in mind that all methods of performance testing affect the underlying performance of the application. It
is true that running a performance monitor of any type has built-in overhead that affects your application, but
the goal of performance testing isn’t to know the exact timing marks of your application, but rather to identify
areas that deviate significantly from the norm, and, more important, to establish a baseline from which you
can track any significant changes as code is modified.
SUMMARY
In this chapter, you have taken a dive into the versions and features of Visual Studio. This chapter was
intended to help you explore the new Visual Studio IDE. It demonstrated the powerful features of the IDE,
even in the freely available Visual Basic 2010 Express Edition.
You’ve seen that Visual Studio 2010 is highly customizable and comes in a variety of flavors. As you worked
within Visual Studio 2010, you’ve seen how numerous windows can be hidden, docked, or undocked. They
can be layered in tabs and moved both within and beyond the IDE. Visual Studio also contains many tools,
including some that extend its core capabilities. Keep in mind that whether you are using Visual Basic 2010
Express Edition or Visual Studio 2010 Ultimate, the core elements associated with compiling your application
are the same.