1
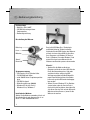
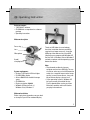
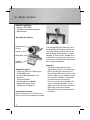
All listed brands are trademarks of the corresponding companies. Errors and omissions excepted,
and subject to technical changes. Our general terms of delivery and payment are applied.
00053926/12.09
Hama GmbH & Co KG
D-86651 Monheim/Germany
www.hama.com
P
C
-
W
E
B
C
A
M
Webcam
»CM-310 MF«
00053926
d Bedienungsanleitung
Packungsinhalt:
• Webcam „CM-310 MF“
• CD-ROM mit umfangreichem
Softwarepaket
• Bedienungsanleitung
Beschreibung der Webcam
Fokusring
Linse
Mikrofon
Stand-/
Klemmfuß
Systemvoraussetzung:
• CPU Pentium IV 2,4 GHz oder höher
• 512 MB RAM oder höher
• mind. 500 MB freier Festplattenspeicherplatz
• CD-ROM Laufwerk
• Bildschirmauflösung: 800x600
• Windows XP Service Pack 2 /
Windows Vista / Windows 7
Installation der Webcam
Stellen Sie die Webcam entweder einfach auf
Ihren Schreibtisch oder klemmen Sie sie an
Ihren TFT- oder Notebookbildschirm.
2
Durch die USB Video Class Technologie
entfällt die bisherige Treiberinstallation.
Verbinden Sie den USB-Stecker der Webcam
einfach mit einem freien USB-2.0-Anschluss
Ihres Computers mit Windows XP Service
Pack 2, Windows Vista oder Windows 7 und
warten Sie einen kurzen Moment bis die
Webcam vom Betriebssystem erkannt wurde.
Hinweis!
• Stecken Sie die Webcam direkt am
Computer und nicht an einem USB-Hub ein.
Durch die Verwendung eines Hubs oder
auch durch aktive und passive USBVerlängerungskabel wird die Bildqualität
negativ beeinträchtigt. Unter Umständen
kann auch gar kein Bild mehr wiedergegeben werden.
• Sollten Sie zwar Windows XP als Betriebssystem haben, aber das Service Pack 2
noch nicht installiert haben, dann laden Sie
sich dieses Service Pack von der Microsoft
Website und installieren es, bevor Sie die
Webcam einstecken.
Installation der Software
• Legen Sie die CD-ROM ein. Nach einigen
Sekunden erscheint automatisch der
Startbildschirm
• Sollte der Startbildschirm nicht erscheinen
dann öffnen Sie den Windows Explorer und
starten die Anwendung „autorun.exe“ auf
der CD-ROM
• Wählen Sie nun die gewünschte Sprache
und installieren Sie dann das Softwarepaket
„Hama Webcam Suite“
• Befolgen Sie die Anweisungen auf dem
Bildschirm
Nachdem Sie Hardware und Software installiert haben, öffnen Sie die ArcSoft Webcam
Companion 3. Je nach Räumlichkeiten,
Tageszeit und Beleuchtung kann es sein das
die Farben nicht ganz realitätsnah wiedergegeben werden oder die Helligkeit angepasst
werden muss. In diesem Fall verwenden Sie
die „Webcam-Einstellungen“ in der Webcam
Companion 3 um die Farbeinstellungen für
Ihre Bedingungen zu optimieren.
ArcSoft Webcam Companion 3
• Erfassen: Erstellen Sie Bilder, Bildserien
oder Videos per Knopfdruck
• Maske: Transferieren Sie Ihr Gesicht auf
ein beliebiges Bild
• Rahmen: Erstellen Sie Bilder mit Rahmen
und Galerien
• Bearbeiten: Bearbeiten Sie die Helligkeit
und den Kontrast Ihrer Videos und Bilder
nach und schneiden Sie Ihre Videos auf die
gewünschte Länge
• Überwachungskamera: Startet automatisch
die Videoaufnahme wenn eine Bewegung
registriert wird und beendet die Aufnahme
selbstständig wieder
ArcSoft Media Impression 2
• Importieren: Importieren Sie Mediadateien
von Ihrer Digitalkamera oder einem
Speichergerät
• Media Player / Photo Viewer: Werfen Sie
einen Blick auf Ihre Videos und Bilder
• Bildschirmpräsentation erstellen: Erstellen
Sie eine Bildschirmpräsentation aus
Ihren Bildern und unterlegen sie mit Ihrem
Lieblingstitel
• Fotos bearbeiten: Bearbeiten Sie Ihre
Bilder in 7 einfachen Schritten nach oder
fügen Sie Rahmen, Farb- und Fotoeffekte
hinzu
• Film erstellen: Erstellen Sie aus Ihren
einzelnen Bildern und Videos einen Film
• Einfaches Archivieren: Brennen Sie die
ausgewählten Mediadateien auf CD oder
DVD
ArcSoft Magic-i Visual Effects 2
• Face Tracking
• digitaler Zoom: Vergrößern Sie einen
Bildschirmausschnitt um bis zu 200%
• Effekte / Rahmen / Themen / Avatare:
Peppen Sie Ihren Videochat mit diesen
originellen Plug-Ins auf.
Sollten Sie Fragen oder Probleme mit den
einzelnen Funktionen haben, drücken Sie
einfach im jeweiligen Programm die F1-Taste.
Dann erhalten Sie eine detaillierte Anleitung
über die Funktionen dieses Programms und
wie sie anzuwenden sind.
3
Technische Daten:
• Sensor: 300 Kpixel
• Videoauflösung: max. 640 x 480
• Standbildauflösung: max. 1280 x 960
(interpoliert)
• Bildrate: max. 30 fps
• Videoformat: WMA, MPG
• Bildformat: JPG, BMP
• Fokussierung: manuell
• Belichtungssteuerung: automatisch
• Weißabgleich: automatisch
• Schärfebereich: 3 cm bis unendlich
• Sichtfeld: 54°
• USB-2.0-Anschluss
• integriertes Mikrofon
Support- und Kontaktinformationen bei
defekten Produkten:
Bitte wenden Sie sich bei Produktreklamationen an Ihren Händler oder an die Hama
Produktberatung.
Internet/World Wide Web
Produktunterstützung, neue Treiber oder
Produktinformationen bekommen Sie unter
www.hama.com
Support Hotline – Hama Produktberatung:
Tel. +49 (0) 9091 / 502-115
Fax +49 (0) 9091 / 502-272
e-mail: [email protected]
4
g Operating Instruction
Package contents:
• “CM-310 MF” webcam
• CD-ROM with a comprehensive software
package
• Operating instructions
Webcam description
Focus ring
Stand/
clamping base
Thanks to USB video class technology,
the driver installation that was previously
required is no longer necessary. Insert the
USB plug of the webcam into a free USB
2.0 port on your computer with Windows XP
Service Pack 2, Windows Vista or Windows 7
and wait a moment until the operating system
detects the device.
System requirements:
• Pentium IV CPU with 2.4 GHz or higher
• 512 MB RAM or higher
• At least 500 MB free hard disk storage
space
• CD-ROM drive
• Display resolution: 800x600
• Windows XP Service Pack 2 /
Windows Vista / Windows 7
Note:
• Plug the webcam directly into your
computer and not into a USB hub. The use
of a hub or active or passive USB extension
cables has a negative impact on the image
quality. In some circumstances, it may not
be possible to display a picture at all.
• If your operating system is Windows XP
but you have not yet installed Service
Pack 2, download the service pack from
Microsoft’s website and install it before
you plug in the webcam.
Lens
Microphone
Webcam installation
Either simply place the webcam on your desk
or clamp it to your LCD or notebook display.
5
Software installation
• Insert the CD-ROM. The start screen
automatically appears after a few seconds.
• If the start screen does not appear, open
Windows Explorer and run the “autorun.exe”
application from the CD-ROM.
• Select the desired language and then
install the “Hama Webcam Suite” software
package.
• Follow the instructions on the screen.
After installing the hardware and software,
open ArcSoft Webcam Companion 3.
Depending on the location, time of day and
lighting, the colours may not be reflected
realistically or the brightness may need to be
adjusted. If this is the case, use the webcam
settings in Webcam Companion 3 to adjust
the colour settings for your conditions.
ArcSoft Webcam Companion 3
• Capture: create photos, photo series or
videos at the touch of a button
• Masque: transfer your face onto any photo
• Frame: create photos with frames and
galleries
• Edit: adjust the brightness and contrast of
your photos and videos and cut your videos
to the desired length
• Surveillance camera: video recording starts
and ends automatically when a movement
is registered
6
ArcSoft Media Impression 2
• Import: import media files from your digital
camera or a storage device
• Media player/photo viewer: take a look at
your videos and photos
• Create a screen slide show: create an
on-screen slide show with your photos and
use your favourite song as background
music
• Edit photos: Edit your photos in 7 simple
steps or add frames, colouring effects and
photo effects
• Films: Make films from your individual
photos and videos
• Simple archiving: burn selected media files
to a CD or DVD
ArcSoft Magic-i Visual Effects 2
• Face tracking
• Digital zoom: enlarge a screen shot by
up to 200%
• Effects/frames/themes/avatars: spice up
your video chat with these original plug-ins
If you have questions or problems with the
individual functions, simply press the F1 key
in the respective program. You can then view
detailed instructions about the functions of
the program and how to apply them.
Specifications:
• Sensor: 300 Kpixel
• Video resolution: max. 640 x 480
• Still resolution: max. 1280 x 960
(interpolated)
• Frame rate: max. 30 fps
• Video format: WMA, MPG
• Image format: JPG, BMP
• Focus: manual
• Exposure control: automatic
• White balance: automatic
• Sharpness range: 3 cm ~ infinity
• Field of view: 54°
• USB 2.0 connection
• Integrated microphone
Support and contact information
If the product is defective:
Contact your retailer or Hama Product
Consulting if you have any product claims.
Internet/World Wide Web
Product support, new drivers and product
information are available at www.hama.com.
Support hotline – Hama Product Consulting:
Tel. +49 (0) 9091 502 115
Fax +49 (0) 9091 / 502-272
E-mail: [email protected]
7
f Mode d‘emploi
Contenu de l‘emballage :
• Webcam „CM-310 MF“
• CD-ROM avec de nombreux logiciels
• Mode d’emploi
Description de la webcam
Bague de mise
au point
Lentille
Microphone
Support/
pied à fixer
Configuration requise :
• Processeur Pentium IV 2,4 GHz ou plus
• 512 Mo RAM ou plus
• Au moins 500 Go disponibles sur le
disque dur
• Lecteur de CD ROM
• Résolution de écran: 800x600
• Windows XP Service Pack 2 /
Windows Vista / Windows 7
Installation de la webcam
Placez la webcam soit sur votre bureau ou
fixez-la à l’écran de votre ordinateur portable.
8
La technologie UVC (USB Video Class) vous
permet d’éviter l’installation d’un pilote. Insérez la fiche USB de la webcam dans un port
USB 2.0 libre de votre ordinateur sur lequel
Windows XP Service Pack 2, Windows Vista
ou Windows 7 est installé, puis patientez un
instant jusqu’à la détection de la webcam par
votre système d’exploitation.
Remarque !
• Connectez la webcam directement à
votre ordinateur et non à un concentrateur
USB. L’utilisation d’un concentrateur ou
d’une rallonge USB active ou passive a une
influence négative sur la qualité de l’image.
Dans certaines conditions, il est possible
qu’aucune image ne soit transmise.
• Dans le cas où vous utilisez Windows XP
comme système d’exploitation, mais ne
disposez pas du Service Pack 2, veuillez le
télécharger à partir du site web de
Microsoft et l’installer avant de connecter
la webcam.
Installation du logiciel
• Insérez le CD-ROM pilote. L’écran de
démarrage apparaît automatiquement
quelques secondes plus tard.
• Ouvrez l’explorateur Windows, puis lancez
l’application « autorun.exe » à partir du CDROM dans le cas où l’écran de démarrage
n’apparaît pas.
• Sélectionnez la langue désirée, puis
installez l’ensemble des logiciels
« Hama Webcam Suite ».
• Suivez les consignes affichées à l’écran.
Ouvrez ArcSoft Webcam Companion 3 après
avoir installé le matériel et le logiciel.
En fonction de la configuration des lieux, du
moment de la journée et de l’éclairage, il est
possible que la reproduction des couleurs
ne soit pas totalement réaliste ou que vous
deviez ajuster la luminosité. Dans ce cas,
utilisez les « Réglages de la webcam » du
Webcam Companion 3 afin d’optimiser les
réglages des couleurs en fonction de vos
conditions d’utilisation.
ArcSoft Webcam Companion 3
• Saisie : enregistrement d’images, de séries
d’images ou de vidéos par simple pression
sur un bouton
• Masque : transfert de votre visage sur
n‘importe quelle image
• Cadres : création d‘images avec cadres et
galeries
• Traitement : traitement ultérieur de la
luminosité et du contraste de vos vidéos et
de vos images, puis découpage de vos
vidéos à la longueur désirée
• Caméra de surveillance : démarrage
automatique de l’enregistrement vidéo dès
qu’un mouvement est détecté, puis mise
hors service automatique
ArcSoft Media Impression 2
• Importation : importation de fichiers médias
à partir de votre appareil photo numérique
ou d’un appareil de stockage de données
• Media Player / Photo Viewer : visualisation
de vos vidéos et de vos images
• Création d’une présentation sur écran :
création d’une présentation sur écran à
partir de vos images et attribution d’un titre
à vos images
• Traitement de vos photos : traitement de
vos photos en 7 étapes simples ou ajout de
cadres, d‘effets couleurs ou d‘effets photo
• Création de films : création d‘un film à
partir de vos images ou vidéos
• Création d’archives simple : gravure des
fichiers médias sélectionnés sur CD ou DVD
Effets visuels ArcSoft Magic-i 2
• Face tracking (suivi du visage)
• Zoom numérique : augmentation du
cadrage de l’écran jusqu’à 200 %
• Effets / cadres / thèmes / transformation :
ajoutez du piquant à vos chats vidéo à
l’aide de ces plugiciels (plug-ins) originaux
En cas de question ou de problème
concernant une fonctionnalité, appuyez
simplement sur la touche de programme F1
correspondante. Vous obtiendrez des instructions détaillées concernant la fonctionnalité de ce programme ainsi que son mode
d’application.
9
Caractéristiques techniques :
• Détecteur : 300 Kpixels
• Résolution vidéo : 640 x 480 maxi
• Résolution des images fixes : 1280 x 960
(interpolée) maxi
• Fréquence d’affichage : max. 30 fps
• Formats vidéo : WMA, MPG
• Formats images : JPG, BMP
• Mise au point : manuelle
• Commande de l’exposition : automatique
• Équilibrage des blancs : automatique
• Plage de netteté : de 3 cm à infini
• Champ de vision : 54°
• Connexion USB 2.0
• Microphone intégré
Support technique et contact
En cas d’appareils défectueux :
En cas de réclamation concernant le produit,
veuillez vous adresser à votre revendeur ou
au département conseil produits de Hama.
Internet / World Wide Web
Notre support technique, les nouveaux
pilotes et les informations produits sont
disponibles sous : www.hama.com
Ligne téléphonique directe d’assistance
– Conseil produits Hama :
Tél. +49 (0) 9091 / 502-115
Fax +49 (0) 9091 / 502-272
E-mail : [email protected]
10
o Gebruiksaanwijzing
Inhoud van de verpakking:
• webcam „CM-310 MF“
• cd-rom voorzien van uitgebreid
softwarepakket
• bedieningsinstructies
Beschrijving van de webcam
Snapshot button
Focus ring
Lens
Microphone
Stand/clamping
base
Systeemeisen:
• CPU Pentium IV 2,4 GHz of hoger
• 512 MB RAM of hoger
• min. 500 MB beschikbare geheugenplaats
op de harde schijf
• CD-rom-drive
• Scherm resolutie: 800x600
• Windows XP Service Pack 2 /
Windows Vista / Windows 7
Dankzij de USB-Video-Class-technologie vervalt de gebruikelijke driverinstallatie. Steek
de USB-stekker van de webcam in een vrije
USB-2.0-aansluiting van uw computer met
Windows XP Service Pack 2, Windows Vista
of Windows 7 en wacht een moment tot de
webcam door het besturingssysteem wordt
herkend en geactiveerd.
Attentie!
• Sluit de webcam direct op de computer
en niet op een USB-poort aan. Door gebruik
te maken van een poort of door actieve
en passieve USB-verlengkabels wordt de
beeldkwaliteit slechter. Het kan zelfs zijn
dat u helemaal geen beeld meer ziet.
• Mocht u wel Windows XP als besturings
systeem hebben, maar u heeft Service
Pack 2 nog niet geïnstalleerd, download
dan Service Pack 2 van Windows XP van
Microsoft of vraag het na bij uw dealer, als
u niet zeker bent.
Installatie van de webcam
U kunt de webcam gewoon op uw bureau
zetten of aan uw TFT- of notebookscherm
klemmen.
11
Installatie van de software
• Plaats de cd-rom. Na een paar seconden
verschijnt automatisch het startscherm
• Als het startscherm niet verschijnt, open
dan de Windows Explorer en start de
toepassing „autorun.exe“ op de cd-rom
• Kies nu de gewenste taal en installeer dan
het softwarepakket „Hama Webcam Suite“
• Volg de aanwijzingen op het beeldscherm
Nadat u de hardware en software geïnstalleerd heeft, opent u de ArcSoft Webcam
Companion 3.
Afhankelijk van de ruimte, het tijdstip en de
verlichting kan het zijn dat de kleuren niet
helemaal overeenkomstig de werkelijkheid
worden weergegeven of dat de helderheid
moet worden aangepast. In dat geval gebruikt
u de „webcam-instellingen“ in de Webcam
Companion 3 om de kleuren naar behoefte
aan te passen.
ArcSoft Webcam Companion 3
• Opnemen: maak foto´s, fotoseries of video´s
met één druk op de knop
• Scherm: plaats uw gezicht in een
willekeurige afbeelding
• Lijst: maak foto´s met lijst en galerijen
• Bewerken: bewerk de helderheid en het
contrast van uw video´s en foto´s en snijd
uw video´s op de gewenste lengte
• Bewakingscamera: start automatisch de
video-opname zodra er een beweging
geregistreerd wordt en beëindigt de opna
me automatisch weer
12
ArcSoft Media Impression 2
• Importeren: importeer bestanden van uw
digitale camera of een opslagmedium
• Media Player / Photo Viewer: bekijk uw
video´s en foto´s
• Beeldschermpresentatie maken: maak een
beeldschermpresentatie van uw foto´s en
geef ze uw lievelingstitel
• Foto´s bewerken: bewerk uw foto´s in 7
eenvoudige stappen of voeg een lijst of
kleur- en foto-effecten toe
• Film maken: maak van uw foto´s en video´s
een film
• Makkelijk archiveren: brand de
geselecteerde bestanden op cd of dvd
ArcSoft Magic-i Visual Effects 2
• Face Tracking
• Digitale zoom: vergroot een
beeldschermfragment met max. 200%
• Effecten/frames/thema´s/avatars: pep uw
videochat op met deze originele plug-ins.
Als u vragen of problemen heeft met de
afzonderlijke functies, druk dan in het
betreffende programma op de F1-toets. Dan
ziet u een gedetailleerde handleiding over de
functies van dit programma en hoe u ze dient
te gebruiken.
Technische specificaties:
• sensor: 300 kpixels
• videoresolutie: max. 640 x 480
• stilstaand beeldresolutie: max. 1280 x 960
(geïnterpoleerd)
• beeldsnelheid: max. 30 fps
• videoformaat: WMA, MPG
• beeldformaat: JPG, BMP
• focussering: handmatig
• besturing belichting: automatisch
• witbalans: automatisch
• scherptebereik: 3 cm tot oneindig
• gezichtsveld: 54°
• USB-2.0-aansluiting
• geïntegreerde microfoon
Support- en contactinformatie
Bij defecte producten:
Neem bij klachten over het product contact
op met uw verkoper of met de afdeling
Productadvies van Hama.
Internet/World Wide Web
Productondersteuning, nieuwe drivers of
productinformatie is verkrijgbaar onder
www.hama.com
Support Hotline – Hama productadvies:
Tel. +49 (0) 9091 / 502-115
Fax +49 (0) 9091 / 502-272
E-mail: [email protected]
13