1
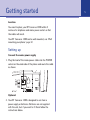
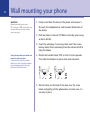
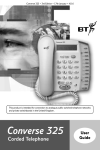
User Guide
BT CONVERSE 1300
Welcome…
to your BT Converse 1300 corded
telephone
■
200 Name and number directory.
■
Nine pre-set BT Calling Feature numbers giving easy
access to, directory enquiries, Call Diversion, Call Waiting
and the 1571 BT answering service.
■
Headset socket lets you make and receive calls privately
while keeping your hands free.
■
Handsfree button lets you make and receive calls using
the built in loudspeaker and microphone.
■
Secrecy lets you talk to someone else close by without
your caller hearing.
■
Redial the last 5 numbers.
■
Adjust the volume of your caller’s voice.
■
Providing you are connected to a compatible
switchboard, or are a 1571 user, the voice mail indicator
lets you know if you have messages on your network’s
answering service.
■
Data Port lets you connect a modem or similar products.
Section
This User Guide provides you with all
the information you need to get the
most from your phone.
Before you make your first call you will
need to set up your phone. Follow the
simple instructions in ‘Getting Started’,
on the next few pages.
■
Hearing aid friendly
The BT Converse 1300 is fitted with an inductive coupler
so it is compatible with hearing aids.
Got everything?
■
BT Converse 1300
telephone
■
Handset and cord
■
Telephone line cord
■
Power supply unit
■
Stand for desk-mounting
(fitted)
■
Wall mounting plugs
and screws
4
In this guide
Getting started
Location . . . . . . . . . . . . . . . . . . . . . . .5
Setting up . . . . . . . . . . . . . . . . . . . . . .5
Getting to know your phone
Buttons . . . . . . . . . . . . . . . . . . . . . . . .8
Using the phone
Making and ending calls . . . . . . . . . . .10
Receiving a call . . . . . . . . . . . . . . . . . .10
Headset . . . . . . . . . . . . . . . . . . . . . . .10
Handsfree . . . . . . . . . . . . . . . . . . . . . .11
Volume . . . . . . . . . . . . . . . . . . . . . . . .12
Redial . . . . . . . . . . . . . . . . . . . . . . . . .12
Secrecy . . . . . . . . . . . . . . . . . . . . . . . .12
Message Waiting . . . . . . . . . . . . . . . . .13
Recall . . . . . . . . . . . . . . . . . . . . . . . . .13
Directory
Store a number in the directory . . . . . .14
Dial a number in the directory . . . . . . .14
Edit a directory entry . . . . . . . . . . . . . .16
Delete a directory entry . . . . . . . . . . .16
Delete all directory entries . . . . . . . . .16
Menu
Ringer volume . . . . . . . . . . . . . . . . . . .17
Ringer tone . . . . . . . . . . . . . . . . . . . . .17
Time & Date . . . . . . . . . . . . . . . . . . . .18
Contrast . . . . . . . . . . . . . . . . . . . . . . .18
BT Calling Features . . . . . . . . . . . . . .19
Caller Display . . . . . . . . . . . . . . . . . . .19
Calls list . . . . . . . . . . . . . . . . . . . . . . .20
View an entry in the Calls list . . . . . . . .20
Dial an entry in the Calls list . . . . . . . .20
Save an entry from the Calls list
to the directory . . . . . . . . . . . . . . . . . .21
Delete an entry in the Calls list . . . . . .21
Delete all entries in the Calls list . . . . .22
Menu options . . . . . . . . . . . . . . . . . . .23
BT Answer 1571 . . . . . . . . . . . . . . . . .23
118 500/118 707 . . . . . . . . . . . . . . . .23
Call Divert . . . . . . . . . . . . . . . . . . . . . .24
Reset your phone . . . . . . . . . . . . . . . .25
Connecting to a switchboard . . . . . . . .25
Help . . . . . . . . . . . . . . . . . . . . . . . . . .27
General information
Safety . . . . . . . . . . . . . . . . . . . . . . . . .28
Cleaning . . . . . . . . . . . . . . . . . . . . . . .28
Environmental . . . . . . . . . . . . . . . . . . .28
Guarantee . . . . . . . . . . . . . . . . . . . . . .29
Returning your phone . . . . . . . . . . . . .30
Accessories and replacement items . . .30
How many telephones can you have? . .30
Switchboard compatibility . . . . . . . . . .31
R&TTE Directive . . . . . . . . . . . . . . . . .31
Wall mounting your phone . . . . . . . . .32
Getting started
Location
You need to place your BT Converse 1300 within 3
metres of a telephone and mains power socket so that
the cables will reach.
Your BT Converse 1300 can be wall mounted, see ‘Wall
mounting your phone’ page 32.
Setting up
Connect the mains power supply
1. Plug the lead of the mains power cable into the POWER
socket on the underside of the phone and route the cable
as shown.
POWER
LINE 1
Optional
2. Your BT Converse 1300 is designed to run from a
power supply or batteries. Batteries are not supplied
with the unit, but if you want to fit them follow the
instructions below.
5
6
Getting started
If you are not using the power supply provided, batteries
are required for the message waiting feature to work.
Turn the phone over and remove the battery
compartment cover. Insert 4 x AA batteries as shown
and replace the cover.
Battery low indicator
If you have batteries fitted and
they need replacing, the
will
flash in the display.
3. Fit the desk mounting plinth if required by positioning
the plinth over the lugs and pushing it down into place,
as shown by the blue arrows.
Getting started
4. Plug the mains power adaptor into the wall socket and
switch on.
5. Plug the telephone line cord into the wall socket.
6. Check the dial mode setting.
The Mode switch on the underside of your BT Converse
1300 is pre-set to TB for tone dialling with timed break
recall. If your phone does not work, try setting the
dialling mode to P or T.
If you are not sure which setting to use, please contact
your service provider or switchboard manager.
7. Your BT Converse 1300 has a data socket so you can
connect another product such as a modem. If required,
connect the device to the DATA port on the side of the
phone.
Data cable
Your BT Converse 1300 is now ready for use.
P = Pulse dialling with earth recall.
T = Tone dialling with earth recall.
7
8
Getting to know your phone
Buttons
Low battery indicator
Flashes when the back-up
battery is low.
Handset park
If the phone is wall-mounted, you can
hang the handset here if you need to
leave the phone during a call.
UP/DOWN
Lets you scroll through options in the
display, e.g. when you have pressed the
menu or phonebook buttons.
(X) Clear
Deletes characters and numbers from
the directory and redial list.
12.18PM
01/01/05
Menu
Calls
Recall
For use with a switchboard and some BT
Calling Features, page 14.
Handsfree
Make and receive calls via the built-in
loudspeaker, page 11.
Redial
Volume + –
Adjust the volume
of your caller’s
voice, page 12.
9
Call indicator
Flashes when you have an incoming call.
Message waiting indicator
Flashes when you have voice mail, page 14.
Directory
Opens the directory, page 15.
Menu
Use the access BT Services and set-up options.
(TICK) Select
Selects and confirms displayed options and entries.
Dials the number entered.
Calls
Use to access the Calls list.
Dialling mode (underneath the phone)
Lets you set the dialling mode, page 7.
Secrecy & indicator
During a call, lets you talk to someone else close by
without your caller hearing you.
When active, the light is illuminated, page 13.
Headset
Lets you make and receive calls when using a headset.
When active, the light illuminates, page 10.
Redial
View and dial any of the last 5 numbers called, page 12.
Microphone
For use when using handsfree.
Display icons
More than one
call from the
same number
displayed.
Handset
in use.
Missed call.
12.18PM
01/01/05
Battery low
icon displayed
if you have
batteries fitted
and they need
replacing.
Ringer’s
switched off
but Call
Indicator
light will still
flash.
10
Using the phone
Making and ending calls
1. Lift the handset and wait for the dial tone. Dial the
number you want.
2. Replace handset to end the call.
Receiving a call
1. When the phone rings the call indicator light will also
flash. Simply pick up the handset.
Headset
Headsets are not supplied with your BT Converse 1300.
However, you can buy headsets (with RJ11 jack plug) by
calling 0870 240 522 or online at
www.withandwithoutwires.com
Making a headset call
1. Plug the headset (not supplied) into the socket marked
HEADSET on the underside of the base.
2. Press
and dial the number. When the headset is in
use, the headset indicator light is illuminated.
3. Press
to end the call.
Using the phone
Receiving a headset call
1. When the phone rings and the headset is plugged in,
press
to answer.
2. When the call is finished, press
to end the call.
Handsfree
Make and receive calls without lifting the handset.
Making a handsfree call
1. Press
. You will hear the dial tone.
2. Dial the number you want. When your call is answered,
speak as normal (or if you wish to speak to your caller
privately, pick up the handset).
3. Press
to end the call.
Receiving a call handsfree
1. When the phone rings, press
2. Press
to end the call.
and speak.
Transferring the call to the
handset or headset
During a handsfree conversation
you can transfer the call to the
handset just by lifting the handset
or to the headset by pressing
.
You may have to adjust the volume.
11
12
Using the phone
Default volume levels
Handset – Level 1
Handsfree – Level 3
Headset – Level ?
Volume
Whether using the handset, headset or handsfree, you
can adjust the volume of your caller’s voice.
1. During a call, press
or
to adjust the volume.
Redial
You can redial any of the last 5 numbers you have called.
Each redial number can be up to 30 digits long.
Redial the last number
1. Lift the handset or press
2. Press
or
.
Redial one of the last 5 numbers
1. Press
then scroll
want is displayed.
or
until the number you
2. Lift the handset or press
,
or
The number on screen is dialled.
.
Using the phone
Save a number from the redial list to the directory
When reviewing the redial list you can store a number to
the directory. Numbers can be no longer than 28 digits
and can include pause,
and
.
1. While reviewing the redial list, press
then
.
(When you store your very first entry in the directory you
will not need to press
).
2. Display shows Add New Entry. Press
.
3. Display shows Enter Name: Enter the name and press
.
4. Display shows Enter Number: Enter the number and press
. The display shows Entry Saved.
Secrecy
During a call, you can talk to someone nearby without
your caller hearing you.
1. During a call, press
. The red secrecy light is
illuminated and your caller cannot hear you although you
will still be able to hear them.
2. Press
again to return to your caller. The red secrecy
light will switch off.
Secrecy works in handset, headset
and handsfree modes.
13
14
Using the phone
IMPORTANT
If you are not using the power
supply provided, you will need to
fit batteries (page 6) to use the
message waiting feature.
If your BT Converse 1300 is
connected to a switchboard, this
feature only works with compatible
models.
Message Waiting switch
Your Converse 1300 is preset to
work with BT’s 1571 on normal
exchange lines. If your telephone is
connected to a switchboard you
may need to change the switch
setting on the base of the phone.
Try it on setting 1571, then, if it
doesn’t work, try the other
settings.
Typically, position MW1 is for an
ISDX type switch, but if the light
stays on permanently use MW2.
Typically, position MW3 is for an
SX 2000 type switch.
Message waiting
1. If you subscribe to your network’s answering service (e.g.
BT’s 1571) and you have new messages, your Message
Waiting indicator will flash.
To access your messages, either:
2. Lift the handset (or press
or
and dial
.
Or
.
Press
. Display shows BT Service, press
Display shows BT Answer 1571, press
again. 1571 will
be dialled in handsfree mode.
Lift the handset or press
to listen to your messages
privately.
Recall
The Recall
button is used to access a range of
switchboard services, for example, to transfer calls and
with some BT Calling Features.
Directory
15
Store your 200 most frequently used names and
numbers in the directory for easy dialling. Each name can
be up to 16 characters long and each number up to 28
digits long. The number can include a Pause,
,
or
.
You can store a number during a
call or while the phone is in standby.
Store a number in the directory
Entering names
Use the keypad letters to enter
names, e.g. to store Tom:
1. Press
then
.
(When you store your very first entry in the directory you
will not need to press
).
2. Display shows Add New Entry. Press
.
3. Display shows Enter Name: Enter the name and press
4. Display shows Enter Number: Enter the number and press
. The display shows Entry Saved.
.
Entries are automatically stored in
alphabetical order.
Press
once to enter T.
Press
three times to enter O.
Press
once to enter M.
Writing tips
If you make a mistake, press
to delete the last character or digit.
Press
Press
to insert a space
to enter a pause.
Dial a number in the directory
1. Lift the handset or press
2. Press
Scroll
3. Press
or
.
. The first number in the directory is displayed.
or
to the number you want.
to dial.
Batteries must be installed in order
to view and add directory entries
when the phone is standby.
If you are using the power supply
then no batteries are needed.
16
Directory
Edit a directory entry
1. To change a directory entry, press
.
2. Scroll
or
to the entry you want and press
3. Scroll
or
to display Edit Entry and press
4. Edit the name and press
5. Edit the number and press
Entry Saved.
.
.
.
to confirm. Display shows
Delete a directory entry
1. To delete a directory entry, press
2. Scroll
press
3. Scroll
.
or
to the entry you want to delete and
or
to display Delete Entry and press
.
4. Display shows Are you sure? Press
confirm. Display shows Entry Deleted.
.
again to
Delete all directory entries
1. Press
, then
2. Scroll
or
.
to display Delete All and press
3. Display shows Are you sure?. Press
Display shows Entry Deleted.
.
again to confirm.
Menu
17
Use the menu to adjust your phone’s settings to your
preference.
Ringer volume
There are 4 volume settings. 1, 2, 3 and Off.
1. Press
and scroll
2. Press
.
3. Scroll
or
4. Press
5. Press
or
to display Ringer Volume.
to the setting you want.
to confirm. Display shows Saved.
to return to standby.
Ringer tone
There are 3 tones to choose from – Tone 1, Tone 2 and
Tone 3.
1. Press
and scroll
2. Press
.
3. Scroll
or
4. Press
5. Press
or
to display Ringer Tone.
to the setting you want.
to confirm. Display shows Saved.
to return to standby.
䡺䡺䡺 = ringer off
䡵䡵䡵 = ringer volume 3
18
Menu
Time and date
1. Press
and scroll
2. Press
or
to display Set Time & Date.
.
3. Use the keypad to enter the time using the 24 hour
format HH:MM, e.g.
for 9.15am
4. Press
to confirm.
5. Enter the date using the format DD:MM:YY
e.g.
for 6th November 04
to confirm. Display shows Saved.
6. Press
7. Press
to return to standby.
Contrast
You can adjust the display contrast to suit your preference.
There are 5 levels and your BT Converse 1300 is pre-set
to level 2.
1. Press
and scroll
2. Press
.
3. Scroll
or
4. Press
5. Press
or
to display Contrast.
to the setting you want, level 1-5.
to confirm. Display shows Saved.
to return to standby.
BT Calling Features
19
BT Caller Display
If you subscribe to a Caller Display service you can see
who is calling you on the display.
If you have stored the number with a name in the
directory, the name will be displayed as well.
Caller information not available
With some incoming calls, the telephone number of the
caller is not available and cannot therefore be displayed.
In this case your BT Converse 1300 provides you with
some explanatory information.
UNAVAILABLE – The number is unavailable.
WITHHELD – The caller has withheld their number.
RINGBACK – Ringback call.
OPERATOR – The call has been made via the operator.
PAYPHONE – The caller is ringing from a payphone.
INTERNATIONAL – International call.
To use Caller Display you must
subscribe to the service from your
network provider. A quarterly fee
is payable.
For more information. Call BT free
on 0800 800 150.
Calls that arrive without a number
will not be stored in the Calls list.
20
BT Calling Features
Calls list
Your BT Converse 1300 lets you view details of the last
30 callers. Entries are stored in the order they were
received. When a new call is received, the
icon will
flash on the display. If a new number is received when
the list is full, the oldest entry is replaced.
If you have received more than
one call from the number you have
displayed the
icon will be
shown next to the
icon.
If a received number matches a
directory entry the name will be
stored in the Calls list.
View an entry in the calls list
1. Press Calls . Display shows details of the most recently
received call.
2. Press
or
to scroll through the list.
Dial an entry in the calls list
1. Press Calls . Display shows details of the most recently
received call.
2. Press
or
to scroll through the list to the entry
you want to dial.
3. Lift the handset, or press
or
.
The number is shown on the display and dialled.
BT Calling Features
Save an entry from the calls list to the directory
1. Press Calls . Display shows details of the most recently
received call.
2. Press
or
to save.
3. Press
4. Press
to scroll through to the entry you want
. Display shows Save Number.
. Display shows Enter name: Enter the name.
5. Press
to confirm. Display shows Edit number.
You can edit the number if you wish. Use
to delete
digits.
6. Press
to confirm. Display shows Entry Saved.
Delete an entry in the calls list
1. Press Calls . Display shows details of the most recently
received call.
2. Press
or
to scroll through to the entry you want
to delete and press
.
3. Scroll
or
to display Delete Entry and press
4. Display shows Are you sure? Press
confirm. Display shows Entry Deleted.
again to
.
21
22
BT Calling Features
Delete all entries in the calls list
1. Press Calls . Display shows details of the most recently
received call.
2. Press
press
and scroll
.
or
to display Delete All and
3. Display shows Are you sure? Press
confirm. Display shows Entry Deleted.
again to
Calling Features
There is a tenth entry available
so you can store another
name/number entry.
If you press
when a BT Calling
Feature is displayed you will be
able to select edit, delete and add
options using
and
and
to change or delete the existing
entries.
If you want to re-instate the prestored numbers, reset the phone
to its original settings, see page 25.
Your BT Converse 1300 gives you easy access to a range
of BT Calling Features. Nine codes have been pre-stored
for the following services.
1. Lift the handset or press
2. Press
3. Scroll
4. Press
or
.
. Display shows BT Service. Press
or
to the option you want.
to dial.
.
BT Calling Features
Menu options
Number dialled
BT Answer 1571
Residential Directory Enquiries
Business Directory Enquiries
Call Diversion On
Call Diversion Off
Call Diversion Check
Call Waiting On
Call Waiting Off
Call Waiting Check
BT Answer 1571
This calls BT’s answering service to access any voicemail
messages you may have. Details on using the service are
provided when you subscribe.
118500/118707
Calls BT’s residential or business directory enquiry service.
Compatibility and availability of
services
If you are connected to a
switchboard, these network features
will not be available. However, if the
switchboard provides similar features
you can store the appropriate
codes in place of the pre-set ones.
If you are not connected to the
BT network, some of these services
may not be available. Please contact
your Network Provider.
23
24
BT Calling Features
Call Divert
Call Diversion services may allow
other divert options. Check with
your Network provider for details
You can divert all incoming calls to another number of
your choice
Switch Call Diversion on
1. Press
. Display shows BT Service. Press
2. Scroll
to Call Diversion On and press
the displayed code.
.
to dial
3. Enter the number you want calls diverted to then press
and listen for confirmation of your instructions.
4. Press
.
Switch Call Diversion off
1. Press
. Display shows BT Service. Press
.
.
2. Scroll
to Call Diversion Off and press
Wait for the number to be dialled and listen for
confirmation.
3. Press
.
For further information, see the BT Calling Features User
Guide supplied when you subscribe to the services of
your choice.
BT Calling Features
Reset
If you change the pre-stored BT Calling Features
numbers, you can reinstate the original numbers at any
time by re-setting your phone to its original settings.
These are:
Ringer tone
Ringer volume
Earpiece volume
Handsfree volume
Headset volume
Time
Date
Contrast
Tone 2
Level 3
Level 1
Level 3
Level 1
12.01pm
01.01.04
Level 2
Reset your phone
1. Press
. The display will show Memory
Reset and then return to idle.
Connecting to a switchboard
You can store the access code required to get an outside
line. This code will be dialled automatically when you call
numbers from your directory, calls list or redial list. It will
not be dialled before manually dialled numbers (including
those held in the redial list).
This will clear all numbers stored in
the memory.
25
26
BT Calling Features
With some switchboards you may also need to switch
your BT Converse 1300 from TONE dialling to PULSE
dialling. Check with your switchboard manager or
supplier to see if this is necessary.
To set the access code
1. Press
2. Press
.
or
to display Access Code and press
3. Enter Code: will be displayed. Using the keypad, enter
the code you need to access an outside line. If your
switchboard requires a pause after the code then press
to enter a pause. If in doubt, consult your
switchboard manager.
4. Press
5. Press
. Display shows Saved.
to return to standby.
.
Help
No dial tone
■
Is the line cord plugged into the phone socket?
Nothing happens when you dial
■
Check the dialling mode switch is set to the correct position. Page 8.
Phone does not ring
■
Is the ringer volume set to Off? Page 17.
You may have too many phones, fax machines and/or answering machines plugged in
which might be overloading the sockets. See Technical Information, page 30.
27
28
General information
Safety information
■
Do not open the handset or base. This could expose you to high voltages or other risks.
■
Never dispose of batteries in a fire. There is a serious risk of explosion and/or the release
of highly toxic chemicals.
Cleaning
■
Clean the phone with a damp (not wet) cloth, or an anti-static wipe. Never use household
polish as this may damage the product. Never use a dry cloth as this may cause a static
shock.
Environmental
■
Do not expose to direct sunlight.
■
We recommend that you do not place the products on antique/veneered wood to avoid
damage.
■
Do not stand your product on carpets or other surfaces which generate fibres, or place it
in locations preventing the free flow of air over its surface.
■
Do not submerge any part of your product in water and do not use it in damp or humid
conditions, such as bathrooms.
■
Do not expose your product to fire, explosive or other hazardous conditions.
General information
Guarantee
Your BT Converse 1300 is guaranteed for a period of 12 months from the date of
purchase.
Subject to the terms listed below, the guarantee will provide for the repair of, or at BT’s
or its agent’s discretion the option to replace the BT Converse 1300 or any component
thereof, (other than batteries), which is identified as faulty or below standard, or as a
result of inferior workmanship of materials. Products over 28 days old from the date of
purchase may be replaced with a refurbished or repaired product.
The conditions of this guarantee are:
■
The guarantee shall only apply to defects that occur within the 12 month guarantee
period.
■
Proof of purchase is required.
■
The equipment is returned to BT or its agent as instructed.
■
This guarantee does not cover any faults or defects caused by accidents, misuse, fair
wear and tear, neglect, tampering with the equipment, or any attempt at adjustment or
repair other than through approved agents.
■
This guarantee does not affect your statutory rights
Within the 12 month guarantee period:
In the unlikely event of a defect occurring, please return the product with the receipt, to
the place of purchase.
29
30
General information
Outside of the 12 month guarantee period:
If your product needs repair after the guarantee period has ended, the repair must meet
the approval requirements for connection to the telephone network. We recommend that
you contact BT’s approved repair agent, TecLogic on 08702 405029 or a local qualified
repairer.
Returning your phone
Where possible, pack the product in its original packaging. Please include all parts,
including the line cords. (Please note, we cannot take responsibility for goods damaged in
transit.) Please obtain and keep proof of posting from the Post Office or carrier.
Accessories and replacement items
For a full range of accessories and replacement items for BT products, please call
0872 240 5522, or visit www.withandwithoutwires.com
Technical information
How many telephones can you have?
All items of telephone equipment have a Ringer Equivalence Number (REN), which is used
to calculate the number of items which may be connected to any other telephone line.
Your BT Converse 1300 has a REN of 1. A total REN of 4 is allowed. If the total REN of 4
is exceeded, the telephone may not ring.
General information
Switchboard compatibility
This product is intended for use within the UK for connection to public telephone network
and compatible switchboards, which support tone dialling and timed break recall. If in
doubt please consult your service provider.
R&TTE Directive
Hereby, TMX, declares that this BT Converse 1300 is in compliance with the essential
requirements and other relevant provisions of Directive 1999/5/EC.
A copy of the Declaration of Conformance for the BT Converse 1300 is available from TMX,
Alpha Business Park, 28 White House Road, Ipswich, IP1 5LT.
For your records
Date of purchase:
Place of purchase:
Serial number:
For guarantee purposes proof of
purchase is required so please
keep your receipt.
31
32
Wall mounting your phone
WARNING
Before you wall-mount your
BT Converse 1300, check that you
are not drilling into any hidden
wiring or pipes.
1. Unclip stand from the base of the phone and remove it.
Re-route the telephone line cord towards the bottom of
the phone.
2. Drill two holes in the wall 75-80mm vertically apart using
an 8mm drill bit.
3. Insert the wall plugs if necessary then insert the screws
leaving about 5mm protruding from the wall on which to
hang the phone.
Using the handset park when the
phone is wall-mounted
If you need to leave the phone
whilst on a call, hang the handset
on the handset park at the top
left-hand side of the base.
4. Rotate the handset hook 180º so that it sticks upwards.
This holds the handset in place when wall-mounted.
5. Slot the holes on the back of the base over the screw
heads and gently pull the phone down to make sure it is
securely in place.
Visit us at www.bt.com
Offices worldwide
The telecommunications services described in this publication
are subject to availability and may be modified from time to time.
Services and equipment are provided subject to British
Telecommunications plc’s respective standard conditions of
contract. Nothing in this publication forms any part of any contract.
© British Telecommunications plc 2005.
Registered Office: 81 Newgate Street, London EC1A 7AJ.
Registered in England No. 1800000.
BT Converse 1300 (03/05) 6
Designed and produced by The Art & Design Partnership Ltd.
Printed in China