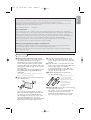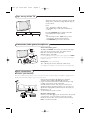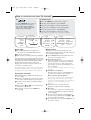
1
Information for users in the UK
(Not applicable outside the UK)
Positioning the TV
For the best results, choose a position where light does not fall directly on the screen, and at some
distance away from radiators or other sources of heat. Leave a space of at least 5 cm all around
the TV for ventilation, making sure that curtains, cupboards etc. cannot obstruct the air flow
through the ventilation apertures.
The TV is intended for use in a domestic environment only and should never be operated or
stored in excessively hot or humid atmospheres.
General Points
Please take note of the section 'Tips' at the end of this booklet.
Interference
The Department of Trade and Industry operates a Radio Interference Investigation Service to help
TV license holders improve reception of BBC and IBA programmes where they are being spoilt by
interference.
If your dealer cannot help, ask at a main Post Office for the booklet "How to improve Television
and Radio Reception".
Mains connection
Before connecting the TV to the mains, check that the mains supply voltage corresponds to the
voltage printed on the type plate on the rear panel of the TV. If the mains voltage is different, consult your dealer.
Important
This apparatus is fitted with an approved moulded 13 Amp plug.
To change a fuse in this type of plug proceed as follows :
1. Remove fuse cover and fuse.
2. Fit new fuse which should be a BS1362 5A, A.S.T.A. or BSI approved type.
3. Refit the fuse cover.
In order to maintain conformity to the EMC directive, the mains plug on this product must not be
removed.
Connecting the aerial
The aerial should be connected to the socket marked x at the back of the set. An inferior aerial is
likely to result in a poor, perhaps unstable picture with ghost images and lack of contrast. Makeshift or set-top aerials are unlikely to give adequate results.
Your dealer will know from experience the most suitable type for your locality.
Should you wish to use the set in conjunction with other equipment, which connects to the aerial
socket such as TV games, or a video camera, it is recommended that you consult your dealer on
the best method of connection.
Stand (if provided)
Use only the stand provided with the set, making sure that the fixings are properly tightened. A diagram showing how to assemble the stand is packed with the stand. Never use a make-shift stand, or
legs fixed with woodscrews.
06-04-2004
09:49
Pagina 1
English
2330.3 gb
Help?
If this instruction manual does not give an answer or if ‘Tips’ do not solve your TV problem, you can call your
Local Philips Customer or Service Centre. See the supplied World-wide guarantee booklet.
Please, have the Model and Product number which you can find at the back of your television set or on the
packaging, ready, before calling the Philips helpline.
Model: 30/37/42PF9946
Product No:
Care of the screen
Do not touch, push or rub or strike the screen with anything hard as this may scratch, mar or damage the
screen permanently. Do not rub with dust clothes with chemical treatment. Do not touch the surface with bare
hands or greasy cloth (some cosmetics are detrimental to the screen). Unplug the TV before cleaning the
screen. When the surface becomes dusty, please wipe gently with absorbent cotton or other soft materials like
chamois soaks. Do not use acetone, toluene and alcohol because they cause chemical damage.
Do not use liquid cleaners or aerosol cleaners. Wipe off saliva or water drops as soon as possible. Their long
time contact with the screen causes deformations and colour fading.
Warning concerning stationary images on the TV screen
A characteristic of Plasma Display Panels is that displaying the same image for a long time can cause a
permanent after-image to remain on the screen. This is called phosphor burn in.
Normal use of the TV should involve the showing of pictures that contain constantly moving and changing
images that fill the screen.
Preparation
& Wall mounting instructions/Table stand
“ Insert the aerial plug firmly into the aerial
According to the type of TV you’ve purchased a
wall mount bracket and/or stand may be
supplied. How to mount the supplied stand
and/or wall mount bracket, see the supplied
separate leaflet. Make sure that the wall mount
is being fixed securely enough so that it meets
safety standards.
The weight of the TV (excl. packaging) is about
18 kg (30PF9946); 30 kg (37PF9946); 42 kg
(42PF9946).
Note: Other (not supplied) stands are optional
accessories. Consult your dealer.
é Make sure that air can circulate freely through
the ventilation slots.
socket x at the bottom of the TV. For best
picture quality use the suppressor-aerial cable
supplied.
‘ Insert the mains cord supplied into the mains
at the bottom of the TV and in the wall socket
having a mains voltage of 198-264V.
To prevent damaging the power (AC) cord
which could cause a fire or electric shock, do
not place the TV on the cord.
( Remote control: Insert the 2 batteries
supplied (Type R6-1,5V).
The batteries supplied do
not contain the heavy
metals mercury and
cadmium. Please check on
how to dispose of
exhausted batteries
according to local
regulations.
§ Switch the TV on : Press the power switch B
at the right side of the TV.
An indicator on the front of the TV lights up
and the screen comes on. If the TV is in
standby mode (red indicator), press the -P+
keys or the B key on the remote control.
To prevent any unsafe situations, no naked
flame sources, such as lighted candles, should
be placed on or in the vicinity. Avoid heat,
direct sunlight and exposure to rain or water.
The equipment shall not be exposed to
dripping or splashing and no objects filled with
liquids, such as vases, shall be placed on it.
1
2330.3 gb
06-04-2004
09:49
Pagina 2
To use the menus
& Press the MENU key on the remote control to
summon the main menu. At any moment you
can exit the menu by pressing the MENU key
again.
é Use the cursor up/down to select Picture,
Sound, Features, Install or Mode.
the menu item.
‘ Use the cursor up/down again to select the
control you want to select or to adjust.
Note: Items temporary not available or not relevant are
displayed in a light grey colour and cannot be selected.
TV menu
TV Menu
Picture
Picture π
Sound
Features
Install
Mode
Brightness π
Brightness
Colour
Colour
Contrast
Contrast
Sharpness
Sharpness
ColourTemp
Temp
Colour
Store
TV Menu
Sound
Picture
Sound π
Features
Install
Mode
Equalizer
π
Brightness
Balance
Colour
Delta
Volume
Contrast
AVL
Sharpness
Virtual
ColourDolby
Temp
Store
TV Menu
Features
Picture
Sound
Features π
Install
Mode
Timer π
Brightness
Contrast+
Colour
Contrast NR
Sharpness
Colour Temp
Install menu: see p. 7
2
p
π
120 Hz
500 Hz
1500 Hz
....
Sleep
Time
Start Time
Stop Time
Program No.
Activate
“ Use the cursor in the right direction to select
Picture menu:
• Brightness: this changes picture brilliance.
• Colour: this changes the intensity of the
colour.
• Contrast: this changes the difference between
the light and dark tones.
• Sharpness: this changes the picture definition.
• Colour Temp: this changes the colour
rendering: Cool (more blue), Normal
(balanced) or Warm (more red).
• Store: to store the picture adjustments and
settings (as well as the settings for Contrast+
and NR in the Features menu).
Sound menu:
• Equalizer: to adjust the sound tone (from
bass 120 Hz to treble 10 kHz).
• Balance: this balances the sound on the left
and right speakers.
• Delta Volume: this is used to compensate any
volume discrepancies between the different
programmes or externals.
This setting is available for programmes 0 to
40 and the EXT connections.
• AVL (Automatic Volume Leveller): this is used
to limit increases in sound, especially on
programme change or advertising slots.
• Virtual Dolby: simulates the surround sound
experience from 2 speakers using Dolby Pro
Logic* providing the listener with the
sensation of being surrounded by additional
speakers.
• Store: this is used to store the sound settings.
Features menu:
• Timer: see p. 8.
• Contrast+: automatic adjustment of the
picture contrast which permanently sets the
darkest part of the picture to black.
• NR: attenuates picture noise (snow) in difficult
reception conditions.
Caution: to store the Contrast+ and NR settings,
use the Store choice in the Picture menu.
2330.3 gb
06-04-2004
09:49
Pagina 3
Use of the remote control RC4333
Note: For most keys pressing a key once will activate the function. Pressing a second time will de-activate it.
Remark: in VGA mode only some keys are valid.
B Standby
Press to switch the TV on or off.
VCR DVD TV SAT AMP
See ‘Audio- and Video equipment
keys’, p. 10.
v Select your peripherals
See p. 6.
b Teletext On/Mix/Off, see p. 9.
B
Colour keys, see Teletext.
VCR DVD TV SAT AMP
OK Press this key to display the
v
MENU
programme list.
†®Ò‡πº
Audio and Video equipment keys.
TV / PC
Press one of these keys to
switch the television between TV
or PC mode.
†
SELECT
®
Ò
TV
PC
‡
¬ Interrupt the sound or restore it.
º
b
Surround sound
To activate/deactivate the
surround sound effect. In stereo,
this gives the impression that the
speakers are further apart. For
models equipped with Virtual
Dolby Surround, you can obtain
Dolby Surround Pro Logic*
sound quality. In mono, a stereo
spatial effect is simulated.
Note:You can make the same
selection in the Sound menu, Virtual
Dolby.
V To adjust the volume.
i On Screen information
To display/remove the
programme number, the time, the
sound mode and the time
remaining on the timer.
Hold down for 5 seconds to
permanently display the
programme number on the
screen.The volume level and the
smart control adjustments are
then displayed each time they are
used.
OK
®
®
®
SURR
P
Programme selection
To move up or down a
programme.The number and the
sound modes are displayed for a
few seconds.
For some TV programmes the title of
the programme appears at the
bottom of the screen.
®
SURR
Main menu on/off
π
MENU
0/9 Digit keys
+
+
¬
V
P
-
-
1
2
3
4
5
6
7
8
9
i
0
0
X
0 Previous TV channel
Press to display the previously
selected TV channel.
:g Teletext keys. See p. 9.
X Sound mode
:
g
To select a TV channel.
For a two digit programme
number, enter the second digit
before the dash disappears.To
switch immediately to a selected
one digit TV channel, keep the
digit key pressed a bit longer.
h
q
SMART
SMART
M
a
To switch from Stereo or
Nicam Stereo to Mono, or to
choose between Dual Y or
Dual Z in case of bilingual
transmission.
When the sound mode is Mono,
the indication is displayed in red.
h Active control on/off/on
with sensor
Optimizes the quality of the
picture according to the quality
or reception.
* Dolby’ ‘Pro Logic’ and the double-D G symbol are trademarks of
Dolby Laboratories Licensing Corporation. Manufactured under license
from Dolby Laboratories Licensing Corporation.
3
2330.3 gb
06-04-2004
i
09:49
0
0
:
g
X
h
q
SMART
SMART
M
a
Pagina 4
q 16:9 formats
The pictures you receive may be transmitted in 16:9 format (wide screen)
or 4:3 format (conventional screen).
4:3 picture sometimes have a black band at the and the bottom of the
screen (letterbox format).
This key allows you to optimise the picture display on screen.
Automatic switching
This TV set is equipped with automatic switching which will select the
correct screen format, provided the specific signals are transmitted with
the programmes.
This automatic format can also be modified manually;
Using the different formats
Use the cursor left/right to select the different modes: 4:3, Zoom 14:9,
Zoom 16:9, Subtitle zoom, Super wide and Wide screen.
4:3
The picture is reproduced in 4:3 format and a black band is displayed
on either side of the picture.
Zoom 14:9
The picture is enlarged to 14:9 format, a thin black band remains on
both sides of the picture.
Zoom 16:9
The picture is enlarged to 16:9 format.This mode is recommended
when displaying pictures which have black bands at the top and
bottom (letterbox format).
Subtitle Zoom
This mode is used to display 4:3 pictures using the full surface of the
screen leaving the subtitles visible.
Super Wide
This mode is used to display 4:3 pictures using the full surface of the
screen by enlarging the sides of the picture.
Widescreen
This mode restores the correct proportions of pictures transmitted
in 16:9 using the full screen display.
Fullscreen
This mode displays images in full screen.
Ma Smart keys
To select predefined picture and sound settings.
Personal refers to the personal preference settings selected in the sound
and picture menu.
4
2330.3 gb
06-04-2004
09:49
Pagina 5
Keys on top of the TV
Should your remote be lost or broken you can still
change some of the basic settings with the keys on
top of your TV.
Press:
• the - V + key to adjust the volume;
• the - P/CH + key to select the TV channels or
sources.
-
V
+
-
MENU/OK
P/CH
+
Press the MENU/OK key to summon the main
menu without the remote control.
Use:
• the V + key and the - P/CH + key to select
menu items in the directions as shown;
• the MENU/OK key to remove the menu.
Camcorder, video games, headphone
L
VIDEO IN
R
S-VIDEO
AUDIO
S•
VH
IN
IN
D
EOO U
DDE A
R
VVI I L
S
IO
L
Camcorder,Video games
The AV and S-VIDEO connections are located at the right
side of the TV or, for large screen sizes at the bottom;
Make the connections as shown opposite.
With the v key, select AV.
For a monophonic device, connect the audio signal to the AUDIO
L input. The sound automatically comes out of the left and right
speakers of the set.
Headphone (only for 30PF9946)
The - V+ keys are used to adjust the volume level.
The headphone impedance must be between 32 and 600 ohms.
Rear connections
Recorder (VCR-DVD+RW)
Note: Do not place your recorder too close to the screen as some recorders may be susceptible to signals from the
display. Keep a minimum distance of 0,5 m from the screen.
Connect the aerial cables 1, 2 and, to obtain the
optimum picture quality, eurocable 3 as shown.
If your recorder does not have a euroconnector, the only
possible connection is via the aerial cable.
You will therefore need to tune in your recorder’s test
signal and assign it programme number 0 or store the test
signal under a programme number between 90 and 99, see
Manual store, p. 7.
See the handbook of your recorder.
CABLE
EXT 1
3
1
2
RECORDER
DECODER
Decoder and Recorder
Connect a eurocable 4 to your decoder and to the special
euroconnector of your recorder. See also the recorder
handbook. You can also connect your decoder directly to
EXT1 or 2 with a eurocable.
5
2330.3 gb
06-04-2004
09:49
Pagina 6
Other equipment (satellite receiver, decoder, DVD, games, etc.)
Connect the aerial cables 1, 2 and 3 as shown
(only if your peripheral has TV aerial in-/output).
Connect your equipment with a eurocable 4 or 5 to
one of the euroconnectors EXT1 or 2 to obtain a
better picture quality.
CABLE
EXT2
EXT1
1
4
Connect the equipment which produces the RGB signals
(digital decoder, games, etc.) to EXT1, and the
equipment which produces the S-VHS signals (S-VHS
and Hi-8 video recorders, certain DVD drives) to EXT2
and all other equipment to either EXT1 or EXT2.
5
3
2
RECORDER
Amplifier
To connect to a hi-fi system, use an audio connection
cable and connect the L and R AUDIO outputs on the
TV set on the AUDIO IN L and R input on your hi-fi
amplifier.
AUDIO
OUT
L
R
Connect your computer
connector at the bottom of the TV.
Fix the connectors firmly with the screws on the plug.
é In case of a Multimedia computer, connect the audio
cable 2 to the audio outputs of your Multimedia
computer and to the AUDIO R (right) and L (left)
inputs.
AUDIO
L
VGA
IN
R
1
& Connect one end of a VGA cable 1 to the video card
of the computer and the other end to the VGA IN
2
The VGA connector allows the following TV and
monitor display modes:
VGA
640 x 480
60 Hz
SVGA
800 x 600
60 Hz
XGA
1024 x 768
60 Hz
WXGA
1280 x 768
60 Hz
Note:
Use the XGA1024x768@60Hz video mode to obtain the best
image quality for your LCD monitor (30PF9946 only).
Use the WXGA1280x768@60Hz video mode to obtain the best
image quality for your PDP monitor (37/42PF9946 only).
To select connected equipment
Press the v key on the remote control repeatedly to select EXT1, EXT2 (S-VHS signals from the EXT2
connector) or AV according to where you connected your equipment.
Remark : Most equipment (decoder, recorder) carries out the switching itself, when it is switched on.
6
2330.3 gb
06-04-2004
09:49
Pagina 7
How to search for and store TV channels
Via
Keep the MENU/OK key on top of
the TV pressed for 5 seconds to
start the Plug & Play installation.
Select your country and language.
Tuning starts automatically.
TV Menu
Picture
Sound
Features
Install π
Mode
Via the TV menu:
& Press the MENU key on the remote control.
é Use the cursor up/down to select Install.
“ Press the cursor right to enter the Install menu.
‘ Use the cursor left/right to select your language.
( Press the cursor down to select Country.
§ Use the cursor left/right to select your country.
Note: Select “.....” when none of the countries applies.
Auto Store
Install
Language
Programmeπ
..........
Country
TV π
freq
Auto Store
o
p Store
π
Manual
œ
Sort
Language
Country
Auto Store
Manual Store
Sort π
Install
....
10 p
11
12 π
13
Language
Country
Auto Store
Manual Store
Sort
System
Search
Program No
π Fine tune
Store
Auto store
Manual store
& Select Auto Store in the Install menu.
Searching for and storing TV channels is done
channel by channel.You must go through every step
of the Manual Installation menu.
The autostore option label Start appears.
é Press the cursor right.
“ The progress of autoprogramming is displayed.
If a cable system or a TV channel which broadcasts
ACI (Automatic Channel Installation) is detected, a
programme list appears.Without ACI broadcast,
the channels are numbered according your
language and country selection.You can use the
Sort menu to renumber them.
It is possible that the cable company or the TV channel
displays a broadcast selection menu. Layout and items
are defined by the cable company or the TV channel.
Sorting TV channels
& Select Manual Store in the Install menu and
press the cursor right to enter.
é Select the TV system:
Select the country or part of the world from
where you want to receive the TV channel. If
you are connected to a cable system, select
your country or part of the world where you
are now located.
Note: for automatic detection select Europe (except
for France).
“ Search for a TV channel:
Press the cursor down to select Search and
press the cursor right to start searching.
& Select Sort in the Install menu and press the
é
“
‘
(
cursor right
Select the TV channel you want to move using
the cursor up/down and press cursor right.
Select the new number and validate with the
cursor left.
Repeat steps é and “ for each TV channel
you wish to renumber.
To exit the menus, press the MENU key
repeatedly.
‘
(
§
è
Direct selection of a TV channel:
If you know the frequency, enter it directly with the
digit keys 0 to 9. Ask for a list from your cable
company or dealer, alternatively consult the Table of
frequencies on the inside backcover of this
handbook.
Press the cursor down and enter the
programme number with the digit keys.
Fine tune:
In case of poor reception, you can improve the
reception by adjusting the frequency with the
cursor left/right.
To store your TV channel, select Store and
press the cursor right. Repeat steps “ to (
to store another TV channel.
To exit from the menu press the MENU key on
the remote control.
7
2330.3 gb
06-04-2004
09:49
Pagina 8
Features menu
§ Stop Time: enter the standby time.
Timer
This menu lets you use the TV set as an alarm.
è Program No.: enter the number of the
programme for the wake-up alarm.
& Press the MENU key.
! Activate: the settings include:
é With the cursor, select Features, then Timer.
• Once for a single alarm;
• Daily for each day,
• Off to cancel.
ç Press the B key on the remote control to put
the TV set in standby. It will automatically come
on at the time programmed. If you leave the TV
set on, it will just change programmes at the
time entered (and will go to standby mode at
the Stop Time).
“ Sleep: to select an automatic standby period.
‘ Time: enter the current time.
Note: the time is updated automatically each time
the TV set is switched on via the teletext
information on programme 1. If the programme
does not have teletext, the update will not take
place.
( Start Time: enter the start time.
Using in PC monitor mode
Your TV can be used as a computer monitor.
You must first of all connect the computer and adjust the resolution (see p. 6).
Choosing PC mode
Press the PC key on the remote control to switch the TV to PC mode. Press the TV key to return to
TV mode. If there is no PC signal for more than five seconds, the TV automatically goes into standby
mode.
Using the PC menus
Press the MENU key to access the specific settings of the
PC monitor mode. Use the cursor keys to adjust them (the
settings are automatically saved).
TV Menu
Picture
Sound
Features
Install
Mode π
TV
PC
PC mode
Picture π
Audio selection
Features
Reset to Factory
Mode
Features
Phase
Clock
Format
Auto adjust
Brightness
Contrast
Horizontal Pos
Vertical Pos
Colour Temp
Picture
• Brightness/Contrast: to adjust the brightness and
contrast.
• Horizontal/Vertical Position: to adjust the horizontal
and vertical placing of the image.
• Colour Temperature: to adjust the colours (cool,
normal or warm).
Audio selection
To choose the sound reproduced on the TV
(PC or TV).
Features
• Phase/Clock: eliminates the horizontal (Phase) and
vertical (Clock) interfering lines.
• Format: to choose between large screen (Full screen)
or the original (Native) format of the PC screens.
• Auto adjust: position is set automatically.
Reset to Factory
To return to the factory settings
Mode
To come back to TV mode.
8
2330.3 gb
06-04-2004
09:49
Pagina 9
Teletext
Teletext is an information system broadcast by certain channels which can be consulted like a
newspaper. It also offers access to subtitles for viewers with hearing problems or who are not familiar
with the transmission language (cable networks, satellite channels, etc.).
Press:
B
You will obtain:
b
Teletext
on/off
This is used to call teletext, change to transparent mode
and then exit.The summary appears with a list of items
that can be accessed. Each item has a corresponding 3
digit page number.
If the channel selected does not broadcast teletext, the indication
100 will be displayed and the screen will remain blank (in this
case, exit teletext and select another channel).
0/9
-P+
Selecting
a page
Enter the number of the page required using the 0 to 9
or -P+ keys. Example: page 120, enter 1 2 0.
The number is displayed top left, the counter turns and
then the page is displayed. Repeat this operation to view
another page.
If the counter continues to search, this means that the page is not
transmitted. Select another number.
OOOO
Direct
access to
the items
Coloured areas are displayed at the bottom of the screen.
The 4 coloured keys are used to access the items or
corresponding pages.
The coloured areas flash when the item or the page is not yet
available.
Contents
This returns you to the contents page (usually page 100).
Enlarge
a page
This allows you to display the top or bottom part of the
page and then return to normal size.
VCR DVD TV SAT AMP
v
†
SELECT
®
Ò
TV
PC
‡
π
b
º
®
OK
®
®
®
SURR
MENU
+
+
¬
V
P
-
-
1
2
3
4
5
6
i
7
8
9
0
0
cursor
up/down
i
:
:
g
X
h
q
SMART
SMART
M
a
X
MENU
OOOO
i
Double page
teletext
Favourite
pages
To activate or deactivate the double page teletext display
mode.The active page is displayed on the left and the
following page is displayed on the right. Press g if you
want to hold a page (i.e. the contents page).The active page
is then displayed on the right.To return to normal mode,
press X.
Instead of the standard coloured areas displayed at the
bottom of the screen, you can store 4 favourite pages on
the first 40 channels which can then be accessed using the
coloured keys (red, green, yellow, blue). Once set, these
favourite pages will become the default every time teletext
is selected.
& Press the MENU key to change the favourite pages
mode.
é Display the teletext page that you want to store.
“ Press the coloured key of your choice for 5 seconds.
The page is stored.
‘ Repeat steps é to “ for the other coloured keys.
( Now when you consult teletext, your favourite pages
will appear in colour at the bottom of the screen; to
temporally retrieve the standard items, press menu.
To clear everything and return to the standard items as the
default, press i for 5 seconds.
9
2330.3 gb
06-04-2004
09:49
Pagina 10
Audio- and video equipment keys
This system remote control operates the following Philips equipment:TV,VCR,
DVD, SAT (RC5), AMP (+TUNER).
B
VCR DVD TV SAT AMP
v
†
SELECT
®
Ò
TV
PC
‡
º
π
b
Note: When the Select key is pressed and held for more than 2 seconds, the RC5/RC6
system select command is transmitted.
®
OK
®
®
®
SURR
MENU
+
+
¬
V
B
º
P
-
-
1
2
3
4
5
6
7
8
9
0
0
i
Press the Select key to operate any of the equipment indicated in the display.
Another device can be selected by pressing Select repeatedly within 2 seconds.
The led will blink slowly to indicate the device.
Press one of the keys on the remote control to operate the peripheral equipment.
To return to TV mode press Select while the led is blinking.
When no action is taken within 60 seconds, the remote goes back to TV mode.
®
Ò
‡
π
†
:
g
X
h
q
SMART
SMART
M
a
b
i
10
to switch to standby
for pause (VCR, DVD, CD)
RDS news/TA (AMP);
to shuffle play (CD/R)
for record
for rewind (VCR, CD);
search down (DVD, AMP)
for stop
for play
for fast forward (VCR, CD);
search up (DVD, AMP)
RDS display (AMP);
to select your choice of subtitle
language (DVD);
display information
MENU to switch the menu on or off
for chapter, channel, track
selection
0 to 9 digit entry
0
tape index (VCR),
select a DVD title/chapter,
select a frequency (AMP)
-P+
cursor up/down
to select the next or the
previous disc (CD)
cursor left/right
to select the previous or
following track (CD)
search up/down (AMP)
2330.3 gb
06-04-2004
09:49
Pagina 11
Tips
Poor Picture
• Have you selected the correct TV system in the manual installation menu?
• Is your TV or house aerial located too close to loudspeakers, non-earthed audio
equipment or neon lights, etc.?
• Mountains or high buildings can cause double pictures or ghost images.
Sometimes you can improve the picture quality by changing the direction of the
aerial.
• Is the picture or teletext unrecognisable? Check if you have entered the correct
frequency. See Store TV channels, Manual store,p. 7.
No Picture
• Are the supplied cables connected properly ? (The aerial cable to the TV, the
other aerial to your recorder, the VGA cables to the display, the power cables.)
• Is your PC switched on ?
• Do you see a black screen and the indicator in front of the TV lights up green,
this means that the display mode is not supported. Switch your VGA-source to a
correct mode.
• In case of weak or bad signal, consult your dealer.
Digital distortion
The low quality of some digital picture material may be the cause of digital image
distortion. In this case select the Soft setting using the Smart picture key a on
the remote control.
No sound
• No sound on any channel? Check the volume isn’t at minimum.
• Is the sound interrupted with the mute key ¬?
No solution found Switch your TV off and then on again once. Never attempt to repair a defective
for your picture or TV yourself. Check with your dealer or call a TV technician.
sound problem ?
Menu
Have you selected the wrong menu? Press the MENU key again to exit from the
menu.
Remote control
• Check if the remote control is in the correct mode.
• If your TV no longer responds to the remote control, the batteries may be dead.
• You can still use the MENU/OK key and the -/+ keys on top of your TV.
Standby
Your TV consumes energy in the standby mode. Energy consumption contributes
to air and water pollution. Power consumption: >3 W.
Miscellaneous
.
.
.
.
.
.
Ambient temperature: + 5~ + 40°C
Mains: 50/60 Hz Auto Voltage ranging from 198 V to 264 V
Power consumption: around 160 W
Standby consumption: >3 W
Weight (excl. packaging): 30”: 18 kg; 37”: 30 kg; 42”: 42 kg
Dimensions (wxhxd):
30”: 895x490x110;
37”: 1130x600x85;
42”: 1215x660x90
11
2330.3 gb
12
06-04-2004
09:49
Pagina 12
Table of TV frequencies.
Frequenztabelle der Fernsehsender.
Liste des fréquences des émetteurs.
Frequentietabel TV-Zenders.
Tabella delle frequenze delle trasmittenti.
Lista de las frecuencias de las emisoras.
Lista das frequências dos emissores.
Liste over TV senderne.
Tabell over TV-frekvenser.
EUROPE
CH ..FREQ (MHz)
E2.............48.25
E3.............55.25
E4.............62.25
E5...........175.25
E6...........182.25
E7...........189.25
E8...........196.25
E9...........203.25
E10.........210.25
E11.........217.25
E12.........224.25
S1...........105.25
S2...........112.25
S3...........119.25
S4...........126.25
S5...........133.25
S6...........140.25
S7...........147.25
S8...........154.25
S9...........161.25
S10.........168.25
S11.........231.25
S12.........238.25
S13.........245.25
S14.........252.25
S15.........259.25
S16.........266.25
S17.........273.25
S18.........280.25
S19.........287.25
S20.........294.25
H1 ..........303.25
H2 ..........311.25
H3 ..........319.25
H4 ..........327.25
H5 ..........335.25
H6 ..........343.25
H7 ..........351.25
H8 ..........359.25
H9 ..........367.25
H10 ........375.25
H11 ........383.25
H12 ........391.25
H13 ........399.25
H14 ........407.25
H15 ........415.25
H16 ........423.25
H17 ........431.25
H18 ........439.25
H19 ........447.25
21 ...........471.25
22 ...........479.25
23 ...........487.25
24 ...........495.25
25 ...........503.25
26 ...........511.25
27 ...........519.25
28 ...........527.25
29 ...........535.25
30 ...........543.25
31 ...........551.25
32 ...........559.25
33 ...........567.25
34 ...........575.25
35 ...........583.25
36 ...........591.25
37 ...........599.25
38 ...........607.25
39 ...........615.25
40 ...........623.25
41 ...........631.25
42 ...........639.25
43 ...........647.25
44 ...........655.25
45 ...........663.25
46 ...........671.25
47 ...........679.25
48 ...........687.25
49 ...........695.25
50 ...........703.25
51 ...........711.25
52 ...........719.25
53 ...........727.25
54 ...........735.25
55 ...........743.25
56 ...........751.25
57 ...........759.25
58 ...........767.25
59 ...........775.25
60 ...........783.25
61 ...........791.25
62 ...........799.25
63 ...........807.25
64 ...........815.25
65 ...........823.25
66 ...........831.25
67 ...........839.25
68 ...........847.25
69 ...........855.25
Tabell över TV-frekvenser.
TV-taajuustaulukko.
Kατάλογος συχνοτήτων ποµπών.
Spisok hastot peredathikov.
A televizió−adóállomások frekvenciáinak a listája.
Lista częstotliwości stacji nadawczych.
Seznam frekvenčních pásem vysílačů.
Zoznam frekvenčných pásiem vysielačov.
E-EUROPE
FRANCE
ITALY
CAN..FREQ (MHz)
R1 ..........49.75
R2 ..........59.25
R3 ..........77.25
R4 ..........85.25
R5 ..........93.25
R 6 .......175.25
R 7 .......183.25
R 8 .......191.25
R 9 .......199.25
R10 ......207.25
R11 ......215.25
R12 ......223.25
S1 ........105.25
S2 ........112.25
S3 ........119.25
S4 ........126.25
S5 ........133.25
S6 ........140.25
S7 ........147.25
S8 ........154.25
S9 ........161.25
S10 ......168.25
S11 ......231.25
S12 ......238.25
S13 ......245.25
S14 ......252.25
S15 ......259.25
S16 ......266.25
S17 ......273.25
S18 ......280.25
S19 ......287.25
S20 ......294.25
H1 ........303.25
H2 ........311.25
H3 ........319.25
H4 ........327.25
H5 ........335.25
H6 ........343.25
H7 ........351.25
H8 ........359.25
H9 ........367.25
H10 ......375.25
H11 ......383.25
H12 ......391.25
H13 ......399.25
H14 ......407.25
H15 ......415.25
H16 ......423.25
H17 ......431.25
H18 ......439.25
H19 ......447.25
21 .........471.25
22 .........479.25
23 .........487.25
24 .........495.25
25 .........503.25
26 .........511.25
27 .........519.25
28 .........527.25
29 .........535.25
30 .........543.25
31 .........551.25
32 .........559.25
33 .........567.25
34 .........575.25
35 .........583.25
36 .........591.25
37 .........599.25
38 .........607.25
39 .........615.25
40 .........623.25
41 .........631.25
42 .........639.25
43 .........647.25
44 .........655.25
45 .........663.25
46 .........671.25
47 .........679.25
48 .........687.25
49 .........695.25
50 .........703.25
51 .........711.25
52 .........719.25
53 .........727.25
54 .........735.25
55 .........743.25
56 .........751.25
57 .........759.25
58 .........767.25
59 .........775.25
60 .........783.25
61 .........791.25
62 .........799.25
63 .........807.25
64 .........815.25
65 .........823.25
66 .........831.25
67 .........839.25
68 .........847.25
69 .........855.25
CAN..FREQ (MHz)
2 ..............55.75
3 ..............60.50
4 ..............63.75
5 ..............176.0
6 ..............184.0
7 ..............192.0
8 ..............200.0
9 ..............208.0
10 ............216.0
B............116.75
C............128.75
D............140.75
E ............159.75
F ............164.75
G ...........176.75
H............188.75
I .............200.75
J ............212.75
K............224.75
L ............236.75
M...........248.75
N ...........260.75
O ...........272.75
P ............284.75
Q ...........296.75
H1..........303.25
H2..........311.25
H3..........319.25
H4..........327.25
H5..........335.25
H6..........343.25
H7..........351.25
H8..........359.25
H9..........367.25
H10........375.25
H11........383.25
H12........391.25
H13........399.25
H14........407.25
H15........415.25
H16........423.25
H17........431.25
H18........439.25
H19........447.25
21 ..........471.25
22 ..........479.25
23 ..........487.25
24 ..........495.25
25 ..........503.25
26 ..........511.25
27 ..........519.25
28 ..........527.25
29 ..........535.25
30 ..........543.25
31 ..........551.25
32 ..........559.25
33 ..........567.25
34 ..........575.25
35 ..........583.25
36 ..........591.25
37 ..........599.25
38 ..........607.25
39 ..........615.25
40 ..........623.25
41 ..........631.25
42 ..........639.25
43 ..........647.25
44 ..........655.25
45 ..........663.25
46 ..........671.25
47 ..........679.25
48 ..........687.25
49 ..........695.25
50 ..........703.25
51 ..........711.25
52 ..........719.25
53 ..........727.25
54 ..........735.25
55 ..........743.25
56 ..........751.25
57 ..........759.25
58 ..........767.25
59 ..........775.25
60 ..........783.25
61 ..........791.25
62 ..........799.25
63 ..........807.25
64 ..........815.25
65 ..........823.25
66 ..........831.25
67 ..........839.25
68 ..........847.25
69 ..........855.25
CAN..FREQ (MHz)
A ..............53.75
B ..............62.25
C ..............82.25
D ............175.25
E ............183.75
F.............192.25
G............201.25
H ............210.25
H1 ..........217.25
S1 ..........105.25
S2 ..........112.25
S3 ..........119.25
S4 ..........126.25
S5 ..........133.25
S6 ..........140.25
S7 ..........147.25
S8 ..........154.25
S9 ..........161.25
S10 ........168.25
S11 ........231.25
S12 ........238.25
S13 ........245.25
S14 ........252.25
S15 ........259.25
S16 ........266.25
S17 ........273.25
S18 ........280.25
S19 ........287.25
S20 ........294.25
H1 ..........303.25
H2 ..........311.25
H3 ..........319.25
H4 ..........327.25
H5 ..........335.25
H6 ..........343.25
H7 ..........351.25
H8 ..........359.25
H9 ..........367.25
H10 ........375.25
H11 ........383.25
H12 ........391.25
H13 ........399.25
H14 ........407.25
H15 ........415.25
H16 ........423.25
H17 ........431.25
H18 ........439.25
H19 ........447.25
21...........471.25
22...........479.25
23...........487.25
24...........495.25
25...........503.25
26...........511.25
27...........519.25
28...........527.25
29...........535.25
30...........543.25
31...........551.25
32...........559.25
33...........567.25
34...........575.25
35...........583.25
36...........591.25
37...........599.25
38...........607.25
39...........615.25
40...........623.25
41...........631.25
42...........639.25
43...........647.25
44...........655.25
45...........663.25
46...........671.25
47...........679.25
48...........687.25
49...........695.25
50...........703.25
51...........711.25
52...........719.25
53...........727.25
54...........735.25
55...........743.25
56...........751.25
57...........759.25
58...........767.25
59...........775.25
60...........783.25
61...........791.25
62...........799.25
63...........807.25
64...........815.25
65...........823.25
66...........831.25
67...........839.25
68...........847.25
69...........855.25
GB
The frequencies used by a cable company may differ from the
frequencies on the table. Consult your cable company or your
dealer for detailed information.
D
In Kabelfernsehanlagen können Abweichungen von den in den
Frequenztabellen aufgeführten Frequenzen vorkommen. Bitte
wenden Sie sich an Ihren Fachhändler oder Ihre
Kabelfernsehgesellschaft, die Ihnen die zutreffenden Frequenzen
mitteilt.
F
Les fréquences utilisées par une société de télédistribution
peuvent être différentes de celles sur la liste des fréquences.
Consultez votre société de télédistribution ou votre revendeur
pour des informations plus détailées.
NL
De frequenties die gebruikt worden door een kabelmaatschappij
kunnen verschillen van deze op de tabel. Raadpleeg uw
kabelexploitant of uw handelaar voor meer informatie.
I
Le frequenze usate per una società di teledistribuzione possano
essere differenti di quelle nella tabella. Consultate la società di
teledistribuzione o il vostro rivenditore per informazione specifica.
E
Las frecuencias utilizadas por las empresas de distribución de
señal por cable, pueden ser diferentes de las que se encuentran
en esta tabla. Consulte con su compañia de distribución de
televisión por cable o con su distribuidor para que le proporcionen
una información más detallada.
P
As frequências utilizadas por uma sociedade de teledistribuição
podem ser diferentes das indicadas na lista de frequências.
Consultar a sociedade de teledistribuição ou o vendedor para
informações mais detalhadas.
DK
Frekvenser benyttet af kabel operatører kan være afvigende fra
disse, kantakt deres kabel operatør eller forhandler for næmere
informa-tion.
N
Frekvensene som benyttes pa et kabelnett kan avvike fra de som
er oppfört i tabellen. Kontakt ditt kabel-TV selskap eller din
forhandler for næmere opplysninger.
S
Frekvenserna som används i kabel-TV-näten kan avvika från
frekvenserna i tabellen. Kontakta ditt kabel-TV-bolag eller din
radiohandlare för vidare information.
SF
Kaapeliyhtiöden käyttämät taajuudet voivat poiketa taulukossa
olevista taajuuksista. Tarkat tiedot saat kaapeliyhtiösta tai myyjältä.
GR
Οι συχντητες που χρησιµοποιούνται απ µια εταιρεία τηλεµετάδοσης
είναι δυνατν να είναι διαφορετικές απ αυτές που περιέχει ο κατάλογος.
(Συµβουλευθείτε την εταιρεία τηλεµετάδοσης ή τον πωλητή για
λεπτοµερέστερες πληροφορίες).
CEI
Hastoty na kotoryx peredaòt telakampaniä mogut
otlihatæsä ot hastot na dannoj tablice. (Obratitæsä k
Vaπej telekampanii ili Vaπemu prodavcu za
dopolnitelænoj informaciej.
H
Egy televizió−adóállomás sugárzáshoz használt frekvenciatar−
tományai lehetnek a táblázatban közöltektől eltérőek is. (Abban
az esetben, ha bővebb információkra van szüksége, forduljon az
eladóhoz.)
PL
Operator sieci telewizyjnej może stosować inne częstotliwości,
niż te, które figurują na tablicy (bardziej szczegółowych infor−
macji na ten temat zasięgnąć u operatora lub sprzedawcy).
CZ
Frekvence používané některými televizními společnostmi se
mohou lišit od údajů uvedených v tomto seznamu. Informujte se
blíže u příslušné společnosti nebo v prodejně, kde jste televizor
koupili.
SK
Frekvencie používané niektorými spoločnos9ami televízneho
prenosu sa môžu liši9 od údajov uvedených v tomto zozname.
Informujte sa bližšie u príslušnej spoločnosti alebo v predajni,
kde ste televízor kúpili.