1
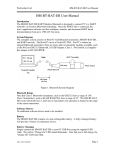
CiscoSecure ACS 2.3 for UNIX Installation Guide
Product Number DOC-CSASC2.3UX-IG=
Use this guide to install the following CiscoSecure Access Control Server (ACS) products:
•
CiscoSecure ACS 2.3 for UNIX (CSU-2.3)— Installs a new CiscoSecure ACS 2.3 for UNIX site
without the optional Distributed Session Manager (DSM) module licensed or enabled.
•
CiscoSecure ACS 2.3 for UNIX Distributed Session Manager (CSU-2.3-DSM)—Installs a new
CiscoSecure ACS 2.3 for UNIX site with the DSM module licensed and enabled.
•
CiscoSecure ACS Distributed Session Manager Option (CSU-DSM)—Adds the licensed and
enabled DSM module to an existing CiscoSecure ACS 2.3 for UNIX site.
•
CiscoSecure ACS for UNIX Upgrade to v2.3 (CSU-2.3-UG)—Upgrades an existing
CiscoSecure ACS 2.x for UNIX site to version 2.3.
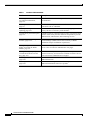
Table 1 lists the sections of this document:
Table 1
Sections of this Document
Section
Description
Considerations Before You Install Start with this section before installing CiscoSecure ACS 2.3 for
CiscoSecure ACS, page iii
UNIX software.
Basic Installation Procedures,
page iv
Read this section for the basic CiscoSecure ACS installation
procedures.
Solaris 2.5.1 Patches, page xiv
Read this section if you are installing on top of Solaris 2.5.1. It
describes Solaris 2.5.1 patches necessary to run
CiscoSecure ACS.
Upgrading from CiscoSecure
ACS 2.x to 2.3, page xiv
Read this section if you are upgrading from a previous version of
CiscoSecure ACS.
Activating the DSM Module on an Read this section if you are licensing and activating the DSM
Existing CiscoSecure ACS 2.3,
module on an existing or newly upgraded CiscoSecure ACS 2.3
page xviii
for UNIX site that is not yet licensed or enabled to support the
DSM.
Setting Up an Oracle Database for Read this section if you intend to use an Oracle database engine
CiscoSecure, page xix
to support CiscoSecure ACS. It describes the preinstallation
Oracle configuration requirements.
Setting Up a Sybase Enterprise
SQL Server for CiscoSecure,
page xxii
Read this section if you intend to use a Sybase database engine to
support CiscoSecure ACS. It describes the preinstallation Sybase
configuration requirements.
CiscoSecure ACS 2.3 for UNIX User Guide
78-5222-02 Rev. A0
i
Table 1
Sections of this Document
Section
Description
Accessing CiscoSecure ACS 2.3
for UNIX Documentation,
page xxiv
This section lists the online and printed sources of CiscoSecure
documentation.
Installing without a CD-ROM,
page xxv
Read this section if you intend to install CiscoSecure ACS on a
workstation with no CD-ROM.
Manually Enabling Profile Cache Read this section if you intend to run third-party programs that
Updating, page xxvi
directly edit the CiscoSecure profile database.
CiscoSecure System Description, Read this section for a basic description of how CiscoSecure ACS
page xxvi
software works with your other network components to provide
authentication, authorization, and accounting services.
Distributed Session Manager
Features, page xxviii
Read this section for a basic description of the Distributed
Session Manager (DSM) feature and a summary of DSM
installation and post-installation requirements.
Editing Configuration Files to
Enable or Disable the DSM
Module, page xxx
Read this section if you want to enable DSM but do not have
access to the CiscoSecure Administrator web pages.
Editing CSU.cfg to Specify a
CiscoSecure Software License
Key, page xxxi
Read this section if you want to specify a new or replacement
software license key for CiscoSecure ACS but do not have access
to the CiscoSecure Administrator web pages.
Obtaining Documentation,
page xxxii
Read this section for information about Cisco documentation and
additional literature.
Obtaining Technical Assistance,
page xxxii
Read this section for guidelines on obtaining assistance and
additional information from Cisco Systems.
CiscoSecure ACS 2.3 for UNIX User Guide
ii
78-5222-02 Rev. A0
Considerations Before You Install CiscoSecure ACS
Considerations Before You Install CiscoSecure ACS
Considerations Before You Install CiscoSecure ACS
Before you begin, consider the following situations and steps you must take before starting the basic
installation procedures in the next section.
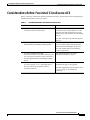
Table 2
Considerations Before You Install CiscoSecure ACS
Consideration
•
If you are not familiar with how
CiscoSecure ACS software works
Requirements
You need to acquaint yourself with the basic
CiscoSecure ACS system and how it works
with other network components to provide
authentication, authorization, and accounting
services.
First read “CiscoSecure System Description,”
page xxvi.
•
If you need general information on the optional
Distributed Session Manager (DSM) product
You need to acquaint yourself with the max
sessions control features that the optional
Distributed Session Manager can provide.
First read “Distributed Session Manager
Features,” page xxviii.
•
If you are installing the product
Start with the procedures in “Basic
CiscoSecure ACS 2.3 for UNIX, which sets up a Installation Procedures,” page iv.
new CiscoSecure ACS site without a licensed or
activated Distributed Session Manager (DSM)
option
•
If you are installing the product CiscoSecure ACS
for UNIX Upgrade to v2.3, which upgrades a
previous version of CiscoSecure ACS to
CiscoSecure ACS 2.3
You need to look up old configuration
information to apply to the upgrade.
First read “Upgrading from CiscoSecure ACS
2.x to 2.3,” page xiv for additional
instructions.
CiscoSecure ACS 2.3 for UNIX User Guide
78-5222-02 Rev. A0
iii
Considerations Before You Install CiscoSecure ACS
Considerations Before You Install CiscoSecure ACS
Table 2
Considerations Before You Install CiscoSecure ACS
Consideration
•
If you are installing the product
CiscoSecure ACS 2.3
for UNIX Distributed Session Manager (DSM),
which installs a new CiscoSecure ACS with the
optional CiscoSecure Distributed Session
Manager (DSM) module licensed and enabled
Requirements
•
You need to preinstall Oracle Enterprise
or Sybase Enterprise software for each of
your CiscoSecure ACSes.
Read “Setting Up an Oracle Database for
CiscoSecure,” page xix or “Setting Up a
Sybase Enterprise SQL Server for
CiscoSecure,” page xxii.
•
You need to obtain a special
DSM-enabling software license key, run
the CiscoSecure installation program, and
after installation, start the CiscoSecure
Administrator web pages to enable the
DSM feature.
Read “Basic Installation Procedures,”
page iv for details.
•
If you are using the product, CiscoSecure ACS
Distributed Session Manager Option, which
enables the optional CiscoSecure Distributed
Session Manager (DSM) module on an already
existing CiscoSecure ACS 2.3 for UNIX site
•
After installation, set up replication
among your Oracle or Sybase profile
databases.
•
Enable AAA accounting functions on
your client NASes.
•
You need to have installed Oracle
Enterprise or Sybase Enterprise software
prior to the last installation of your
CiscoSecure ACSes.
Read “Setting Up an Oracle Database for
CiscoSecure,” page xix or “Setting Up a
Sybase Enterprise SQL Server for
CiscoSecure,” page xxii
•
You need to obtain a special
DSM-enabling software key and enable it
through the CiscoSecure Administrator
web pages.
Read “Activating the DSM Module on an
Existing CiscoSecure ACS 2.3,”
page xviii
•
After enabling the DSM module, set up
replication among your Oracle or Sybase
profile databases.
•
Enable AAA accounting in the client
NASes.
CiscoSecure ACS 2.3 for UNIX User Guide
iv
78-5222-02 Rev. A0
Basic Installation Procedures
Basic Installation Procedures
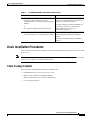
Table 2
Considerations Before You Install CiscoSecure ACS
Consideration
•
If you plan to install more than one
CiscoSecure ACS, and have your users
authenticated from a common replicated profile
database
or
Requirements
You need to purchase and preinstall Oracle
Enterprise or Sybase Enterprise software for
each of your CiscoSecure ACSes.
First read “Setting Up an Oracle Database for
CiscoSecure,” page xix or “Setting Up a
Sybase Enterprise SQL Server for
CiscoSecure,” page xxii.
•
If you plan to support more than 5,000 users
•
If you want to download and install
You need to follow special procedures for
CiscoSecure ACS 2.3 for UNIX from the Internet downloading and starting the installation
package.
First read “Installing without a CD-ROM,”
page xxv.
Basic Installation Procedures
This section describes the basic procedures for first-time installation of CiscoSecure ACS 2.3 for UNIX
at most sites.
Note
If you are upgrading from a previous version of CiscoSecure ACS 2.x, see “Upgrading from CiscoSecure
ACS 2.x to 2.3,” page xiv for additional instructions.
Check Package Contents
The CiscoSecure ACS package includes the following items:
•
CD-ROM labeled CiscoSecure ACS 2.3 for UNIX
•
Release notes (read before starting installation)
•
Requires Immediate Attention form for software key
•
Cisco Information Packet
CiscoSecure ACS 2.3 for UNIX User Guide
78-5222-02 Rev. A0
v
Check System Requirements
Basic Installation Procedures
Check System Requirements
The network components that interact with CiscoSecure ACS 2.3 for UNIX consist of:
•
CiscoSecure ACS itself (a primary server installed on an Ultra 1 workstation plus an optional
backup server, installed on a second Ultra 1 workstation, that can be activated if the primary unit is
disabled)
•
One or more client network access servers (NASes)
•
Web-based console from which to manage CiscoSecure (this can be a separate workstation or the
same Ultra 1 workstation where CiscoSecure ACS is installed)
•
RDBMS database site and server (this can be a separate workstation or the same Ultra 1 workstation
where CiscoSecure ACS is installed)
•
Optional token servers
Each of these components has certain CiscoSecure configuration requirements.
CiscoSecure ACS Server Requirements
CiscoSecure ACS (and its optional backup server) requires the following hardware and software:
•
Ultra 1 or compatible workstation
– To support CiscoSecure ACS without the licensed Distributed Session Manager option:
Ultra 1 with a processor speed of 167 MHz or better
—Minimum 200 MHz if the Oracle or Sybase RDBMS is installed on the same system.
– To support CiscoSecure ACS with the licensed Distributed Session Manager option:
Ultra 1 or better
—Ultra 10 or better if the Oracle or Sybase RDBMS is installed on the same system
•
Minimum 256 MB of swap space
– Minimum 512 MB of swap space if the Oracle or Sybase RDBMS is installed on the same
system
•
128 MB of RAM
– 256 MB of RAM if the Oracle or Sybase RDBMS is installed on the same system
•
Minimum 256 MB of free disk space (if you are using the supplied SQLAnywhere database)
– Minimum 2 GB disk space if the Oracle or Sybase RDBMS is installed on the same system
•
CD-ROM drive (optional)
Note
If you need to install CiscoSecure on an Ultra 1 workstation with no CD-ROM drive, you
can download the CiscoSecure installation package from the Cisco Systems web page. (See
“Installing without a CD-ROM,” page xxv.)
CiscoSecure ACS 2.3 for UNIX User Guide
vi
78-5222-02 Rev. A0
Check System Requirements
Basic Installation Procedures
•
Solaris 2.6, or Solaris 2.5.1 with patches (see “Solaris 2.5.1 Patches,” page xiv for special
instructions concerning Solaris 2.5.1)
Note
To check your version of Solaris, enter the Solaris command uname -a. If the system returns
5.5.1, Solaris 2.5.1 is installed. If the system returns 5.6, Solaris 2.6 is installed.
Note
To support the RADIUS tunneling feature of CiscoSecure ACS 2.3(5), the Sun Ultra 1or
compatible workstation must be running Solaris 2.6.
CiscoSecure NAS Requirements
CiscoSecure ACS works with the following network access servers (NASes):
•
Cisco routers (models AS5100 through AS5800 and AS2509 through AS2512) running Cisco IOS
software (Release 11.2 or later)
•
Selected routers not running Cisco IOS software, running RADIUS protocols conforming to IETF
RADIUS, specifically RFCs 2138 and 2139.
Note
To support the RADIUS tunneling feature of CiscoSecure ACS 2.3(5), the AAA server must
be running Cisco IOS Release 12.0(5)T or another vendor's NAS software that supports
RADIUS tunneling attributes.
CiscoSecure Workstation Console Requirements
The web-browser-based CiscoSecure ACS workstation console requires the following hardware and
software:
•
Pentium 90 or faster PC, or an UltraSPARC or better workstation
•
32 MB of RAM on a PC
•
SVGA display with resolution of 1024 x 768 or higher
•
Minimum 1 MB of video RAM (2 MB recommended)
•
17-inch or larger monitor recommended
•
One of the following web browsers:
– Netscape Communicator (version 4.5, 4.51, 4.6, 4.61, or 4.7 on Windows 95 or NT; version 4.5,
4.51, 4.6, 4.61, or 4.7 on Solaris 2.5.1 or 2.6)
– Internet Explorer (version 4.01 or 5.0 on Windows 95 or NT)
Note
The browser must be enabled for Java and Java Script.
CiscoSecure ACS 2.3 for UNIX User Guide
78-5222-02 Rev. A0
vii
Obtain a CiscoSecure Software License Key
Basic Installation Procedures
Database Installation Requirements
To support CiscoSecure database requirements, you can use either the supplied SQLAnywhere database
engine or supported versions of your own preinstalled Oracle Enterprise or Sybase Enterprise software
running on your network.
Supported database engines include:
•
The supplied SQLAnywhere database—Does not require preinstallation on the network; but be
aware of the limitations of the SQLAnywhere database option:
– Does not support networks of more than 5,000 users
– Does not support database replication
– Does not support the CiscoSecure Distributed Session Manager (DSM) feature (which requires
CiscoSecure database replication setup)
If your network requires these support features, Cisco recommends preinstalling the Oracle
Enterprise or Sybase Enterprise database engine.
•
Oracle Enterprise version 7.3.2, 7.3.3, 7.3.4, or 8.0.x. (Version 7.33 or higher is required for
database replication and DSM support. Version 7.3.4 requires two scripts to be run for replication.
See the User Guide for more information)—Requires preinstallation and configuration. It must be
running during CiscoSecure ACS installation. See “Setting Up an Oracle Database for
CiscoSecure,” page xix, for instructions on configuring this software to support CiscoSecure ACS.
Note
•
If you intend to set up CiscoSecure with Oracle database replication, Cisco recommends that
you read the PDF document Using CiscoSecure with Oracle’s Distributed Database Feature
(filename csbsdoc.pdf) before you install the Oracle or CiscoSecure software. This
document is located in the $BASEDIR/FastAdmin/docs directory of the CiscoSecure
distribution CD-ROM. It provides an easy-to-understand, start-to-finish, screen-by-screen
configuration example of setting up Oracle database replication to work with CiscoSecure.
Sybase Enterprise version 11.0.2 or higher—Requires preinstallation and configuration. It must be
running during the CiscoSecure installation. See “Setting Up a Sybase Enterprise SQL Server for
CiscoSecure,” page xxii for instructions on configuring this software to support the
CiscoSecure ACS.
Token Servers Installed (If You Are Supporting Them)
If you are supporting token servers, they must be installed on the network before you install
CiscoSecure ACS. Supported token servers include:
•
CRYPTOCard
•
Secure Computing
•
Security Dynamics, Inc.
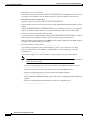
Obtain a CiscoSecure Software License Key
Note
If you are upgrading from a previous version of CiscoSecure 2.x, see “Upgrading from CiscoSecure ACS
2.x to 2.3,” page xiv for instructions on using your old software license key.
CiscoSecure ACS 2.3 for UNIX User Guide
viii
78-5222-02 Rev. A0
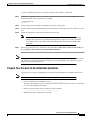
Prepare Your Answers to the Installation Questions
Basic Installation Procedures
If you are installing CiscoSecure ACS for the first time on this Ultra 1 workstation:
Step 1
At the Ultra 1 workstation where you want to install CiscoSecure ACS, enter the hostid command to
obtain the host ID of the system host. For example:
# /usr/ucb/hostid
55412315
Step 2
Note the host ID for the primary and backup CiscoSecure ACS systems.
Step 3
Note the token code on the label attached to the form Requires Immediate Attention: Software License
Keys.
Step 4
Follow the instructions on the form to obtain your license key.
Note
Step 5
Note
Software license keys issued to install CiscoSecure with the Distributed Session Manager
(DSM) option will consist of 28 hexadecimal characters. Software license keys issued for
CiscoSecure ACS 2.3 for UNIX without the DSM option will consist of 20 hexadecimal
characters.
When you get the license key, transcribe it into the blank for Enter the AAA Server License Key, in
the step Prepare Your Answers to the Installation Questions.
The CiscoSecure ACS software is licensed per server. Each CiscoSecure ACS requires its own license.
You can also use a backup server license to allow sites to run redundant systems to back up system
security and accounting information.
Prepare Your Answers to the Installation Questions
The questions you will be asked during the CiscoSecure ACS installation are similar to those below.
Note
Save these answers for both installation and post-installation configuration.
•
Is this a completely new installation (Y/N)? __________________
The answer is Yes unless you have installed a previous version of CiscoSecure ACS (2.x) and want
to use the same database information.
•
Enter the directory name where CiscoSecure will be installed.
______________________________________________
Minimum disk space requirement is 120 MB.
CiscoSecure ACS 2.3 for UNIX User Guide
78-5222-02 Rev. A0
ix
Prepare Your Answers to the Installation Questions
Basic Installation Procedures
•
IP Address to use for CiscoSecure. ______________________
The default is the primary IP address of the server on which you are installing the CiscoSecure ACS.
For single server installation, use the default; otherwise, specify the address of the first ACS.
•
Enter the AAA Server License Key. ______________________
Specify the software license key code that you received from Cisco.
•
If the host name of this server is not the same as its fully qualified domain name (FQDN), enter the
FQDN. ____________________________________
Specify the FQDN of the Ultra 1 workstation where you are installing the ACS only if the FQDN is
different from the host name; otherwise, accept the default (host name) value for this prompt.
•
Enter the TACACS+ NAS name you will be using. ___________________________
To support TACACS+ enabled NAS(es), either specify the host name of one such NAS, or indicate
that any NAS with a specified TACACS+ secret key will be using CiscoSecure ACS.
When you run the install program, pressing Enter for this prompt’s default selection, none, supports
any NAS with a specified TACACS+ secret key.
•
Enter the TACACS+ NAS secret key. ____________________
If you intend to support TACACS+ enabled NAS(es), specify a secret TACACS+ key string.
•
Select the token card(s) to use or none: (1. CRYPTOCard, 2. Secure Computing, 3. Security
Dynamics, Inc.) __________________
If you want to support one of the listed Token Cards, specify the card you want to support.
Note
Selecting Security Dynamics, Inc. requires that the SDI client software be properly installed
before the ACS is started.
– [If Secure Computing] Do you want to use CiscoSecure’s SafeWord GUI Software (Y/N)?
____________________________
This feature requires local root read/write file access to the SafeWord directory.
– [If Secure Computing] Enter the directory path for the SafeWord Software.
_____________________________
Enable SafeWord’s IMPORT/EXPORT option in the Secure Computing SafeWord application
program.
– [If Secure Computing] Enter the IP address of the Secure Computing server.
______________________________
CiscoSecure ACS 2.3 for UNIX User Guide
x
78-5222-02 Rev. A0
Prepare Your Answers to the Installation Questions
Basic Installation Procedures
•
Choose a Database: (1. SQLAnywhere, 2. Oracle Enterprise, 3. Sybase Enterprise)
_______________________
Specify the database for AAA data. SQLAnywhere is the default choice and is supplied with
CiscoSecure ACS. Oracle Enterprise or Sybase Enterprise support require that those products
already be installed and accessible on your network during CiscoSecure installation.
Caution
The SQLAnywhere database engine does not support networks of more than 5,000 users, does not
support database replication, and does not support the maximum session limitation feature of the
optional CiscoSecure Distributed Session Manager feature. If your network requires these support
features, Cisco recommends preinstalling the Oracle Enterprise or Sybase Enterprise database engine.
– If SQLAnywhere, the directory where you want the database files to be created.
________________________________
This directory requires disk space of 256 MB.
– If Sybase or Oracle, the username and password to the DB account that has been assigned
database space for the CiscoSecure ACS data. ___________________________________
– If Oracle, the path to the $ORACLE_HOME directory, where Oracle is installed.
_________________________________
– If Oracle, the TNS Service name of the Oracle server.
__________________________________
– If Sybase [Enterprise], the name of the Sybase SQL server.
__________________________________
– If Sybase [Enterprise], the name of the database to use for CiscoSecure.
________________________________
– If Sybase [Enterprise], the path to the $SYBASE directory where Sybase is installed.
________________________________
•
If not a New Install, do you want to drop and re-init existing Database Tables (Y/N)?
____________________________
If this is not a new installation, specify whether you want to remove the existing tables in the
database and create new ones.
Caution
Dropping existing tables will delete all existing CiscoSecure ACS data. Existing ACS data will not be
carried over to new tables.
•
Enter an available TCP/IP port to be reserved for the CiscoSecure database server process.
____________________________
The default port is 9900. Unless you know that port 9900 is used by another process, specify the
default.
•
Enter a unique name for the CiscoSecure DB server process. ____________________________
Specify any unique string. The default value is CSdbServer.
•
Enter the directory path to use for AAA server profile caching.
______________________________
CiscoSecure ACS 2.3 for UNIX User Guide
78-5222-02 Rev. A0
xi
Install and Start CiscoSecure ACS
Basic Installation Procedures
If no directory is specified, the root directory of the system will be used for profile caching.
Install and Start CiscoSecure ACS
Step 1
Log in as [Root] at the Ultra 1 workstation where you want to install CiscoSecure ACS.
Note
Step 2
Remember, if you are using the Oracle Enterprise or Sybase Enterprise product as your database
engine, that database product must be installed, configured, and running before you start the
install procedures described in this section. If you have not already done so, see “Setting Up an
Oracle Database for CiscoSecure,” page xix, or “Setting Up a Sybase Enterprise SQL Server for
CiscoSecure,” page xxii, for details.
Insert the CD-ROM labeled “CiscoSecure ACS 2.3 for UNIX” and enter:
pkgadd -d /cdrom/csus_23 CSCEacs
The installer displays the first of a series of installation prompts:
Is this a completely new install Y/N (Default yes, q to quit)?
Note
Step 3
If you install CiscoSecure using a link defined in the root directory pointing to the actual
CiscoSecure base directory, a warning message might appear indicating there is not enough
space in root to install CiscoSecure. If you know that there is sufficient space in the linked
directory to install CiscoSecure, ignore this message and press Y at the prompt to continue the
CiscoSecure installation.
Complete the installation using the preinstallation information that you recorded in the “Prepare Your
Answers to the Installation Questions” section on page ix. After installation is complete, the system
displays:
Installation of CSCEacs was successful.
Step 4
Start CiscoSecure ACS. Enter:
# /etc/rc2.d/S80CiscoSecure
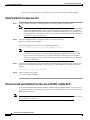
If You Licensed and Installed CiscoSecure with DSM, Enable DSM
If you installed the Distributed Session Manager module using the product labeled CiscoSecure ACS 2.3
for UNIX Distributed Session Manager, log in to the CiscoSecure Administrator web site and enable the
DSM module as follows:
Note
If you did not install CiscoSecure ACS with the Distributed Session Manager option, skip this section.
Go to “What’s Next,” page xiv.
CiscoSecure ACS 2.3 for UNIX User Guide
xii
78-5222-02 Rev. A0
If You Licensed and Installed CiscoSecure with DSM, Enable DSM
Basic Installation Procedures
After starting CiscoSecure ACS, access the CiscoSecure Administrator web site to perform some initial
configuration:
Note
If you do not have access to the CiscoSecure Administrator web site, you can enable the DSM module
by carefully editing the CSU.cfg and CSConfig.ini files. See “Editing Configuration Files to Enable or
Disable the DSM Module,” page xxx.
Step 1
From a Windows 95 or Windows NT workstation, start your Netscape Navigator or Microsoft Internet
Explorer web browser and enter the following URL:
http://your_server/cs
where your_server is the host name (or the fully qualified domain name, FDQN, if host name and FDQN
differ) of the Ultra 1 workstation where you installed CiscoSecure ACS. You can also substitute the Ultra
1 workstation’s IP address for your_server.
Note
Step 2
If the security socket layer feature on your browser is enabled, specify “https” rather than “http”
as the hypertext transmission protocol. Enter: https://your_server/cs
When the CiscoSecure Logon window appears, enter the superuser name and password and click
Submit. The default superuser name and password in a new CiscoSecure ACS installation are:
username: superuser
password: changeme
Step 3
In the CiscoSecure Administrator web site menu bar, click AAA and then click General.
Step 4
In the AAA > General web page locate the Max Sessions Enabled field and select the Distributed
option. This is the option that enables the full set of Distributed Session Manager features on
CiscoSecure ACS.
Step 5
For this setting to take effect, you must stop and restart CiscoSecure ACS.
•
Log in as [Root] to the Ultra 1 workstation where you installed CiscoSecure ACS. To stop
CiscoSecure ACS, enter:
# /etc/rc0.d/K80CiscoSecure
•
To restart CiscoSecure ACS, enter:
# /etc/rc2.d/S80CiscoSecure
Step 6
Confirm that Oracle or Sybase database replication is set up and enabled between your CiscoSecure
database sites. For details, see the chapter “Setting Up Database Replication Among
CiscoSecure ACSes” in the CiscoSecure ACS 2.3 for UNIX User Guide.
Step 7
Confirm that AAA accounting functions are enabled on all client NASes. For details, see the chapter
“CiscoSecure ACS Accounting” in the CiscoSecure ACS 2.3 for UNIX User Guide.
CiscoSecure ACS 2.3 for UNIX User Guide
78-5222-02 Rev. A0
xiii
What’s Next
Solaris 2.5.1 Patches
What’s Next
The CiscoSecure ACS 2.3 for UNIX User Guide provides information about what to do next.
•
If you are using CiscoSecure ACS for the first time, go to the CiscoSecure ACS 2.3 for UNIX User
Guide chapter “Configuring Initial Test Group and User Profiles” for a tutorial on setting up an
initial test user profile.
•
If you are familiar with earlier versions of CiscoSecure, go to the CiscoSecure ACS 2.3 for UNIX
User Guide chapter “Introduction to the CiscoSecure Software” for a listing of new
CiscoSecure ACS features.
•
If you are upgrading from CiscoSecure Version 1.0x, go to the CiscoSecure ACS 2.3 for UNIX User
Guide chapter “Converting an Existing AA Database to a CiscoSecure ACS 2.3 Database.”
•
If you have installed and enabled the CiscoSecure DSM module
OR
•
If you want to set up Oracle or Sybase database replication for any other reason:
Assign a DBA-level Oracle or Sybase administrator to set up replication support for CiscoSecure.
Database Replication instructions are included in the CiscoSecure ACS 2.3 for UNIX User Guide
chapter “Setting Up Database Replication Among CiscoSecure ACSes.”
For a list of the documentation available, see “Accessing CiscoSecure ACS 2.3 for UNIX
Documentation,” page xxiv.
Solaris 2.5.1 Patches
Ultra 1 workstations running Solaris 2.5.1 require the following Solaris patches to support
CiscoSecure ACS 2.3:
•
103566-25 (or a later version of this patch)
•
106529-04 (or a later version of this patch)
•
106255-01 (or a later version of this patch)
•
103640-17 (or later version of this patch)
These patches or their latest versions can be downloaded from:
http://sunsolve.sun.com
README files for each patch are also available at this site.
Note
You will require a SunSpectrum support contract to obtain some or all of the above mentioned patches.
You can use the Solaris showrev -p command to determine what Solaris patches are already installed on
the system.
Upgrading from CiscoSecure ACS 2.x to 2.3
The product labeled CiscoSecure ACS Upgrade to v2.3 upgrades previous versions of CiscoSecure 2.x
for UNIX to CiscoSecure ACS 2.3 for UNIX without the Distributed Session Manager (DSM) module
enabled. If you are upgrading from CiscoSecure ACS 2.x, complete the following steps:
CiscoSecure ACS 2.3 for UNIX User Guide
xiv
78-5222-02 Rev. A0
Upgrading from CiscoSecure ACS 2.x to 2.3
Upgrading from CiscoSecure ACS 2.x to 2.3
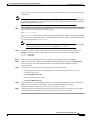
Note
Step 1
If you want CiscoSecure ACS 2.3 for UNIX with the DSM module installed, first follow this procedure
to upgrade to version 2.3. Then use the CiscoSecure ACS Distributed Session Manager Option product
to license and enable the DSM module. To support DSM, make sure that an Oracle or Sybase RDBMS
is installed for CiscoSecure prior to running the CiscoSecure upgrade installation program. For details,
see “Setting Up an Oracle Database for CiscoSecure” section on page xix or “Setting Up a Sybase
Enterprise SQL Server for CiscoSecure” section on page xxii.
Before you start the upgrade installation, read the file $BASEDIR/config/CSU.cfg and write down the
software key value for use during installation.
$BASEDIR is the install directory for CiscoSecure that you specified at the time of installation. For
example, if you specified “ciscosecure” as the install location, the file is located at
/ciscosecure/config/CSU.cfg. Below is an example of the line in the CSU.cfg file that contains the
software key value:
LIST config_license_key = {“a9505ad08a77f927afa4”};
Step 2
Prepare your CiscoSecure ACS 2.x database for upgrade to ACS 2.3 format:
•
Back up your CiscoSecure ACS 2.x database.
•
Export all the accounting records to an external file by running the AcctExport utility.
If you are upgrading from CiscoSecure 2.x, the CiscoSecure ACS installation will implement database
schema changes for version 2.3 compatibility. These schema changes include recreating a profile data
table (cs_profile) as well as an accounting data table (cs_accounting_log).
Step 3
(Optional) If you want to preserve your old debug level, TACACS+ NAS configurations, and supported
authentication methods settings for the ACS, save the current $BASEDIR/config/CSU.cfg file to a
holding directory.
Step 4
(Optional) If you want to preserve your old unknown_user default profile settings, save the current
$BASEDIR/config/DefaultProfile file to a holding directory.
Step 5
Remove the current version of CiscoSecure ACS from the Ultra 1 workstation. Log in as [Root] and
enter:
pkgrm CSCEacs
Step 6
Install CiscoSecure ACS 2.3 for UNIX following the procedures described in the “Basic Installation
Procedures,” page iv.
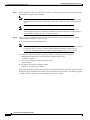
Note
However, skip the section “Obtain a CiscoSecure Software License Key.” You do not need to
obtain a new software license key to upgrade from a previous version of CiscoSecure ACS 2.x
for UNIX to CiscoSecure ACS 2.3 for UNIX.
CiscoSecure ACS 2.3 for UNIX User Guide
78-5222-02 Rev. A0
xv
Upgrading from CiscoSecure ACS 2.x to 2.3
Upgrading from CiscoSecure ACS 2.x to 2.3
Step 7
Step 8
During installation, enter your old software license key (either primary or backup) when prompted by
the installer and complete the installation.
Note
If you did not enter the software key value at the time of installation, you can specify it after
installation in the CiscoSecure License Key field in the CiscoSecure ACS AAA General web
page.
Note
Depending on the number of user profiles existing in the CiscoSecure ACS database, the
database upgrade phase of CiscoSecure installation could take some time. Conversion time is
approximately 5 minutes for every 10,000 user profiles.
If the CiscoSecure installation procedure fails during the database upgrade phase due to a fixable
condition (such as database resources errors):
a.
Note
b.
Fix the condition that caused the failure.
If the failed upgrade was for a Sybase Enterprise database from CiscoSecure ACS 2.0 format to
CiscoSecure ACS 2.3 format, you must manually update the database schema. See “If
CiscoSecure Installation Does Not Update the Sybase Database,” page xxiii for details.
Manually complete the database upgrade procedure by changing to the CiscoSecure
$BASEDIR/utils/bin directory and running the CSdbTool utility. Enter:
./CSdbTool upgrade
c.
Remove the CiscoSecure binary files again. Enter:
pkgrm CSCEacs
d.
Restart the CiscoSecure installation. Enter:
pkgadd -d /cdrom/csus_23 CSCEacs
Even though the database upgrade is now complete, running the installation procedure again ensures that
all other necessary installation tasks will be carried out. Because the CiscoSecure ACS database upgrade
is already complete, this portion of the installation will now be skipped.
CiscoSecure ACS 2.3 for UNIX User Guide
xvi
78-5222-02 Rev. A0
Upgrading CiscoSecure at Sites with a Non-Updatable Replicated Database
Upgrading from CiscoSecure ACS 2.x to 2.3
Step 9
(Optional) After installation, if you saved your old CSU.cfg file as described in step 3, you can cut and
paste your old settings from your old CSU.cfg file to the new CSU.cfg file to restore your original ACS
debug level, TACACS+ NAS configurations, and supported authentication methods settings. See the
section “Server Control File” in the chapter “Tuning CiscoSecure ACS Performance and Configuration”
in the CiscoSecure ACS 2.3 for UNIX User Guide for a listing of CSU.cfg settings.
Alternatively, you can simply reenter these settings through the new CiscoSecure ACS AAA General and
AAA NAS web pages.
Caution
Step 10
Do not copy the old CSU.cfg file over the new CSU.cfg file. The new CSU.cfg file contains important
new settings specific to CiscoSecure ACS 2.3 for UNIX.
(Optional) After installation, if you saved your old DefaultProfile file as described in Step 4, you can use
the CiscoSecure ACS 2.3 CSImport utility to import your old unknown_user default profile settings into
your new ACS installation. Enter:
$BASEDIR/CSimport
-c -p /hold_dir -s DefaultProfile
where:
$BASEDIR is the directory where you installed CiscoSecure ACS.
hold_dir is the holding directory where you stored the old DefaultProfile file.
Note
After you successfully upgrade to CiscoSecure ACS 2.3 for UNIX, you can activate the optional DSM
module. Obtain the CiscoSecure ACS Distributed Session Manager Option product to license and enable
the DSM module. See “Activating the DSM Module on an Existing CiscoSecure ACS 2.3,” page xviii
for details.
Upgrading CiscoSecure at Sites with a Non-Updatable Replicated Database
If you are attempting to upgrade from CiscoSecure 2.x in an existing replication environment and your
environment includes non-updatable sites, when you upgrade the CiscoSecure software on such sites,
you will receive an error message at the end of the upgrade process stating that the installation failed.
This occurs because the CiscoSecure tables that were set up for replication cannot be written to except
by the replication process.
The workaround for this problem is to make sure that you have successfully upgraded CiscoSecure on
your Master Definition site. Ignore the error message received on the non-updatable site(s). When you
replicate, the replication process will update these tables from the Master site.
CiscoSecure ACS 2.3 for UNIX User Guide
78-5222-02 Rev. A0
xvii
Activating the DSM Module on an Existing CiscoSecure ACS 2.3
Activating the DSM Module on an Existing CiscoSecure ACS 2.3
Activating the DSM Module on an Existing CiscoSecure ACS 2.3
If you are using the product labeled CiscoSecure ACS Distributed Session Manager Option (CSU-DSM)
to enable the Distributed Session Manager module on an already existing CiscoSecure ACS 2.3 for
UNIX installation, you do not need to run the installation program:
Step 1
Confirm that a Sybase or Oracle RDBMS site has been set up for your CiscoSecure ACSes prior to the
last CiscoSecure ACS installation as described in “Setting Up an Oracle Database for CiscoSecure,”
page xix or in “Setting Up a Sybase Enterprise SQL Server for CiscoSecure,” page xxii.
Step 2
If you have not already done so, follow instructions in the document labeled Requires Immediate
Attention: License Keys for CiscoSecure ACS to obtain the special 28-character software license keys
required to enable the DSM module.
Step 3
From any workstation with a web connection to CiscoSecure ACS, open your web browser and log in to
the CiscoSecure Administrator web site as superuser.
Note
If you do not have access to the CiscoSecure Administrator web pages, you can manually edit
the CiscoSecure CSU.cfg file to specify the new software license key. See “Editing CSU.cfg to
Specify a CiscoSecure Software License Key,” page xxxi.
Step 4
Locate the CiscoSecure License Key field in the AAA General web page, enter the special 28-character
software license key, and click Re-Initialize.
Step 5
Locate the Max Sessions Enabled field in the AAA General web page and select the Distributed option
to enable the Distributed Session Manager features on this ACS.
Step 6
Stop and restart CiscoSecure ACS for this setting to take effect:
•
Log in as [Root] to the Ultra 1 workstation where you installed CiscoSecure ACS. To stop the ACS
enter:
# /etc/rc0.d/K80CiscoSecure
•
To restart CiscoSecure ACS, enter:
# /etc/rc2.d/S80CiscoSecure
Step 7
Confirm that Oracle or Sybase database replication is set up and enabled between your CiscoSecure
database sites. For details, see the chapter “Setting up Database Replication Among
CiscoSecure ACSes” in the CiscoSecure ACS 2.3 for UNIX User Guide.
Step 8
Confirm that AAA accounting functions are enabled on all client NASes. For details, see the
CiscoSecure ACS 2.3 for UNIX User Guide chapter “CiscoSecure ACS Accounting.”
CiscoSecure ACS 2.3 for UNIX User Guide
xviii
78-5222-02 Rev. A0
Setting Up an Oracle Database for CiscoSecure
Setting Up an Oracle Database for CiscoSecure
Setting Up an Oracle Database for CiscoSecure
Note
If you are installing and supporting the per user, per group, and per VPDN session limitation features of
the optional CiscoSecure Distributed Session Manager feature, you must configure your Oracle
databases for database replication.
Oracle software is not bundled with CiscoSecure ACS. Therefore the CiscoSecure installation does not
install or configure the Oracle product, create an Oracle database, or create a database user.
Note
If you intend to set up CiscoSecure with Oracle database replication, Cisco recommends that you read
the PDF document Using CiscoSecure with Oracle’s Distributed Database Feature (filename
csbsdoc.pdf) before you install the Oracle or CiscoSecure software. This document is located in the
$BASEDIR/FastAdmin/docs directory of the CiscoSecure distribution CD-ROM. It provides an
easy-to-understand, start-to-finish, screen-by-screen configuration example of setting up Oracle
database replication to work with CiscoSecure.
Oracle Setup Requirements Prior to CiscoSecure Installation
If you intend to use an Oracle database with CiscoSecure ACS, make sure the Oracle database meets the
following requirements before starting the CiscoSecure installation:
•
Oracle version should be 7.3.2, 7.3.3, 7.3.4 or 8.0.x.
Note
•
If you intend to support Oracle database replication, Oracle version 7.3.3, 7.3.4, or 8.0x must
be installed. Additionally, Oracle 7.3.3 and 7.3.4 require the Symmetric Replication Option
and Distributed Database Option packages installed to support database replication. Oracle
8.0.x does not require these packages.
The following Oracle products should be installed with the Oracle server (minimum):
– Oracle 7 or Oracle 8 server
– SQL*Net Version 2 or higher
– Oracle TCP/IP protocol adapter
•
The following Oracle products should be installed where CiscoSecure ACS will be installed
(minimum):
– SQL*Net Version 2 or higher—Module on the CiscoSecure server must be from Oracle 7.3.4 or
higher
– Oracle TCP/IP protocol adapter—Module on the CiscoSecure server must be from Oracle 7.3.4
or higher
Note
•
To upgrade to the above modules from a lower version, run the Oracle installation program,
select the upgrade option, and select to upgrade the client versions of these modules.
Make sure the Oracle server and tnslsnr processes are loaded and running before installing
CiscoSecure ACS.
CiscoSecure ACS 2.3 for UNIX User Guide
78-5222-02 Rev. A0
xix
Oracle Information Required During CiscoSecure Installation
Setting Up an Oracle Database for CiscoSecure
•
CiscoSecure ACS requires an Oracle user database account setup prior to the CiscoSecure
installation:
– This user account must have a privilege to create/drop tables. (Connect and Resource privilege).
– This user account should also have Select privilege on two of Oracle’s system views:
sys.dba_free_space and sys.dba_users.
– The Oracle tablespace where the account belongs should have at least 200 MB of data space,
100 MB of rollback tablespace, and 50 MB of temporary tablespace available.
Oracle Information Required During CiscoSecure Installation
CiscoSecure ACS installation prompts require the following information concerning your Oracle
installation:
•
TNS name—Name for the Oracle server. It should be defined in Oracle’s tnsnames.ora file.
•
Oracle user—Database account (not Solaris account) which has Resource privilege.
•
Oracle user’s password.
•
Oracle home—Absolute pathname of the directory where the Oracle product is installed. This
should be the same as the ORACLE_HOME environment variable that is defined when Oracle is
installed. Do not confuse this directory with the home directory of the Solaris user account for
Oracle, such as /home/oracle.
•
Connections—Specifies how many connections CiscoSecure ACS can make to the Oracle server.
CiscoSecure ACS will make that number of connections when it starts up.
Oracle Database Replication Setup Following CiscoSecure Installation
If you want to set up database replication among multiple CiscoSecure ACS sites, assign your Oracle
database administrator (DBA) to do so after CiscoSecure installation is complete. See the
CiscoSecure ACS 2.3 for UNIX User Guide chapter “Setting up Database Replication among
CiscoSecure ACSes” for details.
Caution
Database replication setup requires database administrator (DBA) expertise. If you do not possess DBA
experience, assign this task to someone who does.
Note
If you are installing and supporting the per user, per group, and per VPDN session limitation features of
the optional CiscoSecure Distributed Session Manager feature, you must configure your Oracle
databases for database replication.
CiscoSecure ACS 2.3 for UNIX User Guide
xx
78-5222-02 Rev. A0
Troubleshooting if the CiscoSecure Installation Fails to Access your Oracle Database
Setting Up an Oracle Database for CiscoSecure
Note
If you intend to set up CiscoSecure with Oracle database replication, Cisco recommends that you read
the PDF document Using CiscoSecure with Oracle’s Distributed Database Feature (filename
csbsdoc.pdf) before you install the Oracle or CiscoSecure software. This document is located in the
$BASEDIR/FastAdmin/docs directory of the CiscoSecure distribution CD-ROM. It provides an
easy-to-understand, start-to-finish, screen-by-screen configuration example of setting up Oracle
database replication to work with CiscoSecure.
Troubleshooting if the CiscoSecure Installation Fails to Access your Oracle
Database
Check the following items on the Oracle database:
•
SQL*Net connectivity:
– Check if SQL*Net and TCP/IP protocol adapter are installed on the system where
CiscoSecure ACS is being installed.
– Using Oracle’s tools such as SQL*Plus or tnsping, check if you can connect to the Oracle server
using the TNS name, the database username, and the password.
Note
•
See Oracle’s Network Products Troubleshooting Guide for help in determining the SQL*Net
configuration problems.
Check if Oracle’s shared library exists.
$ORACLE_HOME/lib/libclntsh.so.1.0
If the shared library does not exist, then this points to an Oracle installation problem. The library is
installed as part of SQL*Net.
CiscoSecure ACS 2.3 for UNIX User Guide
78-5222-02 Rev. A0
xxi
Setting Up a Sybase Enterprise SQL Server for CiscoSecure
Setting Up a Sybase Enterprise SQL Server for CiscoSecure
Setting Up a Sybase Enterprise SQL Server for CiscoSecure
If you intend to use a Sybase Enterprise database with CiscoSecure ACS, make sure the Sybase
Enterprise SQL server meets the following requirements.
Sybase Setup Requirements Prior to CiscoSecure Installation
Before you install CiscoSecure:
•
SQL server should be version 11.0.2 or higher. The SQL server could be on a local or a remote
system. At the time of CiscoSecure ACS installation, the SQL server should be running.
•
Sybase Open Client/C version 11.1 or higher should be installed and configured on the system where
CiscoSecure ACS is installed. This includes proper configuration of the $SYBASE/interfaces file.
•
Prior to the CiscoSecure installation, set up an SQL server login account that CiscoSecure can use
to connect to the SQL server.
•
Additionally, Cisco recommends that the customer create a separate database for CiscoSecure ACS
and create a database login account as the owner of the database. The size of the database depends
on the user/group profiles and accounting data expected.
Sybase Information Required During CiscoSecure Installation
CiscoSecure installation will prompt for the following information related to Sybase:
•
Sybase install directory
•
SQL server name—Name of SQL server defined in the $SYBASE/interfaces file
•
Database user account and password
•
Database to use with CiscoSecure ACS
•
Number of database connections that CiscoSecure ACS can use
Sybase Database Replication Setup Following CiscoSecure Installation
If you want to set up database replication among multiple CiscoSecure ACS sites, assign your Sybase
database administrator (DBA) to do so after CiscoSecure installation is complete. See the
CiscoSecure ACS 2.3 for UNIX User Guide chapter “Setting up Database Replication among
CiscoSecure ACSes.” for details.
Caution
Database replication setup requires database administrator (DBA) expertise. If you do not possess DBA
experience, assign this task to someone who does.
Note
If you are installing and supporting the per user, per group, and per VPDN session limitation features of
the CiscoSecure ACS 2.3 for UNIX with DSM package, you must configure your Sybase databases for
database replication.
CiscoSecure ACS 2.3 for UNIX User Guide
xxii
78-5222-02 Rev. A0
If CiscoSecure Installation Does Not Update the Sybase Database
Setting Up a Sybase Enterprise SQL Server for CiscoSecure
If CiscoSecure Installation Does Not Update the Sybase Database
The CiscoSecure installation might fail to update the Sybase Enterprise database for early CiscoSecure
for UNIX 2.x versions. In such cases, the installation program will stop after the following series of
prompts and messages:
alter table cs_password add primary key (profile_id, pwd_type)
*** SQLException caught ***
SQLState:
Message: Line 1 Error 1920 Level 16 State 1
A column in a primary key constraint's
column list is not constrained to be not null,
column name: 'profile_id'.
Vendor:
1920
Upgrading schema failed.
In such cases, you must use Sybase tools to manually update the Sybase database schema, then rerun the
part of the CiscoSecure installation program that updates the CiscoSecure database schema.
Step 1
Start the Sybase SQL command tool, isql, and enter the following series of commands to update the
database schema:
create table cs_password_new
(
profile_id
pwd_type
pwd_value
pwd_from_date
pwd_until_date
pwd_opaque
pwd_qualifier
)
go
int
varchar(32)
varchar(255)
datetime
datetime
varchar(255)
varchar(10)
not null,
not null,
null
,
null
,
null
,
null
,
null
,
insert into cs_password_new (profile_id, pwd_type, pwd_value,
pwd_from_date,pwd_until_date, pwd_opaque, pwd_qualifier)
select profile_id, pwd_type, pwd_value, pwd_from_date, pwd_until_date,
pwd_opaque, pwd_qualifier from cs_password
go
drop table cs_password
go
sp_rename cs_password_new, cs_password
go
Step 2
Run the $BASEDIR/utils/bin CSdbTool utility to continue the CiscoSecure database upgrade. Enter:
CSdbTool upgrade
CiscoSecure ACS 2.3 for UNIX User Guide
78-5222-02 Rev. A0
xxiii
Accessing CiscoSecure ACS 2.3 for UNIX Documentation
Accessing CiscoSecure ACS 2.3 for UNIX Documentation
Accessing CiscoSecure ACS 2.3 for UNIX Documentation
After you install the CiscoSecure ACS 2.3 for UNIX software, the following documentation is available
to you in several formats and several locations:
•
Printed documents included with the CiscoSecure ACS 2.3 for UNIX product package include:
– CiscoSecure ACS 2.3 for UNIX Installation Guide (this publication)
– Requires Immediate Attention: Software License Keys
•
HTML documents at your installed CiscoSecure ACS Administrator web pages include:
– CiscoSecure ACS 2.3 for UNIX User Guide
– CiscoSecure ACS 2.3 for UNIX Installation Guide (this publication)
– Frequently Asked Questions—A compilation of answers to frequently asked questions about
CiscoSecure ACS features
– Profile Syntax Guide—A reference outline of CiscoSecure profile syntax and some common
profile examples
– readme or release notes—Any late-breaking information will be included in one of these files.
To access—While running the CiscoSecure Administrator web pages, click Help.
If you are not running the CiscoSecure ACS Administrator web pages, you can access the
CiscoSecure ACS 2.3 for UNIX User Guide directly at:
http://acs_server:9090/docs/csuxug23/index.htm
where acs_server is the host name (or the FQDN, if it is different from the host name) of the server
where you installed CiscoSecure ACS. You can also substitute the server’s IP address.
•
Online help includes descriptions of individual fields in the CiscoSecure ACS Administrator
web-based interface.
To access—While running the CiscoSecure ACS Administrator web pages, you can access HTML
help for an individual field by clicking on that field name.
•
HTML documents at the Cisco corporate web site. The documents relevant to CiscoSecure ACS 2.3
for UNIX include:
– CiscoSecure ACS 2.3 for UNIX User Guide
– CiscoSecure ACS 2.3 for UNIX Installation Guide (this publication)
Note
The documents at this site are likely to be the most recently updated documents available for
CiscoSecure ACS.
To access—Use your web browser to view the documents at:
http://www.cisco.com/univercd/cc/td/doc/product/access/acs_soft
•
PDF documents at the installed CiscoSecure ACS Administrator web pages include:
– CiscoSecure ACS 2.3 for UNIX User Guide
PDF documents are readable with the Adobe Acrobat Reader, with full search capabilities and
hypertext table of contents and index. They are printable with full hard copy formatting and
available on your installed CiscoSecure ACS.
CiscoSecure ACS 2.3 for UNIX User Guide
xxiv
78-5222-02 Rev. A0
Installing without a CD-ROM
Installing without a CD-ROM
To access—While running the CiscoSecure ACS Administrator web pages, click Help, click User
Guide and then click the PDF icon on the Contents page of the CiscoSecure ACS 2.3 for UNIX User
Guide. You need Adobe Acrobat Reader installed on your system. Free copies of the Acrobat Reader
can be downloaded from the Adobe web site:
http://www.adobe.com
Installing without a CD-ROM
If you do not have a CD-ROM drive attached to the Ultra 1 workstation where you want to install
CiscoSecure ACS, download the installation software from the Cisco web site and run the installation
program as follows:
Note
To take the steps described in this section, you must have a valid SmartNet account. If you do not have
a SmartNet account, contact your authorized Cisco Systems support representative for instructions.
Step 1
Make sure the Ultra 1 workstation where you want to install CiscoSecure ACS has at least 256 MB of
available disk space.
Step 2
Go to the CiscoSecure Software Planner URL:
http://wwwin.cisco.com/cmc/cc/cisco/mkt/access/secure/
http://www.cisco.com/univercd/cc/td/doc/product/access/acs_soft/cs_unx/acsu235/instl235.ht
m
You are prompted for a username and password in order to access Cisco Connection Online (CCO).
Step 3
Using your SmartNet account, log in to CCO, specifying your username and password as prompted.
Step 4
Click Download CiscoSecure Software. The CiscoSecure Server Software Images page appears.
Step 5
Click the button beside the applicable version of CiscoSecure Solaris. If you agree to the terms of the
software agreement, click Execute. You are prompted to specify the location from which to transfer the
software image.
Step 6
Click the location of the CCO server that is closest to your target CiscoSecure server. You are prompted
again for your CCO password.
Step 7
Enter your CCO password. A file is copied to your home directory.
Step 8
Uncompress the CiscoSecure ACS software package by entering the following command at the UNIX
prompt:
uncompress CSCEacs-2.3.x.x.solaris.pkg.Z
Step 9
Translate the package file by entering the following command at the UNIX prompt:
pkgtrans CSCEacs-2.3.x.x.solaris.pkg /tmp
The following output displays:
The following packages are available:
1 CSCEacs-2.3.x.x CiscoSecure Access Control Software
(sun4) x.x
Select package(s) you wish to process (or 'all' to process
all packages). (default: all) [?,??,q]:
Step 10
Enter 1.
The download operation is now complete.
CiscoSecure ACS 2.3 for UNIX User Guide
78-5222-02 Rev. A0
xxv
Manually Enabling Profile Cache Updating
Manually Enabling Profile Cache Updating
Step 11
Obtain your server license key and answer the preinstallation questions according to the instructions in
the section “Basic Installation Procedures,” page iv.
Note
Step 12
Do not enter the pkgadd -d/cdrom/csus_23 CSCEacs string to start the installation program.
To start the installation program, enter:
pkgadd -d /tmp CSCEacs
Manually Enabling Profile Cache Updating
Profile cache updating must be enabled for CiscoSecure ACS servers whose CiscoSecure profile
databases are modified directly by Oracle or Sybase database replication implementations or by
third-party applications.
In the case of Oracle or Sybase database replication, you enable profile cache updating in the process of
implementing the replication.
If you are using third-party applications that directly modify the CiscoSecure ACS profile data, use the
following procedure to enable profile cache updating following the normal CiscoSecure installation.
Note
Step 1
For profile cache updating to work, the database user account used by the third-party application must
be different from the user account that you specified when you originally installed and configured the
Oracle or Sybase engines for CiscoSecure ACS.
After completing CiscoSecure ACS installation on your UNIX host, change to the CiscoSecure
$BASEDIR/utils/bin directory and run the CSdbTool utility. Enter:
./CSdbTool cache_trigger
This installs triggers in the CiscoSecure ACS database tables that insert the changes in a special log
table, cs_trans_log, whenever a third-party program alters any profile data. These changes are
periodically incorporated into the profile cache.
Step 2
In the CSConfig.ini file, make sure the following parameters are set:
[ProfileCaching]
EnableProfileCaching = ON
;polling period in minutes for cs_trans_log table
DBPollinterval = number_of_minutes
where number_of_minutes is the time in minutes that the customer wants between profile cache updates.
This interval should match the intervals at which database replication or third-party applications directly
modify the ACS profile data. For example, if database replication is configured to take place every 15
minutes, then the number_of_minutes for DBPollinterval should also be set to 15.
The default value is 30 minutes.
CiscoSecure ACS 2.3 for UNIX User Guide
xxvi
78-5222-02 Rev. A0
CiscoSecure System Description
CiscoSecure System Description
CiscoSecure System Description
The CiscoSecure ACS 2.3 for UNIX software provides authentication, authorization, and
accounting services on users dialing in to the network through TACACS+ or RADIUS based
network access servers (NASes).
Basic CiscoSecure Components
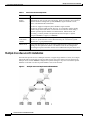
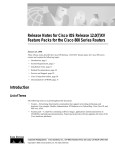
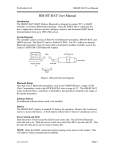
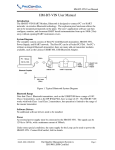
Basic network components that interact with CiscoSecure ACS are shown in Figure 1.
CiscoSecure and Network Components
Command/control:
web browser
NAS
Table 3
External
relational database
(ODBC)
CiscoSecure ACS
Token card server
(Secure Computing, SDI,
CRYPTOCard)
S6295
Figure 1
Basic CiscoSecure Components
Node
Description
Network
access server
(NAS)
The NASes provide the ports (through which remote users can dial in to the
network), forward login requests to CiscoSecure ACS, and carry out authentication
and authorization instructions from CiscoSecure ACS. A single CiscoSecure ACS
can provide authentication, authorization, and accounting services to multiple
NASes.
CiscoSecure ACS receives the login request from the NAS, pulls the profile from
CiscoSecure
Access Control the user making the login request from the RDBMS and based on the profile:
Server (ACS)
• Transmits authentication and authorization instructions back to the NAS
•
Transmits accounting records back to the RDBMS
If a token server is in use, CiscoSecure ACS transmits the login request to the token
server for authentication.
CiscoSecure ACS 2.3 for UNIX User Guide
78-5222-02 Rev. A0
xxvii
Multiple CiscoSecure ACS Installation
CiscoSecure System Description
Table 3
Basic CiscoSecure Components
Node
Description
CiscoSecure
Profile
database
The profile database contains the authentication, authorization, and accounting
information for each of your users and groups. Each CiscoSecure ACS requires a
relational database management system (RDBMS) engine installed to store,
retrieve, and maintain this information.
CiscoSecure supplies an SQLAnywhere database engine with the
CiscoSecure ACS for UNIX product; however, if you intend to support profile
databases larger than 5,000 users or a network of CiscoSecure ACSes using a
common replicated profile database for authentication, authorization, and
accounting, you must purchase and preinstall Oracle Enterprise or Sybase
Enterprise RDBMS to support your RDBMS.
CiscoSecure
workstation
console
The CiscoSecure workstation console provides web-based pages through which the
CiscoSecure profile database can be administered by the CiscoSecure system
administrator or group administrator.
Token server
An optional third-party server for executing authentication of token card users
entering one-time passwords (OTPs). CiscoSecure ACS can be configured to
forward login requests from token card users for authentication by the token server.
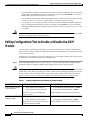
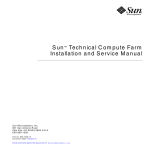
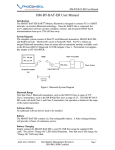
Multiple CiscoSecure ACS Installation
Networks that provide access at multiple locations or support large numbers of users (for example,
nationwide ISP networks that provide local dial-in login across the nation) are best supported by
multiple ACSes with an RDBMS configured to replicate changes to any local CiscoSecure profile
database to all other CiscoSecure profile database sites in the network.
Figure 2
Multiple ACSes and Replicated Profile Databases
CiscoSecure ACS 2.3 for UNIX User Guide
xxviii
78-5222-02 Rev. A0
Distributed Session Manager Features
Distributed Session Manager Features
In order to support database replication among your ACSes, you need to purchase and preinstall Oracle
Enterprise or Sybase Enterprise RDBMS software at each ACS database site where you want replication
of the CiscoSecure profile database to be carried out.
The per user, per group, or per VPDN maximum session limit feature of the CiscoSecure ACS 2.3 for
UNIX with DSM package requires you to configure profile database replication.
Distributed Session Manager Features
With the CiscoSecure ACS 2.3 for UNIX product, you can purchase a special software license key to
enable the Distributed Session Manager (DSM). When installed and enabled, the DSM feature allows
access to special DSM-specific web pages that enable the CiscoSecure system administrator to limit and
enforce, on a very fine-grained basis, the number of concurrent sessions allowed per user, per group, or
per VPDN either on a network-wide basis, or through a particular “point-of-presence” group of NASes.
Note
If you do not purchase the DSM-enabling software license key, you can still limit the number of
concurrent sessions on a per user basis. See the CiscoSecure ACS 2.3 for UNIX User Guide chapter
“Limiting and Tracking Sessions Per User, Group, or VPDN” for descriptions of maximum session
limits supported by the DSM-enabled and the non-DSM-enabled CiscoSecure ACS 2.3 for UNIX
packages.
Summary of DSM Installation and Post-Installation Requirements
Before you attempt to configure DSM max sessions control, make sure that you have implemented the
following CiscoSecure installation and post-installation requirements:
•
You need to have preinstalled Oracle Enterprise version 7.3.3, 7.3.4 or 8.0.x or Sybase Enterprise
version 11.0.2 or higher as the RDBMS for the CiscoSecure ACS profiles. For details see “Setting
Up an Oracle Database for CiscoSecure,” page xix or “Setting Up a Sybase Enterprise SQL Server
for CiscoSecure,” page xxii.
•
You need to have enabled the DSM module using the appropriate product:
– If you were installing CiscoSecure ACS for the first time, you need to have installed the package
titled CiscoSecure ACS 2.3 for UNIX Distributed Session Manager. See “Basic Installation
Procedures,” page iv.
– If you wanted to upgrade a previous version of CiscoSecure ACS 2.x for UNIX to support the
DSM module, you needed to first upgrade to CiscoSecure ACS 2.3 for UNIX. Then you could
use the CiscoSecure ACS Distributed Manager Option product to activate the DSM module. See
“Upgrading from CiscoSecure ACS 2.x to 2.3,” page xiv.
– If you wanted to activate the DSM module at an existing CiscoSecure ACS 2.3 for UNIX site
without a licensed DSM module, you needed to use the package titled CiscoSecure ACS
Distributed Session Manager Option. See “Activating the DSM Module on an Existing
CiscoSecure ACS 2.3,” page xviii.
CiscoSecure ACS 2.3 for UNIX User Guide
78-5222-02 Rev. A0
xxix
Editing Configuration Files to Enable or Disable the DSM Module
Editing Configuration Files to Enable or Disable the DSM Module
Caution
•
After installation or upgrade, you needed to log in to the CiscoSecure Administrator web site located
the Max Sessions Enabled field in the AAA General web page, select Distributed to activate the
DSM module, and restart the CiscoSecure ACS server.
•
You needed to confirm that the AAA accounting functions are enabled on the client NASes. See the
CiscoSecure ACS 2.3 for UNIX User Guide chapter “CiscoSecure ACS Accounting.”
•
If your network is serviced by more than one CiscoSecure ACS installation, database replication
must be configured and enabled between the CiscoSecure profile RDBMS sites. See the chapter
“Setting up Database Replication among CiscoSecure ACSes” in the CiscoSecure ACS 2.3 for UNIX
User Guide.
Database replication setup requires database administrator (DBA) expertise. If you do not possess DBA
experience, assign this task to someone who does.
Editing Configuration Files to Enable or Disable the DSM
Module
Cisco strongly recommends using the Max Sessions Enabled field in the CiscoSecure Administrator
AAA General web page to enable or disable the Distributed Session Manager or other supported types
of max sessions control.
Alternatively, if you do not have access to a web browser, you can enable or disable max sessions control
by editing the CSU.cfg and CSConfig.ini configuration files.
Step 1
Caution
In the $BASEDIR/config directory of your ACS server, edit your CSU.cfg and CSConfig.ini files as
specified in Table 4 to enable the DSM or other supported types of max sessions control.
If you edit the CSU.cfg and CSConfig.ini files, make sure that when you enable one type of max sessions
control that you also disable all other types of max sessions control. Enabling the settings for one type
of max sessions control in the table below without disabling the settings for the other types of max
sessions control can cause extremely slow authentication performance and out-of-memory errors.
Table 4
Type of Max Sessions
None (all max sessions
control disabled)
Editing Configuration Files to Enable or Disable the DSM
CSU.cfg Required Settings
•
config_maxsessions_enable= 0
•
ProcessInMemoryMaxSessionInfo = disable
•
config_distmaxsessions_enable=0
•
ArchiveMaxSessionInfoToDB = disable
Disables AAA server and DSM max
sessions control
Distributed Session1
Manager (DSM)
CSConfig.ini Required Settings
Disables DBServer-based max sessions control.
•
config_maxsessions_enable= 0
•
ProcessInMemoryMaxSessionInfo = disable
•
config_distmaxsessions_enable=1
•
ArchiveMaxSessionInfoToDB = disable
Disables AAA server-based max sessions
control and enable the DSM
Disables DBServer-based max sessions control
CiscoSecure ACS 2.3 for UNIX User Guide
xxx
78-5222-02 Rev. A0
Editing CSU.cfg to Specify a CiscoSecure Software License Key
Editing CSU.cfg to Specify a CiscoSecure Software License Key
Table 4
Type of Max Sessions
Editing Configuration Files to Enable or Disable the DSM
CSU.cfg Required Settings
DBServer-based Max
Sessions control
(default setting)
•
config_maxsessions_enable= 0
•
ProcessInMemoryMaxSessionInfo = enable
•
config_distmaxsessions_enable=0
•
ArchiveMaxSessionInfoToDB = enable
Disables AAA server-based max sessions
control and the DSM
AAA Server-based Max
Sessions control
CSConfig.ini Required Settings
Enables DBServer-based max sessions control
•
config_maxsessions_enable= 1
•
ProcessInMemoryMaxSessionInfo = disable
•
config_distmaxsessions_enable=0
•
ArchiveMaxSessionInfoToDB = disable
Enables AAA server-based max sessions
control and disables the DSM
Disables DBServer-based max sessions control
1. DSM-based session control can only take effect if the optional Distributed Session Manager module has been licensed for this installation of
CiscoSecure ACS 2.3 for UNIX.
Step 2
After making the above settings, stop and restart CiscoSecure ACS to make sure that all the above
settings take effect:
•
Log in as [Root] to the Ultra 1 workstation where you installed CiscoSecure ACS. To stop
CiscoSecure ACS, enter:
# /etc/rc0.d/K80CiscoSecure
•
To restart CiscoSecure ACS, enter:
# /etc/rc2.d/S80CiscoSecure
Note
All forms of max sessions control require that the AAA accounting functions be enabled in the client
NASes.
Editing CSU.cfg to Specify a CiscoSecure Software License Key
If you want to specify a software license key after installing CiscoSecure ACS, or if you want to modify
the software license key for an existing CiscoSecure ACS 2.3 UNIX installation because you have
obtained a new key to enable the optional Distributed Session Manager module, you can use the
CiscoSecure License Key field in the CiscoSecure Administrator AAA General web page.
Alternatively, you can manually edit the config_license_key variable in the CSU.cfg file:
Step 1
Open the file $BASEDIR/config/CSU.cfg.
$BASEDIR is the install directory for CiscoSecure that you specified at the time of installation. If you
used the default install location, the file is located at /ciscosecure/config/CSU.cfg.
Step 2
Find the config_license_key variable and enter or modify the value for software license key number. For
example:
LIST config_license_key = {“a9505ad08a77f927afa4”};
CiscoSecure ACS 2.3 for UNIX User Guide
78-5222-02 Rev. A0
xxxi
Obtaining Documentation
Obtaining Documentation
Step 3
After changing the software license key, stop and restart CiscoSecure ACS for your changes to the
CSU.cfg file to take effect.
•
Log in as [Root] to the Ultra 1 workstation where you installed CiscoSecure ACS. To stop
CiscoSecure ACS, enter:
# /etc/rc0.d/K80CiscoSecure
•
To restart CiscoSecure ACS, enter:
# /etc/rc2.d/S80CiscoSecure
Obtaining Documentation
World Wide Web
You can access the most current Cisco documentation on the World Wide Web at http://www.cisco.com,
http://www-china.cisco.com, or http://www-europe.cisco.com.
Documentation CD-ROM
Cisco documentation and additional literature are available in a CD-ROM package, which ships with
your product. The Documentation CD-ROM is updated monthly. Therefore, it is probably more current
than printed documentation. The CD-ROM package is available as a single unit or as an annual
subscription.
Ordering Documentation
Registered CCO users can order the Documentation CD-ROM and other Cisco Product documentation
through our online Subscription Services at http://www.cisco.com/cgi-bin/subcat/kaojump.cgi.
Nonregistered CCO users can order documentation through a local account representative by calling
Cisco’s corporate headquarters (California, USA) at 408 526-4000 or, in North America, call
800 553-NETS (6387).
Obtaining Technical Assistance
Cisco provides Cisco Connection Online (CCO) as a starting point for all technical assistance. Warranty
or maintenance contract customers can use the Technical Assistance Center. All customers can submit
technical feedback on Cisco documentation using the web, e-mail, a self-addressed stamped response
card included in many printed docs, or by sending mail to Cisco.
CiscoSecure ACS 2.3 for UNIX User Guide
xxxii
78-5222-02 Rev. A0
Cisco Connection Online
Obtaining Technical Assistance
Cisco Connection Online
Cisco continues to revolutionize how business is done on the Internet. Cisco Connection Online is the
foundation of a suite of interactive, networked services that provides immediate, open access to Cisco
information and resources at anytime, from anywhere in the world. This highly integrated Internet
application is a powerful, easy-to-use tool for doing business with Cisco.
CCO’s broad range of features and services helps customers and partners to streamline business
processes and improve productivity. Through CCO, you will find information about Cisco and our
networking solutions, services, and programs. In addition, you can resolve technical issues with online
support services, download and test software packages, and order Cisco learning materials and
merchandise. Valuable online skill assessment, training, and certification programs are also available.
Customers and partners can self-register on CCO to obtain additional personalized information and
services. Registered users may order products, check on the status of an order and view benefits specific
to their relationships with Cisco.
You can access CCO in the following ways:
•
WWW: www.cisco.com
•
Telnet: cco.cisco.com
•
Modem using standard connection rates and the following terminal settings: VT100 emulation;
8 data bits; no parity; and 1 stop bit.
– From North America, call 408 526-8070
– From Europe, call 33 1 64 46 40 82
You can e-mail questions about using CCO to [email protected].
Technical Assistance Center
The Cisco Technical Assistance Center (TAC) is available to warranty or maintenance contract
customers who need technical assistance with a Cisco product that is under warranty or covered by a
maintenance contract.
To display the TAC web site that includes links to technical support information and software upgrades
and for requesting TAC support, use www.cisco.com/techsupport.
To contact by e-mail, use one of the following:
Language
E-mail Address
English
[email protected]
Hanzi (Chinese)
[email protected]
Kanji (Japanese)
[email protected]
Hangul (Korean)
[email protected]
Spanish
[email protected]
Thai
[email protected]
In North America, TAC can be reached at 800 553-2447 or 408 526-7209. For other telephone numbers
and TAC e-mail addresses worldwide, consult the following web site:
http://www.cisco.com/warp/public/687/Directory/DirTAC.shtml.
CiscoSecure ACS 2.3 for UNIX User Guide
78-5222-02 Rev. A0
xxxiii
Documentation Feedback
Obtaining Technical Assistance
Documentation Feedback
If you are reading Cisco product documentation on the World Wide Web, you can submit technical
comments electronically. Click Feedback in the toolbar and select Documentation. After you complete
the form, click Submit to send it to Cisco.
You can e-mail your comments to [email protected].
To submit your comments by mail, for your convenience many documents contain a response card
behind the front cover. Otherwise, you can mail your comments to the following address:
Cisco Systems, Inc.
Document Resource Connection
170 West Tasman Drive
San Jose, CA 95134-9883
We appreciate and value your comments.
This document is to be used in conjunction with the CiscoSecure ACS 2.3 for UNIX User Guide publication.
Access Registrar, AccessPath, Any to Any, AtmDirector, Browse with Me, CCDA, CCDE, CCDP, CCIE, CCNA, CCNP, CCSI, CD-PAC, the Cisco
logo, Cisco Certified Internetwork Expert logo, CiscoLink, the Cisco Management Connection logo, the Cisco NetWorks logo, the Cisco Powered
Network logo, Cisco Systems Capital, the Cisco Systems Capital logo, Cisco Systems Networking Academy, the Cisco Systems Networking
Academy logo, the Cisco Technologies logo, ConnectWay, Fast Step, FireRunner, Follow Me Browsing, FormShare, GigaStack, IGX, Intelligence
in the Optical Core, Internet Quotient, IP/VC, Kernel Proxy, MGX, MultiPath Data, MultiPath Voice, Natural Network Viewer, NetSonar, Network
Registrar, the Networkers logo, Packet, PIX, Point and Click Internetworking, Policy Builder, Precept, ScriptShare, Secure Script, ServiceWay, Shop
with Me, SlideCast, SMARTnet, SVX, The Cell, TrafficDirector, TransPath, ViewRunner, Virtual Loop Carrier System, Virtual Service Node,
Virtual Voice Line, VisionWay, VlanDirector, Voice LAN, WaRP, Wavelength Router, Wavelength Router Protocol, WebViewer, Workgroup
Director, and Workgroup Stack are trademarks; Changing the Way We Work, Live, Play, and Learn, Empowering the Internet Generation, The
Internet Economy, and The New Internet Economy are service marks; and ASIST, BPX, Catalyst, Cisco, Cisco IOS, the Cisco IOS logo, Cisco
Systems, the Cisco Systems logo, the Cisco Systems Cisco Press logo, Enterprise/Solver, EtherChannel, EtherSwitch, FastHub, FastLink, FastPAD,
FastSwitch, GeoTel, IOS, IP/TV, IPX, LightStream, LightSwitch, MICA, NetRanger, Post-Routing, Pre-Routing, Registrar, StrataView Plus, Stratm,
TeleRouter, and VCO are registered trademarks of Cisco Systems, Inc. or its affiliates in the U.S. and certain other countries. All other trademarks
mentioned in this document are the property of their respective owners. The use of the word partner does not imply a partnership relationship between
Cisco and any of its resellers. (9912R)
Copyright © 1998-2000, Cisco Systems, Inc.
All rights reserved.
CiscoSecure ACS 2.3 for UNIX User Guide
xxxiv
78-5222-02 Rev. A0