1
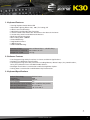
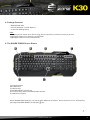
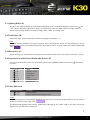
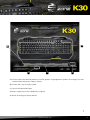
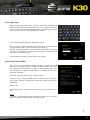
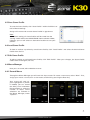
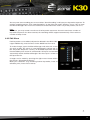
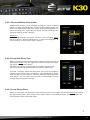
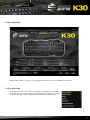
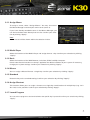
Handbuch Manual Table of Contents 1. Keyboard Features 3 2. Software Features 3 3. Keyboard Specifications 3 4. Package Contents 4 5. The SHARK ZONE K30 at a Glance 4 5.1 Lighting Effect5 5.2 Profile Keys 5 5.3 Macro Keys 5 5.4 Function Keys with Preset Multimedia Actions 5 5.5 Other Shortcuts 5 6. Connecting to the PC 6 7. Installation of the Gaming Software 6 8. Configuration of the Gaming Software 7 8.1 Launch Program7 8.2 Main Control8 8.3 Assign Keys10 8.4 Create Game Profile10 8.5 Save Game Profile11 8.6 Load Game Profile11 8.7 Edit Game Profile11 8.8 Macro Manager11 8.8.1 Record Macro11 8.8.2 Edit Macro12 8.8.2.1 Record Additional Keystrokes13 8.8.2.2 Insert/Edit Delay Time 13 8.8.2.3 Insert Mouse Event 13 8.8.2.4 Delete Recordings 14 8.8.3 Delete Macro 14 8.9 Reset to Factory Default 14 9. Macro Settings 15 9.1 Key Selection15 9.1.1 Assign Macro16 9.1.2 Media Player16 9.1.3 Basic 16 9.1.4 Mouse 16 9.1.5 Standard 16 9.1.6 Assign Shortcut 16 9.1.7 Launch Program 16 9.1.8 Deactivate 17 10. Advanced Settings 17 SHARK ZONE K30 2 1. Keyboard Features • Gaming Keyboard with White LED • Adjustable Lighting Effect: 50%, 100%, Pulsating, Off • 5 Macro and 3 Profile Keys • Individually Configurable Key Functions • 5 Game Profiles with Automatic Activation at the Start of the Game • Function Keys with Preset Multimedia Actions • Multi-Key Rollover Support • Max. Polling Rate: 1,000 Hz • Onboard Memory • Integrated Palm Rest • 3-Block Layout • Gold-Plated USB Plug Number of Keys Dimensions (L x W x H) Weight incl. Cable 104 + 5 Macro Keys + 3 Profile Keys 485 x 208 x 32 mm 1.21 kg 2. Software Features • Free Programming of Key Functions in Games and Other Applications. • Supports Five Different Game Profiles. • Free Programming of the Key Functions including Macros, Macro Loops, Key Combinations, Delay Time, Mouse Events and Multimedia Actions. • Backlight Illumination Customization and Pulsating Effect Option. • Polling Rate Customization and Windows Key Deactivation. 3. Keyboard Specifications Switch Technology Rubber Dome Connector USB Cable Length 160 cm Input Voltage 5V Operating Life Cycles of Keys Min. 10 Million Keystrokes Operating Temperature 0 °C to +40 °C Storage Temperature -10 °C to +50 °C SHARK ZONE K30 3 4. Package Contents • SHARK ZONE K30 • CD with Software and PDF Manual • 1x Set Anti-Sliding Stand Note: Should any of the above items be missing, please contact our customer service by E-mail: [email protected] (Germany and Europe) [email protected] (International) 5. The SHARK ZONE K30 at a Glance A B C E F D (A) Lighting Effect (B) Profile Keys (C) Macro Keys (D) SHARK ZONE Function Key (E) Function Keys with Preset Multimedia Actions (F) LED Status Display Some SHARK ZONE K30 keys are preset with additional functions. These functions can be activated by pressing the SHARK ZONE Function Key (D). SHARK ZONE K30 4 5.1 Lighting Effect (A) To adjust the lighting effect of the SHARK ZONE K30, press the SHARK ZONE Function Key (D) + Esc (A) key. By pressing the Esc (A) key multiple times you can either adjust the light intensity, select the pulsating effect or disable the light (50%, 100%, pulsating, off). 5.2 Profile Keys (B) The profile keys quickly and easily switches through game profiles 1 - 3. Note: After the Gaming Software has been installed, when switching the profile via the profile keys on the keyboard, the current activated profile will be displayed on the PC monitor above the taskbar (lower right side). 5.3 Macro Keys (C) These five keys can be individually programmed and allow quick access to the preset functions. (see 9). 5.4 Function Keys with Preset Multimedia Actions (E) The preset multimedia actions are launched by pressing the SHARK ZONE Function Key F11 keys: Key Combination + F5 + F6 + F7 + F8 + F9 + F10 + F11 and the F5 - Function Stop Previous Track Play/Pause Next Track Mute Volume Down Volume Up 5.5 Other Shortcuts Key Combination + ESC + F12 Function Lighting Effect Deactivate/Activate Windows Key* *Note: When deactivating or activating the Windows Key, the current status will be displayed on the PC monitor above the taskbar (lower right side). The deactivated Windows Key will be additionally indicated by the “WIN” LED on the right side of the keyboard in the LED Status Display (F). SHARK ZONE K30 5 6. Connecting to the PC 1. Connect the USB plug of the SHARK ZONE K30 to an available USB port on your PC. 2. The operating system will automatically recognize the SHARK ZONE K30 keyboard and install all necessary drivers. 3. If the SHARK ZONE K30 is not recognized, disconnect it and try a different USB port on your PC. 7. Installation of the Gaming Software Before starting with the installation of the included Gaming Software, ensure that there is no other keyboard software is installed on your PC. If you have other software already installed, please uninstall before continuing. 1. Insert the CD into your CD/DVD drive. 2. Open the drive that contains the CD (e. g. D:\). 3. Open the folder “Gaming Software”. 4. Run the executable setup file “SHARK ZONE K30 Configuration Setup” and follow the onscreen instructions. SHARK ZONE K30 6 5. Click “Finish” to complete the installation. Once installation is complete, the SHARK ZONE K30 icon software has now been successfully installed on your PC. will be shown in your taskbar. The gaming 8. Configuration of the Gaming Software 8.1 Launch Program To launch the software, double-click the SHARK ZONE icon in your Windows taskbar. Note: The gaming software runs continuously in the background while your PC is running. This is necessary to ensure all functions of the SHARK ZONE K30 are always available. The SHARK ZONE K30 icon will stay displayed in the taskbar while the gaming software is running. SHARK ZONE K30 7 8.2 Main Control The Main Control tab is where you can create, edit or save your Game Profiles or make single key assignments that suit your personal needs. Access to the Macro Settings and Advanced Settings is also available. If necessary, you can also reset all settings to factory default. SHARK ZONE K30 8 D B E A C (A) Click to select the desired profile. An active profile is highlighted in yellow. All changes must be confirmed by clicking the “Apply” button. (B) Create, edit, save or load a profile. (C) Launch the Macro Manager. (D) Every single key can be individually assigned. (E) Reset all settings to factory default. SHARK ZONE K30 9 8.3 Assign Keys When moving the pointer over a key, the blue color indicates the possibility for it to be configured. To make a key assignment, select a key. The key will then be highlighted. By clicking the left mouse button, you can access the “Assign Keys” menu. The current key setting will be displayed in red. You can either assign a single key or, alternatively, a mouse button or mouse event. Press “OK” to confirm your setting. The key will be displayed in orange afterwards within the layout. This gives an overview of all keys with changed assignments and eases the re-editing or reset. To activate the changes in the profile, click “Apply“. 8.4 Create Game Profile You can save your individual profile settings in order to reload them later or assign them to a different game profile. Also, you can assign the game profile to a game or other application. If you start the game, the game profile with all its settings will be automatically activated. To create a game profile, select “Create Profile“. Assign a name in the text field below “Profile Name” and, optionally, select a game or application where the profile shall be activated with. Select “OK“. The game profile is now setup and can be saved in the Main Control. Note: If a game or application has been assigned to more than one profile, then the lowest numbered profile will be activated. SHARK ZONE K30 10 8.5 Save Game Profile To save the Game Profile, click “Save Profile” within the Main Control or Macro Settings. Assign a file name and save the Game Profile in .gkp format. Note: As a default setting, all Game Profiles will be saved into the “config” folder within the SHARK ZONE K30 installation folder, however, you can still select an alternative location to save your profiles. 8.6 Load Game Profile To load or activate a previously saved Game Profile, click “Load Profile“ and select the desired Game Profile from the list. 8.7 Edit Game Profile To edit or update an activated Game Profile, click “Edit Profile”. After your changes, the Game Profile needs to be saved again (see 8.5). 8.8 Macro Manager Here you can record, edit and delete macros. 8.8.1 Record Macro Through the Macro Manager you will reach the input screen. To create a new macro, select “New”. First, assign your macro a name (max. 15 characters) and finish by pressing the Enter key. Your macro will now appear highlighted in yellow. If needed, you can record the delay time in-between the keystrokes or select the number of loops. These selections are available in the Macro Manager, under “Options”. SHARK ZONE K30 11 You may now start recording your macro. Select “Start Recording” and input your keystroke sequence. To end the recording process, click “Stop Recording” on the right side under “Options”. Press “OK” to leave the Macro Manager. Your macro has now been saved and can be used in any of the profiles (see 9.1.1). Note: Per macro, you may record a maximum of 25 keystroke sequences. Once the maximum number of keystroke sequences has been reached, the recording will be stopped automatically. The maximum number of loops is 255. 8.8.2 Edit Macro Each keystroke can be edited, adjusted or deleted in the Macro Manager. Additionally, mouse events can be added into the macro. To make changes, open the Macro Manager and select the macro you wish to edit. The macro is now highlighted in yellow and, in the “Keystroke Sequence” column, all recorded keystrokes will be listed and delay time shown in milliseconds. All inputs are recorded sequentially within the Macro Manager. Your first input is shown at the top of the list. Changes can be made by pressing the right mouse button within the column “Keystroke Sequence”. Make your selections (e.g. recording further keystrokes, insert or edit delay time, insert mouse event). SHARK ZONE K30 12 8.8.2.1 Record Additional Keystrokes Additional keystrokes can be recorded through the “Start recording before” or “Start recording after” functions. Select the keystroke you wish to record before or after. Click either “Start recording before” or “Start recording after” and make your inputs. To stop recording, click “Stop Recording” under “Options“. Attention: When editing keystroke sequences, ensure to start recording always with the functions “Start recording before” or “Start recording after”. To stop recording, use the function under “Options”. 8.8.2.2 Insert/Edit Delay Time Select a command within the keystroke sequence where you wish to add a delay before. Click the right mouse button to open the selection menu. Select “Insert Delay“. The delay will now be inserted with the standard value of 1ms. This value can be adjusted through the function “Edit Delay”. To make a change, select the delay time you wish to change by clicking the left mouse button. The delay is now highlighted in yellow. Click the right mouse button to open the selection menu and select “Edit Delay”. You can now insert the time in milliseconds. Confirm changes by pressing the Enter key. 8.8.2.3 Insert Mouse Event Select an item within the keystroke sequence where you want to add a mouse event before. By clicking the right mouse button, the selection menu opens. Select “Insert Mouse Event”, then afterwards, the mouse button and the required action. SHARK ZONE K30 13 8.8.2.4 Delete Recordings All keystrokes, mouse events and delay time can be separately deleted. Select the command you want to delete from the keystroke sequence. The command is now highlighted in yellow. Click the right mouse button to open the selection menu. Select “Delete“. The item is now removed from your keystroke sequence. Note: In case the edited macro was already assigned to a key, you will need to reassign it (see 9.1.1) and confirm your change within the profile by clicking “Apply”. Only then will it be updated. 8.8.3 Delete Macro To delete a macro, open the Macro Manager and select the macro you want to delete. The macro is now highlighted in yellow. To delete it, click “Delete”. A warning will appear. After you reconfirm, the macro will be deleted. Note: In case the deleted macro is still assigned to a key within the Macro Settings you need to reset the key (see 9.1.5). Otherwise the macro will be still saved in the onboard memory of the keyboard. 8.9 Reset to Factory Default This function resets all profile and macro settings to the factory default. SHARK ZONE K30 14 9. Macro Settings Within each profile, 11 keys can be assigned with either macros or additional functions. 9.1 Key Selection To assign a new function, move the pointer into the box next to the key and click the left mouse button. A selection menu with the available functions will open (e.g. Assign Macro, Media Player, Mouse, etc.). SHARK ZONE K30 15 9.1.1 Assign Macro To assign a macro, select “Assign Macro“. You may also access the Macro Manager to record your own macros (see 8.8). If you have already recorded macros in the Macro Manager, you can find and select them directly from the list. Confirm your selection by clicking “Apply“. Note: Active macros will be shown within the selection in blue. 9.1.2 Media Player Select the functions of the Media Player and assign them to a key. Confirm your selection by clicking “Apply“. 9.1.3 Basic Select the functions of the Web Browser, Calculator, E-Mail and My Computer. Please note that the functions are always applied to the default software of your system. If necessary, change your system settings. Confirm your selection by clicking “Apply“. 9.1.4 Mouse You can assign a Mouse Event to a single key. Confirm your selection by clicking “Apply“. 9.1.5 Standard Reset the key to its standard setting. Confirm your selection by clicking “Apply“. 9.1.6 Assign Shortcut This function allows you can assign a shortcut to a single key. Combinations of multiple keys (e.g. Ctrl + Alt + Del) is also possible. Confirm your selection by clicking “Apply“. 9.1.7 Launch Program You can select a program to be launched when the specific key is pressed. Confirm your selection by clicking “Apply”. SHARK ZONE K30 16 9.1.8 Deactivate This function deactivates the key completely. Confirm your selection by clicking “Apply“. 10. Advanced Settings In the Advanced Settings menu, adjustments for each profile can be made: • Polling Rate 125 Hz, 500 Hz or 1000 Hz • Windows Key On/Off • Lighting Effect: 50%, 100%, Pulsating, off Confirm your selection by clicking “Apply“. Note: The lighting effect can also be changed directly via the keyboard by pressing the key combination SHARK ZONE Function Key + Esc. The Windows Key can be deactivated directly via the keyboard by pressing the key combination SHARK ZONE Function Key + F12. SHARK ZONE K30 17 Legal Disclaimer: For potential loss of data, especially due to inappropriate handling, SHARKOON assumes no liability. All named products and descriptions are trademarks and/or registered trademarks of the respective manufacturers and are accepted as protected. As a continuing policy of product improvement at SHARKOON, the design and specifications are subject to change without prior notice. National product specifications may vary. The legal rights of the enclosed software belong to the respective owner. Please observe the license terms of the manufacturer before using the software. All rights reserved especially (also in extracts) for translation, reprinting, reproduction by copying or other technical means. Infringements will lead to compensation. All rights reserved especially in case of assignation of patent or utility patent. Means of delivery and technical modifications reserved. Disposal of Your Old Product: Your product is designed and manufactured with high quality materials and components, which can be recycled and reused. When this crossed-out wheeled bin symbol is attached to a product, it means the product is covered by the European Directive 2002/96/EC. Please be informed about the local separate collection system for electrical and electronic products. Please act according to your local rules and do not dispose of your old products with your normal household waste. The correct disposal of your old product will help prevent potential negative consequences to the envi ronment and human health. © SHARKOON Technologies 2015 www.sharkoon.com SHARK ZONE K30 18