1
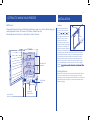
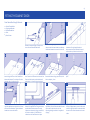
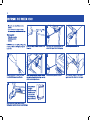
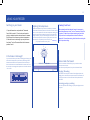
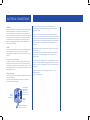
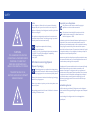
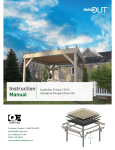
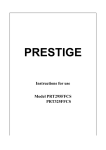
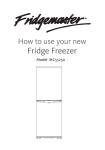
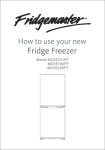
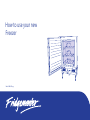
How to use your new
Freezer
Model MBUZ6097
2
GETTING TO KNOW YOUR FREEZER
INSTALLATION
Location
Before use
Please read these instructions and the Safety guidelines on page 12/13 carefully before using your
new Fridgemaster Freezer. The Freezer is for indoor, domestic use only.
Please keep these instructions in a safe place for future reference.
FROZEN FOOD
DRAWERS
min. 550mm
When selecting a position for
your Freezer you should make
sure the
is
and
and
min. 600mm
the room is well ventilated with
820 870mm
an average room temperature of
between 12° c and 32° c. Avoid
locating your Freezer near a
168mm
heat source, eg. cooker, boiler or
radiator. Also avoid direct sunlight.
The Freezer is free standing and
designed to be inserted alongside
kitchen units and fitted with a matching unit door. When your Freezer
is working, the grille at the back may become hot and the sides warm. It
must therefore be installed in a space with the following measurements:
The distance from the floor to the underside of the work surface should
be between 820mm-870mm. It should have a width of 600mm and a
depth of at least 550mm. The Freezer door can either open to the right
or the left, depending on the location and which suits you. See page 6 if
you want
cabinet outer door.
Cleaning before use
VENTILATION
GRILLE
LEVELLING FEET
(behind kick strip)
THERMOSTAT
CONTROL DIAL
Wipe the inside of the Freezer with a weak solution of bicarbonate of soda.
Then rinse with warm water using a ‘wrung-out’ sponge or cloth. Wipe
completely dry before replacing the shelves and baskets. You could clean the
Freezer externally with wax polish. If you require more information refer to
CLEANING on page 9.
3
INSTALLATION
Before plugging in YOU MUST
Adjusting the height and level of the Freezer
The height and level of the Freezer should be adjusted so that the top
Check that you have a socket which is compatible with the plug supplied
with the Freezer. If not, see the section called ELECTRICAL CONNECTIONS surface of the Freezer fits under the kitchen worktop. It should be flush
and level with the underside.
on page 12. Before installing your Freezer you should check the location
To do this use the 4 rotating levelling feet one at each corner of the
of the socket and how accessible it is. It may also be necessary to place
Freezer.
the power cable in position before finally installing the Freezer. DO NOT
1 Loosen the locking nut by turning it
connect the power until final installation is complete. If the socket is
clockwise using the Spanner.
inaccessible after the Freezer has been installed you may have to connect
2 Turn the foot to raise or lower the Freezer.
the power before final installation, if this is the case the thermostat
3 When the feet have been adjusted and
control dial must be turned to 0, the off position, see ‘Setting the
the freezer is level, tighten the locking
temperature’ on page6.
Before switching on!
DO NOT SWITCH ON UNTIL FOUR HOURS AFTER MOVING THE FREEZER.
The coolant fluid needs time to settle.
Before using your Freezer
Before placing frozen foods in your Freezer, turn the Freezer on and wait
for 24 hours, to make sure it is working properly and to allow the Freezer
to fall to the correct temperature.
nut against the bottom of the Freezer by
turning it anti-clockwise.
Once the Freezer has been adjusted to the
correct height, you may find it easier to
carefully push the Freezer in place and use
the front levelling feet to ensure the Freezer is
level. If the Freezer is not level, the doors and
magnetic seal alignments will be affected.
Ensure that the Freezer does not rest on the
power cable. If the power cable damaged it must be replaced by qualified
registered electrician before you use the Freezer.
Adjusting the plinth or kickboard
When the Freezer has been fitted you may decide to attach a plinth or
kickboard to match your existing kitchen units. Remove the bottom rail by
releasing the fastenings just inside the grill on both sides and pull towards
you. Insert the kickboard and replace the bottom rail to hold it in place.
4
FITTING THE CABINET DOOR
Outer Cabinet Door Fixing Kit Contents:
•
•
•
•
•
1
2
3
2 Double Threaded Bolts
4 Right Angled Brackets
2 Domed Headed Nuts
2 Bolts
4 Wood Screws
Remove the two plastic plugs on the top of the
door and insert the double-ended bolts.
4
Subtract B from A to give C=. Mark a centre line
down the length of the rear of the Cabinet Door.
Measure the disatnce C from the top of the door
and mark a line 90° to the centre line.
8
Fit the outer cabinet door onto the two bolts at the
top of the appliance door and check that it is level
with the other cabinet doors. Tighten the domed
headed nuts to secure the backets.
5
Drawer a line the length of D on the rear of the
door. Ensure that it is centred over the centre line.
Place two of the brackets so that the bottom of
each bracket is in line with the horizontal mark.
9
Fit the two remaining right-angled brackets to the
bottom of the appliance door using the two bolts
provided. Mark the hole centres on the outer
cabinet door and remove it. Using a 3mm drill bit,
drill a hole to a depth of 5-8. Refit the outer
cabinet door and screw the brackets in place.
Place two of the right-angled brackets on the bolts
and secure with the domed headed nuts. Measure
the distance between the centres of the bolts. D=
66
Mark the centre of the d rill holes using a b rad aw . l
Remove the brackets. Using a 3mm drill bit, drill a
hole to a depth of 5 - 8mm.
A
Measure from the underside of the work surface to
the bottom of the right angled bracket. A=
Next measure from the underside of the work
surface to the top of the other unit doors. B=
7
Using the screws provided, screw the brackets into
place.
10
11
The appliance must be positioned so that the
top bracket is flush with the underside of the work
surface and fluh with the other units. See
‘Adjusting the height and level of the appliance’
on page 3.
Open the appliance door. Use two screws and a drill
bit that are appropriate to your work suface, mark
and drill through the bracket into the underside of
the work surface. Screw the brackets to the work
suface.
6
USING YOUR FREEZER
Switching on your Freezer
When using your Freezer for the first time you can use the Super Freeze
Switch to reduce the length of time needed to reach the correct
1. Open the freezer door and position the Thermostat
temperature. For more information see Super Freeze Switch opposite.
Control
Dial to number 7. Close the door and insert the
1 Before your Freezer is plugged in, open the freezer door, press the
plugright
intoside
a suitable
electrical
socket
leave
for between
of Super Freeze
Switch
to theand
Off (0)
position.
62 and
8 plugging
hours for
freezer
to getthe
down
topower
temperature.
After
in the
to the
mains supply
green
light and the
red warning
light williscome
Turn theyou
Thermostat
Control
Dial
2. When
the freezer
coldon.
enough
can place
frozen
setting 3Turn
for 6-8
to allow the
freezer dial
to falltotobetween
the correct
foodtoinside.
thehours
Thermostat
Control
temperature.
positions
3 andWhen
4. the correct temperature has been reached the red
warning light will go out.
3 Set the Thermostat Control Dial to between 3-4 for normal operation
and check that the Freezer compartment is cold, leave for
approximately another 6 hours before placing food in the Freezer.
Freezing
FreshSwitch
Food
Super Freeze
Adjusting the temperature
Use this function for freezing fresh food. This makes your Freezer colder
The internal temperature of your Freezer is controlled by a thermostat.
The Thermostat Control Dial, located on the front of the Freezer under the
shelves, sets the temperature for the Freezer compartment. Setting 7 will
make the Freezer coldest and setting 1 the warmest. The recommended
settings is between 3 and 4, the correct setting when the Freezer is used
in normal room temperature. The Freezer may not operate at the correct
temperature if it is in a particularly hot or cold room, see ‘Low
Temperature
Troubleshooting'
Switch’) or if you open the Freezer door very often.
Before
placing fresh food inside the freezer it is necessary to
(approx -30°C). It will therefore freeze quicker and keep the goodness in.
reduce
temperature
Turn
Control
Freezing the
is complete
after 24inside.
hours. Turn
offthe
the Thermostat
Super Freeze switch
to Dial
to
number
7
at
least
4
hours
before
introducing
any
fresh
food.
allow the freezer to return to its normal temperature (-18°C). Never freeze
large quantities
of fresh
food atquantities
one time. and leave the freezer to
Only
freeze food
in small
operate for 24 hours after entering fresh food before returning the
dial to its previous setting.
2
2
3
4
5
6
0
If you are concerned that your Freezer is not being kept cold enough, and
wish to check the temperature, you will need a special fridge / freezer
thermometer available from most supermarkets and hardware shops.
Place the thermometer in the middle basket of the Freezer, where it can
be read easily. Leave overnight, the temperature in the Freezer should be
-18˚C or lower.
4
5
1
1
Is the Freezer cold enough?
3
6
0
7
SUPER FREEZE SWITCH
7
Noises inside the Freezer!
THERMOSTAT CONTROL DIAL
Alarm light
The alarm light will show if your Freezer’s temperature rises over -12°C,
as this may endanger long term preservation of food. The alarm light will
show for the first few moments after the Freezer is started. It will switch
off when the Freezer reaches its optimum temperature.
If you have not owned a freezer before, you may notice that it makes
some rather unusual noises.
Most of these are perfectly normal, but you should be aware of them!
Gurgling, Whooshing
These noises are caused by the circulation of the refrigerant liquid in the
cooling system. It has become more pronounced since the introduction of
CFC free gases. This is not a fault and will not affect the performance of
your freezer.
Humming, purring or pulsating
This is the compressor motor working, as it pumps the refrigerant around
the system.
7
USING YOUR FREEZER
Shopping for frozen foods
Freezing fresh foods
Your Freezer is 4 star
The Golden Rules
When you are buying frozen food, look at the Storage Guidelines on the
packaging. You will be able to store each item of frozen food for the
period shown against the 4 star rating. This is usually the period stated as
‘Best Before’, on the front of the packaging.
Use quality food and handle it as little as possible. Freeze food in small
quantities, it freezes faster, takes less time to thaw and enables you to
eat it in the quantity you need.
What not to Freeze
Check the freezer temperature
Check the temperature of the frozen food cabinet in the shop where you
buy your frozen foods. It should show a temperature lower than -18°C.
Choose packs carefully
Take a quick look at the frozen food package and make sure it is in
perfect condition.
Purchase frozen food last
Always buy frozen products last on your shopping trip or visit to the
supermarket.
Keep frozen foods together
When you are going around the supermarket and when you are travelling
home, if you keep all the frozen foods together they will help to keep
each other cold.
Store food straight away
Don’t buy frozen food unless you can freeze it straight away.
Special insulated bagscan be bought from most supermarkets and
hardware shops. These keep frozen food cold for longer.
Thawing frozen food
For some foods, thawing before cooking is unnecessary. Vegetables and
pasta can be added directly to boiling water or steam cooked.
Frozen sauces and soups can be put into a saucepan and heated gently
until thawed.
Preparations for freezing
•
•
•
•
•
Bananas, Pomegranates, Pears, Carbonated liquids as they can explode or
anything in a glass container, as these may crack.
To Thaw
1 Cover food loosely.
2 Thaw at room temperature. Don’t forget that thawing in a warm area
encouragesthe growth of bacteria.
3 Always make sure there are no ice crystals in the food before
cooking, particularly with meat. These crystals indicate that the food
is not fully thawed. They result in lower temperatures when cooking.
Lower cooking temperatures may not destroy dangerous bacteria.
4 Cook food as soon as possible after thawing.
5 Drain off and throw away any liquid lost during thawing.
•
Oven Thawing
•
Many microwaves and ovens have thaw settings. To avoid bacterial build
up, only use these if you intend to cook the food immediately afterwards.
•
Safety Tips
• Never re- freeze anything that has thawed out unless you cook it
again, to kill off harmful bacteria
• Never re- freeze thawed shellfish.
Useful Tip
• Re- seal packs properly after removing items. This prevents drying or
‘freezer burn’ and a build up of frost on any remaining food.
Leave cooked food to cool completely .
Chill food in a fridge before freezing if possible.
Consider how you want to cook the food before freezing it.
Don’t freeze food in metal containers as you may
want to microwave it straight from the
freezer.
Use special freezer bags available from
supermarkets, freezer film, polythene
bags, plastic containers, aluminium
foil (heavy grade only, if in doubt,
double wrap). Don’t use aluminium
foil for acidic foods (such as citrus
fruits). Don’t use thin cling film or
glass. Don’t use used
food containers (unless cleaned
thoroughly first).
Exclude as much air from the
containeras possible.You could
buy a specialvacuum pump
which sucks excessive air out of
the packaging.
Leave a small amount of ‘air space’ when freezing liquids,
to allow for expansion.
You can use the space in the freezer most efficiently if you freeze
liquids (or solids with liquids, such as stew) in square blocks. This is
known as ‘preforming’. Pour the liquid into a polythene bag which
is inside a square sided container. Freeze it like this, then remove it
from the container and seal the bag.
8
USING YOUR FREEZER
Label everything
Recommended Storage Periods
•
Fruit Syrup or Sugar packed Fruit
Many foods look the same when frozen, so careful labelling will help
avoid forgetting what an item is.
Storage times being exceeded could cause food poisoning.
• You can buy special freezer tape for use in low temperatures.
This tape is available in white, so you can use it to write the items
contents on. You can buy special freezer labels and pens. Labels come
in different colours which can help you use your Freezer effectively.
For instance you could colour code meat red and vegetables green.
Using a different colour label for each quarter of the year will help
you rotate your frozen food more efficiently.
• Write the contents and date. If you are really organised add the
weight and notes on cooking such as ‘thaw first’, or ‘cook from
frozen’ and keep a separate ‘log-book’ of what is in each drawer.
This will save opening the door and searching around unnecessarily.
(when frozen from fresh)
up to 12 months
Open Frozen or Puréed Fruit
up to 12 months
Fruit juices
up to 6 months
Beef
up to 9 months
Lamb
up to 8 months
Veal
up to 6 months
Pork
up to 5 months
Minced meat
up to 3 months
Cured meats
up to 2 months
Sausages
up to 3 months
Packed bacon
up to 7 months
Smoked bacon/ chops/ gammon steaks
Storage Guidelines
There are a series of icons printed on the inside of the Freezer door that
give approximate storage periods for different types of food. These can be
used to provide quick guidelines, if in doubt you should consult the more
accurate table opposite.
1
1-2
2-3
3-4
4-5
6-8
8-10
10-12
up to 2 months
Unsmoked bacon/ chops/ gammon steaks up to 1 month
Chicken
Duck
1
1-2
up to 12 months
2-3
up to 5 months
Goose
up to 5 months
Turkey
up to 6 months
White fish
up to 7 months
Oily fish including salmon
up to 2 months
Smoked salmon
up to 3 months
Caviar
don’t freeze
Shellfish
up to 1 month
Butter
up to 8 months
Cheese
up to 5 months
Cream - double/ whipping
up to 3 months
Eggs - only freeze separated
up to 3 months
Suet
up to 6 months
Milk
up to 1 month
Yogurt
up to 6 weeks
3-4
4-5
9
DEFROSTING
Defrosting
After a period of time frost will build up in certain areas in the Freezer
compartment. As a temporary measure, this frost should be scraped
away using a plastic scraper. NEVER use a metal or sharp instrument.
Remove existing foods and baskets, ideally the frozen food should be
put into another freezer. Scrape off and remove the frost, then move
your foods back in order to gain access to other sections of the Freezer.
Complete defrosting will however,
become necessary, approximately
once a year, or if the frost layer
exceeds 4mm to maintain the
efficiency of the freezer. This should
SCRAPER NOT
be carried out if the frost build up
INCLUDED
cannot be scraped away, or if it begins
to interfere with the food storage. Choose a time when the stock of
frozen food is low and proceed as follows:
1 Take out the frozen food, turn the Freezer off at the mains supply
and leave the doors open. Ideally the frozen food should be put
into another freezer or freezer. If this is not possible wrap the food,
firstly in several sheets of newspaper or large towels and then a
thick rug or blanket and keep it in a cool place.
2 Scrape away as much frost build up as possible using the plastic
scraper (scraper not included).
3 Thawing of the remaining frost can be speeded up by placing bowls
of hot water inside the freezer compartment. As the solid frost
loosens, prize it away with the ice scraper and remove.
4 When defrosting is completed, clean your freezer as described in
CLEANING.
CLEANING
Cleaning inside the Freezer
After defrosting you should clean the Freezer internally with a weak
solution of bicarbonate of soda. Then rinse with warm water using a
‘wrung-out’ sponge or cloth. Wipe the Freezer dry before replacing the
baskets and shelves.
MAINTENANCE
Moving your Freezer
Location
Do not locate your Freezer near a heat source, eg. cooker, boiler or
radiator. Also avoid direct sunlight.
Levelling the Freezer
Cleaning the outside of the Freezer
Use standard furniture polish to clean the Freezer exterior. Make sure that
the doors are closed, to prevent polish getting on the magnetic door seal
or inside.
The grille of the condenser at the back of the Freezer and the adjacent
components can be vacuumed using a soft brush attachment.
Cleaning tip
• Defrost when food stocks are low.
Make sure the Freezer is level. Use the rotating levelling feet at
the front. If the Freezer is not level, the doors and magnetic seal
alignments will be affected.
Do Not Turn on the Freezer for 4 Hours
After the Freezer is in place it needs to be left for 4 hours.
The coolant fluid needs time to settle.
Installation
Don’t cover or block the vents or grilles of your appliance.
Servicing
Repairs and maintenance should only be performed by a qualified
technician.
The appliance must be readily accessible to the service engineer in the
event of maintenance or repair being required.
11
ELECTRICAL CONNECTIONS
Disposal
Old appliances still have some residual value. An environmentally friendly
method of disposal will ensure that valuable raw materials can be
recovered and used again. The refrigerant used in your appliance and
insulation materials require special disposal procedures. Ensure that none
of the pipes on the back of the appliance are damaged prior to disposal.
Up to date information concerning options for disposing of your old
appliance and packaging from the new one can be obtained from your
retailer or local council office.
Locks
If your Freezer is fitted with a lock, to prevent children being entrapped
keep the key out of reach and not in the vicinity of the appliance.
If disposing of an old refrigerator break off any old locks or latches as a
safeguard.
THIS APPLIANCE MUST BE EARTHED.
This appliance is fitted with a fused three pin plug to BS 1363 which will be
suitable for use in all houses fitted with sockets to current specifications.
If the fitted plug is not suitable for your socket outlets, it should be cut off
and carefully disposed of. To avoid a possible shock hazard, do not insert the
discarded plug into a socket.
Fitting a new plug
If for any reason you need to fit a new plug, the flexible mains lead must be
connected as shown here.
The wires in the mains lead fitted to this appliance are coloured in
accordance with the following code:
CONNECT
BLUE TO
NEUTRAL (N)
CONNECT GREEN
AND YELLOW TO
EARTH (E) (Note:
someappliances do
not have earth wires.)
CONNECT
BROWN TO
LIVE (L)
MAKE SURE THE CABLE IS
HELD BY THE CLAMP
If the colours of the wires in the mains lead of this appliance do not
correspond with the coloured markings identifying the terminals in your
plug, proceed as follows:
The wire which is coloured Green and Yellow MUST be connected to the
terminal which is marked with the letter E (Earth) or symbol or coloured Green.
The wire which is coloured Blue MUST be connected to the terminal which is
marked with the letter N or coloured Black. The wire which is coloured Brown
MUST be connected to the terminal which is marked with the letter L or
coloured Red.
Before refitting the plug cover, check that there are no cut or stray strands of
wire inside the plug.
Use a 13 Amp BS1362 fuse, only BSI or ASTA approved fuses should be used.
If you are in any way unsure which plug or fuse to use, always refer to a
qualified electrician.
Note: After replacing or changing a fuse on a moulded plug which has a fuse
cover, the cover must be refitted to the plug, the appliance must not be used
without a fuse cover. If lost, replacement fuse covers can be obtained from an
electrical shop.
This appliance complies with the following EEC Directives: 73 / 23 EEC
(Low VoltageDirective)
89 / 336 EEC (EMC Directive).
12
SAFETY
Locks
If your refrigerator is fitted with a lock, to prevent children being
entrapped keep the key out of reach and not in the vicinity of the
appliance. If disposing of an old refrigerator, break off any old locks or
latches as a safeguard.
The appliance was designed and manufactured in compliance with
international safety standards. The following warnings are provided
for safety reasons and must be read carefully.
WARNING
IT IS HAZARDOUS FOR ANYONE
OTHER THAN AUTHORISED SERVICE
PERSONNEL TO CARRY OUT
SERVICING OR REPAIRS WHICH
INVOLVE THE REMOVAL OF COVERS.
TO AVOID THE RISK OF AN
ELECTRIC SHOCK DO NOT ATTEMPT
REPAIRS YOURSELF.
This appliance complies with the following
Community Directives:
- 73/23/EEC of 19/02/73 (Low Voltage) and subsequent amendments;
- 89/336/EEC of 03/05/89 (Electromagnetic Compatibility)
and subsequent amendments;
- 2002/96/CE.
Information concerning disposal
Disposal of your old appliance
Old appliances are not worthless rubbish! Recycling old
appliances can reclaim valuable raw materials.
This appliance has been identified in accordance with the
European directive 2002/96/EC on Waste Electrical and
Electronic Equipment – WEEE.
The directive requires that old household electronic appliances must not
be disposed of in the normal unsorted municipal waste stream. Old
appliances must be collected separately in order to optimise the recovery
and recycling of the materials they contain and reduce the impact on
human health and the environment. The crossed out “wheeled bin” symbol
on the product reminds you of your obligation, that when you dispose of
the appliance it must be separately collected.
Consumers may take their old appliances to public waste collection areas,
other communal collection areas, or if national legislation allows return it
to a retailer when purchasing a similar new product.
Disposal of packaging
Old appliances still have some residual value. An environmentally friendly
method of disposal will ensure that valuable raw materials can be
The packaging protects your appliance from damage during
recovered and used again. The refrigerant used in your appliance and
transit. Please contribute to a better environment by disposing of
insulation materials require special disposal procedures. Ensure that none
the packaging materials in an environmentally friendly manner.
of the pipes on the back of the appliance are damaged prior to disposal.
Up
to date information concerning options for disposing of your old
Observe local environmental standards when disposing of packaging
appliance and packaging from the new one can be obtained from your
material for recycling purposes.
local council office.
Please ask your dealer or inquire at your local authority about current
means of disposal.
Redundant appliances:
Keep packaging materials out of the reach of children! It can become
a choking or suffocation hazard.
Cut off the mains plug and discard it. Refrigerators contain refrigerants
and the insulation contains gases. Refrigerant and gases must be disposed
of properly.
Ensure the tubing of the refrigerant circuit is not damaged prior to
proper disposal.
13
SAFETY
Safety and warning information
Important information when using the appliance
Before you switch ON the appliance
• This appliance is not intended for use by persons (including children)
with reduced physical, sensory or mental capabilities, or experience or
knowledge, unless they have been given supervision or instructions
concerning the use of the appliance by a person responsible for their
safety. Children should be supervised to ensure that they do not play
with the appliance.
• If the supply cord is damaged, it must be replaced by the manufacturer,
its service agent or similarly qualified persons in order to avoid a hazard.
• Never use electrical appliances inside the refrigerator (e.g. heater,
electric ice maker, etc.). Explosion hazard!
• Never use a steam cleaner to clean the appliance. The steam may penetrate electrical parts and cause a short circuit. Risk of electric shock!
• Do not store products which contain flammable propellants (e.g. spray
cans) or explosive substances in the appliances. Explosion hazard!
• Do not stand or support yourself on the base, drawers or doors, etc.
• Before defrosting and cleaning the appliance, pull out the mains plug or
switch off the fuse. Do not pull out the mains plug by tugging the cable.
• Commercially frozen pre-packed food should be stored in accordance
with the frozen food manufacturers instruction.
• Bottles containing a high percentage of alcohol must be sealed and
stored in an upright position.
• Keep plastic parts and the door seal free of oil and grease. Otherwise,
the plastic and door seal will become porous.
• Never cover or block the ventilation openings for the appliance.
• Do not store bottled or canned drinks (especially carbonated drinks)
in the ice compartment. Bottles and cans may explode!
• Never put frozen food, or ice cubes, straight from the ice compartment
into your mouth. Risk of frost burns to the lips and tongue!
• Avoid prolonged touching of frozen food, ice or the inner freezer walls
or tubing etc. Risk of frost burns to the skin.
• Do not scrape off frost or stuck frozen food with a knife or pointed
object. You could damage the refrigerant tubing. Leaking refrigerant
may ignite. Only use a plastic scraper.
• In the case of malfunction, under no circumstances should you attempt
to repair the appliance yourself. Repairs carried out by inexperienced
persons may cause injury or further malfunctioning to the appliance.
• When the appliance is unplugged please wait for 5 minutes before
plugging it in again. Otherwise, the compressor will be overloaded.
Please read the operating and installation instructions carefully. They
contain important information on how to install, use and maintain
the appliance. Keep all documentation for subsequent use or for the
next owner.
Technical safety
This appliance contains a small quantity of environmentally friendly but
flammable R600a refrigerant. Ensure that the tubing of the refrigeration
circuit is not damaged during transportation and installation. Leaking
refrigerant may ignite.
If damage has occurred
- Keep naked flames and/or ignition sources away from the appliance.
- Pull out the mains plug.
- Thoroughly ventilate the room for several minutes.
- Notify customer services.
The more refrigerant an appliance contains, the larger the room must be.
Leaking refrigerant can form a flammable gas-air mixture in rooms which
are too small. The room must be at least 1m3 per 8 g of refrigerant.
The amount of refrigerant in your appliance is indicated on the rating label
on your appliance.
• Do not use electrical appliances such as a hairdryer or heaters
near your refrigerator.
• Do not store inflammable gases or liquids inside your refrigerator.
Children in the household
• Keep children away from the packaging and its parts. Danger of
suffocation from folding cardboard and plastic film!
• Do not allow children to tamper with the controls or play with the
appliance. It is not a toy. Under no circumstances should children
be allowed to sit on the bins or hang from the door.
• If the appliance features a lock, keep the key out of the reach
of children.
General requirements
• The appliance is designed for domestic use inside the home and is not
intended for commercial or industrial use.
• The appliance must be used to store food products by adults only and
according to the instruction manual.
• Try to avoid keeping the door open for long periods or opening the
door too frequently in order to conserve energy.
• Do not fill the appliance with too much food: cold air must circulate
freely for food to be preserved properly.
NOTES
NOTES
Tel: +44(0) 113 395 6930
Fax: +44(0) 113 270 8599