1
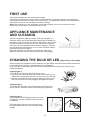
Gebrauchsanweisung
Instructions for use
Mode d’emploi
Gebruiksaanwijzing
Istruzioni per l’uso
Brugsanvisning
Bruksanvisning
Käyttöohje
Manual de utilização
Instrucciones para el uso
Instrukcje użytkowania
Használati utasítás
ИнструкциЯ за употреба
Návod k použití
Návod na použitie
Instrucţiuni de utilizare
Инструкции по эксплуатации
DEUTSCH
ENGLISH
FRANÇAIS
NEDERLANDS
ESPAÑOL
PORTUGUÊS
ITALIANO
ΕΛΛΑΣ
SVENSKA
NORSK
DANSK
SUOMI
POLSKI
ČESKY
SLOVENSKY
MAGYAR
Gebrauchsanweisung
Instructions for use
Mode d’emploi
Gebruiksaanwijzing
Instrucciones para el uso
Manual de utilização
Istruzioni per l’uso
Οδηγίες χρήοης
Bruksanvisning
Bruksanvisning
Brugsanvisning
Käyttöohje
Instrukcje użytkowania
Návod k použití
Návod na použitie
Használati utasítás
РУCCКИЙ
Инcтpyкции по экcплyaтaции
ROMANA
Instrucţiuni de utilizare
БЪЛГAРCКИ
УКРАЇНСЬКА
Инcтpyкция зa yпoтpeбa
Інструкції щодо установлення
3
Seite 4
Page 10
Page 16
Pagina 22
Página 28
Página 34
Pagina 40
Σελίδα 46
Sidan 52
Side 58
Side 64
Sivu 70
Strona 76
Strana 82
Strana 88
Oldal 94
Cтpaницa 100
Cтpaницa 106
Pagina 112
Сторінка 118
FIRST USE
Connect the appliance to the mains power supply.
A beep may be emitted by some models, to indicate that the temperature alarm has intervened:
press and hold the button to switch off acoustic alarms. As applicable, insert the anti-bacterial/antiodour filter into the fan as indicated on the filter package.
Note: after switching on, the refrigerator needs approximately 4/5 hours to reach the correct
temperature for storing a normal fridge load of food.
APPLIANCE MAINTENANCE
AND CLEANING
Clean the appliance regularly using a cloth and a solution of
lukewarm water and neutral detergent specifically formulated for
refrigerator interiors. Never use abrasive detergents. Clean inside
the defrost water drain outlet on the rear wall of the refrigerator
(near the fruit and vegetable crisper drawer) regularly, using the
tool supplied with the appliance so as to ensure defrost water is
removed correctly (see figure).
Before all cleaning or maintenance procedures, unplug the
appliance from the mains or disconnect the electricity supply.
CHANGING THE BULB OR LED (depending on the model)
Always unplug the refrigerator before replacing any light bulbs, then follow the relevant instructions
in accordance with the type of lighting fitted in your appliance.
Only use bulbs of the same type, which can be requested from the After-Sales Service and
authorised dealers.
Lighting type 1)
1.Loosen the screws and take off the lamp cover.
2.The lamp has a bayonet bulb and needs to be pulled out, not
unscrewed, following the directions of the arrows as indicated.
3.After the new bulb has been inserted, replace the lamp cover
and wait five minutes before plugging the appliance back in.
Lighting type 2)
To remove the light bulb, turn anticlockwise as shown in the
figure. Wait for 5 minutes before reconnecting the appliance.
Lighting type 3)
If the product has LED lighting which is in need
of replacing, contact the After-Sales Service for
assistance.
LED lights last longer than normal bulbs, they
illuminate better and are more environmentally
friendly
10
2
1
WHEN THE APPLIANCE IS NOT IN USE
Unplug the appliance from the mains, then empty, defrost (if necessary) and clean it. Leave the
doors ajar, so that air can circulate inside the compartments. This will prevent the formation of
mould and bad odours.
DURING BLACKOUTS
Keep the doors closed to allow the stored food to stay cold as long as possible. Do not refreeze
partially thawed food. If the blackout persists, the blackout alarm may sound (depending on the
model).
REFRIGERATOR COMPARTMENT
The refrigerator compartment is designed for the storage of fresh food and beverages.
Refrigerator compartment defrosting is completely automatic.
Droplets of water on the rear wall of the compartment indicate that the periodic automatic defrost
cycle is in progress. The defrost water is automatically routed to a drain outlet and into a container
from which it evaporates.
Depending on the model, the appliance may have a special box (“Meat & Fish” or “Zero Degrees”)
which is ideal for the storage of fresh meat and fish.
Important: refrigerator accessories must not be washed in a dishwasher.
Note: the ambient temperature, the door opening frequency and the position of the appliance may
affect temperatures inside the two compartments. Set the temperature in accordance with these
factors.
Note: when there is a lot of moisture inside the refrigerator compartment and on the glass
shelves in particular, condensation may form. In this case, we recommend closing any liquidfilled containers (e.g.: saucepans full of stock), wrapping foods with a high liquid content
(e.g.: vegetables) and setting the temperature to a warmer value.
Removing the crisper drawer (depending on the model)
If your product only has a crisper drawer, to facilitate its removal we recommend emptying
(and, if necessary, removing) the two lower door trays beforehand.
Fan and anti-bacterial/anti-odour filter (depending on the model)
The fan will ensure uniform air circulation inside the compartment, for improved food storage and
excess moisture reduction. Do not obstruct the fan inlet. The fan can be activated/deactivated
manually (see Quick Start Guide); when activated, it works automatically as necessary.
11
FREEZER COMPARTMENT
The freezer compartment
stores frozen food (for the period indicated on the package)
and freezes fresh food. The amount of fresh food that can be frozen in 24 hours is shown on the
rating plate; place the food in the freezer compartment (see Quick Start Guide), leaving leaving
enough space around the packages to allow air to circulate. Refreezing partially thawed food is not
recommended. It is important to wrap food so that no water, moisture, or vapour may penetrate.
To save energy and prolong the life of the appliance, make sure hot foods are never placed inside it.
Note: the ambient temperature, door opening frequency and position of the appliance can affect
the temperatures inside the two compartments. Set the temperature based on these factors.
Making ice cubes
Fill the ice cube tray (where provided) 2/3 full and place it in the freezer compartment. Never use
sharp or pointed objects to remove the ice.
Removing drawers (depending on model)
Pull the drawers all the way out, lift them up a little and remove. To create more space, the freezer
compartment can also be used as follows:
A) If the freezer compartment base resembles figure A, remove
the upper drawers and/or lids. The lower drawer should be left in
position. Make sure that, once the food has been placed on the
racks/shelves, the door closes properly.
B) If the freezer compartment base resembles figure B, remove all
drawers or lids. Make sure that, once the food has been placed on
the racks/shelves, the door closes properly.
Removing the lid (if present)
Open the lid and remove the pin, as illustrated in figure C.
A
B
C
DEFROSTING THE FREEZER
COMPARTMENT (depending on the model)
No Frost models do not need defrosting.
For other models, if frost forms in the freezer compartment, we
recommend it is defrosted twice a year or whenever an excessive
amount of frost has formed (3 mm thickness).
It is perfectly normal for frost to form.
The amount of frost which forms and the rate at which it builds
up depends on room temperature and humidity, and on how
often the door is opened. To defrost, unplug the appliance and
remove all foodstuffs. Leave the door ajar to allow the frost to melt.
For products with a freezer compartment below the refrigerator
compartment, the defrost water drain pipe can be removed (see
figure) and a recipient placed underneath.
After defrosting, replace the drain pipe, making sure that no water is
left in it. Clean inside the freezer compartment and dry carefully.
Switch the appliance back on and place the food back inside.
12
MEAT & FISH BOX (depending on model)
The Meat & Fish box was designed specially to keep foods fresher
for longer, without altering nutritional values or original freshness.
Do not store fruit or vegetables in this box, as the temperature may
drop below 0°C, causing water contained in the food to freeze.
Temperature Adjustment
The temperature inside the Meat & Fish box is indicated by the
position of the arm on the door of the box, and depends on the
general temperature of the refrigerator compartment.
We recommend setting the temperature of the refrigerator compartment between +2° and +6°.
To work out if the temperature inside the Meat & Fish box is correct, refer to the pictures below:
When the arm points to the left, you need
to raise the temperature in the refrigerator
compartment.
When the arm is in the middle, the
temperature is ok.
When the arm points to the right, you
need to lower the temperature in the
refrigerator compartment.
Important: when the function is activated and foods with a high water content are present,
condensation may form on the shelves. In this case, disable the function temporarily.
Removing the Meat & Fish compartment:
To ensure correct operation of the product, adequate preservation
of food and to optimise energy consumption, it is advisable not to
remove the Meat & Fish compartment if the symbol
(see Quick
Guide) is not present on the control panel. In all other cases, the
Meat & Fish compartment can be removed to obtain more space
inside the refrigerator.
Proceed as follows:
1. Remove the compartment drawer (Figure 1).
2. Remove the drawer cover by releasing the bottom side clips
(Figure 2).
To reinstate the Meat & Fish compartment, make sure to refit the
drawer cover before inserting the drawer and reactivating operation.
3. Press the “Meat & Fish compartment function” button on the
control panel for 3 seconds, until the yellow indicator goes off.
To optimise energy consumption, it is advisable to deactivate the
Meat & Fish compartment and remove its components (except the
shelf above the crisper drawers).
Fig. 1
Fig. 2
13
“ZERO DEGREES” BOX (depending on the model)
The “Zero Degrees” box is specifically designed to maintain
a low temperature and a suitable humidity level, in order to
keep foods fresher for longer (e.g. meat, fish, fruit and winter
vegetables).
Activating and deactivating the box
The temperature inside the box, when active, is approximately 0°.
To activate the compartment, press the button
shown in the figure for more than 1 second,
until the symbol lights up
The symbol lit indicates that the compartment is
functioning. Press the button again for more
than 1 second to deactivate the compartment
The following factors are vital for the “Zero Degrees” box to work properly:
- the refrigerator compartment must be switched on
- the temperature of the refrigerator compartment must be between +2°C and +6°C
- the box must be inserted to enable activation
- no special functions, such as Standby, Cooling-Off, Vacation, that disable the product or the
refrigerator compartment are selected.
If one of these special functions has been selected, the “Zero Degrees” box must be deactivated
manually, and any fresh food inside it removed.
Note:
- if the symbol does not light up when the box is activated, check that the box is properly inserted;
if the problem persists, contact your nearest authorized After-sales Service
- if the box is active and the drawer open, the symbol on the control panel may be deactivated
automatically. If the drawer is inserted, the symbol will become active again
- irrespective of the state of the box, a slight noise may be heard: this is normal and is not a cause
for concern.
- when the box is not active, the temperature inside it depends on the general temperature inside
the refrigerator compartment. In this case, we recommend it is used to store fruit and vegetables
which are not sensitive to cold temperatures (fruits of the forest, apples, apricots, carrots,
spinach, lettuce, etc.).
Important: If the function is activated and food with high water content is present, condensate
may form on the shelves. In this case, temporarily deactivate the function.
When placing small containers and food products on the top shelf of the “zero degrees”
compartment, make sure they do not accidentally fall between the drawer and the back of the
refrigerator compartment.
Removing the “Zero Degrees” box:
The “Zero Degrees” box can be removed to create more space inside the refrigerator. In this
case proceed as follows:
- to facilitate removal, we recommend emptying (and if necessary, removing) the two lower door trays
- switch off the box
- pull out the drawer and the white plastic shelf underneath the box.
14
Note: the upper shelf and the side supports cannot be removed.
To restore “Zero Degrees” box operation, make sure you replace the white plastic shelf
underneath the box before inserting the drawer and reactivating the function. To optimise energy
consumption, we recommend you deactivate the “Zero Degrees” box and remove it.
Clean the box and all its parts regularly, using a cloth and a solution of warm water and neutral
detergent specifically formulated for refrigerator interiors (take care not to immerse the white
plastic shelf underneath the box in water).
Before cleaning the box (including the outside), remove the drawer so as to disconnect
the box from the electricity supply.
Never use abrasive detergents.
AFTER-SALES SERVICE
• the Service number (the number after the
word SERVICE on the rating plate inside the
appliance)
Before contacting the After-Sales Service:
Switch the appliance on again to see if the
problem has been solved. If it has not, unplug
the appliance and wait for about an hour before
switching on again.
If the appliance is still not working after you
have gone through all the checks listed in the
troubleshooting guide and switched it off then
on again, contact the After-Sales Service to
explain the problem and have the following
information ready:
• the type of fault
• the model
• the type and serial number of the appliance
(given on the rating plate)
Note:
the door opening direction can be
changed. If this operation is performed by
the After-Sales Service it is not covered by
the warranty.
ELECTRICAL CONNECTION FOR GREAT
BRITAIN AND IRELAND ONLY
Warning - this appliance must be earthed
Fuse replacement
If the mains lead of this appliance is fitted with a BS 1363A
13amp fused plug, to change a fuse in this type of plug use an
A.S.T.A. approved fuse to BS 1362 type and proceed as follows:
1. Remove the fuse cover (A) and fuse (B).
2. Fit replacement 13A fuse into fuse cover.
3. Refit both into plug.
Important:
The fuse cover must be refitted when changing a fuse
and if the fuse cover is lost the plug must not be used until
a correct replacement is fitted. Correct replacement are
identified by the colour insert or the colour embossed in
words on the base of the plug. Replacement fuse covers are
available from your local electrical store.
For the Republic of Ireland only
The information given in respect of Great Britain will frequently apply, but a third type of plug and
socket is also used, the 2-pin, side earth type.
Socket outlet / plug (valid for both countries)
If the fitted plug is not suitable for your socket outlet, please contact After-sales Service for further instruction.
Please do not attempt to change plug yourself. This procedure needs to be carried out by a qualified
technician in compliance with the manufactures instructions and current standard safety regulations.
15
QUICK GUIDE
GB
Thermostat position reference mark
Freezing fresh food
Place the fresh food to be frozen inside the freezer compartment.
To freeze the quantity of food indicated on the rating plate, place the
food in the bottom drawer, making sure it is not touching any already
frozen food, and turn the thermostat knob half a setting to a lower
value (e.g. from 4 to 3.5).
Freezing will be complete after 24 hours: turn the thermostat knob
back to setting used before freezing.
Refrigerator and freezer compartment temperature
This Fridge/Freezer is switched on by operating the thermostat unit
inside the refrigerator compartment.
The temperature of both compartments is adjusted by turning the
thermostat knob.
Thermostat to 1/2 : minimum refrigeration
Thermostat from 3-5 : medium refrigeration
Thermostat to 6/7 : maximum refrigeration
Thermostat to • : refrigeration and light are switched off.
The fan is preset as DEACTIVATED.
It is advisable to activate the fan, by pressing the button on the base (as
shown in the figure), when the ambient air temperature goes above 27
÷ 28°C or if there are drops of water on the glass shelves or in case of
high humidity.
To optimise energy consumption it is advisable
to deactivate the fan (as shown in the figure).
Turning the thermostat knob to • switches off the entire product.
Lamp
Least cold zone
Intermediate zone
Coldest zone
Fruit & vegetable zone
Freezer Compartment
G. Top drawer or door (frozen and deep-frozen food
storage zone)
H. Middle drawer (frozen and deep frozen food storage
zone)
I. Bottom drawer (freezing zone)
L. Ice cube tray (if provided)
Note: All shelves, door trays and racks are removable.
The ideal food storage temperatures are already factoryset
Problem
Possible causes
Cure
The appliance doesn't work.
There may be an appliance power supply problem.
Make sure:
• there is not a power failure
• the plug is properly inserted in the power socket and the double-pole switch (if present) is in the correct
position (on)
• the household electrical system protection devices function
• the power cable is not broken.
• the thermostat knob is not turned to "•"
The inside light doesn't work.
The lamp may need replacing.
Disconnect the appliance from the electrical power supply, check the lamp and replace it with a new one if
necessary (see the section "Replacing the lamp or LED").
There could be various causes (see the column "Cure").
Make sure:
• the doors are properly closed
• the appliance is not installed near a heat source
• the temperature set is appropriate
• the circulation of air through the ventilation grilles at the bottom of the appliance is not obstructed.
The temperature inside the compartments isn't low
enough.
Water on the bottom of the refrigerator compartment. The defrost water drain is obstructed.
Clean the defrost water drain hole (see the section "Appliance maintenance and cleaning")
The front edge of the refrigerator is hot at the door
seal.
No cure is necessary.
This is not a problem. It is a design feature to prevent condensation from forming.
Note: Gurgling and hissing noises, caused by the refrigeration system, are normal.
Printed in Italy
Read the instructions carefully before using the
appliance.
Features, technical data and images may vary
according to the model.
01/11 - © Copyright Whirlpool Europe s.r.l. 2011. All rights reserved
Refrigerator Compartment
A. Fan and antibacterial and anti-odour filter (depending
on the model)
B. Thermostat unit with light
C. Shelves
D. Crisper cover
E. Crisper(s)
F. Rating plate (located at side of crisper)
M. Dairy compartment
N. Door trays
O. Bottle holder (if provided)
P. Bottle shelf
D
GB
F
NL
E
P
I
GR
S
N
DK
FIN
5019 608 01080
REFRIGERATORS AND FREEZERS PRODUCT FICHE
BRAND NAME
SMEG
COMMERCIAL CODE
CR5050AP
CATEGORY
Fridge/freezer combination
ENERGY EFFICIENCY CLASS
A+
Energy consumption 296 kWh per year, based on standard test results for 24 hours. Actual
energy consumption will depend on how the appliance is used and where it is located.
FREEZER CAPACITY
95 l
STAR RATING
4
REFRIGERATOR CAPACITY
162 l
TEMPERATURE OF SPECIAL COMPARTMENT
-°C
FROST FREE SYSTEM
No
TEMPERATURE RISE TIME (h)
19
FREEZING CAPACITY (kg/24h)
4.5
CLIMATE CLASS
SN-ST
This appliance is intended to be used at an ambient temperature between 10°C and 38°C.
NOISE LEVEL dB(A) re 1 pW
39
TYPE OF INSTALLATION
Built-in
CB 20 M - CB 18 M 70/30 - 18 M 50/50 - 16 M
D
MONTAGEANWEISUNG UND
ÄNDERUNG DES TÜRANSCHLAGES
PL
INSTRUKCJA MONTAŻU I
PRZESTAWIANIA DRZWI
GB
INSTALLATION INSTRUCTIONS AND
DOORS REVERSIBILITY
CZ
NÁVOD K MONTÁŽI A ZMĚNĚ
OTEVÍRÁNÍ DVEŘÍ
INSTRUCTIONS DE MONTAGE ET
REVERSIBILITE DES PORTES
SK
MONTÁŽNY NÁVOD ZMENY SMERU
OTVÁRANIA DVERÍ
MONTAGE-AANWIJZING EN VERWISSELBARE
DRAAIRICHTING VAN DE DEUREN
H
AZ AJTÓK FELSZERELÉSE ÉS AZ
AJTÓNYITÁSI IRÁNY MEGFORDÍTÁSA
F
NL
E
INSTRUCCIONES DE MONTAJE Y
REVERSIBILIDAD DE LA PUERTA
RUS МОНТАЖНЫЕ ИНСТРУКЦИИ И
P
INSTRUÇÕES PARA A MONTAGEM E
REVERSIBILIDADE DAS PORTAS
BG УКАЗАНИЯ ЗА МОНТИРАНЕТО И
I
ISTRUZIONI PER IL MONTAGGIO E
REVERSIBILITÀ PORTE
RO INSTRUCŢIUNI DE MONTAJ ŞI
GR ΟΔΗΓΙΕΣ ΤΟΠΟΘΕΤΗΣΗΣ ΚΑΙ
ПЕРЕСТАНОВКА ДВЕРЦЫ
ОБРЪЩАНЕТО НА ВРАТИТЕ
REVERSIBILITATEA UŞILOR
LT
MONTAVIMO NURODYMAI IR DURELIŲ
PERSTATYMAS
ΑΝΤΙΣΤΡΕΠΤΟΤΗΤΑΣ ΠΟΡΤΩΝ
S
ANVISNINGAR FÖR MONTERING OCH
OMHÄNGNING AV DÖRRAR
ET
PAIGALDUSJUHISED JA MUUDETAVA
AVAMISSUUNAGA UKSED
N
INSTRUKSJONER FOR MONTERING OG
OMHENGSLING AV DØRENE
LV
MONTĀŽAS NORĀDĪJUMI UN DURVJU
APMAINĀMĪBA
DK ANVISNINGER VEDRØRENDE
MONTERING OG VENDING AF DØRE
FIN
ZH
ZT
ASENNUSOHJEET JA OVIEN
KÄTISYYDEN VAIHTO
TR
KAPI AÇILMA YÖNÜNÜN TERSİNE
ÇEVRİLEBİLİRLİĞİ
UKR
ІНСТРУКЦІЇ З МОНТАЖУ ТА
ПЕРЕНАВІШУВАННЯ ДВЕРЦЯТ
adjustable RAIL SYSTEM
with cover screws
CB 20 M
CB 18 M 70/30
CB 18 M 70/30 - 2C
x4
x4
x4
x2
x1
x1
x1
x 10
x1
x2
2
CB 20 M
3
CB 18 M 70/30
4
CB 16 M
5
CB 18 M 50/50
6
min: 50 mm
2
200 cm
2
200 cm
2
200 cm
1,5 cm
2
80 cm
2
120 cm
2
200 cm
~ 120 cm
7
8
9
1
2
2
1 mm
1 mm
1 mm
1 mm
10
D
Nach der Regulierung des Scharniers sicherstellen, daß zwischen den Holztüren und den Seiten der Säule
kein direkter Kontakt besteht, um ein einwandfreies Schließen des Kühlschranks zu gewährleisten.
GB
After adjusting the appliance door/outer door connecting devices, ensure that the cupboard doors do not
come into direct contact with the cupboard sides or the appliance doors may not close properly.
D
F
NL
Après avoir réglé le guide, s’assurer que les portes en bois ne sont pas en contact direct avec les flancs du
meuble pour garantir une bonne fermeture de l’appareil.
GB
Na het afstellen van het scharnier controleren of er geen direct contact is tussen de houten deurtjes en
de zijkanten van het meubel, dit om een correcte sluiting te garanderen.
F
E
P
I
Tras haber regulado los dispositivos de acoplamiento, asegurarse de que las puertas de madera no toquen
directamente los flancos de la columna para asegurar un cierre correcto del aparato.
NL
Depois de ter regulado a guia, assegurar-se de que as portas de madeira não fiquem em contacto directo
com os flancos da coluna a fim de garantir que o aparelho feche correctamente.
Dopo aver regolato il traino assicurarsi che non ci sia contatto diretto delle portine in legno con i fianchi
S colonna per garantire una corretta chiusura del prodotto.
della
GR
Αφού ρυθμίσετε τον οδηγό βεβαιωθείτε ότι δεν υπάρχει άμεση επαφή ανάμεσα στα ξύλινα πορτάκια
και τις πλευρές της κολόνας για να εξασφαλιστεί το σωστό κλείσιμο του προϊόντος.
S
N
Kontrollera
att det inte är direktkontakt mellan trädörrarna och skåpsidorna när du har justerat beslagen
mellan apparaten och trädörrarna. Detta för att garantera att apparatens dörrar stängs ordentligt.
N
Etter å ha regulert innfestingene mellom apparatdørene og ytterdørene av tre, må man forsikre seg om at
ytterdørene av tre ikke kommer i direkte kontakt med skapsidene, ellers kan det hende at dørene ikke
DK
lukker seg ordentlig.
DK
Efter at have justeret beslagene mellem apparatets døre og køkkenskabets døre skal man sikre sig, at der
ikke er direkte kontakt mellem køkkenskabets døre og sidevægge, da apparatets døre ellers ikke kan
FIN
lukke ordentligt.
FIN
Kun laitteen/kalusteen ovien kiinnitys on säädetty, varmista että puuovet eivät kosketa kalusteen reunoja,
E laite voi sulkeutua moitteettomasti.
jotta
PL
Po wyregulowaniu zawiasy zabezpieczającej, sprawdzić czy drzwiczki drewniane nie stykają się
bezpośrednio
ze ściankami bocznymi mebla, co mogłoby uniemożliwić jego prawidłowe zamknięcie.
P
CZ
Po zregulování vleku zkontrolujte, zda nedochází k přímému styku dřevěných dvířek s boky nástavby,
I
SK
Po nastavení spojovacích súčiastok, skontrolujte či drevené dvere sa nedotýkajú bočných dielov nábytku
GR
H
A készülék tökéletes záródásának biztosítása érdekében a vezetősín beállítása után ügyeljen arra, hogy a
Отрегулировав привод, для того, чтобы гарантировать качественное закрытие прибора, убедитесь в
RUS RUS
том, что деревянные дверцы не соприкасаются с боковыми стенками стойки.
BG
След като регулирате шейната, проверете дали дървените вратички не опират направо върху
RO
După ce aţi reglat tragerea asiguraţi-vă ca nu există vreun contact direct între uşiţele de lemn cu laturile
LT
Sureguliavę prietaiso durelių/išorinių durelių jungiamuosius įtaisus, pasirūpinkite, kad medinės
durelės tiesiogiai nesiliestų su spintos kraštais, nes kitaip prietaiso durelės gali tinkamai
neužsidaryti.
PL
H
11
ET
Pärast külmiku ukse / välise ukse ühendusseadmete reguleerimist kindlustage, et kapiuksed ei
satu kapi külgedega vahetusse kontakti, sest muidu ei pruugi külmiku uksed korralikult sulguda.
LV
Pēc ierīces durvju/ārējo durvju savienošanas mehānisma samontēšanas, pārliecinieties, lai
iebūvētā skapja durvis neatduras pret skapja malām, jo pretējā gadījumā ierīces durvis
pietiekami neaizvērsies.
ZH
ZT
12
TR
Kılavuzları ayarladıktan sonra, ürünün düzgün şekilde kapanmasını garanti etmek üzere ahşap
ufak kapılar ile kolon kenarları arasında direkt temas olmadığından emin olunuz.
UKR
Після регулювання кріплень, за допомогою яких дверцята приладу приєднуються до
дверцят шафи, в яку вбудовується прилад, перевірте відсутність безпосереднього
контакту між дверцятами шафи та її боковими стінками, щоб забезпечити належне
закривання дверцят приладу.
13
14
D
GB
F
NL
E
P
I
GR
S
N
DK
FIN
PL
ÄNDERUNG DES TÜRANSCHLAGES
DOORS REVERSIBILITY
REVERSIBILITE DES PORTES
VERWISSELBARE DRAAIRICHTING VAN
DE DEUREN
REVERSIBILIDAD DE LAS PUERTAS
REVERSIBILIDADE DAS PORTAS
REVERSIBILITÀ PORTE
CZ
ZMĚNA OTEVÍRÁNÍ DVEŘÍ
SK
REVERZIBILITA DVERÍ
H
AZ AJTÓNYITÁSI IRÁNY MEGFORDÍTÁSA
ПЕРЕСТАНОВКА ДВЕРЕЙ
ОБРЪЩАЕМОСТ НА ВРАТИТЕ
RUS
BG
RO
LT
ET
ΑΝΤΙΣΤΡΕΠΤΟΤΗΤΑ ΠΟΡΤΩΝ
LV
OMHÄNGNING AV DÖRRAR
OMHENGSLING AV DØRENE
VENDING AF DØRE
OVIEN KÄTISYYDEN VAIHTO
ZH
PRZESTAWIANIE DRZWI
REVERSIBILITATEA UŞILOR
DURELIŲ PERSTATYMAS
MUUDETAVA AVAMISSUUNAGA UKSED
DURVJU APMAINĀMĪBA
ZT
TR
KAPI AÇILMA YÖNÜNÜN TERSİNE
ÇEVRİLEBİLİRLİĞİ
UKR
ПЕРЕНАВІШУВАННЯ ДВЕРЦЯТ
x2
15