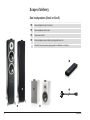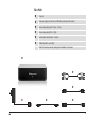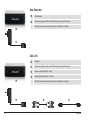
1
Owner’s Manual Xeo English All Apple products are trademarks of Apple Inc. All Sony products are trademarks of Sony Electronics Inc. All Sonos products are trademarks of Sonos Inc. Logitech Squeezebox is a trademark of Logitech Inc. An update to this manual may be necessary due to product improvements and new functions. The latest version of this manual can be found on the Dynaudio website at www.dynaudio.com/xeo 2 Dynaudio Important Safety Instructions 1. 2. 3. 4. 5. 6. 7. 8. 9. 10. 11. 12. 13. Read these instructions. Keep these instructions. Heed all warnings. Follow all instructions. Do not use this apparatus near water. Clean only with dry cloth. Do not block any ventilation openings. Install in accordance with the manufacturer‘s instructions. Do not install near any heat sources such as radiators, heat registers, stoves, or other apparatus (including amplifiers) that produce heat. Do not defeat the safety purpose of the polarized or grounding-type plug. A polarized plug has two blades with one wider than the other. A grounding type plug has two blades and a third grounding prong. The wide blade or the third prong are provided for your safety. If the provided plug does not fit into your outlet, consult an electrician for replacement of the obsolete outlet. Protect the power cord from being walked on or pinched particularly at plugs, convenience receptacles, and the point where they exit from the apparatus. Only use attachments/accessories specified by the manufacturer. Use only with the cart, stand, tripod, bracket, or table specified by the manufacturer, or sold with the apparatus. When a cart is used use caution when moving the cart/apparatus combination to avoid injury from tip-over. Unplug th is apparatus during lightning storms or when unused for long periods of time. 3 14. Refer all servicing to qualified service personnel. Servicing is required when the apparatus has been damaged in any way, such as power supply cord or plug is damaged, liquid has been spilled or objects have fallen into the apparatus, the apparatus has been exposed to rain or moisture, does not operate normally, or has been dropped. 15. WARNING: To reduce the risk of fire or electric shock, this apparatus should not be exposed to rain or moisture and objects filled with liquids, such as vases, should not be placed on this apparatus. 16. To completely disconnect this eq uipment from the mains, d isconnect the power supply cord plug from the receptacle. 17. The mains plug of the power supply cord shall remain readily operable. WARNING RISK OF ELECTRIC SHOCK! DO NOT OPEN! To reduce the risk of electric shock, do not remove the back panel and do not expose the apparatus to rain or moisture. No user serviceable parts inside. Refer servicing to qualified personnel. Never open the loudspeaker housing. 4 Dynaudio Table of Contents Safety information Xeo loudspeakers Power supply unit for Xeo Hub, Extender, and Link Scope of delivery Xeo loudspeakers (Xeo 4 or Xeo 6) Xeo Hub Xeo Extender Xeo Link 7 7 7 8 8 9 10 10 Unpacking11 Packaging material 11 Disposal11 The Xeo system 12 Components12 Combination examples 13 Remote control 14 Control elements 14 Xeo Hub 14 Display elements 15 Inputs15 Other connections and control elements 16 Connection16 Xeo loudspeakers Connections and control elements Division into audio zones Cloth cover Setting up Connecting and adjusting Switching on/standby mode Selecting a Hub or input/autoplay function Fixing the volume Interface display Xeo Extender Connections and control elements Connecting and establishing a link Xeo Link Connections and control elements Connecting and establishing a link 18 18 19 20 20 20 21 21 21 22 24 24 25 26 26 27 Malfunctions28 Technical data 29 Reminding30 IC NOTICE 31 MPE Reminding 31 5 Thank you for choosing Dynaudio Xeo. Xeo combines the latest wireless technology with impressive sound quality and makes listening to music truly comfortable and easy. The next few pages contain important information on connecting the system and its operation to ensure perfect function and the best-possible sound quality. We hope you have a great time listening to your favorite music, Dynaudio 6 Dynaudio Safety information Xeo loudspeakers WARNING Dangerous electrical voltage If the loudspeakers are connected to the mains voltage, a dangerous electrical voltage is present inside the speakers. ►► Never open the loudspeaker housing. ►► Do not operate defective loudspeakers and disconnect defective loudspeakers from the mains voltage. Please contact your Dynaudio Xeo distributor if you have any problems. Distributor addresses can be found in the Internet at www.dynaudio.com. ►► Use the supplied power cable to connect the loudspeakers to the mains voltage. Make sure that the power supply cable is not damaged; exchange it for a new one if it has been damaged. Power supply unit for Xeo Hub, Extender, and Link WARNING Dangerous electrical voltage When plugged in, a dangerous electrical voltage is present inside the housing of the supplied Xeo power supply unit for Hub, Extender, and Link. ►► Only use the delivered Xeo power supply unit. ►► Never open the housing of the power supply unit. ►► Make sure that the housing is not damaged. Exchange the power supply unit for a new one if it has been damaged. 7 Scope of delivery Xeo loudspeakers (Xeo 4 or Xeo 6) 2 Xeo loudspeakers (Xeo 4 or Xeo 6) 2 Xeo loudspeaker cloth covers 1 Xeo remote control 2 Xeo loudspeaker power cables (country-specific version) 1 Xeo first time setup manual (quick guide for installation, not shown) 8 Dynaudio Xeo Hub 1 Xeo Hub 1 Xeo power supply unit with micro USB cable (country-specific version) 1 stereo analog cable (jack 3.5 mm – 3.5 mm) 1 stereo analog cable (RCA – RCA) 1 optical digital cable (Toslink – Toslink) 1 USB cable (USB – mini USB) 1 Xeo first time setup manual (quick guide for installation, not shown) 9 Xeo Extender 1 Xeo Extender 1 Xeo power supply unit with micro USB cable (country-specific version) 1 Xeo first time setup manual (quick guide for installation, not shown) Xeo Link 10 1 Xeo Link 1 Xeo power supply unit with micro USB cable (country-specific version) 1 stereo analog cable (RCA – RCA) 1 optical digital cable (Toslink – Toslink) 1 Xeo first time setup manual (quick guide for installation, not shown) Dynaudio Unpacking After unpacking, make sure the system is complete and check the device and all accessories for transport damage. Transport damage may be expected if the packaging is already severely harmed. Do not attempt to commission a damaged device. If the contents are incomplete or damaged, please contact your Dynaudio Xeo distributor. Distributor addresses can be found in the Internet at www. dynaudio.com. Packaging material The packaging has been designed so that it may be reused if it was not damaged during transport. Keep the packaging and use the original packaging for all further transport. Disposal Disposal of used electrical and electronic equipment (applicable in European countries with separate collection systems for this equipment) This symbol on the product or its packaging indicates that the product may not be treated as household waste. Instead it must be handed over to the applicable collection point for the recycling of electrical and electronic equipment. By ensuring this product is disposed of correctly, you will help prevent potential negative consequences for the environment and human health. The recycling of materials helps to conserve natural resources. For more detailed information on recycling this product, please contact your local authority, community waste disposal office, or the shop where you purchased the product. 11 The Xeo system Xeo consists of several high-quality components that are optimally matched. When combined, they can fulfill the most demanding requirements for a wireless multi-room and multi-source system. NOTE: This manual describes all of the available Xeo components. It is possible that only a few of the descriptions are relevant to you, depending on your system configuration. Components 12 Xeo Hub The Xeo Hub is the control center for the Xeo system. Signal sources such as tuners, receivers, CD players, TVs, streaming clients, network players, MP3 players, or computers are connected to it. Signals are sent via radio from the Hub to the loudspeakers (or Xeo Link) where they are then played back. Xeo Extender The Xeo Extender extends the reception range of the Xeo Hub. As a result, Xeo loudspeakers or other Xeo components can be operated further away from the Hub. Xeo Link The Xeo Link receives wireless signals from a Xeo Hub and outputs analog and digital signals from its connections. As a result, you can also connect active subwoofers, active loudspeakers, other audio components or the Xeo Transmitter to the Xeo Link. Xeo remote control The Xeo remote control can be used to turn the loudspeakers on and off, change the volume, and select a Hub and its connected signal sources. Xeo loudspeakers The active Xeo 4 and Xeo 6 loudspeakers receive the wireless signals from the Hub and play them back in optimal sound quality. They have an integrated amplifier and can be controlled with the Xeo remote control. A display indicates the operational state of the system and lets you switch it on/off or change the volume without using the remote control. Dynaudio Combination examples Below you will find several examples of Xeo component combinations. The high level of flexibility in the Xeo system enables even more variants. Ask your Dynaudio distributor to find the perfect solution for your needs. Standard: Hub + loudspeaker Hub For a larger range: Hub + Extender + loudspeaker Hub Extender For additional active components: Hub + loudspeaker + Link This example would also be possible with only a Hub, Link, and active component. Hub Link NOTE: The Extender and Link may also be combined. 13 Connection and operation This section describes the connections and control elements for the Xeo components. Please contact your Dynaudio Xeo distributor if you have any problems with connection and start-up. Distributor addresses can be found in the Internet at www.dynaudio.com. Remote control The Xeo remote control can be used to turn the loudspeakers on and off, change the volume, and select a Hub and its connected signal sources. If the loudspeakers are being operated in stereo mode (right/left), commands will always apply to both of the loudspeakers. Control elements MUTE Mute the loudspeaker Briefly pressing this button will mute or unmute the selected loudspeaker. Fixing the volume Pressing this button for longer than 2 seconds will set a high volume for the loudspeaker (see page 21). ON/OFF Loudspeaker on/off = on = switch to standby Reset = Pressing this button for longer than 5 seconds will reset the loudspeaker to the factory settings. VOLUME Changing the volume = louder, = quieter INPUT 1/2/3/4 Selecting the signal source Selects one of the signal sources Line In, Optical In, Coax In or USB In from the active Hub. HUB A/B/C Selecting the Hub Selects one of the three possible Hubs A, B, or C. Xeo Hub The Xeo Hub is the control center for the Xeo system. Signal sources such as tuners, receivers, CD players, TVs, network players, MP3 players, or computers are connected to it. Signals are sent via radio from the Xeo Hub to the loudspeakers where they are then played back. 14 Dynaudio Display elements LED Connection status LED illuminated in blue: Connection established (to a loudspeaker, Extender, or Link). LED flashes: The Hub is searching for a connection. LED illuminated in red: The Hub could not establish a connection. Inputs 1 Aux in Input for cable with stereo jack (3.5 mm stereo) Connect devices here that have an output for the stereo jack. Line in Input for cable with RCA plug Connect devices here that have an output for the RCA plug. NOTE: If a device is connected in parallel at Aux in, only that device will be played back. 2 Optical In Input for optical digital cable (Toslink) Connect devices here that have an optical digital output. 3 Coax In Input for electrical digital cable (coax) Connect devices here that have an electrical digital output. 4 USB in Input for USB cable Connect your computer’s USB output here. The Hub will then work as a sound card. 15 Other connections and control elements Ethernet Network connection Intended for future functions. Id Transmission channel If you assign an ID, you can select the desired Hub from several Hubs using the remote control. In addition, each ID has its own transmission channel: A = 2.4 GHz, B = 5.2 GHz, C = 5.8 GHz. If the transmission quality is poor or there is a disruption caused by other radio systems, changing to a different channel may produce an improvement. Power Connection for power supply unit Connect the delivered Xeo power supply unit here. Do not use a different power supply unit! Connection ►► Connect the Hub to the mains voltage using the POWER connection and the Xeo power supply unit. Do not use a different power supply unit! Note: If you connect the Xeo Hub via a USB cable to a computer (that is switched on), you do not need an additional mains connection. ►► Connect your signal source to the appropriate input on the Hub. Below you will find a selection of signal sources and options for connecting to the Xeo Hub. Your signal source Signal source output Xeo Hub input Cable (source – Hub) Notes Notebook, MAC™, PC USB* 4: USB in USB – mini USB Optical 2: Optical In Toslink – Toslink * The Hub works as a sound card. Line out 1: Line in RCA – RCA Headphones 1: Aux in Jack 3.5 mm – 3.5 mm Headphones 1: Aux in Jack 3.5 mm – 3.5 mm Smartphone, other portable devices 16 – Dynaudio Your signal source Signal source output Xeo Hub input Cable (source – Hub) Notes Astell&Kern Headphones 1: Aux in Jack 3.5 mm – 3.5 mm – Optical 2: Optical In Toslink – Toslink PonoPlayer Jack 1: Aux in Jack 3.5 mm – 3.5 mm – Docking station, network client, Sonos, Logitech, Squeezebox, ... Line out 1: Line in RCA – RCA * If available Optical* 2: Optical In Toslink – Toslink Apple AirPort Express Optical 2: Optical In Mini Toslink – Toslink – Apple TV Optical 2: Optical In Toslink – Toslink – Hard disk, network player, CD player Line out 1: Line in RCA – RCA * If available Optical* 2: Optical In Toslink – Toslink Electrical* 3: Coax In Coax – coax – Line out 1: Line in RCA – RCA * If available Analog radio, digital radio Optical* 2: Optical In Toslink – Toslink Analog record player Line out* 1: Line in RCA – RCA * On phono preamplifier TV Headphones 1: Aux in Jack 3.5 mm – 3.5 mm Select a variant. Line out 1: Line in RCA – RCA Optical* 2: Optical In Toslink – Toslink * If available Stereo preamplifier Pre-out, main out 1: Line in RCA – RCA – Stereo power amplifier Tape out 1: Line in RCA – RCA * Disconnect bridge Pre-out, main out* 1: Line in RCA – RCA Second pre-out 1: Line in RCA – RCA Subwoofer Analog output 1: Line in RCA – RCA – AV receiver, AV processor Optical 2: Optical In Toslink – Toslink – Pre-out, main out 1: Line in RCA – RCA 17 Xeo loudspeakers The active Xeo 4 and Xeo 6 loudspeakers have an integrated amplifier and can be controlled with the Xeo remote control. The loudspeakers can be switched between stereo and mono mode using a switch on the rear. Connections and control elements Speaker position Sound adjustment (depending on the position of the loudspeakers) • Neutral = with free-standing placement • Wall = if placed near a wall • Corner = if placed in a corner Loudspeaker placement • Left = left loudspeaker for stereo mode • Mono = if only using one loudspeaker • Right = right speaker for stereo mode Speaker ID/ zone Selection of audio zones Loudspeakers assigned to different zones can be controlled separately via the remote control. The zones are identified as Red, Green, and Blue. Power Power switch • I = The loudspeaker is on. The loudspeaker can be activated and deactivated via the remote control. If the loudspeaker is activated and there is no signal, it will switch to standby mode. • O = The loudspeaker is completely off. Mains socket To connect the loudspeaker to the mains voltage. 18 Dynaudio Division into audio zones Speaker Id Red Green Blue Speaker Id Red Green Blue Speaker Id The Xeo loudspeakers (as well as Xeo Link) can be assigned to an audio zone using the Zone selector switch. All components assigned to a zone can be operated together via the remote control. Red Green Blue Green Zone Red Zone Zone Blue 19 Cloth cover The cloth cover has been designed so it does not influence the sound dispersion of the loudspeaker. The cloth cover is attached to the housing with magnets and may be removed if needed. Setting up CAUTION Spikes with pointed ends Xeo 6 floor-standing speakers are delivered with spikes for permanent installation on the floor. The pointed ends of the spikes may result in injuries and damage delicate floors. ►► Pay attention that you do not injure yourself with the spikes. ►► We recommend inserting the spikes in aluminum feet if you have delicate floors, such as parquet or laminate. ►► Position the loudspeaker in the desired location. –– Do not expose the loudspeakers to direct sunlight, heat, or moisture. –– Do not place the loudspeakers near devices with strong electromagnetic radiation or devices that could be destroyed or damaged by magnetic fields. Connecting and adjusting 1. Use the power cable to connect the loudspeaker to the mains voltage and switch it on using the power switch on the rear. 2. In stereo mode: –– Select Left operating mode for the left loudspeaker. –– Select Right operating mode for the right loudspeaker. In mono: Select Mono operating mode. 3. Select the Red, Green, or Blue zone. In stereo, select the same zone for the right and left loudspeakers. Loudspeakers with different zone settings can be controlled separately via the remote control. 20 Dynaudio Switching on/standby mode To switch the loudspeaker on from standby mode: ►► Point the remote control at the loudspeaker and press the ON button or press on the interface display. ▼▼ The loudspeaker will automatically search for an active Hub and an audio signal. If found, the signal will be output (autoplay function). If there is no input signal, the loudspeaker will go into standby mode after a certain period. ►► To switch it on again, press the ON button or . To switch a loudspeaker to standby mode: ►► Point the remote control at the loudspeaker and press the OFF button or press . ▼▼ The loudspeaker will go into standby mode. To completely switch off the loudspeaker, turn the POWER switch on the rear to OFF. However, the loudspeaker can then no longer be switched on via the remote control. Selecting a Hub or input/autoplay function After it is turned on, the loudspeaker automatically searches for an audio signal and then plays it back immediately. If several signal sources are active, one of the signal sources will be played back. Select a different Hub or input if you want to play back a different signal source. To select a different Hub or input: ►► Press HUB A, B, or C or INPUT 1, 2, 3, or 4 on the remote control. ▼▼ The selected signal source will be played back. Fixing the volume You can set the loudspeaker to a higher volume using the function to fix the volume. This setting also remains in effect in standby mode. If a signal source is connected to a Hub with its own volume control, you have the option to change the output volume across a broad range with the signal source. To fix the volume: ►► Point the remote control at the loudspeaker and press the MUTE button for longer than 2 seconds. To undo fixing, press one of the two volume buttons. 21 Interface display The display on the housing indicates the operational state of the loudspeakers and system using LEDs with various colors and flash functions. Buttons on the display On/off switch Pressing this button for longer than 2 seconds will switch the loudspeaker on or to standby mode. Input selection A brief press of this button switches between the inputs (1 → 2 → 3 → 4 → 1...). Only the inputs in use are shown. Volume control Increases or decreases the volume. LED display meanings On-state LED is illuminated in blue. The loudspeaker is switched on and an audio signal is played back. On-state LED is flashing in blue. The loudspeaker is switched on, but an audio signal cannot be found. Off-state LED is illuminated dimly in red. The loudspeaker is in standby mode. Hub connection LED is flashing in red. There is no active Hub or no connection to a Hub possible. Switch-on process LEDs are illuminated one by one. 22 The loudspeaker is being switched on. Dynaudio Switch-off process The LEDs go out one by one. In the final state, only one LED is illuminated dimly in red. The loudspeaker is being switched off. Select a Hub One of the three LEDs flashes. LED 1 = Hub A LED 2 = Hub B LED 3 = Hub C Select an input One of the four LEDs flashes. LED 1 = INPUT 1 LED 2 = INPUT 2 LED 3 = INPUT 3 LED 4 = INPUT 4 Hub search The blue LED flashes; the lights in the white LEDs move back and forth. Searching for an active input on the Hub Synchronization The red LED flashes; the lights in the white LEDs move back and forth. System synchronization Volume, mute A number of white LEDs are illuminated. The number of LEDs indicates the selected volume. The first LED flashes. The loudspeaker is muted. 23 Xeo Extender The Xeo Extender extends the reception range of the Xeo Hub. As a result, Xeo loudspeakers or other Xeo components can be operated further away from the Hub. Connections and control elements Front Left LED Right LED Both LEDs Reception status LED illuminated in blue: There is a connection to a Hub. LED flashing in red: No connection to a Hub possible. Transmission status LED illuminated in blue: There is a connection to a loudspeaker/Link. LED flashing in red: There is no connection to a loudspeaker/Link. Both LEDs are illuminated in violet: The same ID was selected for Hub Id In and Hub Id Out. This is not permitted. Rear 24 Hub Id In Reception ID Select the same ID as the the one on the Hub that provides the signal: A, B, or C. Extender Id Out Transmission ID Select a transmission ID. The reception and transmission ID may not be identical! Power Connection for power supply unit Connect the delivered Xeo power supply unit here. Do not use a different power supply unit! Dynaudio Connecting and establishing a link Hub Extender 1. Connect the Power socket to the voltage supply via the Xeo power supply unit. Do not use a different power supply unit! 2. Select the same ID on the Hub and Extender for the Hub Id In. E.g. Hub: Id = B → Extender: Hub Id In = B. 3. Select any (other) ID on the Extender for the Extender Id Out. It may not be identical to the Hub Id In. E.g. Extender Id Out = C NOTES: Two Extenders may also be used in a sequence. Select e.g. the following ID settings: • Hub: Id = A → Extender 1: Hub Id In = A, Extender Id Out = B → Extender 2: Hub Id In = B, Extender Id Out = C Only one Extender may be deployed if using two Hubs. Select e.g. the following ID settings: • Hub 1: Id = A • Hub 2: Id = B → Extender: Hub Id In = B, Extender Id Out = C 25 Xeo Link The Xeo Link receives wireless signals from a Xeo Hub or Xeo Extender and outputs analog and digital signals from its connections. As a result, you can also connect active subwoofers, active loudspeakers, or other components to the Xeo system. Xeo Link can also be connected with a 1st generation Xeo transmitter. This lets you operate both Xeo systems together. Connections and control elements Front LED Operational state LED illuminated in blue: The Link receives an audio signal and plays it back. LED is flashing in blue: There is a connection, but no audio signal is transmitted. LED is flashing in red: There is no connection to a Hub or Extender. LED illuminated in red: Xeo Link is in standby mode. Rear 26 Coax Out Output for electrical digital cable Connect devices here that have an electrical digital input (coax). Optical Out Output for optical digital cable Connect devices here that have an optical digital input (Toslink). Line out Output for cable with RCA plug Connect devices here that have an input for the RCA plug. Zone Audio zones Select the desired audio zone here. Power Connection for power supply unit Connect the delivered Xeo power supply unit here. Do not use a different power supply unit! Dynaudio Connecting and establishing a link Hub Link 1. Connect the Power socket to the voltage supply via the Xeo power supply unit. Do not use a different power supply unit! 2. Select an audio zone: Red, Green, or Blue. Use one of the outputs to connect the Xeo Link with one of the active components, e.g. the active subwoofer Dynaudio Sub 600. 3. Select the desired signal source with the remote control and control the volume. NOTES: You can assign the Xeo Link to an audio zone the same way as with the Xeo 4 and Xeo 6 loudspeakers and then control it specifically via the remote control. A Xeo loudspeaker can also be used parallel to the Xeo Link. Several active components can be connected to the Xeo Link. The signal is then output in parallel on all analog and digital outputs. The Xeo Link can also be used in conjunction with the Xeo Extender. The settings are identical for using the Xeo Extender and a Xeo loudspeaker. 27 Malfunctions Interruptions, clicking noises, or other audible interference when playing music is usually not caused by the radio transmission in the Xeo system. Often other external causes influence the transmission quality. Below are a few tips for improving transmission quality: 1. Position all radio transmitters and receivers away from each other. WLAN devices, radio receivers, and radio systems may influence each other if they are too close together. Test out various locations for each device. 2. Switch off the automatic search function in WLAN devices. WLAN devices and other radio systems permanently scan for available frequencies, thus sending signals that could disrupt other radio systems. This automatic search function can usually be switched off. 3. Xeo technology radio signals can, of course, transmit through walls. However, walls may consist of very different materials, such as wood fiberboard, stone, or even steel. The walls may also contain complex cable installations for electrics, phones, TVs, and radios, as well as water pipes and air shafts. These can divert radio signals. This is why you should test different locations for the Xeo Hub, Extender, and Link and favor the most direct radio path between the Xeo components. 4. Some electrical devices, such as microwaves, generate strong electromagnetic fields that could disrupt radio systems. Do not operate such electrical devices near Xeo components. You can ask your Dynaudio Xeo distributor for assistance at any time or contact the Dynaudio helpline at [email protected]. Further information can also be found on the Xeo website at www.xeo.dynaudio.de 28 Dynaudio Technical data Loudspeakers Xeo 4 Xeo 6 Frequency range (± 3 dB) 45 Hz – 23 kHz 31 Hz – 23 kHz Power consumption during operation 5 – 38 W 7.4 – 77 W Power consumption in standby 0.34 W (with active network) 0.35 W (with active network) Amplifier performance Woofer: 50 W, tweeter: 50 W Woofer: 2 x 50 W, tweeter: 50 W Dimensions (W x H x L) 170 x 282 x 246/246 mm 170 x 854 x 246 mm Weight 6.4 kg 14.7 kg Voltage supply 100 – 240 V, 50/60 Hz 100 – 240 V, 50/60 Hz Xeo Hub Signal frequencies Xeo Extender Xeo Link A: 2.4 GHz, B: 5.2 GHz, C: 5.8 GHz* Sampling rate for digital inputs Up to 24 bits/96 kHz – – Input voltage (typ.) RCA: 1 Vrms Mini jack: 250 mVrms – – Input impedance RCA: 11.4 kΩ Mini jack: 8.2 kΩ – – Dimensions (W x H x L) 140 x 32 x 105 mm 120 x 32 x 90 mm 120 x 32 x 90 mm Weight 0.2 kg 0.16 kg 0.16 kg Voltage supply Adapter: 100 – 240 V, micro USB: 5 V/min. 500 mA * If available 29 Reminding This device complies with Part 15 of the FCC Rules. Operation is subject to the following two conditions: (1) This device may not cause harmful interference, and (2) this device must accept any interference received, including interference that may cause undesired operation. Cet appareil est conforme à Ia section 15 des réglementations de Ia FCC. Le fonctionnement de l‘appareil est sujetaux deux conditions suivantes: (1) cet appareil ne doit pas provoquer d‘interférences néfastes, et (2) cet appareil doit tolérer les interférences reçues, y compris celles qui risquent de provoquer un fonctionnement indésirable. This equipment has been tested and found to comply with the limits for a Class B digital device, pursuant to part 15 of the FCC Rules. These limits are designed to provide reasonable protection against harmful interference in a residential installation. This equipment generates uses and can radiate radio frequency energy and, if not installed and used in accordance with the instructions, may cause harmful interference to radio communications. However, there is no guarantee that interference will not occur in a particular installation. If this equipment does cause harmful interference to radio or television reception, which can be determined by turning the equipment off and on, the user is encouraged to try to correct the interference by one or more of the following measures: • Reorient or relocate the receiving antenna. • Increase the separation between the equipment and receiver. • Connect the equipment into an outlet on a circuit different from that to which the receiver is connected. • Consult the dealer or an experienced radio/TV technician for help. Please take attention that changes or modification not expressly approved by the party responsible for compliance could void the user‘s authority to operate the equipment. 30 Dynaudio IC NOTICE This device complies with Industry Canada licence-exempt RSS standard(s). Operation is subject to the following two conditions: (1) this device may not cause interference, and (2) this device must accept any interference, including interference that may cause undesired operation of the device. Le présent appareil est conforme aux CNR d‘Industrie Canada applicables aux appareils radio exempts de licence. L‘exploitation est autorisée aux deux conditions suivantes : (1) l‘appareil ne doit pas produire de brouillage, et (2) l‘utilisateur de l‘appareil doit accepter tout brouillage radioélectrique subi, même si le brouillage est susceptible d‘en compromettre le fonctionnement. MPE Reminding This equipment should be installed and operated with a minimum distance 20 cm between the radiator and your body. (i) The device for operation in the band 5150 – 5250 MHz is only for indoor use to reduce the potential for harmful interference to co-channel mobile satellite systems; (ii) The maximum antenna gain permitted for devices in the bands 5250 – 5350 MHz and 5470 – 5725 MHz shall comply with the e.i.r.p. limit; and (ii1) The maximum antenna gain permitted for devices in the band 5725 – 5825 MHz shall comply with the e.i.r.p. limits specified for point-to-point and non point-to-point operation as appropriate. Cet équipement doit être installe et utilisé à une distance minimale de 20 cm entre le radiateur et votre corps. (i) Tout appareil destiné à la bande 5150 – 5250 MHz devra être exclusivemenl utilisé en intérieur a fin de réduire les risques de pertuarbatians électromagnétiques gênantes sur les systémes de satellite mobile dans un même canal. (ii) Les radars à forte puissance sont désignés comme les utilisateurs principaux (c‘est-à-dire qu‘ils sont prioritaires) des bandes 5250 – 5350 MHz et (iii) 5650 – 5850 MHz. IIs peuvent provoquer des perturbations electromagnetiques sur les appareils de type LELAN (réseau de communication local sans licence) ou les endommager. 31 All there is. Dynaudio A/S, 8660 Skanderborg, Denmark Sales & Marketing: Dynaudio International GmbH, Ohepark 2, 21224 Rosengarten, Germany, Phone: +49 4108 - 41 80 - 0 www.dynaudio.com © Dynaudio International GmbH, Xeo Owner’s Manual 0714 Item No. 4552612. All text and image copyrights reserved. Subject to change without notice.