1
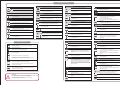
elmeg S560 / S530 System Telephone - Installation Mount and connect The system telephone can be used as a desk or wall unit. An assembly kit (not supplied) is required to attach it to a wall. In order to operate your system telephone, you must insert the cords for the telephone connector and the receiver. Connect your telephone to the elmeg hybird system's S0 or Up0 connector. Label strips: Two hooks are used to put the cover into the holder for label strips, and a magnet is used to secure it on the underside 1 2 3 4 5 6 7 8 9 10 11 12 13 14 15 16 17 18 19 20 System telephone Display 8-line graphic display with LED backlight* Loudspeaker port Function keys with LED Label field Microphone Cradle switch Magnetic clamp in label field Softkeys + / - keys for settings Key for loudspeaker / hands-free Home key Redial key Headset key Hold key Mail key Navigator with OK key Dialling keys Blue status LED Headset: You can connect a headset to the system telephone (not supplied). Connect the headset to the headset socket on the system telephone. Then insert the headset cable into the cable guide and secure it beneath the cable retainers. Connection sockets for S0 / Up0: The socket for selecting the connection is located on the underside of the system telephone. Here you can select between the S0 and Up0 connection. To do this, you press the module's two (2) clips together, take the module out and, depending on the connection type, turn it round and put it back in. The picture shows the connector for S0. The external S0 connector is connected to the »Line in« socket. Another ISDN system telephone or ISDN telephone can be connected to the "Line out" socket. The maximum length of the cable to the telephone here is 10 metres. Safety information Note the ambient temperature for storing and operating the device in the specifications. The device must only be connected once the permissible ambient operating temperature is reached. Please note that condensation may form on or within the device during transitions from cold to warm temperatures . Only remove the device from the packaging when the permissible ambient operating temperature has been reached. During a storm, you should not connect or disconnect any cables and do not make any calls. Only connect the cords to the connectors provided. Position the cords where they will not cause accidents. Avoid the following influencing factors: - Direct sunlight - Heat sources (e. g. heating elements) - Electronic devices (e. g. sound systems, office equipment or microwaves) - Penetration of humidity or liquids - Corrosive liquids or vapours - High levels of dust Do not use the device in humid or explosive areas. Only open those parts of the unit which are shown in the assembly/operating instructions. Do not touch the plug contacts with sharp, metal or damp objects. If the device is not permanently mounted, position the device or the accessory on a non-slip surface. Only clean the device with the antistatic cloth provided. Use approved accessories only. Only terminals that offer SELV (safety extra low voltage) and/or comply with ETS 300047 may be connected to the device. Proper use of approved terminals complies with this directive. Plug power supply unit Only use the plug power supply unit which is available as an accessory. Do not use any plug power supply units that show signs of damage (breaks or cracks in the casing). Electrostatic charges (ESD protection) The ESD protection that the supplied system telephone has against the effects of electrostatic charges is greater than certification values. Nonetheless, you should avoid excessive static charges. Various causes can result in the electrostatic charge achieving values that far exceed the permissible values required and that exceed the system telephone's interference immunity. Such causes or circumstances, such as low humidity and carpets, must be eliminated. The manufacturer of the system telephone accepts no liability for damages resulting from these causes. *elmeg S530 has a 4-line graphic display with LED backlight Available connections elmeg hybird System xDSL Line-in connection socket: Either S0 or Up0 Internet Line-out connection socket: S0 in every mode Public network Mini USB connection (latest release) Receiver port (handset) Headset connector Socket for the plug power supply unit (accessory) Required for the 1st and subsequent T500 key extension on the elmeg S530 / elmeg S560 and for installations for which the existing power supply is insufficient. System telephones elmeg S560 / elmeg S530 Functions Scope of supply Lift receiver, turn on Hands-free, turn on headset, or start preparatory dialling. elmeg S560 / S530 system telephone Receiver with cord Base One connector cord with RJ45 plugs Installation instructions Antistatic cloth 10 wall brackets 5 receiver brackets 20 screws for connecting the system telephone to the wall brackets 10 wood screws 3x30 10 dowels for 5 mm holes 1 drilling template Receiver bracket 5500001619 - V. 1.4 Contact Manual, software and workshops: You will find the latest manual, the Dime Manager and additional information on our website at www.bintec-elmeg.com. The connectors for the receiver and the headset must be inserted prior to fixing the wall bracket. Fix the unit to a flat wall. It is important that you get the distances between the drill holes absolutely accurate. The wall brackets are screwed on underneath, at the back of the system telephone. The system telephone is supplied without the receiver brackets for wall mounting. To mount the system telephone on the wall, the receiver bracket needs to be replaced by the receiver bracket from the assembly kit. To change it over, it can be pulled gently upwards and out. Refer to the manual for information on installation. Contact: If you have any questions about your new product, or if you require further information, the bintec elmeg GmbH Support Centre can be reached Monday to Friday, between the hours of 9 am and 5 pm, at Telephone: +49 911 9673 0 Fax: +49 911 688 0725 For detailed information about our support and service offers please visit our website at www.bintec-elmeg.com. Keys Keys When you enter a number to dial via an SIP provider, the output is only dialled around 5 seconds after entering the last digit. If you end the call number with the hash key, the system dials automatically. The terminal must be able to dial the hash key in to the telephone system. Use the Home key to go back to the Idle menu. When idle, the device info is displayed. A call is signalled. The call melody sounds. You can use this key to protect the system telephone from certain types of use. Use the Mail key to query the system's voicebox. When the key's blue LED flashes, it means there are new messages. You are in a call. Softkeys. The softkeys' available functions are shown in the bottom row in the display. The Headset key is used to switch the headset on and off. A conference call is initiated. You can use the Navigator to navigate in the display. Replace receiver, turn off hands-free or turn off headset. The system telephone is in idle status Assembly kit (not supplied) Wall mounting When the receiver is hung up: Use the Redial Last Number key to dial the last number dialled again. When the receiver is off the hook: Use the Redial Last Number key to display the last 30 numbers dialled. These keys are used to adjust the volume and the display. Wall bracket You hear the positive or negative acknowledge tone. The OK key is used to confirm and save inputs. From the Idle menu, pressing twice opens the phone book. Key 0-9, * or #: Choose call number, code, character or text. You can use the hold key to go from a call to a hold for enquiry. Pressing the key again terminates the hold and you are once more connected with the person you were first speaking to. The Loudspeaker key is used to switch the hands free or loudspeaker on and off. Important menu settings Name Entering settings Sound volume internal The receiver is hung up or lifted. Use the dialling keys to enter the name for the system telephone's internal number. Press the +/- keys to set the desired volume. The settings range from 1 - 10. Select "Menu" with the softkey. The OK key is used to save the name, and you go back to the "1st call number" menu. The OK key is used to save the volume, and you go back to the "Melody" menu. Select "Settings" with the Navigator. View the call number Use the "Right" Navigator to display the next menu for the selected row. Call numbers Select "Call numbers" with the Navigator. Use the dialling keys to enter the system telephone's internal number. Select the melody you want (1 - 20) using the +/- keys. The melody you select is shown, as a number, on the right. The OK key is used to save the number, and you go back to the "1st call number" menu. Use the "Back" softkey or the "Left" Navigator to return to the "Melody" menu. Melody Use the "Right" Navigator to display the next menu for the selected row. Enter call number 1 Use the Navigator to select the number of your system telephone which you wish to view. The OK key is used to save the volume, and you go back to the "Melody" menu. Advanced functions Repeat Use the Navigator to select the function you wish to switch on. On: The call waiting tone sounds for any call, for the duration of the call. Off: The call waiting is signalled once. The tick at the end of the row indicates which function is enabled. The OK key is used to save the function, and you go back to the "Call waiting" menu. Suppress call number Select "Suppress call number" with the Navigator. Call waiting Ring tone internal Use the "Right" Navigator to display the next menu for the selected row. The OK key is used to save the function, and you go back to the "Call waiting" menu. Press the +/- keys to set the desired volume. The settings range from 1 - 10. Use the "Back" softkey or the "Left" Navigator to return to the "1st call number" menu. Use the Navigator to select the row you wish to view. Use the Navigator to select the function you wish to switch (on / off). The tick at the end of the row indicates which function is enabled. Sound volume external Use the Navigator to select the entry you wish to edit. Ring tone internal / external, Sound volume internal / Sound volume external. Use the "Right" Navigator to display the next menu for the selected row. Use the "Right" Navigator to display the next menu for the selected row. Ring tone external Call waiting (internal calls / external calls) Select the melody you want (1 - 20) using the +/- keys. The melody you select is shown, as a number, on the right. Select "Call waiting" with the Navigator. Use the "Right" Navigator to display the next menu for the selected row. Use the "Right" Navigator to display the next menu for the selected row. Select "On" or "Off" with the Navigator. The tick at the end of the row indicates which function is enabled. Use the Navigator to select the function you wish to edit: Internal calls, external calls, repeat. Use the "Back" softkey or the "Left" Navigator to return to the "Melody" menu. The OK key is used to save the setting, and you go back to the "Settings" menu. Before the row with your telephone's name, you will see the symbol for the suppressed number (the number combination "123", crossed out). Use the "Right" Navigator to display the next menu for the selected row. Headset Acknowledge tone Select "Headset" with the Navigator. Select "Acknowledge tone" with the Navigator. Use the "Right" Navigator to display the next menu for the selected row. Use the "Right" Navigator to display the next menu for the selected row. Use the Navigator to select the headset you wish to use: No headset, Standard headset, DSHG/EHS headset. The tick at the end of the row indicates which function is enabled. Use the Navigator to select the row you wish to edit. On: The acknowledge tone is always switched on. Off: The acknowledge tone is switched off. Error tone only: The acknowledge tone is only switched on for incorrect entries. The tick at the end of the row indicates which setting is enabled. Navigation Use the "Up" and "Down" Navigator to select a row in the display. This row is highlighted. Select the highlighted row If there is a + sign to the left of the row, the next menu for the selected row will appear if you press the "Right" Navigator. Headset Return to the previous menu Use the "Left" Navigator or The OK key is used to save the function, and you go back to the "Headset" menu. the "Back" softkey to skip back to the previous display. If you press the "Home" key you return to the initial menu (the system telephone's idle status). Any existing function is aborted. Use automatically If you have connected a headset to your system telephone, you can use Auto Answer so that the headset is automatically used for certain operations . Off: The connection via the headset is not automatically accepted, only after the headset has been switched on. On: The connection via the headset is accepted immediately. Delayed: The connection via the headset is accepted after the time specified. Delete contents You can use the Navigator to select a row in the display. Use the "Delete"softkey to delete the content of the selected row and return to the previous display. Auto answer Select "Auto answer" with the Navigator. Use the "Right" Navigator to display the next menu for the selected row. Use the Navigator to select the row you wish to edit. Off: Auto answer is switched off. On: The call is immediately accepted. Delay: You do not wish to accept the call immediately, but rather after a little time. View options Use the "Options" softkey to go to the next menu. Special functions or information items are provided here. The OK key is used to save the setting, and you go back to the "Settings" menu. Quick-Dial Select "Quick-Dial" with the Navigator. Use the "Right" Navigator to display the next menu for the selected row. Press the +/- keys to specify the delay you want in 5 second increments. The value set is displayed to the right in the row. The settings range from 0 - 20. If the two blue LEDs in the status display are flashing fast, data is being saved in the system telephone or shared with the elmeg hybird. Select "On" or "Off" with the Navigator. The tick at the end of the row indicates which setting is enabled. The OK key is used to save the setting, and you go back to the "Auto answer" menu. While this is happening, it is important that the power supply to the system telephone is not cut off. The OK key is used to save the function, and you go back to the "Settings" menu. The OK key is used to save the setting, and you go back to the "Settings" menu. Status LED