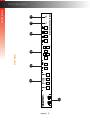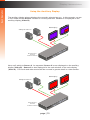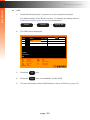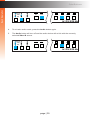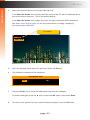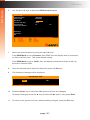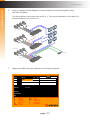
1
*Preferred
4x1 DVI KVM
Multiview Switcher
EXT-DVIK-MV-441
User Manual
Release A2
Important Safety Instructions
1.
Read these instructions.
2.
Keep these instructions.
3.
Heed all warnings.
4.
Follow all instructions.
5.
Do not use this unit near water.
6.
Clean only with a dry cloth.
7.
Do not block any ventilation openings. Install in accordance with the manufacturer’s
instructions.
8.
Do not install or place this unit near any heat sources such as radiators,
heat registers, stoves, or other apparatus (including amplifiers) that produce heat.
9.
Do not defeat the safety purpose of the polarized or grounding-type plug. A polarized
plug has two blades with one wider than the other. A grounding type plug has two
blades and a third grounding prong. The wide blade or the third prong are provided for
your safety. If the provided plug does not fit into your outlet, consult an electrician for
replacement of the obsolete outlet.
10. Protect the power cord from being walked on or pinched particularly at plugs,
convenience receptacles, and the point where they exit from the unit.
11. Only use attachments/accessories specified by the manufacturer.
12. To reduce the risk of electric shock and/or damage to this unit, never handle or touch
this unit or power cord if your hands are wet or damp. Do not expose this
unit to rain or moisture.
13. Unplug this unit during lightning storms or when unused for long periods of time.
14. Refer all servicing to qualified service personnel. Servicing is required when
the unit has been damaged in any way, such as power-supply cord or plug is
damaged, liquid has been spilled or objects have fallen into the unit,
the unit has been exposed to rain or moisture, does not operate normally,
or has been dropped.
15. Batteries that may be included with this unit and/or accessories should never be
exposed to open flame or excessive heat. Always dispose of used batteries
according to the instructions.
ii
Warranty Information
Gefen warrants the equipment it manufactures to be free from defects in material and
workmanship.
If equipment fails because of such defects and Gefen is notified within two (2) years from
the date of shipment, Gefen will, at its option, repair or replace the equipment, provided
that the equipment has not been subjected to mechanical, electrical, or other abuse or
modifications. Equipment that fails under conditions other than those covered will be
repaired at the current price of parts and labor in effect at the time of repair. Such repairs
are warranted for ninety (90) days from the day of reshipment to the Buyer.
This warranty is in lieu of all other warranties expressed or implied, including without
limitation, any implied warranty or merchantability or fitness for any particular purpose, all of
which are expressly disclaimed.
1.
Proof of sale may be required in order to claim warranty.
2.
Customers outside the US are responsible for shipping charges to and from Gefen.
3.
Copper cables are limited to a 30 day warranty and cables must be in their original
condition.
The information in this manual has been carefully checked and is believed to be accurate.
However, Gefen assumes no responsibility for any inaccuracies that may be contained
in this manual. In no event will Gefen be liable for direct, indirect, special, incidental, or
consequential damages resulting from any defect or omission in this manual, even if
advised of the possibility of such damages. The technical information contained herein
regarding the features and specifications is subject to change without notice.
For the latest warranty coverage information, refer to the Warranty and Return Policy under
the Support section of the Gefen Web site at www.gefen.com.
iii
Contacting Gefen Technical Support
Technical Support
(818) 772-9100
(800) 545-6900
8:00 AM to 5:00 PM Monday - Friday, Pacific Time
Fax
(818) 772-9120
Email
[email protected]
Web
http://www.gefen.com
Mailing Address
Gefen, LLC
c/o Customer Service
20600 Nordhoff St.
Chatsworth, CA 91311
Product Registration
Register your product here: http://www.gefen.com/kvm/Registry/Registration.jsp
iv
Operating Notes
•
In order to operate the 4x1 DVI KVM Multiview Switcher using a mouse, a 3-button
mouse is required.
•
When controlling the 4x1 DVI KVM Multiview Switcher using a keyboard, the default
hotkey is the Scroll Lock key. To define a different hotkey, refer to the section Defining
the Hotkey (page 40).
•
The display connected to Video A will support multiple sources. The display
connected to Video B will only be user to display the currently selected source and
connect display multiple sources.
4x1 DVI KVM Multiview Switcher is a trademark of Gefen, LLC.
© 2014 Gefen, LLC. All Rights Reserved. All trademarks are the property of their respective owners.
Gefen, LLC reserves the right to make changes in the hardware, packaging, and any accompanying documentation
without prior written notice.
Pb
This product uses UL or CE listed power supplies.
v
Features and Packing List
Features
•
Dual Screen Workstation Set-up: Full Screen and Multiview
•
4 Multiview Modes: Full Screen, Quad-View, PIP (Picture-In-Picture), and PAP
(Picture-And-Picture)
•
Input and Output resolutions up to 1920 x 1200 (WUXGA) and 1080p Full HD
•
HDCP 1.4 Compliant
•
Controlled via front panel, keyboard/mouse, and RS-232.
•
Comprehensive and easy-to-use On Screen Display.
•
Supports cascading of up to 8 units to create a 32 computer system controlled from
one keyboard/mouse workstation.
•
Firmware update via USB port using the Gefen Syner-G™ software
•
Locking power supply connector
•
Rack-mountable using the included brackets
1080P
Packing List
The 4x1 DVI KVM Multiview Switcher ships with the items listed below. If any of these items
are not present in the box when you first open it, immediately contact your dealer or Gefen.
•
•
•
•
•
•
•
1 x 4x1 DVI KVM Multiview Switcher
1 x 12V DC Power Supply
1 x IEC AC power cord
2 x Rack Ears
6 x Rack Ear-to-unit attachment screws
4 x Self-adhesive bump-ons
1 x Quick-Start Guide
vi
Table of Contents
1
Getting Started
Introduction............................................................................................................ 2
Front Panel..................................................................................................... 2
Back Panel..................................................................................................... 4
Installation.............................................................................................................. 7
Connection Instructions.................................................................................. 7
Sample Wiring Diagram................................................................................. 9
2
Basic Operation
Powering the Switcher......................................................................................... 12
Display Nomenclature.......................................................................................... 14
Main and Auxiliary Displays......................................................................... 14
Using the Auxiliary Display........................................................................... 15
Windows....................................................................................................... 16
Display Modes...................................................................................................... 17
Selecting the Display Mode.......................................................................... 18
Switching Sources................................................................................................ 19
Full Mode..................................................................................................... 19
PIP (Picture-In-Picture) Mode...................................................................... 22
Quad Mode.................................................................................................. 26
PAP (Picture-And-Picture) Mode................................................................. 30
Solo Buttons......................................................................................................... 33
Independent USB Switching........................................................................ 33
Independent Audio Switching....................................................................... 34
PIP & PAP Modes................................................................................................ 36
Zoom and Position (PIP Only)...................................................................... 36
Window Management in PAP Mode............................................................ 37
OSD Menu........................................................................................................... 39
Accessing the Menu System........................................................................ 39
Defining the Hotkey...................................................................................... 40
Linking / Unlinking USB................................................................................ 42
Linking / Unlinking Audio.............................................................................. 44
Linking / Unlinking Video B.......................................................................... 46
OSD Timeout............................................................................................... 48
Titlebar Timeout........................................................................................... 50
Show PC Name............................................................................................ 52
Show Video Signal....................................................................................... 54
Output Resolution........................................................................................ 56
Shrink Control.............................................................................................. 58
EDID Mode................................................................................................... 60
One-Click Switching..................................................................................... 62
PIP Scan Period........................................................................................... 64
Load Factory Default.................................................................................... 66
viii
Table of Contents
Read Monitor EDID...................................................................................... 68
Upgrade Firmware....................................................................................... 70
Changing the Source Name......................................................................... 71
3
Advanced Operation
Cascading............................................................................................................ 76
RS-232 Interface.................................................................................................. 81
RS-232 Interface.......................................................................................... 81
RS-232 Settings........................................................................................... 81
Commands........................................................................................................... 82
4Appendix
Default Settings...................................................................................................116
OSD........................................................................................................... 116
Hotkeys...................................................................................................... 117
Firmware Upgrade..............................................................................................119
Using the USB Port.................................................................................... 119
Using the RS-232 Port............................................................................... 120
Using the OSD........................................................................................... 121
Specifications..................................................................................................... 122
ix
4x1 DVI KVM
Multiview Switcher
1
Getting Started
page | 2
1
USB
EXT-DVIK-MV-41
USB
USB
®
Main
12V DC
1
2
3
RS-232 In
USB
Video B
Audio
2
RS-232 Out
4
USB
USB
Keyboard
Audio
USB
Mouse
Workstation
Video A DVI-D
Solo
3
4
Video B DVI-D
Mic L/R Out
Front Panel
Mic
Source 1
DVI-D In
L/R In USB Host
Select
Menu/Back
Mic
Full
Quad
PAP
Reset
6
Power
7
Source 2
DVI-D In
L/R In USB Host
Mic
Source 3
DVI-D In
L/R In USB Host
Mic
Source 4
DVI-D In
L/R In USB Host
4x1 DVI KVM Multiview Switcher
PIP
5
Getting Started
Introduction
Page Title
Getting Started
Introduction
Page Title
ID
Name
Description
1
USB
Connect a USB device to each of these
USB ports.
2
Source selection (1 - 4)
Press these buttons to select the
video / audio / USB source.
See Switching Sources (page 19) for
more information.
3
Solo (USB, Audio)
These buttons allow separate (unlinked)
selection of USB an audio sources.
When either button is illuminated, the
Source selection (1 - 4) buttons select
the USB or audio source instead of the
Video A source.
4
OSD buttons
Use these buttons to control the built-in
On-Screen Display (OSD). See OSD
Menu (page 39) for more information.
5
Display mode
Press these buttons to select the desired
display mode. See Selecting the Display
Mode (page 18) for more information.
6
Reset
Use a sharp-pointed object to depress
this button and reset the unit.
7
Power
This LED indicator will glow solid blue
when power is applied to the unit.
page | 3
USB
EXT-DVIK-MV-41
USB
1
USB
®
Main
2
12V DC
3
1
2
3
RS-232 In
4
USB
Video B
Audio
5
RS-232 Out
4
USB
USB
Keyboard
page | 4
USB
Mouse
7
Workstation
6
9
Video B DVI-D
Mic L/R Out
8
Back Panel
Audio
Video A DVI-D
Solo
Mic
10
12
Source 1
DVI-D In
L/R In USB Host
11
Select
Menu/Back
Mic
Full
Quad
PAP
Reset
Power
Source 2
DVI-D In
Mic
13
L/R In USB Host
Source 3
DVI-D In
L/R In USB Host
Mic
Source 4
DVI-D In
L/R In USB Host
4x1 DVI KVM Multiview Switcher
PIP
Getting Started
Introduction
Getting Started
Introduction
ID
Name
Description
1
Grounding terminal
Connect a grounding wire from this
terminal to an approved Earth ground.
2
Main
Press this switch to power-on or poweroff the unit.
3
12V DC
Connect the included power supply from
this power receptacle to an available
electrical outlet.
4
RS-232 In
Connect an RS-232 cable from this
power to an RS-232 controller.
5
RS-232 Out
Connect an RS-232 cable from this port
to the RS-232 device to be controlled.
6
Keyboard / Mouse
Connect a keyboard and mouse to these
USB ports.
7
Video A / Video B
Connect a DVI cable from each of these
ports to a DVI display. The Video A port
is the main display and supports multiple
windows. Video B is the auxiliary
display. See Display Nomenclature
(page 14) for more information.
8
Mic (Workstation)
Connect a 3.5mm mini-stereo cable
from this jack to the Mic jack on the
workstation computer.
9
L/R Out
Connect a 3.5mm mini-stereo cable from
this jack to a pair of powered speakers.
10
Mic
(Source 1 - Source 4)
Connect a 3.5mm mini-stereo cable from
this jack to the Mic jack on the source
computer.
11
L/R In
(Source 1 - Source 4)
Connect a 3.5mm mini-stereo cable
from this jack to the Line Out jack on the
computer.
(continued on next page)
page | 5
Getting Started
Introduction
ID
Name
Description
12
USB Host
(Source 1 - Source 4)
Use USB cables to connect up to four
computers to these USB ports.
13
DVI-D In
(Source 1 - Source 4)
Connect up to four computer sources to
these ports using DVI cables.
page | 6
Installation
Menu/Back
Getting Started
Full
PIP
Quad
PAP
Connection Instructions
Reset
►► Video Source
1.
Power
4x1 DVI KVM Multiview Switcher
Select
Use DVI cables to connect a DVI source (e.g. computer) to each one of the DVI-D In
ports (Source 1 - Source 4) on the rear panel. Note that only DVI-D (digital) sources
are supported.
►► Audio Source
2.
Connect 3.5mm mini-stereo cables from the audio output on the computer to the L/R
In jacks on the rear panel.
►► USB (Host)
3.
Connect USB cables from each computer to the USB Host ports on the read panel.
Mic L/R Out
Mic
L/R In USB Host
Mic
Mic
L/R In USB Host
Mic
L/R In USB Host
Solo
Video B
AudioDVI-D In
Video B DVI-D
L/R In USB Host
USB
Menu/Back
Audio
DVI-D In
DVI-D In
DVI-D In
Source 3
Source 4
F
USB
Source 1
1
2
3
Source 2
4
Select
►► Displays
4.
Connect a DVI display to each of the Workstation ports (Video A DVD-D and Video B
DVI-D). Note that the display connected to Video A will support multiple sources.
The display connected to Video B will only be used to display the currently selected
source and cannot display multiple sources.
►► Mouse & Keyboard (Switcher Control)
5.
Connect a computer keyboard to the Keyboard USB port. Connect a mouse device
to the Mouse USB port. To take advantage of all the control features, we recommend
a mouse that has a scroll wheel.
Keyboard
USB
Mouse
RS-232 In
RS-232 Out
Workstation
page | 7
Mic
L/R In USB Host
USB
Video A DVI-D
12V DC
Mic L/R Out
Video B DVI-D
DVI-D In
Source 1
Getting Started
Installation
►► Audio Output
6.
Connect a 3.5mm mini-stereo cable from the L/R Out jack to a pair of powered
speakers.
►► RS-232 (optional)
7.
Connect an RS-232 cable from the automation control device to the RS-232 In port.
8.
Connect another RS-232 cable from the RS-232 Out port to another 4x1 DVI KVM
Multiview Switcher. Up to eight 4x1 DVI KVM Multiview Switchers can be daisychained together. See Cascading (page 76) for more information.
►► USB (computer control)
9.
Connect up to two USB devices (e.g. keyboard, mouse, USB drive, etc.) to these
ports. Depending upon which source is selected, the USB device can be used by
a different computer.
®
®
USB
USB
Solo
USB
Audi
Audio
USB
USB
USB
USB
Solo
Video B
Audio
Video B
USB
Audio
1
USB
USB
1
2
2
3
3
4
4
►► Grounding
9.
Connect a grounding wiring from the grounding terminal to an approved Earth ground.
►► Power
10. Connect the included power supply to the 12V DC power receptacle on the 4x1 DVI
KVM Multiview Switcher.
11. Connect the included AC cable from the power receptacle to an available electrical
outlet.
EXT-DVIK-MV-41
EXT-DVIK-MV-41
Ke
Keyboa
Video A
USB
Main
Main
12V DC
12V DC
page | 8
RS-232 In
RS-232 In
RS-232 Out
RS-232 Out
Video A DVI-
Installation
Getting Started
Sample Wiring Diagram
Daisy-Chain
to a second
EXT-DVIK-MV-41’s
RS-232 In
RS-232 CABLE
USB CABLE
3.5mm MINI-STEREO CABLE
MIC CABLE
DVI CABLE
RS-232
Automation
Control Device
4x
Multimedia
PC/Servers
RS-232
In
RS-232
Out
Powered
Speakers
DVI Display
EXT-DVIK-MV-41
DVI KVM
Multiview Switcher
Mouse
USB Printer
Mic
Keyboard
USB External HDD
DVI Display
page | 9
EXT-DVIK-MV-41
4x1 DVI KVM
Multiview Switcher
2
Basic Operation
Powering the Switcher
Basic Operation
1.
Before powering-on the 4x1 DVI KVM Multiview Switcher, make sure all devices and
the power supply are connected, as outlined under Installation (page 7).
Video B
Audio
®
USB
DVI Displays
Computer USB
Sources
USB
A
1
USB
B
1
2
3
4
2
3
4
EXT-DVIK-MV-41
DVI KVM
Multiview Switcher
2.
Keyboard / Mouse
Press the Main (power) button on the back panel so that the top-portion, marked with
an “I”, is flush with the back panel
Unit is powered
EXT-DVIK-MV-41
Main
3.
12V DC
RS-232 In
The Power indicator on the front of the unit will glow solid blue. In addition, both the
Quad display mode and Source 1 buttons will be selected (illuminated), as shown:
Menu/Back
Solo
Video B
Audio
®
USB
Audio
Full
PIP
Quad
PAP
USB
Reset
USB
Power
USB
USB
1
2
3
4x1 DVI KVM Multiview Switcher
Select
4
page | 12
EXT-DVIK-MV-41
Keyboard
USB
Mouse
USB
Mic L/R Out
Mic
L/R In USB Host
Mic
L/R In USB Host
Mic
L/R In USB Host
Mic
L/R In USB Host
RS-2
Powering the Switcher
Basic Operation
4.
Power-on all computer sources. The image from each source will be combined on
a single screen on the display connected to Video A. The currently selected source
(Source 1, by default) will be shown on the display connected to Video B.
DVI Displays
2
1
4
3
Computer Sources
A
1
1
B
2
3
4
Keyboard / Mouse
EXT-DVIK-MV-41
DVI KVM
Multiview Switcher
The window layout for Quad mode, on Video A, is arranged as follows:
Solo
eo B
dio
®
SB
USB
Menu/Back
Solo
Video B
Audio
Audio
USB
Menu/Back
Audio
Full
PIP
Quad
PAP
Full
P
USB
Reset
Power
USB
USB
3
4
1
2
4
Keyboard
USB
Mouse
USB
Video A DVI-D
RS-232
MainOut
12V DC
RS-232 In
Workstation
4x1 DVI KVMSelect
Multiview Switch
Select
1
V-41
-232 In
3
2
Mic L/R Out
3
Mic
L/R In USB Host
KeyboardMic Mouse
L/R In USBMic
HostL/R Out
Mic
4
USB
Video B DVI-D
DVI-DVideo
In
A DVI-D
RS-232 Out
Source 1
page | 13
L/RMic
In USB
L/R Host
In USB Host
Mic L/RMic
In USB
L/RHos
In
USB
DVI-D Video
In
B DVI-D
Workstation
Source 2
DVI-D In DVI-D In
DVI-D In DVI-D
Source 3Source 1
Source 4Sourc
n
Basic Operation
3
Solo
Menu/Back
Audio
DisplayUSBNomenclature
Full
PIP
Main and Auxiliary Displays
4
Quad
4x1 DVI
Select
The 4x1 DVI KVM Multiview Switcher uses has two output ports on the rear panel: Video
A and Video B. The Video A port is used to display the video modes (Full, PIP, Quad, and
PAP) and is referred to as the main display.
The Video B port is used to display the currently selected source and is referred to as the
auxiliary display. Each of these displays serve a unique function and cannot be changed.
For example, the auxiliary display can never display more than one source at a time.
Video A
Video B
Keyboard
USB
Mouse
Mic L/R Out
L/R In USB Host
Mic
L/R In USB Host
USB
Video A DVI-D
RS-232 Out
Mic
Video B DVI-D
Workstation
Main display (Video A)
DVI-D In
DVI-D In
Source 1
Source 2
Auxiliary display (Video B)
Information
Video A is scaled and the resolution can be set using the #set_output
command. Video B is pass-through and cannot be scaled.
page | 14
Mi
Basic Operation
Display Nomenclature
Using the Auxiliary Display
The auxiliary display always displays the currently selected source. In this example, we are
in PIP mode and the Source 1 button is currently selected. Source 1 is displayed on the
auxiliary display (Video B).
DVI Displays
Computer Sources
2
1
A
1
1
B
2
EXT-DVIK-MV-41
DVI KVM
Multiview Switcher
Now, we’ll switch to Source 2. As expected, Source 2 is now displayed on the auxiliary
display (Video B). Source 2 is also displayed in the main window of the main display
(Video A). PIP mode and other modes will be covered in greater detail in a later section.
DVI Displays
Computer Sources
2
2
A
2
1
B
2
EXT-DVIK-MV-41
DVI KVM
Multiview Switcher
page | 15
Basic Operation
Display Nomenclature
Windows
When we talk about a window, we are referring to an individual source (image) within one
of the multiple-source display modes: PIP, Quad, or PAP.
Source 1
Source 2
®
USB
USB
Source 4
Menu/Back
Audio
Full
PIP
Quad
PAP
USB
1
USB
USB
Source 3
Solo
Video B
Audio
1
2
3
4
Keyboard
USB
Mouse
RS-232 In
RS-232 Out
Mic L/R Out
Video B DVI-D
Workstation
1
Mic
Power
L/R In USB Host
Mic
L/R In USB Host
Mic
L/R In USB Host
Mic
L/R In USB Host
USB
Video A DVI-D
12V DC
Reset
4x1 DVI KVM Multiview Switcher
Select
EXT-DVIK-MV-41
Main
4
3
2
DVI-D In
DVI-D In
DVI-D In
DVI-D In
Source 1
Source 2
Source 3
Source 4
1
2
Main display
Auxiliary display
By definition, a subordinate window can always be switched with a main window. PIP and
PAP modes contain both main and subordinate windows.
subordinate
main
main
subordinate
subordinate
subordinate
Full mode contains a single window. Quad mode contains four fixed windows:
subordinate
subordinate
subordinate
subordinate
main
page | 16
Basic Operation
Display Modes
The Video A port on the 4x1 DVI KVM Multiview Switcher provides the ability to display up
to four DVI sources, simultaneously. The 4x1 DVI KVM Multiview Switcher comes with 4
display modes: Full, PIP (Picture-In-Picture), Quad, and PAP (Picture-And-Picture).
Full
Displays a full-screen image of the
selected source (1 - 4).
1
PIP (Picture-In-Picture)
Displays any two sources, in
separate windows, on a single
screen: The main (larger) window
and the subordinate (smaller)
window. The subordinate window
can be re-sized and repositioned.
See PIP & PAP Modes (page 36)
for details.
1
2
Quad
1
2
3
4
Displays all four sources on a
single screen. Each window
displays a single source. The
window order cannot be changed.
PAP (Picture-And-Picture)
1
2
3
4
Displays all four sources on a
single screen: The main (larger)
window and 3 subordinate
(smaller) windows. The main
window can “swapped” with any of
the subordinate windows.
page | 17
Basic Operation
Display Modes
Selecting the Display Mode
The 4x1 DVI KVM Multiview Switcher comes with 4 display modes. Of these 4 display
modes, both PIP and PAP display modes allow you to switch the main window to a
subordinate window. In the case of PIP mode, the subordinate window can be repositioned
to any location on the display and can be re-sized, if desired.
There are several ways to switch to a display mode. The most straightforward method is
to use the buttons on the front panel. In the next section, we will cover these methods and
how to switch the sources within each display mode.
Full
Menu/Back
Full
PIP
Quad
PAP
Reset
1
Power
4x1 DVI KVM Multiview Switcher
Select
PIP (Picture-In-Picture)
Menu/Back
Full
PIP
Quad
PAP
1
Reset
Mic
Video B DVI-D
L/R In USB Host
2
4x1 DVI KVM Multiview Switcher
Select
Mic L/R Out
Power
Mic
DVI-D In
L/R In USB Host
Mic
L/R In USB Host
Mic
L/R In USB Host
DVI-D In
DVI-D In
DVI-D In
Source 2
Source 3
Source 4
Quad
Source 1
Menu/Back
Full
PIP
Quad
PAP
Reset
4x1 DVI KVM Multiview Switcher
Select
Mic L/R Out
Mic
Video B DVI-D
L/R In USB Host
Power
Mic
DVI-D In
L/R In USB Host
Mic
Full
Mic
DVI-D In
DVI-D In
Source 2
Source 3
Source 4
PIP
Quad
Video B DVI-D
L/R In USB Host
Power
4x1 DVI KVM Multiview Switcher
Select
Mic
Mic
L/R In USB Host
Mic
3
4
PAP
Reset
Mic L/R Out
2
L/R In USB Host
DVI-D In
PAP (Picture-And-Picture)
Source 1
Menu/Back
L/R In USB Host
1
L/R In USB Host
Mic
L/R In USB Host
page | 18
DVI-D In
DVI-D In
DVI-D In
DVI-D In
Source 1
Source 2
Source 3
Source 4
1
2
3
4
Switching Sources
Basic Operation
Switching sources can be accomplished by using the Source buttons on the front panel,
the mouse, function keys, or using predefined hot-key bindings. Hotkey assignments can
be user-defined as needed. In order to operate the Switcher using a mouse, a 3-button
mouse is required.
Full Mode
►► Front panel
1.
Press the Full button to enter Full mode.
2.
Press the desired source button (1 - 4).
3.
The currently selected source will be displayed on both Video A and
Video B.
Solo
Video B
Audio
USB
®
USB
Menu/Back
Solo
Video B
Audio
Audio
USB
Menu/Back
Audio
Full
PIP
Quad
PAP
Full
USB
Reset
USB
2
USB
USB
3
1
4
2
3
4
4x1 DVI KVMSelect
Multiview Sw
Select
Source buttons
Full button
►► Mouse
DVIK-MV-41
1.
Click the middle mouse button / wheel to display the mode menu on the
Video A display.
2.
Left-click the Full mode icon.
3.
A drop-down menu will be displayed.
Keyboard
USB
Mouse
Video A DVI-D
RS-232 In
RS-232
MainOut
12V DC
Mic L/R Out
Mic
L/R In USB Host
KeyboardMic Mouse
L/R In USBMic
HostL/R Out
Mic
USB
USB
Video B DVI-D
01
RS-232
Workstation
02 In
RS-232 Out
03
04
page | 19
DVI-DVideo
In
A DVI-D
Source 1
L/RMic
In USB
L/R Host
In USB Host
Mic L/RMic
In
USB
DVI-D Video
In
B DVI-D
Workstation
Source 2
DVI-D In DVI-D In
DVI-D
Source 3Source 1
Sourc
Basic Operation
Switching Sources
4.
The currently selected source will be indicated by a “dash”, as shown:
01
Current source
02
03
04
5.
Left click the desired input (1 - 4) from the drop-down menu.
6.
The selected source will be shown on both Video A and Video B.
7.
Click the middle mouse button / wheel to dismiss the Display Mode menu.
►► Keyboard
1.
Press the following keys, in sequence, on the computer keyboard.
The default hotkey is the Scroll Lock key. To reassign the hotkey refer to
Defining the Hotkey (page 40) for more information.
hotkey
+
hotkey
+
F
+
X
Where X is a number on the keyboard from 1 to 4. This number represents
the source to be displayed.
For example, to switch to Full mode and display the source connected
to Source 3, use the following keystrokes:
hotkey
2.
+
hotkey
+
F
+
3
The selected source will be shown on both Video A and Video B.
page | 20
Basic Operation
Switching Sources
►► OSD
1.
Press the following keys, in sequence, on the computer keyboard.
The default hotkey is the Scroll Lock key. To reassign the hotkey refer to
Defining the Hotkey (page 40) for more information.
+
hotkey
2.
hotkey
+
Space Bar
The OSD will be displayed.
Input
Name
01
PC01
02
PC02
03
PC03
04
PC04
Select
VID USB AUD USB VID-A VID-B PIP
z
z
X
X
X AUD USB VID-A VID-B
PIP
X
X
X
Settings
Information
Exit
F1
F2
F3
F4
Ins
Home
Full view
PIP view
Quad view
PAP view
Edit
Video B
Esc
Enter
A
H
I
Exit
Select
Switch Audio
Switch USB
PIP display
Main menu
3.
Press the
4.
The selected source will be shown on both Video A and Video B.
5.
Press the
6.
Use the keyboard, mouse, or front panel buttons to set the source for the
main window and the subordinate window.
7.
For more information about OSD features, refer to OSD Menu (page 39).
F1
Esc
key.
key to immediately exit the OSD.
page | 21
Switching Sources
Basic Operation
PIP (Picture-In-Picture) Mode
►► Front panel
1.
Press the PIP button to enter PIP mode.
2.
Press the desired source button (1 - 4).
3.
The selected source will be shown on both Video B and in the main
window on Video A.
Solo
Video B
Audio
USB
®
USB
Menu/Back
Solo
Video B
Audio
Audio
USB
Menu/Back
Audio
Full
PIP
Quad
PAP
Full
USB
Reset
USB
USB
USB
3
2
1
4
2
3
4
4x1 DVI KVMSelect
Multiview Sw
Select
Source buttons
4.
DVIK-MV-41
Video B
Audio
Once the desired source for the main window is selected, press the PIP
button again to select the subordinate window. When the PIP button is
pushed again, it will blink rapidly.
Solo
USB
®
USB
Keyboard
Audio
USB
VideoMouse
B
Audio USB
2
3
RS-232USB
In
DVIK-MV-41
Menu/Back
Solo
Mic
L/R In
USB Host
KeyboardMic Mouse
L/R In USBMic
HostL/R Out
Mic
USB
Audio
USB
Video B DVI-D
Full
DVI-DVideo
In
A DVI-D
USB
PIP
Quad
DVI-D Video
In
B DVI-D
Menu/Back
L/RMic
In
USB
L/R Host
In USB Host
Mic L/RMic
In
PAP
DVI-D In DVI-D In
Reset
Full
DVI-D
USB
4RS-232
MainOut
1 DC
12V
2
3
RS-232 In
Workstation
4RS-232 Out
Select
4x1 DVI KVM
Multiview
Sw
Source 3Source
1
Sourc
Select
Source 1
Workstation
Source 2
5.
Select the desired source for the subordinate window using the source
buttons.
6.
The selected source will be on both Video B and in the subordinate window
of Video A.
7.
Press the PIP button a third time to complete the source selection process.
8.
The PIP button will glow solid blue.
9.
The subordinate window can be re-sized and repositioned on Video A.
See PIP & PAP Modes (page 36) for more information.
Keyboard
USB
Mouse
RS-232
MainOut
12V DC
Mic L/R Out
Mic
L/R In USB Host
KeyboardMic Mouse
L/R In USBMic
HostL/R Out
Mic
USB
Video A DVI-D
RS-232 In
Mic L/R Out
USB
Video A DVI-D
USB
PIP button
RS-232 In
Workstation
USB
Video B DVI-D
RS-232 Out
page | 22
DVI-DVideo
In
A DVI-D
Source 1
L/RMic
In USB
L/R Host
In USB Host
Mic L/RMic
In
USB
DVI-D Video
In
B DVI-D
Workstation
Source 2
DVI-D In DVI-D In
DVI-D
Source 3Source 1
Sourc
Basic Operation
Switching Sources
►► Mouse
1.
Click the middle mouse button / wheel to display the mode menu on the
Video A display.
2.
Left-click the PIP mode icon.
3.
A drop-down menu will be displayed. The drop-down menu will be
separated into two panels, as shown.
The top panel controls the main window. The bottom panel controls
the subordinate window.
Main
01
02
03
04
Sub
01
02
03
04
4.
The currently selected source, for each window, will be indicated
by a “dash”, as shown:
Main
01
Current main source
02
03
04
Sub
01
02
Current sub source
03
04
page | 23
Basic Operation
Switching Sources
5.
Left click the desired input (1 - 4) from the drop-down menu for the main
window on Video A. The selected source will also be displayed on Video
B.
6.
Left click the desired input (1 - 4) from the drop-down menu for the
subordinate window on Video A. The selected source will also be displayed
on Video B.
7.
The selected sources, for each window, will be displayed on Video A.
8.
Click the middle mouse button / wheel to dismiss the Display Mode menu.
►► Keyboard
1.
To set the source for the main window, press the following keys,
in sequence, on the computer keyboard.
The default hotkey is the Scroll Lock key. To reassign the hotkey refer to
Defining the Hotkey (page 40) for more information.
hotkey
2.
+
hotkey
+
I
+
X
To set the source for the subordinate window, press the following keys,
in sequence, on the computer keyboard:
hotkey
+
hotkey
+
P
+
X
In both cases, X represents the number of the source to be displayed.
For example, to switch to PIP mode and set Source 1 to the main window
and Source 4 to the subordinate window, use the following keystrokes:
hotkey
+
hotkey
+
I
+
1
hotkey
+
hotkey
+
P
+
4
The main and subordinate windows can be assigned in any order.
page | 24
Basic Operation
Switching Sources
►► OSD
1.
Press the following keys, in sequence, on the computer keyboard.
The default hotkey is the Scroll Lock key. To reassign the hotkey refer to
Defining the Hotkey (page 40) for more information.
+
hotkey
2.
hotkey
+
Space Bar
The OSD will be displayed.
Input
Name
01
PC01
02
PC02
03
PC03
04
PC04
Select
VID USB AUD USB VID-A VID-B PIP
z
z
X
X
X AUD USB VID-A VID-B
PIP
X
X
X
Settings
Information
Exit
F1
F2
F3
F4
Ins
Home
Full view
PIP view
Quad view
PAP view
Edit
Video B
Esc
Enter
A
H
I
Exit
Select
Switch Audio
Switch USB
PIP display
Main menu
3.
Press the
22
F2
key.
4.
Press the
Esc
5.
Use the keyboard, mouse, or front panel buttons to set the source for the
main window and the subordinate window.
6.
For more information about OSD features, refer to OSD Menu (page 39).
key to immediately exit the OSD.
page | 25
Switching Sources
Basic Operation
Quad Mode
Quad mode allows four all sources (Source 1 - Source 4) to be displayed on Video A.
The order and size of each window cannot be changed. Each window is associated with
a source: Window 1 = Source 1, Window 2 = Source 2, and so on.
Source 1
Source 2
1
2
3
4
Source 3
Source 4
The currently selected source will always be highlighted with a red outline. In the
illustration, below, Source 1 is the currently selected source.
Source 1 selectedSolo
Video B
Audio
®
USB
Menu/Back
Audio
Full
P
USB
USB
USB
1
2
3
4
Select
Red outline
1
2
V-41
Keyboard
USB
Main
12V DC
3
RS-232 In
page | 26
Mic L/R Out
Mic
L/R In USB Host
Mic
L/R In
USB
Video A DVI-D
RS-232 Out
Mouse
Video B DVI-D
4
Workstation
DVI-D In
DVI-D
Source 1
Sourc
Switching Sources
Basic Operation
►► Front panel
1.
Press the Quad button.
2.
Press the desired source button (1 - 4).
3.
The selected source will be displayed on both Video B and in the
associated window of Video A.
Solo
Video B
Audio
USB
®
USB
Menu/Back Solo
Video B
Audio
Audio
USB
Menu/Back
Audio
Full
PIP
Quad
PAP
Full
USB
Reset
USB
Po
USB
3 USB
1
4
2
3
4
Select
4x1 DVI KVM Multiview
Swit
Select
Source buttons
Quad button
►► Mouse
DVIK-MV-41
1.
Click the
middle
mouse
button /Micwheel
to display
theInmode
menu
on the
Keyboard
Mouse
Mic L/R Out
L/R In USB Host Keyboard
Mic L/R Mouse
USB HostMic L/R
Mic
OutL/R In Mic
USB Host
L/R In
Video A display.
USB
RS-232 In
USB
USB
2.
Video A DVI-D
B DVI-Dicon.
Left-click
the QuadVideo
mode
3.
DC
RS-232 In will beRS-232
Out
A 12V
drop-down
menu
displayed.
Workstation
Source 1
RS-232Main
Out
DVI-D In
01
02
03
04
page | 27
Mic
USB Host
L/R In USB
Mic
USB
Video A DVI-D
DVI-D In
Workstation
Source 2
Video B DVI-D
DVI-D In
DVI-D In
DVI-D In
Source 3
Source 1
Source 4
Basic Operation
Switching Sources
4.
The currently selected source, for each window, will be indicated
by a “dash”, as shown:
01
Current source
02
03
04
5.
Left click the desired input (1 - 4) from the drop-down menu.
6.
The selected source will also be displayed on both Video B and in the
associated window in Video A.
7.
Click the middle mouse button / wheel to dismiss the Display Mode menu.
►► Keyboard
8.
Press the following keys, in sequence, on the computer keyboard:
The default hotkey is the Scroll Lock key. To reassign the hotkey refer to
Defining the Hotkey (page 40) for more information.
hotkey
+
hotkey
+
Q
+
X
Where X is a number on the keyboard from 1 to 4. This number represents
the source to be selected.
When a source is selected, it will appear on both Video B and in the
associated window of Video A.
For example, to switch to Quad mode and display the source connected
to Source 3, use the following keystrokes:
hotkey
+
hotkey
page | 28
+
Q
+
3
Basic Operation
Switching Sources
►► OSD
1.
Press the following keys, in sequence, on the computer keyboard.
The default hotkey is the Scroll Lock key. To reassign the hotkey refer to
Defining the Hotkey (page 40) for more information.
+
hotkey
2.
hotkey
+
Space Bar
The OSD will be displayed.
Input
Name
01
PC01
02
PC02
03
PC03
04
PC04
Select
VID USB AUD USB VID-A VID-B PIP
z
z
X
X
X AUD USB VID-A VID-B
PIP
X
X
X
Settings
Information
Exit
F1
F2
F3
F4
Ins
Home
Full view
PIP view
Quad view
PAP view
Edit
Video B
Esc
Enter
A
H
I
Exit
Select
Switch Audio
Switch USB
PIP display
Main menu
3.
Press the
F3
key.
4.
Press the
Esc
key to immediately exit the OSD.
5.
For more information about OSD features, refer to OSD Menu (page 39).
page | 29
Switching Sources
Basic Operation
PAP (Picture-And-Picture) Mode
►► Front panel
1.
Press the PAP button.
2.
Press the desired source button (1 - 4).
3.
The selected source will be displayed on both Video B and in the main
window of Video A. The subordinate windows will display the remaining
sources.
Solo
USB
Menu/Back
Video B
Audio
Audio
®
Solo
USBFull
Menu/Back
Audio
PIP
Quad
PAP
Full
USB
Reset
USB
Power
USB
4 USB
1
2
3
Select
4x1 DVI KVM Multiview
Switcher
4Select
Source buttons
PAP button
►► Mouse
1.
DVIK-MV-41
Click the middle mouse button / wheel to display the mode menu on the
VideoMouse
A display.
Mic L/R Out
Mic L/R In USB Host
Mic L/RKeyboard
In USB Host Mouse
Mic L/R
Mic
In L/R
USB
Out
Host
Mic
Keyboard
2.
Left-click the PAP mode icon.
USB
USB
Video A DVI-D
3.
RS-232 Out
Main
Video B DVI-D
DVI-D In
USB
L/R In USB Host
USB
Video
DVI-D
A DVI-D
In
Video
DVI-D
B DVI-D
In
DVI-D In
Source 3
Source 41
A drop-down menu will be displayed.
12V
DC
Workstation
RS-232 In
RS-232
Out
Source
1
Source 2 Workstation
01
02
03
04
page | 30
Mic
Basic Operation
Switching Sources
4.
The currently selected source for the main window will be indicated
by a “dash”, as shown.
Current source
01
02
03
04
5.
Left click the desired input (1 - 4) from the drop-down menu.
6.
The selected source will also be displayed on both Video B and in the
associated window in Video A.
7.
Click the middle mouse button / wheel to dismiss the Display Mode menu.
►► Keyboard
1.
Press the following keys, in sequence, on the computer keyboard:
The default hotkey is the Scroll Lock key. To reassign the hotkey refer to
Defining the Hotkey (page 40) for more information.
hotkey
+
hotkey
+
A
+
X
Where X is a number on the keyboard from 1 to 4. This number represents
the source to be selected.
When a source is selected, it will appear on both Video B and in the
main window of Video A.
For example, to switch to PAP mode and display the source connected
to Source 2, in the main window, use the following keystrokes:
hotkey
2.
+
hotkey
+
A
+
2
The current source occupying the main window will be moved to a
subordinate window. See Window Management in PAP Mode (page 37)
for details on how the switcher manages main and subordinate windows in
PAP mode.
page | 31
Basic Operation
Switching Sources
►► OSD
1.
Press the following keys, in sequence, on the computer keyboard.
The default hotkey is the Scroll Lock key. To reassign the hotkey refer to
Defining the Hotkey (page 40) for more information.
+
hotkey
2.
hotkey
+
Space Bar
The OSD will be displayed.
Input
Name
01
PC01
02
PC02
03
PC03
04
PC04
Select
VID USB AUD USB VID-A VID-B PIP
z
z
X
X
X AUD USB VID-A VID-B
PIP
X
X
X
Settings
Information
Exit
F1
F2
F3
F4
Ins
Home
Full view
PIP view
Quad view
PAP view
Edit
Video B
Esc
Enter
A
H
I
Exit
Select
Switch Audio
Switch USB
PIP display
Main menu
3.
Press the
22
F4
key.
4.
Press the
Esc
key to immediately exit the OSD.
5.
Use the keyboard, mouse, or front panel buttons to set the source
for the main window.
6.
For more information about OSD features, refer to OSD Menu (page 39).
page | 32
Basic Operation
Solo Buttons
Information
The Solo USB and Audio buttons are used only to temporarily switch between
devices. To unlink devices from one another, use the OSD, RS-232, or
hotkeys. Refer to Linking / Unlinking USB (page 42), the #link and
#unlink commands, and Hotkeys (page 117).
Independent USB Switching
By default, video, USB, and audio are switched simultaneously each time a different
source is selected. However, the switcher provides you with the ability to independently
route USB. This might be useful, for example, if you want to maintain the video connection
to Source 1 but temporarily switch USB control to Source 3.
1.
Press the USB button on the front panel.
2.
The USB button will glow solid blue. The switcher is now in solo USB mode. This will
allow us to switch USB independently of video and audio.
Solo
eo B
dio
USB
®
SB
Solo
Menu/Back
Video B
Audio
Audio
USB
Audio
Menu/Back
Full
PIP
Quad
PAP
Full
PIP
USB
Reset
Power
USB
3
4
1
2
3
4
4x1 DVI Select
KVM Multiview Switch
4x1
Select
USB button
3.
Press a source selection button (1 - 4) on the front panel to switch to the desired USB
source.
In the example, below, we have switched to Source 3. Now, both video and audio are
coming from Source
1 but USB
controlMicis on
Source 3.
Keyboard
Mouse
Mic L/R Out
L/RKeyboard
In USB Host Mouse
Mic L/R
Mic
In L/R
USBOut
Host
Mic
Mic L/R
L/R In
In USB
USB Host
Host
Mic
USB
eo B
dio
SB
-232 In
USB
®
USB
Video A DVI-D
Solo
Video B
Audio
Audio
USB
Video B DVI-D
USB
RS-232
In
Workstation RS-232 Out
Main RS-232 Out12V DC
Video
DVI-D
A DVI-D
In
Solo
Menu/Back
USB
Audio
L/R In USB Hos
USB
Video
DVI-D
B DVI-D
In
Full
Source 1 Workstation
PIP
Source 2
DVI-D In
Menu/Back
Quad
PAP
DVI-D In
Full
Source 31
Reset
PIP
Source
Source 42
Power
USB
3
4
1
2
3
4
Select
page | 33
4x1 DVI Select
KVM Multiview Switch
4x1
Basic Operation
Solo Buttons
eo B
dio
4.
To exit solo USB mode, press the USB button again.
5.
The USB button will turn off and the USB device will re-link with the currently selected
Video B source.
Solo
USB
®
SB
Solo
Menu/Back
Video B
Audio
Audio
USB
Menu/Back
Audio
Full
PIP
Quad
PAP
Full
PIP
USB
Reset
Power
USB
3
1
4
2
3
4
4x1 DVI Select
KVM Multiview Switch
4x1
Select
Independent Audio Switching
By default, video, USB, and audio are switched simultaneously each time a different
source is selected. However, the 4x1 DVI KVM Multiview Switcher provides you with
the ability to independently route audio. This might be useful, for example, if you want to
Mouse
Mic L/R Out
Mic L/RKeyboard
In USB Host Mouse
Mic L/R
Mic
In L/R
USBOut
Host
Mic
Mic L/R
L/R In
In USB
USB Host
Host
maintain the videoKeyboard
and USB
connection
to Source
2 but temporarily
use
the
audio
from
Source 3.
USB
USB
Video A DVI-D
-232 In
USB
Video B DVI-D
Mic
Video
DVI-D
A DVI-D
In
Video
DVI-D
B DVI-D
In
DVI-D In
DVI-D In
Source 2
Source 31
Source
Source 42
1.
Press the Audio
button
on the front panel.Source 1
RS-232 In
Workstation RS-232 Out
2.
The Audio button will glow solid blue. The switcher is now in solo audio mode. This
will allow us to switch audio independently of video and USB.
Main RS-232 Out12V DC
Solo
Solo
Video B
USB
Audio
Audio
eo B
dio
Workstation
Menu/Back
USB
Audio
L/R In USB Hos
USB
Menu/Back
Full
PIP
Quad
PAP
Full
PIP
Quad
USB
SB
Reset
3
Main
-232 In
41
2
3
4
Power
Select
4x1
DVI KVM Multiview
4x1 Switch
DVI KV
Select
Audio button
3.
Press a Source button (1 - 4) on the front panel to switch to the desired audio source.
In the example, below, we have switched the audio to Source 3. Now, both video and
USB are coming from Source 2 but the audio is coming from Source 3.
Keyboard
USB
Mouse
USB
Video A DVI-D
12V
RS-232
DC Out
RS-232 In
RS-232
Out
Workstation
Mic L/R Out
Keyboard
Mic L/R Mouse
In USB HostMic L/R
MicOutL/R In Mic
USB Host
L/R In USB
Mic Host
L/R In Mic
USB Host
L/R In Mic
USB Host
L/R In USB
Mic Hos
L/
USB
Video B DVI-DVideo A DVI-D
USB
DVI-D In
page Workstation
|Source
34 1
Video B DVI-D
DVI-D In
DVI-D In
DVI-D In
DVI-D In
DVI-D In
D
Source 2
Source 1
Source 3
Source 2
Source 4
So
Basic Operation
Solo Buttons
SB
3
Solo
Solo
Video B
USB
Audio
Audio
eo B
dio
Menu/Back
USB
Audio
Menu/Back
Full
PIP
Quad
PAP
Full
PIP
Reset
41
2
3
4
To exit solo audio mode, press the Audio button again.
5.
The Audio button will turn off and the audio device will re-link with the currently
selected Video B source.
Solo
Solo
Video B
USB
Audio
Audio
USB
SB
Menu/Back
USB
Keyboard
Mouse
Audio
Mic L/R Out
Menu/Back
Full
PIP
Quad
PAP
Full
PIP
Main
-232 In
Main
-232 In
41
12V
RS-232
DC Out
2
USB
3
Video
A DVI-D4
RS-232 In
USB
Mouse
USB
RS-232 In
RS-232
Out
Workstation
Video B DVI-D
Workstation
Source 1
Mic L/R Out
Power
USB
Video B DVI-DVideo A DVI-DSelect
DVI-D In
Video A DVI-D
12V
RS-232
DC Out
USB
RS-232
Out
Workstation
Keyboard
Quad
Keyboard
Mic L/R Mouse
In USB HostMic L/R
MicOutL/R In Mic
USB Host
L/R In USB
Mic Host
L/R In Mic
USB Host
L/R In Mic
USB Host
L/R In USB
Mic Hos
L/
Reset
USB
Power
Select
4x1
DVI KVM Multiview
4x1 Switch
DVI KV
Select
4.
eo B
dio
3
Quad
USB
Select
4x1
DVI KVM Multiview
4x1 Switch
DVI KV
DVI-D In
DVI-D In
DVI-D In
DVI-D In
DVI-D In
D
Source 2
Source 1
Source 3
Source 2
Source 4
So
Keyboard
Mic L/R Mouse
In USB HostMic L/R
MicOutL/R In Mic
USB Host
L/R In USB
Mic Host
L/R In Mic
USB Host
L/R In Mic
USB Host
L/R In USB
Mic Hos
L/
USB
USB
Video B DVI-DVideo A DVI-D
DVI-D In
Workstation
Source 1
page | 35
Video B DVI-D
DVI-D In
DVI-D In
DVI-D In
DVI-D In
DVI-D In
D
Source 2
Source 1
Source 3
Source 2
Source 4
So
Basic Operation
PIP & PAP Modes
This section discusses some functions that are unique to PIP (Picture-In-Picture) and PAP
(Picture-And-Picture) modes.
Zoom and Position (PIP Only)
1.
Enter PIP mode and set the main and subordinate windows with the desired sources.
2.
Click the middle mouse button / wheel to display the Mode menu.
3.
Place the mouse cursor over the subordinate window.
4.
Left-click and drag the window to the desired position on the screen.
page | 36
Basic Operation
PIP & PAP Modes
5.
To zoom-in or zoom-out of the subordinate window, use the scroll wheel on the
mouse. Make sure that the mouse cursor is placed over the subordinate window
before zooming.
Note that the zoom-in and zoom-out direction (scroll up or scroll down) will depend
upon the scroll settings of the mouse.
6.
Once the subordinate window is set to the desired position and size, click the scroll
button to dismiss the Mode menu.
Window Management in PAP Mode
In PAP mode, the 4x1 DVI KVM Multiview Switcher manages subordinate windows by
switching the main window with a subordinate window when a different source is selected.
The following example illustrates that moving a subordinate window to the main window is
not arbitrary.
1.
Given that the main window is Source 1:
2
3
4
1
page | 37
Basic Operation
PIP & PAP Modes
2.
Pressing the Source 2 button swaps window 1 with window 2:
1
3
4
2
3.
Pressing the Source 4 button swaps window 2 with window 4:
1
3
2
4
4.
Finally, if we wanted Source 1 back in the main window, we would press the Source 1
button, which would swap window 4 with window 1.
4
3
2
1
page | 38
Basic Operation
OSD Menu
Accessing the Menu System
The 4x1 DVI KVM Multiview Switcher uses a built-in menu system to manage and control
all video features.
1.
Access the menu system using the following keystrokes:
The default hotkey is the Scroll Lock key. To reassign the hotkey refer to Defining the
Hotkey (page 40) for more information.
hotkey
2.
+
+
hotkey
Space Bar
The menu system will be displayed in the foreground.
Input
Name
01
PC01
02
PC02
03
PC03
04
PC04
Select
VID USB AUD USB VID-A VID-B PIP
z
z
X
X
X AUD USB VID-A VID-B
PIP
X
X
X
Settings
Information
Exit
F1
F2
F3
F4
Ins
Home
Full view
PIP view
Quad view
PAP view
Edit
Video B
Esc
Enter
A
H
I
Exit
Select
Switch Audio
Switch USB
PIP display
Main menu
3.
To dismiss the menu system, press the Esc key.
4.
See the following pages for information on using the various functions within the OSD.
page | 39
Basic Operation
OSD Menu
Defining the Hotkey
The default hotkey is the Scroll Lock key. However, the hotkey assignment can be
changed. The Scroll Lock key is used in the following procedure.
1.
To access the menu system, use the following keystrokes:
Scroll Lock
2.
+
+
Scroll Lock
Space Bar
Select the Settings option using the ▲ or ▼ keys on the computer keyboard.
Input
Name
01
PC01
02
PC02
03
PC03
04
PC04
Select
VID USB AUD USB VID-A VID-B PIP
X AUD USB VID-A VID-B
PIP
X
X
X
z
z
X
X
Settings
Information
Exit
F1
F2
F3
F4
Ins
Home
3.
Full view
PIP view
Quad view
PAP view
Edit
Video B
Esc
Enter
A
H
I
Main menu
Exit
Select
Switch Audio
Switch USB
PIP display
Press the Enter key.
Hotkey
Scroll
Link USB
Yes
Link Audio
Yes
Link Video B
Yes
OSD Timeout
30
Sec
Titlebar Timeout
05
Sec
Show PC Name
Yes
Show Video Signal
Yes
Next Page
Main Menu
Information
Exit
F1
F2
F3
F4
Full view
PIP view
Quad view
PAP view
Esc
Enter
WS
AD
Settings
Exit
Select
Navigate
Change
page | 40
Basic Operation
OSD Menu
4.
Select the desired hotkey using the ◄ or ► keys on the computer keyboard.
The available selections are: Scroll, Caps, NumLock, L Ctrl, or R Ctrl.
5.
Once the desired hotkey has been selected, press the Esc key.
6.
The following message will be displayed:
Save Before Exit?
Yes
Esc
7.
No
Back
Press the Enter key to select the Yes option and save the changes.
To discard changes, press the ► key to select the No option, then press Enter.
8.
To return to the previous screen, without making changes, press the Esc key.
page | 41
Basic Operation
OSD Menu
Linking / Unlinking USB
1.
Enter the menu system. See Accessing the Menu System (page 39) for more
information.
2.
Select the Settings option using the ▲ or ▼ keys on the computer keyboard.
Input
Name
01
PC01
02
PC02
03
PC03
04
PC04
Select
VID USB AUD USB VID-A VID-B PIP
X AUD USB VID-A VID-B
PIP
X
X
X
z
z
X
X
Settings
Information
Exit
F1
F2
F3
F4
Ins
Home
Full view
PIP view
Quad view
PAP view
Edit
Video B
Esc
Enter
A
H
I
Main menu
Exit
Select
Switch Audio
Switch USB
PIP display
3.
Press the Enter key.
4.
Use the ▲ or ▼ keys to select the Link USB option.
Hotkey
Scroll
Link USB
Yes
Link Audio
Yes
Link Video B
Yes
OSD Timeout
30
Sec
Titlebar Timeout
05
Sec
Show PC Name
Yes
Show Video Signal
Yes
Next Page
Main Menu
Information
Exit
F1
F2
F3
F4
Full view
PIP view
Quad view
PAP view
Esc
Enter
WS
AD
Settings
Exit
Select
Navigate
Change
page | 42
Basic Operation
OSD Menu
5.
Select the desired option by using the ◄ or ► keys.
If the Link USB is set to Yes, then the USB will follow the source when switching.
If the Link USB is set to No, then the USB can be routed independently of the
currently selected source.
6.
Once the desired option has been selected, press the Esc key.
7.
The following message will be displayed:
Save Before Exit?
Yes
Esc
8.
No
Back
Press the Enter key to select the Yes option and save the changes.
To discard changes, press the ► key to select the No option, then press Enter.
9.
To return to the previous screen, without making changes, press the Esc key.
page | 43
Basic Operation
OSD Menu
Linking / Unlinking Audio
1.
Enter the menu system. See Accessing the Menu System (page 39) for more
information.
2.
Select the Settings option using the ▲ or ▼ keys on the computer keyboard.
Input
Name
01
PC01
02
PC02
03
PC03
04
PC04
Select
VID USB AUD USB VID-A VID-B PIP
X AUD USB VID-A VID-B
PIP
X
X
X
z
z
X
X
Settings
Information
Exit
F1
F2
F3
F4
Ins
Home
Full view
PIP view
Quad view
PAP view
Edit
Video B
Esc
Enter
A
H
I
Main menu
Exit
Select
Switch Audio
Switch USB
PIP display
3.
Press the Enter key.
4.
Use the ▲ or ▼ keys to select the Link Audio option.
Hotkey
Scroll
Link USB
Yes
Link Audio
Yes
Link Video B
Yes
OSD Timeout
30
Sec
Titlebar Timeout
05
Sec
Show PC Name
Yes
Show Video Signal
Yes
Next Page
Main Menu
Information
Exit
F1
F2
F3
F4
Full view
PIP view
Quad view
PAP view
Esc
Enter
WS
AD
Settings
Exit
Select
Navigate
Change
page | 44
Basic Operation
OSD Menu
5.
Select the desired option by using the ◄ or ► keys.
If the Link Audio is set to Yes, then the Audio will follow the source when switching.
If the Link Audio is set to No, then the Audio can be routed independently of the
currently selected source.
6.
Once the desired option has been selected, press the Esc key.
7.
The following message will be displayed:
Save Before Exit?
Yes
Esc
8.
No
Back
Press the Enter key to select the Yes option and save the changes.
To discard changes, press the ► key to select the No option, then press Enter.
9.
To return to the previous screen, without making changes, press the Esc key.
page | 45
Basic Operation
OSD Menu
Linking / Unlinking Video B
1.
Enter the menu system. See Accessing the Menu System (page 39) for more
information.
2.
Select the Settings option using the ▲ or ▼ keys on the computer keyboard.
Input
Name
01
PC01
02
PC02
03
PC03
04
PC04
Select
VID USB AUD USB VID-A VID-B PIP
X AUD USB VID-A VID-B
PIP
X
X
X
z
z
X
X
Settings
Information
Exit
F1
F2
F3
F4
Ins
Home
Full view
PIP view
Quad view
PAP view
Edit
Video B
Esc
Enter
A
H
I
Main menu
Exit
Select
Switch Audio
Switch USB
PIP display
3.
Press the Enter key.
4.
Use the ▲ or ▼ keys to select the Link Video B option.
Hotkey
Scroll
Link USB
Yes
Link Audio
Yes
Link Video B
Yes
OSD Timeout
30
Sec
Titlebar Timeout
05
Sec
Show PC Name
Yes
Show Video Signal
Yes
Next Page
Main Menu
Information
Exit
F1
F2
F3
F4
Full view
PIP view
Quad view
PAP view
Esc
Enter
WS
AD
Settings
Exit
Select
Navigate
Change
page | 46
Basic Operation
OSD Menu
5.
Select the desired option by using the ◄ or ► keys.
If the Link Video B is set to Yes, then the display connected to Video B will always
show the currently selected source. This is the default setting.
If the Link Video B is set to No, then this will allow each display (Video A and
Video B) to show a different source.
6.
Once the desired option has been selected, press the Esc key.
7.
The following message will be displayed:
Save Before Exit?
Yes
Esc
8.
No
Back
Press the Enter key to select the Yes option and save the changes.
To discard changes, press the ► key to select the No option, then press Enter.
9.
To return to the previous screen, without making changes, press the Esc key.
page | 47
Basic Operation
OSD Menu
OSD Timeout
1.
Enter the menu system. See Accessing the Menu System (page 39) for more
information.
2.
Select the Settings option using the ▲ or ▼ keys on the computer keyboard.
Input
Name
01
PC01
02
PC02
03
PC03
04
PC04
Select
VID USB AUD USB VID-A VID-B PIP
X AUD USB VID-A VID-B
PIP
X
X
X
z
z
X
X
Settings
Information
Exit
F1
F2
F3
F4
Ins
Home
Full view
PIP view
Quad view
PAP view
Edit
Video B
Esc
Enter
A
H
I
Main menu
Exit
Select
Switch Audio
Switch USB
PIP display
3.
Press the Enter key.
4.
Use the ▲ or ▼ keys to select the OSD Timeout option.
Hotkey
Scroll
Link USB
Yes
Link Audio
Yes
Link Video B
Yes
OSD Timeout
30
Sec
Titlebar Timeout
05
Sec
Show PC Name
Yes
Show Video Signal
Yes
Next Page
Main Menu
Information
Exit
F1
F2
F3
F4
Full view
PIP view
Quad view
PAP view
Esc
Enter
WS
AD
Settings
Exit
Select
Navigate
Change
page | 48
Basic Operation
OSD Menu
5.
Select the desired timeout by using the ◄ or ► keys.
The timeout can be set to one of the following values, in seconds: 0, 5, 10, 15, 20,
25, 30, 40, 50, or 60. To keep the OSD displayed at all times, set the OSD Timeout
value to 0 seconds. The default value is 10 seconds.
6.
Once the desired option has been selected, press the Esc key.
7.
The following message will be displayed:
Save Before Exit?
Yes
Esc
8.
No
Back
Press the Enter key to select the Yes option and save the changes.
To discard changes, press the ► key to select the No option, then press Enter.
9.
To return to the previous screen, without making changes, press the Esc key.
page | 49
Basic Operation
OSD Menu
Titlebar Timeout
1.
Enter the menu system. See Accessing the Menu System (page 39) for more
information.
2.
Select the Settings option using the ▲ or ▼ keys on the computer keyboard.
Input
Name
01
PC01
02
PC02
03
PC03
04
PC04
Select
VID USB AUD USB VID-A VID-B PIP
X AUD USB VID-A VID-B
PIP
X
X
X
z
z
X
X
Settings
Information
Exit
F1
F2
F3
F4
Ins
Home
Full view
PIP view
Quad view
PAP view
Edit
Video B
Esc
Enter
A
H
I
Main menu
Exit
Select
Switch Audio
Switch USB
PIP display
3.
Press the Enter key.
4.
Use the ▲ or ▼ keys to select the Titlebar Timeout option.
Hotkey
Scroll
Link USB
Yes
Link Audio
Yes
Link Video B
Yes
OSD Timeout
30
Sec
Titlebar Timeout
05
Sec
Show PC Name
Yes
Show Video Signal
Yes
Next Page
Main Menu
Information
Exit
F1
F2
F3
F4
Full view
PIP view
Quad view
PAP view
Esc
Enter
WS
AD
Settings
Exit
Select
Navigate
Change
page | 50
Basic Operation
OSD Menu
5.
Select the desired timeout by using the ◄ or ► keys.
The timeout can be set to one of the following values, in seconds: 0, 5, 10, 15, 20,
25, 30, or OFF. To keep the titlebar displayed at all times, set the Titlebar Timeout
value to 0 seconds. To prevent the titlebar from being displayed, set the timeout value
to OFF. The default value is 5 seconds.
6.
Once the desired option has been selected, press the Esc key.
7.
The following message will be displayed:
Save Before Exit?
Yes
Esc
8.
No
Back
Press the Enter key to select the Yes option and save the changes.
To discard changes, press the ► key to select the No option, then press Enter.
9.
To return to the previous screen, without making changes, press the Esc key.
page | 51
Basic Operation
OSD Menu
Show PC Name
1.
Enter the menu system. See Accessing the Menu System (page 39) for more
information.
2.
Select the Settings option using the ▲ or ▼ keys on the computer keyboard.
Input
Name
01
PC01
02
PC02
03
PC03
04
PC04
Select
VID USB AUD USB VID-A VID-B PIP
X AUD USB VID-A VID-B
PIP
X
X
X
z
z
X
X
Settings
Information
Exit
F1
F2
F3
F4
Ins
Home
Full view
PIP view
Quad view
PAP view
Edit
Video B
Esc
Enter
A
H
I
Main menu
Exit
Select
Switch Audio
Switch USB
PIP display
3.
Press the Enter key.
4.
Use the ▲ or ▼ keys to select the Show PC Name option.
Hotkey
Scroll
Link USB
Yes
Link Audio
Yes
Link Video B
Yes
OSD Timeout
30
Sec
Titlebar Timeout
05
Sec
Show PC Name
Yes
Show Video Signal
Yes
Next Page
Main Menu
Information
Exit
F1
F2
F3
F4
Full view
PIP view
Quad view
PAP view
Esc
Enter
WS
AD
Settings
Exit
Select
Navigate
Change
page | 52
Basic Operation
OSD Menu
4.
Select the desired option by using the ◄ or ► keys.
If the Show PC Name is set to Yes, then the name of the PC will be displayed above
the current input resolution. This is the default setting.
If the Show PC Name is set to No, then only the input resolution will be displayed.
See Show Video Signal (page 54) for more information on hiding / displaying
the current input resolution.
PC Name
03 PC03
1920 x 1200
5.
Once the desired option has been selected, press the Esc key.
6.
The following message will be displayed:
Save Before Exit?
Yes
Esc
7.
No
Back
Press the Enter key to select the Yes option and save the changes.
To discard changes, press the ► key to select the No option, then press Enter.
8.
To return to the previous screen, without making changes, press the Esc key.
page | 53
Basic Operation
OSD Menu
Show Video Signal
1.
Enter the menu system. See Accessing the Menu System (page 39) for more
information.
2.
Select the Settings option using the ▲ or ▼ keys on the computer keyboard.
Input
Name
01
PC01
02
PC02
03
PC03
04
PC04
Select
VID USB AUD USB VID-A VID-B PIP
X AUD USB VID-A VID-B
PIP
X
X
X
z
z
X
X
Settings
Information
Exit
F1
F2
F3
F4
Ins
Home
Full view
PIP view
Quad view
PAP view
Edit
Video B
Esc
Enter
A
H
I
Main menu
Exit
Select
Switch Audio
Switch USB
PIP display
3.
Press the Enter key.
4.
Use the ▲ or ▼ keys to select the Show Video Signal option.
Hotkey
Scroll
Link USB
Yes
Link Audio
Yes
Link Video B
Yes
OSD Timeout
30
Sec
Titlebar Timeout
05
Sec
Show PC Name
Yes
Show Video Signal
Yes
Next Page
Main Menu
Information
Exit
F1
F2
F3
F4
Full view
PIP view
Quad view
PAP view
Esc
Enter
WS
AD
Settings
Exit
Select
Navigate
Change
page | 54
Basic Operation
OSD Menu
5.
Select the desired option by using the ◄ or ► keys.
If the Show Video Signal is set to Yes, then the current input resolution will be
displayed below the current PC name. This is the default setting.
If the Show Video Signal is set to No, then only the PC name will be displayed.
See Show PC Name (page 52) for more information on hiding / displaying
the PC name.
03 PC03
1920 x 1200
Video Signal
6.
Once the desired option has been selected, press the Esc key.
7.
The following message will be displayed:
Save Before Exit?
Yes
Esc
8.
No
Back
Press the Enter key to select the Yes option and save the changes.
To discard changes, press the ► key to select the No option, then press Enter.
9.
To return to the previous screen, without making changes, press the Esc key.
page | 55
Basic Operation
OSD Menu
Output Resolution
1.
Enter the menu system. See Accessing the Menu System (page 39) for more
information.
2.
Select the Settings option using the ▲ or ▼ keys on the computer keyboard.
Input
Name
01
PC01
02
PC02
03
PC03
04
PC04
Select
VID USB AUD USB VID-A VID-B PIP
X AUD USB VID-A VID-B
PIP
X
X
X
z
z
X
X
Settings
Information
Exit
F1
F2
F3
F4
Ins
Home
Full view
PIP view
Quad view
PAP view
Edit
Video B
Esc
Enter
A
H
I
Main menu
Exit
Select
Switch Audio
Switch USB
PIP display
3.
Press the Enter key.
4.
Use the ▲ or ▼ keys to select the Next Page option.
Hotkey
Scroll
Link USB
Yes
Link Audio
Yes
Link Video B
Yes
OSD Timeout
30
Sec
Titlebar Timeout
05
Sec
Show PC Name
Yes
Show Video Signal
Yes
Next Page
Yes
Main Menu
Information
Exit
F1
F2
F3
F4
5.
Full view
PIP view
Quad view
PAP view
Esc
Enter
WS
AD
Settings
Exit
Select
Navigate
Change
Press the Enter key.
page | 56
Basic Operation
OSD Menu
6.
Use the ▲ or ▼ keys to select the Output Resolution option.
Previous Page
Output Resolution
1280x1024
Shrink Control
Keep Ratio
EDID Mode
External
OneClick Switching
Wheel
PIP Scan Period
10
Sec
Load Factory Default
Main Menu
Information
Exit
F1
F2
F3
F4
Full view
PIP view
Quad view
PAP view
Esc
Enter
WS
AD
Settings
Exit
Select
Navigate
Change
Important
Before changing this setting, make sure that the connected display can
support the selected output resolution. If an unsupported resolution is
selected, you will need to set the output resolution using the RS-232
command set. See the #set_output command for more information.
7.
Select the desired resolution by using the ◄ or ► keys.
The following resolutions are available: 1024x768, 1280x1024, 1280x720,
1360x768, 1600x1200, 1680x1050, 1920x1080, 1920x1200, and Auto.
8.
Once the desired resolution has been selected, press the Esc key.
9.
The following message will be displayed:
Save Before Exit?
Yes
Esc
No
Back
10. Press the Enter key to select the Yes option and save the changes.
To discard changes, press the ► key to select the No option, then press Enter.
11. To return to the previous screen, without making changes, press the Esc key.
page | 57
Basic Operation
OSD Menu
Shrink Control
1.
Enter the menu system. See Accessing the Menu System (page 39) for more
information.
2.
Select the Settings option using the ▲ or ▼ keys on the computer keyboard.
Input
Name
01
PC01
02
PC02
03
PC03
04
PC04
Select
VID USB AUD USB VID-A VID-B PIP
X AUD USB VID-A VID-B
PIP
X
X
X
z
z
X
X
Settings
Information
Exit
F1
F2
F3
F4
Ins
Home
Full view
PIP view
Quad view
PAP view
Edit
Video B
Esc
Enter
A
H
I
Main menu
Exit
Select
Switch Audio
Switch USB
PIP display
3.
Press the Enter key.
4.
Use the ▲ or ▼ keys to select the Next Page option.
Hotkey
Scroll
Link USB
Yes
Link Audio
Yes
Link Video B
Yes
OSD Timeout
30
Sec
Titlebar Timeout
05
Sec
Show PC Name
Yes
Show Video Signal
Yes
Next Page
Yes
Main Menu
Information
Exit
F1
F2
F3
F4
5.
Full view
PIP view
Quad view
PAP view
Esc
Enter
WS
AD
Settings
Exit
Select
Navigate
Change
Press the Enter key.
page | 58
Basic Operation
OSD Menu
6.
Use the ▲ or ▼ keys to select the Shrink Control option.
Previous Page
Output Resolution
1280x1024
Shrink Control
Keep Ratio
EDID Mode
External
OneClick Switching
Wheel
PIP Scan Period
10
Sec
Load Factory Default
Main Menu
Information
Exit
F1
F2
F3
F4
7.
Full view
PIP view
Quad view
PAP view
Esc
Enter
WS
AD
Settings
Exit
Select
Navigate
Change
Select the desired option by using the ◄ or ► keys.
If the Shrink Control is set to Keep Ratio, then the output aspect ratio will match
the input aspect ratio. This is the default setting.
If the Shrink Control is set to Fill, then the image will be stretched to fill the screen.
8.
Once the desired resolution has been selected, press the Esc key.
9.
The following message will be displayed:
Save Before Exit?
Yes
Esc
No
Back
10. Press the Enter key to select the Yes option and save the changes.
To discard changes, press the ► key to select the No option, then press Enter.
11. To return to the previous screen, without making changes, press the Esc key.
page | 59
Basic Operation
OSD Menu
EDID Mode
1.
Enter the menu system. See Accessing the Menu System (page 39) for more
information.
2.
Select the Settings option using the ▲ or ▼ keys on the computer keyboard.
Input
Name
01
PC01
02
PC02
03
PC03
04
PC04
Select
VID USB AUD USB VID-A VID-B PIP
X AUD USB VID-A VID-B
PIP
X
X
X
z
z
X
X
Settings
Information
Exit
F1
F2
F3
F4
Ins
Home
Full view
PIP view
Quad view
PAP view
Edit
Video B
Esc
Enter
A
H
I
Main menu
Exit
Select
Switch Audio
Switch USB
PIP display
3.
Press the Enter key.
4.
Use the ▲ or ▼ keys to select the Next Page option.
Hotkey
Scroll
Link USB
Yes
Link Audio
Yes
Link Video B
Yes
OSD Timeout
30
Sec
Titlebar Timeout
05
Sec
Show PC Name
Yes
Show Video Signal
Yes
Next Page
Yes
Main Menu
Information
Exit
F1
F2
F3
F4
5.
Full view
PIP view
Quad view
PAP view
Esc
Enter
WS
AD
Settings
Exit
Select
Navigate
Change
Press the Enter key.
page | 60
Basic Operation
OSD Menu
6.
Use the ▲ or ▼ keys to select the EDID Control option.
Previous Page
Output Resolution
1280x1024
Shrink Control
Keep Ratio
EDID Mode
External
OneClick Switching
Wheel
PIP Scan Period
10
Sec
Load Factory Default
Main Menu
Information
Exit
F1
F2
F3
F4
7.
Full view
PIP view
Quad view
PAP view
Esc
Enter
WS
AD
Settings
Exit
Select
Navigate
Change
Select the desired option by using the ◄ or ► keys.
If the EDID Mode is set to External, then EDID from the display that is connected
to Video A will be used. This is the default setting.
If the EDID Mode is set to 1080P, then the display connected to Video A will use
the built-in internal EDID.
8.
Once the desired option has been selected, press the Esc key.
9.
The following message will be displayed:
Save Before Exit?
Yes
Esc
No
Back
10. Press the Enter key to select the Yes option and save the changes.
To discard changes, press the ► key to select the No option, then press Enter.
11. To return to the previous screen, without making changes, press the Esc key.
page | 61
Basic Operation
OSD Menu
One-Click Switching
1.
Enter the menu system. See Accessing the Menu System (page 39) for more
information.
2.
Select the Settings option using the ▲ or ▼ keys on the computer keyboard.
Input
Name
01
PC01
02
PC02
03
PC03
04
PC04
Select
VID USB AUD USB VID-A VID-B PIP
X AUD USB VID-A VID-B
PIP
X
X
X
z
z
X
X
Settings
Information
Exit
F1
F2
F3
F4
Ins
Home
Full view
PIP view
Quad view
PAP view
Edit
Video B
Esc
Enter
A
H
I
Main menu
Exit
Select
Switch Audio
Switch USB
PIP display
3.
Press the Enter key.
4.
Use the ▲ or ▼ keys to select the Next Page option.
Hotkey
Scroll
Link USB
Yes
Link Audio
Yes
Link Video B
Yes
OSD Timeout
30
Sec
Titlebar Timeout
05
Sec
Show PC Name
Yes
Show Video Signal
Yes
Next Page
Yes
Main Menu
Information
Exit
F1
F2
F3
F4
5.
Full view
PIP view
Quad view
PAP view
Esc
Enter
WS
AD
Settings
Exit
Select
Navigate
Change
Press the Enter key.
page | 62
Basic Operation
OSD Menu
6.
Use the ▲ or ▼ keys to select the One-Click Switching option.
Previous Page
Output Resolution
1280x1024
Shrink Control
Keep Ratio
EDID Mode
1080P
OneClick Switching
Wheel
PIP Scan Period
10
Sec
Load Factory Default
Main Menu
Information
Exit
F1
F2
F3
F4
7.
Full view
PIP view
Quad view
PAP view
Esc
Enter
WS
AD
Settings
Exit
Select
Navigate
Change
Select the desired option by using the ◄ or ► keys.
The following options are available: Wheel, Button 4, Button 5,
or Disabled. The default setting is Wheel.
8.
Once the desired option has been selected, press the Esc key.
9.
The following message will be displayed:
Save Before Exit?
Yes
Esc
No
Back
10. Press the Enter key to select the Yes option and save the changes.
To discard changes, press the ► key to select the No option, then press Enter.
11. To return to the previous screen, without making changes, press the Esc key.
page | 63
Basic Operation
OSD Menu
PIP Scan Period
1.
Enter the menu system. See Accessing the Menu System (page 39) for more
information.
2.
Select the Settings option using the ▲ or ▼ keys on the computer keyboard.
Input
Name
01
PC01
02
PC02
03
PC03
04
PC04
Select
VID USB AUD USB VID-A VID-B PIP
X AUD USB VID-A VID-B
PIP
X
X
X
z
z
X
X
Settings
Information
Exit
F1
F2
F3
F4
Ins
Home
Full view
PIP view
Quad view
PAP view
Edit
Video B
Esc
Enter
A
H
I
Main menu
Exit
Select
Switch Audio
Switch USB
PIP display
3.
Press the Enter key.
4.
Use the ▲ or ▼ keys to select the Next Page option.
Hotkey
Scroll
Link USB
Yes
Link Audio
Yes
Link Video B
Yes
OSD Timeout
30
Sec
Titlebar Timeout
05
Sec
Show PC Name
Yes
Show Video Signal
Yes
Next Page
Yes
Main Menu
Information
Exit
F1
F2
F3
F4
5.
Full view
PIP view
Quad view
PAP view
Esc
Enter
WS
AD
Settings
Exit
Select
Navigate
Change
Press the Enter key.
page | 64
Basic Operation
OSD Menu
6.
Use the ▲ or ▼ keys to select the PIP Scan Period option.
Previous Page
Output Resolution
1280x1024
Shrink Control
Keep Ratio
EDID Mode
1080P
OneClick Switching
Wheel
PIP Scan Period
10
Sec
Load Factory Default
Main Menu
Information
Exit
F1
F2
F3
F4
7.
Full view
PIP view
Quad view
PAP view
Esc
Enter
WS
AD
Settings
Exit
Select
Navigate
Change
Select the desired option by using the ◄ or ► keys.
The following time periods (in seconds) are available: 10, 20 30, 40, 50, or 60.
The default setting is 10.
8.
Once the desired option has been selected, press the Esc key.
9.
The following message will be displayed:
Save Before Exit?
Yes
Esc
No
Back
10. Press the Enter key to select the Yes option and save the changes.
To discard changes, press the ► key to select the No option, then press Enter.
11. To return to the previous screen, without making changes, press the Esc key.
page | 65
Basic Operation
OSD Menu
Load Factory Default
1.
Enter the menu system. See Accessing the Menu System (page 39) for more
information.
2.
Select the Settings option using the ▲ or ▼ keys on the computer keyboard.
Input
Name
01
PC01
02
PC02
03
PC03
04
PC04
Select
VID USB AUD USB VID-A VID-B PIP
X AUD USB VID-A VID-B
PIP
X
X
X
z
z
X
X
Settings
Information
Exit
F1
F2
F3
F4
Ins
Home
Full view
PIP view
Quad view
PAP view
Edit
Video B
Esc
Enter
A
H
I
Main menu
Exit
Select
Switch Audio
Switch USB
PIP display
3.
Press the Enter key.
4.
Use the ▲ or ▼ keys to select the Next Page option.
Hotkey
Scroll
Link USB
Yes
Link Audio
Yes
Link Video B
Yes
OSD Timeout
30
Sec
Titlebar Timeout
05
Sec
Show PC Name
Yes
Show Video Signal
Yes
Next Page
Yes
Main Menu
Information
Exit
F1
F2
F3
F4
5.
Full view
PIP view
Quad view
PAP view
Esc
Enter
WS
AD
Settings
Exit
Select
Navigate
Change
Press the Enter key.
page | 66
Basic Operation
OSD Menu
6.
Use the ▲ or ▼ keys to select the Load Factory Default option.
Previous Page
Output Resolution
1280x1024
Shrink Control
Keep Ratio
EDID Mode
1080P
OneClick Switching
Wheel
PIP Scan Period
10
Sec
Load Factory Default
Main Menu
Information
Exit
F1
F2
F3
F4
Full view
PIP view
Quad view
PAP view
Esc
Enter
WS
AD
Settings
Exit
Select
Navigate
Change
7.
Press the Enter key.
8.
The following message will be displayed:
Load Default Settings?
Yes
Esc
No
Back
The No option will be selected by default.
►► To continue without resetting the unit to factory-default settings, press the
Enter key.
►► To reset the unit to factory-default settings, select the Yes option using
the ◄ or ► key and then press the Enter key.
9.
To return to the previous screen, without making changes, press the Esc key.
page | 67
Basic Operation
OSD Menu
Read Monitor EDID
The Read Monitor EDID function is designed to be used if the 4x1 DVI KVM Multiview
Switcher is unable to automatically read the EDID of the display connected to Video A.
If the display’s EDID is corrupted, then the switcher will automatically use the built-in EDID
on the switcher.
1.
Enter the menu system. See Accessing the Menu System (page 39) for more
information.
2.
Make sure the EDID Mode is set to External.
3.
Select the Information option using the ▲ or ▼ keys on the computer keyboard.
Input
Name
01
PC01
02
PC02
03
PC03
04
PC04
KVM ID:
Select
VID USB AUD USB VID-A VID-B PIP
z
z
X
X
X AUD USB VID-A VID-B
PIP
X
X
X
01 / 02
Settings
Information
Exit
F1
F2
F3
F4
Ins
Home
4.
Full view
PIP view
Quad view
PAP view
Edit
Video B
Esc
Enter
A
H
I
Exit
Select
Switch Audio
Switch USB
PIP display
Main menu
Press the Enter key to display the Information screen.
Read Monitor EDID
Upgrade Firmware
Monitor Model
DVIK-MV-41
Preferred Timing
1920x1080
Firmware Version
FW 1.0.2
Main Menu
Settings
Exit
F1
F2
F3
F4
Full view
PIP view
Quad view
PAP view
Esc
Enter
WS
Information
Exit
Select
Navigate
page | 68
Basic Operation
OSD Menu
5.
The Read Monitor EDID option will be highlighted.
6.
Press the Enter key to read the EDID.
7.
The following progress bar will be displayed as the 4x1 DVI KVM Multiview Switcher
reads the EDID of the display that is connected to Video A:
Read Monitor EDID
8.
After the progress bar disappears, the EDID-reading process will be complete.
9.
The EDID of the display connected to Video A will now be used.
page | 69
Basic Operation
OSD Menu
Upgrade Firmware
1.
Enter the menu system. See Accessing the Menu System (page 39) for more
information.
2.
Select the Information option using the ▲ or ▼ keys on the computer keyboard.
Input
Name
01
PC01
02
PC02
03
PC03
04
PC04
KVM ID:
Select
VID USB AUD USB VID-A VID-B PIP
z
z
X
X
X AUD USB VID-A VID-B
PIP
X
X
X
01 / 02
Settings
Information
Exit
F1
F2
F3
F4
Ins
Home
3.
Full view
PIP view
Quad view
PAP view
Edit
Video B
Esc
Enter
A
H
I
Exit
Select
Switch Audio
Switch USB
PIP display
Main menu
On the following screen, select Upgrade Firmware using the ▲ or ▼ keys on the
computer keyboard.
Read Monitor EDID
Upgrade Firmware
Monitor Model
PanasonicTV0
Preferred Timing
1920x1080
Firmware Version
FW 1.0.2
Main Menu
Information
Exit
F1
F2
F3
F4
Full view
PIP view
Quad view
PAP view
Esc
Enter
WS
Information
Exit
Select
Navigate
4.
Press the Enter button to begin the upgrade process.
5.
Refer to Firmware Upgrade (page 119) for instructions on completing the process.
page | 70
Basic Operation
OSD Menu
Changing the Source Name
By default, each of the four inputs on the switcher is named as follows: PC01, PC02,
PC03, and PC04. To keep track of your sources, it is recommended to use names that are
unique to each device.
1.
Enter the menu system. See Accessing the Menu System (page 39) for more
information.
2.
Select the desired Input Name by using the ▲ or ▼ keys on the computer keyboard.
3.
Press the
4.
The Input Name text will be red and the first character in the Input Name will be
highlighted in blue.
Ins
Input
Name
01
PC01
02
PC02
03
PC03
04
PC04
key.
Select
VID USB AUD USB VID-A VID-B PIP
z
z
X
X
X AUD USB VID-A VID-B
PIP
X
X
X
Settings
Information
Exit
F1
F2
F3
F4
Ins
Home
Full view
PIP view
Quad view
PAP view
Edit
Video B
Esc
Enter
A
H
I
Exit
Select
Switch Audio
Switch USB
PIP display
Main menu
5.
Type the new name of the Input Name. The name cannot exceed 12 characters in
length.
6.
Press the Enter key.
page | 71
Basic Operation
OSD Menu
7.
The new Input Name will be displayed.
Select
VID USB AUD USB VID-A VID-B PIP
Input
Name
01
BossComputer
02
PC02
03
PC03
04
PC04
z
z
X
X
X AUD USB VID-A VID-B
PIP
X
X
X
Settings
Information
Exit
F1
F2
F3
F4
Ins
Home
8.
Full view
PIP view
Quad view
PAP view
Edit
Video B
Esc
Enter
A
H
I
Exit
Select
Switch Audio
Switch USB
PIP display
Repeat steps 2 - 6 for each input, as desired.
page | 72
Main menu
4x1 DVI KVM
Multiview Switcher
3
Advanced Operation
Cascading
Advanced Operation
By cascading (“daisy-chaining”) switchers, up to 32 computers can be controlled from a
single keyboard and mouse. The RS-232 In / RS-232 Out ports are used to connect each
switch in the chain. A maximum of eight switchers can be connected.
Information
The video, audio, and front-panel USB devices cannot be shared (connected)
between switchers. An external RS-232 controller connected to switcher #1
can send commands to all of the connected switchers, if needed.
1.
Connect an RS-232 controller (if applicable) to the RS-232 In port on the first switcher.
2.
Connect another RS-232 cable to the RS-232 Out port.
3.
Connect the opposite end of the RS-232 cable, from the first switcher, to the
RS-232 In port on the second switcher.
Solo
Video B
Audio
®
USB
Menu/Back
Audio
Full
PIP
Quad
PAP
USB
USB
4.
Continue the process outlined in steps 2 and 3 for each switcher.
5.
The connection of each switcher should appear as follows:
1
2
3
4
Solo
Video B
Audio
®
USB
Menu/Back
Audio
Reset
Full
PIP
Quad
PAP
to RS-232 controller
to Keyboard
USB
Reset
to Mouse
USB
1
2
3
4
USB
Mouse
Video B
Audio
RS-232
In
USB
12V DC
Video B DVI-D
L/R In USB Host
Mic
DVI-D In
Solo
USB
Mic
2
3
Workstation
Source 1
4
DVI-D In
Full
USB
Mouse
RS-232 In
RS-232 Out
Mic L/R Out
USB
Mic
Video B DVI-D
L/R In USB Host
L/R In USB Host
PIP
Source 2
Quad
DVI-D In
DVI-D In
PAP
Source 3
Source 4
Reset
Power
4x1 DVI KVM Multiview Switcher
Mic
DVI-D In
Workstation
Source 1
Menu/Back
Solo
Video B
Audio
®
Mic
L/R In USB Host
Mic
L/R In USB Host
Mic
L/R In USB Host
USB
Video A DVI-D
12V DC
L/R In USB Host
Switcher 1
Select
Keyboard
Main
Mic
Menu/Back
Audio
RS-232 Out
USB
1
L/R In USB Host
USB
Video A DVI-D
Main
Mic L/R Out
Power
4x1 DVI KVM Multiview Switcher
Select
Keyboard
®
Power
4x1 DVI KVM Multiview Switcher
Select
Audio
Full
USB
DVI-D In
DVI-D In
DVI-D In
Source 2
Source 3
Source 4
Quad
Switcher
2PAP
PIP
Reset
Power
USB
1
2
3
4
Keyboard
USB
Mouse
12V DC
RS-232 In
RS-232 Out
Mic Select
L/R In USB Host
Mic
4x1 DVI KVM Multiview Switcher
L/R In USB Host
Mic
L/R In USB Host
Mic
L/R In USB Host
USB
Video A DVI-D
Main
Mic L/R Out
Video B DVI-D
Workstation
DVI-D In
DVI-D In
DVI-D In
DVI-D In
Source 1
Source 2
Source 3
Source 4
Switcher 3
Keyboard
USB
Mouse
Video A DVI-D
Main
12V DC
RS-232 In
RS-232 Out
Mic L/R Out
Mic
L/R In USB Host
Mic
L/R In USB Host
Mic
L/R In USB Host
Mic
L/R In USB Host
USB
Workstation
Video B DVI-D
DVI-D In
DVI-D In
DVI-D In
DVI-D In
Source 1
Source 2
Source 3
Source 4
Switcher 8
page | 76
Advanced Operation
Cascading
6.
Here is a sample wiring diagram of three switchers connected together using
two RS-232 cables.
The first switcher in the chain has an ID of 1. The second switcher in the chain is 2,
the third switcher is 3, and so on.
B
ID
A
=3
B
A
RS-232 cable
B
A
ID
=2
Computer Sources
RS-232 cable
Keyboard / Mouse
Video / USB / Audio
7.
ID
=1
Display the OSD using the keyboard or front-panel buttons.
Input
Name
01
PC01
02
PC02
03
PC03
04
PC04
KVM ID:
Select
VID USB AUD USB VID-A VID-B PIP
z
z
X
X
X AUD USB VID-A VID-B
PIP
X
X
X
01 / 03
Settings
Information
Exit
F1
F2
F3
F4
Ins
Home
Full view
PIP view
Quad view
PAP view
Edit
Video B
Esc
Enter
A
H
I
Exit
Select
Switch Audio
Switch USB
PIP display
page | 77
Main menu
Advanced Operation
Cascading
8.
Next to KVM ID, there are two numbers. The first number is the active switcher.
The second number is the total number of switchers in the chain.
In the example below, we have 01 / 03:
Input
Name
01
PC01
02
PC02
03
PC03
04
PC04
KVM ID:
Select
VID USB AUD USB VID-A VID-B PIP
z
z
X
X
X AUD USB VID-A VID-B
PIP
X
X
X
01 / 03
Settings
S
USB AUD USB V
Main menu VID
Information
Exit
Input
F1
F2
F3
F4
Ins
Home
01
02
Full view
PIP view
Quad view
PAP view
Edit
Video B
Esc
Enter
A
H
I
Exit
Select
Switch Audio
Switch USB
PIP display
z X AUD USB V
z X
X X
Total switchers
X X
PC01
PC02
PC03
03
04
Name
Active ID
KVM ID:
PC04
01 / 03
Because all the switchers are connected, we can control any of switches directly from
the keyboard and mouse that are connected to the first switcher in the chain.
Settings
9.
Information
To move between switchers, use one of the following methods:
•
•
•
Use the #kvm command to set the active switcher.
Exit
Use the following hotkey combination:
F1
Full view
Esc
Exit
+
+
+
X
hotkey
hotkey
K
F2
PIP view
Enter
Select
F3
Quad view
A
Switch Audio
a number
on the keyboard from
number represents
the
F4Where X isPAP
view
H 1 to 8. ThisSwitch
USB
switcher to be selected.
Ins
Edit
I
PIP display
Move the mouse
cursor
Home
Video
B to the desired display of the switcher to be controlled.
page | 78
Advanced Operation
Cascading
10. For example, to switch to switcher 3 using hotkeys, type the following:
+
hotkey
+
hotkey
K
+
3
11. Display the OSD using the keyboard or front-panel buttons.
Input
Name
01
PC01
02
PC02
03
PC03
04
PC04
KVM ID:
Select
VID USB AUD USB VID-A VID-B PIP
z
z
X
X
X AUD USB VID-A VID-B
PIP
X
X
X
03 / 03
Settings
Information
Active switcher is 3
Exit
F1
F2
F3
F4
Ins
Home
Full view
PIP view
Quad view
PAP view
Edit
Video B
Esc
Enter
A
H
I
Exit
Select
Switch Audio
Switch USB
PIP display
Main menu
12. To set the active switcher using the mouse, make sure that the display mode icons
are displayed in the active display.
13. Click the middle mouse button to bring up the display mode icons.
page | 79
Advanced Operation
Cascading
10. Move the mouse cursor to the display connected to switcher 2.
Note that in display mode, that the mouse is not displayed on Video B when moving
between switchers.
Video A (Switcher 2)
Video A (Switcher 3)
11. As soon as the mouse is displayed on Video A on switcher 2, then switcher 2 will
be the active switcher.
12. Select the desired display mode for Video A on switcher 2 by clicking the middle
mouse button.
page | 80
Advanced Operation
RS-232 Interface
RS-232 Interface
5 4
3
2 1
DE-9
6 7
8
9
DA-15
RS-232 Controller
Switcher
DCD
1
1
DCD
RXD
2
2
RXD
TXD
3
3
TXD
DTR
4
4
DTR
GND
5
5
DSR
6
6
RTS
7
7
CTS
8
8
CTS
R1
9
9
R1
Only TXD, RXD, and GND pins are used.
DB-25
GND
DSR
RTS
DC-37
RS-232 Settings
Description
Setting
Baud rate
115200
Data bits
8
Parity
None
Stop bits
1
Hardware flow control
None
DD-50
Important
When sending RS=232 commands, a carriage return (0x0d) and a line feed
(0x0a) must be included and the end of the command.
page | 81
Advanced Operation
Commands
Command
Description
#aspect
Sets the aspect ratio
#audio
Switches the audio source
#beeper
Activates the beeper
#fadefault
Resets unit to factory-default settings
#help
Displays all available commands
#hotkey
Sets the hotkey
#kvm
Switches the active KVM
#link
Binds peripherals to the specified KVM port
#list
Displays the hotkey list
#lock_edid
Locks EDID settings during power-up
#mode
Sets the display mode
#mute
Mutes the audio
#pip
Sets the Picture-In-Picture mode
#quad
Sets Quad-View mode
#reboot
Reboots the unit
#scan
Auto-scan mode
#set_edid
Sets the EDID mode
#set_mask
Masks the video on the specified port
#set_output
Sets the output resolution
#show_edid
Displays the EDID settings
#show_output
Displays the current output resolution
#show_ver_data
Displays the software
#unlink
Unbind peripherals from the KVM port
#upgrade
Upgrade the firmware
#usb
Switches the USB port
#usbreset
Resets the USB
#video
Switches the video source
#video_b
Switches the auxiliary monitor
m
Displays the KVM status
r
Switches the KVM port
page | 82
Advanced Operation
Commands
#aspect
Sets the aspect ratio of the output image. The default settings is Fill Screen.
Syntax
#aspect
Parameters
param1
State
param1
Description
1
Fill Screen
2
Keep Ratio
Example
#aspect 2
aspect Keep Ratio
Related Commands
#set_output
#show_output
page | 83
[1 ... 2]
Advanced Operation
Commands
#audio
Selects the specified audio input.
Syntax
#audio
Parameters
param1
Input
Example
#audio 3
audio input 3
Related Commands
#kvm
#mute
#usb
#video
#video_b
page | 84
[1 ... 4]
Advanced Operation
Commands
#beeper
Enables or disables an audible “beep” each time a key is pressed. By default, this feature
is disabled.
Syntax
#beeper
Parameters
param1
State
param1
Description
0
Off
1
On
Example
#beeper 1
beeper on
page | 85
[0 ... 1]
Advanced Operation
Commands
#fadefault
Resets the unit to factory-default settings.
Syntax
#fadefault
Parameters
None
Example
#fadefault
defaults restored
Related Commands
#usbreset
page | 86
Advanced Operation
Commands
#help
Displays help on a specific command. If no command is specified (param1), then a list
of all available commands will be displayed.
Syntax
#help [param1]
Parameters
Command (optional)
param1
Examples
#help
#aspect
#audio
#beeper
#fadefault
#help
#hotkey
#kvm
...
...
#usb
#upgrade
#unlink
#usbreset
#video
#video_b
m
r
#help #audio
#audio
-
-
Keep aspect ratio or stretch to fit the monitor
- Switch Audio Source
- Activate Beeper
- Restore Default Values
- Print All Commands
- Hotkey Settings
- Switch Active KVM
-
Switch USB Hub
Firmware Upgrade
Unbind peripherals from KVM port
USB Reset
Switch Video Source
Switch Auxiliary Monitor
KVM Status
Switch KVM Port
Switch Audio Source
Usage: #audio [x]
x= 1 ~ 4 [inputs 1 -
4]
page | 87
Advanced Operation
Commands
#hotkey
Defines the hotkey.
Syntax
#hotkey param1
Parameters
param1
State
param1
Description
1
Scroll Lock
2
Caps Lock
3
Num Lock
4
Left Ctrl
5
Right Ctrl
Example
#hotkey 4
hotkey Left Ctrl
Related Commands
#list
page | 88
[1 ... 5]
Advanced Operation
Commands
#kvm
Switches to the active KVM. This command is used when units are cascaded.
The first unit is always 1. The second unit is 2, the third unit is 3, and so on.
See Cascading (page 76) for more information.
Syntax
#kvm param1
Parameters
param1
Unit
Example
#kvm 2
Related Commands
#audio
#usb
#video
#video_b
page | 89
[1 ... 8]
Advanced Operation
Commands
#link
Binds the specified peripheral device with the KVM port.
Syntax
#link param1
Parameters
param1
Device
param1
Description
audio
Audio device
usb
USB device
video_b
Video B port
Example
#link audio
link audio
Related Commands
#unlink
page | 90
Advanced Operation
Commands
#list
Displays the list of available hotkeys.
Syntax
#list
Parameters
None
Example
#list
1 [Scroll], 2 [Caps] , 3 [NumLock], 4 [Left Ctrl] , 5 [Right Ctrl]
Related Commands
#hotkey
page | 91
Advanced Operation
Commands
#lock_edid
Locks or unlocks the EDID settings.
Syntax
#lock_edid param1
Parameters
param1
State
param1
Description
0
Unlock EDID
1
Lock EDID
Example
#lock_edid 1
EDID locked
Related Commands
#set_edid
#show_edid
page | 92
[0 ... 1]
Advanced Operation
Commands
#mode
Sets the display mode.
Syntax
#mode param1
Parameters
param1
Mode
param1
Description
full
Full-screen mode
pip
Picture-In-Picture mode
quad
Quad-picture mode
pap
Picture-And-Picture mode
Example
#mode quad
mode quad
Related Commands
#pip
#quad
page | 93
[String]
Advanced Operation
Commands
#mute
Mutes or unmutes the audio.
Syntax
#mute param1
Parameters
param1
State
param1
Description
0
Unmute audio
1
Mute audio
Example
#mute 1
mute mute
Related Commands
#audio
page | 94
[0 ... 1]
Advanced Operation
Commands
#pip
Sets the display mode to Picture-In-Picture mode and assigns the specified inputs to each
window. param1 is the main (large) window and param2 is the smaller window.
Syntax
#pip param1 param2
Parameters
param1
param2
Main display
Sub display
Example
#pip 2 3
pip input 2 3
Related Commands
#mode
#quad
page | 95
[1 ... 4]
[1 ... 4]
Advanced Operation
Commands
#quad
Sets the display mode to Quad mode and selects the specified input.
Syntax
#quad param1
Parameters
param1
Input
Example
#quad 3
quad input 3
Related Commands
#mode
#pip
page | 96
[1 ... 4]
Advanced Operation
Commands
#reboot
Reboots the unit. All settings are maintained.
Syntax
#reboot
Parameters
None
Example
#reboot
EXT-DVIK-MV-41 build Nov 21 2014 - 17:40:23
Related Commands
#fadefault
page | 97
Advanced Operation
Commands
#scan
Enables or disables PIP auto-scan. Enabling this feature will cycle through all available
input sources (if connected) in the subordinate window. This command is only applicable
when in PIP mode.
Syntax
#scan param1
Parameters
param1
State
param1
Description
1
Start scan
2
Stop scan
Example
#scan 1
scan start scan
Related Commands
#pip
page | 98
[1 ... 2]
Advanced Operation
Commands
#set_edid
Sets the EDID mode. By default, the unit is set to External EDID.
Syntax
#set_edid
Parameters
param1
State
param1
Description
1
External EDID
2
Internal EDID
Example
#set_edid 2
edid internal
Related Commands
#lock_edid
#show_edid
page | 99
[1 ... 2]
Advanced Operation
Commands
#set_mask
Mask (disables) the video for the specified input.
Syntax
#set_mask param1 param2
Parameters
param1
param2
Input
State
param1
Description
0
Disable masking
1
Enable masking
Example
#set_mask 1 1
mask input 1 1
page | 100
[1 ... 4]
[0 ... 1]
Advanced Operation
Commands
#set_output
Sets the output resolution.
Syntax
#set_output param1
Parameters
param1
Resolution
param1
Description
1
1920 x 1080
2
1280 x 720
3
1280 x 1024
4
1920 x 1200
5
1024 x 768
6
1680 x 1050
7
1600 x 1200
8
1360 x 768
9
Auto-select
Example
#set_output 5
output 1024x768
Related Commands
#show_output
page | 101
[1 ... 9]
Advanced Operation
Commands
#show_edid
Displays the current EDID mode.
Syntax
#show_edid
Parameters
None
Example
#show_edid
edid internal
Related Commands
#set_edid
page | 102
Advanced Operation
Commands
#show_output
Displays the current output resolution.
Syntax
#show_output
Parameters
None
Example
#show_output
Output resolution : 1024x768
Related Commands
#set_output
page | 103
Advanced Operation
Commands
#show_ver_data
Displays the firmware version.
Syntax
#show_ver_data
Parameters
None
Example
#show_ver_data
version:
ID 01 : FW 1.0.2
Related Commands
#upgrade
page | 104
Advanced Operation
Commands
#unlink
Removes the binding for the specified peripheral.
Syntax
#unlink param1
Parameters
param1
Device
param1
Description
audio
Audio device
usb
USB device
video_b
Video B port
Example
#unlink usb
unlink usb
Related Commands
#link
page | 105
Advanced Operation
Commands
#upgrade
Upgrades the firmware. See Firmware Upgrade (page 119) for more information.
Syntax
#upgrade
Parameters
None
Example
#upgrade
Boot loader Nov 18 2014
Related Commands
#show_ver_data
page | 106
Advanced Operation
Commands
#usb
Switches to the specified USB port.
Syntax
#usb param1
Parameters
param1
Input
Example
#usb 2
usb input 2
Related Commands
#usbreset
page | 107
[1 ... 4]
Advanced Operation
Commands
#usbreset
Resets the USB hub.
Syntax
#usbreset
Parameters
None
Example
#usbreset
Reset USB ...
Related Commands
#fadefault
page | 108
Advanced Operation
Commands
#video
Switches to the specified video input.
Syntax
#video param1
Parameters
param1
Input
Example
#video 2
video input 2
Related Commands
#set_mask
#video_b
r
page | 109
[1 ... 4]
Advanced Operation
Commands
#video_b
Switches to the specified input on the auxiliary (Video B) monitor.
Syntax
#video_b param1
Parameters
param1
Input
Example
#video_b 3
video_b input 3
Related Commands
#audio
#usb
#video
r
page | 110
[1 ... 4]
Advanced Operation
Commands
m
Displays the current KVM status. Do not precede this command with the “#” symbol.
Syntax
m
Parameters
None
Example
m
video 2
usb 4
audio 1
aux 2
Related Commands
#audio
#usb
#video
#video_b
r
page | 111
Advanced Operation
Commands
r
Switches to the specified KVM port. Do not precede this command with the “#” symbol.
Syntax
r param1
Parameters
param1
Input
Example
r 3
input 3
Related Commands
#audio
#kvm
#usb
#video
#video_b
page | 112
[1 ... 4]
4x1 DVI KVM
Multiview Switcher
4
Appendix
page | 115
Appendix
Default Settings
OSD
Setting
Value
Hotkey
Scroll
Link USB
Yes
Link Audio
Yes
Link Video B
Yes
OSD Timeout
30
Titlebar Timeout
5
Show PC Name
Yes
Show Video Signal
Yes
Output Resolution
Auto
Shrink Control
Fill
EDID Mode
External
One-Click Switching
Wheel
PIP Scan Period
10
Input 1
PC01
Input 2
PC02
Input 3
PC03
Input 4
PC04
page | 116
Appendix
Default Settings
Hotkeys
Hotkey
Description
ScrLk + ScrLk + (X)
Selects KVM port X
ScrLk + ScrLk + A + (X)
PAP mode
ScrLk + ScrLk + B
Toggle beep sound
ScrLk + ScrLk + BckSpc
Select the previously-selected KVM port
ScrLk + ScrLk + C
Enable PC and audio binding
ScrLk + ScrLk + Del
Unbind primary and auxiliary monitor switching
ScrLk + ScrLk + S
Selects the next KVM port
ScrLk + ScrLk + F + (X)
Enables Full mode using input X
ScrLk + ScrLk + F1
Switch to hub port 1
ScrLk + ScrLk + F2
Switch to hub port 2
ScrLk + ScrLk + F3
Switch to hub port 3
ScrLk + ScrLk + F4
Switch to hub port 4
ScrLk + ScrLk + F5
Switch to audio port 1
ScrLk + ScrLk + F6
Switch to audio port 2
ScrLk + ScrLk + F7
Switch to audio port 3
ScrLk + ScrLk + F8
Switch to audio port 4
ScrLk + ScrLk + F9
Switch Video B (auxiliary monitor) to port 1
ScrLk + ScrLk + F10
Switch Video B (auxiliary monitor) to port 2
ScrLk + ScrLk + F11
Switch Video B (auxiliary monitor) to port 3
ScrLk + ScrLk + F12
Switch Video B (auxiliary monitor) to port 4
ScrLk + ScrLk + H + (Y)
Defines the hotkey
ScrLk + ScrLk + I + (X)
ScrLk + ScrLk + P + (X)
Enable PIP mode and assigns input X to the
main / subordinate display
ScrLk + ScrLk + Ins
Bind Video A (primary) and Video B (auxiliary)
switching
ScrLk + ScrLk + K + (X)
Switches to the specified unit, when cascading
ScrLk + ScrLk + O
Enables the display mode menu
ScrLk + ScrLk + Q + (X)
Enables Quad mode and selects window X
ScrLk + ScrLk + S + (X)
Toggles PIP auto-scan
X = Input 1 ... Input 4
X = Input 1 ... Input 4
X = Input 1 ... Input 4
Y = ScrLk, Caps, Num Lock, L Ctrl, R Ctrl
I = main display, P = subordinate display
X = Input 1 ... Input 4
X = Input 1 ... Input 4
page | 117
Appendix
Default Settings
Hotkey
Description
ScrLk + ScrLk + Space Bar
Displays the OSD
ScrLk + ScrLk + T
Toggles the title bar
ScrLk + ScrLk + W
Selects the next port
ScrLk + ScrLk + V
Disable PC and audio binding
ScrLk + ScrLk + W
Swaps the main and subordinate window in PIP
mode
ScrLk + ScrLk + X
Unbinds PC and USB switching
ScrLk + ScrLk + Z
Binds PC and USB switching
page | 118
USB
Audio
Full
PIP
Quad
PAP
Firmware Upgrade
Reset
4x1 DVI KVM Multiview Switcher
Appendix
Select
Using the USB Port
1.
Download and install USB Loader from Gefen website.
2.
Launch the USB Loader program.
3.
Connect a USB cable, from the computer running the USB Loader program, to the
USB Host port on the Source 1 input.
Keyboard
USB
Mouse
Out
Mic L/R Out
Mic
L/R In USB Host
Video B DVI-D
Workstation
L/R In USB Host
Mic
L/R In USB Host
Mic
L/R In USB Host
DVI-D In
DVI-D In
DVI-D In
DVI-D In
Source 1
Source 2
Source 3
Source 4
4.
Power OFF the 4x1 DVI KVM Multiview Switcher.
5.
Press and hold the Source 1 button on the front panel.
USB
Solo
Video B
Audio
®
USB
Menu/Bac
Audio
USB
USB
USB
1
2
6.
Power ON the switcher.
7.
The display mode buttons will flash.
Solo
USB
Mic
USB
Video A DVI-D
2 Out
Power
3
4
Full
PIP
Select
Menu/Back
Audio
Quad
PAP
Power
Reset
4x1 DVI KVM Multiview Switcher
Select
EXT-DVIK-MV-41
Keyboard
USB
Mouse
Mic L/R Out
8.
Select the firmware file using the USB Loader program: kvm-[version].bin.
Video A DVI-D
Video B DVI-D
9.
Click the Upgrade
button.
Main
12V DC
RS-232 In
RS-232 Out
Workstation
10. After the upgrade progress completes, click the OK button.
11. Reboot the unit using the Reboot button on the USB Loader program.
12. The upgrade process is complete.
Keyboard
USB
Mouse
Mic L/R Out
Mic
L/R In USB Host
Mic
L/R In USB Host
Mic
L/R In USB Host
Mic
L/R In USB Host
USB
Video A DVI-D
Workstation
Video B DVI-D
DVI-D In
Source 1
DVI-D In
DVI-D In
DVI-D In
Source 2
Source 3
Source 4
page | 119
Mic
L/R In
USB
DVI-D
Sourc
Firmware Upgrade
Solo
Video B
Audio
USB
Menu/Back
Audio
Full
PIP
Quad
PA
Appendix
USB
1
3
4
Using the RS-232 Port
Download and install USB Loader from Gefen website.
2.
Launch the USB Loader program.
3.
Connect an RS-232 cable or automation system, that will be sending RS-232
commands, to the RS-232 In port.
4.
Connect a USB cable, from the computer running the USB Loader program, to the
USB Host port on the Source 1 input.
USB
Mouse
12V DC
RS-232 In
RS-232 Out
Mic
L/R In USB Host
Video B DVI-D
Workstation
5.
Execute the #upgrade command.
6.
The display mode buttons will flash.
Solo
Mic L/R Out
Mic
L/R In USB Host
Full
DVI-D In
DVI-D
Source 1
Source 2
Source
PIP
Quad
PAP
Reset
Power
4x1 DVI KVM Multiview Switcher
Select
7.
Select the firmware file using the USB Loader program: kvm-[version].bin.
8.
Click the Upgrade button.
9.
After the upgrade progress completes, click the OK button.
10. Reboot the unit using the Reboot button on the USB Loader program.
11. The upgrade process is complete.
Keyboard
USB
Mouse
Mic L/R Out
Mic
L/R In USB Host
Mic
L/R In USB Host
Mic
L/R In USB Host
Mic
L/R In USB Host
USB
Video A DVI-D
Workstation
Video B DVI-D
L/R In
DVI-D In
Menu/Back
Audio
Mic
USB
Video A DVI-D
USB
4x1 DVI KVM
Select
1.
Keyboard
ain
2 Out
2
DVI-D In
DVI-D In
DVI-D In
DVI-D In
Source 1
Source 2
Source 3
Source 4
page | 120
USB
Audio
Full
PIP
Quad
PAP
Reset
Power
Firmware
Upgrade
4x1 DVI KVM Multiview Switcher
Appendix
Select
Using the OSD
1.
Download and install USB Loader from Gefen website.
2.
Launch the USB Loader program.
3.
Connect a USB cable, from the computer running the USB Loader program, to the
USB Host port on the Source 1 input.
Keyboard
USB
Mouse
Video A DVI-D
Out
2 Out
Mic L/R Out
Mic
Video B DVI-D
Workstation
Mic
L/R In USB Host
Mic
L/R In USB Host
Mic
L/R In USB Host
DVI-D In
DVI-D In
DVI-D In
DVI-D In
Source 1
Source 2
Source 3
Source 4
4.
Select Upgrade Firmware (page 70) from the OSD menu.
5.
The display mode buttons will flash.
Solo
USB
L/R In USB Host
USB
Menu/Back
Audio
Full
PIP
Quad
PAP
Reset
Power
4x1 DVI KVM Multiview Switcher
Select
6.
Select the firmware file using the USB Loader program: kvm-[version].bin.
7.
Click the Upgrade button.
8.
After the upgrade progress completes, click the OK button.
9.
Reboot the unit using the Reboot button on the USB Loader program.
10. The upgrade process is complete.
Keyboard
USB
Mouse
Mic L/R Out
Mic
L/R In USB Host
Mic
L/R In USB Host
Mic
L/R In USB Host
Mic
L/R In USB Host
USB
Video A DVI-D
Workstation
Video B DVI-D
DVI-D In
DVI-D In
DVI-D In
DVI-D In
Source 1
Source 2
Source 3
Source 4
page | 121
Appendix
Specifications
Connectors, Controls, and Indicators
Video Input
•
4 x DVI-I, 29-pin, female (digital only)
Video Output
•
2 x DVI-I, 29-pin, female (digital only)
USB (front panel)
•
2 x Type A, 5V DC at 1A max shared current
USB (rear panel)
•
•
2 x Type A, 5V DC at 1A max shared current
4 x Type B
Microphone
•
•
1 x 3.5mm mini-mono (input)
4 x 3.5mm mini-mono (output)
L/R Audio
•
•
4 x 3.5mm mini-stereo (input)
1 x 3.5mm mini-stereo (output
RS-232
•
•
1 x DB-9, female (input)
1 x DB-9, male (output)
Power switch
•
1 x rocker-type
Grounding
•
1 x machine screw (rear chassis)
Front Panel Buttons
•
•
10 x tact-type, blue backlight
6 x tact-type
Power Supply Connector
•
1 x 3-pin, locking
Power Indicator
•
1 x LED, blue
Video B Indicator
•
4 x LED, blue
Audio Indicator
•
4 x LED, blue
USB Indicator
•
4 x LED, blue
Maximum Pixel Clock
•
165 Mhz
Maximum TMDS Clock
•
165 MHz
Power Supply
•
12V DC
Power Consumption
•
40W maximum
Operating Temperature
•
+32 to +122 °F (0 to +50 °C)
Operating Humidity
•
5% to 90% RH, non-condensing
Storage Temperature
•
-4 to +185 °F (-20 to +85 °C)
Relative Humidity
•
0% to 95% RH, non-condensing
MTBF
•
50000 hours
Dimensions (W x H x D)
•
17.2” x 1.2” x 7.9” (437mm x 30mm x 200mm)
Unit Weight
•
3.7 lbs (1.6 kg)
Operational
Physical
page | 122
*Preferred
Stretch it. Switch it. Split it. Gefen’s got it. ®
20600 Nordhoff St., Chatsworth CA 91311
1-800-545-6900 818-772-9100 fax: 818-772-9120
www.gefen.com [email protected]