1
White Paper
System Administration for the
Intel® Xeon Phi™ Coprocessor
1
Preface
This document provides a general overview of system administration on the Intel® Xeon Phi™
coprocessor. It is written with the small scale system administrator in mind. It is not intended as a
replacement for the documentation which comes with each release of the Intel® Many Integrated
Core Architecture (Intel® MPSS) but as a supplement, providing advice, troubleshooting suggestions
and pointers to other useful documents.
2
Table of Contents
Overview ........................................................................................................................................................................................................... 6
Requirements for a system administrator .............................................................................................................................. 7
Useful documentation.......................................................................................................................................................................... 7
Installing, Configuring and Booting System Software for the Intel® Xeon Phi™ Coprocessor ...................... 9
Installing the MPSS .............................................................................................................................................................................10
States of the Coprocessor .............................................................................................................................................................11
Updating the Coprocessor’s Flash and SMC Memory .....................................................................................................11
Configuring an Intel® Xeon Phi™ coprocessor .....................................................................................................................12
Configuring the Host Kernel Module ........................................................................................................................................12
Building the Root File System ......................................................................................................................................................13
Starting and Stopping the System ............................................................................................................................................13
Monitoring the Intel® Xeon Phi™ Coprocessor..........................................................................................................................15
micctrl..........................................................................................................................................................................................................15
micflash ......................................................................................................................................................................................................15
micinfo ........................................................................................................................................................................................................15
micsmc ........................................................................................................................................................................................................15
miccheck ....................................................................................................................................................................................................16
micrasd .......................................................................................................................................................................................................16
Linux commands on the coprocessor ......................................................................................................................................16
Using a virtual console......................................................................................................................................................................16
Installing Other Commonly Used Software ...............................................................................................................................17
OFED ............................................................................................................................................................................................................17
Ganglia ........................................................................................................................................................................................................17
3
Eclipse .........................................................................................................................................................................................................18
Additional software ............................................................................................................................................................................18
Adding Users to the Intel® Xeon Phi™ Coprocessor ..............................................................................................................18
The special user: micuser ................................................................................................................................................................19
Network configuration...........................................................................................................................................................................19
Network file system considerations ........................................................................................................................................21
Implementation using Overlay: ..............................................................................................................................................22
Implementation using MicDir: ..................................................................................................................................................22
Implementation using CommonDir: ......................................................................................................................................23
Firewalls and coprocessor network access .........................................................................................................................23
Configuration Considerations ............................................................................................................................................................24
Power Management, the System Clock and Timing Measurements ....................................................................24
Peer to Peer ............................................................................................................................................................................................25
Rebuilding the RPM Files ......................................................................................................................................................................25
Rebuilding the card driver for the host..................................................................................................................................25
Rebuilding the GPL RPM ..................................................................................................................................................................25
Rebuilding the OFED RPMs ............................................................................................................................................................26
Rebuilding the GANGLIA RPMs ....................................................................................................................................................26
Troubleshooting .........................................................................................................................................................................................26
User does not show up in /etc/passwd file on the coprocessor when the file is autogenerated ....26
User does not show up in the /etc/passwd file on the coprocessor when an externally created file
is used .........................................................................................................................................................................................................26
User does not show up in the /etc/passwd file on the coprocessor when you have added them
using the micctrl --useradd? .........................................................................................................................................27
User cannot log in ................................................................................................................................................................................27
User’s home directory on the coprocessor is empty. ....................................................................................................28
4
Linux command returns “not found” on the coprocessor. ..........................................................................................28
System administration tool on the host will not run .....................................................................................................28
The coprocessor appears to be hung ......................................................................................................................................29
NFS is not mounting a network file system ........................................................................................................................29
The flash has been updated but the flash version is still showing as the old value .................................30
Changes made to files in /etc/sysconfig/mic have disappeared ............................................................................30
For the Inexperienced Linux System Administrator ...........................................................................................................30
“How to” questions .............................................................................................................................................................................30
Glossary .....................................................................................................................................................................................................31
Acknowledgements .................................................................................................................................................................................34
About the Author ......................................................................................................................................................................................34
5
Overview
This paper provides a look at the Intel Xeon Phi coprocessor from the system administrator’s point
of view.
A server powered by one or more Intel® Xeon® processors serves as the host for the coprocessor.
An individual host may have one or more coprocessors. The coprocessors are numbered from 0 to
(n-1) where n is the number of coprocessors in the system. A system may have up to 256
coprocessors although when peer to peer (coprocessor to coprocessor) communication is used the
number of coprocessors should be limited to 8.
Currently the host must run a version of the Linux* operating system, although support for running
Windows Server 2008* on the host is coming. A Linux microkernel runs on the coprocessor
regardless of what operating system is being used on the host.
The coprocessor card contains flash and SMC (System Management and Configuration) memory
which hold the BIOS, bootloader, small embedded kernel and firmware for the coprocessor. This
memory does not hold the Linux microkernel. The small embedded kernel is loaded from flash when
the coprocessor is initialized; the Linux microkernel is pulled over from the host when the
coprocessor is booted.
The coprocessor does not have direct access to any permanent file systems. All file systems must
be either RAM file systems (residing in coprocessor memory) or network files systems (residing on
disks attached to the host or other systems and accessed over the network.) The default
configuration uses a RAM file system for the root file system.
With a RAM file system, all files for the coprocessor reside within a directory structure stored on a
file system accessible on the host until the coprocessor is booted. When the coprocessor is booted, a
6
temporary file system is created in coprocessor memory and populated with files copied from the
host.
Because a RAM file system takes up space which might otherwise be used by running processes,
this root file system included in the Intel Manycore Platform Software Stack (Intel MPSS) is kept as
small as possible. This is achieved by limiting the commands and libraries included by default. The
majority of Linux commands are supplied by BusyBox (http://www.busybox.net), a single program
containing many of the standard Linux commands in a simplified implementation.
On the host, the device driver providing the basic PCIe interface to the coprocessor is a kernel
module named mic.ko. The host also runs the mpssd daemon which handles communication to the
coprocessor during boot. The system administration tools for the coprocessor also reside on the
host and are executed from there.
On the coprocessor side the coi_daemon (Coprocessor Offload Infrastructure daemon) runs
along with the standard Linux daemons. The coi_daemon handles process and space
management for programs written using the offload programming model. (See “Using the Offload
Compiler” in the Intel® Xeon Phi™ Coprocessor Developer’s Quick Start Guide)
Requirements for a system administrator
In order to administer the coprocessor, you must have super-user privileges on the host system,
either as the root user or as a user with sudo privileges. All commands in this paper are written as
if run by the root user. If they are run by a non-root user, the commands will need to be prefixed
with the sudo command. Sudo is the preferred method for safety and traceability reasons. In
either case, the root user must have an .ssh directory with valid RSA keys in root’s home directory
on the host.
Useful documentation
readme-xx.txt included with each Intel MPSS release (available at http://software.intel.com/enus/articles/intel-manycore-platform-software-stack-mpss)
Intel Manycore Platform Software Stack (Intel MPSS) Boot Configuration Guide (IBL document
number 328344-001US, provided with each Intel MPSS release) (available at
http://software.intel.com/en-us/articles/intel-manycore-platform-software-stack-mpss)
Intel Xeon Phi Coprocessor Developer’s Quick Start Guide (http://software.intel.com/enus/articles/intel-xeon-phi-coprocessor-developers-quick-start-guide)
Intel Xeon Phi Coprocessor System Software Developers Guide (http://software.intel.com/enus/articles/intel-xeon-phi-coprocessor-system-software-developers-guide)
Intel Manycore Platform Software Stack (Intel MPSS) Cluster Setup Guide (available soon)
Configuring Intel Xeon Phi coprocessors inside a cluster
(http://software.intel.com/sites/default/files/650_Intel_R__Xeon_Phi_tm__Cluster_configurationv081.pdf)
7
Using the Intel MPI Library on Intel Xeon Phi Coprocessor Systems (http://software.intel.com/enus/articles/using-the-intel-mpi-library-on-intel-xeon-phi-coprocessor-systems)
Debugging on Intel Xeon Phi Coprocessor Use Case Overview (http://software.intel.com/enus/articles/debugging-on-intel-xeon-phi-coprocessor-use-case-overview)
Intel and Third Party Tools and Libraries available with support for Intel Xeon Phi Coprocessor
(http://software.intel.com/en-us/articles/intel-and-third-party-tools-and-libraries-available-withsupport-for-intelr-xeon-phitm)
Intel Xeon Phi Coprocessor Instruction Set Reference Manual
(http://software.intel.com/sites/default/files/forum/278102/327364001en.pdf)
8
Installing, Configuring and Booting System Software for the Intel Xeon Phi
Coprocessor
The system software for the coprocessor, as well as the host software which supports the
coprocessor is collectively known as the Intel MPSS, the Intel Many Integrated Core (MIC) Platform
Software Stack. When installing a new Intel MPSS release, always consult the readme files that
accompany the software. They provide step by step instructions as well as the latest information on
currently supported host operating systems and any special configuration requirements for that
release.
First some preliminaries –
It may be necessary to modify the BIOS on your host system. The readme-xx.txt file will tell
you if there are any special BIOS requirements but check with the vendor of your host
system to see if these changes apply to your system.
The operating system for the host is not provided as part of the Intel MPSS software
release. As the administrator, you will need to obtain and install one of the supported Linux
distributions. If you choose to install an unsupported distribution, you should stop here and
read the section, “Rebuilding the RPM Files,” to understand why you do not want to do this.
When installing the host operating system, some software included with the operating
system will be optional. However, to use the Intel Xeon Phi coprocessor, the SSH software is
required. Also, it is recommended that you install a complete GNU build environment (gcc and
related tools) on the host.
If you have SELinux enabled on the host, disable it and reboot the host before installing the
Intel MPSS release. Failing to do this could result in unexplained ‘Connection refused’
messages when you attempt to log into the coprocessor.
If you are running the iptables service (the Linux firewall) on the host, disable it ( service
iptables stop) before installing the Intel MPSS release. Failing to do this could also
result in unexplained ‘Connection refused’ messages when you attempt to log into the
processor. When restarting the firewall after the installation is complete, it may be
necessary to adapt your settings.
The Intel MPSS is delivered as a compressed tar file containing:
A set of rpm files for the required host and coprocessor software
A gpl directory containing the source code and executables for the GPL (General Public
License) licensed components to be installed on the coprocessor (see
http://www.gnu.org/licenses/ for information on the GPL.)
A src directory containing the source code for kernel modules which may need to be
modified/recompiled if the software is installed on an unsupported version of the Linux
kernel
9
A docs directory containing the installation information (the readme-xx.txt files), the Intel
Software License Agreement, the Intel MPSS Boot Configuration Guide and the Intel Xeon
Phi Coprocessor Performance Workloads document (readme-perf-en.txt)
Other directories containing files used to adapt software such as OFED* and Ganglia* for use
with the coprocessor (see the section “Installing Other Commonly Used Software” for more
information)
Installing the Intel MPSS
Detailed directions for installing the Intel MPSS, including commands and options to be used, are
provided in the readme-xx.txt file included with the Intel MPSS release. Follow those directions. The
general procedure once you have the host operating system installed and booted is:
Stop, unload and uninstall any previous versions of the Intel MPSS driver - do not try to
upgrade an existing version.
Unpack the Intel MPSS tar file onto the host
Install the rpm packages you find in the top directory in the unpacked Intel MPSS
The rpm installation will place the following files on the host:
/usr/sbin/micctrl – the primary system administration command for booting and
controlling the coprocessor
/usr/sbin/mpssd – the daemon responsible for host side management of coprocessor
communication
/lib/firmware/mic/* - the operating system files for the coprocessor, including the
coprocessor’s Linux microkernel (uos.img), kernel modules and the vmlinux file
/lib/modules/<host-os-level>/extra/mic.ko – kernel module for the host
to drive the coprocessor card
/etc/modprobe.d/mic.conf – configuration options for mic.ko
/etc/sysconfig/modules/mic.modules – system configuration file configuring
mic.ko to load automatically
/etc/sysconfig/mic/* - coprocessor configuration files; these files are specific to
the Intel MPSS; these files set boot options, network configuration, locations of files defining
the coprocessor’s root filesystem and more; this directory will be empty the first time you
install the Intel MPSS; it will be populated when the configuration is initialized
/usr/linux-K1om-* - GNU cross-compiler tools; these allow you to generate binaries
on the host which will execute on the coprocessor
10
/opt/intel/mic/* - all other files
Except for micctrl, the system administration tools are located in /opt/intel/mic/bin.
You will want to add this directory to your PATH environment variable. You will also want to add
/opt/intel/mic/man to your MANPATH environment variable. Do not move the executables
out of /opt/intel/mic; the software relies on them being in this location.
At this point in the installation process, the mic kernel module will have been loaded into the host
kernel and will have brought each of the coprocessors to the ready state. A coprocessor is in the
ready state when it has gone through the initial power on process, the bootstrap microkernel is
loaded and executing and the coprocessor is ready to copy over and boot its Linux microkernel.
States of the Coprocessor
If the mpssd is running, you can use the command micctrl –s on the host to query the state
of the coprocessors.
•
resetting – The coprocessor is undergoing reset. A firmware program is testing and
initializing the hardware. This process must complete before any microkernel can be booted.
•
ready – The coprocessor has undergone reset. This is comparable to a PC waiting at the boot
select screen. At this point the coprocessor is ready for the Linux microkernel to be transferred
from the host and booted.
•
booting – The coprocessor is booting the Linux microkernel. This process can be interrupted
by a fresh reset.
•
online – The coprocessor is ready for use. The Linux microkernel has finished booting and
access via ssh or minicom should be possible.
Updating the Coprocessor’s Flash and SMC Memory
Each Intel MPSS release contains coprocessor flash and smc versions required for that release. When
the MPSS is installed, flash image files are placed in /opt/intel/mic/flash/ on the host. If the correct
version of flash is not already installed, you will need to update it. If you do not know what version
of flash you currently have installed, you can find out by using the command:
micflash –getversion 2 –device <n>
where <n> is the coprocessor number.
If the installed version has a lower version number than the files in /opt/intel/mic/flash, you will
need to update the flash. Be sure to follow the detailed directions in the readme-xx.txt file included
with the Intel MPSS release. Pay special attention to identifying which update file corresponds to
which coprocessor hardware. Using the wrong file will make the card unusable and require it to be
replaced. If you are uncertain of the hardware version for your coprocessor, the micinfo
command will provide the “MIC Silicon Stepping” identifier you need. (micinfo will give warnings
about incomplete information when the coprocessor is in the ready state. That is expected.)
11
After updating the flash, the host must be rebooted before proceeding. This will cause the
coprocessor cards to be re-initialized with the new version of flash and brought to the ready state.
A software reboot of a virtual machine on the host will not cause the coprocessor to be re-initialized.
If you are running the coprocessors using a virtual machine, a hardware reboot of the host will be
necessary at this point.
Configuring an Intel Xeon Phi coprocessor
The configuration files for an Intel Xeon Phi coprocessor are located in the directory
/etc/sysconfig/mic/ on the host. These are not Linux configuration files although some of the
information in these files is used to generate/update those files.
The coprocessor configuration files include:
default.conf –configuration items which are the same for all coprocessors regardless of the
number of coprocessors installed on the system
mic<n>.conf (where <n> is the coprocessor number) –configuration items which change
based on the identity of the coprocessor
conf.d/* - zero or more configuration files for configuring additional software you want to
install on the coprocessors
After initial installation of the Intel MPSS, no files are present in /etc/sysconfig/mic/ until you create
a default set of files with the command:
micctrl --initdefaults
Each line in these configuration files has the format “KeyWord value”. A complete list of the
configuration keywords with possible values can be found in the Intel Manycore Platform Software
Stack (Intel MPSS) Boot Configuration Guide.
Whenever these configuration files change, you need to propagate the changes using:
micctrl --resetconfig [mic<n>]
The mic<n> switch is optional if you wish to reconfigure all coprocessors in the system.
Configuring the Host Kernel Module
The mic kernel module is configured using the module parameter control file
/etc/modprobe.d/mic.conf on the host.
Any time /etc/modprobe.d/mic.conf is changed, the mpss service must be stopped and unloaded
before the change can take effect. Unloading the mpss service should cause the mic kernel
module to be unloaded from the host’s kernel. To check that the kernel module has successfully
unloaded, see if the module name shows up in the list of loaded modules:
lsmod | grep mic
12
If the module did not successfully unload, force it to unload:
modprobe –r –f mic
When the mpss service is restarted or the host is rebooted, the kernel module will be reloaded with
the new configuration.
Building the Root File System
The root file system for the coprocessor is constructed on the host and packaged into a compressed
cpio file. When the coprocessor is booted, the contents of this file are copied from the host to the
coprocessor and unpacked into the coprocessor’s ram disk.
The compressed file archive is created using the BaseDir, CommonDir, MicDir and Overlay entries in
the default.conf, mic<n>.conf and conf.d/* files under /etc/sysconfig/mic:
•
BaseDir – basic embedded Linux file system
•
CommonDir – files specific to coprocessors in general
•
MicDir – files specific to a single coprocessor
•
Overlay – additional files as needed; may occur multiple times in a configuration file
For more detailed information on how the root file system is built, see “The File System Creation
Process” in the Intel Manycore Platform Software Stack (Intel MPSS) Boot Configuration Guide.
Overlay entries are particularly useful when adding software packages to the coprocessor. In
addition to adding executables and libraries to the coprocessor’s root file system, they can be used
to add system configuration files to the coprocessor’s /etc directory. This allows you to both add
software and have it initialized or executed automatically when the coprocessor reboots. By placing
the Overlay entry in a separate file, you can add or remove the software from the coprocessor at
boot time by simply adding that file to or removing that file from the host’s
/etc/sysconfig/mic/conf.d directory and running micctrl --resetconfig.
Starting and Stopping the System
Detailed directions for starting the Intel MPSS can be found in the readme-xx.txt file included with
the Intel MPSS release. The first step is to start the mpss service on the host:
service mpss start
If the mic kernel module has not been loaded into the host kernel, it will be automatically loaded at
this point. The mpss service starts the mpssd daemon on the host. If the BootOnStart is set to
“enabled” in the mic<n>.conf file for coprocessor <n>, the mpss service will also cause that
coprocessor to be booted. This is the default behavior. If you choose not to enable BootOnStart for
one or more coprocessors, those coprocessors will sit in the ready state until you boot that
coprocessor individually:
13
micctrl --boot mic<n>
Coprocessors can be booted, shutdown, reset or rebooted without affecting the mpss service using
the micctrl commands with the –-boot, --shutdown, --reset or --reboot options
respectively. However, stopping the mpss service
service mpss stop
will also stop all coprocessors on the host as well as killing the mpssd daemon. It does not, however,
unload the mic kernel module from the host kernel. Unloading the service
service mpss unload
will cause the kernel module to be unloaded. You only need to unload the kernel module if you are
installing a new version of the Intel MPSS or changing the kernel module configuration.
When the host is rebooted, the mpss service is not restarted by default. You can change this
behavior with the Linux chkconfig command:
chkconfig mpss on
While you are installing a new Intel MPSS release, it is a good idea to disable the automatic start
with:
chkconfig mpss off
This will prevent the mpss service from automatically restarting when you reboot the host after
updating the coprocessor’s flash.
When a coprocessor is booted, either as part of executing service mpss start or by
executing the micctrl command, it copies the Linux microkernel from /lib/firmware (or other
location given by OSimage in the mic<n>.config file) on the host to the coprocessor’s memory. It also
copies the compressed root file system image for the coprocessor from /opt/intel/mic/filesystem on
the host to a RAM disk in memory on the coprocessor. The coprocessor’s Linux microkernel begins
executing. From this point on, a normal Linux boot process occurs, with daemons being started and
network connections being established.
When a coprocessor is booted, the command will return once the boot process has started. The
same is true when the micctrl command is used to shut down or reset the coprocessor. You can
add a –w to the micctrl command, which will force the command to wait until the operation is
complete and the coprocessor is in a steady state. This is especially important if you have written
any administrator scripts which depend on the coprocessor being up before they execute.
Although files are copied to the coprocessor when it is booted, files are not copied back to the host
when the coprocessor is shut down nor are those files preserved across reboots. Any file changes
made on the coprocessor which you want to save must be manually copied back to the host using
14
the scp command or copied to a network mounted disk (see “Configuring the Network”) before
shutting down the coprocessor.
Monitoring the Intel Xeon Phi Coprocessor
So far we have seen the micctrl command when it was used to control the state of the
coprocessor and we have seen the micflash command. The micctrl and micflash
commands can also be used to obtain information about the state of the coprocessor. In addition,
there are a number of other tools provided in the /opt/intel/mic/bin directory. You can get more
information about each of these commands from the man pages in /opt/intel/mic/man or by simply
executing the command with the –h option. All of these tools execute on the host.
micctrl
micctrl is the most heavily used of the administrator tools for the coprocessor. In addition to
controlling the coprocessor, it provides status information. For example:
micctrl --status
provides a simple status statement such as
mic0: online (mode: linux image: /lib/firmware/mic/uos.img)
indicating that the coprocessor is booted and running the Linux microkernel copied from
/lib/firmware/mic/uos.img on the host.
micflash
micflash updates the flash on the coprocessor. It also saves and retrieves the version and other
information for each section of the flash.
micinfo
micinfo provides information about host and coprocessor system configuration.
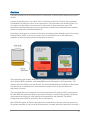
micsmc
micsmc is the System Management and Configuration (SMC) utility. It monitors the load,
temperature, etc. on the coprocessor. By default, the SMC runs in a GUI which refreshes every few
seconds. If you specify anyparameters on the micsmc command, it runs in command line mode
which does not refresh. This command can be used by a non-root user but not all the information is
visible.
micsmc lets you monitor system load for user contention, work distribution and memory usage. You
can see if users are oversubscribing the number of cores, if the work is packed onto a few cores
rather than spread out or if memory utilization is approaching 100%.
The advanced button on the GUI gives you access to log files, card information and a settings dialog.
15
miccheck
miccheck verifies the configuration of an Intel Xeon Phi coprocessor by running various
diagnostic tests. It is sometimes referred to as the sanity check because it can quickly provide you
with information from as basic as whether the coprocessor can be physically detected by the host
to the state of network connections to other coprocessors. You can run the whole suite of tests or
individual tests.
micrasd
micrasd runs diagnostics and logs error conditions to /var/log/messages on the host, prepending
a “micras” tag to each message. micrasd can be run in either command line mode or as a daemon
by adding the –daemon option. When run as a daemon, micrasd can automatically restart the
coprocessor under specified circumstances.
Linux commands on the coprocessor
Although no coprocessor specific administration commands are available on the coprocessor itself,
many of the usual Linux commands are available in /sbin and /usr/sbin, as well as useful but not
specifically administration commands in /bin and /usr/bin. The man pages are not provided as part of
the default root file system. In general, the man pages found on the host will provide the
information you need. Commands provided as part of BusyBox (many of the common Linux user
commands) may not support all the normal command line options. Information on these commands,
as well as other BusyBox restrictions can be found with the command
busybox -h
or by looking at http://www.busybox.net/.
Using a virtual console
When the Intel MPSS is started, a character special device file, /dev/ttyMIC<n>, is created on the
host for each coprocessor <n>. This file provides a virtual serial port to the coprocessor. It can be
used with a virtual console program such as minicom to provide an administrator console for the
coprocessor. In this context, console means an administrator’s terminal window, not a general user’s
terminal window. For directions on setting up minicom, see the readme-xx.txt file included with
the Intel MPSS release. Note that the minicom program itself is no longer provided with the Intel
MPSS but can be obtained from http://alioth.debian.org/projects/minicom/.
16
Installing Other Commonly Used Software
There are several software packages that are commonly installed to support the Intel Xeon Phi
coprocessor.
Various Intel Software Development Tools, such as Intel® Composer XE (containing compilers and
libraries), Intel® MPI Library and Intel VTune™ Amplifier XE tools provide support for both the
processor and coprocessor. By default, these tools install in /opt/intel on the host. Any shared object
libraries needed on the coprocessor must either be copied over to the coprocessor RAM disk or
network mounted onto the coprocessor. Programs using the offload programming model will
generally locate needed libraries and copy them over to the coprocessor as they run. For programs
that a user runs directly on the coprocessor, the user can either manually copy all the necessary
libraries from the host to the coprocessor or they can use
/opt/intel/mic/bin/micnativeloadex. The micnativeloadex program will
attempt to automatically detect library dependencies, copy the executable and libraries to the
coprocessor, then launch the program. However, network mounting the files can greatly simplify
things for the user and save on memory space. For a discussion on using the MPI library on the
coprocessor, see Using the Intel MPI Library on Intel Xeon Phi Coprocessor Systems.
In addition to Intel tools, there are a number of other software tools you may wish to install. Many
of these software packages require you to install a complete Linux build environment (compilers,
libraries and tools). The readme-xx.txt file included with the Intel MPSS release lists additional items
which must be installed with the different supported versions of Linux in order to have a complete
build environment on the host.
OFED
The OpenFabrics Enterprise Distribution (OFED) software allows the host and coprocessor to use
RDMA over the PCIe connection. OFED also allows the coprocessor to connect with other
coprocessors over an InfiniBand connection.
Directions for installing OFED can be found in readme-xx.txt file. You will need to install the open
source software from www.openfabrics.com, as well as the rpm files in the ofed directory that
comes with the Intel MPSS release. Pay careful attention to the order in which the services
associated with OFED are started and stopped. Also be sure to check the readme-xx.txt file included
with the Intel MPSS release to see which versions of OFED are currently supported and if there are
any known issues with different versions of InfiniBand.
Ganglia
Ganglia provides system monitoring via the web for clusters and grids. It provides graphical views of
system loads and memory usage. Where micsmc provides information on multiple coprocessors
installed on a single host, Ganglia provides information on coprocessors distributed on multiple hosts.
For information on GANGLIA see http://ganglia.sourceforge.net.
Directions for installing Ganglia can be found in the readme-xx.txt file. You will need to install the
open source software from http://ganglia.info/, as well as the rpm and tar files in the ganglia
directory that comes with the Intel MPSS release.
17
Eclipse*
Support for graphical debugging of user processes is provided by Eclipse. You will need to download
the Eclipse program from http://www.eclipse.org then add in the support files which come with the
Intel Composer XE. For directions, see Debugging on Intel® Xeon Phi™ Coprocessor Use Case
Overview
Additional software
For additional software you might wish to install, see Intel and Third Party Tools and Libraries
available with support for Intel® Xeon Phi™ Coprocessor
Adding Users to the Intel Xeon Phi Coprocessor
Using the offload programming model, it is not necessary for a user to have an account on the
coprocessor in order to run a program. Offloaded programs use a generic user, micuser, when
executing on the coprocessor. However, if a user wishes to run a native program (one which starts
execution on the coprocessor itself) or an MPI program, they will need to be able to log into the
coprocessor itself.
Users will automatically be added to the /etc/passwd file for the coprocessor if they have an entry
in the host’s /etc/passwd file, the user authentication method is set to local and their user id falls in
the range specified in the /etc/sysconfig/mic/default.conf file. (See “User Access” in Intel® Manycore
Platform Software Stack (Intel® MPSS) Boot Configuration Guide.) At the same time, a home
directory will be created for them in the disk image used to make the coprocessor’s RAM file system.
In addition to being in the host’s /etc/passwd file, users must have a .ssh directory in their home
directory on the host containing valid RSA keys. Users should not set a passphrase when they
generate their keys; encryption of this passphrase can cause difficulty in logging onto the
coprocessor. When a user’s home directory is created in the disk image for the coprocessor, the .ssh
directory is copied over. This is the only thing which is copied from the user’s home directory on the
host to the user’s home directory on the coprocessor.
Changes to the host’s /etc/passwd file or the user’s .ssh directory only take effect on the
coprocessor after the micctrl --resetconfig command is run and the coprocessor is
rebooted.
Users can also be added to the coprocessor’s /etc/passwd file using the micctrl --useradd
command. Directions for doing this can be found with the command micctrl --help. If you
choose to add users in this way, be sure to create a home directory for them as well, and ensure
that their .ssh directory is copied over. The easiest way to do this is to use the --home and
--sshkeys options on the micctrl --useradd command. If you choose to add users in this
way, be careful – some micctrl options such as --cleanconfig and --configuser can
completely remove and rebuild the coprocessor’s /etc/passwd file, causing you to lose users who
were added manually.
18
Users can be explicitly removed using the micctrl --userdel command. Again, be careful
since some options to micctrl can remove the coprocessor’s /etc/passwd file and remake it from
the host’s /etc/passwd file.
In addition to changing the coprocessor’s /etc/passwd file, you can change its /etc/groups file using
micctrl --groupadd and micctrl –-groupdel.
The special user: micuser
A user known as micuser is automatically created on each coprocessor. When a program running on
the host uses the Offload programming model to offload some of its work to a coprocessor, the
process running on the coprocessor will execute as micuser.
Any requests for data files and services are proxied back to the host, where it once again becomes
owned by the original user. However, library files and any temporary files on the coprocessor itself
will be accessed as micuser. Similarly, when the micnativeloadex command on the host is
used to execute a program on the coprocessor, the program will execute as micuser and all files will
be accessed as micuser. This can cause problems if the files are mounted over the network. In this
case, you will need to create a user named micuser on the host. You can do this using the normal
useradd and groupmod Linux commands. The micuser user and group ids should be set to 400
to match the default values on the coprocessor. A value of 400 falls outside the default range used
to automatically add users to the /etc/passwd file for the coprocessor. It is important that the id
value for micuser remains outside that range.
Network configuration
A virtual TCP/IP network connection between the host and the Intel Xeon Phi coprocessor is created
over the PCIe bus. How you go about configuring a network and the options you have is currently
undergoing changes. The information provided here shows setting up a static bridge using the
default.conf and mic<n>.conf files. The ability to use DHCP rather than a static bridge and to modify
the network using the micctrl command will be available soon.
In its simplest form, the network connection is between a single coprocessor and the host. By
default, the network address for the coprocessor is subnet.<n+1>.1 where subnet is the
first two octets for the Subnet value in the default.conf file and n is the coprocessor number. The
host side of this network connection has the address subnet.<n+1>.254. The default value for
Subnet is taken from the list of addresses reserved for private networks, for example, “Subnet
172.31”. An example of the network addresses that would be created is
Subnet:
Host side address of first coprocessor:
IP address of first coprocessor:
Host side address of second coprocessor:
IP address of second coprocessor:
172.31.0.0
172.31.1.254
172.31.1.1
172.31.2.254
172.31.2.1
To set up a network of this type, make sure the Subnet value is set in the default.conf file and that
the Bridge entry is commented out. The IP addresses will be generated automatically and updated in
the /etc/hosts files for the host and coprocessor when the coprocessor is booted. The name
19
assigned to the coprocessor will be <hostname>-mic<n> where hostname is the formal name
of the host. For example, if the host is called mymachine, the first coprocessor will be called
mymachine-mic0. From the host or from another coprocessor attached to that host, the coprocessor
can also be addressed by the name of mic<n>. The name assigned to the host side of the connection
from a coprocessor will be hostmic<n>. For example, the name associated with the host’s
connection from the first coprocessor will be “hostmic0”. Each coprocessor will address
the host using the name host.
It is also possible to set up the network connection to include communication between two or more
coprocessors on the same host. This is done by setting the value of Bridge in the default.conf file to
a name beginning with mic and uncommenting that line. For example:
Bridge micbr0
When the mpss service is started, an internet bridge will be created on the host with an entry for
the host and each of the coprocessors. In this case, the host side of the connection from all the
coprocessor is assigned the name hostmic and the address subnet.1.254. Each coprocessor
is assigned the name <hostname>-mic<n> and the address subnet.1.<n+1>.
Finally, it is possible to set up the network connection to include communication between the
coprocessors, the host and the network beyond the host. To do this, the bridge name in the
default.conf file must be set to a name that does not begin with mic, such as br0. The bridge
name needs to be unique on a single host but if you have multiple hosts (as in a cluster) you can use
the same bridge name on all the hosts.
In this case you will probably want to explicitly assign IP addresses rather than relying on the
automatically generated ones. To do this, specify the host IP address in the default.conf file using
the HostIPaddress keyword and specify the coprocessor IP address in the mic<n>.conf file using the
micIPaddress keyword.
When the bridge name does not start with mic, the mpss does not automatically create the bridge,
although it does add all the coprocessors to the bridge. Creating a bridge on the Linux host requires
creating a file /etc/sysconfig/network-scripts/ifcfg-<bridge_name> such as the following one:
DEVICE=br0
TYPE=Bridge
ONBOOT=yes
DELAY=0
NM_CONTROLLED=no
MTU=9000
BOOTPROTO=dhcp
NOZEROCONF=yes
and adding the following line to the network script for the host primary network interface (usually
/etc/sysconfig/network-scripts/ifcfg-eth0):
BRIDGE=<bridge_name>
20
There are a number of special considerations when setting up the coprocessor network for use as
part of a cluster. See Configuring Intel® Xeon Phi™ coprocessors inside a cluster for details.
Network file system considerations
The coprocessor itself has no directly attached disks. If you want a file system to be visible on the
coprocessor and have it reside on a disk rather than in memory, you will need to mount that file
system over the network. There are a number of reasons you would want to do this:
users can have the same home directory on the host and coprocessor
users can easily access and store large data files when running programs natively on the
coprocessor
you can make more programs and libraries available on the coprocessor without using up
memory on the coprocessor
NFS is available on the coprocessor as part of the Intel MPSS release. It is possible to add other
network file systems as well. See the Configuring Intel Xeon Phi coprocessors inside a cluster for
information on building and using Lustre and Panasas*.
In order to use NFS, you must first set up a network which allows the coprocessor and the system
acting as the file server to address each other. The default network configuration will allow you to
use disks connected to the host. To access disks on an NFS server beyond the host, you will need to
set up a bridge as described in the opening section of this chapter.
Suppose you wanted to mount files from a directory called /large_data on a remote system named
bigdataserver to a location call /permanent_large_data on the coprocessor. When setting up
NFS, the setup for the system acting as the file server is the same as it would be in any other case.
The /etc/exports file on that system must contain a line such as:
/large_data {coprocessorIPaddress}(rw,no_root_squash)
The /etc/hosts.allow file on that system might need to contain a line such as:
ALL:{coprocessorIPaddress}
Whenever you change one of these files, run
exportfs –a
to be sure the changes are pushed out to the system.
On the coprocessor, you will need to create a directory which can be used as the mount point and
you will need to add directions for mounting the network file system. There are several ways to do
this, all involving changes to the root file system that is copied over to the coprocessor at boot time.
21
Implementation using Overlay:
Using an Overlay entry has the advantage that it keeps all of the details separate from and
independent of the default configuration files. To do this, create a directory on the host where you
can store the files you will need; for example, a directory named /usr/local/mycoprocmounts. In that
directory, put a file, called for example mycoprocmounts.filelist containing lines similar to:
dir /etc/ 755 0 0
dir /etc/init.d 755 0 0
file /etc/init.d/mountlargedata etc/init.d/mountlargedata
755 0 0
dir /etc/rc3.d 755 0 0
slink /etc/rc3.d/S97mountlargedata ../init.d/mountlargedata
777 0 0
dir /permanent_large_data 755 0 0
Also in that directory, create a file that matches the file directive – in this case
etc/init.d/mountlargedata. In that file put a mount command such as:
mount -o nolock bigdataserver:/large_data
/permanent_large_data
Next create a file, for example a file named mynfsmounts, in the /etc/sysconfig/mic/confg.d
directory. In that file put the line:
Overlay /usr/local/mycoprocmounts /usr/local/mycoprocmounts/mycoprocmounts.filelist
Use the micctrl --resetconfig command to make sure the changes take effect. The next
time the coprocessor is booted, the files from /large_data on the remote system should appear
under /permanent_large_data on the coprocessor.
Implementation using MicDir:
This method has the advantage of being simple.
Add the mount information to the coprocessor’s fstab file using the micctrl command or by hand
as shown here.
In the file /opt/intel/mic/filesystem/mic<n>/etc/fstab, where <n> is the number of the coprocessor
you want to mount the network file system to, add the line:
bigdataserver:/large_data /permanent_large_data nfs
rsize=8192,wsize=8192,nolock,intr 0 0
In the file /opt/intel/mic/filesystem/mic<n>.filelist add the line:
dir /permanent_large_data 755 0 0
22
Use the micctrl --resetconfig command to make sure the changes take effect. The next time the
coprocessor is booted, the files from /large_data on the remote system should appear under
/permanent_large_data on the coprocessor.
Implementation using CommonDir:
This has the advantage of making the change on all coprocessors attached to the host.
Under /opt/intel/mic/filesystem/common, create a subdirectory called etc. Copy the file
/opt/intel/mic/filesystem/mic0/etc/fstab to this new directory. To this copy, add the line:
bigdataserver:/large_data /permanent_large_data nfs rsize=8192,wsize=8192,nolock,intr 0 0
If it does not already exist, create the file /opt/intel/mic/filesystem/common.filelist. Add the
following lines to this file:
dir /permanent_large_data 755 0 0
file /etc/fstab etc/fstab 664 0 0
In the file /opt/intel/mic/filesystem/mic<n>.filelist, for each coprocessor, remove the fstab file entry.
Use the micctrl --resetconfig command to make sure the changes take effect. The next
time the coprocessor is booted, the files from /large_data on the remote system should appear
under /permanent_large_data on the coprocessor.
Firewalls and coprocessor network access
At this time, firewalls interfere with some network commands, such as ssh, used to communicate
with the coprocessor. If you are running selinux and find you are getting unexplained ‘Connection
refused’ messages, try the following:
1) Disable selinux (/etc/selinux/config) on the host and reboot the host
2) Stop the mpss service
3) Save off a copy of any configuration files in /etc/sysconfig/mic which you have modified
4) Execute ‘micctrl --cleanconfig’
5) Execute ‘micctrl --initdefaults’
6) Restore any changes you wish to keep from your old configurations files to the new files in
/etc/sysconfig/mic
7) Start mpss service ‘service mpss start’
23
Configuration Considerations
Power Management, the System Clock and Timing Measurements
There are a number of tradeoffs that can be made between power and performance. For the
coprocessor, you make these tradeoffs using the PowerManagement keyword in the default.conf
file. The power management options enable or disable sleep states and set frequency adjustments
that can be made when a coprocessor core is idle. To get an idea of how these changes affect
performance see the “Interpreting Power Analysis Data” section in Intel® VTune™ Amplifier XE 2013.
In addition to affecting performance, power management options can affect the timing
measurements used to calculate performance. The initial time on the coprocessor is set on boot
from the host system. After that, time can be measured either by referring to the Elapsed Time
Counter (ETC) or the Time Stamp Counter (TSC). By default the ETC is used as the clock for the
coprocessor.
There is one ETC for each coprocessor card. It is independent of power management, making it a
very precise time measurement. However, access time to the ETC is affected by ring bus latencies
and contention between cores. A call to a routine such as gettimeofday() can be 100 times slower
than a call to gettimeofday() when TSC is used.
Each core on the coprocessor has its own TSC. The TSC is affected by a core’s power management
features but has a fast access time. To obtain reliable timings using TSC, it is necessary to disable
most of the power management features. If the kernel detects that the TSC timings appear to be
unreliable, it will switch to using “jiffies,” which are based on the system interrupt timer. Jiffies have
a timing resolution of only 10ms.
You can check to see which clock source is being used by looking at the
/sys/devices/system/clocksource/clocksource0/current_clocksource file on the coprocessor. To
change between the ETC and the TSC, you can change the default.conf file, reset the configuration
and restart the coprocessor. If the coprocessor has switched to using jiffies, you can restart the
coprocessor to get back to using the TSC.
To change the clock source without rebooting, log onto the coprocessor as root, find the names of
the available clock sources
cat /sys/devices/system/clocksource/clocksource0/\
available_clocksource
and change the value of clock source in current_clocksource. For
example:
echo tsc > /sys/devices/system/clocksource/clocksource0/\
current_clocksource
24
Peer to Peer
In order for one coprocessor to directly address a second coprocessor on the same host or over a
direct PCIe connection, peer to peer support must be enabled in the /etc/mocprobe.d/mic.conf file.
The default is for it to be enabled.
When a large number (>8) of coprocessors are installed in a host, the time required for a
coprocessor to enable peer to peer to all other coprocessors can result in a timeout error. However,
disabling peer to peer will break any code using SCIF (Symmetric Communications Interface) routines
which rely on that type of access. This tradeoff should be kept in mind when deciding how many
coprocessors you want to install on a given host.
Rebuilding the RPM Files
It is strongly recommended that you use the rpm files from the Intel MPSS package as is. However, if
you are using an unsupported host operating system, you will need to rebuild the files for the kernel
modules. The term “unsupported host operating systems” includes supported operating systems
containing unsupported updates.
If you install one of the supported host operating systems, it will often automatically download
updates. These updates cause the host OS to be categorized as “unsupported.” To avoid rebuilding
the rpm files, you can revert to the supported release by editing the file /boot/grub/menu.lst. In this
file, count the number of kernel entries, starting from 0 (the latest version, at the top of the list) to
the supported version. Change the value of the “default” variable from 0 to the number of the
kernel entry you want to use. The next time the host is rebooted, the grub (GRand Unified
Bootloader) Linux routine will automatically load that kernel instead of the latest one.
Rebuilding the card driver for the host
The source code, intel-mic-kmod-<version>.src.rpm, for the mic kernel module can be found in the
src directory included with Intel MPSS.
Before the kernel module can be rebuilt, the kernel header files must be installed. For the supported
versions of Linux, the readme-xx.txt file from Intel MPSS release provides the names of the rpm
packages required. The names of the packages required for unsupported versions of Linux may be
different.
Depending on the Linux distribution you are using, the ability to rebuild kernel modules may be
disabled by default. If it is, check the documentation for your distribution to learn how to enable this
capability.
The kernel module is rebuilt using the rpm –rebuild command. If the rebuild fails or if the rebuilt
kernel module does not function properly, Intel cannot provide support for unsupported kernels.
Rebuilding the GPL RPM
Typically it is not necessary to rebuild the intel-mic-gpl rpm file when an unsupported version of
Linux is installed on the host, but the code is provided in the gpl/package-full_src-k1om.tar.bz2 file
25
included with the Intel MPSS release. Directions for rebuilding the rpm file are found in the readmexx.txt file from the Intel MPSS release.
Rebuilding the OFED RPMs
The source code for the OFED rpm files can be found in the src directory included with the Intel
MPSS. Use of an unsupported kernel will require that the mic-ofed- rpm file be rebuilt. As with the
mic.ko kernel module, the kernel header files must be installed and the system must be configured
to allow kernel modules to build. As with the GPL rpm file, the mic-ofed-card rpm file will not
necessarily require rebuilding when an unsupported kernel is used.
Rebuilding the GANGLIA RPMs
The source code for the GANGLIA rpm file can be found in the src directory included with the Intel
MPSS. Use of an unsupported host operating system might require a rebuild. As with the card driver,
the kernel header files must be installed and the system must be configured to allow kernel modules
to build.
Troubleshooting
User does not show up in /etc/passwd file on the coprocessor when the file is
autogenerated
1. Is the user in the /etc/passwd file on the host? The autogenerated /etc/passwd file for the
coprocessor is based on the host’s /etc/passwd file.
2. Is the user’s id number on the host in the range specified by the UserAuthentication option
in the /etc/sysconfig/mic/default.conf or /etc/sysconfig/mic/mic<n>.conf files? A user entry
is copied from the host’s /etc/passwd file to the coprocessor’s /etc/passwd file only if
UserAuthentication is set to Local and the user id falls within the range specified.
3. Does the /etc/sysconfig/mic/mic<n>.conf file you are looking at correspond to the
coprocessor, mic<n>, where the problem is? UserAuthentication must be specified in the
configuration for each coprocessor.
4. Have you run micctrl --resetconfig since you added the user to the host’s
/etc/passwd file? The --resetconfig pushes changes to the files under
/etc/sysconfig/mic out to the /opt/intel/mic/filesystem files. This includes rebuilding the
/etc/passwd file for the coprocessor.
User does not show up in the /etc/passwd file on the coprocessor when an externally
created file is used
1. Are you replacing the default /etc/passwd file created by micctrl with your own file?
There are several ways to do this. You can use an Overlay entry to automatically copy your
password file over the automatically generated password file in the
/opt/intel/mic/filesystem/mic<n>.image file. You can manually copy your password file over
26
the /opt/intel/mic/filesystem/mic<n>/etc/passwd file before booting the coprocessor. You
can also copy your password file over /etc/passwd on the coprocessor after booting it.
2. Have you run micctrl --resetconfig since copying your password file over
/opt/intel/mic/filesystem/mic<n>/etc/passwd? Some options to micctrl, such as
--resetconfig, will overwrite any changes you have made to files under the
/opt/intel/mic/filesystem/mic<n> directory.
3. Have you rebooted the coprocessor either by using micctrl --boot or by restarting
the mpss service since you made your changes? Changes you make to
/opt/intel/mic/filesystem/mic<n>/etc/passwd will not show up on the coprocessor until you
reboot it. On the other hand, changes you make to /etc/passwd on the coprocessor itself will
be overwritten by the file in /opt/intel/mic/filesystem/mic<n>.image when the coprocessor
is rebooted.
User does not show up in the /etc/passwd file on the coprocessor when you have added
them using the micctrl --useradd?
1. Did you add the user to the coprocessor you are looking at? You must either specify the
specific coprocessor number you want to add the user to or you must specify no
coprocessor number to add the user to all coprocessors on the system.
2. Did you add the user after this coprocessor was installed? If you have added a new
coprocessor since you added the user, the user will need to be specifically added to that
coprocessor even if the user was originally added to all coprocessors.
3. Have you rebooted the coprocessor since adding the adding the user? Changes to the
password file made with micctrl --useradd are not pushed out to the coprocessor
until it is rebooted.
4. Have you run micctrl --resetconfig since adding the user? Changes made to the
password file with micctrl --useradd are overwritten with the automatically
generated password file when the --resetconfig option is used.
User cannot log in
1. Does the user show up in the /etc/passwd file on the coprocessor RAM file system? The
user must exist on the coprocessor before they are able to log in.
2. Is the user using ssh to log in? The user must use a secure login to log into the coprocessor.
3. Does the user have a valid .ssh directory in their home directory on the host? If you are
using the automatically generated /etc/passwd file and home directories on the coprocessor,
the .ssh directory will have been copied from the host home directory to the default home
directory on the coprocessor. The key in that directory must be a valid RSA key.
4. Did the user set a passphrase when they generated their RSA key? Depending on the
version of Linux you are using, there can be differences in the encryption of the passphrase.
27
If the user created the key using a passphrase they should remove the key and generate a
new one without a passphrase.
5. If the user’s home directory is mounted from a network file system, does that home
directory contain a valid .ssh directory? If the home directory being used on the coprocessor
is not the default one created by micctrl, you must make sure the .ssh directory for each
user finds its way to that alternate home directory.
6. Are you running SELinux on the host? Secure Linux uses different file permissions for some
directories than those expected by ssh on the coprocessor. If you install the Intel MPSS
with SELinux enabled, uninstall the MPSS, disable SELinux and reinstall the Intel MPSS.
7. Has the user defined StrictHostKeyChecking in the ssh options? If yes, does
their .ssh/known_hosts file contain the correct key?
User’s home directory on the coprocessor is empty.
1. Is the home directory for the user the default directory created by micctrl? The default
home directory created by micctrl contains only the .ssh directory and a .profile file.
2. Is the home directory for the user located on the coprocessor itself? The only file space
directly on the coprocessor is on the RAM disk in the coprocessor’s memory. Files the user
leave in that directory will be lost when the coprocessor is rebooted.
3. Is the home directory mounted from a network file system? Make sure the file system is
mounted correctly and that the home directory listed in the /etc/passwd file matches the
name of the home directory that has been mounted over the network.
Linux command returns “not found” on the coprocessor.
1. Is the command provided on the coprocessor? To save space the coprocessor contains only a
subset of the usual Linux commands. Check to see if the command is installed on the
coprocessor.
2. Is the command a link to BusyBox? Many of the commands on the coprocessor are provided
as links to the file /bin/busybox. Make sure the file /bin/busybox exists and the command
you are trying to use points to the correct file.
3. Is the command in your path? Check your PATH variable to be sure it points to the directory
where the command is located.
System administration tool on the host will not run
1. Some tools provided in the Intel MPSS package only work if the coprocessor is booted.;
2. Some tools provided in the Intel MPSS package only work if the coprocessor is in the ready
state and the mpssd daemon is running.
a. micctrl --boot
28
3. Some tools provided in the Intel MPSS package only work when the coprocessor is in ready
state and the mpssd daemon is not running.
a. micctrl --initdefaults
b. micctrl –-resetconfig
c. micctrl –-resetdefaults
d. micctrl –-cleanconfig
The coprocessor appears to be hung
1. Does micctrl –-status say that the coprocessor is online? Try connecting to the
coprocessor using a virtual console.
2. Does miccheck say that the coprocessor is detected? If it is not detected, there may be a
hardware problem. Check to be sure the coprocessor is properly seated in the PCIe
connector. Review any recent installs that have been done to be sure the proper version of
flash was installed. If the flash that was installed was for a different version of the
coprocessor, contact the supplier for your coprocessor card. The problem may be
unrecoverable.
3. Does miccheck say that the host OS can talk to the coprocessor?
4. Does miccheck say that the network connections are working? Try connecting to the
coprocessor using a virtual console and using the standard Linux networking command to be
sure the network is configured properly.
NFS is not mounting a network file system
1. Is the remote system allowed to export the files? The /etc/hosts.allow file on the remote
system must allow the coprocessor to have NFS access. The /etc/exports file must list the
directories that can be exported to the coprocessor.
2. Have you run exportfs –a? Any NFS daemons which are running when you change
/etc/hosts.allow and /etc/exports won’t see the changes until you run the exportfs
command.
3. Are the proper deamons running on the remote system? The daemons required to export
files differ slightly between versions of Linux. Check the documentation for the remote
host’s operating system to be sure the proper NFS daemons are running.
4. Are there firewalls between the coprocessor and remote system? Make sure ports 111
(portmapper) and 2049 (the nfs server) are not being blocked by any firewalls.
5. Has the coprocessor attempted to mount the file system? You must either have a line in the
/etc/fstab file on the coprocessor that provides mounting directions at boot time or you
must execute a mount command, either by hand or by running a startup script.
29
6. Do you have a mount point for that file system on the coprocessor? Before you can mount a
file system over the network, you must have a directory on the coprocessor which can serve
as the parent directory for the files that are being mounted. Make sure you have created
that directory in the filelist file used to construct the disk image for the coprocessor.
7. Can you ping the coprocessor from the file server and the file server from the coprocessor?
You must have a network connection in order to mount network file systems. Check to be
sure your IP addresses, netmask and subnet are correct and that, if the coprocessor requires
a bridge to reach the remote host, the bridge is properly configured.
8. Do the MTU sizes along the path between the coprocessor and the file server match? If the
MTU sizes between the coprocessor and file server do not match, NFS will be unable to
mount the file system even if ping succeeds. You can log onto the file server and use the
traceroute –-mtu command to determine the mtu sizes along the path. Alternately
you can use the ifconfig command on each system to see how each interface is
configured.
9. Is your NFS file server using NFS version 3? NFS version 4 is not currently supported by the
Intel MPSS.
The flash has been updated but the flash version is still showing as the old value
1. Did you reboot the host after updating the flash? Changes to flash show up only after the
coprocessor card has been fully reinitiallized.
2. Are you using the coprocessor from a virtual machine on the host? A software reboot of the
virtual machine does not reinitiallize the coprocessor card. You must power cycle the host
before changes in the flash take effect.
Changes made to files in /etc/sysconfig/mic have disappeared
1. Have you run micctrl --resetdefaults ? This option resets your configuration
files to default values. If you want to save your changes, run
micctrl –-cleanconfig. This will backup your configuration
files and remove the actual files.
For the Inexperienced Linux System Administrator
“How to” questions
How do I find out the version of Linux running on the host system?
cat /etc/system-release
Is it better to log in as root or precede commands with sudo?
The sudo command leaves a better record of who did what and prevents you from
accidentally doing something as root that you don’t intent to (such as rm –rf *).
30
How do I find out what kernel modules are installed?
lsmod
How do I find out if a specific module is installed?
lsmod | grep <name_of_the_module_I_am_interested_in>
How do I findout which file systems are mounted?
mount
How do I find out which network interfaces are configured on a system?
ifconfig
How do I find out if I have a network connection to another system?
ping <ip_address_of_target_system>
How do I find out which path a network connection followed?
traceroute <ip_address_of_target_system>
Where can I go to find out more about a particular command?
If you installed the man pages (manual pages) when you installed your host operating
system:
man command_name_I_am_interested_in
Glossary
BIOS - Basic Input/Output System, the interface on the host which executes firmware from the
system’s ROM to initialize and test the system hardware at boot time, then manage and monitor the
hardware after boot
COI – Coprocessor Offload Infrastructure, library routines and a daemon used when work is being
offloaded from the host to the coprocessor; responsible for coordinating the moving of data,
executables and libraries between the host and coprocessor and for managing process setup and
teardown on the coprocessor
coi-daemon – the daemon which runs on the coprocessor and controls setup and teardown of
processes that are offloaded from the host to the coprocessor
flash – ROM memory on the coprocessor containing the software used to initialize the coprocessor
Ganglia – a tool providing web based system monitoring for clusters and grids; see
http://ganglia.sourceforge.net
31
GPL – the General Public License (the Gnu license), which requires anyone providing executables
built with GPL licensed code to also make the source code available – hence the gpl directory in the
Intel MPSS release
grub - GRand Unified Bootloader, the Linux utility responsible for selecting the desired version of
the operating system at boot time
host – a computer system containing one or more coprocessor cards
kernel module – a section of executable code which can be added to or removed from the operating
system kernel without needing to reboot the system; kernel modules are often used to add drivers
to the kernel, as in the case of the mic kernel modules which provides the driver for accessing the
Intel® Xeon Phi™ coprocessor card
Linux service – a program or set of programs which run in the background, waiting to perform some
action for the users; Linux services are controlled from scripts in /etc/rc.d/init.d which set up a
known environment in which the service is executed; in the case of the mpss service, the mpss
script starts the mpssd only after ensuring that the mic kernel module is installed and checking on
the status of the coprocessor cards using the micctrl command; the script also provides the
ability to stop or restart the mpssd and to remove the mic kernel module from the host’s kernel
Intel MIC – Many Integrated Core architecture, the architecture used for the Intel® Xeon Phi™
coprocessor
Intel MPSS - the Many Integrated Core (MIC) Platform Software Stack, the collection of software,
including firmware, daemons, kernel modules, administrative tools, Linux uOS and Linux commands,
required by the Intel Xeon Phi coprocessor
mpssd – the daemon which runs on the host and is responsible for communicating with the
coprocessor
OFED - the OpenFabrics Enterprise Distribution (OFED), provides support for performing RDMA
(remote direct memory access, see below) between computer systems; see www.openfabrics.com
PCIe - Peripheral Component Interconnect Express; a high speed serial expansion bus standard; Intel
Xeon Phi coprocessor cards are connected to their host system via PCIe connections
RAM FS – a file system which is stored in the machines memory rather than on a disk or other
permanent medium
RDMA – Remote Direct Memory Access, the ability to read or write to another system’s memory
without the involvement of that system’s CPU; RDMA minimizes overhead in the communication
between network systems thereby optimizing bandwidth and latency
rpm – a software package manager that can build, install, update and uninstall software packages
known as rpm files
32
RSA keys – a pair of keys, one publicly know and one known only to its owner, generated using the
RSA algorithm; the SSH (secure shell) routines use this pair of keys to encrypt and decrypt
information sent between two computer systems
SCI (formerly SCIF) – Symmetric Communications Interface, a mechanism for internode
communication used to communicate between the host and coprocessor over the PCIe connection
SMC - System Management and Configuration, an interface on coprocessor which executes firmware
from ROM to configure, manage and monitor the coprocessor’s hardware
sudo – a command which allows you to execute another command as if you were a different user,
often used to allow a limited set of users to execute a specified set of commands with superuser
(root) privileges without needing to provide them with the root password
uOS – micro-OS, a small operating system; uOS can refer to the small boot kernel which is stored in
flash on the coprocessor and is used to bring the coprocessor to the ready state; it can also refer to
the small Linux kernel which is copied from the host to the coprocessor at boot time
33
Acknowledgements
I would like to thank all the individuals who provided information, documentation and feedback in an
effort to keep me honest about how an Intel Xeon Phi coprocessor is administered, especially,
Michael Hebenstreit, Charles Congdon, Taylor Kidd, Loc Nguyen and Sumedh Naik. Of course, any
mistakes I manage to slip past them are purely my responsibility.
About the Author
Frances Roth received a Bachelor’s degree in Math from MIT, a Master’s
degree in Geoscience from the University of Arizona and did graduate
work in Computer Science at the University of Maryland, Baltimore County.
She is currently a software engineer with Intel Corporation's Software
and Services Group. Her interests include parallel processing and Fortran
.
34
Notices
INFORMATION IN THIS DOCUMENT IS PROVIDED IN CONNECTION WITH INTEL PRODUCTS. NO LICENSE,
EXPRESS OR IMPLIED, BY ESTOPPEL OR OTHERWISE, TO ANY INTELLECTUAL PROPERTY RIGHTS IS
GRANTED BY THIS DOCUMENT. EXCEPT AS PROVIDED IN INTEL'S TERMS AND CONDITIONS OF SALE FOR
SUCH PRODUCTS, INTEL ASSUMES NO LIABILITY WHATSOEVER AND INTEL DISCLAIMS ANY EXPRESS OR
IMPLIED WARRANTY, RELATING TO SALE AND/OR USE OF INTEL PRODUCTS INCLUDING LIABILITY OR
WARRANTIES RELATING TO FITNESS FOR A PARTICULAR PURPOSE, MERCHANTABILITY, OR
INFRINGEMENT OF ANY PATENT, COPYRIGHT OR OTHER INTELLECTUAL PROPERTY RIGHT.
A "Mission Critical Application" is any application in which failure of the Intel Product could result, directly or indirectly,
in personal injury or death. SHOULD YOU PURCHASE OR USE INTEL'S PRODUCTS FOR ANY SUCH MISSION
CRITICAL APPLICATION, YOU SHALL INDEMNIFY AND HOLD INTEL AND ITS SUBSIDIARIES,
SUBCONTRACTORS AND AFFILIATES, AND THE DIRECTORS, OFFICERS, AND EMPLOYEES OF EACH,
HARMLESS AGAINST ALL CLAIMS COSTS, DAMAGES, AND EXPENSES AND REASONABLE ATTORNEYS'
FEES ARISING OUT OF, DIRECTLY OR INDIRECTLY, ANY CLAIM OF PRODUCT LIABILITY, PERSONAL
INJURY, OR DEATH ARISING IN ANY WAY OUT OF SUCH MISSION CRITICAL APPLICATION, WHETHER OR
NOT INTEL OR ITS SUBCONTRACTOR WAS NEGLIGENT IN THE DESIGN, MANUFACTURE, OR WARNING OF
THE INTEL PRODUCT OR ANY OF ITS PARTS.
Intel may make changes to specifications and product descriptions at any time, without notice. Designers must not
rely on the absence or characteristics of any features or instructions marked "reserved" or "undefined". Intel reserves
these for future definition and shall have no responsibility whatsoever for conflicts or incompatibilities arising from
future changes to them. The information here is subject to change without notice. Do not finalize a design with this
information.
The products described in this document may contain design defects or errors known as errata which may cause the
product to deviate from published specifications. Current characterized errata are available on request.
Contact your local Intel sales office or your distributor to obtain the latest specifications and before placing your
product order.
Copies of documents which have an order number and are referenced in this document, or other Intel
literature, may be obtained by calling 1-800-548-4725, or go
to: http://www.intel.com/design/literature.htm
Intel, the Intel logo, VTune, Cilk, Phi and Xeon are trademarks of Intel Corporation in the U.S. and other countries.
*Other names and brands may be claimed as the property of others
Copyright© 2013 Intel Corporation. All rights reserved.
35
Optimization Notice
Intel's compilers may or may not optimize to the same degree for non-Intel microprocessors for
optimizations that are not unique to Intel microprocessors. These optimizations include SSE2, SSE3, and
SSE3 instruction sets and other optimizations. Intel does not guarantee the availability, functionality, or
effectiveness of any optimization on microprocessors not manufactured by Intel.
Microprocessor-dependent optimizations in this product are intended for use with Intel
microprocessors. Certain optimizations not specific to Intel microarchitecture are reserved for Intel
microprocessors. Please refer to the applicable product User and Reference Guides for more information
regarding the specific instruction sets covered by this notice.
Notice revision #20110804
36