1
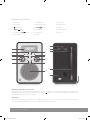
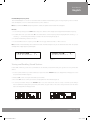
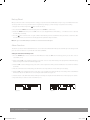
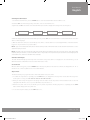
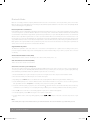
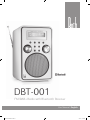
DBT-001
FM/DAB+ Radio with Bluetooth Receiver
User Manual : English
DBT-001 Manual VJ.indd 1
7/8/12 13:23:09
Contents
Important Safety Precautions........................................................... 3
Features and Controls.. .................................................................... 4
Listening to your radio...................................... ............................. 5-6
Storing and Recalling Stored Stations ................................................ 7
Factory Reset.................................................. ............................... 8
Alarm Function.. ........................................................................... 8-9
Bluetooth Mode.............................................. ......................... 10-11
Aux Input, USB Port, Headphone Jack, Display Backlight.. ..................... 11
Specifications.................................................................... Back Page
Thank you...
Thank you for purchasing the Roth DBT-001 FM/DAB/DAB+/Bluetooth radio.
We sincerely hope that you enjoy using this radio for many years to come.
Turn It Up.
2
|
Roth DBT-001 User Manual
DBT-001 Manual VJ.indd 2
7/8/12 13:23:10
User Manual
English
Important Safety Precautions
READ BEFORE OPERATING EQUIPMENT
Mains Cable
Read all the instructions carefully before using the unit and keep
- Make sure the unit is not resting on top of the mains cable, as the weight
them for future reference. Check that the voltage marked on the
of the unit may damage the mains cable and create a safety hazard.
rating label matches your mains voltage.
Location of Unit
- The unit must be placed on a flat stable surface and should not be
subjected to vibrations.
- Do not place the unit on sloped or unstable surfaces as the unit
may fall off or tip over.
- The mains socket must be located near the unit and should be
easily accessible.
- Avoid extreme degrees of temperature, either hot or cold. Place the
unit well away from heat sources such as radiators or gas/electric
fires. Avoid exposure to direct sunlight and other sources of heat.
- If the mains cable is damaged it must be replaced by the
manufacturer, its service agent, or similarly qualified persons in order
to avoid a hazard.
Interference
- The normal function of the product may be disturbed by Strong Electro
Magnetic Interference. If so, simply reset the product to resume normal
operation by following the instruction manual. In case the function
could not resume, please use the product in other location.
- This unit includes micro-processors which may malfunction as a result
of external electrical interference/noise or electrostatic discharge. If
the unit is not working properly, disconnect the power source and
then reconnect it.
- Never place any type of candle or naked flame on the top of or
near the unit.
- To reduce the risk of fire, electric shock or product damage, do not
expose this unit to rain, moisture, dripping or splashing. No objects
filled with liquids, such as vases, should be placed on the unit.
- If you spill any liquid into the unit, it can cause serious damage.
Switch it off at the mains immediately. Withdraw the mains plug
and consult your dealer.
- To prevent the risk of electric shock or fire hazard due to
overheating, ensure that curtains and other materials do not
obstruct the ventilation vents.
- Do not install or place this unit in a bookcase, built-in cabinet or in
another confined space, ensure that a minimum of 10cm should
be kept around the apparatus for ventilation.
Supervision
- Children should be supervised to ensure that they do not play with
the unit.
- Never let anyone especially children push anything into the holes,
slots or any other openings in the case - this could result in a fatal
electric shock.
Service / Maintenance
- To reduce the risk of electric shock, do not remove screws. The
unit does not contain any user-serviceable parts. Please leave all
maintenance work to qualified personnel.
- Do not open any fixed covers as this may expose dangerous voltages.
- Ensure to unplug the unit from the mains socket before cleaning. Do
not use any type of abrasive pad or abrasive cleaning solutions as these
may damage the unit’s surface. Do not use liquids to clean the unit.
Safety
- Always disconnect the unit from the mains supply before
connecting/disconnecting other devices or moving the unit.
- Unplug the unit from the mains socket during a lightning storm.
- This unit will become warm when used for a long period of time.
This is normal and does not indicate a problem with the unit.
Caution
Risk of electric shock do not open!
Caution: To Reduce the risk of electric shock, do not
remove cover (or back). No user serviceable parts inside.
Refer servicing to qualified service personnel.
DANGEROUS VOLTAGE
ATTENTION
Conductor dangerous voltage, that may be of sufficient magnitude to constitute
The owner’s manual contains important operating and maintenance
a risk of electric shock to persons is present within this product’s enclosure.
instructions, for your safety, it is necessary to refer to the manual.
rothaudio.co.uk
DBT-001 Manual VJ.indd 3
|
3
7/8/12 13:23:10
Features and Controls
1. LCD Display
7. Backlight Button
13. Aux In Socket
2. Mode Button
8. Alarm/Snooze Button
14. Headphone Jack
3.
9. INFO/
15. USB Port
Power Button
4. MENU/
Button
5. Scroll Control & OK/
Button
6. Memory Button
Button
10. Volume Control
16. Telescopic Antenna
11. Sleep Button
17. DC In Jack
12. Speaker
13
14
1
2
7
3
4
8
9
5
10
6
11
15
16
12
17
Switching Your Radio On For The First Time
When the radio is connected to the AC power for the first time, it will be in standby mode. The display backlight will be on for a few seconds,
the display will first show the greetings and finally the clock. Press the
button once to turn the radio on, it will then automatically enter
into the DAB mode and perform auto scan function.
Clock setting
The clock will only set and be updated if you can receive DAB signals in your location. In order for the clock to synchronise to the current local
time you must leave it one DAB station for a short period. Manual clock setting is not required.
4
|
Roth DBT-001 User Manual
DBT-001 Manual VJ.indd 4
7/8/12 13:23:14
User Manual
English
Listening To Your Radio
Hints for better reception
This radio carries a single DAB/FM telescopic antenna, to obtain the best performance, you should fully extend the antenna and adjust its
position as well as the direction until you find the best reception. For ideal DAB reception, always maintain the antenna in an upright vertical
position is highly recommended.
DAB mode
If the radio is powered up and switched on for the first time, it will automatically enter into the DAB mode and perform auto scan function.
During the scan the display will show “Scanning...” together with a slide bar that indicates the progress of the scan and the amount of
stations that have been found so far. (Figure 1)
Once the scan has finished, the radio will select the first alphanumerically found station. To explore the found stations, rotate the OK control,
and when you find a station that you would like to listen to, press on the OK control. (Figure 2)
Figure 1
Figure 2
Note: If there is no stations found after auto scan, the radio will then enter into the Tune Select Menu, you can now rotate the OK control
followed by pressing on the same control to select “Manual tune” or “Autoscan” for stations.
DAB auto scan
The auto scan will search for the entire DAB Band III channels. After the scan has finished, the first alphanumerically found station will be
automatically selected.
To activate auto scan, first press the MENU button to enter into the Tune Select Menu, then rotate the OK control to select “Autoscan”,
finally press on the OK control to confirm, the display will show “Scanning...” and a progressing slide bar. (Figure 3)
All the stations that have been found will be stored automatically, to explore and select listening to the found stations, rotate the OK control
followed by pressing on the same control.
Figure 3
rothaudio.co.uk
DBT-001 Manual VJ.indd 5
|
5
7/8/12 13:23:14
Listening To Your Radio continued
DAB manual tune
To select manual tune, first press the MENU button to enter into the Tune Select Menu, then press on the OK control to select “Manual tune”.
(Figure 4)
Rotate the OK control to move through the DAB channels, the display will show “5A to 13F” and their associated frequencies. (Figure 5)
When your desired frequency appears in the display, press on the OK control to confirm. The name of the station group (ensemble/multiplex)
will be displayed. To listen to the station selected, press on the OK control again.
Figure 4
Figure 5
DAB secondary services
On some occasions you will see a “>” symbol directly after the name of the station, this indicates that there are secondary services available
to that station. These secondary services contain extra services that relate to the primary station. E.g. a sports station may want to add extra
commentaries. The secondary services are inserted directly after the primary station. To select the secondary station, press on the OK control once.
DAB display modes
Every time you press the INFO button, the display will cycle through the following display modes:
Time and date
Frequency
Ensemble / Multiplex (Group Name)
Audio Bit Rate
Programme Type
Signal Strength
DLS
Time and date The time and date will be automatically updated by the broadcasted information; it is no need to set the clock manually. In
the unlikely event that no clock information is received, the display will show “<TIME/DATE>”.
Frequency The frequency of the present station will be displayed.
Audio bit rate The display will show the digital audio bit rate being received.
Signal strength The display will show a slide bar to indicate the signal strength, the stronger the signal, the longer the bar will be from left to right.
DLS DLS stands for Dynamic Label Segment which is a scrolling message that the broadcaster may include in their transmissions. The
message usually includes information such as programme details etc.
Programme type This describes the style of the programme that is being broadcast. If the information is not available, the display will show
“<Programme Type>”.
6
|
Roth DBT-001 User Manual
DBT-001 Manual VJ.indd 6
7/8/12 13:23:14
User Manual
English
Ensemble/Multiplex (Group name)
The Ensemble/Multiplex is a collection of radio stations that are bundled and transmitted together in a single frequency. There are national
and local multiplexes, local ones contain stations that are specific to that area.
Note: Press and hold the INFO button for longer than 2 seconds, the software version number will be displayed.
FM radio
1. To select FM, repeatedly press the MODE button until you see “Switch to FM” is displayed, the display will show FM and the frequency.
2. To activate auto search, press and hold the OK control until it starts to scan the frequency band, the display will show “Searching... > .” or
“Searching... < .”, and it will stop automatically once a station has been found. (Figure 6)(Figure 7)
3. To activate manual tuning, rotate the OK control.
4. To select the FM stereo/mono reception, press the OK control to toggle between the “Auto” or “Mono” selection.
Note: The radio will automatically switch between the stereo and mono reception, but you can override this and switch this function
manually which is helpful for poor signal reception.
Figure 6
Figure 7
Storing and Recalling Stored Stations
In either DAB or FM mode, you can store up to 10 stations to the favourite presets; this will enable you to get direct access to your favourite
stations.
1. To store a preset, first tune to your desired station, then press and hold the MEMORY button, the display will show “Empty preset 1”, and
the preset number will flash. (Figure 8)
2. Rotate the OK control to select your desired station preset number.
3. Press on the OK control to confirm your selection, the display will show “Preset # saved” (Figure 9)
4. To recall a preset station, first press the MEMORY button once, then rotate the OK control to scroll up or down the presets that you
have stored. When the display shows your desired preset number, stop your rotation of the control. If the preset hasn’t been allocated a
station, the display will show “Empty preset #”.
Figure 8
Figure 9
rothaudio.co.uk
DBT-001 Manual VJ.indd 7
|
7
7/8/12 13:23:15
Factory Reset
When you move the radio to another part of the country, your pre-tuned and stored DAB stations may no longer be available. If this is the
case then you will need to reset your radio back to its original factory settings; to perform a factory reset, please do the following:
1. Plug the radio to mains and press the
button to turn the radio on.
2. Press and hold the MENU button until the display shows “Press SELECT to confirm reset”.
3. Release the MENU button and press on the OK control once, the display will first show “Restarting …” and after the reset is completed,
the radio will go to standby.
4. Press the
button to turn the radio on again, it will then automatically enter into the DAB mode and perform auto scan function. After
the scan has finished, the radio will select and display the first alphanumerically found station.
Note: All of your stored DAB & FM presets will be lost once the reset has taken place.
Alarm Function
This unit incorporates an identical Dual Alarm function. You can have two individual alarm wake-up time and wake-up mode settings to wake
you to an electronic buzzer tone or your favourite radio station (DAB/FM).
Setting the alarm time and wake-up mode
1. Press the ALARM button once to enter into the Alarm Menu, then rotate the OK control followed by pressing on the same control to
select Alarm (1 or 2).
2. Again rotate the OK control followed by pressing on the same control to select “Alarm Setting”. The display will show “Alarm # Setting”
and the hour digit of the alarm time will flash. (Figure 10)
3. Rotate the OK control followed by pressing on the same control to adjust and confirm your desired alarm time - first set the hour and then
the minute.
4. After the confirmation of the minute setting, the alarm time is set and you will enter into the wake-up mode settings.
5. Rotate the OK control followed by pressing on the same control to adjust and confirm the wake-up mode settings -first set the DAB and
FM Preset (1-10), then the Buzzer Tone (1 or 2), finally the alarm Volume level. (Figure 11)
6. After the selection of the alarm volume level, the wake-up mode settings are completed and the alarm function is now ready for you to activate.
7. Repeat the above procedures to set the other Alarm (1 or 2).
Figure 10
8
|
Figure 11
Roth DBT-001 User Manual
DBT-001 Manual VJ.indd 8
7/8/12 13:23:15
User Manual
English
Activating the alarm function
1. To activate the alarm function, press the ALARM button to enter into the Alarm Menu and select Alarm (1 or 2).
2. Rotate the OK control followed by pressing on the same control to select “Alarm Source”.
3. Again rotate the OK control and the associated alarm wake-up mode will be displayed and changed in the below sequence:
Alarm #Off
DAB Preset #
FM Preset #
Buzzer Tone #
4. When the display shows your desired alarm wake-up mode, press the OK control, the alarm function is now activated and the associated
alarm icon will be displayed.
5. When the alarm time arrives, the selected wake-up mode will be on and the alarm icon in the display will flash to indicate the alarm is
triggered. To stop the alarm sooner, press the button.
Note 1: If you have activated the alarm function and the wake-up mode is DAB or FM, make sure that the alarm volume level is set at a
sufficient level for you to hear.
Note 2: The alarm comes first will have the priority and it would continue for a duration of one hour, the snooze will just switch off this alarm
temporary during this duration, so if the second alarm comes in this period, it will not function. But if the first alarm is switched off before the
second alarm arrives, then the second alarm will be activated.
Automatic Alarm Repeat
The alarm will automatically repeat each day at the selected time as long as the alarm icon is displayed. To cancel this function, go to the
Alarm Menu and select “Alarm # off” in the associated “Alarm Source” menu.
Snooze function
When the alarm has triggered, press the SNOOZE button will temporary switch off the alarm for 5 minutes, the display will show “ Zz ” to
indicate snooze on. This is repeatable in the one hour alarm duration.
Sleep Function
This function allows you to program the radio to switch off itself after a set period of time.
1. To activate the sleep function, repeatedly press the SLEEP button, the display will show “Sleep Timer” and the time will change in the
below sequence on every press: 90 > 80 > 70 > 60 > 30 > 10 > Off > 90 > 80 > …
2. When your desired sleep time appears in the display, release the button and the sleep function will be activated in two seconds. The
display will show “s#” where “s1” is to represent “10 minutes” sleep time and so on.
3. When the sleep time counts to zero, the unit will go off. To put the sleep function off during sleep timer on, repeatedly press the SLEEP
button until the display shows “Sleep Timer Off”.
4. To check the sleep timer status, press the SLEEP button once.
rothaudio.co.uk
DBT-001 Manual VJ.indd 9
|
9
7/8/12 13:23:15
Bluetooth Mode
Bluetooth connectivity performance may vary with brand and model of the connected device. For best performance, please connect newer
Bluetooth devices incorporating Bluetooth 2.1 and using the latest firmware update available from the device vendor. Compatibility with all
devices and media types is not guaranteed.
Bluetooth performance considerations
Ensure all Bluetooth devices within 30 feet have Bluetooth transmission disabled. The presence of other functioning Bluetooth devices during
connection may lead to operational difficulties. Bluetooth is a short-range radio communication standard. The Bluetooth transmitter and
receiver hardware in this unit has an approximate operational range of 30 feet in open space. Generally Bluetooth devices can communicate
with each other clearly within a regular sized room or office. Operation between different rooms will depend on the construction of the room.
It is important to recognize the fact that Bluetooth communication range may be substantially reduced if the signal passes through a solid
object. Human bodies, brick and concrete walls, and heavy furniture or bookcases will reduce the operational range of your Bluetooth devices.
Glass, dry-wall or wood paneled walls and office partitions may have a less severe but noticeable effect. You should position your Bluetooth
devices closer to each other if you observe communication difficulties.
Supported Bluetooth profiles
The Bluetooth capabilities of this radio enable it to receive audio from many Bluetooth- capable devices including mobile phones,
personal computers and PDAs. It supports the following Bluetooth profiles and functionality. Only one device per profile can be connected
concurrently.
Advanced Audio Distribution Profile (A2DP)
-High-quality stereo audio connection -Streaming of stereo music from PC, mobile phones…etc
Audio Video Remote Control Profile (AVRCP)
-Device remote control -Control connected device
Stereo music connection to your mobile phones
This connection requires a mobile phone supporting the Bluetooth A2DP profile for stereo music connection. In order to create new Bluetooth
connection you will need some familiarity with the Bluetooth functions of your mobile phone. As each phone operates slightly differently,
please familiarize yourself with the Bluetooth capabilities of your device before connecting.
1. Ensure that the Bluetooth on your mobile phone is powered on. You might need to refer to the phone user manual for details.
2. Place the radio and the phone where they are no more than 3 feet apart.
3. Repeatedly press the MODE button to select Bluetooth mode, the display will show “Bluetooth” together with the “flashing icon”.
4. Set the A2DP-capable phone to search for Bluetooth devices and follow the instructions on the phone’s screen. You will recognize the
radio by its Bluetooth name “BT Speaker”. In case that you are prompted for a passkey, enter “0000”.
5. Select and confirm the pairing on your phone, the connection will be completed in a few seconds and the radio will produce a double beep
confirmation tone, the “flashing icon” on the display will change to
^ and you can now start your Bluetooth music streaming operation.
6. Press the OK control on the radio or select starting playback on your phone to start the music playback.
7. To interrupt playback, press the OK control again or select “pause” on your phone.
8. To skip forward or back to other songs during playback, press the
or
buttons on the radio or select the “skip controls” on your
phone.
Note:
Some mobile phones may connect and disconnect as you make and end calls. This is not an indication of a problem with your unit.
10
|
Roth DBT-001 User Manual
DBT-001 Manual VJ.indd 10
7/8/12 13:23:15
User Manual
English
Stereo music connection to other Bluetooth devices
This connection requires a device supporting the Bluetooth A2DP profile for stereo music connection. Please ensure your device has the latest
versions of software drivers and/or firmware supporting Bluetooth functionality. Compatibility with all devices is not guaranteed. In addition
to the procedures described above for mobile phones, this radio can receive stereo music from many other Bluetooth source devices including
personal computers, PDAs, Bluetooth enabled music players. The exact connection procedures may vary from device to device, please refer to
the device user manual for specific operations.
Note: An increasing number of computing devices include support for Bluetooth, and many include support for stereo music over Bluetooth
(A2DP). For best performance from your particular device, please ensure that you are using the latest update of software drivers and/or
firmware available. In certain circumstances, updating the software drivers or firmware of your device to the latest release may add support
for A2DP that was not available in a previous release. Please contact the vendor of your device for such updates and refer to the device user
manual for update procedures. Please remember that system updates should only be performed by qualified individuals after performing a
full system backup.
Aux Input
There is a 3.5mm stereo aux input socket located at the back of the unit; analogue audio sound signals from other sources can be input to
the radio through this socket. To select AUX function, repeatedly press the MODE button until you see “Switch to AUX” is displayed, the audio
will be switched to the aux input signal and you can adjust the volume control for your desired sound output level.
Note: To further enhance energy saving, if the unit is left in AUX mode and without any user operation for three hours, the unit will switch
itself to standby automatically; To toggle select this function between on & off During unit on, press and hold the MODE button for longer
than two seconds, the display will show “ECO ON” or “ECO OFF”.
USB Port
There is an USB port located at the back of the unit, a standard 5V/500mA output is provided for normal USB charging capability. USB data
communication is not available through this port.
Headphone Jack
A 3.5mm type stereo headphone jack is located at the back of the unit. Connect a set of stereo headphones (not included) to this jack for
private listening without disturbing others. The speakers are automatically disconnected when the headphones are in use.
IMPORTANT: When using headphones always set the volume to a low level before you put the headphones on. Then insert the headphones
and gradually increase the volume to a comfortable listening level.
Display Backlight
There are four backlight levels for you to set in unit operation. To set the backlight, repeatedly press the BACKLIGHT button and the
brightness of the display will change in the below sequence on every press:
Backlight off > Backlight 01 > Backlight 02 > Backlight 03 > Backlight off >...
During standby, the backlight level is defaulted to be “Backlight 01”, press the BACKLIGHT button will toggle the backlight level between
“Backlight off” and “Backlight 01”, and it will be turned on to full brightness for 5 seconds on every key press.
Note: The display backlight level is defaulted to “Backlight 01” in standby and “Backlight 03” during operation. This is resumed only when
the factory reset has taken place.
rothaudio.co.uk
DBT-001 Manual VJ.indd 11
|
11
7/8/12 13:23:15
Specifications
DBT-001 Design:
DAB+ / FM PLL / Bluetooth Receiver
20 Radio Station Presets (10 DAB+ + 10 FM)
Multi-Function Dot Matrix LCD Display with Backlight & Dimmer Control
Automatic DAB Synchronised Real Time Clock
Dual Alarm with Selectable Wake Up Mode (Radio/Buzzer)
Electronic Rotary Jog Select Controls
Service
Please contact your local
authorised dealer or reseller.
Email: [email protected]
Performance:
Output Power - 5W RMS High Acoustic Performance
Inputs & Outputs:
Stereo Earphone Output & Auxiliary Input
Frequency Range: DAB - 174-240 MHz / FM - 87.5-108 MHz
Power Supply - AC 100-240V~60/50Hz
Dimensions:
L: 115mm W: 128mm H: 190mm
Weight 1.3Kgs
rothaudio.co.uk
Just search for Roth AV.
In accordance with our policy of continuous development, we reserve the right to change specifications without notice. Photographs are for illustration only and actual product may vary. E&OE.
DBT-001 Manual VJ.indd 12
7/8/12 13:23:16