1
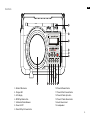
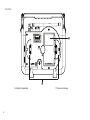
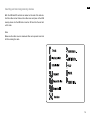
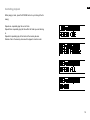
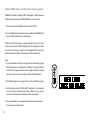
Operating instruction
USBBOX2
3A81XB6L00000
GB
AM / FM-RDS / USB / SD Ultra Rugged Digital Tuning Receiver
Contents
Important Safety Instructions ............................................... 2
Controls ............................................................................ 3-7
Power the radio .................................................................... 8
AC operation ........................................................................ 8
Charging the batteries ......................................................... 9
Operating the radio ............................................................ 10
Manual Tuning ................................................................... 10
Seek station ....................................................................... 10
Memory preset stations ...................................................... 11
Recall stations from preset memories ................................ 11
Clock Time ......................................................................... 11
INFO button in FM mode ................................................... 12
RDS (Radio Data System) ................................................. 12
Operating the radio – Aux In .............................................. 13
LCD illumination ................................................................. 13
Using SD card and USB memory device ...................... 13-14
Playing MP3/ WMA files- SD/USB ................................ 15-19
Specification ....................................................................... 20
GB
Important Safety Instructions
1. Read these instructions.
2. Keep these instructions.
12. Use only with the cart, stand, tripod, bracket, or table specified by
the manufacturer, or sold with the apparatus. When a cart is used,
use caution when moving the cart/apparatus combination to avoid
injury from tip-over.
3. Heed all warnings.
4. Follow all instructions.
5. Do not use this apparatus near water.
6. Clean only with dry cloth.
7. Do not block any ventilation openings. Install in accordance with the
instructions.
8. Do not install near any heat sources such as radiators, heat registers,
stoves or other apparatus (including amplifiers) that produce heat.
9. Do not defect the safety purpose of the polarized or grounding-type
plug. A polarized plug has two blades with one wider than the other.
A grounding type plug has two blades and a third grounding prong.
The wide blade or the third prong are provided for your safety. If the
provided plug does not fit into your outlet, consult an electrician for
replacement of the obsolete outlet – USA version only.
13. Unplug this apparatus during lightning storms or when unused for
long periods of time.
14. Refer all servicing to qualified service personnel. Servicing is required
when the apparatus has been damaged in any way, such as powersupply cord or plug is damaged, liquid has been spilled or objects
have fallen into the apparatus, the apparatus has been exposed to
rain or moisture, does not operate normally, or has been dropped.
15. To reduce the risk of fire or electric shock, Do not expose this appliance to Rain or Moisture.
16. The Shock Hazard Marking and Associated Graphical Symbol is provided on the bottom panel of unit.
17. Apparatus shall not be exposed to dripping or splashing and no objects filled with liquids, shall be placed on the apparatus.
18. For outdoors use, to avoid electric shock, use battery only during a
raining day or the weather is wet.
10. Protect the power cord from being walked on or pinched particularly at plug,
convenience receptacles, and the point where they exit from the apparatus.
11. Only use attachments/accessories specified by the manufacturer.
19. The power plug should be close to the radio, and easy to be approached that during the emergency, to disconnect the power from
the radio, just unplug the power plug from the AC power slot.
Controls
1. Volume Control
2. Tuning Control/Seek station
GB
Controls
3. Rubber FM antenna
4. Charge LED
5. LCD display
6. RDS/Play Mode button
7. Information/Folder Browser
8. Power On/Off
9. Preset 5/Play & Pause button
10. Preset 4/Rewind button
11. Preset 3/Fast Forward button
12. Preset 2/Folder Up button
13. Preset 1/Folder Down button
14. Audio Source band
15. Loudspeaker
Controls
16. Battery Compartment
17. Power cord storage
GB
Controls
18. Aux In socket
19. SD card socket
20. USB socket
Controls
21. Batteries/Charger switch
GB
Power the radio
1. Installing the batteries, first turn battery cover fixture anti-clockwise to
loosen and pull down the battery cover.
Note:
Before you insert the batteries, if you use non-rechargeable batteries,
make sure the Batteries/Charger switch which is located inside the battery compartment is switched to Batteries position. If you use rechargeable batteries, make sure to switch the Batteries/Charger switch to
Charger position.
2. Insert 4 x C size (UM-2) battery into the compartment. Ensure the
batteries are inserted in accordance with the diagram shown. Close
the battery cover and fasten the fixture by turning clockwise.
If the radio is not to be used for any extended period of time, it is recommended that the batteries are removed from the radio. Reduced power,
distortion and a “stuttering“ sound or low battery sign flashing on the
LCD display are all signs that the batteries need replacing or recharging
(see below charging the batteries).
AC operation
Before plugging the AC power cord into the AC socket, be sure the voltage is correct. If you have batteries in the radio and connect the AC power
cord into the AC socket, the batteries will automatically be disconnected.
AC power cord storage is designed to store the cord when the radio is
not in use.
Charging the batteries
Reduced power, distortion and a “stuttering“ sound or low battery sign
flashing on the LCD display are all signs that the batteries need replacing or recharging.
Note:
The batteries can be charged only when the radio is off. Connect the AC
power cord into the AC socket to charge the batteries. Be sure the battery type switch is set to Charger position.
When the batteries are being charged, the red Charge LED will be flashing. Charging time can take up to approx. 10 hours depending on the
battery capacity of the rechargeable batteries. When the batteries are
fully charged, the charged LED will be steady on.
Note:
Charge new batteries fully the first time before first use. This can take
longer depending on the capacity of the rechargeable batteries.
Do not use a mix of old and new rechargeable batteries.
Do not use a mix of full and empty rechargeable batteries.
Do not use batteries that have a different mAh capacity.
Do not use damaged or leaking batteries.
Operating the radio
Seek station
This radio is equipped with three tuning methods- Manual Tuning, Seeking station and presets recall.
1. Press the Power button to turn on the radio.
GB
2. Select to FM waveband by pressing the SOURCE button.
Manual Tuning
3. Press in the Tuning Control knob, will enter SEEK mode.
1. Press the Power button to turn on the radio.
2. Select to FM waveband by pressing the SOURCE button.
4. The radio will up seek and stop automatically when it finds a radio
station with good signal.
3. Rotate the Tuning Control knob to get required FM station.
The radio will change the frequency in 100 kHz increment.
5. Pressing in the Tuning Control knob again will find next radio station
with good signal.
4. Rotate the Volume Control knob to get required sound level.
5. Rotate the rubber antenna to get the best reception.
6. To turn off the radio, press the Power button.
10
Memory preset stations
Storing a station in preset memories, please follow steps below.
There are 5 memory presets in this radio.
1. Press the Power button to turn on the radio.
2. Tune to required station as described above.
3. Press and hold the required preset until radio beeps and shows PX
STORED.
4. Repeat this procedure for the remaining presets.
5. Stations stored in preset memories can be over written by following
above procedures.
Recall stations from preset memories
1. Press the Power button to turn on the radio.
2. Press SOURCE button to get FM waveband.
3. Momentarily press the required Preset button, the preset number and
station frequency.
Note:
If the station equips with RDS system and reception quality is good, LCD
display will show station name underneath station frequency (described
later in RDS)
Clock Time
11
This radio basically has no clock function. However when it tunes to a
radio station with RDS system and reception quality is good, you can
press the INFO button to get clock time and date from the radio station.
It may take a few minutes for the radio to pick up the clock time information and display it.
GB
INFO button in FM mode
When you are listening to FM broadcasting, press and release INFO
button to cycle through Clock Time information and FM station signal
strength level (SGLV).
However LCD display won’t show Time information, if the radio station
you are listening to does not have RDS system.
RDS (Radio Data System)
When you are listening to a FM station with RDS system, press RDS
button will cycle through the various modes. However this will only function if reception level is sufficient and clear.
a. Program service (PS) –
displays the radio station name.
b. Program type (PTY) –
displays the type of station being listening to e.g. Pop, Classic, News,
etc.
c. Radio Text (RT) –
displays radio text messages such as news items etc.
12
Operating the radio – Aux In
1. Connect a stereo or mono audio source (like CD walkman or MP3
player) to the Aux In socket, which is located on the side, behind the
rubber cover.
2. Press the SOURCE button to select AUX input. Display will show AUX IN.
3. Play the file in the CD walkman or MP3 player.
4. Adjust the volume control to the required level.
Make sure rubber cover is closed well after use to prevent moist and dirt
from entering the radio.
LCD illumination
When radio is switched on, press any button except Power button will
illuminate the LCD display for approx. 15 seconds. However if you use
AC cord to power the radio, the LCD display will be always illuminated
until you turn the radio off by pressing Power button.
Using SD card and USB memory device
This section describes how to use your radio to access and playback
your audio files via USB memory devices and Secure Digital (SD,
SDHC) cards.
Important:
Your radio is only designed to work with USB memory devices. It is not intended to be connected to hard disk drives or any other types of USB device.
13
The USBBOX2 has been tested with a range of USB memory devices of up
to 32 GB capacity and SD cards up to 2GB and SDHC cards up to 16 GB
are supported. However, there are different cards variants available not all
cards can be guaranteed to work in the USBBOX2. Memory must use the
FAT 16 or FAT 32 filing system in order to operate with the USBBOX2.
GB
Inserting and removing memory devices
Both the USB and SD card slot are located on the side of the radio behind the rubber corner. Remove the rubber cover and press in the USB
memory device into the USB slot or insert an SD card into the card slot
until it clicks.
Note:
Make sure the rubber cover is closed well after use to prevent moist and
dirt from entering the radio.
14
Playing MP3/WMA files- SD/USB
1. Power on the radio and press the Source button to select either USB
or SD mode. Now the radio will scan the SD card or the USB memory
device which may take approximately 30 seconds depending on the
capacity of the device.
2. The radio will start to play the first file (track) in the first folder. Press
the Play/ Pause button
to pause playing. To resume playing press
the Play/ Pause button again.
3. Press either the Fast-forward
file.
15
or Rewind button
to the desired
GB
File browser
Searching the desired folders and files.
1. Press and hold the INFO button for 3 seconds to perform the “file
browser” function. The upper line of display will indicate existing folder
number and total number of folder, the second line will show the
selected folder’s name.
2. Rotate the Tuning Control knob to search the desired folder and press
in the Tuning Control knob to select the folder. Display will show first
file of the selected folder.
3. Rotate the Tuning Control knob to search the desired file.
And press in the Tuning Control knob to select the desired file, the radio
will start to play the selected file.
16
Display modes
Your radio has a range of display mode while in music playback mode.
1. Press the INFO button to cycle through the different options.
a. File name
b. Folder name
c. Album name
d. Artist name
e. Bit rate
f . Total number of files on the USB
g. Clock time (make sure you set the clock time with the RDS function
in advance)
17
GB
Controlling playback
While playing a track, press PLAY MODE button to cycle through the following:
Repeat one- repeatedly play the current track
Repeat folder- repeatedly play the files within the folder you are listening
to.
Repeat All- repeatedly play all the tracks in the memory devices
Random- files in the memory devices will be played in random order.
18
Charging MP3 player or mobile phone during playback
USBBOX2 is capable of charging a MP3 media player or mobile phone via
USB slot during the playback of MP3/WMA files via Aux In socket.
1. Press and release the SOURCE button to select AUX-IN
2. Connect USB cable (not supplied ) between USB slot of USBBOX and
I/O port of MP3 media player or mobile phone.
USB can offer 5V 0.5A power to charge external device by AC power
source and only offer 5V 0.25A by battery power. The charging current limit
is 5V 0.5A, if the loading is over the limit LCD display shows “Over Load”
and check the device. Within a few seconds, the radio will switch off.
Note:
1. It is recommended to use AC power to power the radio while charging
MP3 media device or mobile phone via USB slot. Though the battery
is also able to charge the device, however using the battery to charge
the device will consume much energy and drain the battery easily.
2. The USB charging may not support the entire iPod and iPhone range.
3. Once the display shows “OVER LOAD!” indicating it’s over powered
and your radio will automatically shut down. Make sure you remove
your external device before restarting the radio power again.
4. It’s recommended not to use a portable hard disc as external device.
It may easily over load the radio.
19
GB
Specification
Power source
AC power: AC 100~240Vac, 50/60 Hz, 22W
Battery: 4 x UM-2(C size, LR14), Alkaline or Ni-MH battery
Frequency range
FM band: 87.5~108MHz, tuning step 100kHz
MP3/WMA features
USB media capacity: 16MB~32GB (HCSD)
USB format: FAT-12/FAT-16/FAT-32
Playable media: MP3 (16kbps~320kbps)/WMA (16kbps~192kbps)
Frequency response of media player: 40Hz~20kHz (192kbps)
Dimension: W 300 x H 230 x D 185 mm
Electronic features
Speaker: 5 inches 8 ohm 10W full range, waterproof.
Output power: 3W@alkaline/Ni-MH battery, 7W@ AC-IN
Rechargeable current of charger: 0.5A
AUX-IN level: 300mVrms (rated level), 1Vrms (max.)
Maximum supplying power of USB socket: 5V 0.5A
If at any time in the future you should need to dispose of this product please note that: Waste electrical products should not be disposed of with household waste. Please recycle where facilities exist. Check with your Local Authority or retailer for recycling advice.
(Waste Electrical and Electronic Equipment Directive)
20