1
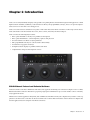
Artist Color User Guide EuControl v2.6 Legal Notices This guide is copyrighted ©2011 by Avid Technology, Inc., with all rights reserved. Under copyright laws, this guide may not be duplicated in whole or in part without the written consent of Avid. 003, 96 I/O, 96i I/O, 192 Digital I/O, 192 I/O, 888|24 I/O, 882|20 I/O, 1622 I/O, 24-Bit ADAT Bridge I/O, AudioSuite, Avid, Avid DNA, Avid Mojo, Avid Unity, Avid Unity ISIS, Avid Xpress, AVoption, Axiom, Beat Detective, Bomb Factory, Bruno, C|24, Command|8, Control|24, D-Command, D-Control, D-Fi, D-fx, D-Show, D-Verb, DAE, Digi 002, DigiBase, DigiDelivery, Digidesign, Digidesign Audio Engine, Digidesign Intelligent Noise Reduction, Digidesign TDM Bus, DigiDrive, DigiRack, DigiTest, DigiTranslator, DINR, DV Toolkit, EditPack, Eleven, EUCON, HD Core, HD Process, Hybrid, Impact, Interplay, LoFi, M-Audio, MachineControl, Maxim, Mbox, Artist Color, MediaComposer, MIDI I/O, MIX, MultiShell, Nitris, OMF, OMF Interchange, PRE, ProControl, Pro Tools M-Powered, Pro Tools, Pro Tools|HD, Pro Tools LE, QuickPunch, Recti-Fi, Reel Tape, Reso, Reverb One, ReVibe, RTAS, Sibelius, Smack!, SoundReplacer, Sound Designer II, Strike, Structure, SYNC HD, SYNC I/O, Synchronic, TL Aggro, TL AutoPan, TL Drum Rehab, TL Everyphase, TL Fauxlder, TL In Tune, TL MasterMeter, TL Metro, TL Space, TL Utilities, Transfuser, Trillium Lane Labs, Vari-Fi, Velvet, X-Form, and XMON are trademarks or registered trademarks of Avid Technology, Inc. Xpand! is Registered in the U.S. Patent and Trademark Office. All other trademarks are the property of their respective owners. Bonjour, the Bonjour logo, and the Bonjour symbol are trademarks of Apple Computer, Inc. Product features, specifications, system requirements, and availability are subject to change without notice. Guide Part Number 9329-65083-00 REV A 05/11 Documentation Feedback We are always looking for ways to improve our documentation. If you have comments, corrections, or suggestions regarding our documentation, email us at [email protected]. Contents Chapter 1. Introduction . . . . . . . . . . . . . . . . . . . . . . . . . . . . . . . . . . . . . . . . . . . . . . . . . . . . . . . . . . . . . . . . . . . . . . . . . . . 1 What’s Included . . . . . . . . . . . . . . . . . . . . . . . . . . . . . . . . . . . . . . . . . . . . . . . . . . . . . . . . . . . . . . . . . . . . . . . . . . . . . . 2 System Requirements and Compatibility . . . . . . . . . . . . . . . . . . . . . . . . . . . . . . . . . . . . . . . . . . . . . . . . . . . . . . . . . . . . . 2 Registration . . . . . . . . . . . . . . . . . . . . . . . . . . . . . . . . . . . . . . . . . . . . . . . . . . . . . . . . . . . . . . . . . . . . . . . . . . . . . . . . . 2 About This Guide. . . . . . . . . . . . . . . . . . . . . . . . . . . . . . . . . . . . . . . . . . . . . . . . . . . . . . . . . . . . . . . . . . . . . . . . . . . . . . 2 About www.avid.com . . . . . . . . . . . . . . . . . . . . . . . . . . . . . . . . . . . . . . . . . . . . . . . . . . . . . . . . . . . . . . . . . . . . . . . . . . . 3 Chapter 2. Installation . . . . . . . . . . . . . . . . . . . . . . . . . . . . . . . . . . . . . . . . . . . . . . . . . . . . . . . . . . . . . . . . . . . . . . . . . . . . 5 Unpacking and Elevating Artist Color. . . . . . . . . . . . . . . . . . . . . . . . . . . . . . . . . . . . . . . . . . . . . . . . . . . . . . . . . . . . . . . . 5 Installing Software and Hardware . . . . . . . . . . . . . . . . . . . . . . . . . . . . . . . . . . . . . . . . . . . . . . . . . . . . . . . . . . . . . . . . . . 7 Chapter 3. Artist Color Surface Controls . . . . . . . . . . . . . . . . . . . . . . . . . . . . . . . . . . . . . . . . . . . . . . . . . . . . . . . . . . . 11 Operational Basics . . . . . . . . . . . . . . . . . . . . . . . . . . . . . . . . . . . . . . . . . . . . . . . . . . . . . . . . . . . . . . . . . . . . . . . . . . . 11 Controls and Displays . . . . . . . . . . . . . . . . . . . . . . . . . . . . . . . . . . . . . . . . . . . . . . . . . . . . . . . . . . . . . . . . . . . . . . . . . 12 Chapter 4. Common Tasks . . . . . . . . . . . . . . . . . . . . . . . . . . . . . . . . . . . . . . . . . . . . . . . . . . . . . . . . . . . . . . . . . . . . . . . 17 Common Tasks . . . . . . . . . . . . . . . . . . . . . . . . . . . . . . . . . . . . . . . . . . . . . . . . . . . . . . . . . . . . . . . . . . . . . . . . . . . . . . 17 Using the NAV Key. . . . . . . . . . . . . . . . . . . . . . . . . . . . . . . . . . . . . . . . . . . . . . . . . . . . . . . . . . . . . . . . . . . . . . . . . . . . 17 Using the Trackballs and Trackwheels . . . . . . . . . . . . . . . . . . . . . . . . . . . . . . . . . . . . . . . . . . . . . . . . . . . . . . . . . . . . . . 17 Using the Show Key. . . . . . . . . . . . . . . . . . . . . . . . . . . . . . . . . . . . . . . . . . . . . . . . . . . . . . . . . . . . . . . . . . . . . . . . . . . 17 Using the Trackwheel to Jog . . . . . . . . . . . . . . . . . . . . . . . . . . . . . . . . . . . . . . . . . . . . . . . . . . . . . . . . . . . . . . . . . . . . . 18 Transport Keys . . . . . . . . . . . . . . . . . . . . . . . . . . . . . . . . . . . . . . . . . . . . . . . . . . . . . . . . . . . . . . . . . . . . . . . . . . . . . . 18 Chapter 5. EuControl. . . . . . . . . . . . . . . . . . . . . . . . . . . . . . . . . . . . . . . . . . . . . . . . . . . . . . . . . . . . . . . . . . . . . . . . . . . . . 19 Surfaces. . . . . . . . . . . . . . . . . . . . . . . . . . . . . . . . . . . . . . . . . . . . . . . . . . . . . . . . . . . . . . . . . . . . . . . . . . . . . . . . . . . 20 Workstations . . . . . . . . . . . . . . . . . . . . . . . . . . . . . . . . . . . . . . . . . . . . . . . . . . . . . . . . . . . . . . . . . . . . . . . . . . . . . . . 22 General . . . . . . . . . . . . . . . . . . . . . . . . . . . . . . . . . . . . . . . . . . . . . . . . . . . . . . . . . . . . . . . . . . . . . . . . . . . . . . . . . . . 23 Preferences . . . . . . . . . . . . . . . . . . . . . . . . . . . . . . . . . . . . . . . . . . . . . . . . . . . . . . . . . . . . . . . . . . . . . . . . . . . . . . . . 23 Assign . . . . . . . . . . . . . . . . . . . . . . . . . . . . . . . . . . . . . . . . . . . . . . . . . . . . . . . . . . . . . . . . . . . . . . . . . . . . . . . . . . . . 24 Layouts . . . . . . . . . . . . . . . . . . . . . . . . . . . . . . . . . . . . . . . . . . . . . . . . . . . . . . . . . . . . . . . . . . . . . . . . . . . . . . . . . . . 24 Soft Keys . . . . . . . . . . . . . . . . . . . . . . . . . . . . . . . . . . . . . . . . . . . . . . . . . . . . . . . . . . . . . . . . . . . . . . . . . . . . . . . . . . 24 Chapter 6. Soft Keys . . . . . . . . . . . . . . . . . . . . . . . . . . . . . . . . . . . . . . . . . . . . . . . . . . . . . . . . . . . . . . . . . . . . . . . . . . . . . 25 Command Types . . . . . . . . . . . . . . . . . . . . . . . . . . . . . . . . . . . . . . . . . . . . . . . . . . . . . . . . . . . . . . . . . . . . . . . . . . . . . 28 Chapter 7. Using Artist Color with Apple Color . . . . . . . . . . . . . . . . . . . . . . . . . . . . . . . . . . . . . . . . . . . . . . . . . . . . . 31 Primary In . . . . . . . . . . . . . . . . . . . . . . . . . . . . . . . . . . . . . . . . . . . . . . . . . . . . . . . . . . . . . . . . . . . . . . . . . . . . . . . . . 31 Secondary: Vignette Control . . . . . . . . . . . . . . . . . . . . . . . . . . . . . . . . . . . . . . . . . . . . . . . . . . . . . . . . . . . . . . . . . . . . . 32 Color FX . . . . . . . . . . . . . . . . . . . . . . . . . . . . . . . . . . . . . . . . . . . . . . . . . . . . . . . . . . . . . . . . . . . . . . . . . . . . . . . . . . . 32 Using Artist Color and Artist Transport . . . . . . . . . . . . . . . . . . . . . . . . . . . . . . . . . . . . . . . . . . . . . . . . . . . . . . . . . . . . . . 32 Contents iii Chapter 8. Setting the IP Address . . . . . . . . . . . . . . . . . . . . . . . . . . . . . . . . . . . . . . . . . . . . . . . . . . . . . . . . . . . . . . . . . 33 Appendix A. EUCON Commands . . . . . . . . . . . . . . . . . . . . . . . . . . . . . . . . . . . . . . . . . . . . . . . . . . . . . . . . . . . . . . . . . . . 35 Appendix B. Compliance Information . . . . . . . . . . . . . . . . . . . . . . . . . . . . . . . . . . . . . . . . . . . . . . . . . . . . . . . . . . . . . . . 39 Environmental Compliance . . . . . . . . . . . . . . . . . . . . . . . . . . . . . . . . . . . . . . . . . . . . . . . . . . . . . . . . . . . . . . . . . . . . . . 39 EMC (Electromagnetic Compliance) . . . . . . . . . . . . . . . . . . . . . . . . . . . . . . . . . . . . . . . . . . . . . . . . . . . . . . . . . . . . . . . . 39 iv Artist Color User Guide Chapter 1: Introduction Artist Color is a slim, beautifully designed, easily portable color grading media controller that integrates with Apple™ Color. With high-resolution trackballs, trackwheels, touch-sensitive Soft Knobs, and programmable Soft Keys, Artist Color provides unprecedented control over the entire color editing process. Artist Color can be used as a standalone color grader or with other Artist Series media controllers to form a larger control surface. Artist Series media controllers include Artist Color, Artist Control, Artist Mix, and Artist Transport. Artist Color has the following major features: • Three optical Trackballs to modify color parameters and vignettes • Three optical Trackwheels to control brightness, vignettes and pan/scan • Six touch-sensitive Soft Knobs to adjust parameters • Nine programmable Soft Keys for context-sensitive functionality • Four dedicated copy/paste Grade keys • Six high-resolution displays for parameter names and values • Comprehensive transport and navigation controls EUCON Ethernet Protocol and EuControl Software Artist Series media controllers communicate with audio/video applications running on a workstation computer over a 100 Mb/s Ethernet EUCON™ connection. EUCON is a proprietary, high-speed communication protocol that enables control of virtually every application feature. The EuControl software application finds, links, and communicates information from your computer and your audio or video application to all Artist Series controllers on the network. EuControl software must be installed on the workstation computer that runs the applications before using the Artist media controllers. Chapter 1: Introduction 1 What’s Included • Artist Color, with riser brackets • EuControl software installer disc • 1 Ethernet Crossover cable • Power supply • Artist Color Quick Setup • Registration Information Card System Requirements and Compatibility Avid can only assure compatibility and provide support for hardware and software it has tested and approved. For compatibility, downloads and Artist Series support, visit: www.avid.com/artistsupport Registration Review the enclosed Registration Information Card and follow the instructions on it to quickly register your purchase online. By registering, you become eligible to receive the following: • Technical support information • Software update and upgrade notices • Hardware warranty information About This Guide Conventions Used in This Guide All of our guides use the following conventions to indicate menu choices and key commands: : Convention Action File > Save Choose Save from the File menu Control+N Hold down the Control key and press the N key Control-click Hold down the Control key and click the mouse button Right-click Click with the right mouse button The names of Commands, Options, and Settings that appear on-screen are in a different font. The following symbols are used to highlight important information: User Tips are helpful hints for getting the most from your system. Important Notices include information that could affect your data or the performance of your system. Shortcuts show you useful keyboard or mouse shortcuts. Cross References point to related sections in this guide and other Avid guides. 2 Artist Color User Guide Hardware Keys on Artist Series Units The names of keys on Artist Series hardware are shown in bold (such as SEL). The SHIFT key on Artist Series hardware is indicated by bold text, in all-caps (SHIFT) to distinguish it from references to the Shift key on your computer keyboard. The SHIFT key on Artist Series units is used in conjunction with other keys to access secondary functions labeled above the primary function. Artist Color provides a SHIFT key at the bottom right of the control surface. The following terminology is used to describe SHIFT functions. Example: • “Press and hold the SHIFT key then press the AUX key” is written as • “Press SHIFT+AUX/GROUP” How to Use this PDF Guide The Acrobat PDF version of this manual can be a valuable online resource. These are some useful features of the PDF: • The Bookmarks on the left serve as a continuously visible table of contents. Click on a subject heading to jump to that page. Click a + symbol to expand that heading to show subheadings. Click the – symbol to collapse a subheading. • The Table of Contents provides active links to their pages. Select the hand cursor, allow it to hover over the heading until it turns into a finger. Then click to locate to that subject and page. • All cross references are active links. Allow the hand cursor to hover over the reference until it turns into a finger and click to follow the reference. • Select Find from the Edit menu to search for a subject. About www.avid.com The Avid website (www.avid.com) is your best online source for information to help you get the most out of your system. The following are just a few of the services and features available. Product Registration Register your purchase online. Support and Downloads Contact Avid Customer Success (technical support); download software updates and the latest online manuals; browse the Compatibility documents for system requirements; search the online Knowledge Base or join the worldwide Pro Tools community on the User Conference. Training and Education Study on your own using courses available online or find out how you can learn in a classroom setting at a certified Pro Tools training center. Products and Developers Learn about Avid products; download demo software or learn about our Development Partners and their plug-ins, applications, and hardware. News and Events Get the latest news from Avid or sign up for a demo. Chapter 1: Introduction 3 4 Artist Color User Guide Chapter 2: Installation Unpacking and Elevating Artist Color Unpack Artist Color, its Trackballs, power supply, installation disc, Ethernet crossover cable, and riser brackets. Artist Color can be elevated or angled using small foldout legs on the bottom of the unit or elevated and angled by attaching the larger riser brackets. Since both methods require turning Artist Color over, do this before attaching any cables. Turn the unit over and place it on a soft surface. Pull out all four of the small foldout legs to moderately elevate the unit; pull out only the back two to angle the unit towards you. Pull out the metal clips from the same area as the legs and move them until they snap into the legs. Two larger, detached riser brackets elevate and angle the unit more than the foldout legs. Use moderate force to snap them into the bottom panel. Chapter 2: Installation 5 Removing the Riser Brackets To remove the riser brackets: 1 Slide the side panels off. 2 Press the tabs to release the riser brackets. 3 Lift the riser bracket out. 4 Unpack the trackballs and place them in their trackball holders. Attaching Multiple Units If your system includes more than one Artist Series media controller, you can attach them at their sides to form a single, solid surface. For instructions, see the Artist Transport User Guide, Artist Mix User Guide, or Artist Control User Guide. 6 Artist Color User Guide Installing Software and Hardware You must install EuControl software before using Artist Series media controllers. To install EuControl software and your Artist Series media controller: 1 Do one of the following: • Download the EuControl installer for your computer platform from www.avid.com/artistsupport. After downloading, make sure the installer is uncompressed (.dmg on Mac or .ZIP on Windows). – or – • Insert the Installer disc into your computer. 2 Double-click the EuControl installer application. 3 Follow the on-screen instructions to complete the installation. If prompted to download a newer version of EuControl software, follow the on-screen instructions. 4 When installation is complete, click Quit (Mac) or Finish (Windows). EuControl will launch automatically and is running when its icon appears: Menu bar with unlit EuControl icon • On Mac, the icon is shown in your menu bar. • On Windows, the icon appears in the System tray (or alongside other Hidden Icons in the lower tool bar if you do not have your system configured to always show icons in the System tray). 5 Shut down your computer. 6 Plug one end of the AC power cord into the power adapter and the other into a power outlet. Make sure the AC power cord is pushed all the way into the adapter. 7 Connect the DC output cable from the power adapter to DC In on the left side of the back panel. H ITC TSW FOO 5V In 1 DC Chapter 2: Installation 7 8 Plug one end of the Ethernet crossover cable into the Ethernet jack on the Artist Color back panel. o Euc n Ethernet cable and back panel jack 9 Plug the other end of the Ethernet crossover cable into an open Ethernet jack on your computer, router, or Ethernet switch. • Note that connecting directly to the computer may require removing your Internet cable. If you have a computer with two Ethernet ports, use Ethernet 1, rather than Ethernet 2. Artist Color connected directly to computer • An Ethernet router or switch is required to connect additional Artist Series units (such as an Artist Mix), or to connect units to a local area network. Artist Color Artist Color Multiple Artist Series units connected using a router 10 Turn on your router (if applicable), then turn on your computer and wait until it finishes starting up. 8 Artist Color User Guide 11 Press and release the POWER switch on Color. Do the following, as appropriate for your operating system: Mac Wait up to 60 seconds. A lit EuControl icon in the menu bar indicates correct installation. EuControl icon on Mac Windows Wait up to 60 seconds. A lit EuControl icon appears in the System tray (or, in Hidden Icons if your system is not configured to show all icons in the System tray). EuControl icon on Windows 12 If you did not see the lit EuControl icon, do the following: • See “Surfaces” on page 20 and add the Artist Color manually. • Shut down the Artist Color and your computer, then turn them on (computer first, then Artist Color). • If your computer is pre-2002 and you are using an Ethernet router or switch, you need to purchase a normal straight-through Ethernet cable (instead of the crossover Ethernet cable supplied) from a computer store. • See www.avid.com/artist/support for the most current troubleshooting information. 13 If you downloaded the latest software from the web, you may need to update the firmware on your Artist Series controllers. See “Update Firmware” on page 21 for instructions. 14 Launch your audio or video application (such as Apple Color) and open a session or project. 15 To set up your application to work with Artist Color, see the EUCON Application Setup Guide that you downloaded at the beginning of this section. Controlling a Second Workstation Artist Color can control applications running on a second computer, referred to in this guide as a workstation. Most users will not need to do this because EuControl will be running on the same workstation as the their audio/video applications. To enable control of a second workstation: 1 Do one of the following: • Download the EuControl installer from www.avid.com/artistsupport onto the second computer. After downloading, make sure the installer is uncompressed (.dmg on Mac or .ZIP on Windows). – or – • Insert the Installer disc into the second computer. 2 In the Extras folder, double-click the Install EuCon Workstation installer. 3 Follow the instructions to install the EuCon Workstation software. Chapter 2: Installation 9 10 Artist Color User Guide Chapter 3: Artist Color Surface Controls Artist Color is a control surface designed for color editing. While most of its controls can be programmed and customized for your preferences, a few controls are dedicated to a single purpose. This chapter identifies the default assignments of dedicated surface controls, and explains a few of the programmable controls. Operational Basics The most important controls on Artist Color are the three Trackballs and Trackwheels. There are also nine assignable Soft Keys, six Soft Knobs, Copy/Paste Grade keys, and Transport Controls. The Soft Key assignments are stored in an Application Set for each application. Apple Color comes with its own Application Set that lets you start working right away, and this set can be used as a starting point to modify and store your own. You can restore the default Application Set at any time or create a new one. The top-most application (also called foreground, or focussed application): • Receives mouse commands and keystrokes; • Is controlled by Artist Color; • Determines Artist Color surface assignments. Chapter 3: Artist Color Surface Controls 11 Controls and Displays 10 11 5 15 12 2 1 13 Artist Color 7 4 6 14 3 8 9 1 POWER 8 Trackballs 2 SHOW 9 Trackwheels 3 SHIFT 10 APPLICATION Key 4 Soft Keys 11 PAGE Keys 5 Soft Knobs 12 BANK Keys 6 RESET Keys 13 COPY/PASTE GRADE Keys 7 Transport Keys 14 NAV Key 15 Displays 12 Artist Color User Guide POWER Key To turn the device on and off: Press POWER. SHOW Key The SHOW key displays the current key assignments. To show a current key assignment: 1 Press and hold the SHOW key. 2 Press another key. That key’s function name is shown above the image of that key on-screen in EuControl software. Locking the Show Key The SHOW key can be locked to browse multiple key functions. To lock SHOW: 1 Press and release the SHOW key quickly and then press another key to display its assignments. 2 Continue browsing in this manner until finished. 3 Press and release the SHOW key quickly again when finished to restore normal operation. SHIFT Key The SHIFT key accesses a second function for each key, if one has been assigned. Press and hold the SHIFT key and press another key to access the second function. The SHIFT key can be used in conjunction with the SHOW key to display the second function. Since this may require holding down three keys, it is useful to lock the SHIFT key. Locking the Shift Key The SHIFT key can be locked to access multiple alternate key functions. To lock SHIFT: 1 Press and release the SHIFT key quickly. 2 Press another key to access its alternate function. The Shift keys light when locked. Continue in this manner until finished. 3 Press and release the SHIFT key quickly again to restore normal operation. If you have another Artist Series media controller connected to the same instance of EuControl as Artist Color, you can also lock the SHIFT key by pressing two SHIFT keys down simultaneously. They can be on different devices. Unlock the SHIFT key by pressing and releasing one quickly on any device. Soft Keys The Soft Keys are initially factory programmed for each application. The nine Soft Keys can also access nine additional functions by holding down the Shift key before pressing a Soft Key. The Soft Keys can be reassigned within each application. To learn how to program the Soft Keys, see Chapter 6, “Soft Keys.” Soft keys Chapter 3: Artist Color Surface Controls 13 Soft Knobs The six Soft Knobs are dual-function controls; they can be pressed like a switch, or turned to adjust parameters. Pressing a Soft Knob can navigate to a room, clear color parameters, and select specific secondary operations. RESET Keys Each Trackball/Trackwheel has two RESET keys to restore their default settings. The left key of each group resets that Trackball, the right resets that Trackwheel. Transport Keys The Transport keys are factory programmed for Apple Color. Each Transport Key lights when active. The Transport keys are Forward Play, Reverse Play, Stop, and Go To Next/Previous clip. Trackballs and Trackwheels Three Trackballs control Hue, Saturation and Brightness for Shadow, Midtone, and Highlight. The right Trackwheel can be reassigned to jog through the timeline. (For more information, see Chapter 6, “Soft Keys.”) Trackball and Trackwheel Sensitivity Trackball and Trackwheel sensitivity can be adjusted. Increasing the sensitivity changes the assigned parameter faster while decreasing it has the opposite effect. To adjust Trackball and Trackwheel sensitivity: 1 Press both PAGE keys simultaneously. The bottom half of the first and second displays show the Trackball and Trackwheel sensitivity values, respectively, while the label is in the top half. 2 Move the Trackball up to increase the sensitivity or down to decrease it. 3 Move the Trackwheel clockwise to increase sensitivity and counterclockwise to decrease it. Trackball and Trackwheel sensitivity can also be adjusted by turning the knobs below the displays. 4 Press both PAGE keys simultaneously to exit. APPLICATION Key The APPLICATION key lets you target different applications. To toggle between the two most recently used, open applications: Press the APPLICATION key. To cycle through all open applications: Hold down the APPLICATION key and press both PAGE keys. 14 Artist Color User Guide Artist Color can control Apple Color running on a second computer, referred to in this guide as a workstation. To control another workstation: 1 Use EuControl to create a list of workstations to switch between (see “Workstations” on page 22). 2 Press SHIFT + APPLICATION to attach Artist Color to another workstation. While attached to a second workstation, your computer keyboard and mouse can be configured to control that workstation and not your primary system. <PAGE> Keys Press PAGE> or <PAGE to navigate to parameters that are not displayed on the six displays. Press both PAGE keys simultaneously to set the Trackball and Trackwheel sensitivity. For more information, see “Trackball and Trackwheel Sensitivity” on page 14. BANK Keys The BANK keys let you access Basic, Advanced, and Vignette settings depending when in a Primary or Secondary room, as follows: When in a Primary room: Do either of the following: • Press BANK 1 to select the Basic settings tab. – or – • Press BANK 2 to select the Advanced settings tab. When in a Secondary room: Do any of the following: • Press BANK 1 to select the Basic settings tab. • Press BANK 2 to select Vignette controls. • Press SHIFT+BANK 1 to select the Advanced settings tab. Copy/Paste Grade and BANK Keys The Grade comprises all color correction operations for a clip from all the rooms. The CG1/PG1–CG4/PG4 keys copy the Grade to four dedicated memory banks in Apple Color. The Copy keys are on top, and the Paste keys are on the bottom. With a clip selected in the timeline, press a Copy key. Select one or more clips in the timeline and press the corresponding Paste key. NAV Key In all rooms, press the NAV key to show the room names in the display. Press the PAGE > key to display the Still Store and Render Queue rooms. Navigate to the desired room by pressing the corresponding Soft Knob. In a secondary room, press SHIFT+NAV to show six operational tabs on the displays. Select the desired tab by pressing the corresponding Soft Knob. Chapter 3: Artist Color Surface Controls 15 16 Artist Color User Guide Chapter 4: Common Tasks Common Tasks After installing and configuring Artist Color, you are ready to learn some common tasks. Note that the Soft Knobs are dual-function encoders that can be turned like a conventional knob, and pressed like a switch to select a parameter. Using the NAV Key To navigate to rooms in Apple Color: 1 Press the NAV key. The displays show the room names defined in Apple Color that you can navigate to from Artist Color. Press the PAGE > key to display the Still Store and Render Queue rooms. 2 Press the corresponding Soft Knob below the display to go to that room. 3 Push the knob below Primary In. In Apple Color, the Primary and Secondary rooms have color wheels controlled by the Trackballs, and contrast sliders controlled by the Trackwheels for three sections: Shadow, Midtone, and Highlight. When navigating to the Setup, Color Effects, Still Store, and Render Queue rooms, the displays continue to show the room names. Using the Trackballs and Trackwheels In each of the following, the corresponding Trackwheel controls the contrast slider for that attribute. • Move the left Trackball to control the Shadow hue and saturation. • Move the middle Trackball to control Midtone hue and saturation. • Move the right Trackball to control Highlight hue and saturation. Using the Show Key The SHOW key lets you view key assignments. To use the SHOW key: 1 Press the SHOW key. The Soft Keys are shown on your computer screen. 2 Press the NAV key and navigate to Secondary In. (Notice the Soft Key assignments change as you navigate between Primary In and Secondary In.) 3 Locate the Toggle Trackwheel Jog Soft Key and press the Show key again. Chapter 4: Common Tasks 17 Using the Trackwheel to Jog You can use the Trackwheel to jog through the project timeline. To jog: 1 Press the Toggle Trackwheel Jog Soft Key. 2 Turn the right Trackwheel, which now jogs. The playhead moves through the timeline in Apple Color. 3 Press the Toggle Trackwheel Jog Soft Key to restore the previous function. Transport Keys Use the Transport keys to move through the project timeline. 1 2 5 3 4 Transport keys 1 Previous Clip 2 Next Clip 3 Reverse Play 4 Stop 5 Forward Play 18 Artist Color User Guide Chapter 5: EuControl EuControl is launched automatically upon starting your computer and runs in the background. EuControl is responsible for finding, linking, and communicating with all Artist Series media controllers on the network. Accessing EuControl Settings To open the EuControl Settings window: Do one of the following: • On Mac, click the EuControl icon on the task bar and select EuControl Settings. • On Windows, click the EuControl icon in the Task or System tray (Windows) and select EuControl Settings. Unused icons will be shown in the Hidden icons view. Only one instance of EuControl can run on a workstation. However, multiple workstations on a single network can each run EuControl. Each instance of EuControl can connect to one Artist Color, one Artist Transport, one Artist Control, and up to four Artist Mix units on the network. These multiple devices act together as a single control surface. Once connected, Artist Series controllers are not available to other instances of EuControl until relinquished in the EuControl Settings Surfaces tab. The tabs in EuControl software are discussed in the order (left to right) they appear at the top of the EuControl Settings dialog. Some EuControl features do not pertain to Artist Color. These are called out at the beginning of each section. Chapter 5: EuControl 19 Surfaces The Surfaces tab shows all Artist Series controllers on your network and those connected to your instance of EuControl. The following feature does not pertain to Artist Color: • Artist Control banks independently All Surfaces All Surfaces shows all Artist media controllers on the network. A device shown in light gray is already connected either to your own or another instance of EuControl running on a different workstation. In both cases, it is not selectable. My Surfaces My Surfaces shows the Artist media controllers connected to your instance of EuControl. There can be one Artist Color, one Artist Control, one Artist Transport, and up to 4 Artist Mix units in the My Surfaces list, linked into a single large surface. The top-to-bottom order corresponds to the left-to-right order of the surfaces, respectively. The left-most surface has fader number 1. Use the up and down buttons (to the right of the My Surfaces list) to reorder the list. Each Artist Series controller can be renamed by double-clicking the existing name and typing a new name. Add Click Add to add the selected All Surfaces entry to My Surfaces. This connects this Artist Series controller to your instance of EuControl. You can also click and drag an Artist media controller from All Surfaces to My Surfaces. Add is disabled if all Artist media controllers in All Surfaces are connected to any instance of EuControl. Remove Click Remove to remove the selected surface from My Surfaces and make it available to other instances of EuControl. Remove is disabled if no surface is selected. 20 Artist Color User Guide Automatically Add The Automatically Add menu has two settings that control what happens to stored Surfaces between shutdown and startup. All Surfaces (Default) This setting is best used when you are the only person running EuControl in your home or studio. It provides an easy plug-and-play experience by automatically adding your All Surfaces list to your My Surfaces list so you never have to manually edit the My Surfaces list. My Surfaces Only This setting is useful in facilities where other EuControl users are on your network. When EuControl starts, only the surfaces from your My Surfaces list are added. Because a surface can only be claimed by one user at a time, this avoids claiming another user’s surfaces. Update Firmware Each time a new version of EuControl is installed, you might need to update firmware on your Artist Series controllers. The firmware is embedded in EuControl software so an Internet connection is not required. To update firmware: 1 Select each Artist Series controller in the My Surfaces list (Shift-click to select multiple devices). 2 Click Update Firmware to update their firmware. If a dialog displays a message that the firmware is up to date, no further action is necessary. 3 Follow the instructions in the EuControl dialog box. While updating firmware, observe the following: • The Artist Series controllers must be plugged into a working power source. • Do not power off any units during the update or attempt to interrupt the update. • The status for each unit being updated is displayed on that device as well as in the EuControl dialog box. Show Info Select an Artist media controller and click Show Info to display the name, and hardware and software information on-screen. Chapter 5: EuControl 21 Workstations An Artist media controller can control applications running on a second computer, referred to in this guide as a workstation. The Workstations tab establishes the list of workstations that the SHIFT+APPLICATION key cycles through. Any workstation running EuControl software can be in this list, including those controlled by the System 5-MC, MC Pro, Artist Mix, Artist Transport, and Artist Control. Workstations tab All Workstations All Workstations lists all EUCON-enabled workstations on the network. If the workstation is already in the My Workstations list, it is shown in gray and cannot be selected. My Workstations My Workstations lists the workstations that can be attached to by pressing the WORKSTATION key. It is possible to put a workstation in the My Workstations list that is already attached to another instance of EuControl running on another computer. It cannot be attached here until it is unattached from the other instance of EuControl. This was done to allow multiple users to share workstations without having to frequently edit their My Workstations list. Add Click Add to add the selected workstation from the All Workstations list to the My Workstations list. If the workstation is already in the My Workstations list, it is gray and cannot be selected. Remove Click Remove to remove the selected workstation from the My Workstations list. Attach/Detach Select a workstation in the My Workstations list and click Attach. A check mark appears in the Attach column next to that workstation. This workstation is now communicating with the Artist Series controller(s) connected to your instance of EuControl. If the selected workstation is already attached, the button displays Detach. Redirect Keyboard and Mouse Control to Attached External Workstation Your computer keyboard and mouse can control a second external workstation, if desired. Select this option to redirect keyboard and mouse control to the attached workstation. Note that the keyboard and mouse will no longer control your primary workstation. If this option is not selected (default setting), your keyboard and mouse control your primary computer. 22 Artist Color User Guide You can manually toggle control back and forth between your primary workstation and the attached external workstation by pressing Control+Option+\ (Mac) or Control+Alt+\ (Windows). The Redirect Keyboard and Mouse Control to Attached External Workstation option must be checked before adding the workstation to the My Workstations list. If it is toggled ON after adding the workstation it will have no affect. Only workstations added with the option checked will respond. General The General tab controls how the Artist media controller and application software work together. This tab does not pertain to Artist Color. Preferences Preferences tab The following features do not pertain to Artist Color: • Footswitch • Artist Control Display Artist Mix, Artist Transport, and Artist Color Display Screen Dim Time Drag the slider to set the amount of inactive time before the display screens of any of these devices in your system dims to half intensity. Chapter 5: EuControl 23 Assign This tab manages how tracks are assigned to strips on the Artist Control or Artist Mix, and offers the Lock to Application settings. Assign tab The following features do not pertain to Artist Color: • Display application’s track numbers • Clear All Assignments • Monitor and Control Room Lock to Application This feature lets the transport controls and/or the entire surface to stay locked to the application listed at the top-left of the dialog, even when that application is not focussed. The locked-to application also is the only application that will be affected by adjusting the EuControl Wheel Sensitivity settings. Entire Surface Select this checkbox to lock the entire surface, including those of all linked Artist media controllers, to the listed application. Transport Select this checkbox to lock the transport controls of Artist Transport and Artist Control to the listed application. All transport controls, including jog/shuttle wheels, are locked when selected. Monitor and Control Room Locks the Monitor and Control Room controls to the listed application. Layouts This tab does not pertain to Artist Color. Soft Keys This tab controls assignments and programming for Artist Color’s nine Soft Keys. For more information, see Chapter 6, “Soft Keys.” 24 Artist Color User Guide Chapter 6: Soft Keys This tab controls function assignments to the 9 Artist Color Soft Keys. Soft Keys tab in EuControl To edit an application’s assignments in EuControl, that application must be top-most immediately before switching to EuControl. The application listed in the upper left of the window is called focussed because: is controlled by Artist Color – and – receives computer keystrokes and mouse events. Since Artist Color responds dynamically as the in-focus application changes, you may be initially surprised to see the Soft Keys assignments change in EuControl. Simply switch the focus back to Apple Color and then switch back to EuControl to restore them. Although Apple Color unsaved Soft Key edits are preserved between focus changes until you quit the application, we still recommend saving frequently. Apple Color Soft Key assignments are stored in an Application Set. Be sure to check that the Apple Color is in focus before using Save, Restore, or Revert. Save Click Save to permanently store any changes in assignment and/or function to the Soft Keys. Changes are retained even without clicking Save until you quit EuControl. Revert Click Revert to revert to the Soft Key assignments since the last Save command. This discards any changes made since EuControl was last started. Restore Click Restore to restore the Soft Key assignments to the factory default settings. Chapter 6: Soft Keys 25 Section Click the Section pop-up menu to select the Soft Key type to edit: Touchscreen or Surface, or Color Grader. Section pop-up menu Page Select the Soft Key page to view and edit from the Page pop-up, or use the arrows beside the menu to increment or decrement the page by one. Plus Key (+) Click the Plus key (+) to add a new page of Soft Keys after the last page. There is no limit on the number of Soft Key pages. Minus Key (-) Click the Minus key (–) to delete the currently displayed page of Soft Keys. Soft Key Label Select a Soft Key (its outline highlights yellow) and type a label in this text field. Layout Select Text Only, Icon Only, or Text and Icon from the Layout popup menu. Icon Click the Icon button and select an icon from the dialog. Font Click the Font button and select a font from the dialog. Color Click the Color button and select a color from the dialog. Clear Click the Clear button to delete the function assigned to the selected key. Once cleared, pressing the selected key does nothing. 26 Artist Color User Guide Command Select a Soft Key (its outline highlights yellow) and click Command to view or edit the command(s) assigned to that Soft Key. Double-clicking the key is a shortcut to open the command editor. Command editor The type of command is set in the left column. Key Key commands can execute menu commands, other application-specific commands that have key equivalents, and even inject a specific text string if necessary. Key commands can also be used to make a macro, which consists of multiple commands executed sequentially by one Soft Key. For a description of Key and other Command type and an example how to create a new command, see “Command Types” on page 28. Add Click Add to select a command type. Multiple commands can be added to the same key to create a macro. Delete Click Delete to delete the selected command. Repeat Click Repeat to allow the command to be repeated if the Soft Key is held down. Repeat dialog Chapter 6: Soft Keys 27 Numeric fields in the Repeat dialog accept integer values only. The Repeat controls are: No Repeat The key does not repeat (default setting). As fast as possible Repeats as fast as the computer allows. [x] times per second Repeats the key x times per second. Once every [x] seconds Repeats the key every x seconds. Initial delay [x] milliseconds Specifies a delay of x ms before starting to repeat the key. This field is active only when No Repeat is not selected. Command Types Artist Color uses two of the five EuControl command types: Key and EuCon. Key Key commands can execute menu commands and other application-specific commands that have key equivalents. Key commands can be programmed to enter a specific text string. Key commands can also be used to make a macro, which consists of multiple commands executed sequentially by one Soft Key. Key Command editor Key Command Parameters • To enter text, type into the text field in the Details pane. Use the Control, Shift, Opt/Alt, and Command/Start modifiers along with the Insert Special menu to finish creating the key command. • Select Repeat to repeat the command if the Soft Key is held down. For example, if the key executes a Nudge command and Repeat is selected, holding down the Soft Key will continue to Nudge. • Click Delete to delete the selected command. Example To create a command to move to the previous key frame of the current shot in the current room: 1 Select the Soft Keys tab in EuControl. 2 Select a Soft Key to program. 3 Check the Shift box to place this command on the SHIFT layer. 4 Click Command or double-click the Soft Key. 5 Select Key from the Add menu. 6 Choose Alt/Opt and select Left Arrow from the Insert Special menu. 28 Artist Color User Guide 7 Close the command editor. 8 Name the Soft Key Previous Key Frame. 9 Click Save. Pressing that Soft Key now navigates to the previous key frame. EUCON The EUCON command types under the Details column are specific to Apple Color. The Mouse Injection command engages the center Trackball to control the mouse cursor and the R3/R4 buttons control Left click/Right click. When entering the Color Effects Room Artist Color automatically activates Mouse Injection. However it can be useful to implement this function elsewhere (such as to control curves in a primary room). 1 Select the Soft Keys tab in EuControl. 2 Select Soft Keys from the Section pop-up with Artist Color icon to its left. 3 Double-click the desired Soft Key. 4 Select EuCon from the Add popup menu. 5 Select Color from the left column. 6 Select Surface Modes from the middle column. 7 Select Mouse Injection. EuCon commands automatically label the button but do not select an icon. 8 Click Save to save the command. Chapter 6: Soft Keys 29 30 Artist Color User Guide Chapter 7: Using Artist Color with Apple Color This section describes the color correction process by examining important functions in some of the Apple color rooms (Primary In, Secondary: Vignette Control, and Color FX). Primary In Contrast Most colorists begin by correcting the contrast of an image before adjusting its color. Artist Color lets you adjust the Shadow, Midtone, and Highlight contrast using the three Trackwheels as follows: • To adjust Shadow, use the left Trackwheel; • To adjust Midtone, use the middle Trackwheel; • To adjust Highlight, use the right Trackwheel. Contrast can be further adjusted by engaging Mouse Injection and changing the Luma curve control. To change Luma curve: 1 Press the Mouse Injection Soft Key. 2 Press R3 to left-click and create a control point. 3 Use the center Trackball to hover over a control point, then press and hold R3 and use the Trackball to move the control point. To adjust Master Lift, Master Gain, and Master Gamma controls in the Basic tab: 1 Press Bank 1. 2 Turn Soft Knobs 4–6 to control Lift, Gain and Gamma, respectively. Color Balance After correcting image contrast you can adjust the color balance. Fast, coarse adjustments to color balance (Shadow, Midtone, and Highlight) can be made using the Trackballs to set the primary color balance, as follows: • The left Trackball controls the Shadow Color Balance wheel; R1 resets Hue and Saturation. • The middle Trackball controls the Midtone Color Balance wheel; R3 resets Hue and Saturation. • The right Trackball controls the Highlight Color Balance wheel; R5 resets Hue and Saturation. More detailed adjustments can be made by engaging Mouse Injection to change the red, green, and blue curve(s). Numeric adjustments can be made to the Red, Green, and Blue Lift, Gamma, and Gain controls by selecting Bank 2 to go to the Advanced tab and then turning the Soft Knobs. Saturation When the quality of the colors is satisfactory, the next step is to raise or lower the saturation (also called intensity) of the colors in the image. Select BANK 1 and use the Soft Knobs to adjust the Saturation, Highlight Sat., and Shadow Sat. controls in the Basic tab. This allows adjusting the overall saturation or only the saturation within specific tonal regions. Chapter 7: Using Artist Color with Apple Color 31 Secondary: Vignette Control Vignette controls are available in BANK 2 of Secondaries. To access and adjust Vignette controls: 1 Press the BANK 2 key to select them. 2 Press the Enable Vignette Soft Key to toggle the vignette on or off for that tab. 3 Press the Mouse Injection Soft Key. 4 Use the center Trackball to hover the cursor over the Shape pop-up menu and press R3 to select a Circle or Square. The following parameters are available only when the Square or Circle options are selected from the Shape pop-up menu: • Angle: Rotates the current shape • Center: Adjusts the position of the shape • Softness: Blurs the edges of the shape • Size: Scales the shape size up/down • Aspect: Adjusts the width-to-height ratio of the shape Color FX When navigating to the Color FX Room, Artist Color automatically engages Mouse Injection to select effects, connect node trees, and adjust parameters while maintaining contact with Artist Color. To Keyframe in the Timeline: 1 Press the Add Keyframe Soft Key. 2 Adjust color parameters or vignette controls. 3 Press the Trackwheel Jog Soft Key. 4 Jog to another frame to select another edit point. 5 Press the Add Keyframe Soft Key. 6 Adjust color parameters or vignette controls. Using Artist Color and Artist Transport Artist Color can be used simultaneously with an Artist Transport to create a larger control surface with additional programmable Soft Keys, Numeric Keypad, weighted Jog Wheel, and high-resolution Shuttle Ring. The Numeric Keypad on Artist Transport lets you navigate to specific clips and timecode locations in the timeline. To use the Numeric Keypad on Artist Transport to navigate among Clips: 1 Press the Numpad go to clip Soft Key. 2 Use the Numeric Keypad to enter the desired clip number. 3 Press ENTER. To use the Numeric Keypad on Artist Transport to navigate to Timecode: 1 Press the Numpad go to timecode Soft Key. 2 Use the Numeric Keypad to enter the desired timecode location. 3 Press ENTER. 32 Artist Color User Guide Chapter 8: Setting the IP Address Most Artist Color users will never have to set a static Internet Protocol (IP) address, but in the rare cases that require it, the Artist Color does allow for it. Normally, Artist Series media controllers use Dynamic Host Configuration Protocol (DHCP) to obtain its IP address, typically from a router. Artist Color reverts to link-local addressing to generate an IP address if a DHCP server is not found on the network, such as when Artist Color is connected directly to a computer with an Ethernet cable. Both of these methods of obtaining IP addresses can be overridden by supplying a static IP address, which Artist Color will then use in all cases when powered on. This step requires that you have prior experience configuring a network. To set a static IP address: 1 While holding down the left-most two Soft Keys simultaneously, press and release the POWER switch. Continue to hold the Soft Keys down until the display lights. 2 Turn the Jog Wheel clockwise to change the underlined value from yes (default) to no. Use DHCP yes (left); Use DHCP no (right) The + and – keys on the Numeric Keypad can be used instead of the Jog Wheel to decrease or increase the value, respectively. 3 Press the ENTER key to move the cursor to the next screen, in this case the first field of the IP Address screen. 4 Press the ENTER key to cycle the cursor back to a previous field or screen to change a parameter to a different value. 5 Use the Jog Wheel to set the first field of the IP Address. Alternately, press the + or – keys on the Numeric Keypad to increment or decrement the value, respectively. You can also enter the number directly using the Numeric Keypad. 6 Press the ENTER key to move the cursor to the second field. 7 Rotate the Jog Wheel to set the second field of the IP address. IP Address displays 8 Set the remaining IP Address fields. Chapter 8: Setting the IP Address 33 9 After setting the last IP Address field, press the ENTER key to move the cursor to the first field of the Subnet Mask screen. Subnet Mask display 10 Set the Subnet Mask using the same techniques described in the previous steps. 11 Press the two left-most Soft Keys simultaneously to save this static IP address. Power Artist Color off and on to use the new IP address. To cancel any changes made to the IP address at any time, power off Artist Color before pressing the two left-most Soft Keys simultaneously. 34 Artist Color User Guide Appendix A: EUCON Commands EUCON Commands and Descriptions EUCON Command Name Description Add all to Queue Adds all clips in the project to the Render Queue Add Key Frame Adds a keyframe to the current clip at the position of the playhead Add Selected to Queue Adds selected clips in the timeline to the Render Queue Blue Channel Waveform Displays the Blue Channel Change Key Frame Switches keyframe interpolation type between linear, smooth, and constant Copy Current Grade Bank 1 Copies grade from current clip to memory bank 1 Copy Current Grade Bank 2 Copies grade from current clip to memory bank 2 Copy Current Grade Bank 3 Copies grade from current clip to memory bank 3 Copy Current Grade Bank 4 Copies grade from current clip to memory bank 4 Copy Current Grade Bank 5 Copies grade from current clip to memory bank 5 Copy Grade from Previous Clip Copies grade from the previous clip on the timeline. Cue Navigation Moves playhead to the navigational time Cut Edit Splits current clip at the Playhead Delete Key Frame Deletes keyframe at position of playhead Green Channel Waveform Displays the Green Channel Histogram Waveform Displays the Histogram Inch Play Forward Plays forward by frame Inch Play Reverse Plays backward by frame Keyer Enable H Enable or disable secondary keyer for Hue Keyer Enable S Enable or disable secondary keyer for Saturation Keyer Enable L Enable or disable secondary keyer for Luma Keyer Left Side Only Control only the left side of selected keyer spread or falloff Keyer Right Side Only Control only the right side of selected keyer spread or falloff Luma Y Waveform Displays the Luma Channel Merge Edit Joins two shots at an edit point at the position of the Playhead Appendix A: EUCON Commands 35 EUCON Commands and Descriptions EUCON Command Name Description Next Edit Moves the Playhead to the next edit Next Grade Selects the next grade on a clip for correction and viewing, or creates a new one. Next Secondary Selects the next Secondary tab for the current clip; cycles 1-8 Overlay Waveform Displays Overlay Parade Waveform Displays Parade Paste Current Grade Bank 1 Pastes grade from memory bank 1 to the current clip Paste Current Grade Bank 2 Pastes grade from memory bank 2 to the current clip Paste Current Grade Bank 3 Pastes grade from memory bank 3 to the current clip Paste Current Grade Bank 4 Pastes grade from memory bank 4 to the current clip Paste Current Grade Bank 5 Pastes grade from memory bank 5 to the current clip Previous Edit Moves the Playhead to the Previous Edit Previous Grade Selects the previous grade on a clip for correction and viewing Previous Secondary Selects the previous Secondary tab for the current clip; cycles 1-8 Print Queue Render all clips in the Queue Red Channel Waveform Displays the Red Channel Reset Grade Resets grade for the current clip Revert Project Reverts to last saved state of the current project Save Project Saves Project Set Player Marker In Sets the player in Marker Set Player Marker Out Sets the player out Marker Scope Resolution 100% Sets the vector scope resolution to 100% Scope Resolution 25% Sets the vector scope resolution to 25% Scope Resolution 50% Sets the vector scope resolution to 50% Scope Resolution 75% Sets the vector scope resolution to 75% Set as Beauty Grade Sets the current grade to Beauty Grade Start Playback Forward Play forward Start Playback Reverse Play backward Stop Playback Play Store Still Creates a still of the current frame To Project End Navigates playhead to project end To Project Start Navigates playhead to project start 36 Artist Color User Guide EUCON Commands and Descriptions EUCON Command Name Description Toggle Grading Toggle between clip ID and showing grade Toggle Playback Mode Toggle between playback on active clip or entire timeline Toggle Primary Out Clipping Toggle Primary Out Clipping on or off Toggle Secondary Enable or disable selected secondary for current clip Toggle Secondary In or Out Enable or disable the inner or outer control for selected secondary for current clip Toggle Secondary Vignette Enable or disable secondary vignette for the selected secondary for the current clip Toggle Still Store Show or hide still Numpad go to Clip # MC Transport’s numpad is used to go to clip ID. Numpad go to Time Code MC Transport’s numpad is used to go to timecode location Toggle Mouse Injection Center trackball controls mouse cursor; R3 and R4 become mouse buttons Toggle Trackwheel Jog Right trackwheel becomes jog wheel Trackball & Wheel Accel Multiplies acceleration of ball and wheel 10 times Appendix A: EUCON Commands 37 38 Artist Color User Guide Appendix B: Compliance Information Environmental Compliance Disposal of Waste Equipment by Users in the European Union EMC (Electromagnetic Compliance) This model Artist Color complies with the following standards regulating interference and EMC: • FCC Part 15 Class B • EN 55022 Class B • EN 55024 Class B • AS/NZS CISPR 22 Class B • CISPR 22 Class B FCC Compliance for United States Radio and Television Interference This symbol on the product or its packaging indicates that this product must not be disposed of with other waste. Instead, it is your responsibility to dispose of your waste equipment by handing it over to a designated collection point for the recycling of waste electrical and electronic equipment. The separate collection and recycling of your waste equipment at the time of disposal will help conserve natural resources and ensure that it is recycled in a manner that protects human health and the environment. For more information about where you can drop off your waste equipment for recycling, please contact your local city recycling office or the dealer from whom you purchased the product. Proposition 65 Warning This product contains chemicals, including lead, known to the State of California to cause cancer and birth defects or other reproductive harm. Wash hands after handling. Perchlorate Notice This product may contain a lithium coin battery. The State of California requires the following disclosure statement: “Perchlorate Material – special handling may apply, See www.dtsc.ca.gov/hazardouswaste/perchlorate.” Communication Statement NOTE: This equipment has been tested and found to comply with the limits for a Class B digital device, pursuant to Part 15 of the FCC Rules. These limits are designed to provide reasonable protection against harmful interference in a residential installation. This equipment generates, uses, and can radiate radio frequency energy and, if not installed and used in accordance with the instructions, may cause harmful interference to radio communications. However, there is no guarantee that interference will not occur in a particular installation. If this equipment does cause harmful interference to radio or television reception, which can be determined by turning the equipment off and on, the user is encouraged to try and correct the interference by one or more of the following measures: • Reorient or relocate the receiving antenna. • Increase the separation between the equipment and receiver. • Connect the equipment into an outlet on a circuit different from that to which the receiver is connected. • Consult the dealer or an experienced radio/TV technician for help. Any modifications to the unit, unless expressly approved by Avid, could void the user's authority to operate the equipment. Recycling Notice Appendix B: Compliance Information 39 Australian Compliance Important Safety Instructions 1) Read these instructions. 2) Keep these instructions. 3) Heed all warnings. Canadian Compliance 4) Follow all instructions. This Class B digital apparatus meets all requirements of the Canadian Interference-Causing Equipment Regulations. 5) Do not use this equipment near water. Cet appareil numérique de la classe B respecte toutes les exigences du Règlement sur le matériel brouilleur du Canada. CE Compliance (EMC and Safety) 6) Clean only with dry cloth. 7) Do not block any ventilation openings. Install in accordance with the manufacturer’s instructions. 8) Do not install near any heat sources such as radiators, heat registers, stoves, or other equipment (including amplifiers) that produce heat. 9) Do not defeat the safety purpose of the polarized or grounding-type plug. A polarized plug has two blades with one wider than the other. A grounding type plug has two blades and a third grounding prong. The wide blade or the third prong are provided for your safety. If the provided plug does not fit into your outlet, consult an electrician for replacement of the obsolete outlet. Avid is authorized to apply the CE (Conformité Europénne) mark on this compliant equipment thereby declaring conformity to EMC Directive 2004/108/EC and Low Voltage Directive 2006/95/EC. 10) Protect power cords from being walked on or pinched particularly at plugs, convenience receptacles, and the point where they exit from the equipment. 11) Only use attachments/accessories specified by the manufacturer. Safety Compliance This equipment has been tested to comply with USA and Canadian safety certifications in accordance with the specifications of UL Standards: UL60950-1:2007, 2nd Edition and canadian CAN/CSA C22.2 60950-1-07, 2nd Edition. Avid Inc. has been authorized to apply the appropriate UL and CUL mark on its compliant equipment. Warning 12) For products that are not rack-mountable: Use only with a cart, stand, tripod, bracket, or table specified by the manufacturer, or sold with the equipment. When a cart is used, use caution when moving the cart/equipment combination to avoid injury from tip-over. 13) Unplug this equipment during lightning storms or when unused for long periods of time. 14) Refer all servicing to qualified service personnel. Servicing is required when the equipment has been damaged in any way, such as power-supply cord or plug is damaged, liquid has been spilled or objects have fallen into the equipment, the equipment has been exposed to rain or moisture, does not operate normally, or has been dropped. 15) For products that are a Mains powered device: The equipment shall not be exposed to dripping or splashing and no objects filled with liquids (such as vases) shall be placed on the equipment. Warning! To reduce the risk of fire or electric shock, do not expose this equipment to rain or moisture. 16) For products containing a lithium battery: CAUTION! Danger of explosion if battery is incorrectly replaced. Replace only with the same or equivalent type. 17) For products with a power switch: The main power switch is located on the top panel of Artist Color. It should remain accessible after installation. 18) The equipment shall be used at a maximum ambient temperature of 40° C. 40 Artist Color User Guide Avid Technical Support (USA) Product Information 2001 Junipero Serra Boulevard Daly City, CA 94014-3886 USA Visit the Online Support Center at www.avid.com/support For company and product information, visit us on the web at www.avid.com