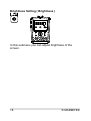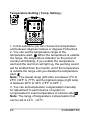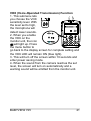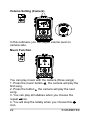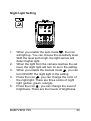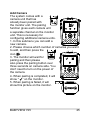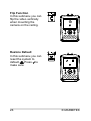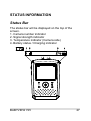
1
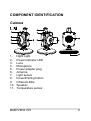
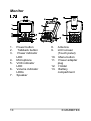
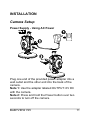
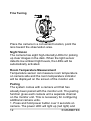
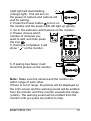
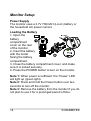
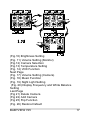
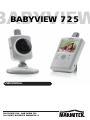
BABYVIEW 7 2 5 BABYVIEW USER MANUAL 20611/20131210 • BABYVIEW 725 ALL RIGHTS RESERVED MARMITEK © 2 © MARMITEK SAFETY WARNINGS This product is NOT intended to replace proper supervision of children. You MUST check your child’s activity regularly, as this product will not alert parents to silent activities of a child. STRANGULATION HAZARD - Keep cord out of child's reach. NEVER place camera or cords within 1 meter of crib or playpen. Never use extension cords with AC Adapters. Only use the AC Adapters provided. To prevent short circuits, this product should only be used inside and only in dry spaces. Do not expose the components to rain or moisture. Do not use the product close to a bath, swimming pool, etc. Do not expose the components of your system to extremely high temperatures or bright light sources. In case of improper usage or if you have altered and repaired the product yourself, all guarantees expire. Marmitek does not accept responsibility in the case of improper usage of the product or when the product is used for purposes other than specified. Marmitek does not accept responsibility for additional damage other than what is covered by the legal product responsibility. This product is not a toy. Keep out of reach of children. BABYVIEW 725 3 4 Do not open the product (battery panel excepted): the device may contain live parts. The product should only be repaired or serviced by a qualified expert. Keep batteries out of the reach of children. Dispose of batteries as chemical waste. Never use old and new batteries or different types of batteries together. Remove the batteries when you are not using the system for a longer period of time. Check the polarity (+/-) of the batteries when inserting them in the product. Wrong positioning can cause an explosion. Only connect the adapter to the mains after checking whether the mains voltage is the same as the values on the identification tags. Never connect an adapter or power cord when it is damaged. In that case, contact your supplier. "This appliance is not intended for use by persons (including children) with reduced physical, sensory or mental capabilities, or lack of experience and knowledge, unless they have been given supervision or instruction concerning use of the appliance by a person responsible for their safety." Children should be supervised to ensure that they do not play with the appliance. Disconnect the AC/DC Power Adapter from the mains, when this device is not in use for a prolonged peroid of time. © MARMITEK TABLE OF CONTENTS SAFETY WARNINGS ................................................. 3 TABLE OF CONTENTS ............................................. 5 SET INCLUDES ......................................................... 6 INTRODUCTION ........................................................ 7 FEATURES................................................................. 8 COMPONENT IDENTIFICATION ............................... 9 Camera ................................................................... 9 Monitor .................................................................. 10 INSTALLATION ........................................................ 11 Camera Setup ...................................................... 11 Power Supply - Using AC Power ....................... 11 Fine Tuning ....................................................... 12 Night Vision ....................................................... 12 Room Temperature Measurement .................... 12 Pairing ............................................................... 12 Monitor Setup ....................................................... 14 Power Supply .................................................... 14 Loading the Battery ........................................... 14 Using AC Power ................................................ 15 Talkback Function ............................................. 16 Menu Options ....................................................... 16 Brightness Setting ( Brightness ) ....................... 18 Volume Setting ( Monitor ) ................................. 19 Camera Selection ( Camera Select ) ................. 19 Temperature Setting ( Temp. Setting ) .............. 20 VOX (Voice-Operated Transmission) Function . 21 Music Function .................................................. 22 Night Light Setting ............................................. 23 BABYVIEW 725 5 Display Frequency and White Balance Setting . 24 Delete Camera .................................................. 24 Add Camera ...................................................... 25 Flip Function ...................................................... 26 Restore Default ................................................. 26 STATUS INFORMATION ......................................... 27 Status Bar ............................................................. 27 Warning Alarm ...................................................... 28 OPTIONAL ACCESSORIES .................................... 29 FREQUENTLY ASKED QUESTIONS ...................... 29 CARE AND MAINTENANCE .................................... 30 FOLLOWING THE SAFETY TIPS ............................ 31 TECHNICAL DATA ................................................... 32 DECLARATION OF CONFORMITY ......................... 33 COPYRIGHTS .......................................................... 35 SET INCLUDES 1 x Camera 1 x Monitor 2 x Power Adapter (with 2 meter cable) 1 x Battery for Monitor ( 3.7V 700mAh Li-ion ) 2 x Cable Clip 2 x Screw 2 x Wall Anchor 1 x User's Manual 6 © MARMITEK INTRODUCTION Congratulations on your purchase of your BabyView 725 video baby monitor. The Marmitek BabyView 725 video baby monitor provides you with round-the-clock support and it allows you to see your baby day and night from anywhere in the house. The latest digital technology guarantees clear sound and the clearest image of your baby. This gives you an additional sense of security without entering your baby’s room and disturbing its sleep. Keep a remote eye on your baby day and night Comfort your baby using the talk feature, by playing lullabies or with the baby night light Instils a safe feeling, because you will be warned when you get out of range, the rechargeable battery gets low or if the nursery gets too hot or too cold Digital technology with a range of 150 metres and 100% privacy BABYVIEW 725 7 FEATURES 2.4” Touchscreen for easy operation Digital, secure transmission technology for 100% privacy Selectable standby function with adjustable voice activation (VOX) Parent unit works on power adapter (included) and rechargeable Li-Ion battery (included) Range up to 150 meter Automatic infrared night vision activation on camera Two-way talkback function Soft night light with 3 colours and 4 dimlevels Remotely selectable lullabies Volume indicator LEDs Out of range indication and alert Temperature monitoring and alert Expandable up to 8 cameras Extra long power cables (2 meters) 8 © MARMITEK COMPONENT IDENTIFICATION Camera 1. 2. 3. 4. 5. 6. 7. 8. 9. 10. 11. Night Light Power indicator LED Lens Microphone Power adapter plug Antenna Light sensor Power/Pairing button Infrared LEDs Speaker Temperature sensor BABYVIEW 725 9 Monitor 1. 2. 3. 4. 5. 6. 7. 10 Power button Talkback button Power indicator LED Microphone VOX indicator LED Volume indicator LEDs Speaker 8. 9. 10. 11. 12. 13. Antenna LCD screen (Touch panel) Menu button Power adapter plug Holder Battery compartment © MARMITEK INSTALLATION Camera Setup Power Supply - Using AC Power Plug one end of the provided power adapter into a wall outlet and the other end into the back of the camera. Note 1: Use the adapter labeled OUTPUT: 6V DC with the camera. Note 2: Press and hold the Power button over two seconds to turn off the camera. BABYVIEW 725 11 Fine Tuning Place the camera in a convenient location, point the lens toward the observation area. Night Vision The camera has eight high-intensity LEDs for picking up clear images in the dark. When the light sensor detects low ambient light levels, the LEDs will be automatically activated. Room Temperature Measurement Temperature sensor can measure room temperature on camera side and the room temperature indicator will be displayed on the screen of the monitor unit. Pairing The system comes with a camera unit that has already been paired with the monitor unit. The pairing function gives each camera unit a separate channel on the monitor unit. This is necessary for configuring additional camera units. 1. Press and hold power button over 3 seconds on camera. The power LED will light up (red light) and 12 © MARMITEK night light will start blinking (orange light). This will turn on the power of camera and camera will wait for pairing. 2. Press the Power button to turn on the monitor and the power LED will light up (green). 3. Go in the submenu add Camera on the monitor. 4. Please choose which number of cameras you want to add, and then press the icon . 5. Pairing is completed, it will show " " on the monitor. 6. If pairing has failed, it will show this picture on the monitor. Note : Make sure the camera and the monitor are within range of each other. If there is out of range, the picture will be displayed on the LCD screen and the warning sound will be emitted from the monitor unit if the monitor exceeds the range (unlink). The warning sound will be emitted from the monitor until you press any button to stop. BABYVIEW 725 13 Monitor Setup Power Supply The monitor uses a 3.7V 700mAH (Li-ion) battery or the household AC power current. Loading the Battery 1. Open the battery compartment cover on the rear of the monitor. 2. Insert the battery with the metal facing the battery compartment. 3. Close the battery compartment cover, and make sure it is locked securely. 4. Press the POWER button to turn on the monitor. Note 1: When power is sufficient, the "Power” LED will light up (green light). Note 2: Press and hold the Power button over two seconds to turn off the monitor. Note 3: Remove the battery from the monitor if you do not plan to use it for a prolonged period of time. 14 © MARMITEK Using AC Power 1. Plug one end of the provided power adapter into a wall outlet and the other end into the monitor, the "Power" LED will appear red. Note : Use the adapter labeled OUTPUT: 6V DC with the monitor. 2. Press the POWER button to turn on the monitor. Note 1: When power on the monitor, "Power" LED will appear orange. Note 2: Press and hold the Power button over two seconds to turn off the monitor. Note 3: When power on and charging starts, "Power" LED will appear orange. If charging is finished (fully charged) the "Power" LED will turn green. When power off and charging starts, and "Power" LED will appear red. If charging is finished (fully charged) the "Power" LED will turn green. BABYVIEW 725 15 Talkback Function Press the talkback button camera unit. to speak through the Menu Options 1. 2. 16 Press the menu button on the monitor unit to display the main menu on the screen (touch panel).. There are three main menus. © MARMITEK (Fig.10) Brightness Setting (Fig. 11) Volume Setting (Monitor) (Fig.12) Camera Selection (Fig.13) Temperature Setting (Fig. 14) VOX Function Next Page (Fig. 17) Volume Setting (Camera) (Fig. 18) Music Function (Fig. 19) Night Light Setting (Fig. 20) Display Frequency and White Balance Setting Last Page (Fig 21) Delete Camera (Fig 22) Add Camera (Fig 25) Flip Function (Fig. 26) Restore Default BABYVIEW 725 17 Brightness Setting ( Brightness ) In this submenu you can adjust brightness of the screen. 18 © MARMITEK Volume Setting ( Monitor ) In this submenu you can adjust volume level on monitor side. Camera Selection ( Camera Select ) In this submenu you can select which camera that you want to display on the screen. BABYVIEW 725 19 Temperature Setting ( Temp. Setting ) 1. In this submenu you can choose the temperature unit between degrees Celsius or degrees Fahrenheit. 2. You can set the temperature range of the temperature alert. When the temperature is outside the range, the temperature indicator on the panel of monitor will blinking. If you enable the temperature alert and the alert icon will light up, the warning sound will be emitted from the monitor unit if the temperature is outside the range until you disable the temperature alert. 0 Note : The lowest range (left side) is between 0 C to 0 0 0 25 C (32 F to 77 F) and the highest range (right side) 0 0 0 0 is between 26 C to 38 C (78 F to 99 F ). 3. You can set temperature compensation manually for adjustment in performance of system to compensate for exact temperature of camera side. Note: The range of temperature compensation that 0 0 can be set is ±2 C(±3 F) 20 © MARMITEK VOX (Voice-Operated Transmission) Function 1. This submenu lets you choose the VOX sensitivity level. With the level set to high, the microphone will detect lower sounds. 2. When you enable the VOX on the monitor unit, the icon will light up. Press the menu button to go back to the display screen for complete setting and the VOX LED will remain ON (blue light). 3. This will turn off the screen within 10 seconds and enter power saving mode. 4. When the sound from the camera reaches the set level, the screen will turn on automatically and a warning sound will be emitted from the monitor unit. BABYVIEW 725 21 Volume Setting (Camera) In this submenu you can adjust volume level on camera side. Music Function You can play music with the camera (three songs) . 1. Press the music button , the camera will play the first song. 2. Press the button , the camera will play the next song. 3. You can play all lullabies when you choose the repeat icon. 4. You will stop the lullaby when you choose this icon. 22 © MARMITEK Night Light Setting 1. 2. 3. 4. 5. When you enable the auto mode , the icon will light up. You can choose the sensitivity level. With the level set to high, the light sensor will detect higher light. When the light from the camera reaches the set level, the night light will turn on as in the setting. When you enable the manual mode , you can turn ON/OFF the night light in the setting. Press the icon , you can change the color of the night light. There are three colors of night light (yellow, green, orange). Press the icon , you can change the level of brightness. There are four levels of brightness. BABYVIEW 725 23 Display Frequency and White Balance Setting 1. 2. In this submenu you can choose what frequency and color temperature are better on the monitor. There are three types of color temperature and two frequencies (50Hz or 60Hz). Delete Camera In this submenu you can delete a paired camera. 1. Please press which number of cameras you want to delete. 2. Press to delete. 24 © MARMITEK Add Camera The system comes with a camera unit that has already been paired with the monitor unit. The pairing function gives each camera unit a separate channel on the monitor unit. This is necessary for configuring additional camera units. 1. In this submenu you can add a new camera. 2. Please choose which number of cameras you want to add, and then press the icon . 3. The monitor will wait for pairing and then please also press the pairing button over three seconds on camera side. You don’t need to turn on the power of the camera. 4. When pairing is completed, it will show " “ on the monitor. 5. When pairing is failed, it will show this picture on the monitor. BABYVIEW 725 25 Flip Function In this submenu you can flip the video vertically when mounting the camera on the ceiling. Restore Default In this submenu you can reset the system to default. Press to make sure. 26 © MARMITEK STATUS INFORMATION Status Bar The status bar will be displayed on the top of the screen. 1. Camera number indicator 2. Signal strength indicator 3. Temperature indicator (Camera side) 4. Battery status / Charging indicator BABYVIEW 725 27 Warning Alarm Status Out of range Lost connection Indication Continuous beeps for one minute Temperature alarm 2 consecutive beeps and temperature indicator on the screen blinking VOX alarm 3 consecutive beeps Low battery 2 consecutive beeps and on the screen blinking Action Move the monitor closer to the camera. Check the power of camera. Check the temperature of camera side. Disable temperature alert (See Setup) Disable VOX function (See Setup) Connect the monitor unit to the AC adapter. (See Setup) Note : You can press any key of the monitor to stop the alarm. 28 © MARMITEK OPTIONAL ACCESSORIES Extra Camera (Up to 8 cameras) Extra Monitor (Up to 2 monitors) FREQUENTLY ASKED QUESTIONS You don't get any signal at all Make sure the camera and the monitor are turned on. Make sure the power plugs are pushed all the way in. If the signal is poor, or there is interference If there is a microwave oven in use in the path between the camera and monitor, remove the microwave oven or turn it off. Make sure the camera and the monitor are within range of each other (range of approximately 150 metres in a clear line of sight). Do you have other questions that have not been resolved by the above information? Please go to www.marmitek.com BABYVIEW 725 29 CARE AND MAINTENANCE 30 Keep all parts and accessories out of children's reach. Fingerprints or dirt on the lens surface can adversely affect camera performances. Avoid touching the lens surface with your fingers. Should the lens become dirty, use a blower to blow off dirt and dust, or a soft, dry cloth to wipe off the lens. Keep the camera dry. Precipitation, humidity, and other liquids contain minerals will corrode electronic circuits. Do not use or store in dusty, dirty areas. Do not store in hot areas. High temperatures can shorten the life of electronic devices and warp or melt certain plastics. Do not store in very cold areas. When the system warms up (to its normal temperature), moisture can form inside the case, which may damage electronic circuit boards. Do not attempt to open the case. Non-expert handling of the device may damage the system. Avoid dropping or strong shocks. Operate this product using only with the power supply included or provided as an accessory. Do not overload electrical outlets or extension cords this can result in fire or electric shocks. Do remember that you are using public airwaves when you use the system and that sound and © MARMITEK video may be broadcast to other 2.4 GHz receiving devices. Conversations, even from rooms near the camera, may be broadcast. To protect the privacy of your home, always turn the camera off when not in use. FOLLOWING THE SAFETY TIPS To prevent deaths and injuries associated with baby monitor cords: Make sure the baby unit and AC adapter cord is always out of reach of the baby and at least 1 meter away. Note: It's important even if your baby is not yet standing or mobile. Never use extension cords with AC adapters. Only use the AC adapters provided. BABYVIEW 725 31 TECHNICAL DATA Camera RF frequency Antenna Transmission Range 2.4 GHz Monopole antenna Up to 150m free field, up to 50m through walls and ceilings Modulation/Demodulation GFSK Date rate 4M Image sensor Color CMOS Effective pixels 320H x 240V pixels Lens f 3.0mm, F2.4 Viewing angle Horizontally 300 degrees, Vertically 80 degrees Dimensions 80(W) x 117.2(H) x 80(D) mm Power DC 6V, 800mA Ambient temperature: 0°C tot +40°C (Operation) Monitor RF frequency Antenna LCD screen size Number of color Dimensions Weight Power Operating temperature 2.4 GHz Monopole antenna Touch panel 2.4-inch Full-color 69.4(W) x 122.5(H) x 32.2(D) mm 104g (with battery) DC 6V, 800mA, Li-ion battery 0 degrees C ~ 40 degrees C In order to continue improving the product, Marmitek reserves the right to change specifications and/or designs without prior notice. 32 © MARMITEK DECLARATION OF CONFORMITY Hereby, Marmitek BV, declares that this BABYVIEW 725 is in compliance with the essential requirements and other relevant provisions of the following Directives: Directive 1999/5/EC of the European Parliament and of the Council of 9 March 1999 on radio equipment and telecommunications terminal equipment and the mutual recognition of their conformity Directive 2004/108/EC of the European Parliament and of the Council of 15 December 2004 on the approximation of the laws of the Member States relating to electromagnetic compatibility Directive 2006/95/EC of the European Parliament and of the Council of 12 December 2006 on the harmonisation of the laws of Member States relating to electrical equipment designed for use within certain voltage limits Directive 2011/65/eu of the european parliament and of the council of 8 June 2011 on the restriction of the use of certain hazardous substances in electrical and electronic equipment Commission Regulation (EC) No 278/2009 of 6 April 2009 implementing Directive 2005/32/EC of the European Parliament and of the Council with regard to ecodesign requirements for no-load condition electric power consumption and average active efficiency of external power supplies BABYVIEW 725 33 Environmental Information for Customers in the European Union European Directive 2002/96/EC requires that the equipment bearing this symbol on the product and/or its packaging must not be disposed of with unsorted municipal waste. The symbol indicates that the product should be disposed of separately from regular household waste streams. It is your responsibility to dispose of this and other electric and electronic equipment via designated collection facilities appointed by the government or local authorities. Correct disposal and recycling will help prevent potential negative consequences to the environment and human health. For more detailed information about the disposal of your old equipment, please contact your local authorities, waste disposal service, or the shop where you purchased the product. 34 © MARMITEK COPYRIGHTS Marmitek is a trademark of Pattitude B.V. BabyView 725™ is a trademark of Marmitek B.V. All rights reserved. Every effort has been made to ensure that the information in this manual is accurate. Marmitek is not responsible for printing or clerical errors. Copyright and all other proprietary rights in the content (including but not limited to model numbers, software, audio, video, text and photographs) rests with Marmitek B.V. Any use of the Content, but without limitation, distribution, reproduction, modification, display or transmission without the prior written consent of Marmitek is strictly prohibited. All copyright and other proprietary notices shall be retained on all reproductions. Other company and product names mentioned herein may be trademarks of their respective companies. Mention of third-party products is for informational purposes only and constitutes neither an endorsement nor a recommendation. Marmitek assumes no responsibility with regard to the performance or use of these products. MARMITEK BV - P.O. BOX 4257 - 5604 EG EINDHOVEN – THE NETHERLANDS BABYVIEW 725 35 36 © MARMITEK