1
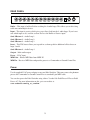
Pedal Switcher
Owner’s Manual
Version 1.0
Please visit our web site at:
www.voodoolab.com
Copyright ©2007 by Voodoo Lab
This publication is protected by copyright and all rights are reserved.
No part of it may be reproduced or transmitted by any means or in any form
without the express prior consent in writing from Voodoo Lab.
Voodoo Lab is a trademark of Digital Music Corp.
TABLE OF CONTENTS
INTRODUCTION . . . . . . . . . . . . . . . . . . . . . . . . . . . . . . . . 2
What is Pedal Switcher? . . . . . . . . . . . . . . . . . . . . 2
Unpacking . . . . . . . . . . . . . . . . . . . . . . . . . . . . . . . 2
Rear Panel . . . . . . . . . . . . . . . . . . . . . . . . . . . . . . . 3
Power . . . . . . . . . . . . . . . . . . . . . . . . . . . . . . . . . . 3
AUDIO CONNECTIONS . . . . . . . . . . . . . . . . . . . . . . . . . . 4
Do I use the Buffer or Passive input? . . . . . . . . . . 4
About Audio Loops . . . . . . . . . . . . . . . . . . . . . . . . 4
Pedal Switcher Loops . . . . . . . . . . . . . . . . . . . . . . 5
Tuner/Mute Send . . . . . . . . . . . . . . . . . . . . . . . . . 6
TRS insert . . . . . . . . . . . . . . . . . . . . . . . . . . . . . . . 7
A/B Switching . . . . . . . . . . . . . . . . . . . . . . . . . . . . 7
USING PEDAL SWITCHER WITH COMMANDER . . . . . 8
Overview . . . . . . . . . . . . . . . . . . . . . . . . . . . . . . . . 8
Connection . . . . . . . . . . . . . . . . . . . . . . . . . . . . . . 8
Selecting Presets . . . . . . . . . . . . . . . . . . . . . . . . . 8
Programming Presets . . . . . . . . . . . . . . . . . . . . . . 9
USING PEDAL SWITCHER
WITH GROUND CONTROL PRO . . . . . . . . . . . . . . . . . . 9
Overview . . . . . . . . . . . . . . . . . . . . . . . . . . . . . . . . 9
Connection . . . . . . . . . . . . . . . . . . . . . . . . . . . . . . 9
Operation . . . . . . . . . . . . . . . . . . . . . . . . . . . . . . 10
FAQ . . . . . . . . . . . . . . . . . . . . . . . . . . . . . . . . . . . . . . . . . 11
WARRANTY . . . . . . . . . . . . . . . . . . . . . . . . . . . . . . . . . . 12
INTRODUCTION
WHAT IS PEDAL SWITCHER?
Designed to sit on your pedalboard, Pedal Switcher gives you 4 true bypass loops that send your
signal only to the pedals you’re using. On a traditional pedalboard, even when the effects are off,
your signal still goes through numerous tone-trashing buffers, solid-state switches and patch
cables. Thanks to Pedal Switcher’s true bypass switching via gold relays sealed in nitrogen, no
matter how many pedals you use, your tone will stay pure and dynamic.
Not only does Pedal Switcher give your vintage and modern effects true bypass without any
modification, it’s also completely expandable. When used with Commander foot controller, you
can create presets for an unlimited number of Pedal Switchers. With one stomp, you can instantly
go from screaming vintage fuzz with flange and echo, to clean straight-to-amp tone without ever
missing a note. Now you can concentrate on playing instead of tap dancing.
Unpacking
Your factory carton should contain:
1. This manual
2. Pedal Switcher
3. Power adapter
4. Warranty card
Please fill out the enclosed warranty card and return it to Voodoo Lab. By registering, you enable
us to send you important information about related products, updates and accessories.
2
REAR PANEL
MADE IN
U.S.A.
POWER
BUFFER
INPUT
SEND 1
RETURN 1
SEND 2
RETURN 2
SEND 3
RETURN 3
INSERT
SEND 4
RETURN 4
OUTPUT
9VAC
MIDI OUT
MIDI IN
Buffer – This input is buffered before reaching the 4 audio loops. This allows you to drive long
cable runs and multiple devices.
Input – This input is passive which gives you a direct feed into the 4 audio loops. If you’re not
sure which input to use, read the section: Do I use the Buffer or Passive input?
Send 1/Return 1 – Audio Loop 1.
Send 2/Return 2 – Audio Loop 2.
Send 3/Return 3 – Audio Loop 3.
Insert – This TRS insert allows you to patch in a volume pedal or additional effects between
loops 3 and 4.
Send 4/Return 4 – Audio Loop 4.
Output – Main audio output.
Power – 9VAC input.
MIDI Out – Echoes MIDI data from MIDI IN
MIDI In – Receives MIDI data and provides power to a Commander or Ground Control Pro.
Power
Use the supplied 9VAC power adapter to run your Pedal Switcher. This same source also phantom
powers the Commander or Ground Control Pro via standard 5-pin MIDI cable.
You can also power the Pedal Switcher using either a Voodoo Lab Pedal Power 2 Plus or Pedal
Power AC. For more information on this, go to our website at:
www.voodoolab.com/faq_sw_com.htm.
3
AUDIO CONNECTIONS
Do I use the Buffer or Passive input?
Guitar pickup tone is greatly affected by the input characteristics of the devices you’re plugging
into. Typical buffers found in most common pedals utilize bipolar transistor components resulting
in an unnatural sound. Unlike those, Pedal Switcher’s BUFFER input is carefully matched to those
of tube amplifier inputs. By using state-of-the-art ultra low noise FET technology, the BUFFER
in provides tube amp characteristics with the lowest possible noise level. The result is an exceptionally transparent buffer which optimizes guitar pickup tone quality.
The passive INPUT is simply hard-wired from the jack to the gold contact relays. There are
many guitar players that love the guitar-cable-amp sound. If that’s you, this input is the way to
go. When you have all the loops turned off, the tone you get is completely passive. This input is
especially helpful because some transistor-based circuits like vintage fuzz, octave, and overdrive
pedals will only perform correctly when being driven directly from your pickups.
The choice is up to you. If your pedals consist of mostly vintage-based circuits, you’ll probably
prefer the passive INPUT. But, if you to run a lot of cable, or possibly some post-Pedal Switcher
rack effects, you’ll probably want to use the buffer. We encourage you to experiment and use
your ears to find what works best for you.
I f you want to hear and see some suggestions on how to integrate your vintage and modern
effects with Pedal Switcher, check out the videos on our website at:
http://www.voodoolab.com/switcher.htm
ABOUT AUDIO LOOPS
Important: Pedal Switcher audio loops are for instrument and line level signals only. Using
them to switch amplifier or speaker outputs will severely damage your Pedal Switcher!
The most important characteristic of an audio switcher is sonic transparency. Some manufacturers
implement loops using either opto-FETs (optical transistors) or LDRs (light dependent resistors),
or a combination of the two. Both opto-FETs and LDRs cause sound coloration and measurable
distortion. Some even claim their switching to be passive while using opto-FETs (transistors are not
passive). LDRs, while technically passive, are not linear and therefore degrade tone quality. Occasionally digital crosspoint switches are used for their routing flexibility (you can re-order effects).
However, their limited dynamic range results in either reduced headroom, added noise, or both.
4
The only completely transparent way to switch both instrument and line level signals (with no
audible distortion) is with relays. Pedal Switcher uses the finest gold contact relays sealed in
nitrogen.
PEDAL SWITCHER LOOPS
The basic function of a Pedal Switcher loop is to bring your effects in and out of the signal path
via true bypass, instant access switches.
LOOP ON
LOOP OFF
LOOP ON
LOOP OFF
DELAY
CHORUS
OD
FUZZ
IN
OUT
IN
OUT
IN
OUT
IN
OUT
In this example, the Overdrive and Delay pedals are on. But, the Fuzz and Chorus pedals are
completely bypassed.
5
TUNER/MUTE SEND
Any one of the 4 audio loops can be used to send your signal to a tuner while muting the rest of
your setup. However, by placing the tuner in Loop 1, you’re able to send un-effected signal to
the tuner.
NOTE: The last thing you’d want to do is have your tuner in the last loop. This means that you
might end up with chorus or delay on the signal. You’ll be trying to tune for days!
DIST.
CHORUS
DELAY
AMP
TUNER
IN
IN
OUT
IN
OUT
IN
OUT
MADE IN
U.S.A.
POWER
BUFFER
INPUT
SEND 1
RETURN 1
SEND 2
RETURN 2
SEND 3
RETURN 3
INSERT
SEND 4
RETURN 4
OUTPUT
9VAC
MIDI OUT
MIDI IN
As you can see from the example above, by not returning the signal back into the Pedal Switcher,
you’ve now broken the audio path, thus muting all sound post your tuner.
Important: Pedal Switcher audio loops are all hard-wired together in series. This means that if
you engage a loop that doesn’t have anything plugged into it, you’ll break the audio path and no
audio will pass!
6
TRS INSERT
Using the TRS insert breaks the connection between loops 3 and 4. This allows you to patch in a
volume pedal or additional effects that you don’t need Pedal Switcher to control. TRS refers to the
type of stereo 1/4-inch plug (Tip, Ring, Sleeve) which then breaks out into mono IN and OUT jacks.
This is commonly referred to as an “insert point” cable.
IN
OUT
VOLUME
PEDAL
DIST.
VIBE
CHORUS
DELAY
AMP
IN
OUT
IN
OUT
IN
OUT
IN
OUT
MADE IN
U.S.A.
POWER
BUFFER
INPUT
SEND 1
RETURN 1
SEND 2
RETURN 2
SEND 3
RETURN 3
INSERT
SEND 4
RETURN 4
OUTPUT
9VAC
MIDI OUT
MIDI IN
In this example, we’ve placed a volume pedal after the distortion and vibe sounds, but before the
delay. Set up like this, you can volume swell into chords with delay without the initial pick
attack getting repeated.
A/B SWITCHING
Pedal Switcher’s last loop can easily be used for A/B switching. In the example below, we’re
using Loop 4 as an amp selector. When the loop is engaged (LED on), the signal goes to AMP A
via the SEND jack. When the loop is bypassed, the signal goes straight to AMP B via Pedal
Switcher’s main OUTPUT jack.
AMP
A
DIST.
VIBE
DELAY
LIGHT ON
IN
LIGHT OFF
AMP
B
IN
OUT
IN
OUT
OUT
MADE IN
U.S.A.
POWER
BUFFER
INPUT
SEND 1
RETURN 1
SEND 2
RETURN 2
SEND 3
RETURN 3
7
INSERT
SEND 4
RETURN 4
OUTPUT
9VAC
MIDI OUT
MIDI IN
USING PEDAL SWITCHER
WITH COMMANDER
OVERVIEW
Commander gives you 10 user-customizable presets and is phantom powered by Pedal Switcher.
For instant punch-in/punch-out selection of multiple effects, you can toggle between pairs of
presets with a single button. It will even send a MIDI program change with each preset to your
MIDI controlled amp or effect processor. Plus, multiple Commanders can be used for changing
presets from an alternate stage position.
CONNECTION
Pedal Switcher will phantom power Commander through a standard 5-pin MIDI cable. Connect
the MIDI cable from Commander’s MIDI OUT to the MIDI IN of Pedal Switcher. If you have
additional Pedal Switchers or MIDI devices, connect the MIDI OUT of the first Pedal Switcher
to the MIDI IN of the next device. Continue to chain your devices until they are all connected.
Important Note: If your Commander doesn’t power up from the Pedal Switcher, here’s the
problem: MIDI only requires 3 pins, so to save money some cables only have these 3 pins wired.
Since the Pedal Switcher uses the 2 unused pins to send phantom power, these cables don’t
work! You need to make sure your cable has all 5 pins wired. Cables with all 5 pins wired are
often labeled “5-Pin Active”.
SELECTING PRESETS
Commander lets you create and instantly recall 10 different preset configurations of Pedal
Switcher settings. These presets are organized in 2 banks as 1-5 and 6-10. To activate a preset:
1. Press BANK if necessary to select 1-5 or 6-10.
2. Hit the desired preset number.
All Pedal Switchers will now instantly change to your programmed preset configuration.
8
PROGRAMMING PRESETS
Regardless of whether you have only one or an entire herd of Pedal Switchers, creating presets
with Commander is quick and easy. Here’s how:
1. Make active all the Pedal Switcher loops you want.
2. Select bank 1-5 or 6-10 on Commander.
3. Hold down BANK/STORE until it starts blinking (about 3 seconds), then hit the desired preset
button at the same time.
All LEDs will flash briefly to confirm that your preset has been saved. That’s it!
USING PEDAL SWITCHER
WITH A GROUND CONTROL PRO
Overview
You can add programmability for up to 8 Pedal Switchers, or a combination of Pedal Switchers
and rackmount GCX Guitar Audio Switchers, by using a Voodoo Lab Ground Control Pro MIDI
foot controller. While Commander is custom made to work Pedal Switcher, and is more pedalboard friendly thanks to its small size, if you require a full featured MIDI foot controller, Ground
Control Pro is the way to go.
Ground Control Pro provides 200 named presets and a large alphanumeric display. In addition to
Pedal Switchers, it will control 8 MIDI devices on independent channels, including real time
control via 2 expression pedal inputs.
If you already have a Ground Control Pro based switching system, adding Pedal Switcher lets
you put pedal effects on the floor instead of your rack for convenient access to controls. Plus,
since Pedal Switcher includes dedicated buttons for each loop, you can save Ground Control
Pro’s programmable instant access buttons for other functions.
Connection
Pedal Switcher will phantom power the Ground Control Pro through a standard 5-pin MIDI
cable. Connect a MIDI cable from the Ground Control Pro’s MIDI OUT to the MIDI IN of Pedal
Switcher. If you have additional Pedal Switchers or MIDI devices, connect the MIDI OUT of the
9
first Pedal Switcher to the MIDI IN of the next device. Continue to chain your devices until they
are all connected.
Important Note: If your Ground Control Pro doesn’t power up from Pedal Switcher, here’s the
problem: MIDI only requires 3 pins, so to save money some cables only have these 3 pins wired.
Since Pedal Switcher (and the GCX) uses the 2 unused pins to send phantom power, these cables
don’t work! You need to make sure your cable has all 5 pins wired. Cables with all 5 pins wired
are often labeled “5-Pin Active”.
Operation
Ground Control Pro treats Pedal Switcher loops exactly the same as GCX loops. A single Pedal
Switcher is recognized as loops 1 through 4 of GCX #1. A second Pedal Switcher will be loops
5 through 8 of GCX #1 and so on.
For detailed instructions on how to setup and control your GCX/Pedal Switcher loops from
Ground Control Pro, consult your Ground Control Pro manual. Or, go to our website for the most
up-to-date instructions, FAQs, and manuals here: www.voodoolab.com/support.htm
10
FAQ
Can the Pedal Switcher loops switch the channels on my amp?
No. The Pedal Switcher is intended for switching pedals! Besides pedals, loops can be used as a
mute and/or tuner out, and the last loop can be used as an A/B switch.
Can the Pedal Switcher loops switch my amp head into different speaker cabinets?
No. Pedal Switcher audio loops are for instrument and line level signals only. Using them to switch
amplifier or speaker outputs will severely damage your Pedal Switcher!
Does Pedal Switcher have the same buffer circuit as the GCX?
Yes. The buffer circuit is identical to the current production GCX, including the expensive (and
sonically superior) Burr-Brown opamp.
Can I add Pedal Switcher to an existing Ground Control Pro/GCX system?
Yes. The Ground Control Pro can control Pedal Switchers in the same way that it controls the GCX.
Can I use a third-party MIDI footcontroller with Pedal Switcher?
Not really. You can call up the Pedal Switcher’s presets with MIDI program change commands,
but there is no way to save or modify presets without Commander.
11
Warranty
Voodoo Lab warrants this product against any defects that are due to faulty material or workmanship
for a period of five years from the date of original retail purchase. This warranty does not include
damage to the product resulting from accident or misuse. This warranty is given to the original
purchaser only and it is not assignable to any other person.
If the product should become defective within the warranty period, Voodoo Lab will repair it
or replace it free of charge, provided it is returned freight prepaid to Voodoo Lab with a valid
RMA (return material authorization) number. Return shipping will be paid by Voodoo Lab
within the U.S. only.
This warranty shall not apply to any goods that have been repaired or altered by anyone other
than the manufacturer. There are no warranties which extend beyond the terms described herein.
Should you experience any difficulty with this Voodoo Lab product, contact us as described below.
If it is determined that the product must be returned to the factory for repair, you will be issued
an RMA and given shipping and packaging instructions.
How to Reach Us
You can reach us by any of the following:
Voodoo Lab
3165 Coffey Lane
Santa Rosa, CA 95403
Tel:
Fax:
707 545 0600
707 545 9777
Email:
[email protected]
Website: www.voodoolab.com
12