1
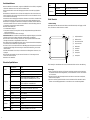
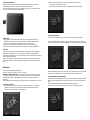
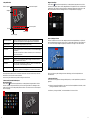
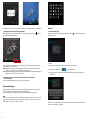
TP7.85-1200QC Tablet PC TP7.85-1200QC-3G Tablet PC Chips and More GmbH Gewerbestr. 7 | D-79112 Freiburg Tel.-Nr. Tablet-Support: + 49 800 - 8 08 25 80* E-Mail: [email protected] | www.i-onik.de *Kostenfrei aus allen deutschen Netzen / Free from all German telephone networks 25039/25040 Kurzanleitung Quick Start Guide Deutsch Sehr geehrter Kunde, vielen Dank, dass Sie sich zum Kauf dieses Produktes entschieden haben! Bitte lesen Sie die Anweisungen sorgfältig durch, bevor Sie das Gerät in Betrieb nehmen. Diese Anleitung dient dazu, Ihnen die Hauptfunktionen dieses Geräts vorzustellen, so dass Sie das Tablet zu seinem vollen Potential nutzen können. Die Funktionen werden erklärt und detaillierte Informationen gegeben. Zudem erhalten Sie Tipps und Tricks, um die technische Leistungsfähigkeit zu verstehen. Die beigelegte Garantiekarte erklärt Ihnen unsere zusätzlichen Serviceleistungen. Bitte lesen Sie die Garantiebestimmungen sorgfältig durch, um eventuelle Probleme zu vermeiden. Dieses Hochleistungsgerät verfügt über leistungsstarke Funktionen, um Ihr Online-Erlebnis zu verbessern. Achtung: Alle Information in dieser Betriebsanleitung sind zum Zeitpunkt der Erstellung gültig. Da wir jedoch stets bemüht sind, das Gerät weiter zu entwickeln und zu verbessern, kann die Software leicht in Aussehen und Funktionalität von der Beschreibung in dieser Anleitung abweichen. Wir behalten uns das Recht vor, das Produkt, die Spezifikation und das Design ohne vorangehende Bekanntmachung zu verbessern! Inhalt Vorsichtsmaβnahmen.................................................................................................... 4 Technische Spezifikationen........................................................................................... 4 Tablet Übersicht........................................................................................................... 1. Tablet Einleitung.......................................................................................................... 2. TF-Karte..................................................................................................................... 3. Aufladen..................................................................................................................... 5 5 6 6 Schnellstart................................................................................................................... 6 1. Das Tablet einschalten.................................................................................................. 6 2. Das Tablet ausschalten................................................................................................. 7 3. Sperr-Bildschirm und Energiesparmodus......................................................................... 8 4. Hauptbildschirm.......................................................................................................... 8 5. Benutzerdefiniertes Bildschirmlayout.............................................................................. 9 6. Hintergrund ändern.....................................................................................................10 7. Verbindung mit dem PC mittels Micro-USB-Kabel.............................................................10 8. V erbindung mit einem externen Speicher (z.B. USB-Stick, microSD-Karte) mittels OTG-Kabel.........................................................10 Systemeinstellungen................................................................................................... 10 Internet...................................................................................................................... 11 1. Netzwerkeinstellungen.................................................................................................11 2. Integrierte 3G-Verbindung...........................................................................................12 3. Internet.....................................................................................................................12 Software Management................................................................................................ 12 1. Dateimanager............................................................................................................12 2. Software-Installation...................................................................................................13 Anwendungen............................................................................................................. 13 1. Musik abspielen..........................................................................................................13 2. Fotos suchen..............................................................................................................14 3. E-mail.......................................................................................................................15 4. Kamera und Videoaufnahmen.......................................................................................15 Garantiekarte.................................................................................................................33 Wir übernehmen keine Verantwortung für verlorene oder zerstörte Daten oder für Beschädigung anderer Geräte. Vor dem Zugriff von Kindern schützen. Gefahr durch Verschlucken. Alle Angaben ohne Gewähr. Bilder können abweichen. All trademarks, registered trademarks and logos are the property of their respective owners. We do not guarantee any data with respect to their content, completeness or up-to-dateness. 2 3 Vorsichtsmaßnahmen • Bauen Sie das Gerät nicht auseinander; reinigen Sie die Oberfläche nicht mit Alkohol, Lösungsmittel oder Benzol: Kontaktieren Sie uns bitte, wenn Sie Probleme haben. • Dieses Gerät sollte bei den ersten drei Ladevorgängen mindestens 12 Stunden lang aufgeladen werden. • Bitte bewahren Sie das Produkt nicht an feuchten oder staubigen Orten auf. Achten Sie bitte auch darauf, das Produkt nicht im Sommer bei geschlossenen Fenstern im Auto aufzubewahren. Vermeiden Sie direkte Sonneneinstrahlung. • Vermeiden Sie schwere Schläge gegen das Produkt und lassen Sie es nicht fallen. Außerdem sollten Sie das Gerät nicht schütteln, da Sie so den Touchscreen oder das Display beschädigen könnten. • Bitte wählen Sie eine geeignete Lautstärke. Wenn Sie Kopfhörer verwenden, sollten Sie darauf achten, dass die Lautstärke nicht zu laut ist. Wenn die Lautstärke Ihr Gehör beeinträchtigt, sollten Sie die Lautstärke verringern oder das Gerät ausschalten. • Bitte laden Sie das Gerät wenn: a. Der Batteriestatus niedrig ist. b. Das System automtisch herunter gefahren wird. (Bei niedriger Batterieleistung schaltet sich das System automatisch aus.) c. Das Gerät beim Anklicken der Tasten nicht reagiert. Bitte beachten Sie: Bitte verwenden Sie ausschließlich das mitgelieferte Ladegerät, um das Tablet aufzuladen. Es können keine anderen Ladegeräte verwendet werden − Brandgefahr! • Bitte unterbrechen Sie die Verbindung zum Gerät nicht, wenn Sie gerade formatieren oder Daten übertragen, da ansonsten ein Programmfehler auftreten kann. • Wenn das Gerät nicht richtig abgeschaltet wurde, scannt und repariert das Gerät den Datenspeicher beim Neustart. Dieser Prozess kann einige Minuten dauern. • Die Firma ist nicht für einen Speicherverlust durch Beschädigungen oder Reparaturen des Produkts verantwortlich. Bitte befolgen Sie die Anweisungen in dieser Gebrauchsanweisung, wenn Sie das Tablet verwenden. • Verwenden Sie das Gerät nicht an Orten, wo der Gebrauch von Elektrogeräten verboten ist, z. B. in Flugzeugen. • Bitte verwenden Sie das Gerät nicht, wenn Sie Auto fahren oder zu Fuß unterwegs sind. Dies könnte einen Unfall verursachen. • Das Gerät ist nicht wasserfest. Technische Spezifikationen Gehäusematerial Hauptteil Konfiguration 4 Größe ca. 200 x 134 x 7,8 mm Gewicht ca. 300 g Betriebssystem Android 4.2 CPU TP7,85-1200QC: MTK8123 Quad Core, 1,2 GHz TP7,85-1200QC-3G: MTK8389 Quad Core, 1,2 GHz Flashspeicher TP7,85-1200QC: 8 GB NAND Flash TP7,85-1200QC-3G: 16 GB NAND Flash RAM 1 GB DDR3 Erweiterungs-Steckplatz Micro SD/SDHC (TF) Kartenslot, bis zu 32 GB 7,85“ IPS G+G kapazitiver 5-point Touchscreen 1024 x 768 Pixel Verbindung Netzwerkzugang Wi-Fi 802.11 b/g/n Sound Eingebauter Lautsprecher 2x 8 Ohm/1 W USB-Anschluss Micro USB 2.0 Batterie DC 5 V/2 A Musikformate MP3, AMR, APE, FLAC, AAC, WAV Unterhaltung Videoformate AVI, MKV, MP4, FLV, RMVB, MPG, WMV, RM Bildformate BMP, PNG, JPG, GIF Tablet Übersicht 1. Tablet Einleitung Dieses Kapitel beschreibt das Aussehen des Tablets, einschließlich der Knöpfe und Zugänge, und hilft Ihnen, die Funktionen und das Zubehör zu verstehen. (7) (6) (5) (4) (1)Kopfhöreranschluss (2)HDMI-Anschluss (3)Micro-USB-Anschluss (8) (4) An-/Aus-Schalter (5)Backkamera (9) (3) (2) (1) (6) Lautstärke + (7) Lautstärke - (8)Lautsprecher (9)Lautsprecher TP7,85-1200QC-3G: Der SIM-Karten-Slot und der TF-Kartenslot befinden sich unter der Abdeckung. Bildschirm Anschlüsse Spannung Metall Auflösung Display Betriebszustand Kopfhörer 3,5 mm Kamera Front: 2 Megapixel, Back: 5 Megapixel Batterie Li-Polymer aufladbarer Akku 4000 mAh Bemerkungen: 1) K licken und ziehen finden auf dem LCD Touchscreen statt. Bitte verwenden Sie keine Kugelschreiber, Bleistifte oder andere scharfe Gegenstände, um auf den Bildschirm zu drücken. So vermeiden Sie ein Zerkratzen. 2) B itte sorgen Sie dafür, dass die Lautsprecher sauber sind. Wenn sie mit Schmutz verstopft sind, beinflusst es die Tonqualität. 3) D ie Antenne und das Typenschild befinden sich an der Rückseite des Tablet. Bitte decken Sie die Rückseite nicht mit Metallgegenständen ab. So vermeiden Sie eine verminderte Signalstärke. 5 2. TF-Karte/microSD-Karte Befolgen Sie die Anweisungen des Symbols, das auf dem Bildschirm erscheint, wenn Sie eine TF-Karte einlegen. Bitte beachten Sie, dass die TF-Karte richtig eingelegt wird. (Drücken Sie mit dem Daumen auf die Karte und lassen Sie sie wieder los, um die Karte zu entfernen. Die Karte wird dann automatisch herausgeschoben.) Bemerkungen: 1) S orgen Sie dafür, dass der Kartenschlitz sauber und frei von anderen Objekten bleibt. (Um Beschädigungen der Karte durch Staub oder Feuchtigkeit zu vermeiden, legen Sie die Karte bitte zurück in ihren Karton oder ihre Verpackung, wenn Sie sie nicht nutzen) 2) Stellen Sie sicher, dass das Tablet ausgeschaltet ist, wenn Sie eine TF-Karte entfernen. 3) Vermeiden Sie ein versehentliches Entfernen der TF-Karte, wenn das Tablet eingeschaltet ist. 1.2 W enn Sie die Unlock-Zeichen drücken und halten, erscheint ein Kreis um die Taste. Zum Entsperren auf die rechte Seite ziehen. Diese Schieb- und Ziehfunktion verhindert ein unbeabsichtigtes Entsperren des Geräts. 2. Das Tablet ausschalten Drücken Sie den Ein-/Ausschalter (langes Drücken), und das System wird heruntergefahren. Es werden je nach Modell bis zu fünf Optionen angezeigt: „Ausschalten”, „Reboot”, die Symbole „Ton an/aus” und „Vibrationsmodus”. Wählen Sie „Ausschalten”, um zum nächsten Bildschirm zu gelangen. 3. Aufladen Dieses Produkt verfügt über ein Standard-5V/2A-Netzteil. Bitte verwenden Sie das mitgelieferte Ladegerät. Andere Ladegeräte können zu Problemen führen und stellen eine Brandgefahr dar. Verwenden Sie das Ladegerät nicht bei hoher Luftfeuchtigkeit. Wenn Ihre Hände oder Füße nass sind, fassen Sie das Gerät bitte nicht an. Wenn Sie das Ladegerät verwenden oder das Produkt aufladen, sorgen Sie bitte für gute Luftzufuhr. Decken Sie das Gerät nicht mit Papier oder anderen Materialien ab. Dies könnte zur Überhitzung führen. Schnellstart Sie können das Tablet folgendermaßen bedienen: (1) Klicken. (2) Halten. (3) Schieben. (4) Ziehen. (5) Rotieren. Definition der Bedienung der Tasten: (1) Kurzes Drücken: Drücken Sie eine Taste weniger als 1,2 Sekunden. (2) Langes Drücken: Drücken und halten Sie die Taste mehr als 3 Sekunden. Wenn nicht ausdrücklich erwähnt, sind alle Bedienungen in dieser Anleitung mittels kurzem Drücken auszuführen. 360 Grad Rotation: Rotieren Sie das Tablet, um zwischen Horizontal- und Vertikalansicht zu wechseln. 1. Das Tablet einschalten 1.1 D rücken Sie den Ein-/Ausschalter an der Seite des Geräts (lange Drücken), um das System hochzufahren. Sie werden einige Sekunden lang Animationen auf dem Boot-Screen sehen, bevor der Sperr-Bildschirm erscheint (siehe Screenshot). 6 Sollte die Batterieanzeige weniger als 15 % anzeigen, wird Sie das System auffordern, das Ladegerät anzuschließen. Sollte die Batterie nahezu leer sein, fährt das System automatisch herunter. 3. Sperr-Bildschirm und Energiesparmodus Durch längere Inaktivität des Bildschirms, oder durch kurzes Drücken des Ein-/Ausschalters, schaltet das Tablet in den Energiesparmodus. Die Programme sind immer noch aktiv, aber der Bildschirm ist dunkel. Ein nochmaliges Drücken des Ein-/Ausschalters öffnet den Entsperr-Bildschirm. Halten und ziehen Sie die Entsperrtaste nach rechts, um wieder mit dem Gerät zu arbeiten. 7 4. Hauptbildschirm Textsuche Symbol Sprachsuche Symbol Widgets Widgets hinzufügen Taste auf dem Hauptbildschirm, um das Application Programm Menü zu öffnen. Klicken Sie die Drücken Sie die „Widget” Option und der Widget-Bildschirm wird geöffnet. Drücken und Halten des Symbols öffnet den „Widget hinzufügen” Bildschirm. Bewegen Sie das Symbol auf den Ort, wo Sie das Symbol platzieren möchten. Das Widget wird nun zum Hauptbildschirm hinzugefügt. Shortcut Symbol Zurück Statusleiste Home Geöffnete Apps Sprachsuche Symbol Klicken Sie das Sprachsuche Symbol, wenn Sie mit einem Netzwerk verbunden sind. Sprechen Sie ein Schlagwort direkt in das Mikrofon. Shortcut Symbol Shortcut Symbol zufügen/löschen (siehe unten) Widgets Widgets zufügen/löschen (siehe unten) Zurück Taste Drücken Sie diese Taste in einem Popup Menü, um einen Arbeitsvorgang abzubrechen. Verwenden Sie diese Taste in anderen Untermenüs, um zu deren Hauptmenüs zurückzukehren. Home-Taste Drücken Sie diese Taste, um zum Hauptmenü zurückzukehren. Geöffnete APPS Klicken Sie, um alle geöffneten APPS anzuzeigen. Klicken Sie auf eine APP, um dessen Menü zu öffnen. Statusleiste Sehen Sie mehr Informationen zu USB, Wi-Fi, Datum, usw. Klicken Sie auf ein Symbol, um die Einstellungen zu sehen. Textsuche Symbol Klicken Sie das Textsuche Symbol, wenn Sie mit einem Netzwerk verbunden sind. Tippen Sie ein Schlagwort ein, um eine Suche zu starten. Der Hauptbildschirm besteht aus 5 verschiedenen Menüseiten. Wechseln Sie die Seiten, indem Sie den Bildschirm nach links oder rechts verschieben. Sie können auf jeder dieser Seiten Symbole hinzufügen oder entfernen. 5. Benutzerdefiniertes Bildschirmlayout Shortcut hinzufügen Klicken Sie die Taste auf dem Hauptbildschirm, um das Application-Programm-Menü zu öffnen. Drücken und Halten des Symbols öffnet den „Shortcut hinzufügen” Bildschirm. Bewegen Sie das Symbol auf den Ort, wo Sie das Symbol platzieren möchten. Der Shortcut wird nun zum Hauptbildschirm hinzugefügt. 8 Shortcut/Widgets löschen Drücken und halten Sie ein Shortcut- oder Widget-Symbol auf dem Hauptbildschirm, bis „Entfernen” am oberen Bildschirmrand erscheint. Ziehen Sie es nun auf das Wort „Entfernen”. Das Symbol wird nun rot. Der Shortcut/das Widget wird gelöscht, sobald Sie Ihren Finger von der Taste nehmen. Klicken und ziehen Sie jeden beliebigen Shortcut oder Widget, um Ihren Hauptbildschirm zu individualisieren. 6. Hintergrund ändern Sie können Ihre Lieblingsfotos als Hintergrundbild speichern, um den Hauptbildschirm persönlich zu gestalten. 6.1 K licken Sie lange auf den Bildschirm, wenn Sie sich auf dem Hauptbildschirm befinden, um das „Hintergrund auswählen” Fenster zu öffnen. 6.2 Klicken Sie „Hintergrund-Bilder”, um das Auswahlmenü für Fotos zu öffnen. 9 6.3 Wählen Sie ein Foto. Klicken Sie „Hintergrund festlegen”. Das Hintergrundbild ist nun gespeichert. Internet 7. Verbindung mit dem PC mittels Micro-USB-Kabel Wenn Sie das Gerät mit einem USB-Kabel an einen Computer verbinden, erscheint das der Statusleiste des Hauptbildschirms. 1. Netzwerkeinstellungen Das Tablet verfügt über ein eingebautes WLAN Modul. Klicken Sie dem Tablet aufzurufen. Symbol in In den Einstellungen unter „Speicher” können Sie wählen, ob Sie Ihr Gerät als Mediengerät (MTP) oder als Kamera (PTP) nutzen wollen. MTP: E rmöglicht die Übertragung von Mediendateien auf Windows- oder, mithilfe von Android File Transfer, auf Mac-Computer (siehe www.android.com/filetransfer). PTP: E rmöglicht die Übertragung von Fotos mithilfe der Kamera-Software sowie die Übertragung von Dateien auf Computer, die MTP nicht unterstützen. , um das Einstellungsmenü auf 1.1 WLAN 1.1.1 Klicken Sie auf „WLAN”, um zum WLAN-Einstellungsmenü zu gelangen. 1.1.2 Ziehen Sie den WLAN Knopf zu , um WLAN einzuschalten. 1.1.3 D as System sucht automatisch nach verfügbaren Netzwerken und zeigt den Namen des Netzwerks an. 8. Verbindung mit einem externen Speicher (z.B. USB-Stick, microSD-Karte) mittels OTG-Kabel Wählen Sie im Dateimanager den Menüpunkt „usbdisk” oder „sdcard”. Systemeinstellungen Das Einstellungsmenü ermöglicht eine Reihe von benutzerdefinierten Einstellungen und Sie können sich einen Überblick über die gesamte installierte Software verschaffen. Klicken Sie „Einstellungen” im Anwendungsmenü, um zum Einstellungsmenü zu gelangen. APPS Sie können alle installierten APPS auf dem APPS Einstellungsbildschirm aufrufen. Wenn Sie eine APP öffnen, können Sie die Informationen zu dieser APP sehen. Sollten Sie eine APP nicht mehr nutzen wollen, wählen Sie „Löschen”, um diese zu entfernen. 10 Klicken Sie auf ein drahtloses Netzwerk und das Tablet öffnet ein Fenster. Geben Sie den Netzwerkschlüssel ein und klicken Sie „Verbinden”. 11 Wenn eine Verbindung aufgebaut wird, wird das Netzwerksymbol menüs angezeigt. in der Statusleiste des Haupt- Bitte beachten Sie: Das Tablet speichert verbundene Router automatisch. Wenn es nach einem Netzwerk sucht, stellt das Tablet automatisch eine Verbindung zu dem gespeicherten Router her. Wenn das Netzwerksymbol auf dem Hauptbildschirm angezeigt wird, dann ist das Tablet mit dem WLAN-Netzwerk verbunden. 2. Integrierte 3G-Verbindung Stecken Sie zuerst die 3G SIM Karte in den SIM Kartenschlitz, klicken Sie in den Einstellungen „Drahtlos & Netzwerke”, dann „Mehr” und „Mobilfunknetze”. Schalten Sie das Modul an und klicken Sie „Mobilfunkanbieter”; das System wird automatisch mit dem Internet verbunden. Warten Sie einen Moment bis die Verbindung über 3G eingerichtet ist. 3. Internet auf dem Hauptbildschirm, um den Google-Browser zu öffnen, wenn eine Netzwerk3.1 K licken Sie verbindung besteht. 2. Software Installation Klicken Sie im Google Play Store auf die Software (App), die Sie installieren möchten. Die Installation wird automatisch gestartet. Anwendungen 1. Musik abspielen 1.1 Klicken Sie im Anwendungsprogramm, um zur Abspielliste zu gelangen. 1.2 Klicken Sie auf eine Musikdatei und spielen Sie diese. Zufallsmodus Abspielliste 3.2 K licken Sie auf das Texteingabefeld. Die Tastatur wird geöffnet. Tippen Sie einen Suchbegriff ein und öffnen Sie die Webseite. 3.3 K licken Sie das angezeigt. Abspielmodus Interpret Titel Genre Symbol (rot umrandet). Ein Dropdown-Menü mit mehr Funktionen wird Abspielzeit Gesamtzeit Voriger Titel Nächster Titel Abspielen/pausieren Software Management Das Gerät ermöglicht es Ihnen, Anwendungen von Drittanbietern über die Android-Plattform zu nutzen. Die meisten APPs können direkt über das Internet heruntergeladen werden. 1. Dateimanager (je nach Version auch: Explorer oder Dokumente) Sie können mit dem Dateimanager Programme, die auf dem Gerät oder einer TF-Karte gespeichert sind, browsen, kopieren, löschen, verschieben, bearbeiten und umbenennen. 12 13 1.3 Im Hintergrund abspielen Wenn Sie Musik abspielen, klicken Sie bitte dann die Musik im Hintergrund ab. 1.3.1 Klicken Sie , um das Hauptmenü aufzurufen. Das Tablet spielt im Hauptmenü, um das Abspielmenü anzuzeigen. 1.3.2 Wählen Sie den Musikspieler, um zum Abspielmenü zurückzukehren. 3. E-Mail Klicken Sie im Application-Programm-Menü, um die E-Mail-Einstellungen zu öffnen. Geben Sie die E-Mail-Adresse und das Passwort sowie die übrigen notwendigen Einstellungen ein, damit Sie Nachrichten senden und empfangen können. 4. Kamera und Videoaufnahmen Klicken Sie im Application-Programm-Menü, um die Kamera manuell zu öffnen. 2. Fotos suchen 2.1 K licken Sie im Anwendungsprogramm, um Fotos zu suchen. Hier finden Sie alle Fotos und Videos, die auf dem Tablet oder der TF-Karte gespeichert wurden. 2.2 Wählen Sie dies, um ein Foto zu öffnen. 2.3 Video abspielen. Abspielzeit Gesamtzeit Abspielen/pausieren 14 15 English Dear Customer, Thank you for purchasing this product! Please read the instructions carefully before using this product. This manual is intended to introduce you to the basic characteristics of this product, so you can get the best out of your experience using the tablet. The product‘s features are described and detailed information is given. Furthermore you receive tips and hints to fully understand the technical capability of the tablet. The warranty, which is included, will explain you our additional services. Please read the terms of warranty carefully, to avoid unnecessary problems. Attention: All the information in this manual is correct at the time of publication. However, as we continue to update and improve the product, the software may be slightly different in appearance and functionality than described in this manual. We reserve the right to improve the product, specification and design without prior notice! Content Important Safety Precautions..................................................................................... 22 Technical Specification................................................................................................ 22 Tablet Overview.......................................................................................................... 23 1. Tablet Introduction......................................................................................................23 2. TF Card.....................................................................................................................23 3. Charging...................................................................................................................24 Finding your Way........................................................................................................ 24 1. Turning on the Tablet...................................................................................................24 2. Switching off the Tablet...............................................................................................24 3. Lock-screen and Power-saving Mode..............................................................................25 4. Main Interface............................................................................................................25 5. Custom Screen...........................................................................................................26 6. Changing your Wallpaper.............................................................................................27 7. Connection to a Computer via micro USB Cable..............................................................27 8. Connection to an External Storage (e.g. USB Stick, microSD Card) via OTG Cable...............28 System Settings.......................................................................................................... 28 Internet...................................................................................................................... 28 1. Network Settings........................................................................................................28 2. Built-in 3G Connection.................................................................................................29 3. Internet.....................................................................................................................29 Software Management................................................................................................ 30 1. File Manager..............................................................................................................30 2. Software Installation...................................................................................................30 Applications................................................................................................................ 30 1. Playing Music.............................................................................................................30 2. Browsing Pictures.......................................................................................................31 3. E-Mail.......................................................................................................................32 4. Camera and Video......................................................................................................32 Warranty Card...............................................................................................................33 We do not assume any liability for lost or destroyed data or for any other devices. Keep away from children. Danger of choking on or swallowing small parts. All data without guaranty. Pictures may vary. All trademarks, registered trademarks and logos are the property of their respective owners. We do not guarantee any data with respect to their content, completeness or up-to-dateness. 20 21 Important Safety Precautions Tablet Overview • Do not disassemble the product; do not use alcohol, solvent or benzene to clean the surface of the product. Please contact us if you experience any problems. • This product should be charged for more than 12 hours when charging it the first three times. • Do not store the product in high temperature, humidity or dust; do not put the product in a vehicle with closed windows especially not during summer. • Avoid dropping or strong impact to the product, do not shake it violently, otherwise it may cause damage to the touch screen or display. • Please select the appropriate volume; the volume should not be too high when using headphones; if you feel signs of tinnitus, please turn down the volume or stop using the product. • Please charge the product when: a. The battery icon shows low power. b. The system is automatically shut down. (The system will shut down automatically when the battery is low.) c. There is no response when clicking buttons. Note: P lease only use the adapter delivered with the product to charge the tablet. No other chargers can be used – risk of fire! • Please do not disconnect the machine when it is formatting or uploading/downloading, otherwise a program error may occur. • When improperly being shut down, the machine will scan and repair the disk on reboot. This process may take a few minutes. • The company is not responsible for memory loss caused by damaging or repairing the product or other reasons stated. Please follow the instructions of this manual when using the tablet. • Do not use the product in places where the use of electronic devices is prohibited; e.g. an aircraft • Please do not use the product when driving or walking. It may cause an accident. • This machine is not water resistant. 1. Tablet Introduction This chapter describes the appearance of the tablet, including its buttons and ports; it will guide you to understand the features and accessories. Technical specifications Main Body Configuration Metal ca. 200 x 134 x 7,8 mm Weight ca. 300 g Operating System Android 4.2 CPU TP7,85-1200QC: MTK8123 Quad Core, 1,2 GHz TP7,85-1200QC-3G: MTK8389 Quad Core, 1,2 GHz Flash Memory TP7,85-1200QC: 8 GB NAND Flash TP7,85-1200QC-3G: 16 GB NAND Flash RAM 1 GB DDR3 Expansion slot Micro SD/SDHC (TF) card slot, up to 32 GB Screen 7,85“ IPS G+G capacitive 5-point touch screen Resolution 1024 x 768 Pixels Connection Network access Wi-Fi 802.11 b/g/n Sound Speaker 2x 8 Ohm/1 W USB interface Micro USB Display Earphone 3.5 mm Camera Front: 2 Megapixel, Back: 5 Megapixel Battery Battery Li-polymer rechargeable battery 4000 mAh System operation conditions Voltage DC 5 V/2 A Music formats MP3, AMR, APE, FLAC, AAC, WAV Video formats AVI, MKV, MP4, FLV, RMVB, MPG, WMV, RM Picture formats BMP, PNG, JPG, GIF Ports Entertainment 22 Material Dimensions (7) (6) (5) (4) (8) (9) (1) Earphone jack (2) HDMI port (3) Micro USB port (4) Power on/off (3) (2) (1) (5) Back camera (6) Volume + (7) Volume - (8)Speaker (9)Speaker TP7,85-1200QC-3G: The SIM card slot and TF card slot are located under the cover. Note: 1) C licking and dragging are performed using the LCD touch screen. Please do not use pens, pencils or other sharp objects to click on the screen to avoid scratching. 2) Please keep the speakers clean to avoid them being blocked by dirt and affecting the sound quality. 3) T he antenna and the type label are located at the back of the tablet. Please do not cover the back with metal objects to avoid poor signal strength. 2. TF Card/microSD card Follow the instructions of the icon displayed on the tablet when inserting a TF card. Please pay attention to the direction in which the TF card has to be inserted. (Press the card with your thumb and then release it to remove the card. The card will be ejected automatically.) 23 Note: 1) K eep the card slot free of dust or other objects. (To prevent damage to the card due to dust or moisture, please put the card back into its box or package when not in use). 2) Be sure that the tablet is switched off when removing a TF card. 3) Avoid accidental removal of the TF card when the tablet is switched on. 3. Charging This product uses a standard 5V/2A power supply. Please use the supplied power charger. Other chargers may cause failure and risk of fire. Do not use the charger in a hutablet environment. If your hands and feet are wet, please do not touch the charger. When using the charger or charging the product, please maintain good ventilation. Do not cover the machine with paper or other objects. This could result in a reduced cooling effect. Finding your way When the battery level is down to 15 %, the system will prompt to connect the charger. When the battery is running low, the system will automatically shut down. The tablet can achieve a variety of operating modes: (1) Clicking. (2) Holding. (3) Sliding. (4) Dragging. (5) Rotating. Key action definition: (1) Short press: press less than 1.2 seconds. (2) Long press: press and hold for more than 3 seconds. All operations in this manual are performed by a short press unless stated otherwise. 360 degree rotation: Rotate the tablet to switch between horizontal and vertical view. 3. Lock-Screen and Power-Saving Mode If the screen is inactive for a certain time, or when pressing the power switch, the Tablet will enter the screen-off/lock screen status to save power. Programs are still running, but the screen is blank. Pressing the power switch again will open the unlock screen. Hold and drag the unlock button to the right and the Tablet will resume working status. 1. Turning on the Tablet 1.1 P ress the power switch at the side of the tablet (long press) and the machine will be booted. The booting screen and animations will be shown on the LCD screen for a few seconds, before you will enter the lock screen as shown in the screenshot below. 4. Main Interface Text search icon 1.2 P ress and hold the unlock button and a circle will appear around the lock. Drag to the right to unlock. The hold and drag function prevents the accidental booting of the tablet. Voice search icon Widgets Shortcut icon Back Home Notice/fast settings column Apps are opened 2. Switching off the Tablet Press the power switch key (long press) and the system will display the shutdown screen. Up to five (depending on the model) options will be displayed: “Power off”, “Reboot” and “Volume on/ off”, and “Vibration”. Select “Power off” to enter the next screen. 24 25 Voice search Icon When connected to a network, click to enter the voice search menu. Speak a keyword directly into the MIC. Shortcut Icon Shortcut icon add/delete (will be covered later) Widgets Widgets add/delete (will be covered later) Back Key Press in pop-up menu to cancel an operation. In other menus, press to return to parent menu. Home Key Press in any menu to return to main interface. Apps having been opened Click to display all APPS that have been opened. Click each of the applications to enter the relevant menu. Notice/Fast Setting Column Click to display more information: USB, Wi-Fi, Date etc. Click on any item to enter its settings menu. Text search Icon When connected to a network, click to enter the Text search menu. Type in a key word and search. The main interface features 5 different menu pages. Switch between pages by sliding the screen left and right. You can add/delete icons in each of the pages of the main menu. 5. Custom Screen Add Shortcut Click the button in the main interface to open the Application Program menu. Pressing and holding the icon will open the add shortcut interface. Move the icon to the place where you want to place the shortcut and it will be added to the main interface. Add Widgets button in the main interface to open the Application Program menu. Press the “WIDClick the GETS” option. This will open the widget interface. Pressing and holding the icon will open the add widget interface. Move the icon to the place where you want to place the widget and it will added to the main interface. 26 Delete Shortcut/Widgets Press and hold a shortcut icon or widget icon in the main interface until on the top of the screen “Delete” appears. Then drag the shortcut/widget on to the word “Delete”. The icon will turn red. The shortcut or widget will be deleted after releasing the button. Click and drag any shortcut or widget icon to customize your main interface. 6. Changing your Wallpaper In order to personalize the main interface users can set their favorite pictures or photos as wallpaper of the main interface. 6.1 Click the touch screen (long press) in the main interface to open the “Choose wallpaper” dialog box. 6.2 Click “Wallpaper” to enter the selection menu of pictures. 6.3 Select a picture. Now the wallpaper is selected. 7. Connection to a computer via micro USB cable When connecting the tablet to a computer with a micro USB cable, the Notice/Fast settings column of the main interface. icon will be displayed in the 27 In the settings under “Storage” you can choose whether you want to use your device as a media device (MTP) or as a camera (PTP). MTP: A llows you to transfer media files to Windows or by using Android File Transfer to Mac computers (see www.android.com/file transfer). PTP: A llows you to transfer photos using the camera software and transfer files to computers that do not support MTP. 8. Connection to an External Storage (e.g. USB Stick, microSD Card) via OTG Cable From the File Manager, select the menu item “usbdisk” or “sdcard”. System Settings The settings interface allows a variety of custom settings and you can overview relevant information of all the installed software. Click “Settings” in the application program menu to enter the settings menu. APPS In the apps settings interface, users can see all installed applications. If you open one application, the relevant information is displayed. If you do not wish to use an application any longer, select “Delete” to remove the application. Click a wireless network and the tablet opens a window. Enter the network key and click “Connect”. will be displayed in the Notice/Fast settings If the connection is successful, the network icon column of the main interface. Please note: The tablet will save connected routers automatically. When searching for a network, the tablet will automatically connect to the saved router. is displayed in the main interface, the tablet has connected to the Wi-Fi When the network icon network successfully. 2. Built-in 3G Connection First insert the 3G SIM card into the SIM card slot. Enter the setting menu, click “wireless & network”, then click “more”, click “mobile network”. Turn on the module and click “network operator”, the system will automatically connect to the internet, hold on for a moment to wait for finishing the connection to use 3G network. 3. Internet 3.1 W hen successfully connected to a network, click browser. in the main interface to enter the Google Internet 1. Network Settings The tablet features a built-in Wi-Fi module. Click tablet. , the settings menu will be displayed on the 3.2 Click the input box. The keyboard will pop-up. Type in a new search and open the website. 3.3 C lick the displayed. 1.1 Wi-Fi 1.1.1 Slide the “Wi-Fi” switch button to icon (red border) and a dropdown menu with more operational functions is to enable Wi-Fi. 1.1.2 Click “Wi-Fi” to enter the Wi-Fi settings menu. 1.1.3 T he system will automatically search for available networks and display the name of the network. 28 29 Software Management The product supports third-party applications on an Android platform. Most applications can be obtained and downloaded from the Internet. 1.3 B ackground play When playing music, click background. 1.3.1 Click to open the main interface. The Tablet will play the music in the in the main interface to display the music player menu. 1. File Manager (Depending on the Version also Explorer or Documents) in the application program Interface to enter the explorer. You can browse, copy, delete, Click move, edit and rename programs saved on the tablet or a TF card. 1.3.2 Select the music player to return to the player menu. 2. Software Installation In Google Play Store click on the software (app) that you want to install. The installation will start automatically. 2. Browsing Pictures 2.1 Click in the application program Interface to browse pictures. Here you find all pictures and videos saved on the tablet or a TF card. 2.2 Select to open a picture. Applications 1. Playing Music 1.1 Click in the application program Interface to enter the playlist. 1.2 Click a music file to open and play it. Random Playlist Play mode Artist Song name Genre 2.3 Select to play a video. Play time Total time Previous title Next title Play/pause Play time Total time Play/pause 30 31 3. E-mail Click in the application program Interface to open the e-mail settings. Enter the e-mail address and password as well as urther neccessary settings to send and receive e-mail messages. Garantiekarte QUALITY PRODUCTS FROM CHIPS AND MORE Modell: SerienNr. Vom Service vergeben Ticket Nr. Kaufdatum: Name: Adresse: Für Kunden aus Deutschland: Wie erhalte ich einen Rücksendeschein? 1. Rufen Sie uns kostenlos an (siehe Vorderseite). 2. Sprechen Sie mit unserem freundlichen Servicepersonal. Hier erhalten Sie Informationen zum Erhalt Ihres Rücksendescheins und der RMA Nr. 3. Auf Wunsch kostenlose Abholung oder Abgabe bei jeder DHL-Annahmestelle. 4. Kostenlose Rücksendung durch DHL nach Reparatur. Kurze Fehlerbeschreibung: 4. Camera and Video Click in the application program interface to open the camera manually. Tel. / Fax / E-Mail: Die Garantie ist nur gültig, wenn die Karte vollständig ausgefüllt und die Originalrechnung bzw. der Kaufbeleg beigefügt ist. Bitte bewahren Sie diese Karte für die Dauer der Garantie auf. Kunden mit Wohnsitz außerhalb Deutschlands, bitten wir die Ware direkt bei Ihrem Händler abzugeben. Bei missbräuchlicher und unsachgemäßer Behandlung, Gewaltanwendung und bei Eingriffen, die nicht von unserem Fachpersonal vorgenommen wurden sowie bei Entfernung des Sicherheitssiegels, erlischt der Garantieanspruch. 2 Jahre Garantie ab Kaufdatum. Warranty Card QUALITY PRODUCTS FROM CHIPS AND MORE Model: Serial no: Assigned by the service ticket no: Date of purchase: Name: For customers from Germany: How do I get a return receipt? 1. Call us free of charge (see front). 2. Talk to our friendly staff. We are happy to provide you with information on how to procure your return receipt. 3. Free pickup or delivery at any DHL drop-off centre on request. 4. Free return shipping by DHL after repair. Address: Short description of error: Tel / Fax / E-Mail: 32 The warranty is only valid if the card is fully completed and the original invoice or sales receipt is attached. Please keep this card for the duration of the warranty. Customers residing outside of Germany are asked to return the product to their dealer. In case of abusive and improper handling, force and internal tampering not made of our personnel, and the removal of the security seal will void the warranty. 2 years warranty from date of purchase. Service QUALITY PRODUCTS FROM CHIPS AND MORE Diese Garantie ist gültig in der Europäischen Union. Für technische Unterstützung kontaktieren Sie bitte: Chips and More GmbH Gewerbestr. 5a D-79112 Freiburg Tel.: + 49 800 - 8082580* – Mo. - Fr. von 9.00 - 17.00 Uhr Mail:[email protected] Internet:www.i-onik.de Bitte verpacken Sie das Produkt sorgfältig und vergessen Sie die Rücksendeadresse sowie die vom Service vergebene RMA Nr. nicht. Bitte geben Sie uns außerdem eine kurze Beschreibung des auftretenden Fehlers. * Innerhalb Deutschlands kostenlos. Service QUALITY PRODUCTS FROM CHIPS AND MORE This warranty is valid in the European Union. For technical support please contact: Chips and More GmbH Gewerbestr. 5a D-79112 Freiburg Tel:+ 49 800 - 8082580* – Mo - Fr 9.00 - 17.00 hours +49 76 64 / 403 69 12 – Mo - Fr 9.00 - 17.00 hours (for customers outside Germany) Mail:[email protected] Internet:www.i-onik.de Please pack the product carefully and don‘t forget to add the return address and the RMA No. assigned by our service. Please also give a brief description of the fault occurring. * Free of charge within Germany. 35