1
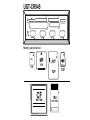
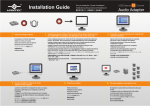
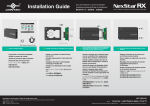
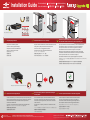
Installation Guide
Guía de instalación
Guide d'installation
Installationsanleitung
Guida all’installazione 取り付けガイド 安裝指南
安装指南
USB 3.0 Upgrade Kit
Or
PCIe TO USB 3.0
PCIe Slot
9-Pin USB 2.0 Header
1.
PCIe (USB 3.0)
Verify the package contents.
5.25” Drive Bay
2.
9-Pin USB 2.0 Header
3.5” Drive Bay
3.
Install into either a 5.25” or 3.5” drive bay
Desplace el bastidor insertándolo en una bahía de unidad de 3,5”/5.25”.
Faites glisser le plateau pouces dans la baie 3,5/5.25 pouces.
Far scorrere il rack in un alloggiamento da 3,5”/5.25.
Schieben Sie das in einen 3,5/5.25-Zoll-Laufwerkschacht.
3.5 /5.25 ド ライブベイに滑らせます。
將本產品推入主機前方3.5”/5.25”空間。
将本产品推入计算机前方3.5“/5.25”驱动器托架。
Compruebe el contenido del paquete.
Vérifiez le contenu du paquet d’emballage.
Überprüfen Sie den Inhalt des Produktkartons.
Verificare i contenuti della confezione.
梱包物を確認してください。
檢查包裝內容。
检查包装内物品。
Secure the front panel with the screws provided and carefully connect
the 9-Pin USB 2.0 Header and PCIe card into their corresponding slots.
Fije el panel frontal con los tornillos suministrados y conecte cuidadosamente los
9-Pin USB 2.0 de cabecera y la tarjeta PCIe en sus ranuras correspondientes.
Fixer le panneau avant avec les vis fournies et soigneusement connecter le
9-Pin USB 2.0 En-tête et carte PCIe dans leur logement correspondant.
Befestigen Sie die Frontplatte mit den mitgelieferten Schrauben und sorgfältig
verbinden die 9-Pin USB 2.0 Header-und PCIe-Karte in den entsprechenden Slots.
Fissare il pannello frontale con le viti in dotazione e collegare il
9-Pin USB 2.0 Intestazione e PCIe nei rispettivi alloggiamenti corrispondenti.
付属のネジでフロントパネルを固定し、慎重に接続しますそれらの対応するスロットに9-Pin USB 2.0
ヘッダとPCIeカード。
前面板安全與提供的螺絲和仔細連接9-Pin USB 2.0接頭和PCIe卡到相應的插槽。
前面板安全与提供的螺丝和仔细连接9-Pin USB 2.0接头和PCIe卡到相应的插槽。
Driver CD
www.vantecusa.com
*May require optional 4-Pin To SATA Power Cable
4.
Plug the power into the appropriate port.
Conecte la alimentación y los en sus respectivos puertos de la placa base y del.
Branchez le câble d'alimentation dans leurs prises respectives sur la carte mère.
Verbinden Sie die Strom über passende Kabel mit den entsprechenden
Anschlüssen am Motherboard.
Connettere i cavi di alimentazione alle rispettive porte sulla scheda madre.
電源とSATAケーブルをマザーボードのそれぞれのポートに接続します。
將電源線連接至主機板及連接埠。
连接电源到主板和对应的端口。
Printed in China
Printed on Recycled Paper.
5.
Once the computer is powered on, proceed with installing the
necessary drivers.
Una vez encendido el equipo, instale los controladores necesarios.
Une fois que l’ordinateur est activé, installez les drivers nécessaires.
Sobald der Computer eingeschaltet ist, müssen Sie die erforderlichen
Treiber installieren.
Una volta acceso il computer, procedere con l’installazione dei driver
necessari.
コンピュータの電源をオンにし、必要なデバイスのインストールに進んでください。
電腦開機時,請繼續安裝必要的驅動程式。
开机后安装必要的驱动程序
Information in this document is subject to change without notice.
Reproduction of these materials in any manner whatsoever without written permission is strictly forbidden.
6.
You have completed the installation of the USB 3.0 Upgrade Kit.
Usted ha completado la instalación del Kit de actualización USB 3.0.
Vous avez terminé l'installation du kit de mise à niveau USB 3.0.
Sie haben die Installation des USB 3.0 Upgrade Kit abgeschlossen.
Avete completato l'installazione del kit di aggiornamento USB 3.0.
あなたは、USB 3.0アップグレードキットのインストールが完了しました。
您已經完成了安裝的USB 3.0升級包。
您已经完成了安装的USB 3.0升级包。
Model: UGT-CR945
Copyright © 2011 Vantec Thermal Technologies. All Right Reserved.
|
All Registered Trademarks Belong To Their Respective Companies.
UGT-CR945
Memory card direction
TOP
TOP
LOCK
M2
TOP
CF
BOTTOM
MS
BOTTOM
TOP