1
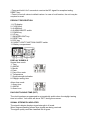
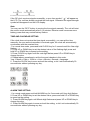
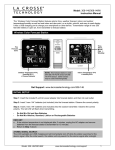
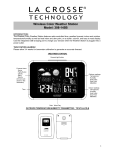
WT195 – RADIO CONTROLLED CLOCK WITH TEMPERATURE
USER’ INSTRUCTIONS
Please read the instructions carefully and keep the manual well for future reference.
GETTING STARTED
1. Remove the battery door.
2. Install two new AA size batteries as per the polarity information marked on the
battery compartment.
3. Replace the battery door.
4. Once the battery is installed, the normal segments of the LCD will be shown before
entering the radio controlled time reception mode.
5. The RC clock will automatically start scanning for the radio controlled time signal in
8 seconds.
Note
If no display appears on the LCD after inserting the battery, press the “RESET” key
by using a metal wire. In some cases, you may not receive the signal immediately.
Due to the atmospheric disturbance, the best reception often occurs during nighttime.
FUNCTION KEYS
CLOCK key:
- In normal time mode,press and hold it for 2 seconds to enter normal time setting.
- In setting mode, press it to step the setting items. Or press and hold it for 2 seconds
to return to normal time mode and save the values.
ALARM key:
- In normal time mode,press it to display alarm time for 5 seconds.Or press and hold
it for 2 seconds to enter alarm time setting.
- In setting mode, press it to step the setting items.
- After setting, press it again to save the setting values.
ALARM ON / OFF switch:
- Slide the switch to turn on/off the alarm.
DOWN key:
- In setting mode, press it to decrease the setting value. Press and hold it to speed up
the setting.
UP key:
- In setting mode, press it to increase the setting value. Press and hold it to speed up
the setting.
SNOOZE/LIGHT
- Press it once to turn on the backlight for 5 seconds.
- When the unit is sounding,press it to stop the current alarm and enter the snooze
mode.
NIGHT LIGHT FUNCTION ON/OFF switch:
- Slide it to ON position to turn on the night light function, that the backlight will turn
on automatically when the light-sensor can not sense light in dark environment.
- Slide it to OFF position to turn off the night light function.
RCC key:
- Press it to switch between Celsius and Fahrenheit.
- Press and hold it for 3 seconds to receive the RC signal for reception testing.
RESET key:
- Press it to set all values to default values. In case of mal-function, the unit may be
required to reset.
PRODUCT DESCRIPTION
1. LCD display
2. CLOCK key
3. ALARM key
4. ALARM ON/OFF switch
5. DOWN key
6. UP key
7. SNOOZE/LIGHT key
8. RESET key
9. RCC key
10. NIGHT LIGHT FUNCTION ON/OFF switch
11. Battery compartment
DISPLAY SYMBOLS
Normal time mode
1. Time
2. AM/PM
3. Month
4. Date
5. Day of the week
6. Temperature
7. Signal strength indication
8. Daylight saving time
Alarm time mode
1. Alarm time
2. AM/PM
3. Alarm icon
DAYLIGHT SAVING TIME (DST)
The clock has been programmed to automatically switch when the daylight saving
time is in effect. Your clock will show “DST” during the summer.
SIGNAL STRENGTH INDICATOR
The signal indicator displays signal strength in 4 levels.
Wave segment flashing means time signals are being received.
The signal quality could be classified into 4 types:
If the RC clock receives signal successfully, a sync-time symbol “
” will appear on
the LCD. The unit has already received the time signal. Otherwise the signal strength
symbol will disappear from the LCD display.
Note
You may use the “RCC” button to receive the time signal manually. The unit will exist
the receive mode automatically after 6-12 minutes. Receive mode consumes more
battery power that may reduce battery lifetime.
TIME AND CALENDAR SETTING
If the clock does not receive the time signal successfully, you can set the time
manually. As soon as the transmitter is received again, the clock will automatically
synchronize with the received time.
1. In normal time mode, press and hold CLOCK key for 2 seconds until the Year digit
flashes.
2. Press UP or DOWN key to set the desired value of the flashing digit, press and
hold UP or DOWN key to speed up the setting.
3. Press CLOCK key again until the next digit flashes.press UP or DOWN key to
change its value.
4. Repeat above operations to set the time and calendar in this order:
Year > Month > Date > 12/24-hr > Hour > Minute > Second > Language.
6 . Press the CLOCK key to save and exit the setting, or let it exit automatically 30
seconds later without pressing any key.
ALARM TIME SETTING
1. In normal mode,press and hold ALARM key for 2 seconds until Hour digit flashes.
2. Press UP or DOWN key to set the desired value, press and hold UP or DOWN key
to speed up the setting.
3 . Press ALARM key again until Minute digit flashes.and press UP or DOWN key to
change its value.
4 . Press ALARM key again to save and exit the setting, or let it exit automatically 30
seconds later without pressing any key.
USING ALARM AND SNOOZE FUNCTION
1. Slide ALARM ON/OFF switch to ON position to turn on the alarm, with the alarm
icon “ ” displayed on the LCD.
2. Slide ALARM ON/OFF switch to OFF position to turn off the alarm.
3. When it is sounding,press SNOOZE/LIGHT to stop the current alarm and enter the
snooze mode,with the alarm icon flashing. Or the sound will stop automatically one
minute later.
4. Once the snooze function is activated, the 4 step crescendo alarm will sound 5
times in 5-minute interval. The alarm duration is 60 seconds.
BATTERY REPLACEMENT
When the LCD becomes dim, replace with 2 new AA size batteries at once. Pay
attention to the battery polarity.