1
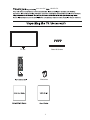
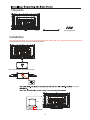
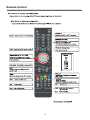
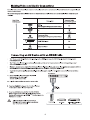
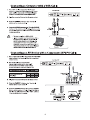
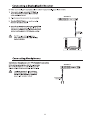
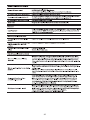
GVLEDHD50
50” LED Digital TV
Contents
Unpacking the TV / Accessory’s
Installing / Removing the Base Stand
1
2
Front / Right Side View and Controls
Rear View and Sockets
3
4
Remote Control
Installing Batteries in the Remote Control
Remote Control Operation Range
5-6
7
7
Making Video and Audio Connections
Connecting an AV Device with an HDMI Cable
Connecting a Computer with a VGA Cable
Connecting an AV Device with a Component (YPbPr) cable
Connecting an AV Device with a SCART Cable
Connecting an AV Device with Composite Cable
Connecting a Digital Audio Receiver
Connecting Headphones
Turning the TV on for the First Time
8
8
9
9
10
10
11
11
12-13
Basic Operation
13
OSD Menu
1. Picture Setting
2. Sound Setting
3. Channel Setting
4. Feature menu
5. Setup menu
14-20
14-15
16
17-19
20-23
24
EPG(Electronic Programme Guide)(DTV Mode)
Teletext(ATV Mode)
Digital Teletext(DTV Mode)
25
26
26
Connecting a USB Storage Device
Viewing Photos
Listening to Music
Watching Movies
Viewing Texts
Time Shift Function(DTV Mode)
Recording DTV Programme onto a USB Storage Device
Timer Porgramming
Play Recorded Programme
27
28
28-29
29-30
30
31
31
32
33
Maintenance
Hints and Tips
Display Modes
Specifications
Safety Warnings
34
34-35
36
37
38
your new 50 "
HD LED TV.
Stand & Screws
TV set
Bat teries
1
The parts
Stand
TV set
Screws(supplied)
Installation
Place the TV face down on a soft and flat surface (blanket, foam, cloth, etc.) to prevent any damage to the TV.
Put the stand to the neck of the TV set as shown below.
Attach the stand with the supplied screws.
200x200mm
200mm
200mm
M5x10
2
3
4
Remote Control
5
Remote Control
6
7
1/2/3
8
9
10
11
5. If this is the first time you are turning on the TV and there are no programs in the TV memory, the 4XLFN6WDUW
menu
will appear on the screen. There are 4 setups as follow:
- 2-
-1Deutsch
language :
Move
Enter
Ok
English
UK
Francais
France
Italiano
Italy
~
Espanol
Spain
Exit
Move
Exit
Move
Ok
Enter
Exit
Exit
-4Never
The TV will automatically
switch off after the selected
time has elapsed.
This setting can also be
changed in the main menu.
Enter
Ok
-3Auto Power Off :
Germany
Country :
ATV
TV Connection :
Please select the method of
TV Connection.
1 Hour
2 Hours
Freeview
Cable
4 Hours
Exit
Exit
Move
12
Ok
Enter
Exit
Exit
Ensure your aerial, cable or dish is plugged in to the TV and
then press OK.
The TV will start to install the service you have selected.
This could take some time depending on your selected service.
You can tune an additional service at any time by pressing the
Quick Start button.
Cancel
OK
Move
DTV, ATV, AV, SCART, YPBPR, HDMI1, HDMI2, HDMI3, PC, Media.
Radio
20
LOCK
/
Mu t e
Mute
13
Ok
Enter
Exit
Exit
14
15
16
Channel
Allows you to set up a variety of channel options.
1. Press the Menu button and then press the
CHANNEL menu.
buttons to select the
Picture
ENTER
Favorite Management
ENTER
C ountry
UK
TV Connection
Freeview
Auto Search
ENTER
DTV Manual Search
ENTER
ATV Manual Search
ENTER
Sound
Channel
2. Press the OK and then press the
buttons to select
the following channel options and then press the OK button
Feature
Setup
Move
Channel Management
To manage (Delete / Rename /Move / Lock / Skip) all channels.
1. Press theƷͩbuttons to Channel Managemen then press the OK button to confirm.
2.
Channel Management
A channel management screen will pop up,
Press the Ʒͩ buttons to select the channel you want to edit.
Lock
Move
3.
4.
Favorite Management
To manage (Add / Delete ) favorite channels.
1. Press theƷͩbuttons to Favorite Management then press the OK button
to confirm.
2. A favorite management screen will pop up.
3.
4.
5.
17
OK
ok
Enter
Exit
Exit
MENU
Return
TV Connection
Select DTV type, you can choose Freeview, Cable as you like.
18
ATV Manual Search
To search analogue channel by entering parameters manually.
1. Press the ▲▼ buttons to ATV Manual Search then press the OK button to confirm.
2. Select ATV manual search item to enter air channel manual search
in ATV source and the user operation interface as following.
Current Channe
Frequency
BG / DK / I / L / L’ .
3.
4.
19
Feature - Language
OSD Language
Sound
Channel
Feature
1st/2nd
English
1st P referred Subtitle
Picture
English
2nd P referred Subtitle
English
1st Preferred Audio
English
2nd Preferred Audio
English
DTV Teletext Language
English
ATV Teletext Language
West
Setup
Move
1st/2nd
20
OK
ok
Enter
Exit
Exit
MENU
Return
21
22
Feature - PVR/Timeshift
Picture
Sound
Timer
Enter
Record List
Enter
Recorder Start
Enter
Partition Select
ENTER
Pause TV Buffer
Auto
Channel
Feature
Setup
Move
Pause TV Buffer
OK
ok
Enter
Exit
Exit
30mins / 1hr / 2 hr.
23
MENU
Return
Setup
Picture
Sound
Channel
Feature
OSD Timer
10 Seconds
PC Steup
ENTER
Home M ode
Home
Reset TV Setting
E NTER
S oftware Upgrade
ENTER
OTA Upgrade
ENTER
Factory Reset
ENTER
Setup
Move
OTA Upgrade
24
OK
Enter
MENU
Return
EXIT
Exit
EPG
EPG
There are 3 modes of EPG menu:
Daily mode:
shows the information of the programs to be broadcasted
in daily mode.
RED (Weekly)
GREEN (Reminder)
YELLOW (Prev Day)
BLUE (Next Day)
Weekly mode:
Update the program information of the current 7 channels in the channel
list to the previous day and the start time keeps the same.
Update the program information of the current 7 channels in the channel
list to the next day and the start time keeps the same.
shows the information of the programs to be broadcasted
in weekly mode.
RED (Daily)
YELLOW (Prev Day)
BLUE (Next Day)
Change to weekly mode.
Change to Daily mode.
If the cursor lies on the right event list, update the right event list to
display the event information of the previous day and move the cursor
to the same place in the updated page.
If the cursor lies on the right event list, update the right event list to
display the event information of the next day and move the cursor to
the same place in the updated page.
Extended mode: shows the detailed information of each program.
Extended detailed programme information can
be displayed by pressing the info button on the
remote control.
25
26
27
/ GIF / TIFF.
function: Play / Pause / Stop / Prev. / Next / Rotate / Zoom /
Info / Photo Setup / Play list.
28
WAVE / WMA / AAC / AC3 / MPEG.
function: Play / Pause / Stop / FB / FF / Prev. / Next / Goto Time /
Repeat All / Play list / Music.
AVI / MPEG1/2 / MPEG4 / WMV / H.264.
29
function: Play / Pause / Stop / FB / FF / Slow mode / Step mode /
Repeat A-B / Prev. / Next / Play list / Info / Movie Setup / Goto Time.
30
Time shift input info menu:
Information
Time shift input info menu displays as a flag of Time shift. After Time shift start this menu displays
Enter method
After Time shift start, it will display automatically.
all the time until. Time shift stop (except there is some other menu exist) .
Time shift info banner menu:
Information
Time shit info banner shows some current Time shift information.
Enter method
After Time shift start, press Info to show the menu .
Function explain :
a
Time is equal to current play time minus current recording time.
b
Progress bar is for current recording length compared with the disk free space when REC start.
The black triangular icon is for current play length compared with current recording length.
c
MB Free is the disk instantaneous free space.
d
The right red time menu has the same function with the time in info banner menu(only when info banner menu closed it showed).
Time shift info menu
Rec
REC
REC info menu
Rec
31
Time shift time menu
Timer
Timer
2. Press the ADD button enter the Time Edit menu for the channel.
Recorder
Press the ▲▼ buttons to select the Recorder On or Off.
Type
Press the ▲▼ buttons to select the Type
Channel
Press the ▲▼ buttons to select the
Duration
Date
Press the ▲▼ buttons to select the date of starting
recording, Format is day / month / year.
32
Press the SOURCE button on the TV or the SOURCE button on the remote
control then
33
34
35
36
C50223DVB-LED Ver2
50 inch LED Panel
1920 (H) x 1080 (V) pixels
5000:1
AC 100-240V~ 50Hz/60Hz
Approx. 127cm(50 inch)
93 W
136 kWh
200 x 200mm/M5*10
10W + 10W
1149 x 98 x 685 mm
1149 x 260 x 740 mm
16 kg
37
38
39
40
If you have any problems using or installing this product, please contact our customer helpline
Tel: 0871 230 1777 (Mon to Fri 9am to 5pm) or go to www.goodmans.co.uk for troubleshooting, help and advice