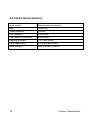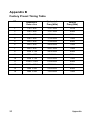
1
User Guide 使用手册 E N G L I S H IMPORTANT SAFEGUARDS E N G L I S H Warnings: 1. Read all of these instructions Save these instructions for later use, please. 2. Unplug this monitor from the wall outlet before cleaning. Do not use liquid cleaners or aerosol cleaners. Use a damp cloth for cleaning. 3. Do not use attachments not recommended by the monitor manufacturer as they may cause hazards. 4. Do not use this monitor near water. For example near a bathtub, washbowl, kitchen sink, or laundry tub, in a wet basement, or near a swimming pool, etc... 5. Do not place this monitor on an unstable cart, stand, or table. The monitor may fall, causing serious injury to a child or adult, and serious damage to the appliance. Use only with a cart or stand recommended by the manufacturer or sold with monitor. Wall or shelf mounting should follow the manufacturer’s instructions, and should use a mounting kit approved by the manufacturer. 6. Slots and openings in the cabinet and the back or bottom are provided for ventilation, and to insure reliable operation of the television receiver and to protect it from overheating, these openings must not be blocked or covered. The openings should never be blocked by placing the monitor on a bed, sofa, rug, or other similar surface. This monitor should never be placed near or over a radiator or heat register. This monitor should not be placed in built-in installation such as a bookcase unless proper ventilation is provided. 7. This monitor should be operated only from the type of power source indicated on the marking label. If you are not sure of the type of power supplied in your home, consult your monitor dealer or local power company. 8. This monitor is equipped with a three-wire grounding type plug, a plug having a third (grounding) pin. This plug will only fit into IMPORTANT SAFEGUARDS grounding-type power outlet. This is a safety feature. If you are unable to insert the plug into the outlet, contact your electrician to replace your obsolete outlet. Do not defeat the safety purpose of the grounding-type plug. 9. Do not allow anything to rest on the power cord. Do not locate this monitor where the cord will be abused by persons working on it. 10. Follow all warnings and instructions marked on the monitor. 11. For added protection for this monitor, when it is left unattended and unused for long periods of time, unplug it from the wall outlet. This will prevent damage to the monitor due to power-line surges. 12. Do not overload wall outlets and extension cords as this can result into fire or electric shock. 13. Never push objects of any kind into this monitor through cabinet slots as they may touch dangerous voltage points or short out parts that could result in a fire or electric shock. Never spill liquid of any kind on the monitor. 14. Do not attempt to service this monitor yourself since opening or removing covers may expose you to dangerous voltage or other hazards. Refer all servicing to qualified service personnel. 15. Unplug this monitor from the wall outlet and refer servicing to qualified service personnel under the following conditions: a. When the power cord or plug is damaged or frayed. b. If liquid has been spilled into the monitor. c. If the monitor has been exposed to rain or water. d. If the monitor does not operate normally by following the operating instructions. Adjust only those controls that are covered by the operating instructions as improper adjustment of other controls may result in damage and will often require extensive work by a qualified technician to restore the monitor to normal operation. e. If the monitor has been dropped or the cabinet has been damaged. f. When the monitor exhibits a distinct change in performance this indicated a need for service. IMPORTANT SAFEGUARDS 16 .When replacement parts are required, be sure the service technician has used replacement parts specified by the manufacturer that have the same characteristics as the original parts. Unauthorized substitutions may result in fire, electric shock, or other hazards. 17. Upon completion of any service or repairs to this monitor, ask the service technician to perform routine safety checks to determine that the monitor is in safe operating condition. 18. The socket outlet shall be near the equipment and shall be easily accessible. 19. The power supply cord is used as the main disconnect device. IMPORTANT SAFEGUARDS Contents 1. INTRODUCTION ............................................................................ 6 1.1 PACKING LIST..................................................................................6 1.2 QUICK SETUP ....................................................................................7 2. OPERATION GUIDE......................................................................10 2.1 ADJUSTING SETTING DISPLAY FREQUENCY AND RESOLUTION....................................................................................... 10 2.2 WORKING WITH THE TABLET PEN............................................ 10 2.3 OSD FUNCTION ............................................................................ 12 3. TROUBLESHOOTING...................................................................16 3.1 DISPLAY PROBLEMS.................................................................... 16 3.2 TABLET PROBLEMS ..................................................................... 17 4. PRODUCT SPECIFICATIONS.......................................................18 4.1 LCD DISPLAY CHARACTERISTICS ............................................ 18 4.2 TABLET CHARACTERISTICS....................................................... 19 APPENDIX ........................................................................................20 FACTORY PRESET TIMING TABLE................................................... 20 5 Contents 1. Introduction 1.1 Packing List After unpacking, make sure that all of the following parts are included. 1. 19” LCD monitor 2. User’s guide 3. Tablet CD 4. Power adapter 5. Power cord 6. Tablet pen module 7. Pen holder If there is a defect or missing part,contact the agency where you purchased the product. 6 Introduction 1.2 Quick Setup 1.2.1 External controls Figure Designation LED indicator POWER MENU Function When the monitor is working, the indicator turns blue. When the monitor is in saving mode, the indicator turns red. Turns power on or off. Activate OSD menu, or confirm the adjustment. When the OSD menu is inactive, press button, will auto adjust UP / AUTO display mode to its utmost performance according to VGA setting; when the OSD is activated, this key function is up/right/increase adjustment. DOWN Down/left/decrease adjustment EXIT/VGA OUT/OFF When the OSD menu is inactive, press button, to turn on or cut off video output signal. (VGA output function off default) When the OSD menu is active, press button, will return to previous menu or exit the OSD. 1.2.2 Connection ① VGA/O: VGA OUT port for external display equipment.( such as projector & larger screen display ) ② VGA input/USB 2 in 1 cable: 7 Introduction Plug the VGA cable & USB cable into your computer VGA & USB port. ④ ② ③ Figure 1 ① ③DC input port: Plug the adapter port to DC input port, ④Pen holder slot: Insert the pen holder to the slot. Secure pen in holder when not in use. 8 Introduction 1.2.3 Adjusting the Base Your LCD Monitor is designed to allow you to adjust it to an optimal viewing angle. Figure 2 CAUTION: Make sure the angle of the monitor is at least 10 degrees from the vertical; otherwise the monitor will be unstable and could fall over. Figure 3 9 Introduction 2. Operation Guide 2.1 Adjusting Display Frequency and Resolution The monitor’s true (physical) resolution is 1440 x 900,be sure to set the monitor refresh rate to 60 Hz if displaying the monitor at WXGA resolution (1440×900). 2.2 Working with the Tablet Pen This is an energy saving stylus pen. Stylus pen will be turnoff automatically when not in use. Stylus pen will activate automatically by tap the stylus on the screen. Figure 4 2.2.1 Basic Stylus Pen Operations The basic methods of working with the pen tip are as follows: Clicking Tap the display screen once with the pen tip. Double-clicking Tap the display screen twice in the same place with the pen tip quickly. Dragging Select an object, hold the pen against the screen and move the pen. 10 Operation Guide * You do not need to touch the tablet surface to move the screen cursor and the pen tip needs to be within 5 mm of the pen display screen. * Hold your stylus pen the way you would hold a normal pen or pencil while writing on paper and the allowed pen input angle is 45° in any direction from a position. 2.2.2 Using the Pen Side Buttons The stylus pen have two side buttons and the default button settings as follows. 1) In Windows XP / Windows 7 The upper button is set to mouse right click, and the lower button is set to mouse middle click by default. . *When you use the side buttons, press the button and the pen tip needs to be within 5mm of the pen display screen, but the pen tip no need to touch the screen. Pen tip Side Button No. 1(up) Side Button No. 2(down) Figure 5 11 Operation Guide 2.3 OSD Function Press button to activate OSD menu. 2.3.1 Picture control Figure 6 BRIGHTNESS: Adjust the image and background screen brightness CONTRAST: Adjust the image brightness in relation to the background. RATIO SELECT: Select screen ratio between FULL SCREEN (16:10) and NORMAL (4:3). 2.3.2 Geometry control Figure 7 12 Operation Guide H POSITION: To adjust the image horizontally left or right. V POSITION: To adjust the image vertically up or down. PHAES: To adjust the focus of the display. H SIZE: To increase or decrease the horizontal size of image. 2.3.3 OSD control Figure 8 H POSITION: To adjust the OSD menu horizontally left or right. V POSITION: To adjust the OSD menu vertically up or down. 2.3.4 Color control COLOR mode : Cool mode: Bluer and brighter. Warm mode : Redder and closer to paper white. 13 Operation Guide Native mode : White color a natural tint. sRGB mode: Sets your screen colors to adapt to the color standards used in the image technology industry. User Mode: RED: Red color adjustment. GREEN: Green color adjustment. BLUE: Blue color adjustment. MEW: Include STANDARD, SCENERY, THEATER picture modes. Figure 9 14 Operation Guide 2.3.5 Enhance control LANGUAGE: Language selection. AUTO: Auto adjust display mode to its utmost performance according to VGA setting. RESET: Reset the currently highlighted control to the factory setting. Figure 10 15 Operation Guide 3. Troubleshooting If you encounter problems with the monitor, please refer to the following tables. 3.1 Display problems Problem & Question Possible Solution No picture, the LED *The Signal Cable should be completely connected to the indicator is light up computer *If it is red, then the monitor and the computer are in dormancy mode. You need press your keyboard or move the mouse to reactivate the system. *If it is green, please adjust the brightness and contrast by OSD menu. *Check that the computer is switched on.*Check that the signal’s pin are bent or broke.* If you use laptop PC, check that the external (RGB) output is selected. Picture is gray *Adjust the contrast and brightness controls. Picture bounces or a *Move electrical devices that may cause electrical wave pattern is interference. present in the picture Picture is fuzzy *19” Wide LCD monitor’s true (physical) resolution is 1440 x 900. Under the resolution, it will get the best display. Missing one of the primary colors (RED, GREEN, or BLUE) Screen image is not centered or sized properly. *Inspect the monitor’s video cable and make sure that none of the pins are bent or broke (the pin’s number reference to figure 6) *Adjust pixel frequency (Clock) and Phase or press hot-key to auto adjustment Picture has color *Adjust RGB color or select color temperature defects (white does not look white) Poor brightness or *When the brightness of the screen lowers after being contrast used for a certain period and the function of the display is affected, send it to our authorized service center for repair. Horizontal or vertical *Use Win XP/Vista shutdown mode Adjust Clock and disturbances on the Phase or perform hot- key screen 16 Troubleshooting 3.2 Tablet problems Problem & Question Possible Solution The pen is no function *Check the battery whether worn out? If Yes, replace the pen battery *Check whether the pen tip is too short. If yes replace the pen tip. * Re-plug the USB cable. *Restart your computer or your application. The cursor move * Re-plug the USB cable or your computer. incorrectly Cursor not accurate Perform calibration The side switch does not work. *Be sure that when you press the side button, the pen tip is within 5mm of the display surface and your pen tip is not against the display surface. *Be sure that the side button is set to the proper function you are expecting to occur for the application.(Open the Tablet control panel to check it) Others Contact local technical support 17 Troubleshooting 4. Product Specifications 4.1 LCD Display Characteristics Item Specification Product name Tablet Monitor LCD Display Input/output Environmental Display type TFT color LCD Backlight LED Dimension 408.24mm(H)*255.15mm(V) (19 in.) Resolution 1440×900 (WXGA) Pixel pitch 0.285×0.285mm Standard colors 16,700,000 colors Viewing angles right 85°, left 85°, up 80°, down 80° Input D-sub 15-pin (analogue RGB) Output D-sub 15-pin (analogue RGB) Temperature During use: 0 – +40C; in storage: conditions -20– +60C Humidity During use: 10 – 80% (no condensation); in storage: 5– 95% (no condensation) Power Input 100-240V ac, 50/60Hz Power Consumption Power On<24W, standby<1W, Power Off<0.5W Plug and Play DDC/CI External dimensions 566 (L)×140 (W)×490(H) mm Net weight/Gross weight 4.0kg/5.4kg Stand adjustment Adjustable in the range of 10° to40° Compatible operating systems Windows XP/7/VISTA/MAC 10.4 above 18 Product Specification 4.2 Tablet Characteristics Input system Electromagnetic induction Pen Stylus pen Tablet resolution 4000Lpi Pen Pressure 2048 levels Pen Power Consumption 950uA(Max) Reading accuracy ± 0.5 mm(center) Data Report Rate 133 points per second Data Interface USB interface (USB2.0) 19 Product Specification Appendix B Factory Preset Timing Table NO 20 Horizontal Vertical Dots x line Freq.(kHz) Freq.(kHz) 1 720 × 400 31.47 kHz 70 Hz 2 640 × 480 31.47 kHz 60Hz 3 640 × 480 37.86 kHz 73Hz 4 640 × 480 37.50 kHz 75Hz 5 800 × 600 37.88 kHz 60Hz 6 800 × 600 48.08 kHz 72Hz 7 800 × 600 46.87 kHz 75Hz 8 1024 × 768 48.36 kHz 60Hz 9 1024 × 768 56.48 kHz 70Hz 10 1024 × 768 60.02 kHz 75Hz 11 1280 × 1024 63.98 kHz 60Hz 12 1280 × 1024 79.98 kHz 75Hz 13 1440 × 900 55.94 kHz 60Hz 14 1440 × 900 70.64 kHz 75Hz Resolution Appendix