1
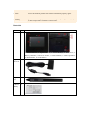
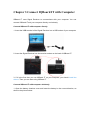
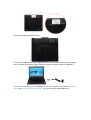
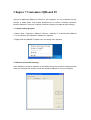
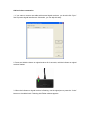
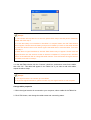
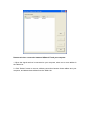
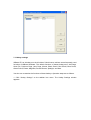
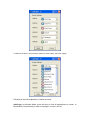
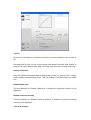
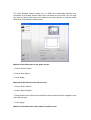
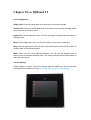
IQBoard IT
User Manual
Copyright(C) 2003-2009 Returnstar Technology Co., Ltd.
Web: www.recoverystar.com; www.iqboard.net
Tel: +86-591-83385086, 87274373
Fax: +86-591-87274383
E-mail: [email protected]
Important Statements
This manual is for IQBoard IT.
Use this product strictly according to detailed operation instruction in this manual so
as to ensure proper use. Before you install this product, please read this manual
carefully to save your time.
Opening the package means you have agreed to purchase this product, Returnstar
will not accept returns of opened packages.
The product specification may be subject to change without prior notice. The sample
pictures in this User Manual may differ from the real product.
Returnstar reserves all rights to charge the fee at anytime for product replacement,
revision and update. The content in this manual will be regularly revised without prior
notice, and the printed manual will be updated when new version is released.
Returnstar will make no guarantee for this product, both explicit and implicit, including
the salability and the adaptability to certain purpose, and will deny all guarantees
alike.
Copyright
Returnstar, IQBoard are registered trademarks of Returnstar Technology Co., Ltd.
Window is a registered trademark of Microsoft.
Environment Protection
When discarding this electronic device, please don’t treat it as normal trash. To
minimize the pollution and protect the environment, please recycle it.
Working Temperature and Humidity
Storage: Temperature: -40 degrees to 60 degrees; Humidity: 0% to 95%
Operation: Temperature: 0 degrees to 40 degrees; Humidity: 15% to 85%
Chapter 1 Introduction
IQBoard IT is our wireless interactive tablet that allows you to wirelessly interactive
with your computer or interactive whiteboard. You can use the interactive digital pen to
perform mouse functions, write notes, or control computer programs directly on the
active area of the tablet. IQBoard IT has the following features:
Teach wherever you want
IQBoard IT is small enough to be held in hand easily. Teacher can interactive with
computer or interactive whiteboard from anywhere in the classroom.
Involve every student
With IQBoard IT, teacher can assign one or more students to demonstrate or answer
question directly from their seats. Multiple tablet users can write at the same time.
Save your work
IQBoard IT can save your work to editable file, from a single letter to the whole
teaching process. Your extraordinary moment can become eternity.
Create digital art
IQBoard IT makes your computer your canvas, allowing you to unleash your digital
creativity by simply touching the pen tip to the tablet.
Natural way to work
IQBoard IT gives you a supplement to keyboard input and helping reduce
mouse-related stress on your hand and wrist. You can use IQBoard IT to handwrite
notes, sign your name, or chat with your friends.
Chapter 2 Specifications
Specifications
Digitizing
Technology
Electromagnetic, use battery-free digital pen to write and operate
Size
245mm×235mm×20mm
Active Area
6inch×4inch
Weight
0.5kg (tablet + pen)
1024 levels, can sense pressure from 7g-500g, the sensing range can be
Pressure Sensitivity customized. Allow users to write with the pen leaned in any direction. The
writing feel is as natural as writing with marker pen.
Resolution
4000LPI
Precision
±0.01mm
Responding rate
Signal tracking rate: 5m/s, Signal processing rate: 480 dot/s
Tablet Buttons
Provide Wake-up Button, Channel Switch Button, and 6 optional virtual
hotkeys on tablet to achieve frequently used functions.
Pen Button
Right-click Button
Communication
Adopt 2.4G radio frequency for wireless connection within 25m
(100m.without obstacle)
Power Supply
When connected with computer, the tablet obtains power from USB port.
When not connected with computer, the tablet obtains power from lithium
battery. The digital pen is battery-free.
Power Consumption Suspend: 110uA×3.7V, Idle: 12mA×3.7V, Writing: 16.5mA×3.7V
Battery
Time
Charging
Battery
Time
Working
6 hours
48 hours
Max Number of
63
Devices per System
Anti-interference
capability
Can resist any electromagnetic interference
Operating system
Windows 2000/XP/Vista X86
Software
IQBoard Software V4.X, IQBoard Resource Library.
Product certification CE, FCC, ROHS
Company
certification
ISO9001
Patents
Possess all hardware patents and software intellectual property rights.
Warranty
3 years for main body (can be extended to 5 years upon registration), 1 year
for other components. Click here to learn more.
Parts List
Name
Qty.
Tablet
1
Picture
1. Power Indicator, 2. Signal Indicator, 3. Virtual Hotkeys, 4. Work Area, 5.
Battery Chamber, 6. Receiver Socket, 7. Channel Button, 8. Wake Up Button,
9. Reset Button, 10. Code Button
Signal
Receiver
1
Digital
Pen
1
Lithium
Battery
1
Pen
Stand
1
Chapter 3 Connect IQBoard IT with Computer
IQBoard IT uses Signal Receiver to communicate with your computer. You can
connect IQBoard IT and your computer directly or wirelessly.
Connect IQBoard IT with computer directly
1. Insert the USB terminal of the Signal Receiver into a USB socket of your computer
2. Insert the Signal Receiver into the receiver socket on the back of IQBoard IT.
3. If it is the first time you use IQBoard IT on your computer, you should install the
drivers. Then you can start using IQBoard IT.
Connect IQBoard IT with computer wirelessly
1. Open the battery chamber cover and insert the battery in the correct direction, as
show in the picture below.
2. Close the battery chamber cover.
3. Insert the USB terminal of the Signal Receiver into a USB socket of your computer.
You don’t need to insert the Signal Receiver into the receiver socket of IQBoard IT.
4. If it is the first time you use IQBoard IT on your computer, you should install the
drivers and create wireless connection. Then you can start using IQBoard IT.
Chapter 4 Connect IQBoard IT with Projector
IQBoard IT can work with whiteboard, projector and LCD TV. In case you want to use
projector, open the projector after connection, and adjust it to make its projection
image within the projection area and centered. Then use the trapezoid rectification
function of the projector to make the projection image quadrate.
Note: Please do not place the cable on the ground to avoid stumble. If you have to do
so, please straighten and stick them on the ground with colored adhesive tape and wire.
Chapter 5 Install and Uninstall Drivers
Install drivers
Run “IQBoard IT Drivers” in the installation CD, and install the drivers according to the
on-screen instructions. After the installing process is finished, please restart your
computer.
Uninstall drivers
Select “Start > Programs > IQBoard IT Drivers >Uninstall” to uninstall drivers. You also
can open Control Panel, select “Add/Remove Programs”, and in the list of currently
installed Programs, select “IQBoard IT Drivers”, then press the “Remove” button to
remove the driver and orientation program.
Chapter 6 Charge the Battery
IQBoard IT uses a rechargeable lithium battery as the wireless power source. You are
advised to charge the battery completely before using IQBoard IT. Charging IQBoard
IT is simple. You only need to connect IQBoard IT with your computer. IQBoard IT will
take approximately 6 hours to charge.
If you have installed IQBoard IT drivers on your computer, when you connect IQBoard
IT with your computer, the power indicator will show the battery status, as follows:
The 2 indicators are not
lighting
or
flashing
alternately
The red indicator is continuous
lighting
The
green
indicator
continuous lighting
The battery is not installed
The battery is fully charged
The battery is charging
is
Chapter 7 Customize IQBoard IT
After you installed the IQBoard IT drivers on your computer, you can customize the way
the pen or tablet works. This chapter describes how to create a wireless connection
between IQBoard IT and your computer, and how to adjust your tablet and pen settings.
7.1 Launch setting program
1. Select “Start > Programs > IQBoard IT Drivers > IQBoard IT”, or double-click “IQBoard
IT” on the desktop, the IQBoard IT taskbar icon appears.
2. Right-click the IQBoard IT taskbar icon, the setting menu appears.
7.2 Wireless Connection Settings
Click “Wireless Connection Settings” on the taskbar icon menu to enter the setting window.
Here you can adjust the wireless connection between IQBoard IT and your computer.
Add a wireless connection
1. If you want to connect one tablet with several signal receivers, you should click “Sync”
first to prevent signal interference. Otherwise, you can skip this step.
2. Press and hold the button on signal receiver for 3 seconds, until the indicator on signal
receiver flashes.
3. When the indicator on signal receiver is flashing, use the signal pen to press the “Code”
button on the tablet back. Following Add Tablet window appears.
Prompt:
1. The indicator will only flash for 15 seconds, please finish step 3 with this period. Otherwise,
please redo from step 2.
2. In case the battery is not installed or the tablet is in suspend status, the Add Table window
will not appear. Please check the battery, and press the “Wake Up” button on the tablet left side
or press the “Reset” button on the bottom right of the tablet back to reset the tablet. Then redo
from step 2.
3. When there is signal interference, the Add Table window may not appear. Please insert the
Signal Receiver into the receiver socket on the back of IQBoard IT, and press the “Channel”
button on the tablet left side to change the tablet channel. Then disconnect the signal receiver
and tablet, and redo from step 2.
4. In the Add Table window, tick the “Connect” check box, and enter a name for the tablet,
then click “Ok”. This tablet will appear in the Tablet List. If you want to add other tablet,
repeat the above steps.
Prompt:
1. One signal receiver can connect up to 63 tablets.
2. To prevent signal interference, please connect only one signal receiver to one computer.
Change tablet properties
1. When the signal receiver is connected to your computer, select a tablet in the Tablet List
2. Click “Edit’ button, and change the tablet name and connecting status.
Remove wireless connection between IQBoard IT and your computer
1. When the signal receiver is connected to your computer, select one or more tablets in
the Tablet List
2. Click “Delete” button to remove wireless connection between these tablets and your
computer, and delete these tablets from the Tablet List.
7.3 Hotkey settings
IQBoard IT has 6 hotkeys on the left side of Work Area to achieve some frequently used
functions of IQBoard Software. The default functions of theses hotkeys are: Add Page,
Save File, Previous Page, Next Page, Mouse, Black Pencil, Red Pencil, Blue Pencil,
Green Pencil, Eraser, Magnifier, Reveal Screen, Spotlight, and Start.
You also can customize the functions of these hotkeys. Operation steps are as follows:
1. Click “Hotkey Settings” on the taskbar icon menu. The Hotkey Settings window
appears.
2. Select a function in the pull-down menu for each hotkey, and click “Apply”.
Following is the brief explanation of these functions.
Add Page: In Windows Mode, press this key to clear all annotations on screen. In
Board Mode, Press this key to add a new page in current “cdf” file.
Save File: In Windows Mode, press this key to save all annotations on screen to a
page in current file. In Board Mode, press this key to save the current “cdf” file.
Previous Page: Press this key to go to the previous page.
Next Page: Press this key to go to the next page.
Mouse: Press this key, you can use the digital pen to achieve mouse functions on
tablet, such as click, double-click, and drag.
Black Pencil: Press this key, you can use Pencil tool to write on tablet in black color.
Red Pencil: Press this key, you can use Pencil tool to write on tablet in red color.
Blue Pencil: Press this key, you can use Pencil tool to write on tablet in blue color.
Green Pencil: Press this key, you can use Pencil tool to write on tablet in green color.
Eraser: Press this key, you can erase normal eraser to erase digital ink created by
Freehand Drawing Tools.
Magnifier: Press this key to magnify areas of the screen.
Reveal Screen: Press this key to cover and reveal the information on your screen.
Spotlight: Press this key to draw attention to an area of the screen.
Start: Press this key to start the IQBoard Software.
Prompt:
1. Except the “Start” key, all hotkeys are functional only after IQBoard Software is started.
2. Please refer to the user manual of IQBoard Software for details of each function.
7.4 System Settings
System Settings include Pen Settings and Area Settings. Here you can customize the
Digital Pen and Work Area.
7.4.1 Pen Settings
To make the Digital Pen more comfortable to use, you can customize its tip feel,
double-click speed, and right-click function.
Tip Feel
Move the Tip Feel slider to customize the amount of pressure needed to click or write, or
ink.
After adjust the Tip Feel, you can try your writing in the Writing Test Area. Click “Default” to
reset the Tip Feel to default value. Click “Clear” the clear the content in Writing Test Area.
Double-click Speed
Drag the Double-click speed slider to adjust how quickly you want to click. A larger
setting makes double-clicking easier. Test the setting by double-clicking the folder
icon.
Disable Right-click
Tick the checkbox of “Disable Right-click” to disable the right-click function of the
digital pen.
Disable Pressure Sensing
Tick the checkbox of “Disable Pressure Sensing” to disable the pressure sensing
function of the digital pen.
7.4.2 Area Settings
The Area Settings options enable you to define the relationship between pen
movement on the tablet surface and cursor movement on the screen. You can map
the entire or partial Work Area of the tablet to the entire screen, or map the entire
Work Area of the tablet to partial screen.
Map the entire Work Area to the entire screen
1. Select ‘Entire Screen”.
2. Select “Auto Adjust”.
3. Click “Apply”.
Map partial Work Area to the entire screen
1. Select “Entire Screen”.
2. Select “Manual Adjust”,
3. Drag borders of the Work Area to define the Work Area that will be mapped to your
entire screen area.
3. Click “Apply”.
Map the entire Work Area of the tablet to partial screen.
1. Select “Partial Screen”.
2. Click on screen to define the top left corner and the bottom right corner of the
screen area that will be mapped to your tablet Work Area.
4. Click “Apply”.
Return settings to their factory defaults
1. Click “Default”.
2. Click “Apply”.
Chapter 8 Use IQBoard IT
8.1 Use Digital Pen
Single-click: Press the tablet Work Area with pen tip at proper strength.
Double-click: Press the tablet Work Area twice with pen tip at proper strength. Make
sure you press at the same point.
Right-click: Lift the digital pen 1mm-1cm from the tablet, and press the side switch of
the digital pen.
Move: Lift the digital pen 1mm-1cm from the tablet, and move the digital pen.
Drag: Use the digital pen to press an item, and slide the pen across the Work Area to
drag the item to the desired position.
Write: When you are using IQBoard Software, you can use the drawing tools to
directly write on the tablet Working Area. (The writing strength should be the same as
using the normal pen.)
8.2 Use Hotkeys
Using Hotkeys is simple. Press the hotkeys with the digital pen, and the relevant
functions will be activated. You can customize the functions of these hotkeys.
Chapter 9 Troubleshooting
1. When operating and writing on the tablet, the system respond is slow, or
the stroke is Intermittent.
1. The computer is not under normal running or the memory is occupied too much.
Please close some applications or restart the computer.
2. The operating or writing force is uneven. Sometimes the force is too light to be
sensed.
2. Under wireless connection, when you move the pen tip across the tablet
Work Area, the pointer doesn’t move on the display.
1. The battery runs out. Please recharge the battery.
2. The tablet is in suspend status. Please press the “Wake Up” button on the tablet left
side or press the “Reset” button on the bottom right of the tablet back to reset the
tablet.
3. The battery is not installed. Please install the battery.
3. When using IQBoard IT, the screen cursor jumps.
1. The digital pen is placed on the tablet Work Area, please move it away.
2. Two tablets are stacked together, please separate them.
3. There is interference source nearby, such as high voltage cable or large generator
set which can generate strong magnetic field.
Background knowledge: IQBoard IT adopts working principle of electromagnetic
induction. So if there is interference source that can generate strong magnetic field
nearby, the above symptom will occur. In normal condition, devices like cell phone,
display, TV won’t affect IQBoard IT. In case the interfering magnetic field is too strong,
you can move either the interference source or IQBoard IT to keep their distance over
50cm.
4. The pen tip worn out.
Common abrasion will not affect normal operation. When the pen tip is severely
abraded, you can purchase it from local dealer.
5. Other questions, please consult our service center or local dealer.
Chapter 10 Maintenance
Tablet
Before cleaning the tablet, please disconnect the tablet with your computer. Please
use soft cloth to clean the tablet.
Please do not use sharp or pointed objects to scratch the tablet.
During the usage, please do not knock the surface fiercely with the digital pen.
Please do not put the additional weight or pressure on the tablet.
Please do not bend the tablet.
Please do not use the tablet in dusty, foggy, wet and inclement environment. Keep it
away from sharp object, heat source, corrosive chemicals, fire, and water. Please do
not put the whiteboard in the outlet of hot air, otherwise the material will deteriorate
and its life-span will be shortened.
Transport
Please handle with care, and do not put any weight on the surface so as to avoid the
surface distortion and damage. Lay the whiteboard upright during the transportation
or storage. In long distant transportation, it is suggested to repack the whiteboard
with the original packing. If the original packing is unavailable, insert some protective
padding between the components to protect them from intense vibration or crash.
Avoid vibration, dampness, electricity, water and pressure in transportation.
Part Replacement
Please do not disassemble the whiteboard or modify its inner structure so as to
prevent accident or trouble. For maintenance or part replacement, please resort to our
authorized technician. Make sure that you use our designated part or the one with
same specification when replacing.