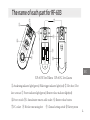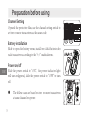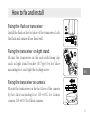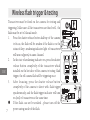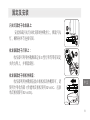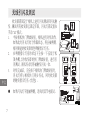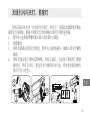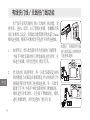
1
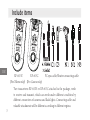
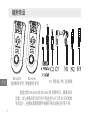
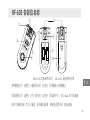
RF-603
Wireless Flash Trigger /
Synchronized Shutter Release
Remote Control Transceiver
无线引闪 /
快门遥控同步收发器
User Manual EN
使用手册
中文
Contents
General description ……………………………………………………1
Cautions …………………………………………………………………2
Include items ……………………………………………………………3
The name of each part for RF-603 ………………………………………4
Preparation before using …………………………………………………5
How to fix and install ……………………………………………………6
Wireless flash trigger & testing
Wireless flash /studio flash trigger
……………………………………7
…………………………………8
Wired/wireless remote shutter release ……………………………………9
Function extend ……………………………………………………10-11
Specification ……………………………………………………………12
EN
General description
Thank you for purchasing YongNuo products in advance. Please read this user
manual carefully and learn how to use camera and flash before.
●● RF-603 using a global free FSK 2.4GHz wireless channel which can be suitable
in many country. RF-603 with FSK, can guarantee speed, distance and stability.
Within capacious areas, the remote control distance may reach to 100m.
●● RF-603 wireless flash trigger system consist two or more similar transceivers,
automatically change transmit and receive state, namely two or more
transceivers can be used at the same time to control cameras or flash lights.
●● In support of flash waking up and triggering synchronically , with PC sync
cable (optional) can be triggering studio lights sync, with specially camera
shutter connecting cable (optional) can be used as wired / wireless shutter
release remote control. Even installed on the flash can also be used as a shutter
release remote and flash trigger sync.
●● When special transceiver for Canon or Nikon were used, the flash sync speed
reach to 1/320s(some of models may reach to 1/250s only or less, difference
models of flash and camera using may achieved difference flash sync speed).
EN
1
Cautions
1.
2.
3.
4.
5.
6.
7.
8.
As this is an electronic product accessory, some of the environment causes may
affect the working. However this is hardly ever to get this situation, don't worry.
Do not pull the wires and turn off the camera when connecting.
For a long time non-use, please turn the transceiver off and remove the batteries.
Do not put it in high temperature, such as a closed car under direct sunlight, the
control panel and other high temperature areas.
Keep dry, do not use wet hands contact with the product, the product must not
be immersed in water or exposed to rain, and this may and this may lead to not
work properly.
Do not used in the flammable occasion in violation of this warning may cause
an explosion or fire.
Owing to this product include battery, please operate it strictly according to
related rules, otherwise maybe cause explosion, fire or physical injury.
Do not trigger the flash close to a person's eyes, it may impair the person's
vision.
EN
2
Include items
EN
RF-603N
RF-603C
(For Nikon only) (For Canon only)
PC sync cable/Shutter connecting cable
Two transceivers RF-603N or RF-603C attached in the package, work
to receive and transmit, which can work under different condition by
different connection of cameras and flash lights. Connecting cable and
valuable attachments will be different according to different regions.
3
The name of each part for RF-603
②
⑦
①
③
OF
F
④
⑧
ON
R
FS F-6
K 0
AD 2.4 3N
E IN G
CH Hz
IN
⑨
M
A
⑤
⑥
⑩
EN
RF-603N for Nikon RF-603C for Canon
① Awakening indicator light (green) /Flash trigger indicator light (red) ② Hot shoe / Hot
shoe contacts ③ Power indicator light (green) /Shutter release indicator light(red)
④ Power switch ⑤ 2.5mm shutter remote cable socket ⑥ Shutter release button
⑦ PC socket ⑧ Hot shoe mounting foot
⑨ Channel setting switch ⑩ Battery room
4
Preparation before using
Channel Setting
Opened the protective film, use the channel setting switch to
set two or more transceivers as the same code.
Battery installation
Slide to open the battery room, install two AAA batteries for
each transceiver according to the "+/-" marks shown.
Power on/off
Slide the power switch to "ON", the power indicator light
will turn on(green), slide the power switch to "OFF" to turn
off.
EN
●
5
The follow cases are based on two or more transceivers
at same channel on power.
How to fix and install
Fixing the flash on transceiver:
Install the flash on the hot shoe of the transceiver, lock
the flash and ensure all are fixed well.
Fixing the transceiver on light stand:
Mount the transceiver on the rack with fixing clip
such as light stand bracket (B Type) by hot shoe
mounting foot, and tight the locking screw.
EN
Fixing the transceiver on camera:
Mount the transceiver on the hot shoe of the camera
by hot shoe mounting foot. RF-603C for Canon
camera ,RF-603N for Nikon camera .
6
Wireless flash trigger & testing
Transceiver must be fixed on the camera for testing and
triggering. Make sure all the transceivers are fixed well, the
flash must be set to Manual mode.
1. Press the shutter release button halfway of the camera
to focus, the flash will be awaken if the flash is on the
status of sleep, awakening indicator light of transceivers
will turn on(green) in same channel.
2. In the state of awakening indicator on, press the shutter
release button completely of the transceiver which
installed on the hot shoe of the camera to testing flash
EN
trigger, the off-camera flash will be triggering once.
3. After focusing, press the shutter release button
completely of the camera to shoot with flash trigger
synchronously, and the flash trigger indicator will turn
on (red) of transceivers at the same time.
●● If the flash can not be awaked , please turn off the
power saving mode of the flash.
7
Wireless flash/studio flash trigger sync
Camera controls one or more flashes and studio flash lights. Purchase YongNuo
studio flash PC sync cable according to different studio flash .
1. Insert the PC connecting cable plug with nut into the PC socket of transceiver.
2. Screw down the nut.
3. Fix the transceiver near the studio flash lights, and insert the cable plug with jack
into the control socket of studio flash lights.
4. Install the transceiver on the hot shoe of the camera, after focusing, press the
shutter release button completely of the camera to shoot with all off-camera
flash lights triggering synchronously, and the flash trigger indicator light will turn
on(red) of transceivers at the same time.
EN
8
Wired/wireless remote shutter release
This product may achieve wired remote shutter release/
wireless remote shutter release, in support of single frame,
continuous photograph, delay and bulb shooting modes.
And the modes shall be set on the camera before using.
Additional YongNuo 2.5mm shutter connecting cable needs Connected the shutter
to be purchased.
connecting cable as
1. Single transceiver can be used as a wired remote shown in the figure.
shutter release.Press the release button halfway of the
transceiver to focus, press completely to shoot, the
EN
shutter indicator light will turn on(red).
2. When it is used as wireless remote shutter release, fix
one transceiver on the hot shoe or near the camera,and
hold the other transceiver.As shown in the figure, press
the shutter release button halfway of the transceiver
which on your hand, and the camera will focus, press
the button completely to shoot, meanwhile, the shutter
indicator light will turn on( red).
9
Function extend
Handhold the flash for remote flash trigger sync
Take the RF-603 on flash light as shutter release remote control,additional YongNuo
2.5mm shutter connecting cable needs to be purchased.
1. Install the handhold flash on the hot shoe of the transceiver as transmitter.
2. Fixed the camera such as a tripod, installed the other transceiver on the hot
shoe of the camera as receiver,and connected with specially shutter cable to the
external shutter socket of the camera.
3. Press the shutter release button of the transceiver on flash for remote shooting,
and the flash will be triggering synchronously.
●
●
The function is available for single
frame shooting mode only.
If the camera failed to focus, it may
take no photograph even signal
receiving, adjust the focus mode to
"M" (manual) for the lens.
EN
10
Function extend
EN
11
Remote shooting with flash trigger sync
Several RF-603 combination using, additional YongNuo 2.5mm shutter connecting
cable and more RF-603 transceivers needs to be purchased.
1. Install one of transceiver on the hot shoe of the camera, and connected the
shutter connecting cable to the camera.
2. Install the flash on the hot shoe of the other transceivers, or connected with PC
sync cable to studio flash lights.
3. Handhold one of transceiver as a remote control transmitter, press the shutter
release button halfway of the transceiver to focus, press the shutter release
button completely to remote shooting with flashes trigger sync.
●● When it is used for combination of the RF603 control of cameras and flash lights, as
the cameras have difference reaction time,
the shooting time may be small differences.
●● If the camera failed to focus, it may take no
photograph even signal receiving, adjust the
focus mode to "M" (manual) for the lens.
Specification
Type: FSK 2.4GHz wireless remote control system
Transmission distance: 100m
Channels: 16
Shutter release: half-press, full-press
Shutter interface: 2.5mm socket
Studio flash light interface: standard PC socket
Battery: AAA×2
Stand-by time: over 45 hours
Size (W x H x D): 37mm×30mm×81.5mm
EN
HongKong YongNuo Photographic Equiment Co., Ltd.
Address:G/F,4 Bulkeley Street, Hung Hom,Kowloon,HongKong
After-sales:[email protected]
Tel:(86) 755-837-62448
Web:www.hkyongnuo.com
12
目录
产品功能简介······················1
注意事项························2
随附物品························3
RF-603 各部位名称····················4
使用前准备·······················5
固定及安装·······················6
无线引闪及测试························7
无线引闪闪光灯、影室灯················8
有线快门线、无线快门线功能···················9
功能延伸·······················10-11
规格·························12
中文
产品功能简介
首先感谢您购买永诺产品,在使用前,请您务必通读并理解本使用说明书和
相机及闪光灯的使用方法。
●● RF-603 产品使用 2.4GHz 无线频道,适用更多国家免费频道。采用 FSK
制式更有效保证速度、距离及其稳定性,在空旷环境遥控距离最远可
达 100 米。
●● RF-603 无线闪光灯同步触发套装由两只相同的收发器组成,自动切换
发射和接收状态,即您可以使用两只或多只收发器在同一时刻控制多
台相机及闪光灯。
●● 支持闪光灯的唤醒并同步触发 , 搭配影室灯同步触发 PC 线(另购)可
同步触发影室灯,搭配相机专用快门线(另购)可实现有 / 无线快门遥
控功能,即使是装在闪光灯上的收发器也可以作为无线快门遥控并同
步触发闪光。
中文
●● 使用“尼康”或“佳能”相机专用型收发器控制闪光灯时,相机闪光
同步速度最高达 1/320 秒 ( 部分相机型号只能达到 1/250 秒甚至更低,
不同型号的闪光灯与相机组合使用的同步速度不同 )。
1
注意事项
1.
2.
3.
4.
5.
6.
7.
8.
本产品属电子产品的附件,有可能因外界环境因素影响而造成相机不
能拍摄或异常动作。请勿担心,这种情况的可能性非常小。
连接线与相机连接时,请勿拉扯连接线,并在关闭相机电源时连接。
长时间不使用本产品时,请将电源关闭,并将电池取出。
请勿置于高温中,如阳光直射下的封闭汽车内、控制面板等高温地方。
请保持干燥,勿用湿手接触产品,亦不可将产品浸入水中或暴露雨中,
否则可能引起无法正常使用,甚至损坏。
请勿在易燃易爆场合中使用,违反此警告可能引起爆炸或火灾。
本产品涉及电池,关于电池的使用请严格按照相关规定,否则会引起
财产损失或人身伤害。
搭配闪光灯使用时,请勿将闪光灯靠近人眼闪光,否则可能造成视力
伤害。
中文
2
随附物品
RF-603N
RF-603C
尼康相机专用 佳能相机专用
中文
PC 同步线 / 快门连接线
包装内附 RF-603N 或 RF-603C 收发器两只,兼备收发
功能,在与相机和闪光灯的不同连接方式工作在不同的收
发状态下。连接线及增值附件根据不同区域将会有所不同。
3
RF-603 各部位名称
②
⑦
①
③
OF
F
④
⑧
ON
R
FS F-6
K 0
AD 2.4 3N
E IN G
CH Hz
IN
M
A
⑤
⑥
⑨
⑩
RF-603N 尼康相机专用
RF-603C 佳能相机专用
中文
①唤醒指示灯(绿色)/ 触发指示灯(红色)②热靴座 / 热靴触点
③电源指示灯(绿色)/ 快门指示灯(红色)④电源开关
⑤ 2.5mm 快门线插座
⑥快门释放按钮 ⑦ PC 插座 ⑧热靴固定脚 ⑨频道设置开关 ⑩电池舱
4
使用前准备
频道设置
揭开保护膜,使用频道设置开关把收发器设置在
相同的编码位置。
电池安装
打开电池仓,依照电池仓上的 “+/-”指示分别
为两只收发器安装两只 AAA 电池。
中文 开 / 关电源
将电源开关推到“ON”的位置开启电源 , 绿色
电源指示灯亮,推到“OFF”位置关闭。
●
5
以下功能说明均为设置在相同频道时的两只或
多只收发器电源开启的状态下。
固定及安装
闪光灯固定于收发器上:
安装机载闪光灯在收发器的热靴坐上,锁紧闪光
灯,确保各环节连接牢固。
收发器固定于灯架上 :
收发器可利用热靴脚固定在 B 型灯架等带有固定
夹的支架上,并锁紧旋钮。
收发器固定于相机热靴座:
收发器利用热靴脚安装在相机机顶热靴即可,请
使用专用收发器(佳能单反相机使用 RF-603C、尼康
单反相机使用 RF-603N)。
中文
6
无线引闪及测试
收发器需固定于相机上进行闪光测试和闪光触
发 , 确认所有收发器已固定牢固,闪光灯需设置在
手动 "M" 模式。
1. 半按相机快门释放按钮,相机进行对焦动作 ,
如果此时闪光灯处于休眠状态,将会被唤醒 ,
相同频道的收发器绿色唤醒指示灯亮。
2. 在唤醒指示灯亮的状态下全按一下安装于机
顶热靴上的收发器的快门释放按钮,进行引
闪测试 , 离机闪光灯将被触发闪光一次。
3. 对焦完成后,完全按下相机快门释放按钮时,
闪光灯将与相机快门同步闪光,同时收发器
的触发指示灯亮(红色)。
中文
●●
7
如果闪光灯不能被唤醒,请关闭其节电模式。
无线引闪闪光灯、影室灯
相机无线同步引闪一台或多台闪光灯、影室灯。实现此功能需要另购永
诺影室灯连接线,根据不同影室灯的控制接口使用不同的连接线。
1. 使用 PC 连接线带螺母插头插入收发器 PC 插座。
2. 旋紧螺母。
3. 将收发器固定在影室灯附近,使用 PC 连接线插头一端插入影室灯触发
插座。
4. 将收发器安装于相机机顶热靴,对焦完成后,完全按下相机快门释放
按钮时,所有闪光灯、影室灯将与相机同步闪光,同时收发器的触发
指示灯亮(红色)。
中文
8
有线快门线 / 无线快门线功能 本产品可实现有线快门线 / 无线快门线功能,支
持单张、连拍、延时、B 门等模式拍摄,拍摄模式需
先行在相机上设定。实现此功能需要另购永诺 2.5mm
相机连接线,根据不同相机型号选择不同的连接线。
中文
9
1.
如图所示,单只收发器可作为有线快门线使用。
半按手中收发器的快门释放按钮进行对焦 , 全
按进行拍摄,同时红色快门指示灯亮。
2.
作无线快门线使用时,将一只收发器固定在相
机热靴座上或固定在相机附近并与相机快门外
接插座使用专用快门连接线连接,另一只收发
器置于手中。半按手中收发器的快门释放按钮,
相机进行对焦动作。完全按下释放按钮,相机
进行拍摄动作,同时红色快门指示灯亮。
如图示,在相机快门插
座与收发器之间使用快
门连接线连接。
功能延伸
手持闪光灯遥控拍摄并同步引闪
使用装上闪光灯的 RF-603 作为快门遥控并同步引闪 , 本功能需另购永
诺 2.5mm 快门连接线。
1. 手持闪光灯安装在收发器的热靴座上作为发射器并锁紧闪光灯。
2. 固定好相机 ( 如三脚架上 ), 使用另一只收发器装于相机机顶热靴座作
接收器 , 并通过专 用快门连接线与相机的外接快门插座连接。
3. 按下手中闪光灯上的收发器快门释放按钮可以对相机进行遥控拍摄操
作,闪光灯将与快门同步引闪。
●
●
该功能仅支持单张拍摄模式。
部分相机未找到焦点时,即使
收到拍摄信号也不会进行拍摄,
应将相机镜头对焦模式调整为
手动“M”。
中文
10
功能延伸
无线遥控拍摄并同步触发闪光灯
多个 RF-603 组合使用的例子,实现此功能需另购永诺 2.5mm 相机快门
线及多只 RF-603 收发器。
1. 将一只收发器安装在相机机顶热靴座上,并使用快门连接线与相机快
门插座连接。
2. 将闪光灯安装在收发器的热靴座上,或与影室灯使用 PC 连接线连接。
3. 手持一只收发器作为遥控发射器,半按该收发器快门释放按钮,受控
相机相机进行对焦,全按下收发器快门释放按钮时,相机进行拍摄动作,
闪光灯同步引闪。
●●
中文
11
●●
当多台相机及闪光灯与 RF-603 组合使
时,由于不同相机的反应时间有差异,
拍摄时间可能有微小差别。
部分相机未找到焦点时,即使收到拍
摄号也不会进行拍摄,应将相机镜头
对焦模式调整为手动“M”。
规格
类型:FSK 2.4GHz 无线遥控系统
传送距离:100 米
频道:16 个频道
快门释放:半按,全按
快门接口:2.5MM 接口
影室灯接口:标准 PC 接口
电池:AAA×2
待机时间:45 小时以上
体积(宽 × 高 × 深):37mm×30mm×81.5mm
深圳市永诺摄影器材股份有限公司
地址 : 深圳市华强北路赛格科技园二栋西 A511 室
电话:(86) 755-837-62448
售后服务:400-001-3888
网址:www.yongnuo.com.cn
中文
12
V2.01
Made in China