1
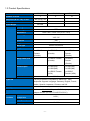
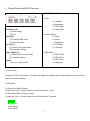
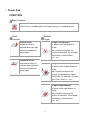
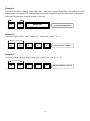
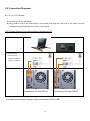
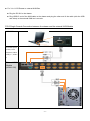
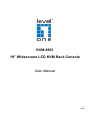
KVM-8901 19” Widescreen LCD KVM Rack Console User Manual V1.0 TABLE OF CONTENTS 1. Information........................................................................................................................................................... - 2 1.1 Overview ........................................................................................................................................................... - 2 1.2 Features ............................................................................................................................................................ - 3 1.3 Product Specifications .................................................................................................................................... - 4 - 2. 3. Panel Control and OSD Function .................................................................................................................... - 5 2.1 Auto-Tune .................................................................................................................................................. - 5 - 2.2 Contrast ...................................................................................................................................................... - 5 - 2.3 Brightness .................................................................................................................................................. - 6 - 2.4 Color Adjust ............................................................................................................................................... - 6 - 2.5 Color Temperature.................................................................................................................................... - 6 - 2.6 Language ................................................................................................................................................... - 7 - Touch Pad ........................................................................................................................................................... - 8 - 4. KVM Module ........................................................................................................................................................... - 9 4.1 Introduction ....................................................................................................................................................... - 9 4.2 KVM Features ................................................................................................................................................ - 10 4.3 KVM’s Switch Operation ............................................................................................................................... - 11 4.4 Remarks ................................................................................................................................................... - 13 - 5. Installation ............................................................................................................................................................. - 14 5.1 Cabinet Installation ........................................................................................................................................ - 14 5.2 Connection Diagrams ................................................................................................................................... - 16 6. Package Contents ............................................................................................................................................... - 19 7. Certifications ......................................................................................................................................................... - 20 APPENDIX-1 Notes on 3-in-1 LCD Drawer ......................................................................................................... - 21 - -1- 1. Information 1.1 Overview The LCD drawer, a modularized design, has a 19”-wide screen TFT LCD panel, a 105-key keyboard, and a touchpad. “KVM-8901” is the 3-in-1 model (LCD, Keyboard, and Touchpad), while “KCM-0832” and “KCM-1632” is the 4-in-1 model (LCD, keyboard, Touchpad and KVM). The power source of all the models is +12V DC-in from an external power adapter. Model Name Description 1 KVM-8901 19” Widescreen LCD KVM Rack Console 2 KCM-0832 8-Port KVM Module 3 KCM-1632 16-Port KVM Module FIG. the LCD drawer (KVM-8901) -2- 1.2 Features 1U-19” rack mount size design 19 inches wide screen LCD with on screen display (OSD) setting Touch-pad (compatible with PS/2 mouse interface) Standard 105 keyboard plus 18 push-buttons (hotkeys) KVM functions Hot Plug - add PCs or remove connected PCs for maintenance without powering down the KVM switch or PCs Very high video quality - up to 1920X1440, bandwidth: 200MHz (it might be limited by the monitor resolution) No software required - easy PC selection via KVM-OSD manual, push buttons, or hot Keys Support eight characters password protection and search PC server name Auto Scan Mode for monitoring PCs and flexible Scan time from 5~99 seconds Keyboard status restored when switching PCs Buzzer sound for switching port confirmation Support DOS, Win3.X, Win95/98/98SE/2000/ME/XP, WinNT, Netware, Unix, Linux Support iMAC, Power MAC and Sun Microsystems with USB port Easy-Installation -3- 1.3 Product Specifications Model Name KVM-8901 KCM-0832 KCM-1632 1 8 16 Numbers of Ports 482 x 610 x 44 Dimension (W x L x H), in mm Net Weight 20 KGS Gross Weight 24 KGS LCD 19 inch Wide Screen Display Size Panel Type TFT Resolution 1440 x 900 / 1366x 768 (16:10 / 16:9) View Angle H 85 / 85 V 85 / 85 500 Contrast Brightness 250cd/m2 Back light lifetime: 50,000 hrs 16.7M Support Colors Connectors PC port 1x HDB15 8x HDB15 Female 16x HDB15 Female (Combo) Female (Combo) Daisy-chain port (Combo) - 1x HDB15 Female 1x HDB15 (Combo) Female (Combo) Console port - 1x USB (KB) 1x USB (KB) 1x USB (MS) 1x USB (MS) 1x HDB15 Female 1x HDB15 (VGA) Female (VGA) DC12V Power-In 105 key Keyboard, compatible to IBM PC/AT, PS/2 Keyboard keyboard, supports Language: Germany, English, French, Italian, Spanish, Japanese, Chinese, and UK. Touch pad Microsoft mouse compatible with PS/2 mouse interface Power Adapter Universal 100~240V AC input, 12V DC output power adapter Module (UL/cUL/TUV/CE/FCC/CCC) ENV Operation Condition Temperature 0~50℃ -20 ~ 60℃ Storage Temperature 10~90% Humidity -4- 2. Panel Control and OSD Function LCD OSD Menu-Tree 1. Color Auto-Tune (A): [1] Auto setting [2] Exit Menu (M) : [1] Activate OSD menu [2] Select the item a. Contrast b. Brightness c. Color Adjust d. Color Temp 2. Image Setting a. Clock b. Phase c. Sharpness d. H.Position e. V.Position Up / Left (-): [1] Scroll up the menu bar [2] Decrease setting Down / Right (+): [1] Scroll down the menu bar [2] Increase setting Power: Turn on or off the LCD 3. OSD Menu a. OSD H.Pos. b. OSD V.Pos. c. OSD Timer d. Language 2.1 Auto-Tune Press the “Auto Tune” button. The panel will adjust the display size automatically and also tune the panel to its best condition. 2.2 Contrast (1) Press the “Menu” button. (2) Use the “Up” or “Down” button to scroll to the item “Color”. (3) Press the “Menu” button to enter. (4) Use the “Up” or “Down” button to scroll to the item “Contrast”. Contrast Brightness Color Adjust Color Temp -5- (5) Use the “Up” or “Down” button to adjust the contrast of the display. (6) Press the “Menu” button to save and finish this setting. 2.3 Brightness (1) Press the “Menu” button. (2) Use the “Up” or “Down” button to scroll to the item “Color”. (3) Press the “Menu” button to enter. (4) Use the “Up” or “Down” button to scroll to the item “Brightness”. Contrast Brightness Color Adjust Color Temp (5) Press the “Menu” button to enter. (6) Use the “Up” or “Down” button to adjust the brightness of the display. (7) Press the “Menu” button to save and finish this setting. 2.4 Color Adjust (1) Press the “Menu” button. (2) Use the “Up” or “Down” button to scroll to the item “Color”. (3) Press the “Menu” button to enter (4) Use the “Up” or “Down” button to scroll to the item “Color Adjust” Contrast Brightness Color Adjust Color Temp (5) Press the “Menu” button to enter. (6) Use the “Up” or “Down” button to adjust the Color of the display. (7) Press the “Menu” button to save and finish the setting. 2.5 Color Temperature (1) Press the “Menu” button. (2) Use the “Up“ or “Down” button to scroll to the item “Color”. -6- (3) Press the “Menu” button to enter (4) Use the “Up“ or “Down” button to scroll to the item “Color Temp” Contrast Brightness Color Adjust Color Temp (5) Press the “Menu” button to enter. (6) Use the “Down” and “Up” button to adjust the Color Temp of the display. (7) Press the “Menu” button to save and finish the setting. 2.6 Language The LCD_OSD support 7 languages, English, French, German, Spanish, Tradition Chinese, Simple Chinese and Japanese by selecting the item in the menu by the item “English”, “Français”, “Deutsch”, “Español”, “繁體中文”, “简体中文”, and “日本語”, respectively. (1) Press the “Menu” button. (2) Use the “Up“ or “Down” button to scroll to the item “OSD Menu”. (3) Press the “Menu” button to enter (4) Use the “Up“ or “Down” button to scroll to the item “Language” (5) Press the “Menu” button to enter (6) Use the “Up“ or “Down” button to scroll to the desired OSD-language, below shows the language “Deutsch” (German) is selected. English Français Deutsch Español 繁體中文 简体中文 日本語 (7) Press the “Menu” button to save and finish the setting. < Other OSD functions will be operated as the steps above> -7- 3. Touch Pad FUNCTION Basic Function Cursor Move This function is enabled when the finger moving on touchpad device. Scroll Function Multiple Finger Vertical Scroll vertical scrolling is 1 Finger (Left Button) It’s same as the left button of enabled when tap right side of touchpad then move finger. mouse. And it could be setup as the function as selected. for example: Click/Select, Content Menu, Run ...etc. Horizontal Scroll horizontal scrolling is 2 Finger (Middle Button) It’s same as the middle button of mouse. And it could be setup as the function as selected but expect Click/Select. for example: Content Menu, Run, Zoom in ...etc. enabled when tap down side of touchpad then move finger. 3 Finger (Right Button) It’s same as the right button of mouse. And it could be setup as the function as selected. for example: Click/Select, Content Menu, Run ...etc. -8- 4. KVM Module 4.1 Introduction The 4-in-1 LCD drawer includes KVM module which provides efficient way to control many computers. Powerful model-detection design will enable all connected PCs to identify KVM model correctly to meet server versatility and reach optimum setup. Stackable function (by daisy-chain) enables to link other KVM switches at any time to expand connected computers. With the on-screen display (OSD), you can view all computer situation and able to name and set password for each computer. FIG. the 16-port KVM module Console Daisy-chain PORT16 PORT15 PORT14 PORT13 PORT12 PORT11 PORT10 PORT9 PORT8 PORT7 PORT6 PORT5 PORT4 PORT3 PORT2 PORT1 PORT7 PORT6 PORT5 PORT4 PORT3 PORT2 PORT1 FIG. the 8-port KVM module Console Daisy-chain PORT8 -9- 4.2 KVM Features Use One KVM Console to control 8/16 PCs Scan Interval: 5-99 Seconds Automatic KVM signal simulation, able to boot-up PC simultaneously Support advanced function of Logitech and Microsoft mouse Support Plug & Play, Software free Support DDC2B, correct Monitor type detection for each port at any time Compatible with MS-DOS, Windows, Linux, Unix, FreeBSD VGA resolution up to 1920x1440 (it might be limited by the resolution of the display) Front panel, hot-key, and full-function OSD menu for PC selection Daisy chain to expand the connected PCs Keyboard/Video Monitor/Mouse signal RESET function Automatic KVM type detection for optimum setup Integrated HD15 3-in-1 KVM cable, easy connect and save space - 10 - 4.3 KVM’s Switch Operation (1) Switch Ports by Hotkey Commands You can conveniently command KVM Switch via a simple hotkey sequence. To send commands to KVM Switch, you must press the hotkey (default is Caps Lock) twice within 2 seconds. You will hear a beep sound confirming you are in the hotkey mode. If you do not press any key during hotkey mode over 2 seconds the hotkey mode will be terminated and back to normal state. The default hotkey is Caps Lock but you can change hotkey as your application convenience. If you prefer to use other hotkey, please go to OSD menu and change the default hotkey to the other. The table below lists all the supported hotkey commands. Command Space Bar or 1~8 Bank 01~16 Port Function Bring up the OSD screen Move selection up or down The first digit is bank number starting with “1”. The first KVM Switch on the daisy chain line is bank 1 (the Master). A standalone KVM Switch is fixed in bank 1. The second and the third digits indicate the port number from 01 to16. PgUp Back to previous bank. PgDn Go to next bank. B L S To enable/disable beep sound function. To enable/disable the Screen Saving function and 10min auto-logout function. This default function is OFF. For supervisor to activate the Auto-scan function. For supervisor to enable/disable Security function. If the Security is off, you can U access the KVM system without user name & password. This default function is OFF. To login to the OSD. If Security is enabled it will display the Login window waiting P for username and password. If Security is disabled it will display the Status window. R For supervisor to reset the OSD back to factory default value (except User Security settings). - 11 - Example 1: To bring up the OSD by hotkey, press “Caps Lock”, “Caps Lock” and the “Space Bar”. Immediately, the OSD overlay screen will appear. The superimposed menu screen is generated by the KVM Switch, and does not affect your computers or software function in any way. within 2 seconds Caps Lock + Caps Lock Space Bar + = On Screen Display Menu Example 2: To switch to Bank 1 Port1, press “Caps Lock”, “Caps Lock”, and “1”, “0”, “1”. within 2 seconds Caps Lock + Caps Lock + 1 + 0 + 1 = Switch to Bank 1’s Port 1 Example 3: To switch to Bank 3 Port12, press “Caps Lock”, “Caps Lock”, and “3”, “1”, “2”. within 2 seconds Caps Lock + Caps Lock + 3 + 1 + 2 - 12 - = Switch to Bank 3’s Port 12 (2) Switch Ports by KVM-OSD Press the button “M” = To activate KVM-OSD menu Use the up / down arrow to select the desired port. Figure KVM-OSD Menu of KVM Switch 4.4 Remarks (1) Please plug KVM switch adapter and use high quality 3-in-1 KVM cable for optimum operation. (2) To prevent potential power damage, please don’t use 2-wire extension cord and ensure AC outlets at PCs and monitors are on the same phase and have correct grounding. (3) Limited Warranty: A. In no events shall the direct vendor’s liability for direct or indirect, special, incidental or consequential damages, loss of profit, loss of business, or financial loss which hay be caused by the use of the product exceeds the price paid for the product. B. The direct vendor makes no warranty or representation, expressed or implied with respect to the contents or use of this documentation, and especially disclaims its quality, performance, merchantability, or fitness for any particular purpose. C. The direct vendor also reserves the right to revise or update the product or documentation without obligation to notify any user of such revisions or updates. For further information, please contact your direct vendor. - 13 - 5. Installation 5.1 Cabinet Installation Below is the steps to install the LCD drawer with the standard 19-inch cabinet. Step 1: Figure 1: Attach the left and right mounting rails to the rack Step 2: Figure 2: Remove the screws - 14 - Step 3: Figure 3: Let the LCD drawer slide-in the rack mount bracket Step 4: Figure 4: Screw–in the LCD drawer at the left/right position - 15 - 5.2 Connection Diagrams For 3-in-1 LCD Drawer Plug the DC12V to the drawer. Plug HDB-15 end of the KVM cable to the drawer and plug the other end of the cable (with the sequence mouse, keyboard, then video) to PC’s ports. FIG.1 Single Console Connection between drawer and PC KVM-8901 3 M cable (PS/2 mouse, PS/2 keyboard, DB15 VGA) x 1, USB x 1 PC Connecting to PC with PS2 I/F Connecting to PC with USB I/F *The cable has ‘converter’ function, which converts the PS2 to USB. - 16 - For 3-in-1 LCD Drawer to external KVM Box Plug the DC12V to the drawer. Plug HDB-15 end of the KVM cable to the drawer and plug the other end of the cable (with the USB and video) to the external KVM box’s console. FIG.2 Single Console Connection between the drawer and the external KVM Module KVM-8901 3 M cable (PS/2 mouse, PS/2 keyboard, DB15 VGA) x 1, USB x 1 External KVM Module (KCM-1632) - 17 - For 4-in-1 LCD Drawer Plug the DC-power adapter to the drawer. Plug HDB-15 end of the KVM cable to a selected switch channel and plug the other end of the cable (with mouse/keyboard/video) to PC’s ports. FIG.3 Connection between 4-in-1 drawer and PC KVM-8901 Cascade additional KVM-Switch: plug HDB-15 end of the cable to the “cascade port” and the other end to the second KVM’s user console. FIG.4 Cascade Connection KCM-1632 Cable To the next bank - 18 - 6. Package Contents KVM-8901 KCM-0832 KCM-1632 Control Center LCD drawer 1 PCS 1 PCS 1 PCS User’s manual 1 PCS 1 PCS 1 PCS AC to DC Power Adapter 1 PCS 1 PCS 1 PCS Rack Mount Kit * 1 SET 1 SET 1 SET 3 M cable 1 SET No No - 19 - 7. Certifications FCC This equipment has been tested and found to comply with Part 15 of the FCC Rules. is subject to the following two conditions: (1) This device may not cause harmful interference (2) This device must accept any interference received. Operation CE – Certificate This equipment is in compliance with the requirements of the following regulations: EN 55 022: CLASS B - 20 - APPENDIX-1 Notes on 3-in-1 LCD Drawer 1. Ensure that all cables are well seated. Label all of cables with the number for each respective computer to avoid confusion. 2. The recommended VGA cable distance is 5 meters maximum without ghosting and degradation. Normally, the cable length is based on driver capacity of your VGA card. If you need longer VGA cable, please use VGA extender (Model No. VGA-100, MAX. 100) to accomplish your applications. 3. The recommended PS2 cable distance is 5 meters maximum. Normally, the cable length is based on driver capacity of your motherboard PS2 port. If you need longer PS2 cable, please use PS2 extender (Model No. PS-100, MAX. 100 feet ) to accomplish your applications. 4. Don’t press any keys on the keyboard while the selected computer is booting up. Otherwise, it might cause the keyboard error or keyboard is not detected at PC side. 5. If forgetting the password you typed, please contact your supplier. Trouble Shooting The computer boot up fine, but keyboard doesn’t work The Mouse is not detected during PC boot up The power switch is off, but the switch still works fine or power adapter is unplugged from the switch, but the switch still works fine. Make sure the keyboard works when directly plugged into the computer. Try a different keyboard, but use only 101, 102 or 104-key keyboard. Make sure the mouse works when directly plugged into the computer. Make sure the mouse is a true PS/2 mouse. A combo mouse will work just as long as it is set for PS/2 mode with the correct adapter. Try a different mouse. Avoiding moving the mouse or pressing the mouse buttons when switching ports. Avoiding switching ports during shutting down the PC process. When you switch one PC port to another PC port, the best scan time setting need to be set to 5 sec. or more. Normally, the VGA monitor change one resolution mode to another will take one or two seconds. So, the scan time is not recommended to below 5 seconds. KVM Switch unit draws the power source from power adapter and all PC’s PS2 port. Some PC’s PS2 port can support enough power for the switch, but some PC’s PS2 port (like laptop, notebook computer…etc.) is unable to supply enough power for the switch. In order to make sure the system can work steadily, please do not set power switch to off state or remove the power adapter from the switch. Although the PCs connected to KVM Switch unit are able to support enough power to the stand alone switch, KVM Switch unit still needs a power adapter for daisy chain more banks. - 21 -