1
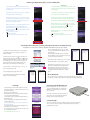
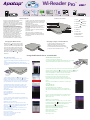
Wi-Reader Pro
TM
iOS
iOS
Personal
Cloud Storage
802.11 b/g/n
7
Power bank
(External Battery)
FCC Statement
reception, which can be determined by turning the
equipment off and on, the user is encourage to try
to correct the interference by one or more of the
following measures:
1.Reorient the receiving antenna.
2.Increase the separation between the equipment
and receiver.
3.Connect the equipment into an outlet on a
circuit different from that to which the receiver is
connected.
4.Consult the dealer or an experienced radio/TV
technician for help.
This device compiles with Part 15 of the FCC rules.
Operation is subject to the following two
conditions: (1) this device may not cause harmful
interference, and (2) this device must accept any
interference received, including interference that
may cause undesired operation.
This equipment has been tested and found to
comply with the limits for a Class B digital device,
according to Part 15 of the FCC rules. These limits
are designed to provide reasonable protection
against harmful interference in a residential
installation. This equipment generates, uses and
can radiate radio frequency energy and if not
installed and used in accordance with the
instructions, may cause harmful interference to
radio communication. However, there is no
guarantee that interference will not occur in a
particular installation. If this equipment does
cause harmful interference to radio or television
Android
Free App
Location of Controls
1. Wi-Fi
2. Card/Drive
Indicator
2
3
3. Charging
Indicator
4. Power
4
5
6
7
5. SD Card Slot
8
9
6. USB Port
10
7. RJ-45 Jack
8. Micro USB Port
10. Function Switch
Charging an Apple or Android Device
To charge an Apple or Android device, simply
indicator is orange, it is time
plug the cable from the external device’s
connect the small end of the supplied Micro USB
charging port to the USB port on the Wi-Reader
cable to the Micro USB port on this unit and the
Pro. Then slide the Function switch to the Charge
other end to a powered USB port on a computer
position; the external unit will be charged.
or to a USB Power Adapter (Not included). While
indicator will light red.
When fully charged, the charging
indicator
will turn off.
Using the Wi-Reader Pro as a Card Reader
iOS (Shown in blue)
Android (shown in green)
Text in blue pertains to the Apple Device only.
Text in green pertains to the Android only.
Screens may vary slightly depending on the Apple device you are
using.
1.Download the Wi-Reader App from the Apple App Store.
Screens may vary slightly depending on the Android device you are using.
1.Download the Wi-Reader Pro App from the Google Play Store.
2.Insert an SD Card into the SD card slot or insert a Flash drive into
the USB port.
2.Insert an SD Card into the SD card slot or insert a Flash drive into the USB port.
3.Slide the Function switch to the
position; after a short while, the
indicator
will blink blue and the Wi-Reader Pro will be available. Enter the Settings on your
device, then Wi-Reader Pro_xxxxxx (x represents random digits).
4. Tap the Wi-Reader Pro App to open the App. You will see five
3.Slide the Function switch to the
position; the Power
indicator will light and after a short while, the
indicator will
blink blue and the Wi-Reader Pro will be available. Tap the
items: Videos, Photos, Music, Documents and Folder View.
Select Folder View to view contents of SD card or Flash drive, or
select one of the options to view the contents. See below for valid
Settings App on your i-device, then select Wi-Fi. From this Wi-Fi
format.
list, select Wi-Reader Pro_xxxxxx (x represents random digits).
Video: Please download MX Player or MoboPlayer to watch videos
on this App.
4.Tap the Wi-Reader App to open the App. You will see five
items: Videos, Photos, Music, Documents and Folder View.
Select Folder View to view contents of SD card or Flash drive, or
select one of the options to view the contents. See below for
Photos: JPG, BMP, PNG
Music: MP3, WAV, AAC
Documents: PDF, DOC, PPT, TXT, HTM, XLS
valid format.
Note: For HTC/Samsung Phone, please use the build-in Polaris
Video: M4V, MP4, MOV
Office App. For other Android phones, please download OliveOf-
Photos: JPG, BMP, PNG
fice.
Music: MP3, WAV, AAC
Documents: PDF, DOC, PPT, TXT, HTM, XLS, KEY, PAGES,
NUMBERS
5.Tap one of the files and it will play/appear in the Wi-Reader Pro
App. If you try to play a non-valid file, “no app support” will
5.Tap one of the files and it will play/appear in the Wi-Reader
appear on the screen.
App. If you try to play a non-valid file, “Unable to Open” will
appear on the screen.
6.What Else Can You Do With Files:
While a list (music, photo, etc.) appears, tap on one of the
option, for example Photos, tap Edit, tap on the desired file and
then click the
icon. This will bring up buttons which
6.What Else Can You Do With Files:
While a list (music, photo, etc.) appears, tap on one of the option,
for example photos, tap the
file and then click the
icon (top right), tap on the desired
icon (top left). This will bring up
buttons which perform the following functions:
perform the following functions:
Download: Tap to download the file into your Collections.
Save to Library (Photos only): Tap to save the photo to your
Export: Tap to export the file into other App.
device’s photo library.
Download: Tap to download the file into your Collections.
Move: Tap to move files.
Export: Tap to export the file into other App.
Rename: Tap to rename the file.
Delete: Tap to delete the file.
Cancel: Tap to cancel.
Indicator
9. Reset Button
to charge the battery. To charge this unit, simply
charging, the charging
Indicator
1
Caution: Any changes or modifications not
expressly approved by the party responsible for
compliance could void your authority to operate
the equipment.
Charging the Wi-Reader Pro
When the Power
USB Flash Drive
& SD card
Android
Rename: Tap to rename the file.
Move: Tap to move fies.
Delete: Tap to delete the file.
Cancel: Tap to cancel.
Viewing or Uploading Files in Your Collections
iOS
Android
1.Open the Wi-Reader App as previously described. Tap the
1.Open the Wi-Reader Pro App as previously described. Tap the
Collections icon at the bottom of the screen and the Collections
Collections icon at the bottom of the screen and the Collections
screen will appear.
screen will appear.
2.If any files have been saved to your collection, simply tap on
2.If any files have been saved to your collection, simply tap on
one to play/view it in the Wi-Reader App.
one to play/view it in the Wi-Reader Pro App.
3.To Upload a file from your photos on your device to an SD
3.To Upload a file from your device to an SD card/flash drive,
card/flash drive, tap Upload From Camera Roll. Select photo(s)
tap Upload From Smartphone. Select file(s) then tap Choose
then tap Done. Select where to upload the files to, then tap
target folder then tap Upload and the unit will upload the files.
Done and the unit will upload the files.
4.While in the Collection’s list, tap the
icon (top right),
4.While in the Collection’s list, tap the Edit button at the top
tap on the desire file and then click the
icon (top left). This
right to bring up the icons at the bottom of the screen.
will bring up options which allow you to Upload, Export,
Select a file, then tap the
Rename, Move or Delete the selected file.
icon. This will bring up a screen
that will allow you to Upload, Move, Export, Rename, Delete or
Mail the selected file.
5.While in the Collection’s list, tap the icons to perform the
Tap to create a new folder.
following functions:
Tap to select all files.
Tap to create a new folder.
Tap to sort the files, either by Name, Type or Date.
Tap to sort the files, either by Name, Type or Date.
Creating a Wi-Fi Hotspot (Similar procedure for iOS or Android Device)
Illustrations are of the iPhone, but the other iOS and Android screens are very similar.
6.If connecting through a hotel room’s internet
1.Plug internet cable into RJ-45 jack. It is recommended to
connection, select DHCP from the WAN Access Type
keep the Wi-Reader Pro connected to the computer; or a
pull down menu.
USB power adapter.
If connecting through ASDL modem, select PPPoE
from the WAN Access Type pull down menu and enter
2.Slide the Function switch to the
position; the power
indicator will light and after a short while, the
your username/password. Tap Next.
indicator
will blink blue and the Wi-Reader Pro will be available. Tap
7.At the Wireless Basic Setting screen, you can change
the Settings App on your iOS device, then select Wi-Fi (on
the SSID of Wi-Reader or tap on Next to continue.
Android, go to Wi-Fi setting). From this Wi-Fi list, select
Wi-Reader Pro_xxxxxx (x represents random digits).
8.At the Wireless Security Setup screen, you can set
the password of the Wi-Fi here then tap Finished.
3.Open the device’s browser then enter “10.10.1.1” in
The Wi-Reader Pro will reboot. You may have to
the space provided for the URL.
change the Wi-Reader Pro will reboot. You may have
to change the Wi-Fi to the Wi-Reader Pro_xxxxxx
4.Select Settings at the top right of the screen.
again.
5.Select Gateway and then tap Next. At the next LAN
Wi-Fi Repeater
Interface screen, tap Next again.
This unit can also be used as a Wi-Fi Repeater. This feature will allow you to extend
the signal by receiving the signal and then sending it out again, thus extending the
Settings
iOS
Resetting the Wi-Reader Pro
If you are having trouble or experiencing erratic
Tap the Settings icon at the bottom right of the screen to
operation with the Wi-Reader Pro, the blue light
bring up the Setting screen. The items listed on this screen
flash while operating Wi-Reader Pro, follow the
perform the following:
instruction below.
App Version: This is App version.
About Wi-Reader: If connected to the internet, tap this to
Insert a pin or similar pointed object into the Reset
see more info about the Wi-Reader.
button, hold 3-4 seconds, until the blue light stop
Send Feedback: Tap to send feedback about Wi-Reader or
flashing. This will reset the Wi-Reader Pro.
the Wi-Reader app.
Device Setting: Tap to enter the Wi-Fi password and/or
Contacting Us
change the Wi-Fi SSID.
Connect Setting (iOS only): Used by iOS, you will not need
Android
If you have any trouble, please try resetting the unit as describe above. If that does
this unless instructed.
not work, you can contact us using the Send Feedback option in the Setting or
Clean Thumnail Cache: Tap to clean the Thumbnail Cache
visiting www.carry.com.tw
which takes space on your device.
Check storage Space: Tap to view the sda 1 Free Space and
the Collection files Used Space.
Logout (Android only): Tap to log out.