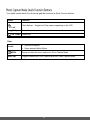
1
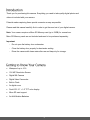
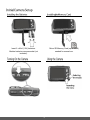
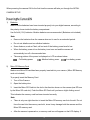
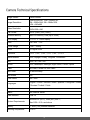
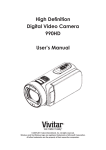
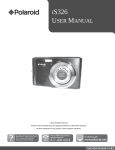
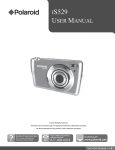
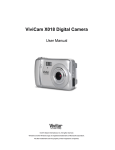
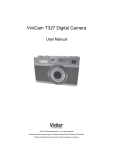
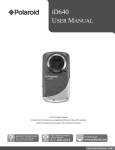
IF045 USER MANUAL © 2012 All Rights Reserved. Windows and the Windows logo are registered trademarks of Microsoft Corporation. All other trademarks are the property of their respective companies. Introduction .................................................................................................................................. 2 Getting to Know Your Camera ...................................................................................................... 2 What’s Included ............................................................................................................................ 3 Parts of the Camera ..................................................................................................................... 4 Initial Camera Setup ..................................................................................................................... 5 Main Camera Modes .................................................................................................................... 8 Camera Technical Specifications .................................................................................................. 9 Computer System Requirements ............................................................................................... 10 Powering the Camera On/Off ...................................................................................................... 11 Changing Camera Mode ............................................................................................................ 12 Navigating the Menus................................................................................................................. 13 Photo Capture Mode .................................................................................................................. 14 Photo Playback Mode ................................................................................................................ 19 Video Capture Mode .................................................................................................................. 23 Video Playback Mode ................................................................................................................. 24 Navigating the Menus................................................................................................................. 25 Status Icon Description ............................................................................................................... 26 Menu Options ............................................................................................................................. 27 Installing the Software ................................................................................................................ 30 Connecting the Camera to the Computer ................................................................................... 31 Getting Photos and Videos from your Camera to Your Computer .............................................. 31 Get Started! ................................................................................................................................ 32 Transferring Images from my Camera to my Computer Manually .............................................. 33 Camera Maintenance ................................................................................................................. 34 Warranty Card ............................................................................................................................ 35 Technical Support ....................................................................................................................... 37 Troubleshooting .......................................................................................................................... 37 E-Waste / FCC Declaration ........................................................................................................ 38 1 Thank you for purchasing this camera. Everything you need to take quality digital photos and videos is included with your camera. Polaroid makes capturing those special moments as easy as possible. Please read this manual carefully first in order to get the most out of your digital camera. Note: Your camera requires a Micro SD Memory card (up to 32GB) for normal use. Micro SD Memory cards are not included and need to be purchased separately. Important: - Do not open the battery door underwater. - Close the battery door properly for best water sealing. - Rinse the camera with clean water after use and keep dry for storage. Waterproof up to 10 ft. 10.0 MP Resolution Sensor Digital Still Camera Digital Video Camcorder Built-in Flash 5x digital zoom Dual LCD: 2.7 + 1.8" TFT color display Micro SD card support 2x AAA Alkaline Batteries 2 1. Digital Camera 2. USB cable 3. Polaroid Instant Memories Software Installation CD 4. Wrist Strap Note: Micro SD Memory Card and batteries not included. 3 1. Shutter Button 11. Up / Zoom In 2. Power On/Off 12. Down / Zoon Out 3. LCD Switch 13. Left / Flash Light 4. Wrist Strap Connector 14. Right / Playback 5. Small LCD Monitor (front) 15. MODE 6. Flash 16. Menu / Delete 7. Lens 17. Battery Compartment 8. LED Busy Indicator 18. Micro SD Memory Card Slot 9. Macro/Normal Switch 19. USB Port 10. LCD Screen (back) 20. Tripod Mount 4 Insert 2 x AAA (1.5V) batteries. Alkaline batteries recommended (not included). Micro SD Memory Card (up to 32GB) needed for normal use. 5 When powering the camera ON for the first time the camera will take you through the INITIAL CAMERA SETUP. 1) Batteries Make sure the batteries have been inserted properly into your digital camera, according to the polarity shown inside the battery compartment. Use 2x AAA (1.5V) batteries. Alkaline batteries are recommended. (Batteries not included.) Note: Remove the batteries from the camera when not in use for an extended period. Do not mix alkaline and non-alkaline batteries. Some features, such as Flash, will not work if the battery power level is low. When the battery power is low the battery icon turns red and the camera will automatically turn off a few seconds later. The energy status of the power is displayed on LCD as shown below: Full battery power 2) Medium battery power Low battery power Micro SD Memory Card Make sure a Micro SD card has been properly inserted into your camera. (Micro SD Memory card not included.) To properly insert the Memory Card: 1. Turn off the Camera. 2. Open the battery door. 3. Insert the Micro SD Card into the slot in the direction shown on the camera (see SD icon by the Micro SD card slot). Push the Micro SD Card until you hear a slight clicking sound. This indicates the memory card has been inserted correctly. Note: There is only one right direction to insert the Micro SD memory card into the slot. Do not force the card into the memory card slot, since it may damage both the camera and the Micro SD memory card. After the camera is powered on, a memory card icon will appear on the LCD display. If 6 you do not see the SD icon on the display, please check if the card was inserted properly. IMPORTANT: The Micro SD memory card must be formatted before taking photographs. Formatting the Micro SD Memory Card 1. Press the MENU button ( ) in Photo Capture or Video Capture mode. 2. Select the Setup Menu options by pressing the RIGHT button. 3. Press the W ( )DOWN button to highlight and select the ‘Format’ and press the SHUTTER/OK button to confirm. 4. To format the Micro SD Memory Card, select ‘Yes’ and press the SHUTTER/OK button. To exit the menu without formatting the SD Memory Card select ‘No’ then press the SHUTTER/OK button. Alternatively, you can press the MENU button to exit. 6. Once the SD Memory Card is formatted – ‘Completed’ appears briefly on the LCD indicating the format process has finished. 3) Power On Press the POWER button on the top of the camera to turn on the camera. 7 Your camera has different modes for the various camera functions. Use this mode to capture pictures with your camera. This is the default mode when the camera is powered ON. To take a picture, aim your camera as desired and press the Shutter button. The picture will be automatically saved to your camera’s memory card. To access the various menus for the Photo Capture mode, press the MENU button while in the Photo Capture mode. Use this mode to capture videos with your digital camera. After turning on your camera, press the MODE (M) button once to open the Video Capture mode. To take a video, aim your camera as desired and press the Shutter button to start the record. A red record indicator will appear on the LCD screen while record is in progress. To stop the record, press the Shutter button again. The video will be automatically saved to your camera’s memory card. To access the various menus for the Video Capture mode, press the MENU button while in the Video Capture mode. Use this mode to view and manage the photos and videos on your camera. After turning on your camera, press the PLAYBACK button to open the Playback mode for photos and videos. You can scroll through the photos and videos that you’ve previously taken to view or delete them as desired. To access the various menus for the Playback mode for photos and videos, press the MENU button while in the Playback mode. 8 Image Sensor Image Resolution Video Resolution CMOS Sensor 14M=4320x3240; 10M = 3648x2736; 5M = 2592x1944; 3M = 2048x1536; VGA = 640x480 VGA 640 x 480 QVGA 320 x 240 File Format JPEG (Photo) /AVI (Video) External Memory Micro SD Memory Card (up to 32GB) LCD Display 2.7+1.8" TFT color display Lens f=8.5 mm Focus Range 0.5m. ~ Infinity Zoom 5X Digital Zoom Exposure ±2.0, ±5/3, ±4/3, ±1.0, ±2/3, ±1/3, 0 White Balance Auto, Daylight, Cloudy, Tungsten, Fluorescent ISO Auto / 50 / 100 / 200 Scene Auto, Landscape, Backlight, Night Scene, Portrait, Sports Flash No Flash, Forced On, Auto Flash Self-Timer 10 second delay Anti-Shake Yes Face Detect Yes - Auto F2.8 English / French / German / Italian / Spanish / Portuguese / Greek Languages / Russian / Turkish / Polish Microphone Yes Macro Yes, Manual Switch USB Interface USB 2.0 Windows XP (SP 3), Vista (SP1) and 7 ; System Requirements Mac OSX v10.5.x and above Battery 2 * AAA (1.5V) alkaline batteries Working Temperature 0~45C 9 To be able to download photos and videos to your PC using the Polaroid Instant Memories Software, you will need the following minimum configuration: Microsoft® Windows XP with Service Pack 3, Windows Vista with Service Pack 1 or Windows 7 Pentium® 4 processor (or above) 1 GB of RAM, with 250 MB of free hard disk space 16-bit Color monitor, 1024 X 768 recommended screen resolution CD-ROM Drive QuickTime® 6 or higher Microsoft® Internet Explorer 7 or higher Windows Media Player 10 or higher DirectX 9 or higher Internet connection required To be able to download photos and videos to your Macintosh using the Polaroid Instant Memories Software, you will need the following minimum configuration: Intel processor running Mac OS X v10.5.x or later 1 GB RAM, 250 MB free hard disk space Display: 1024 x 768 or higher-resolution monitor CD-ROM Drive QuickTime® 6 or higher Internet connection required 10 Make sure the batteries have been inserted properly into your digital camera. Make sure the Micro SD card has been inserted properly into your camera. (Micro SD card up to 32GB - not included) Please see Initial Camera Setup for more information. Press the Power button to turn your camera ON. After powering on, the camera LED light turns on briefly. The LCD screen turns on with your camera in Photo Capture mode to start. While the camera is on, you can press the Power button down again for a few seconds at any point to turn your camera OFF. Note: Your digital camera also has an Auto Power Off feature that will automatically turn off your camera after a specific period of time that your camera is left idle. The Auto Power Off settings can be set from the ‘Power Save’ settings menu (accessed in either Photo Capture Mode or Video Capture Mode general Camera Settings menu). 11 Your camera has three main modes: 1) Photo Capture Mode - Use this mode to capture photos with your camera. 2) Video Capture Mode - Use this mode to capture videos with your camera. 3) Playback Mode (for photos and videos) - Use this mode to view the photos and videos you have already taken with your camera. When the camera is first powered ON, the Photo Capture Mode will be active. The icons that appear on the LCD screen are the best default settings so that you can begin to capture and enjoy clear quality photos. To change the active camera mode, make sure the camera is powered ON and press the MODE (M) button. When in Photo Capture Mode, this icon will display on the top-left corner of the LCD display. When in Video Capture Mode, this icon will display on the top-left corner of the LCD display. When in Playback Mode, this icon will display on the top-left corner of the LCD display. Note: Press the PLAYBACK button to enter the Playback Mode. 12 Each camera mode has a set of menus specific to that mode as well as menus for the general Camera Settings. To access the Main Menu for each Mode: 1) Press the MENU button to open the Main Menus for the current mode. 2) Press the W/Down and T/Up buttons to select a specific menu. 3) Press the Shutter button to confirm and save your selection and open the options for the menu you have selected. 4) To select a specific option, press the W/Down or T/Up button and then the Shutter button to save the selected option and return to the Main Menu. 5) At any time you can press the MENU button to exit the menus and return to the previous screen. To access the General Camera Setup Menu: 1) Press the MENU button. 2) Press the Right or Left button to select the General Camera Setup. 3) Press the W/Down and T/Up buttons to select a specific menu. 4) Press the Shutter button to confirm and save your selection and open the options for the menu you have selected. 5) To select a specific option, press the W/Down or T/Up button and then the Shutter button to save the selected option and return to the Main Menu. 6) At any time you can press the MENU button to exit the menus and return to the previous screen. 13 The Photo Capture mode allows you to capture pictures with your digital camera. 1) Power on your camera. Photo Capture Mode is the default mode that appears upon powering on your camera. 2) Use the LCD display on the back of the camera to direct the camera at the scene you would like to capture. 3) Press the T/Up, Zoom In and W/Down, Zoom Out buttons to zoom in/out if desired. You can magnify your subject up to 8 times using the digital zoom. 4) Press the Shutter button to take the picture. 5) The picture will automatically be saved to the camera’s Micro SD memory card. You can also capture your photos using the LCD screen on the front of the camera. 1) Before taking the photo, ensure that the Macro Switch on the side of the camera is down and in the MACRO ON position 2) . The flower icon will appear on the LCD display. When you would like to quickly include yourself in the photo, simply press the LCD Switch button and hold the camera steady facing towards you at arm’s length (30~45cm). 3) Make sure you can see yourself on the LCD screen. 4) Look at the camera lens. 5) Press the Shutter button to take the picture. 14 You can use the Self-Timer function when you would like to include yourself in the photograph or when you would like to take a photograph without flash. To avoid shaking of the camera a tripod is recommended. 1) While in Photo Capture Mode, press the MENU ( ) button to open the menus options. 2) Press the W/Down ( 3) Press the SHUTTER button to select and open the highlighted menu option. 4) Press the W/Down ( 5) Press the SHUTTER button to confirm and save the highlighted submenu option. 6) The Self-Timer feature is now ready for use. 7) Set the camera in the direction you would like to capture. 8) Press the Shutter button to take the photograph. 9) The photo will be taken after a delay of 10 seconds. ) button to select Capture Mode. ) button to select the Self-Timer delay option: 10S Timer. The camera will beep during the countdown. NOTE: Depending on the distance to the object being photographed, use the Macro switch to adjust the distance. Select the flower symbol ( ) if you wish to take a close-up photograph (11cm –18 cm). If you wish to take a photograph of surroundings or people (0.5m – infinity), set the Macro switch to normal mode ( ). See “Macro Switch” for more details. If you are not sure if there is enough lighting, turn on the automatic flash ( ) by pressing the flash button. (If the battery power is too low, the flash won’t be activated). See “Flash Options” for more details. Face Detection function will be activated automatically if you take pictures of people. If Smile Detection is ON, the Shutter will automatically activate and capture a photo once a smile is detected. 15 Your digital camera has a four-directional pad that functions as Quick Function buttons: Button Left T / Up Function Flash Options – Toggles the Flash options appearing on the LCD Zooms In W / Down Zooms Out Other Shutter MENU MODE (M) Captures the photo Saves selected Menu Option Opens and exits the menu options for Photo Capture Mode Toggles between the Photo Capture Mode and Video Capture Mode 16 There are several Flash options available on your camera. The options appear on the Photo Capture Mode LCD screen in sequence. To change the Flash mode, press the LEFT Quick Function button until you arrive at your desired settings. Important: When using Flash, stand between 8 to 10 feet away from the scene you would like to capture. Note: The MACRO mode must be turned OFF when you want to use the Flash. To turn off MACRO mode: Slide the MACRO Switch down to the mountain icon . When MACRO is OFF, the mountain icon Flash Type Forced Off (Default) appears on the LCD display. Description No flash will appear. Use this when you do not want to activate Flash. Note: A ‘Turn On Flash’ message appears when the camera detects a need for flash. When this message appears, it is recommended to press the Flash/Up button and select one of the flash options: Auto Flash, Forced On or Red-Eye Reduction. A When you want the camera to determine if Flash is needed, select Auto Flash. Auto Flash The flash will automatically turn on according to the lighting conditions. When the LED light stops blinking, the Flash is ready for use. Note: In some cameras, an initial flash appears to test your lighting conditions. If flash is needed, a second flash will appear upon taking the photo. Forced On The flash is enabled for each photo. Note: If you use this option in a well lit environment, your photo may be appear too bright/light (overexposed). 17 MACRO ON: Close-up Photographs Your camera has a Macro Switch that allows you to manually enable or disable the Macro mode on your camera. While using the Macro mode, you can capture images at close range (11cm ~ 18 cm). To turn the Macro mode ON, slide the Macro Switch on the side of your camera DOWN to the flower icon . When enabled, the Macro mode will allow your camera to focus on an object that is close to the camera. The flower icon will appear on the LCD and indicates that the Macro mode is ON. MACRO OFF: Normal Mode To turn the Macro mode OFF Slide the Macro Switch on the side of the camera UP to the mountain The mountain icon. icon will appear on the LCD display. When Macro mode is off, photos can be captured from 0.5m - ∞ (infinity). Note: The Macro mode must be turned OFF when you want to use the following features of your camera: Flash, Smile Detection. To Turn the Macro mode OFF: Slide the Macro Switch up to the mountain icon Macro mode OFF. The mountain icon will appear on the LCD display. 18 to turn To select the Photo Capture Mode menu: 1) While in Photo Capture Mode, press the MENU ( 2) Press the T/Up ( ) button or the W/Down ( ) button to open the menus options. ) button to scroll between the various menus for the current mode. 3) Press the SHUTTER button to select and open the highlighted menu option. 4) Press the T/Up ( ) button or the W/Down ( ) button to scroll between the various Submenu options within the selected menu. 5) Press the SHUTTER button to confirm and save the highlighted submenu option. 6) Changes made to these options will remain until you decide to change them again at a later time. The selected menu option appears as an icon on the LCD. 7) At any time you can press the MENU button to exit the menus and return to the previous screen. The Playback Mode allows you to review and edit photos and videos that you’ve already taken with you camera. When you first turn on the camera, the camera will be in Photo Capture mode by default. Press the PLAYBACK The latest captured image appears on the LCD screen. If there are no images stored, a button to open the Playback Mode. message (No File) appears. 19 1) Select your Photo: Once in Playback Mode, press the LEFT or RIGHT direction buttons to scroll through the images on your camera’s memory card until you find the image you would like to view. Each captured image (video and photo) is displayed on the LCD screen. Photos appear with an photo icon on the top left of the LCD screen. 2) Zooming In/Out of your selected Photo: Press the T / Zoom In button to Zoom In and magnify the selected photo. Use the UP / DOWN / LEFT / RIGHT direction buttons to navigate around the photo. Press the W/Zoom Out button to Zoom Out of the selected photo. Use the UP / DOWN / LEFT / RIGHT direction buttons to navigate around the photo. Easily navigate and select the image you wish to view by using the Thumbnail View. The images on your camera will be displayed in a 3 X 3 matrix where you can use the direction buttons to scroll and select images from the thumbnails. 1) Press the W/Zoom Out button. All the images on your camera will appear in the Thumbnail View. 2) Use the UP / DOWN / LEFT / RIGHT direction buttons to scroll and select the image you wish to view. 3) Press the SHUTTER button to enlarge the selected image full size. 20 The following are the menus that appear in your camera’s Photo Playback Mode: Delete Menu While in the Playback Mode, you can quickly delete pictures from your camera through the Delete menu. You can delete a single photograph / video clip, or delete all the photographs / video clips in the SD card. To delete a captured image: 1. Press the Playback ( ) button to enter the Playback mode. 2. Press the LEFT or RIGHT button to select a photograph or video you would like to delete. 3. Press the MENU/Delete button( )and select “Delete This Image(Video)” or “All” . 4. Press the SHUTTER button, then select OK to confirm. 5. Press the MENU button to exit. NOTE: Select “All” and Press the SHUTTER button to confirm: all the pictures and videos will be deleted. To access the additional Photo Playback menus, press the MENU ( ) button in Playback mode, then press again and hold the MENU button until the following menu options display. Delete Menu See above section. Protect Menu Pictures and Videos taken with your camera can be protected or “locked” to prevent any deletion or alteration being made to the files. 1) Press the Playback ( ) button to enter the Playback mode. 21 2) Press the LEFT or RIGHT button to select a photograph or video you would like to Protect/Lock. 3) Press the MENU button then hold and press again to until the Menu options are shown. 4) Press the W/Down ( 5) Press the SHUTTER button to confirm and view the following Protect menu options: ) button to highlight the Protect menu option. Lock, Unlock, Lock all, Unlock All 6) Press the T/Up ( ) button or the W/Down ( ) button to scroll between the various options, then press the Shutter button to save your selected option and return to the Playback Menu screen. 7) Press the MENU button to exit. NOTE: Locked images appear with a key symbol while viewing the image in Playback mode. Locked images cannot be deleted. You must first unlock the image(s) and then select the delete option. Slide Show Menu You can view a Slide Show of all the pictures taken with your camera. The Slide Show menu allows you to set the interval length of time that each picture will display during the Slide Show. 1) Press the Playback ( ) button to enter the Playback Mode. 2) Press the MENU button then hold and press again to until the Menu options are shown. 3) Press the W/Down ( 4) Press the SHUTTER button to confirm and view the following Slide Show menu options: ) button to highlight the Slide Show menu option. 2 seconds, 5 seconds, 8 seconds 5) Press the T/Up ( ) button or the W/Down ( ) button to scroll between the various options, then press Shutter button to save your selected option and begin the Slide Show. 6) Press the Shutter button to stop the Slide Show and return to Playback Mode. 22 The Video Capture Mode allows you to capture videos with your digital camera. When the camera is first powered ON, the camera will be in Photo Capture Mode. Press the MODE button once to access the Video Capture Mode. 1) While in Video Capture Mode use the LCD display to direct the camera at the scene you would like to capture. 2) Press the T/Zoom In and W/Zoom Out buttons to better set the camera display if desired. 3) Press the Shutter button on the top of the camera to START the video capture. 4) You will see a red icon at the top of the LCD indicating that the record is in progress. 5) To STOP the video record, press the Shutter button again. 6) The video will automatically be saved to the camera’s Micro SD card. 23 The Playback Mode allows you to review and edit photos and videos that you’ve already taken with you camera. When you first turn on the camera, the camera will be in Photo Capture mode by default. Press the Playback button to enter the Playback Mode. The latest captured image appears on the LCD screen. If there are no images stored, a message (No File) appears. 1) Select your video: Once in Playback mode, press the LEFT or RIGHT direction buttons to scroll through the images on your camera’s memory card until you find the video you would like to view. Each captured image (video and photo) is displayed on the LCD screen. Videos appear with a video icon on the top left of the LCD screen. 2) Play your selected video: Press the Shutter button to START playing the video. Press the Shutter button again to PAUSE the video and to continue playing and pausing as needed. To fully STOP the video and restore the icons to the LCD, press the UP button. While the Video is playing all the icons on the top section of the LCD disappear. Easily navigate and select the image you wish to view by using the Thumbnail View. The images on your camera will be displayed in a 3 X 3 matrix where you can use the direction buttons to scroll and select images from the thumbnails. 1) Press the W/Zoom Out button All the images on your camera will appear in the Thumbnail View. 2) Use the UP / DOWN / LEFT / RIGHT direction buttons to scroll and select the image you wish to view. 24 3) Press the SET button to enlarge the image full size. 4) Once the selected video is full size you can play and view the video. Each camera mode has a set of menus specific to that mode. The general Camera Settings can also be accessed from the menu. Photo Capture, Video Capture and Playback Mode Menus: 1) Press the MENU ( 2) Press the T/Up ( ) button to open the menus for the current mode. ) button or the W/Down ( ) button to scroll between the various menus for the current mode. 3) Press the SHUTTER button to select and open the highlighted menu option. 4) Press the T/Up ( ) button or the W/Down ( ) button to scroll between the various options within the selected menu. 5) Press the SHUTTER button to confirm and save the highlighted menu option. 6) Changes made to these options will remain until you decide to change them again at a later time. The selected menu option appears as an icon on the LCD. 7) At any time you can press the MENU button to exit the menus and return to the previous screen. Setup Menus (accessed from the Photo/Video Capture Mode): 1) Press the MENU ( 2) Press the 3) Press the T/Up ( /Left ( ) button to open the menus for the current mode. ) button or the /Right ( ) button or the W/Down ( ) button to select the Setup Menu ) button to scroll between the various options within the Setup menu. 4) Press the SHUTTER button to select and open the highlighted menu option. 5) Press the T/Up ( ) button or the W/Down ( ) button to scroll between the various options within the selected menu. 6) Press the SHUTTER button to confirm and save the highlighted menu option. 25 . 7) Changes made to these options will remain until you decide to change them again at a later time. 8) At any time you can press the MENU button to exit the menus and return to the previous screen. The following icons appear on the LCD screen and indicate the selected menu options and camera status. Item Function Description Photographs mode. 1 Mode selected Videos mode. Force flash: The flash is on in any environment. 2 Flash indicator Auto flash: The camera determines if the flash should be used or not. No flash: The flash is turned off. Mode (0.5m – infinity). Normal/Macro 3 mode indicator Macro mode (11cm – 18cm). 26 Self-timer 4 Shows selected Self-timer setting 14M=4320x3240; 10M = 3648x2736; Selected resolution 5 5M = 2592x1944; 3M = 2048x1536; VGA = 640x480 Super fine. Picture quality 6 Fine. Normal. The batteries are full. 7 Battery indicator 8 Zoom indicator The batteries are empty. Shows the zoom ratio in preview mode The micro SD card is inserted and will The micro SD card 9 be used as storage for PHOTO and indication 10 VIDEO White Balance Shows selected White-balance mode. Photo mode: No. of pictures that can be 11 Photo/Video counter taken. Video mode: Recording time in seconds. The following are the menus and menu options that appear in your camera’s Photo/Video Capture Modes and Setup Mode: Photo settings 14M pixel resolution 4320x3240; 10.0M pixel resolution 3648x2736; 5.0M pixel resolution 2592x1944; 3.0M pixel resolution 2048 x 1536 VGA resolution 640 x 480 Resoluti on Quality Super Fine/Fine/Normal 27 Picture quality setting Metering Center/Multi/Spot Metering setting Auto Automatic white balance White balance selected for Daylight daylight surrounding White balance selected for White Cloudy cloudy surrounding balance White balance selected for Tungsten tungsten lighting White balance selected for Fluorescent fluorescent surrounding ISO Auto/100/200/400/800 Sensitivity selection Exposur ±2.0, ±5/3, ±4/3, ±1.0, ±2/3, Exposure setting e ±1/3, 0 Self On/Off Self timer setting Hard/ Normal/ Soft Sharpness setting Timer Sharpne ss Normal/ B&W/ Sepia/ Negative/ Lomo/ Pencil Effect Effect setting Sketch/ Red/ Green/ Blue/ Vivid Date On/ Off Date stamp setting On/ Off Quick view setting Movie VGA 640 x 480 Video resolution setting Size QVGA 320 x 240 up Auto Automatic white balance Stamp Quick View Video White balance White balance selected for Daylight daylight surrounding 28 White balance selected for Cloudy cloudy surrounding White balance selected for Tungsten tungsten lighting White balance selected for Fluorescent fluorescent surrounding Sounds Off/On Sounds setting Frequen Select power frequency in 50Hz / 60Hz cy your location Power Off / 1Minute / 3 Minutes Auto power off selection Save English/ French/ Languag Display language Setup Deutsch/Italian/Spanish/ e selection Portuguese/Japanese Date/Tim YY/MM/DD Date or time setting e Format the memory Format Yes/No location selection. Reset All Yes/No Reset all setting Version See the firmware version 29 1) Insert the installation CD into your CD-ROM drive. On PC: The Polaroid Instant Memories Installer window appears. If the window does not appear, open the application’s CD/DVD drive and click on “Setup.exe” to launch the installer. On Macintosh: Click the icon that appears on the desktop to install the Polaroid Instant Memories the click “Continue”. 2) Please review the license terms. PC: Click the “I accept the terms of the License Agreement” and then click “Next” to continue. MAC: Click “Continue” to accept the license agreement. 3) On PC: Let the “Polaroid Instant Memories” installer create the folder to where the program will be installed, and then click “Install”. On Mac: Click “Install”. 4) Please wait while the application continues the installation process on your computer. Follow all instructions. 5) On PC: Click the “Close” button when the installation is complete. The application automatically opens. On MAC: After the installation is complete, the application automatically opens. 6) If you closed the application, click on Polaroid Instant Memories desktop icon or open and run the application from the Programs menu on your computer. 30 1) Use the USB cable that came with your camera to connect your camera to your computer. 2) Power the camera ON. 3) The first time you connect the device to the computer you will have to wait a few seconds until the computer recognizes the device. An SD card needs to be inserted. Do not disconnect the cable during transfer. Doing so will cancel the transfer of any files on their way to your computer. 1) Select the “Get Images” button from the Main menu. 2) The “Get Images from device” window opens. 3) You can select to download photos, videos or both. 4) Select your camera (removable disk) from the device window. If your camera is the only 31 USB device connected then it will be selected automatically. 5) Select a location on the computer where to place the new photo and video files. 6) Add the new photo and video files to albums if desired. 7) Select to remove the media files from the selected device (removable disk) after the import. 8) Click the “Get Images” button to transfer the photos and videos from your camera to your computer. 9) A media download progress bar appears on the bottom left showing the number of media files downloading to your computer. A message appears when the download is complete. 10) The photo and video files that you selected are now downloaded to your computer to the selected folder and albums ready for your use. Using the Polaroid Instant Memories, you can: Upload and manage photos and videos to and from the most popular photo sharing and social networking sites - Facebook, Flickr, Picasa, MySpace, Photobucket, Twitpic, Twitgoo and YouTube Seamlessly transfer photos and videos from one social network to another Organize your images by creating offline and online albums Edit images using automatic and manual tools For more details on how to use the Polaroid Instant Memories open the “Help” from the menu option. 32 1) Use the USB cable that came with your camera to connect your camera to your computer. 2) MSDC appears on the LCD. 3) A window appears with a list of options, select “Open folder to view files” and click OK. 4) Open the DCIM folder and the folder inside to view the media files. 5) Select the media and copy the files from this folder into your computer. Optionally, select the files and choose Copy from the Edit menu. Then select a folder and choose Paste from the Edit menu. 6) We recommend that you copy the images into the Pictures/My Pictures folder and the videos into the Videos/My Videos folder. 7) Do not disconnect the cable during transfer. Doing so will cancel the transfer of any files on their way to your computer. 1) Use the USB cable that came with your camera to connect your camera to your computer. 2) MSDC appears on the LCD. 3) The camera’s device icon appears on the desktop. 4) Click on the device icon and open the DCIM folder and the folder inside to view the media files. 5) Select the files and drag them into your computer. Optionally, select the files and choose Copy from the Finder’s Edit menu. Then select a folder and choose Paste from the Edit menu. 6) We recommend that you copy the images into the Pictures folder and the videos into the Movies folder. 7) Do not disconnect the cable during transfer. Doing so will cancel the transfer of any files on their way to your computer. 33 NOTE: Please check your device packaging for compatibility with the iPad. Apple iPad Camera Connection: For models that are compatible with the iPad, photos and videos can be imported from your digital camera to your iPad by following either one of the options below: 1) Connecting your digital camera to your iPad using an iPad Camera Connector: Plug the Camera Connector into the dock connector port on your iPad, and then attach your digital camera using a USB cable (included) to the Camera Connector. NOTE: The iPad Camera Connector is not included. This item may be purchased separately. 2) Using an iPad SD Card Reader: Connect the SD Card Reader to your iPad, then insert your digital camera's SD Memory card into the slot to import photos and videos directly from your camera's SD card. NOTE: The iPad SD Card Reader is not included. This item may be purchased separately. After you make the connection, your iPad automatically opens the ‘Photos’ application. This allows you to choose which photos and videos to import and to organize them into albums. The digital camera is a delicate device. Please handle your camera with care to avoid damaging it. Do not expose your camera to heat sources. 34 This warranty covers the original consumer purchaser only and is not transferable. This warranty covers products that fail to function properly UNDER NORMAL USAGE, due to defects in material or workmanship. Your product will be repaired or replaced at no charge for parts or labor for a period of one year. Damages or malfunctions not resulting from defects in material or workmanship and damages or malfunctions from other than normal use, including but limited to, repair by unauthorized parties. Call 877-408-0033 or Visit our website at www.polaroid.com. To receive Warranty service along with the name and address of an authorized product service center, the original consumer purchaser must contact us for problem determination and service procedures. Proof of purchase in the form of a bill of sale or receipted invoice, evidencing that the Product is within the applicable Warranty period(s), MUST be presented in order to obtain the requested service. It is your responsibility to properly package and send any defective products along with a dated copy of proof of purchase, a written explanation of the problem, and a valid return address to the authorized service center at your expense. Do not include any other items or accessories with the defective product. Any products received by the authorized service center that are not covered by warranty will be returned unrepaired. 35 NO WARRANTIES, WHETHER EXPRESS OR IMPLIED, INCLUDING, BUT NOT LIMITED TO, ANY IMPLIED WARRANTIES OF MERCHANTABILITY OR FITNESS FOR A PARTICULAR PURPOSE, OTHER THAN THOSE EXPRESSLY DESCRIBED ABOVE SHALL APPLY. DISTRIBUTOR FURTHER DISCLAIMS ALL WARRANTIES AFTER THE EXPRESS WARRANTY PERIOD STATED ABOVE. NO OTHER EXPRESS WARRANTY OR GUARANTY GIVEN BY ANY PERSON, FIRM OR ENTITY WITH RESPECT TO THE PRODUCT SHALL BE BINDING ON DISTRIBUTOR. REPAIR, REPLACEMENT, OR REFUND OF THE ORIGINAL PURCHASE PRICE - AT DISTRIBUTOR’S SOLE DISCRETION - ARE THE EXCLUSIVE REMEDIES OF THE CONSUMER. IN NO EVENT WILL DISTRIBUTOR, ITS MANUFACTURERS, OR PLR IP HOLDINGS, LLC BE LIABLE FOR ANY INCIDENTAL, DIRECT, INDIRECT, SPECIAL, PUNITIVE OR CONSEQUENTIAL DAMAGES (SUCH AS, BUT NOT LIMITED TO, DAMAGES FOR LOSS OF PROFITS, BUSINESS, SAVINGS, DATA OR RECORDS) CAUSED BY THE USE, MISUSE OR INABILITY TO USE THE PRODUCT. EXCEPT AS STATED HEREIN, NO OTHER WARRANTIES SHALL APPLY. NOTWITHSTANDING THE FOREGOING, CONSUMER’S RECOVERY AGAINST DISTRIBUTOR SHALL NOT EXCEED THE PURCHASE PRICE OF THE PRODUCT SOLD BY DISTRIBUTOR. THIS WARRANTY SHALL NOT EXTEND TO ANYONE OTHER THAN THE ORIGINAL CONSUMER WHO PURCHASED THE PRODUCT AND IS NOT TRANSFERABLE. Some countries, states or provinces do not allow the exclusion or limitation of incidental or consequential damages or allow limitations on warranties, so limitation or exclusions may not apply to you. This warranty gives you specific legal rights, and you may have other rights that vary from state to state or province to province. Contact your authorized retailer to determine if another warranty applies. This product is manufactured, distributed and sold by SAKAR International, Inc. Polaroid, Polaroid & Pixel, Made in Polaroid and Polaroid Classic Border Logo are trademarks of PLR IP Holdings, LLC, used under license. All other trademarks are the property of the respective owner, who has not sponsored, endorsed or approved this product. PLR IP Holdings, LLC does not manufacture this product or provide any Manufacturer's Warranty or support. 36 For technical support issues please visit our website at www.polaroid.com. For further assistance, you can also call our technical support department toll free at 877-408-0033, or for e-mail support, please contact us at [email protected]. Q: I have taken photos and selected the “Get Images” button. I get a message that the images were successfully transferred but the photos do not appear on my computer. What do I do? First ensure that you have in fact taken photos. Press the Shutter button to take some sample photos and then try downloading them again. With test photos (if applicable to your camera), if the camera's power is off before you upload them to the computer, the photos are not stored in the camera’s memory. These photos should be uploaded quickly before the camera's power is off. If the photos are saved to the SD memory card, then all the photos should appear. Q: How do I make sure I don't lose important pictures? This camera requires an SD card for normal use. If the camera's power is off, nothing will happen to the images stored on the SD memory card. We recommend always downloading your photos to your computer as soon as possible to prevent unintentional data loss. Q: I deleted images using the Polaroid Instant Memories. The images were also deleted from my computer. How do I recover images that I accidently deleted? All images deleted using the Polaroid Instant Memories are sent to your computer’s Recycle or Trash Bin and can be retrieved from there. 37 Disposal of Waste Electrical and Electronic Equipment and/or Battery by users in private households in the European Union. This symbol on the product or on the packaging indicates that this can not be disposed of as household waste. You must dispose of your waste equipment and/or battery by handling it over to the applicable take-back scheme for the recycling of electrical and electronic equipment and/or battery. For more information about recycling of this equipment and/or battery, please contact your city office, the shop where you purchased the equipment or your household waste disposal service. The recycling of materials will help to conserve natural resources and ensure that it is recycled in a manner that protects human health and environment. Battery 38 E-Waste - PLR IP Holdings, LLC, its licensees, affiliates, and Sakar International, Inc. fully supports all electronic waste initiatives. As responsible stewards of the environment, and to avoid violating established laws, you should properly dispose of this product in compliance with all applicable regulations, directives or other governances in the area where you reside. Please check with local authorities or the retailer where you purchased this product to determine a location where you can appropriately dispose of the product. You may also go to www.polaroid.com and reference Social Responsibility to learn more about the specific laws in your area and to locate a collection facility near your home. If your electronic device has internal memory on which personal or other confidential data may be stored, you may want to perform a data sanitization process before you dispose of your device to assure another party cannot access your personal data. Data sanitization varies by the type of product and its software, and you may want to research the best sanitization process for your device before disposal. You may also check with your local recycling facility to determine their data sanitization procedures during the recycling process. This device complies with the part 15 of the FCC rules. Operation is subject to the following two conditions: (1) this device may not cause harmful interference, and (2) this device must accept any interference received, including interference that may cause undesired operation. Caution: changes or modifications not expressly approved by the party responsible for compliance could void the user’s authority to operate the equipment. NOTE: This equipment has been tested and found to comply with the limits for a Class B digital device, pursuant to Part 15 of the FCC Rules. These limits are designed to provide reasonable protection against harmful interference in a residential installation. This equipment generates. Uses and can radiate radio frequency energy and, if not installed and used in accordance with instructions, may cause harmful interference to radio communications. However, there is no guarantee that interference will not occur in a particular installation. If this equipment does cause harmful interference to radio or –television reception, which can be determined by turning the equipment off and on, the user is encouraged to try to correct the interference by one or more of the following measures: - Reorient or relocate the receiving antenna. - Increase the separation between the equipment and receiver. - Connect the equipment into an outlet on a circuit different form that to which the receiver is connected. - Consult the dealer or experienced radio/TV technician for help. 39