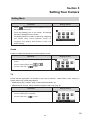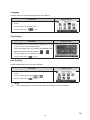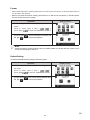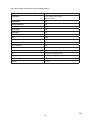
1
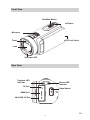
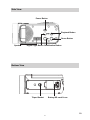
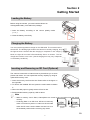
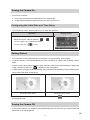
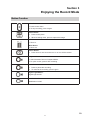
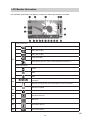
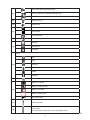
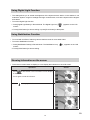
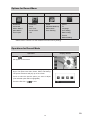
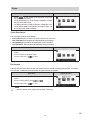
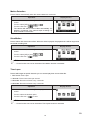
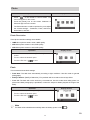
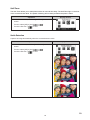
High Definition
Digital Video Camera
990HD
User’s Manual
© 2009-2011 Sakar International, Inc. All rights reserved.
Windows and the Windows logo are registered trademarks of Microsoft Corporation.
All other trademarks are the property of their respective companies.
Read This Before Using the Camera
SAFETY INSTRUCTIONS
• Do not drop, puncture or disassemble the camera.
• Use the camera with care. Rough handling may damage the internal components.
• Do not expose the camera to high temperature. Avoid contact with water.
• Please notice that the camera body may become warm when operating it for an extended period.
• Test for proper operation before using the camera.
• Only use accessories supplied by the manufacturer.
• Use only the type of battery that came with your camera.
• Remove the battery if the camera is not going to be used for long periods.
Product Information
• Designs and specifications of the camera are subject to change without notice. This includes primary
product specifications, software, and this User’s Manual.
• This User’s Manual is a general reference guide for the camera.
• The illustrations in this manual may not be the same as the actual design of your camera and those
you see on the LCD screen.
2
EN
Contents
Read This Before Using the Camera .................................................... 2
Section 1
Getting to Know Your Camera............................................ 4
Section 2
Getting Started..................................................................... 7
Section 3
Enjoying the Record Mode................................................. 9
Section 4
Enjoying the Playback Mode............................................ 21
Section 5
Setting Your Camera ........................................................ 26
Section 6
Viewing Photos and Videos on TV................................... 30
Section 7
Using the Software............................................................ 31
Section 8
Transferring Media............................................................ 34
Section 9
Sakar Warranty Card......................................................... 35
Section 10 Technical Support............................................................. 37
Section 11 Specifications and System Requirements...................... 36
Section 12 Troubleshooting................................................................ 38
Section 1
Getting to Know Your Camera
Overview
The camera is equipped with a 5 Mega Pixel sensor that can take H.264 format videos. The H.264
technology allows for extanded video recording with less memory. High quality images up to 16 megapixels can also be delivered smoothly. With a color LCD monitor, you can view and examine the videos
and photos easily.
The camera features 3” (16:9) LCD touch panel which is an ideal platform for you to operate your
camera. The menu options are accessible with your finger. With the touch panel, you can select the
options directly and quickly. The camera also features video recording at an HD resolution of 1920x1080. You can also connect it to
an HDTV via an HDMI cable, and easily playback the recorded high-definition videos on the wide screen
HDTV.
Moreover, the CD included with the camera has an advanced uploading feature. With the exclusive
Vivitar Experience Image Manager application, you can upload videos and photos captured by the
camera to online social network sites effortlessly .
ISO sensitivity and color balance can either be adjusted automatically or changed manually. A 23 x
Optical zoom helps you to control over the videos and photos you take.
The varied effect options, such as Time Lapse and Slow Motion, make recording more fun.
The built-in memory allows you to take photos and to record videos without a memory card. The memory
card slot allows users to increase the storage capacity.
Note
• Partial memory of the built-in memory is used for the camera’s Firmware code and software.
• Install the bundled software application on the CD, Vivitar Experience Image Manager, for
viewing the videos and photos on a PC.
Standard Accessories
Unpack the package and make sure all standard accessories listed are included:
• Camera
• USB Cable
• AV Cable
• HDMI Cable
• Adaptor
• Lithium-ion Rechargeable Battery
• Camera Easy Guide
• CD-ROM (Software, User’s Manual)
• Pouch
• Lens Cover Set (Lens cover and Strap)
4
EN
Front View
Tele/Wide Button
Photo Button
Microphone
Flash
LCD Touch Panel
Lens
Self-timer LED
Rear View
Playback LED
Indicator
Record LED
Indicator
TV Port
Video Button
HDMI Port
Mini USB 2.0 Port
5
EN
Side View
Power Button
Playback Button
Pause Button
Speaker
Digital Light Button Stabilization Button
Bottom View
Battery/SD card Cover
Tripod Socket
6
EN
Section 2
Getting Started
Loading the Battery
Before using the camera, you must load the Lithium-ion
rechargeable battery come within the package.
1.Insert the battery according to the correct polarity marks
( + or -).
2.Close the battery cover firmly.
Charging the Battery
You must use the supplied AC charger or the USB cable. The camera must be
turned OFF. The blinking light confirms the camera is currently charging, and
the light becomes constant after the charging is completed. In AC charging
Mode, the light will turn itself off automatically after 3~5 minutes . The full
charge time is about 4 to 5 hours. (Actual charging time may vary. It depends
on the battery conditions.)
Inserting and Removing an SD Card (Optional)
The camera comes with an internal memory that allows you to store
photos and videos. You can expand the memory capacity by using an
optional SD memory card.
1.Insert the memory card into the slot. Please refer to the figure on
the right side.
2.To remove the installed SD card, press the card inward to release
it.
3.When the card pops out, gently remove it from its slot.
4.Recommended memory capacity: 1GB or above.
Note
• When a memory card is fitted, videos/photos are saved to the card rather than the built-in
memory.
• Protecting Data on an SD Card: SD Card is read-only
when it is locked. No photos or videos can be recorded
when the SD card is locked. Make sure the lock is on
the writeable position before recording any media.
7
Writeable
position
Write-Protected
Position
EN
Turning the Camera On
• To turn on the camera:
1. Flip out the LCD panel; the camera will turn on automatically.
2. Or press [Power Button] for approximately one second to turn it on.
Configuring the Initial Date and Time Setup
• The time setting screen appears to allow you to setup date and time:
Operation
Display Screen
1. Touch Year, Month, Day, Hour, Minute, and AM/PM to set.
2. Adjust the numeric value by touching
/
3. Touch the [OK] icon to validate the setting.
4. Touch the Exit icon (
) to exit.
Getting Started
• To record video: Press [Video Button] to record video. To stop recording, press it again.
• To pause recording: Press [Pause Button] to pause recording. To continue the recording, press it
again.
• To take a photo during video recording: When recording video, press [Photo Button] to capture the
image. The Dual record icon (
) appears on the LCD monitor.
• To take a photo: Press [Photo Button] halfway down until the focusing frame turns from white to green.
Then, press it fully down to take photo.
Focusing Frame: White
Focusing Frame: Green
• To view stored videos and photos: Press [Playback Button] or touch
the Playback mode.
on the screen to switch to
Turning the Camera Off
• To turn off the camera: You can either press [Power Button] for one second, or you can place the LCD
panel back to its original position.
8
EN
Section 3
Enjoying the Record Mode
Button Function
Video Button:
1.Press to take video.
2.To stop recording, press it again.
Photo Button:
1. Press to take photo.
2. When recording video, press to capture the image.
Tele Button:
1.Zoom In.
Wide Button
1.Zoom out.
Power Button:
1. Press down for one second to turn on or turn off the camera.
Playback Button:
1.Switch between Record / Playback Mode.
2.For quick review, press it after recording.
Pause Button:
1. Press to pause the recording.
2. To continue the recording, press it again.
Digital Light Button:
Digital Light On/Off.
Stabilization Button:
Stabilization On/Off.
9
EN
LCD Monitor Information
The indicators shown below may display on LCD when videos and photos are recorded:
Video Resolution
Full HD (1080p 30 fps)
HD (720p 60 fps)
HD (720p 30 fps)
VGA (640X480)
(1)
Slow Motion (Record video at 432x240(QVGA) resolution.)
Photo Resolution
16MP
5MP
3MP
(2)
Recording time of the video that can still be taken at current
resolution
Number of images that can still be taken at current resolution
(3)
Self-timer enabled
Dual Record
(4)
Playback Mode On
(5)
Menu On
(6)
Information bar On
(7)
SD Card Inserted
10
EN
Flash Auto (Photo Recording Only)
(8)
Red Eye Reduction (Photo Recording Only)
Flash Off
(9)
Digital Light On
(10)
Stabilization
Pre-Record Mode
(11)
Time Lapse
Smile Detection
(12)
Macro Focusing On
Daylight
(13)
Fluorescent
Tungsten
Scene
Skin
Night
(14)
Backlight
Black/White
Classic
Negative
(15)
Date Printing On
Battery: full power
Battery: medium power
(16)
Battery: low power
Battery: empty power
DC power mode
(17)
Motion Detection
(18)
Zoom meter:
1X~2700X (23X Optical zoom and 120X Digital zoom)
11
EN
Note
• Stabilization, Time Lapse, and Slow Motion functions can not be used simultaneously.
• Stabilization and Night Mode functions can not be used simultaneously.
• Pre-Record, Motion Detect, Slow Motion, and Time Lapse functions can not be used
simultaneously.
Video Recording
• Press [Video Button] to start recording. When a video is being recorded, a time indicator will display
on the LCD monitor (
). To stop recording, press it again.
• To pause recording: Press [Pause Button] to pause recording (
press it again.
). To continue the recording,
• Dual record: press [Photo Button] to capture the image.The Dual record icon(
LCD monitor.
• Press [Playback Button] or touch
) appears on the
on the screen to view the recorded video.
• Four resolution settings are available:
Video Quality
Full HD (1080p 30 fps)
HD (720p 60 fps)
HD (720p 30 fps)
VGA (640X480)
Note
• The image resolution captured during video recording is the same as the video resolution.
• The flash can not be used when capturing image during movies recording.
Photo Capturing
• Press [Photo Button] halfway down until the focusing frame turns from white to green. Then, press it
fully down to take photo.
• Press [Playback Button] or touch
on the screen to view the photos.
• Three resolution settings are available:
Image Quality
16 Mega Pixels
5 Mega Pixels
3 Mega Pixels
Using Zoom Function
• The zoom magnifies images when recording video or taking photo.
1.To zoom in/out, press the Tele/Wide Button.
2.It can be set from 1X~2700X (23X Optical zoom)
12
EN
Using Digital Light Function
• The setting allows you to extend the brightness of the objects that are dark or in the shadow. It can
extend the dynamic range for backlight and high contrast sense, so that the objects will be brighter
and clearer.
• To use the Digital Light function:
1.Press [Digital Light Button] in Record Mode. The Digital Light icon(
monitor.
) appears on the LCD
2.Press [Video Button] to start recording or press [Photo button] to take photo.
Using Stabilization Function
• To record with an effect of reducing camera shake to result in more stable video.
• To use the Stabilization function:
1.Press [Stabilization Button] in Record Mode. The Stabilization icon(
) appears on the LCD
monitor.
2.Press [Video Button] to start recording.
Showing Information on the screen
• Touch the on-screen button to display or not to display the indicators on the LCD screen.
Operation
Screen
1.Touch
on the screen. The information bar will display
on the screen.
2.Touch again to hide all indicators.
3.Touch
to display the indicators.
13
EN
Options for Record Menu
Video
•
•
•
•
•
Resolution
Pre-record
Motion Detect
Slow Motion
Time Lapse
Photo
•
•
•
•
•
Resolution
Flash
Self-Timer
Smile Detect
ISO
Effect
•
•
•
•
Scene
WB(White Balance)
Macro Mode
Face Tracking
Setting*
•
•
•
•
•
•
•
Sound
TV
Language
Time Setting
Date Printing
Format
Default Setting
* Please refer to Section 5 for the detailed information about [Setting].
Operations for Record Mode
Operation
Display Screen
1.Touch
on the screen in Record Mode. The menu
will appear on the screen.
2.Touch the option icons on the screen lightly with your
finger. The options are Video, Photo, Effect, and Setting.
3.The option submenus will pop up on the screen.
4.Touch to select the specific option you want to adjust.
(The selected option will be highlighted.)
5.Touch the Exit icon (
) to exit.
14
EN
Video
Operation
Display Screen
1. Touch
on the screen in Record Mode. The menu
will appear on the screen.
2. Touch the [Video] icon on the screen. Submenu of Video
will pop out on the screen.
3. The Video submenu contains 5 options-- Resolution, Prerecord, Motion Detect, Slow Motion, and Time Lapse --for
you to adjust the camera settings.
Video Resolution
Four resolution settings are available.
• FHD (1080p 30):Record videos at 1920x1080p 30 fps resolution.
• HD+ (720p 60):Record videos at 1280x720p 60 fps resolution.
• HD (720p 30):Record videos at 1280x720p 30 fps resolution.
• VGA (640X480): Record videos at 640x480p 30 fps resolution.
Operation
Display Screen
1. In the Video menu, touch the [Resolution] icon on the
screen.
2. Touch to select the desired option.
3. Touch the Exit icon (
) to exit.
Pre-record
The Pre-record function ensures that you will not miss any critical recording opportunities. The videos
are recorded 3 additional seconds before the [Video Button] is pressed.
Operation
Display Screen
1. In the Video menu, touch the [Pre-record] icon on the
screen.
2. Touch to select [Off] or [On] (
3. Touch the Exit icon (
).
) to exit.
Note
• Aim the camera at the subject and position it securely.
15
EN
Motion Detection
Record videos automatically when the camera detects a movement.
Operation
Display Screen
1. In the Video menu, touch the [Motion Detect] icon on the
screen.
2. Touch to select [Off] or [On] (
).
3. Touch the Exit icon (
) to exit.
4. The camera will start to record video automatically if it
detects a movement. The camera stops recording if it
does not detect a movement.
Slow Motion
Record videos with slow motion effect. When the video is played, the playback time will be longer than
the actual recording time.
Operation
Display Screen
1. In the Video menu, touch the [Slow Motion] icon on the
screen.
2. Touch to select [Off] or [On] (
3. Touch the Exit icon (
).
) to exit.
Note
• Pause function can not be used when Slow Motion function is activated.
Time Lapse
Record still images at specific intervals you can set and play them as one video file.
• Off: Disable Time Lapse.
• 1 Second.: Record one frame per second.
• 3 Seconds: Record one frame every 3 seconds.
• 5 Seconds: Record one frame every 5 seconds.
Operation
Display Screen
1. In the Video menu, touch the [Time Lapse] icon on the
screen.
2. Touch to select the desired option.
3. Touch the Exit icon (
) to exit.
Note
• Pause function can not be used when Time Lapse function is activated.
16
EN
Photo
Operation
Display Screen
1. Touch
on the screen in Record Mode. The
menu will appear on the screen.
2. Touch the [Photo] icon on the screen. Submenu of
Photo will pop out on the screen.
3. The Photo submenu contains 5 options for you to adjust
the camera settings -- Resolution, Flash, Self-Timer,
Smile Detect, and ISO. --
Photo Resolution
Three photo resolution settings are available.
• 16MP:Shoot photo at 4608 x 3456, 16MP quality.
• 5MP:Shoot photo at 2592 x 1944, 5MP quality.
• 3MP:Shoot photo at 2048 x 1536, 3MP quality.
Operation
Display Screen
1. In the Photo menu, touch the [Resolution] icon on the
screen.
2. Touch to select the desired option.
3. Touch the Exit icon (
) to exit.
Flash
This camera has three flash settings.
• Flash Auto: The flash fires automatically according to light conditions. Use this mode for general
photography.
• Red Eye Reduct. (Red Eye Reduction) :The pre-flash will fire to reduce the red-eye effect.
• Flash Off: The flash will not fire under any circumstances. Use this mode when taking photo in a
place where flash photography is prohibited, or when the subject is distant (beyond the range of the
flash).
Operation
Display Screen
1. In the Photo menu, touch the [Flash] icon on the screen.
2. Touch to select the desired option.
3. Touch the Exit icon (
) to exit.
Note
The flash will be disabled automatically when the battery power is low (
17
).
EN
Self-Timer
The Self-Timer allows you to take photos with a ten-second time delay. The Self-Timer light on the front
of the camera will also blink. The speed of blinking will increase just before the photo is taken.
Operation
Display Screen
1. In the Photo menu, touch the [Self-Timer] icon on the
screen.
2. Touch to select [Off] or [On] (
3. Touch the Exit icon (
).
) to exit.
Smile Detection
Capture an image automatically when the camera detects a smile.
Operation
Display Screen
1. In the Photo menu, touch the [Smile Detect] icon on the
screen.
2. Touch to select [Off] or [On] (
3. Touch the Exit icon (
).
) to exit.
18
EN
ISO
The camera adjusts the ISO sensitivity of its images automatically. Four manual ISO sensitivity settings
are available. (800/1600/3200/6400). The larger the number is, the higher the ISO sensitivity is set.
Select a small number to shoot a smoother image. Select a large number to shoot an image in a dark
location or to shoot a subject moving at high speed.
Operation
Display Screen
1. In the Photo menu, touch the [ISO] icon on the screen.
2. Touch to select the desired option.
3. Touch the Exit icon (
) to exit.
Note
The image may become noisy when the ISO number is large.
Effect
Operation
Display Screen
1. Touch
on the screen in Record Mode. The menu
will appear on the screen.
2. Touch the [Effect] icon on the screen. Submenu of Effect
will pop out on the screen.
3. The Effect submenu contains 4 options for you to adjust
the camera settings -- Scene, White Balance, Macro
Mode, and Face Tracking.
Scene
You can select the mode according to the scene condition.
• Auto: Shoot without any special effect on the image.
• Skin: Shoot with an effect that makes skin tones more natural.
• Night: Use Night Mode for night scenes or low light conditions.
• Backlight: You can take shots when the bright light is behind the subject.
• Black/White: The image is converted to black-and-white.
• Classic: The image is converted to a sepia look.
• Negative: The image is converted as the negative of the normal.
Operation
Display Screen
1. In the Effect menu, touch the [Scene] icon on the
screen.
2. Touch to select the desired option.
3. Touch the Exit icon (
) to exit.
Note
To avoid blurry photos, place the camera on a flat, steady surface, or use a tripod when taking
shots in the Night Mode.
19
EN
White Balance
The camera adjusts the color balance of images automatically. Three manual white balance settings are
available:
• Auto: The camera automatically adjusts white balance.
• Daylight: Under outdoor condition.
• Fluorescent: Under fluorescent light condition.
• Tungsten: Under tungsten light condition.
Operation
Display Screen
1. In the Effect menu, touch the [White Balance] icon on
the screen.
2. Touch to select the desired option.
3. Touch the Exit icon (
) to exit.
Macro Mode
You can select the Macro mode for recording close-up videos and photos.
Operation
Display Screen
1. In the Effect menu, touch the [Macro Mode] icon on the
screen.
2. Touch to select [Off] or [On] (
3. Touch the Exit icon (
).
) to exit.
Face Tracking
The camera can detect human face(s) and focus on the face(s) automatically. This function works
with video recording and photo capturing. It is wonderful for capturing beautiful portraits in a backlight
situation.
Operation
Display Screen
1. In the Effect menu, touch the [Face Tracking] icon on
the screen.
2. Touch to select [Off] or [On] (
3. Touch the Exit icon (
).
) to exit.
Note
When Face Tracking is activated, aim the camera at the human face(s). The focus frame(s) will
appear on the LCD before the [Video Button]/[Photo Button] is pressed.
20
EN
Section 4
Enjoying the Playback Mode
Button Function
The Buttons have the following functions in Playback Mode.
Video Button:
1.Switch to Record Mode.
Tele Button:
1.Zoom In.
Wide Button
1.Zoom out.
Playback Button:
1.Switch between Record / Playback Mode.
2.For quick review, press it after recording.
Pause Button:
1. In Video Playback Mode, press to pause the recorded video.
21
EN
LCD Monitor Information
Indicators on the LCD screen while in Playback Mode:
Video Playback Mode
Photo Playback Mode
Video Resolution
Full HD (1080p 30 fps)
HD (720p 60 fps)
HD (720p 30 fps)
VGA (640X480)
(1)
Slow Motion (432x240(QVGA))
Photo Resolution
16MP
5MP
3MP
Dual Record (The image resolution captured during videos recording
is the same as the video resolution.)
(2)
(3)
Video playback time counter.
Current number/ Total number of photo/video.
Volume
Return
(4)
Video stop
(5)
Previous video/photo
(6)
Video fast rewind
22
EN
Video play
(7)
Video pause
(8)
Video fast forward
(9)
Next video/photo
(10)
Delete
(11)
(12)
Slide Show
Slide Show stop
Magnification Indicator
Operations for Playback Mode
The Playback Mode allows you to view and manage your captured videos and photos from the built-in
memory or from the SD Card.
Operation
1. Press [Playback Button] or touch
switch to the Playback mode.
Display Screen
on the screen to
2. Touch to select the specific option.
3. Touch (
) to back to Record Mode.
23
EN
Video Playback
Operation
Display Screen
1. In the Video Playback mode, touch
/
to play
or pause the videos.
2. Sweep to the right or touch
to go to the previous
video; sweep to the left or touch
to go to the next
video.
3. While playing videos, touch
/
to fast rewind/
forward.
4. Touch
to increase the volume; touch
to
reduce the volume.
5. Touch (
) to exit.
Note
• When the LCD is idle for a few seconds, the playback function icons will disappear
automatically.
Delete Videos
Operation
1. Touch Display Screen
to go to the Delete option screen.
2. Touch [Yes] to delete the current video or [No] to cancel
the operation and to exit; touch [All (Delete All)] to
delete all videos.
3. Before all videos are about to be deleted, a confirmation
screen will appear; touch [Yes] to execute the operation
and [No] to cancel the operation.
Note
• If a memory card has been inserted, you can only delete those videos stored on the card.
• Videos on a written-protected memory card cannot be deleted.
24
EN
Photo Playback
Operation
Display Screen
1. In the Photo Playback mode, sweep to the right or touch
to go to the previous photo; sweep to the left or
touch
to go to the next photo.
2. While the photo is selected, press [Tele Button] to magnify.
(The Magnification Indicator appears on the screen)
3. To navigate the magnified photo, press on the screen and
move as well. (The inner Magnification Indicator turns
red)
4. Press [Wide Button] to zoom out or exit the magnification
mode.
5. Touch
/
to start or to stop the Slide Show.
6. Touch (
) to exit.
Note
• When the LCD is idle for a few seconds, the playback function icons will disappear
automatically.
Delete Photo
Operation
1. Touch
Display Screen
to go to the Delete option screen.
2. Touch [Yes] to delete the current photo or [No] to cancel
the operation and to exit; touch [All (Delete All)] to delete
all photos.
3. Before all photos are deleted, a confirmation screen will
appear; touch [Yes] to execute the operation and [No] to
cancel the operation.
Note
• If a memory card has been inserted, you can only delete those photos stored on the card.
• Photos on a written-protected memory card cannot be deleted.
25
EN
Section 5
Setting Your Camera
Setting Menu
Operation
Display Screen
1. Touch
on the screen in Record Mode. The menu
will appear on the screen.
2. Touch the [Setting] icon on the screen. The Setting
Submenus will appear on the screen.
3. The Setting submenu contains 7 options for configuring
your camera setup: Sound (operation sound), TV,
Language, Time Setting, Date Printing, Format, and
Default Setting.
Sound
Enable or disable the keypad tone and the operation sound.
Operation
Display Screen
1. In the Setting menu, touch the [Sound] icon on the
screen.
2. Touch to select [Off] or [On] (
3. Touch the Exit icon (
).
) to exit.
TV
Ensure that the appropriate TV standard of your area is selected – either NTSC or PAL. Wrong TV
system setting may cause image flickers.
• NTSC(60Hz):USA, Canada, Japan, South Korea and Taiwan, etc.
• PAL(50Hz):UK, Europe, China, Australia, Singapore and Hong Kong, etc.
Operation
Display Screen
1. In the Setting menu, touch the [TV] icon on the screen.
2. Touch to select [PAL] or [NTSC].
3. Touch the Exit icon (
) to exit.
26
EN
Language
Use this option to select the language of the user interface.
Operation
Display Screen
1. In the Setting menu, touch the [Language] icon on the
screen.
2. Touch to select the desired option.
3. Touch the Exit icon (
) to exit.
Time Setting
Operation
Display Screen
1. In the Setting menu, touch the [Time Setting] icon on the
screen to enter the time setting screen.
2. Touch Year, Month, Day, Hour, Minute, and AM/PM to set.
3. Adjust the numeric value by touching
/
4. Touch the [OK] icon to validate the setting.
5. Touch the Exit icon (
) to exit.
Date Printing
Imprint the date and time on the video and photo.
Operation
Display Screen
1. In the Setting menu, touch the [Date Printing] icon on the
screen.
2. Touch to select [Off] or [On] (
3. Touch the Exit icon (
).
) to exit.
Note
• Date Printing function can not be used when Slow Motion function is activated.
27
EN
Format
• Yes: Format the built-in memory (when there is no SD card in the camera ) / SD Card (when there is
an SD card in the camera).
• No: Do not format the built-in memory (when there is no SD card in the camera ) / SD Card (when
there is an SD card in the camera).
Operation
Display Screen
1. In the Setting menu, touch the [Format] icon on the
screen.
2. Touch to select [Yes] or [No] (
). (Touch [Yes] to enter the confirmation screen.)
3. Touch the [Yes
] icon to execute the operation and
the [No
] icon to cancel the operation.
Note
All the data will be erased if the SD card is formatted. Make sure all the data are copied to your
PC before formatting the SD card.
Default Setting
To restore the default factory setting, select this option.
Operation
Display Screen
1. In the Setting menu, touch the [Default Setting] icon on
the screen.
2. Touch to select [Yes] or [No] (
). (Touch [Yes]
to enter the confirmation screen.)
3. Touch the [Yes
] icon to execute the operation and
the [No
] icon to cancel the operation.
28
EN
The following table indicates the camera’s default settings
Setting
Resolution
Default Factory Setting
FHD (1080p 30) for Video
5MP for Photo
Stabilization
Off
Motion Detection
Off
Slow Motion
Off
Time Lapse
Off
Self-Timer
Off
Smile Detection
Off
ISO
Auto
Scene
Auto
White Balance
Auto
Face Tracking
Off
Flash
Off
Sound
On
TV
Depends on shipping area
Language
Depends on shipping area
Date Printing
Off
Volume
Level 6
29
EN
Section 6
Viewing Photos and Videos on TV
Connecting to a High-Definition 16:9(Wide) TV
1.Connect the HDMI cable to your camera’s HDMI Out port.
2.Connect the other end of the cable to a television.
3.Set the video input source of your TV to “HDMI.”
4.The steps for viewing stored videos and photos on HDTV are exactly the same as for viewing them
on the LCD monitor.
Connecting to a non-high-definition 4:3 TV
1.Connect one end of the AV cable to your camera’s AV out port.
2.Connect the other end of the cable to a television.
3.The steps for viewing stored videos and photos on TV are exactly the same as for viewing them on
the LCD monitor.
30
EN
Section 7
Using the Software
Installing the Software
You must be connected to the internet to install and run the Vivitar Experience Image Manager software.
1. Insert the installation CD into your CD-ROM drive. The installation screen should automatically open.
2. On PC: The Vivitar Experience Image Manager Installer window appears. If the window does not
appear, open the application’s CD/DVD drive and click on “Setup.exe” to launch the installer.
3. On Macintosh: Click the icon that appears on the desktop to install the Vivitar Experience Image
Manager.
4. If you do not have internet access at the time of inserting the CD-ROM, connect to the internet and
then click the “Install Vivitar Experience Image Manager” button to begin the installation.
Note
• If you do not have internet access, you can still download media from the camera. Click the
“How to transfer photos and videos from my camera to my computer” button for instructions.
5. If you have internet access, the “Choose your language” window opens, choose your language
and click “Next” to open the next window.
6. Select your camera model from the list and click “Next” to open the next window.
7. Click “Next” to confirm your camera model selection and to install the application.
8. Please wait while the application is being installed on your computer.
9. Please review the license terms.
On PC and Macintosh: Click the “I accept the terms of this license agreement” and then click
31
EN
“Next” to continue.
10. On PC only: Let the “Vivitar Experience Image Manager” installer create the folder to where the
program will be installed, and then click “Install”.
11. Please wait while the application continues the installation process on your computer.
12. On PC: Click the “Close” button when the installation is complete. Click the “Launch Vivitar Experience Image Manager” to open the application.
13. On Macintosh: Click the “Quit” button when the installation is complete.
Click the “Launch Vivitar Experience Image Manager” to open the application.
14. If you close the application you can run the Vivitar Experience Image Manager from the Programs
(PC) or Applications (Mac) menu on your computer. Connecting the Camera to a Computer
1.Connect the computer and camera with the supplied mini USB 2.0 cable.
2.Power the camera ON.
3.The first time you connect the device to the computer you will have to wait a few seconds until the
computer recognizes the device.
32
EN
Getting Photos and Videos from your Camera to your Computer
Do not disconnect the cable during transfer. Doing so will cancel the transfer of any files on their way to
your computer.
1. Select the “Get Images” button from the Main menu.
2. The “Get Images from device” window opens.
3. You can select to download photos, videos or both.
4. Select your camera (removable disk) from the device window. If your camera is the only USB device
connected then it will be selected automatically.
5. Select a location on the computer where to place the new photo and video files.
6. Add the new photo and video files to albums if desired.
7. Select to remove the media files from the selected device (removable disk) after the import.
8. Click the “Get Images” button to transfer the photos and videos from your camera to your computer.
9. A media download progress bar appears on the bottom left showing the number of media files
downloading to your computer. A message appears when the download is complete.
10. The photo and video files that you selected are now downloaded to your computer to the selected
folder and albums ready for your use.
Get Started!
Using the Vivitar Experience Image Manager, you can:
• Upload and manage photos and videos to and from the most popular photo sharing and social
networking sites - Facebook, Flickr, Picasa, MySpace, Photobucket, Twitpic, Twitgoo and YouTube
• Seamlessly transfer photos and videos from one social network to another
• Organize your images by creating offline and online albums
• Edit images using automatic and manual tools
• Use automatic “Geotagging” with built in Google Maps
For more details on how to use the Vivitar Experience Image Manager open the Help file or click the
“Take the Tour” button on the application`s Home page.
33
EN
Section 8
Transferring Media
Transferring Videos and Photos: Using Windows
To transfer media from your camera to your computer manually using Windows:
1. Use the USB cable that came with your camera to connect your camera to your computer.
2. MSDC appears on the LCD.
3. A window appears with a list of options, select “Open folder to view files” and click OK.
4. Open the DCIM folder and the folder inside to view the media files.
5. Select the media and copy the files from this folder into your computer. Optionally, select the files
and choose Copy from the Edit menu. Then select a folder and choose Paste from the Edit menu.
6. It is recommended that you copy the images into the Pictures/My Pictures folder and the videos into
the Videos/My Videos folder.
7. Do not disconnect the cable during transfer. Doing so will cancel the transfer of any files on their
way to your computer.
Transferring Videos and Photos: Using Macintosh
To transfer media from your camera to your computer manually using Macintosh:
1. Use the USB cable that came with your camera to connect your camera to your computer.
2. MSDC appears on the LCD.
3. The camera’s device icon appears on the desktop.
4. Click on the device icon and open the DCIM folder and the folder inside to view the media files.
5. Select the files and drag them into your computer. Optionally, select the files and choose Copy from
the Finder’s Edit menu. Then select a folder and choose Paste from the Edit menu.
6. We recommend that you copy the images into the Pictures folder and the videos into the Movies
folder.
7. Do not disconnect the cable during transfer. Doing so will cancel the transfer of any files on their
way to your computer.
34
EN
Section 9
Sakar Warranty Card
This warranty covers for the original consumer purchaser only and is not transferable. Products that
fail to function properly UNDER NORMAL USAGE, due to defects in material or workmanship will be
repaired at no charge for parts or labor for a period of one year from the time of purchase.
What Is Not Covered By Warranty:
Damages or malfunctions not resulting from defects in material or workmanship and damages or
malfunctions from other than normal use, including but limited to, repair by unauthorized parties,
tampering, modification or accident.
What to Do When Service Is Required:
When returning your defective product (postage pre-paid) for service, your package should include:
1)
Copy of original bill of sale
2)
A detailed written description of the problem.
3)
Your return address and telephone number (Daytime)
MAIL TO ADDRESS BELOW:
Sakar US
Sakar UK/Europe
Sakar Australia
Sakar International
Attention: Service Department
Attention: Service Department
2D, Siskin Parkway East
195 Carter Drive
4020 Middlemarch Business Park
Return faulty camera to the
Refund Counter at the store
where purchased
Edison, NJ
Coventry, CV3 4PE
08817
Section 10
Technical Support
For technical support issues please visit our website at www.vivitar.com. You can find manuals,
software and FAQ’s at the website. Can’t find what you are looking for? E-mail us at support@vivitar.
com and one of our technical support team members will answer your questions. For phone support
in the US please call 1-800-592-9541, in the UK call 0800 917 4831, in Australia call 1800-006-614. If
you would like to call from anywhere else, please visit www.vivitar.com for your local toll free number.
35
EN
Section 11
Specifications and System Requirements
Specification
Image sensor
5 Mega pixel CMOS sensor
Operation modes Video record, Photo record
Lens
Auto Focus Lens (F3.5)
Focus range
Macro Mode:1cm~120cm
Normal Mode: 1 cm ~ infinite
Zoom
1X~2700X (23X Optical zoom and 120X Digital zoom)
Shutter
Electronic
LCD monitor
3” touch LCD (16:9)
Storage media
Built-in 128MB memory (partial memory is used for firmware code and software);
SD/SDHC/SDXC card slot support (up to 64GB)
Image resolution
High 4608 x 3456 (16M pixels) (Interpolated)
Standard 2592x1944 (5M pixels)
Low 2048x1536 (3M pixels)
Video resolution
FHD (1080p 30) 1920X1080(30fps)
HD+ (720p 60) 1280X720(60fps)
HD (720p 30) 1280X720(30fps)
VGA (640X480) 640X480(30fps)
White balance
Auto/Manual (Daylight, Fluorescent, Tungsten)
ISO
Auto/800/1600/3200/6400
Self-timer
10 seconds delay
Flash
Flash Auto/Red-Eye-Reduction/Flash Off
File format
Photo: JPG
Video: AVI
Image play
Single image/Slide Show
PC interface
Mini USB 2.0 port
TV out
NTSC/PAL selectable, HDMI
Battery
Lithium-ion rechargeable battery
Dimension
126mm (L) x 57mm (H) x 60mm (W)
Weight
340g ( without battery)
36
EN
System requirements
WINDOWS OS
To be able to download photos and videos to your PC, you will need the following minimum configuration:
•
Microsoft® Windows XP with Service Pack 3, Windows Vista with Service Pack 1 or Windows 7
•
Pentium® 4 processor (or above)
•
512 MB of RAM, with 250 MB of free hard disk space
•
16-bit Color monitor, 1024 X 768 recommended screen resolution
•
CD-ROM Drive
•
QuickTime® 6 or higher
•
Microsoft® Internet Explorer 7 or higher
•
Windows Media Player 10 or higher
•
DirectX 9 or higher
•
Internet connection required
MACINTOSH OS
To be able to download photos and videos to your MAC, you will need the following minimum configuration:
•
Intel processor running Mac OS X v10.5.x or later
•
256 MB RAM, 250 MB free hard disk space
•
Display: 1024 x 768 or higher-resolution monitor
•
QuickTime® 6 or higher
•
Internet connection required
Note
The LCD screen is manufactured using extremely high-precision technology, so over 99.99% of
the pixels are operational for effective use. However, some tiny black and/or bright dots (white,
red, blue or green) may appear on the LCD screen. These dots are a normal result of the
manufacturing process, and do not affect the recording.
37
EN
Section 12
Troubleshooting
1. The flash is not working.
The battery power is low.
The camera is in DC power mode.
In flash auto mode, camera flash fires ONLY when necessary (in dark setting as example).
2. The files on the memory card do not display smoothly when the LCD shows the “!” marking.
The “!” means the SD card is low speed or is having wrong content inside. The way to solve this
condition is to format SD card by the camera instead of a PC (Please refer to the detailed Format
instruction in Section 5).
Or please change the SD/SDHC/SDXC card to a high speed one.
3. Why do some of my indoor photos look blurry and dark?
The camera extends photo exposure time under low light/ indoor condition. Keep the camera (and
the target subject) steady for several seconds when taking photos. The shutter will sound when
photos are being taken.
4. How do I charge battery?
You must use the supplied AC charger or the USB cable. The camera must be turned OFF. The
blinking light confirms the camera is currently charging, and the light becomes constant after the
charging is completed. In AC charging Mode, the light will turn itself off automatically after 3~5
minutes . The full charge time is about 4 to 5 hours. (Actual charging time may vary. It depends on
the battery conditions.)
5. After connecting the USB cable to the computer, ……
A. The disk [DV] indicates the internal memory of the camera. (The disk label may be different
according to different model and PC OS.)
B. [Removable Disk] indicates the external memory. (Under the circumstances of within the SD/
SDHC/SDXC card in the camera)
6. I have taken photos and selected the “Get Images” button. I get a message that the images
were successfully transferred but the photos do not appear on my computer. What do I
do?
First ensure that you have in fact taken photos. Press the Shutter button to take some sample
photos and then try downloading them again.
With test photos if the camera powers off before you upload them to the computer the photos are
not stored in the camera`s memory. These photos should be uploaded quickly before the camera
powers off. If the photos are saved to the SD memory card then all the photos should appear.
38
EN
7. How do I make sure I don’t lose important pictures?
We recommend always downloading your photos to your computer as soon as possible to prevent
unintentional data loss. 8. I deleted images using the Vivitar Experience Image Manager. The images were also
deleted from my computer. How do I recover images that I accidently deleted?
All images deleted using the Vivitar Experience Image Manager are sent to your computer`s
Recycle or Trash Bin and can be retrieved from there.
39
EN