1
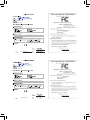
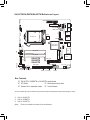
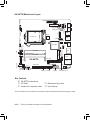
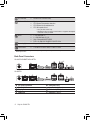
GA-H81TN GA-B85TN GA-H87TN GA-Q87TN User's Manual 12QC1-H81TN0-00R For more information, please visit GIGABYTE's website. Motherboard GA-H81TN Motherboard GA-H81TN Sept. 23, 2013 Sept. 23, 2013 Motherboard GA-B85TN Motherboard GA-B85TN Sept. 23, 2013 Sept. 23, 2013 Motherboard GA-H87TN Motherboard GA-H87TN Sept. 23, 2013 Sept. 23, 2013 Motherboard GA-Q87TN Motherboard GA-Q87TN Sept. 23, 2013 Sept. 23, 2013 FUSB2_4 GA-H81TN/GA-B85TN/GA-H87TN Motherboard Layout PCIE4X SPKR EXT_CON CLR_CMOS Socket 1150 FP_AUDIO LPT FUSB2_2 DMIC_CON CODEC BIOS FUSB2_3 USBX_1 BATTERY HDMI Intel H81j/ B85kH87l GA-H81TN GA-B85TN GA-H87TN SATA_PWR SYS_PANEL CPU_FAN FUSB2_1 Realtek GbE LAN (Note) SO_DIMM2 DP ® SO_DIMM1 MPCIE1X LCD_VCC BL_SW WF_LED FPD_PWR MON_SW LVDS LINE_OUT USB3_1 COM1 ® FPD MIC_IN LAN SYS_FAN SATAIII_2 SATAIII_3kl FUSB2_5 SATAIII_0 SATAIII_1 ATX_19V DC_IN FUSB3 Box Contents 55 GA-H81TN, GA-B85TN or GA-H87TN motherboard 55 I/O Shield 55 Motherboard driver disk 55 Screws kit for expansion cards 55 User's Manual * The box contents above are for reference only and the actual items shall depend on the product package you obtain. MM Only for GA-H81TN. NN Only for GA-B85TN. OO Only for GA-H87TN. (Note) The chip is located on the back of the motherboard. FUSB2_4 GA-Q87TN Motherboard Layout PCIE4X SPKR EXT_CON CLR_CMOS BIOS Socket 1150 FUSB2_3 LINE_OUT USBX_1 USB3_1 COM1 BATTERY HDMI Realtek GbE LAN (Note) SO_DIMM2 GA-Q87TN MON_SW LAN SYS_FAN LAN SATAIII_2 SATAIII_3 FUSB2_5 SATA_PWR SYS_PANEL CPU_FAN DP ® MPCIE1X LCD_VCC SO_DIMM1 FUSB2_1 Intel® Q87 BL_SW WF_LED FPD_PWR LVDS FPD FP_AUDIO LPT FUSB2_2 DMIC_CON CODEC MIC_IN SATAIII_0 SATAIII_1 ATX_19V DC_IN FUSB3 Intel® GbE LAN (Note) Box Contents 55 GA-Q87TN motherboard 55 I/O Shield 55 Screws kit for expansion cards 55 Motherboard driver disk 55 User's Manual * The box contents above are for reference only and the actual items shall depend on the product package you obtain. (Note) The chip is located on the back of the motherboard. Product Specifications CPU Support for Intel® Core™ i7 processors/Intel® Core™ i5 processors/ Intel® Core™ i3 processors/Intel® Pentium® processors/Intel® Celeron® processors in the LGA1150 package (Supports up to 65W) (Go to GIGABYTE's website for the latest CPU support list.) L3 cache varies with CPU Chipset Intel® H81j/B85k/H87l/Q87m Express Chipset Memory 2 x 1.5V DDR3 SO-DIMM sockets supporting up to 8 GB of system memory *Due to a Windows 32-bit operating system limitation, when more than 4 GB of physical memory is installed, the actual memory size displayed will be less than the size of the physical memory installed. Dual channel memory architecture Support for DDR3 1600/1333 MHz memory modules (Go to GIGABYTE's website for the latest supported memory speeds and memory modules.) Onboard Graphics Chipset: -1 x HDMI 1.3 port, supporting a maximum resolution of 4096x2160 -1 x DisplayPort, supporting a maximum resolution of 2560x1600 - 1 x LVDS connector Audio Realtek® ALC887 codec High Definition Audio 2/4/5.1/7.1-channel *To configure 5.1/7.1-channel audio, you have to use an HD front panel audio module and enable the multi-channel audio feature through the audio driver. LAN Expansion Slots Storage Interface MM NN OO PP Only for GA-H81TN. Only for GA-B85TN. Only for GA-H87TN. Only for GA-Q87TN. 1 x Realtek® GbE LAN chip (10/100/1000 Mbit) (LAN1) jklm 1 x Intel® GbE LAN chip (10/100/1000 Mbit) (LAN2) m 1 x PCI Express x4 slot (Supports 25W only) (The PCIEX4 slot conforms to PCI Express 3.0 standard.) 1 x Mini PCI Express x1 slot Chipset: -2 x SATA 6Gb/s connectors (SATAIII 0/1); 1 x SATA 3Gb/s device (SATAII 2) j -3 x SATA 6Gb/s connectors (SATAIII 0/1/2); 1 x SATA 3Gb/s device (SATAII 3) k -4 x SATA 6Gb/s connectors (SATAIII 0/1/2/3) lm - 1 x mSATA connector USB Internal Connectors Back Panel Connectors MM NN OO PP Only for GA-H81TN. Only for GA-B85TN. Only for GA-H87TN. Only for GA-Q87TN. Chipset: - 2 USB 3.0/2.0 ports; 7 USB 2.0/1.1 ports j - 4 USB 3.0/2.0 ports; 5 USB 2.0/1.1 ports k - 6 USB 3.0/2.0 ports; 5 USB 2.0/1.1 ports lm 1 x 2-pin power connector 1 x CPU fan header 1 x system fan header 2 x SATA 6Gb/s connectors j 3 x SATA 6Gb/s connectors k 4 x SATA 6Gb/s connectors lm 1 x SATA 3Gb/s connector jk 1 x mSATA connector 1 x SATA power connector 5 x USB 2.0/1.1 headers 1 x serial port header 1 x parallel port header 1 x front panel header 1 x front panel audio header 1 x digital microphone header 1 x AIO speaker header 1 x LVDS connector 1 x LVDS drive voltage header 1 x flat panel display power header (both panel and backlight inverter) 1 x flat panel display power connector 1 x backlight switch header 1 x flat panel display switch header 1 x WIFI activity indicator LED header 1 x Clear CMOS jumper 1 x HDMI port 1 x DisplayPort 4 x USB 3.0/2.0 ports klm 2 x USB 3.0/2.0 ports j 2 x USB 2.0/1.1 ports j 1 x RJ-45 port jkl 2 x RJ-45 ports m 2 x audio jacks (Line Out, Mic In) 1 x DC-In power connector *USB 2.0/1.1 ports available through the internal USB headers (Card reader/Touch panel/webcam and other devices) I/O Controller Nuvoton I/O Controller Chip Hardware Monitor System voltage detection CPU/System temperature detection CPU/System fan speed detection CPU fan speed control BIOS 1 x 64 Mbit flash j 1 x 128 Mbit flash klm Use of licensed AMI EFI BIOS PnP 1.0a, DMI 2.0, SM BIOS 2.6, ACPI 2.0a *For 4-pin CPU coolers only. *Whether the CPU fan speed control function is supported will depend on the CPU cooler you install. Operating System Support for Windows 8/7 Form Factor Thin Mini-ITX Form Factor; 17.0cm x 17.0cm * GIGABYTE reserves the right to make any changes to the product specifications and product-related information without prior notice. Back Panel Connectors GA-H81TN/GA-B85TN/GA-H87TN: j GA-Q87TN: DC Power Connector RJ-45 LAN Port DisplayPort HDMI Port MM Only for GA-H81TN. USB 3.0/2.0 Port Line Out Jack (Green) Mic In Jack (Pink) USB 2.0/1.1 Port j Installing the CPU Read the following guidelines before you begin to install the CPU: •• Make sure that the motherboard supports the CPU. (Go to GIGABYTE's website for the latest CPU support list.) •• Always turn off the computer and unplug the power cord from the power outlet before installing the CPU to prevent hardware damage. •• Locate the pin one of the CPU. The CPU cannot be inserted if oriented incorrectly. (Or you may locate the notches on both sides of the CPU and alignment keys on the CPU socket.) •• Apply an even and thin layer of thermal grease on the surface of the CPU. •• Do not turn on the computer if the CPU cooler is not installed, otherwise overheating and damage of the CPU may occur. •• Set the CPU host frequency in accordance with the CPU specifications. It is not recommended that the system bus frequency be set beyond hardware specifications since it does not meet the standard requirements for the peripherals. If you wish to set the frequency beyond the standard specifications, please do so according to your hardware specifications including the CPU, graphics card, memory, hard drive, etc. Installing the Memory/Expansion Card Read the following guidelines before you begin to install the memory: •• Make sure that the motherboard supports the memory. It is recommended that memory of the same capacity, brand, speed, and chips be used. (Go to GIGABYTE's website for the latest supported memory speeds and memory modules.) •• Make sure the motherboard supports the expansion card. Carefully read the manual that came with your expansion card. •• Always turn off the computer and unplug the power cord from the power outlet before installing the memory/expansion card to prevent hardware damage. •• Memory modules have a foolproof design. A memory module can be installed in only one direction. If you are unable to insert the memory, switch the direction. Drivers Installation After installing the operating system, be sure to install all of the required drivers for the system to work properly. Regulatory Statements Regulatory Notices This document must not be copied without our written permission, and the contents there of must not be imparted to a third party nor be used for any unauthorized purpose. Contravention will be prosecuted. We believe that the information contained herein was accurate in all respects at the time of printing. GIGABYTE cannot, however, assume any responsibility for errors or omissions in this text. Also note that the information in this document is subject to change without notice and should not be construed as a commitment by GIGABYTE. Our Commitment to Preserving the Environment In addition to high-efficiency performance, all GIGABYTE motherboards fulfill European Union regulations for RoHS (Restriction of Certain Hazardous Substances in Electrical and Electronic Equipment) and WEEE (Waste Electrical and Electronic Equipment) environmental directives, as well as most major worldwide safety requirements. To prevent releases of harmful substances into the environment and to maximize the use of our natural resources, GIGABYTE provides the following information on how you can responsibly recycle or reuse most of the materials in your "end of life" product. Restriction of Hazardous Substances (RoHS) Directive Statement GIGABYTE products have not intended to add and safe from hazardous substances (Cd, Pb, Hg, Cr+6, PBDE and PBB). The parts and components have been carefully selected to meet RoHS requirement. Moreover, we at GIGABYTE are continuing our efforts to develop products that do not use internationally banned toxic chemicals. Waste Electrical & Electronic Equipment (WEEE) Directive Statement GIGABYTE will fulfill the national laws as interpreted from the 2002/96/EC WEEE (Waste Electrical and Electronic Equipment) directive. The WEEE Directive specifies the treatment, collection, recycling and disposal of electric and electronic devices and their components. Under the Directive, used equipment must be marked, collected separately, and disposed of properly. WEEE Symbol Statement The symbol shown below is on the product or on its packaging, which indicates that this product must not be disposed of with other waste. Instead, the device should be taken to the waste collection centers for activation of the treatment, collection, recycling and disposal procedure. The separate collection and recycling of your waste equipment at the time of disposal will help to conserve natural resources and ensure that it is recycled in a manner that protects human health and the environment. For more information about where you can drop off your waste equipment for recycling, please contact your local government office, your household waste disposal service or where you purchased the product for details of environmentally safe recycling. When your electrical or electronic equipment is no longer useful to you, "take it back" to your local or regional waste collection administration for recycling. If you need further assistance in recycling, reusing in your "end of life" product, you may contact us at the Customer Care number listed in your product's user's manual and we will be glad to help you with your effort. Finally, we suggest that you practice other environmentally friendly actions by understanding and using the energy-saving features of this product (where applicable), recycling the inner and outer packaging (including shipping containers) this product was delivered in, and by disposing of or recycling used batteries properly. With your help, we can reduce the amount of natural resources needed to produce electrical and electronic equipment, minimize the use of landfills for the disposal of "end of life" products, and generally improve our quality of life by ensuring that potentially hazardous substances are not released into the environment and are disposed of properly. Contact Us GIGA-BYTE TECHNOLOGY CO., LTD. Address: No.6, Bao Chiang Road, Hsin-Tien Dist., New Taipei City 231,Taiwan TEL: +886-2-8912-4000, FAX: +886-2-8912-4005 Tech. and Non-Tech. Support (Sales/Marketing) : http://ggts.gigabyte.com.tw WEB address (English): http://www.gigabyte.com WEB address (Chinese): http://www.gigabyte.tw You may go to the GIGABYTE website, select your language in the language list on the top right corner of the website. Copyright © 2013 GIGA-BYTE TECHNOLOGY CO., LTD. All rights reserved. The trademarks mentioned in this manual are legally registered to their respective owners. Disclaimer Information in this manual is protected by copyright laws and is the property of GIGABYTE. Changes to the specifications and features in this manual may be made by GIGABYTE without prior notice. No part of this manual may be reproduced, copied, translated, transmitted, or published in any form or by any means without GIGABYTE's prior written permission. For product-related information, check on our website at: http://www.gigabyte.com