1
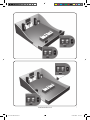
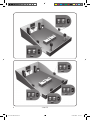
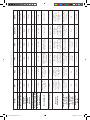
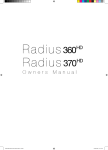
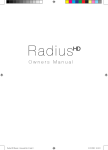
S
i
l
v
er
RX series
o w n e r s m a n u a l
Silver RX Manual.indd 1
03/06/2009 16:18:09
Silver RX Manual.indd 2
03/06/2009 16:18:09
Contents Page
Important Safety Instructions 2
Recycling 3
RoHS Declaration of Conformity 3
Introduction 4
Positioning 6
AV Positioning 6
2 Channel Positioning 9
Setting up the RX-FX 9
Fixing the RX-FX to a Wall 10
Plinth Fixing 10
Grilles 10
Spiked Foot Fixing 11
Port Bungs 12
Specifications 13
Guarantee and Service 14
Claims Under the Guarantee 14
Data Protection 15
Owner Information 15
EC Declaration of Conformity 16
monitoraudio.co.uk
Silver RX Manual.indd 1
1
03/06/2009 16:18:09
Important Safety Instructions
1. Please read these instructions.
2. Please keep these instructions.
3. Heed all warnings.
4. Follow all instructions.
5. Do not use this apparatus with water.
6. Clean only with a dry cloth. Great care and attention has gone into the materials
chosen to produce the Silver RX Series. A gentle wipe with a dry, clean cloth is all
that is required to remove any dust. Treat them as you would a fine piece of furniture
because that is how they have been designed. To clean the high gloss finishes use
our “Lacquer Polish” that has been developed alongside Auto Glym. It can only be
purchased from the shop on our web site.
7. Do not install near any heat source, such as radiators, heat registers, stoves, or
other apparatus (including amplifiers) that produce heat.
8. Only use attachments/ accessories specified by Monitor Audio.
9. Use only with the cart, stand, tripod, bracket, or table specified by monitor Audio
or sold with the apparatus. When a cart is used, use caution when moving the cart/
apparatus combination to avoid injury from tip-over.
10. Refer all servicing to qualified service personnel. Servicing is required when
the apparatus has been damaged in any way, such as power supply cord or plug
is damaged, liquid has been spilled or objects have fallen onto the apparatus, the
apparatus has been exposed to rain or moisture, does not operate normally or has
been dropped.
11. This apparatus shall not be exposed to dripping or splashing water and that no
object filled with liquids such as vases shall be placed on the apparatus.
12. This exclamation point within an equilateral triangle is intended to alert the user
to the presence of important maintenance (servicing) instructions in the literature
accompanying the appliance.
2
Silver RX Manual.indd 2
silver RX
03/06/2009 16:18:10
Re-cycling
Correct Disposal of Waste Electrical and Electronic Equipment (WEEE) by User in Private
Households in the EU.
This symbol on the product or accessories indicates that they must not be
disposed of with your household wastes throughout the EU. To prevent
possible harm to the environment or human health from uncontrolled
waste disposal, recycle it responsibly to promote the sustainable reuse of
material resources. Instead it is your responsibility to dispose of your waste
equipment by handing it over to a designated WEEE collection point for
recycling. The separate collection and recycling of your waste equipment
will help conserve natural resources and ensure that it is recycled in a
manner that protects human health and the environment.
For more specific information about where you can take your equipment for recycling please
contact your local city/council office, your local waste disposal service or the outlet where
you purchased your Silver RX product.
RoHS Declaration of Conformity
Directive 2002/95/EC of the European Parliament and of the Council on
the reduction of the use of certain hazardous substances in electrical and
electronic equipment, January2003.
Background
The RoHS directive restricts the use of Lead (Pb), Cadmium (Cd), Mercury (Hg), hexavalent
Chromium (CrVI), polybrominated biphenyl (PBB) compounds, and polybrominated diphenyl
ether (PBDE) compounds in electrical and electronic equipment sold in the European
Union.
monitoraudio.co.uk
Silver RX Manual.indd 3
3
03/06/2009 16:18:10
introduction
The new Silver RX Series builds on the huge success of the award winning Silver RS
Series by incorporating advanced technologies, developed from the prestigious Platinum
and Gold Signature Series. It’s the blend of these advanced technologies that makes the
new RX Series so unique, with performance to eclipse that of its predecessor.
Honed from the renowned C-CAM® material, the new RST® cone profile has been designed
and refined using hi-tech computer simulation to reduce cone break up and provide purer,
more natural mid-range clarity. The rigid, non magnetic cast polymer chassis incorporates
venting to keep the driver cool as well as reduce internal pressure, resulting in the ability to
play louder and cleaner.
A new C-CAM gold dome tweeter has been optimised to propel high frequency performance
to beyond 35kHz, enabling the full potential of current and future wide-bandwidth High
Definition audio and cinema formats.
HiVe®II port design has been introduced, providing clean powerful bass and superior
transient response. Single bolt through driver technology has also been employed to
enhance cabinet rigidity by providing additional bracing, whilst maintaining consistent
tension for the driver. This in turn reduced excessive vibration from the driver and cabinet
together, giving lower colouration across the entire frequency spectrum. Stylish magnetic
grilles have no visible fixings and provide clean overall visuals, adding to the simplicity and
refinement of the smooth overall appearance.
The Silver RX range has all the necessary ingredients to build the most demanding audio or
multi-channel systems. From a two-channel audiophile set-up to serious theatre install, the
Silver RX Series blends versatility, performance and style coupled with the ethos of Monitor
Audio’s long audiophile heritage.
RX1
The diminutive RX1 is configured to offer an impressively natural, rhythmic sound in a
beautifully compact and practical form. Standing at just 31cm tall, the RX1 will deliver
faithful crystal-clear definition and power from just about anywhere. Perfect for music and
film sound where space is at a premium, the RX1 provides elite Monitor Audio quality to
refresh and enliven your system.
RX2
The larger RX2 is designed as an audiophile compact 2-way speaker, having the efficiency
and bandwidth of a much larger speaker, while being easier to position around the home. It
offers extended high frequencies to resolve hidden detail, coupled with immense dynamic
headroom and bass depth, so that all the delicacy and drama of your favourite and future
music and film sound is revealed.
4
Silver RX Manual.indd 4
silver RX
03/06/2009 16:18:10
RX6
The elegant floor-standing RX6 places the new wider-bandwidth RX tweeter in concert
with freshly-designed 6” C-CAM bass and 6” C-CAM bass/mid drivers to form a balanced
two-and-a-half way system. Separate chambers are utilised within the enclosure to
provide differential tuning for the 6” drivers, producing higher efficiency and exceptional
low frequency extension. For such a slim, easy-to-position speaker, the innovative RX6 is
capable of an extraordinarily wide bandwidth, enhanced with a natural tonality that breathes
life into every format – even HD audio. Base plinths are supplied for added stability.
RX8
A feat of ergonomic brilliance by our design team has engineered the greater poise and
power of a large three-way loudspeaker into the svelte RX8. Its ultra-slim front profile hides
a slightly deeper cabinet, which provides the volume needed for seismic levels of bass from
dual 6” bass drivers. A single 6” bass/mid driver delivers naturally vibrant midrange sound
to the most critical part of the audible spectrum, while a newly developed C-CAM gold
dome tweeter smoothly extends high frequency performance. Sheer control, wide-open
dynamics and bandwidth compliment the sound of the RX8: a very big speaker disguised
as a very slender one. Base plinths are supplied for added stability.
RX-Centre
Reproducing up to 60% of a movie sound track, including the critical dialogue content is
the job of a centre speaker. The exceptional RX-Centre proves the old adage that you get
out what you put in. It has been very finely calibrated to match dynamics and timbre with
other RX speakers for a wonderfully open, detailed and seamless front sound stage in any
RX system configuration. We’ve tuned the RX Centre’s multi-driver components to deliver
the optimal combination of sonic virtue and size, so that the subtlety of whispers and the
explosive force of action scenes are conveyed with equal priority by a compact design
that’s perfect for the role.
RX-FX
The surround sound that leaks from televisions is a very poor substitute for the allembracing, edge-of-the-seat excitement that’s possible from a properly designed and
equalised home theatre system. The perennial problem has been integration with living
space. Monitor Audio’s space-efficient RX speakers effortlessly enhance any décor, but the
real deal-maker is the matching, wall-hugging RX-FX surround speaker. Discreet enough
to be flush-mounted on side or rear walls, the RX-FX design will blend with the system to
provide a convincing, enveloping timbre-consistent surround sound that places you at the
heart of the action. It’s also immensely flexible and can be set-up for direct or diffuse sound
effects at the flick of a switch.
monitoraudio.co.uk
Silver RX Manual.indd 5
5
03/06/2009 16:18:10
positioning
AV Positioning
In the following pages, there are illustrations showing optimal positioning and some
suggested room layouts for AV applications. For advice on configuring a 2 channel system,
please refer to page 9.
The front, and in some cases rear, floor standing and stand mount speakers should be
positioned approx 6 - 9 feet apart (1.8m - 2.5m) and start with them about 10 inches
(25cm) from the wall.
If, when playing music, the sound is too bass heavy or there is bass boom from the room,
then move them slightly further away from the rear/ corner walls. If this is not possible, then
try the supplied port bungs (not included in the RX-FX or RX Centre). Refer to Page 12.
The RX Centre should be positioned so that it is pointing at you, in your viewing position,
and at approximate ear height. If it is below or above ear height, use some rubber feet
(small feet supplied) to angle it slightly.
The RX-FX’s should be positioned in accordance with the below illustrations and approx 2
feet (60cm) above ear height when in your listening position.
Left
Centre
0°
Right
22°
30°
90°
Surround
Left
110°
Surround
Right
135°
150°
6
Silver RX Manual.indd 6
Rear
Surround
Left
silver RX
Rear
Surround
Right
03/06/2009 16:18:11
Bi-Pole
Di-Pole
RIGHT
Bi-Pole
Di-Pole
LEFT
Bi-Pole
Di-Pole
RIGHT
Bi-Pole
Di-Pole
LEFT
monitoraudio.co.uk
Silver RX Manual.indd 7
7
03/06/2009 16:18:12
Bi-Pole
Di-Pole
RIGHT
Bi-Pole
Di-Pole
LEFT
Bi-Pole
Di-Pole
RIGHT
Bi-Pole
Di-Pole
Bi-Pole
LEFT
Di-Pole
Bi-Pole
LEFT
Di-Pole
RIGHT
8
Silver RX Manual.indd 8
silver RX
03/06/2009 16:18:13
Speci
NOTE: When using 2 pairs of RX-FX in a 7.1 system, you need to use the Right
speaker for the rear surround left and the Left speaker for the rear surround right.
This is because of the tweeter phasing.
2 Channel Positioning
For use in a 2 channel system, the listening position and the loudspeakers should form an
equilateral triangle. The speakers should be positioned approximately 6 - 10 feet (1.8 - 3m)
apart. They ideally need to be between 8 - 18 inches (20 - 45cm) away from the rear and
3 feet (1m) from the side walls.
Experimentation is strongly advised when initially setting up your speakers, as environments
and personal preference differ with each installation. If there is not enough bass, for
example, then try moving your speakers closer to a wall. The opposite, if there is too much
bass. Also see the information on page 12 refering to Port Bungs. If you are loosing stereo
imaging, try ‘toeing’ them in slightly. The sound should appear to originate from the centre
point between the speakers, not the actual speakers themselves.
Setting up the RX-FX
The Silver RX-FX’s are paired, but specifically, right hand and left hand units. Of which both
can be configured to bi-pole (normal operation) or di-pole modes. The factory setting is
bi-pole.
In bi-pole mode, all speaker units (mid/bass unit and tweeters) are in phase. This feature is
designed for when the RX-FX is set up as a rear/surround speaker in a typical 5.1 channel
system, or alternatively in a 7.1 channel system without a second pair of RX-FX’s for rear/
surround duties.
In di-pole mode, the front firing tweeters are out of phase with the other tweeter and mid/
bass unit. It is best to implement this configuration when using the two pairs RX-FX as part
of a 7.1 channel system, with the RX-FX’s taking up positions on the side and rear walls.
Please note that the RX-FX’s are left and right handed. This is not an issue when used in bipole mode. It is essential that they are positioned correctly if used in a 7.1 channel system.
Please refer to the positioning section on page 8.
NOTE: Before changing your RX-FX’s from bi-pole mode to di-pole mode, please
ensure that the speaker wires are disconnected from your loudspeakers. This
helps to protect your amplifier.
monitoraudio.co.uk
Silver RX Manual.indd 9
9
03/06/2009 16:18:14
Fixing the RX-FX to a wall
CAUTION: You will need to determine where the RX-FX will be fixed and the structure
of the wall. For safety reasons, if you are unsure of your ability to provide a secure and
safe fixing, do not attempt to fix these speakers to your wall, please obtain the services
of a competent and qualified trades person.
CAUTION: Ensure that there are no water pipes or electricity cables running behind
where the wall brackets are going to be secured. Work from secure steps and avoid
trailing wires.
We do not supply wall fixing screws and plugs with the RX-FX. Please use suitable fixings
for the type of wall construction the RX-FX’s will be fixed to.
To fix your RX-FX’s to the wall, we would recommend using the wall fixing template enclosed
within the packaging carton
Plinth Fixing
(RX6 & RX8 only)
The Silver RX6 & RX8’s are provided with plinths to improve stability and acoustic response.
The plinths are secured in place by using the supplied M8 bolts.
Before you fit the plinth ensure the floor area is clear of any hard/sharp objects. To fit the
plinth turn the cabinet over so that the bottom is facing upwards. Then, place the plinth
onto the cabinet ensuring the plinth is orientated correctly, lining up the bolt holes in the
plinth with the inserts in the cabinet. Using the bolts, secure the plinth to the cabinet.
Tighten them up gradually at first and ensure the plinth is fitted securely to the cabinet. Fit
the feet to the plinth before turning the loudspeaker back over. (Please read the instructions
opposite). The spikes are used to improve sound quality and bass performance
Grilles
All of the Silver RX speakers come with grilles covered in acoustically transparent cloth.
The grilles are held invisibly in place by magnets in both the grille and the cabinet (except
RX-FX).
To fit them, firstly ensure they are the correct way up (badge at the bottom) and offer them
up to the cabinet. The magnets should them pull it into position.
The RX-FX comes with the grilles factory fitted. If you wish to remove them, carefully prize
them away from the cabinet with the tips of your fingers. There are three separate grilles
fitted to each RX-FX cabinet.
CAUTION: Do not lift or move the loudspeaker with the grilles fitted. If any movement
needs to be done, please remove the grilles first.
10
Silver RX Manual.indd 10
silver RX
03/06/2009 16:18:14
Spiked Foot
For Carpeted Floors
(Silver RX6 & RX8 only)
The Silver RX spiked foot encorporates a spike for use on carpeted floors and also, a soft
polymer pad for use on wooden or tiled floors.
Locking Nut
Main Threaded
Assembly
Polymer Pad
Spike
Please ensure there are no hidden wires under the
carpet that could be damaged by the spikes.
The foot comes fully assembled for use on carpeted
floors. All that is required is fixing into the plinth. This is
achieved by screwing the feet fully into the 4-threaded
insert in the underside of the plinth. If your carpet has
a very thick pile, remove the soft polymer pad from the
foot to ensure the spike goes right through the carpet
into the floor. With great care turn your cabinet the right
way up. Place the cabinet in your desired location, and
check that it is level on all sides. If it is slightly off level,
unscrew the spike at the lowest point and check again.
Continue this process until the cabinet is fully level. Use
the locking nut on the foot to fix the foot in place and to
stop any unwanted vibrations.
For Wooden/Hard Floors
(Silver RX6 & RX8 only)
For use on solid floors or where spikes are inappropriate, it is possible
to use the foot without the spike insert. To use the foot in this manner
carefully grip the knurled portion of the spike and rotate anti clockwise
to unscrew the spike fully.
You may find it easier to first remove the polymer pad so as to gain
more purchase on the spike. The pad should be replaced before
carrying out the levelling operation described above.
monitoraudio.co.uk
Silver RX Manual.indd 11
11
03/06/2009 16:18:18
Port bungs
WARNING: Care must be taken not to insert the port bungs too far into the port as
this may result in the foam bung being lost inside the cabinet.
If the loudspeaker is to be used in a small room, typically 9 sqM ( 80 sqFT) or a room
that is known to reproduce accentuated bass response, it may be desirable to fit the port
bungs. However, before this is done it is worth experimenting with the positioning of the
loudspeaker in the room. To reproduce the optimum performance from the loudspeaker it
is important to make sure the loudspeaker is not positioned too close to a wall (typically
150mm / 6” from the back of the cabinet) or near corners of a room (typically 1M / 3FT).
If the room is larger than detailed above and no problems are known, please read point 1.
If the positioning of the loudspeaker is predetermined by room aesthetics or layout, please
move on and read point 2 for the RX1/ RX2 and point 3 for the RX6/ RX8.
1. If you can adhere to the room characteristics detailed above we recommend that you
do not fit the port bungs to achieve the best performance. However you may feel that
by fitting the bungs even under these circumstances provides you with a degree of
fine-tuning to suite particular taste. Experimentation is highly recommended.
2. Where a bookshelf/ stand-mount speaker (RX1 & RX2) is to be used in close proximity
(2”, 50mm) to a rear wall such as on a bookshelf, positioned in a cabinet or mounted
on a wall, we recommend fitting the port bungs to the ports. This will reduce the bass
‘boom’ sometimes termed as overhang, and assist the loudspeaker to reproduce its
best performance under the environmental constraints. ‘Boom’ is generally caused
when bass energy from the loudspeaker ‘excites’ room modes and causes an
accentuation at a particular frequency, or number of frequencies.
3. Where a floor-standing loudspeaker (RX6 & RX8) is to be used in close proximity (closer
than 150mm 6”) to a rear wall, we recommend fitting the port bungs. This will reduce the
bass ‘boom’ sometimes termed as overhang and assist the loudspeaker to reproduce
its best performance under these environmental constraints. This is caused when bass
energy from the loudspeaker ‘excites’ room modes and causes an accentuation at a
particular frequency, or number of frequencies.
Where the loudspeaker has two ports per speaker, RX6 and RX8, a further degree
of fine-tuning is provided. In this case you have three options; to leave all the ports
open (point 1), fit the port bungs to the rear ports or to fit a port bung to the front
port. We recommend that you experiment with fitting the port bungs to the rear port
or the front port in succession as the results can vary dependant on room acoustics
and positioning. The overall bass extension will not be reduced, however the bass
energy/ output around the port tuning frequency will be reduced. This has the effect
of reducing bass ‘boom’ increasing bass clarity and apparent agility. Experimentation
is highly recommended.
12
Silver RX Manual.indd 12
silver RX
03/06/2009 16:18:18
Silver RX Manual.indd 13
03/06/2009 16:18:19
2.0kHz
1 x 8” RST®
Bass/ Mid driver.
1 x 1” (25mm)
C-CAM® gold dome
tweeter
111.8
80W
25 - 80W
Bass reflex – rear
ported. HiVe® port
System
3.0kHz
1 x 6” RST®
Bass/ Mid driver.
1 x 1” (25mm)
C-CAM® gold dome
tweeter
312 x 185 x 240mm
12 5/16 x 7 5/16
x 9 7/16”
N/A
Maximum SPL (dBA)
Power Handling (RMS)
Recommended Amp
Requirements
Bass Alignment
Crossover Frequency
Drive unit
Complement
External Dimension
HxWxD
(mm & inch)
Plinth Dimensions
HxWxD
(mm & inch)
6.8 (15)
Bass reflex – rear
ported. HiVe® port
System
6 Ohms
Nominal
Impedance
Weight (each)
Kg (lb)
25 - 100W
89dB
Sensitivity
(1w @ 1m)
2 Way
9.5 (20.88)
N/A
375 x 230 x 300mm
14 3/4 x 9 1/16
x 11 13/16”
100W
113.8
6 Ohms
90dB
40Hz - 35kHz
2 Way
45Hz - 35kHz
System Format
RX2
RX1
Frequency Response
Model
16.4 (36.13)
25 x 265 x 310mm
1 x 10 7/16
x 12 3/16”
21.76 (47.88)
25 x 265 x 388mm
1 x 10 7/16
x 15 1/4”
900 x 185 x 330mm
35 7/16 x 7 5/16 x 13”
1 x 6” RST®
Bass driver.
1 x 6” RST®
Bass/ Mid driver.
1 x 1” (25mm) C-CAM
gold dome tweeter
2 x 6” RST®
Bass drivers.
1 x 6” RST®
Bass/ Mid driver.
1 x 1” (25mm) C-CAM
gold dome tweeter
1 x 6” RST®
Bass driver.
1 x 6” RST®
Bass/ Mid driver.
1 x 1” (25mm) C-CAM
gold dome tweeter
850 x 185 x 250mm
33 7/16 x 7 5/16
x 9 13/16”
LF: 500Hz
MF/HF: 3.0kHz
LF/MF: 300Hz
MF/HF: 2.2kHz
LF: 700Hz
MF/HF: 2.7kHz
9.62 (21.13)
N/A
185 x 500 x 200mm
7 5/16 x 19 11/16 x
7 7/8”
Sealed Cabinet
Bass reflex. Twin
HiVe® port System
Dual Chamber, Bass
reflex with differential
tuning. Twin HiVe®
port System
40 - 125W
125W
114.8
6 Ohms
90dB
45Hz - 35kHz
2 1/2 Way
RX-Centre
50 - 175W
175W
116.2
4 Ohms
90dB
32Hz - 35kHz
3 Way
RX8
40 - 125W
125W
114.8
6 Ohms
90dB
38Hz - 35kHz
2 1/2 Way
RX6
specifications
4.69 (10.38)
N/A
300 x 120 x 250mm
11 13/16 x 4 3/4
x 9 13/16”
1 x 6” RST®
Bass/ Mid driver.
2 x 1” (25mm)
C-CAM® gold dome
tweeters
2.1kHz
Sealed Cabinet
10 - 80W
80W
111.8
6 Ohms
89dB
60Hz - 35kHz
2 Way
RX-FX
Guarantee and Service
To validate your warranty please visit www.monitoraudio.co.uk within 30 days of purchase.
When you register online you’ll gain free entry to our monthly prize draw! What’s more
you’ll be the first to hear about the great things happening at Monitor Audio, including new
products and events!
This equipment has been fully tested prior to dispatch from the factory. Both the craftsmanship
and the performance of this product is guaranteed against manufacturing defects for the
period of three years from the date of purchase (see conditions below), provided that the
product was supplied by an authorised Monitor Audio retailer under the consumer sale
agreement. (The words ‘consumer sale’ shall be construed in accordance with section 15
of the supply of goods act 1973). Monitor Audio accepts no responsibility for defects arising
from accident, misuse, abuse, wear and tear, modification or operation outside of that
specified within this instruction manual. Neither will responsibility be accepted for damage
or loss occurring during transit to or from the parties claiming under this guarantee.
This guarantee covers both labour and parts. The liability of Monitor Audio is limited to the
cost of repair or replacement of the defective parts (at the discretion of Monitor Audio) and
under no circumstances extends to consequential losses or damage.
Claims under this Guarantee
The equipment should be returned in its original packaging to the original supplier where
possible, or to any other authorised Monitor Audio dealer. If it is not possible to return the
equipment by hand, then it should be sent carriage prepaid via a reputable carrier. If the
original packing is not available replacement packaging can be purchased from Monitor
Audio.
If you have any difficulties complying with these requirements please contact us at the
following address:
Customer Service
Tel: +44 (0)1268 740580
Monitor Audio Ltd.
Fax: +44 (0)1268 740589
24 Brook Road
Internet: www.monitoraudio.co.uk
Rayleigh
Email: [email protected]
Essex
SS6 7XJ
England
This guarantee does not affect the statutory rights of the consumer under UK law.
14
Silver RX Manual.indd 14
silver RX
03/06/2009 16:18:19
Data Protection
We at Monitor Audio are committed to respecting the wishes and privacy of our customers.
Any information you provide will be held in the strictest confidence and only used within the
Monitor Audio organisation for the provision of services such as warranty claims or spare
parts.
We may wish to contact you in the future to ensure you are happy with the products and
standards of service we provide and to keep you up-to-date with the latest products and
promotions we have to offer.
Should you wish not to be contacted by us either by post, e-mail or phone, please tick the
box on the warranty form on the web site. Alternatively you can request not to be contacted
in future by writing to Customer Service, at the address above.
Owner Information
Product Details
Model .................................................................
Product Serial No ................................................
Date of Purchase ................................................
Dealer Details
Dealer Name .....................................................................................................................
Address .............................................................................................................................
...........................................................................................................................................
e-mail address ...................................................................................................................
Telephone Number ............................................................................................................
Monitor Audio reserves the right to alter specifications without notice.
monitoraudio.co.uk
Silver RX Manual.indd 15
15
03/06/2009 16:18:19
EC Declaration of Conformity
We, Monitor Audio Ltd.
24 Brook Road
Rayleigh
Essex
SS6 7XJ
England
09
Declare in own responsibility, that the Silver RX products described in this manual
is in compliance with Technical Standards/Council Directives:
(LVD) 2006/95/EC Low Voltage Directive
EN60065: 2002+A1: 2006 Safety requirements for mains operated electronic and
related apparatus for household and similar use.
(EMC) 89/336/EEC Electro Magnetic Compatibility
EN55013: 08.90+A12:08.94+A13:12.96 Limits and methods of measurement
of radio disturbance characteristics of broadcast receivers and associated
equipment.
EN55020: 12.94+A11:12.96 Electro magnetic immunity of broadcast receivers
and associated equipment.
EN61000-3-2: 04.95+A1:1998+A2:1998 Electro magnetic compatibility (EMC) –
Part 3: Limits – Section 2: Limits for harmonic current emissions (equipment input
current up to and including 16 Ampere per phase).
EN6100-3-3: 01.95 Electro magnetic compatibility (EMC) – Part 3: Limits – Section
3: Limits of voltage fluctuations and flicker in low-voltage supply systems for
equipment with rated current up and including
16 Ampere per phase.
Signed by:
Name: D.S. Hartley
Position: Technical Director
Company: Monitor Audio Ltd
16
Silver RX Manual.indd 16
silver RX
03/06/2009 16:18:19
Silver RX Manual.indd 17
03/06/2009 16:18:19
m o n i t o r a u d i o . c o . u k
Monitor Audio Ltd.
Unit 2, 24 Brook Road
Rayleigh, Essex
SS6 7XJ
England
Tel: +44 (0)1268 740580
Fax: +44 (0)1268 740589
Email: [email protected]
monitoraudio.co.uk
Designed in the United Kingdom
© 2009. Version 1
Silver RX Manual.indd 18
03/06/2009 16:18:20